manuals.online logo
Brands
  1. Home
  2. •
  3. Brands
  4. •
  5. Marley
  6. •
  7. Solar Panel
  8. •
  9. Marley SolarTile User manual

Marley SolarTile User manual

This manual suits for next models

13

Popular Solar Panel manuals by other brands

O.N 23.8757.15 user manual

O.N

O.N 23.8757.15 user manual

PV-ezRack DFendr installation guide

PV-ezRack

PV-ezRack DFendr installation guide

Navitron HFC-2 installation instructions

Navitron

Navitron HFC-2 installation instructions

AXITEC 60-CELL installation manual

AXITEC

AXITEC 60-CELL installation manual

thermital TSOL 20 N BLU installation instructions

thermital

thermital TSOL 20 N BLU installation instructions

moovo KSM001 Installation and use instructions and warnings

moovo

moovo KSM001 Installation and use instructions and warnings

AZO Digital MPPT-3000 operating manual

AZO Digital

AZO Digital MPPT-3000 operating manual

Clenergy PV-ezRack SolarTripod installation guide

Clenergy

Clenergy PV-ezRack SolarTripod installation guide

Beretta SCF-20N installation manual

Beretta

Beretta SCF-20N installation manual

Solarland Portable Series Instruction handbook

Solarland

Solarland Portable Series Instruction handbook

Ubiquiti sunMAX user guide

Ubiquiti

Ubiquiti sunMAX user guide

Sonnenkraft GK5-HP manual

Sonnenkraft

Sonnenkraft GK5-HP manual

REC TwinPeak 2S Mono 72 Series installation instructions

REC

REC TwinPeak 2S Mono 72 Series installation instructions

Flexsolar C100 Instruction manual & warranty

Flexsolar

Flexsolar C100 Instruction manual & warranty

Energizer HardCase Sunpack 120W user guide

Energizer

Energizer HardCase Sunpack 120W user guide

solarwatt EasyIn 60M Series installation instructions

solarwatt

solarwatt EasyIn 60M Series installation instructions

Mission Solar Energy MONO Series Installation and user manual

Mission Solar Energy

Mission Solar Energy MONO Series Installation and user manual

Wiedenmann Favorit XP Translation of original operating instructions

Wiedenmann

Wiedenmann Favorit XP Translation of original operating instructions

manuals.online logo
manuals.online logoBrands
  • About & Mission
  • Contact us
  • Privacy Policy
  • Terms and Conditions

Copyright 2025 Manuals.Online. All Rights Reserved.

JUNE 2020
ySOLAR INSTALLATION GUIDE
FIND OUT MORE ymarley.co.uk 32 Marley SolarTile®installation guide
n
m
n x m
n
m
n x m
x = 260 + (m x 992) + ([m-1] x 30)
y = 505 + (n x 1640) + ([n-1] x 5)
x = 260 + (m x 1640) + ([m-1] x 30)
y = 505 + (n x 992) + ([n-1] x 5)
270
5
1640
1640
235
30 30992 992
130 992 130
y
x
270
5
992
992
235
30 301640 1640
130 1640 130
y
x
PORTAIT
ORIENTATION
LANDSCAPE
ORIENTATION
MECHANICAL SPECIFICATION
Thickness 69mm
Static roof loading (distributed) 12.9 kg/m2
Characteristic wind resistance 5.32 kPa
Ultimate wind design loads 5.40 kPa
Positive design load* (IEC61215) kPa
Fire rating (EN 13501-5 / BS 476-3) BROOF (T1, T2, T3, T4) / AA
Power warranty 90% (10 years), 80% (25 years)
Standards IEC61215, 61730, TUV, MCS012
* Design resistance to ultimate loads includes a partial material safety factor
Tested batten size - 50mm x 25mm, rafter 35mm x 75mm, rafter spacing 600mm. For sarking brackets - softwood sarking boards 100mm
SOLAR TILE ORIENTATIONS
4Marley SolarTile®installation guide
1 x 2
Marley SolarTile®
xxxPV16 2
F16-TL 1
F16-TR 1
2 x 1
Marley SolarTile®
xxxPV16 2
VAT16 1
F16-TY 1
1 x 4
Marley SolarTile®
xxxPV16 4
F16-TL 1
F16-TC 1
F16-TR 1
2 x 2
Marley SolarTile®
xxxPV16 4
F16-TL 1
F16-TC 0
F16-TR 1
F16-TY 1
F16-J 1
2 x 3
Marley SolarTile®
xxxPV16 6
F16-TL 1
F16-TC 1
F16-TR 1
F16-TY 1
F16-J 2
2 x 4
Marley SolarTile®
xxxV16 8
F16-TL 1
F16-TC 2
F16-TR 1
F16-TY 1
F16-J 3
3 x 3
Marley SolarTile®
xxxPV16 9
F16-TL 1
F16-TC 1
F16-TR 1
F16-TY 2
F16-J 4
n
m
n x m
Marley
xxxSolarTile®PV16 (n x m)
F16-TL 1
F16-TC (m-2)
F16-TR 1
F16-TY (n-1)
F16-J (n-1) x
(m-1)
12
13
11
TL TC TR TY J
1 Marley SolarTile®PV16
2Sill ashing 111
3Lower side ashing 1 1
4Upper side ashing 2
5Top ashing 111
6 Joining strip 1 1
7 Lower gutter 1 1
8 Lower gutter cover 2 2
9 Upper gutter 1
10 Upper gutter cover 2
TL TC TR TY J
11 Tile support 111
12 Rafter bracket 444
13 Combi rafter bracket 2 2
14 Batten bracket 3 3 6
15 Combi batten bracket 3 3 3
16 Gutter xing strip 1 1 1
17 Side xing tab 6 6 12
18 Nail 6 1 7 12 1
19 4 x 25mm screw 6 6 12 12 6
20 4 x 50mm screw 88888
14
15
16
17
18
19
20
2
3
3
5
5
5
4
4
6
7
7
8
8
8
8
9
9
10
10
2
2
6
6
10
10
1
1
1
1
1
1
FIND OUT MORE ymarley.co.uk 5
PORTRAIT
ORIENTATION PORTRAIT
ORIENTATION
6Marley SolarTile®installation guide
LANDSCAPE
ORIENTATION
1 x 2
Marley SolarTile
PV16 2
F16-LL 1
F16-LR 1
2 x 1
Marley SolarTile
PV16 2
VAL16 1
F16-LY 1
1 x 4
Marley SolarTile
PV16 4
F16-LL 1
F16-LC 1
F16-LR 1
2 x 2
Marley SolarTile
PV16 4
F16-LL 1
F16-LC 0
F16-LR 1
F16-LY 1
F16-LJ 1
2 x 4
Marley SolarTile
PV16 8
F16-TL 1
F16-TC 2
F16-TR 1
F16-TY 1
F16-J 3
3 x 3
Marley SolarTile
PV16 9
F16-LL 1
F16-LC 1
F16-LR 1
F16-LY 2
F16-LJ 4
22x 3
Marley SolarTile
PV16 6
F16-LL 1
F16-LC 1
F16-LR 1
F16-LY 1
F16-LJ 2
n
m
n x m
Marley SolarTile
PV16 (n x m)
F16-TL 1
F16-TC (m-2)
F16-TR 1
F16-TY (n-1)
F16-J (n-1) x
(m-1)
FIND OUT MORE ymarley.co.uk 7
12
13
11
LL LC LR LY LJ
1 Marley SolarTile PV16
2Sill ashing 111
3Lower side ashing 1 1
4Upper side ashing 2
5Top ashing 111
6 Joining strip 1 1
7 Lower gutter 1 1
8 Lower gutter cover 2 2
9 Upper gutter 1
10 Upper gutter cover 2
LL LC LR LY LJ
11 Tile support 111
12 Rafter bracket 666
13 Combi rafter bracket 3 3
14 Batten bracket 2 2 4
15 Combi batten bracket 2 2 2
16 Gutter xing strip 1 1 1
17 Side xing tab 4 4 8
18 Nail 41581
19 4 x 25mm screw 44884
20 4 x 50mm screw 12 12 12 12 12
14
15
16
17
18
19
20
2
3
2
2
3
5
4
4
6
6
6
8
7
8
8
8
9
9
10
10
10
55
10
7
111
1
1
1
LANDSCAPE
ORIENTATION
FIND OUT MORE ymarley.co.uk 98 Marley SolarTile®installation guide
• Choose to connect panels in rows or
columns based on consideration of
shading and potential difference.
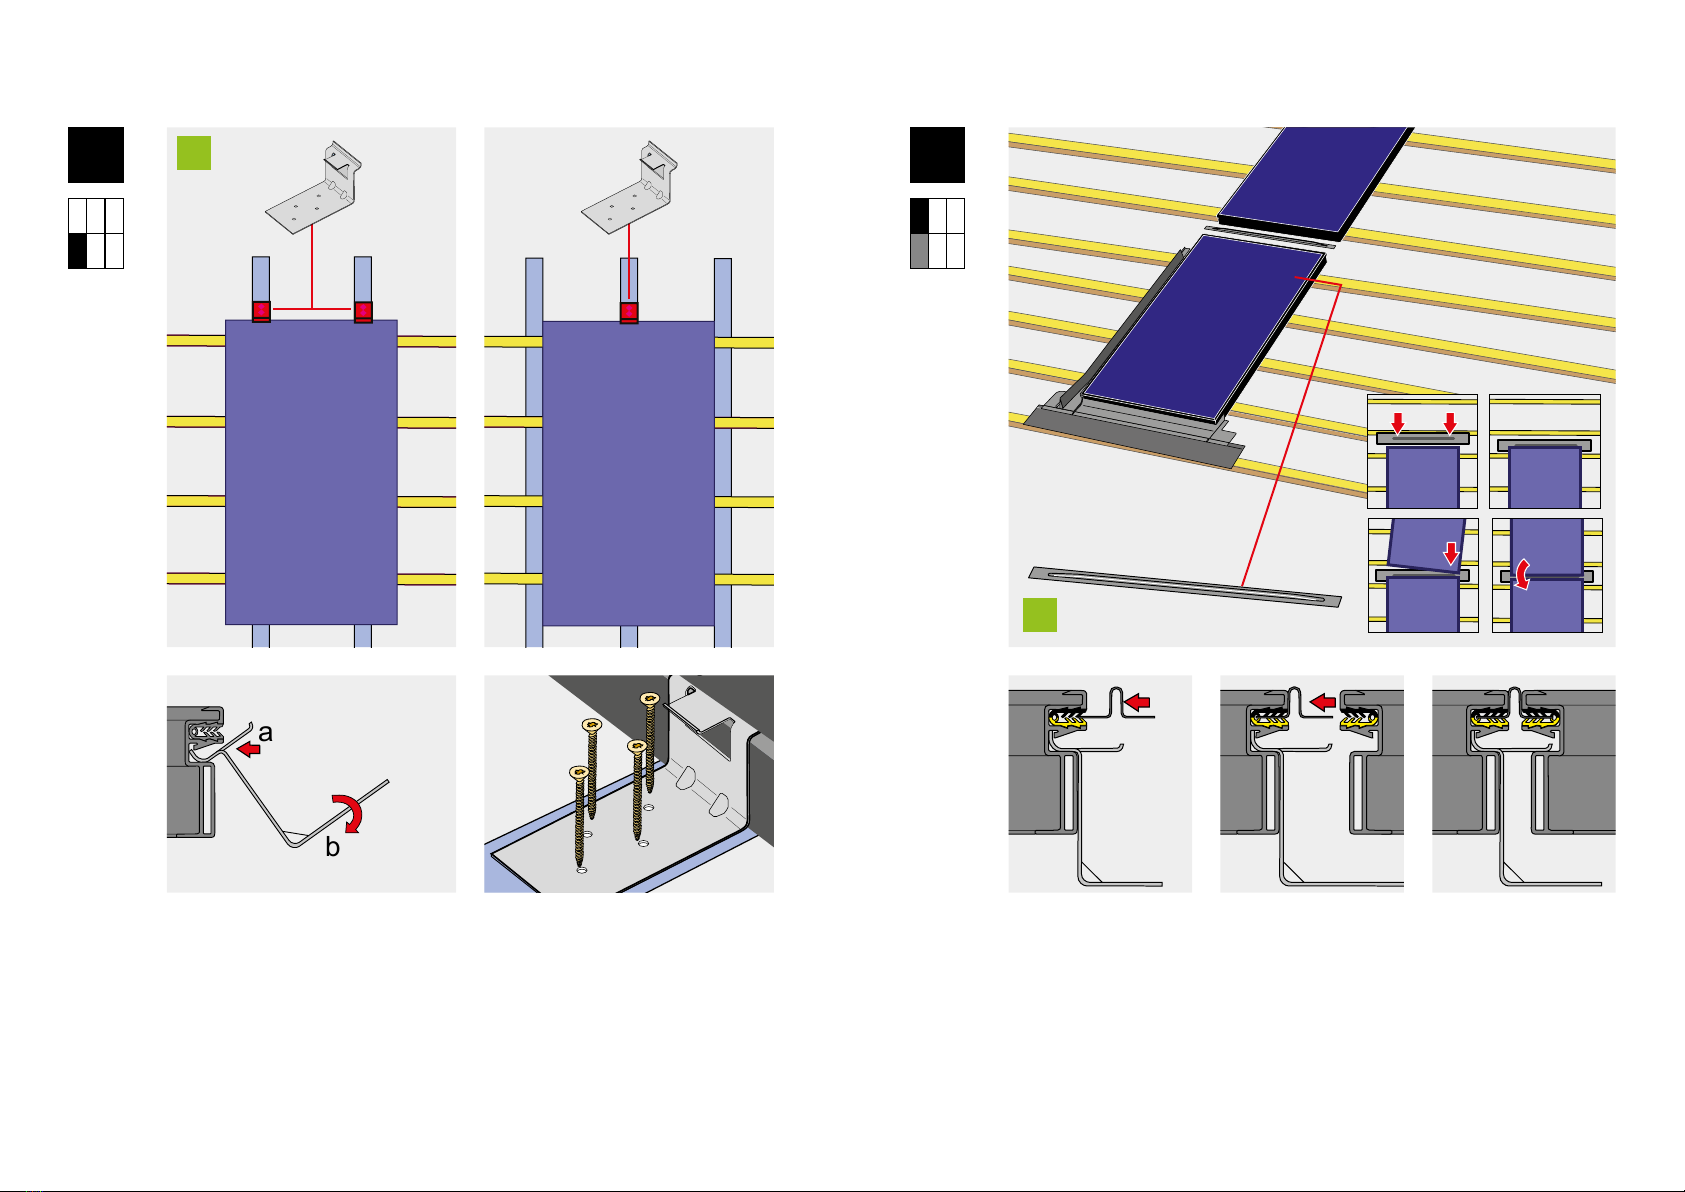
• Panels can be installed with the junction
box at the top or bottom.
• Important: Use only genuine Staubli
MC4 when connecting to modules
For best results:
• Don’t rush it.
• Ensure the ashing edges are straight.
• It may be helpful to lubricate gaskets
before pushing in the ashing – use glass
cleaner for this.
ELECTRICAL
FIXING GUIDANCE
• Electrically test each solar panel as it is
installed.
• Cables can be passed through roong
membrane laps for connection inside the
building (recommended) or connected
to adjacent panels in the batten space.
Important:
• Flashings may have sharp edges, wear
gloves.
• The installation must comply with local
regulations on lightning protection.
• Marley recommends that the
panel installation is carried out by an
installer with roong competence.
Y
60-150
30-60
x
INSTALLATION OVERVIEW
A Interlocking tiles – set lower gap ‘X’
130-150mm. Reduce for thinner tiles,
if unsure - contact us
B Slate – for best results align the bottom
edge of panel with the slate line. This
may require that slates below the panels
are nailed in advance. If installing
before slating, set ‘Y’ to 130mm.
C Start at the bottom left of the array.
Move to the right as each column is
nished.
Important:
• Marley SolarTile®is intended for
installation above a continuous,
functional underfelt that terminates
in a gutter.
Fig. A – Interlocking tiles
Fig. C – Installation sequence
Fig. B – Slates
1
2
3
4
5
6
7
8
9
10
11
12
FIND OUT MORE ymarley.co.uk 1110 Marley SolarTile®installation guide
1
2
t = 25mm
+5mm
TILE BATTENS
Roong kits are provided with brackets suitable for
tile battens of 25mm thickness.
A For 22mm tile battens replace Rafter Brackets
(12) with brackets from B22 kit. Replace Combi
Rafter Brackets (13) with brackets from B22J kit.
B For tile battens of greater than 25mm thickness,
use the required number of 5mm bracket
spacers. Use SP-5 for Rafter Bracket (12) and
SP-5J for Combi Rafter Bracket (13).
C For roong without tile battens (direct x to deck)
replace standard brackets with brackets from
Sarking Bracket kits as shown, aligning brackets
to screw through into rafters below where they
cross panels.
Fig. A: t = 22mm
Fig. C: t = 0mm
Fig. B: t > 22mm
12
12
12
14
13
13
15
13
B22
+SP-5
SB16-*
+SP-5J
+SP-5J
SB16-J
SB16-Y
SB16-J
+5mm
INSTALLATION SEQUENCE
1TL
TL
OPEN THE YELLOW BOX
Start with the bottom left panel. Brackets rotate into the lower slot on the
panel frame. Fix the batten brackets (14) to the left side with two 25mm
screws (19) each. Fix rafter brackets (12) at the bottom to each rafter the
panel crosses with two 50mm screws (20) each.
The following portrait 3 above 3 installation illustrates how the system works
for any rectangular array. Landscape installation follows the same principles.
TL
TL
FIND OUT MORE ymarley.co.uk 1312 Marley SolarTile®installation guide
a
b
INSTALLATION SEQUENCE INSTALLATION SEQUENCE
2 3
Fit the sill ashing (a) then the lower side ashing (b) to the panel.
Flashings push into the rubber gasket seal in the upper slot of the panel
frame. Take care to align the leading edge just above the yellow line
on the gasket. If lubrication is required, use glass cleaning uid.
Secure the edge of the side ashing using side xing tabs (17) and nail (18).
Fold over the tab on the sill ashing (a) to grip the side ashing. Fold down the
tab on the side ashing (b).
TL TL
a
b
FIND OUT MORE ymarley.co.uk 1514 Marley SolarTile®installation guide
a
b
INSTALLATION SEQUENCE INSTALLATION SEQUENCE
4 5
OPEN THE GREEN BOX
Fix combi rafter brackets (13) to each rafter the panel crosses with four 50mm
screws (20) each.
Push the joining strip (6) into the gasket on the top face of the lower solar
panel. Align to the centre of the panel.
Slide the upper solar panel down the roof to simultaneously engage with the
combi-bracket and the joining strip. Aligning the panels on the right corner
then rotating the left corner downwards ensures a smooth connection.
TY-A
TY
FIND OUT MORE ymarley.co.uk 1716 Marley SolarTile®installation guide
INSTALLATION SEQUENCE INSTALLATION SEQUENCE
6 7
TY-A TC
TY-A
Fix the left side of the solar panel with batten brackets (14) and 25mm screws
(19). Push in the upper side ashing (4) and x the outside edge with side
xing tabs (17).
Fold the protruding end of the joining strip (6) down over the side ashing.
Important: Do not fold the protruding end of the joining strip upwards
RED BOX
Fix combi-batten brackets (15) to the right hand side of the bottom solar panel.
The bracket must be turned so that the side with the taller edge goes into the
panel. Fix each brackets with two 25mm screws (19).
a
b
a
b
FIND OUT MORE ymarley.co.uk 1918 Marley SolarTile®installation guide
INSTALLATION SEQUENCE INSTALLATION SEQUENCE
8 9
TC
TC
Slide the rst panel of the next column sideways to engage with the combi-
batten brackets. The bracket sets the gap to 30 mm. Secure the new solar
panel to each rafter it crosses with rafter brackets (12) and two 50mm screws
(20) each.
Push the sill ashing (2) into the gasket on the solar panel.
30mm