Marquant MCR-633 User manual

CAR RADIO WITH CD PLAYER
STEREO AUTORADIO MET CD
AUTORADIO AVEC LECTEUR CD
AUTORADIO CON LETTORE CD
SINTONIZADOR COM LEITOR DE CD
AUTORRADIO CON REPRODUCTOR DE CD
MCR - 633
INSTRUCTIONS MANUAL
GEBRUIKSAANWIJZING
MODE D’EMPLOI
MANUALE D’ISTRUZIONI
MANUAL DE INSTRUÇÕES
MANUAL DE INSTRUCCIONES
®
ENGLISH NEDERLANDS FRANÇAIS ITALIANO PORTUGUÊS ESPAÑOL

2
Figura A / Figure A
1819
213 6
8101116
14
155
1
3
4
7912
17

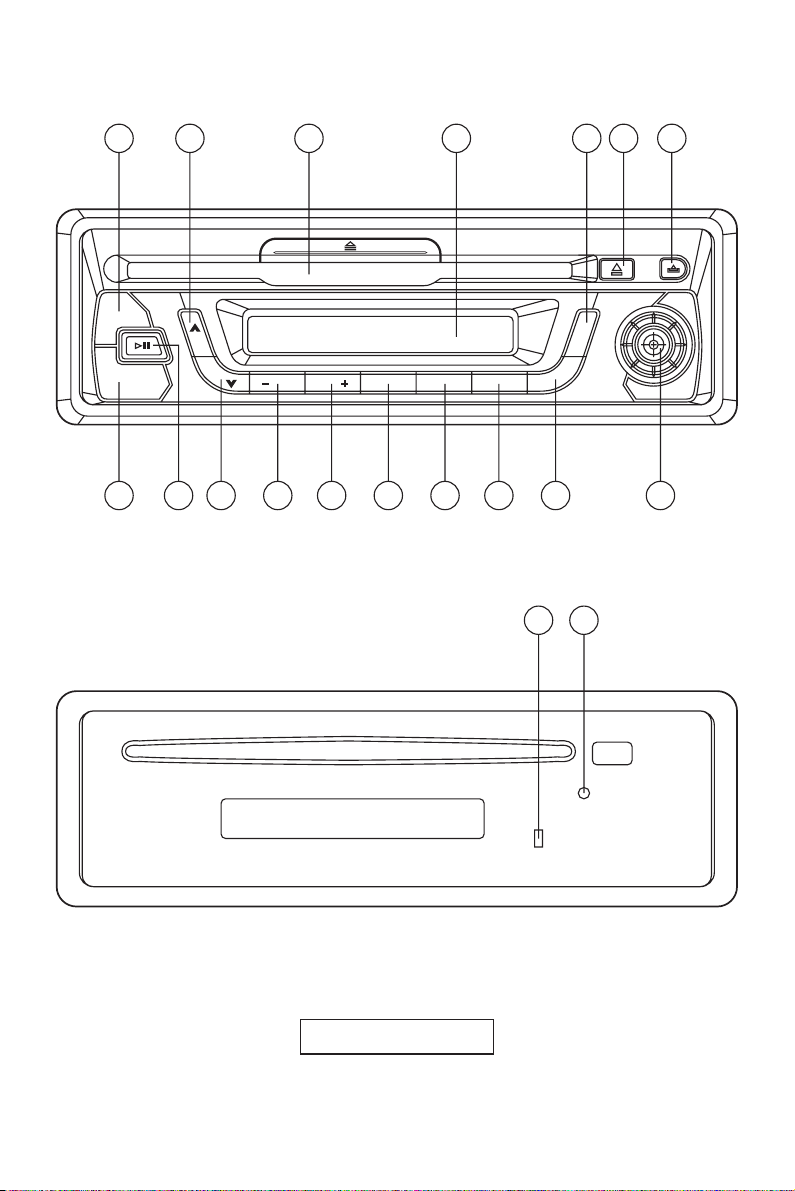
GENERAL OPERATION (see figure A)
ON/OFF
Press PWR button (1) to turn on the unit. Press it again to turn it off.
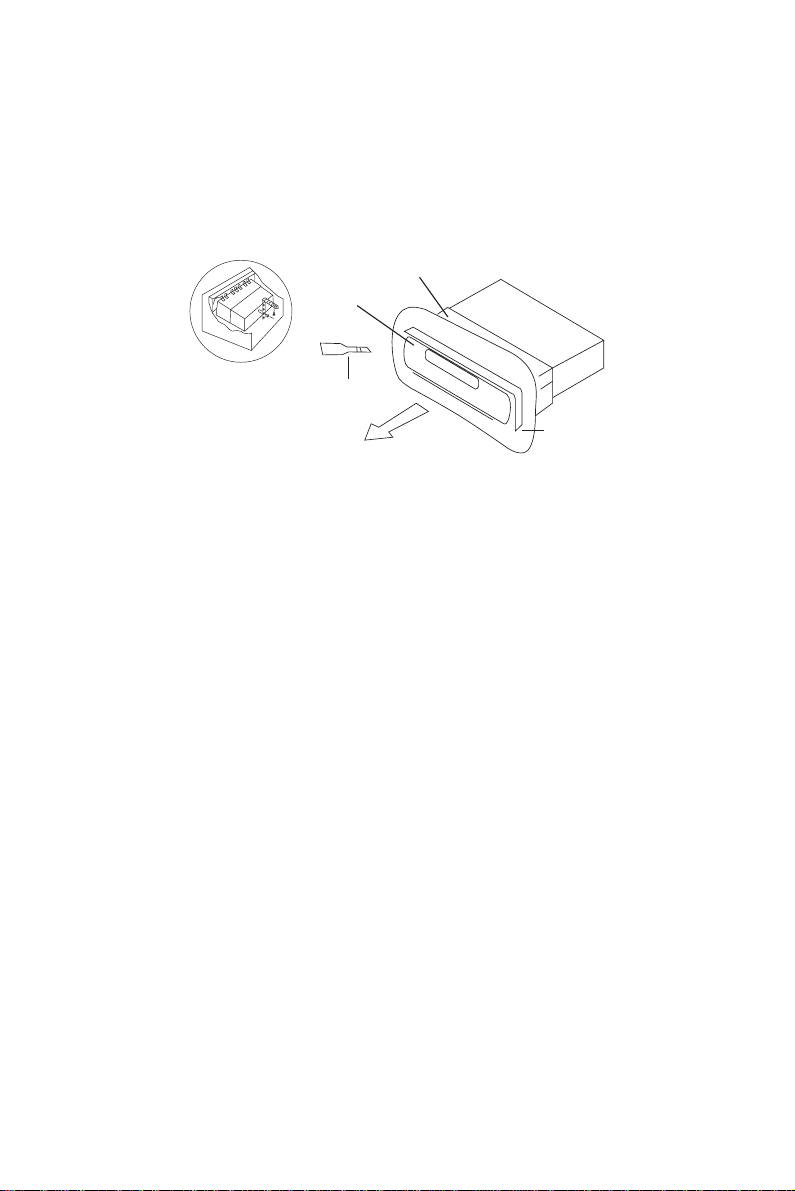
FACEPLATE RELEASE
Press REL button (2) to detach the removable faceplate.
SELECT AUDIO MODE
Press SEL button (3) for change audio mode through volume, bass, treble and balance
modes. Use (4) and (5) buttons for adjust the selected mode.
When mode has not been adjusted for 3 seconds, display returns for normal radio or
CD display.
Volume: Adjust volume level by using (4) and (5) buttons.
Note: The unit is initially set to volume mode.
Bass: Press SEL button (3) one time. Adjust bass level by using (4) and (5)
buttons.
Treble: Press SEL button (3) two times. Adjust treble level by using (4) and (5)
buttons.
Balance: Press SEL button (3) three times. Adjust sound balance between left and
right speakers by using (4) and (5) buttons.
LOUDNESS
Press and release RND/LOU button (11) immediately for reinforce the bass output.
TIME SETTING
Press DSP button (6) for change the display for clock display, if no key is activated
in 5 seconds, it will automatically return for previous display. Press and hold the DSP
button (6) for 3 seconds until the clock display flashes. Press (5) for change minutes
or (4) for change hours.
SELECT MODE
During CD operation, press BND button (7) for switch for radio mode. During radio
operation, when a compact disc is inserted in the disc slot, press >II button (12) for
switch for CD mode and start playing.
LIQUID CRYSTAL DISPLAY
Exhibit current frequency and activated functions on the display (17).
LED
When the front panel do not install on the unit, the LED indicator (18) is flashing.
RESET
Press RESET button (19) to re-initialize the unit in case abnormalities or malfunction
is observed. When reset is activated, all preset station/program will be cleared.
Reset button can be access by.
VOL BAS TRE BAL
(Volume) (Bass) (Treble) (Balance)
3

RADIO OPERATION
SELECT BAND
Press BND button (7) for change bands as below:
(2 bands)
SELECT STATION
Rotate the TUNE knob (8) clockwise or anticlockwise for choose the desired frequency.
SELECTING LOCAL/DISTANT
In radio operation, press RPT/LOC button (9) select between local setting for reception
of strong station and distant setting for reception of weak stations when tuning.
SELECTING MONO/STEREO
In radio operation, press INT/MON button (10) for select mono or stereo reception for
radio stations. You can sometimes improve reception of distant stations by selecting
mono operation.
CD OPERATION
DISC PLAY
Push a compact disc with the label side facing up into the disc slot (13) and you will
hear a click sound. If no sound heard, the CD should be incorrectly inserted into the
disc slot. Then it automatically start playing the first track of the disc. The display
will indicate the track number and playing time. During the playing, press >II button
(12) for temporarily stop the playing or press if again for recover playing.
Press eject button (14) for eject CD from the slot. The unit switches for radio operation.
SELECT TRACKS
In CD operation, press MAN/SKIP buttons – (15) or + (16) for move for the previous
track or the following track. Track number shows on display.
In CD operation, hold MAN/SKIP buttons – (15) or + (16) for fast reverse or fast
forward. CD play starts from when you release the button.
REPEAT
In CD operation, press RPT/LOC button (9) for continuously repeat the same track.
Press once more for continuously repeat the same disc. Press if at the third time for
release the mode.
PLAY IN RANDOM ORDER
Press and hold RND/LOU button (11) or more than 1.5 seconds for play all tracks on
the current CD in random order. Press if again for cancel the function.
PREVIEW ALL TRACKS
During CD operation, press INT/MON button (10) for play first 10 seconds of each
track on current CD. Press if again for stop intro and recover normal playing.
FM AM
4

INSTALLATION
a) Insert the supplied key into the slot as shown, and slide the unit out of the
dashboard while holding the trim plate.
b) Slide the unit out of the dashboard.
c) Remove the detachable front panel.
d) Remove the metal strap attached to the back of the unit.
e) Remove the key from the slot.
f) Disconnect all the wires of the unit and the antenna plug.
ELECTRICAL CONNECTION
NOTE: Incorrect wiring or operation will void the warranty of this unit.
WHITE LEFT SPEAKER ( + )
WHITE/BLACK LEFT SPEAKER ( – )
GREY RIGHT SPEAKER ( + )
GREY/BLACK RIGHT SPEAKER ( – )
ORANGE B+ (CONNECT TO BATTERY)
RED CONNECT TO IGN. SW.
BLACK GROUND
YELLOW POWER ANT.
THIS MODEL IS PROVIDED WITH ISO CONNECTOR
SPECIFICATIONS
POWER SUPPLY DC 12V, negative ground
CD PLAYER Signal to noise ratio: more than 60 dB
Channel separation: more than 60 dB
Frequency response: 40 Hz - 15 KHz
RADIO SECTION AM: 522/1620 KHz, sensitivity (S/N = 20 dB): 32 dB
FM: 87.5/108 MHz, sensitivity (S/N = 30 dB): 5 µV, stereo
separation: > 25 dB
SPECIFICATION ARE SUBJECT TO CHANGE WITHOUT PRIOR NOTICE
SLEEVE
KEY SLOT
KEY
DASHBOARD
5

6
MECHANISCHE INSTALLATIE
Monteer de radio in het dashboard van uw auto, volgens de hierboven beschreven
manier, de montage behuizing moet als eerst gemonteerd worden, zodat later de
radio passend in het dashboard geschoven kan worden.
DASH BOARD
BOUT
VEER
PARKER
RING
SLEUF
MONTAGE SLEDE
METALEN STRIP
BOUT

7
FRONTPANEEL
1. Het ontkoppelen van het frontpaneel geschied door op de ontkoppeltoets te
drukken aan de rechterzijde van het apparaat.
2. Verwijder het frontpaneel door de rechterzijde naar u toe te bewegen, en uit te
nemen.
3. Om het frontpaneel goed te beschermen tefen vuil en stoten, bewaar deze
zorgvuldig in de opberg doos.
Opberg Doos
Frontpaneel
Frontpaneel
Ontkoppel Toets

8
BEDIENINGSTOETSEN
GEBRUIK VAN DE GENERAL
• STROOM AAN/UIT
Aan: Druk op de “power” toets (1) om de stroom in te schakelen.
Uit: Druk opnieuw op de “power” toets (1) om de stroom uit de schakelen.
• GLEUF VOOR HET VERWIJDEREN VAN HET FRONTPANEEL
Druk op deze toets voor het verwijderen van het paneel (2).
1819
213 6
8101116
14
155
1
3
4
7912
17

9
• KEUZETOETS
Druk deze toets in om de regeling van: bassen, hoge tonen, geluidsbalans, en
geluidssterkte achtereenvolgens te veranderen.
Als deze toets niet binnen 5 seconden opnieuw wordt ingedrukt, gaat de regeling
weer over op geluidssterkteregeling.
Geluidsniveau / (4 + 5)
Nadat u elke soort geluidsregeling hebt gekozen door de keuzetoets in te drukken,
kunt het niveau van elke geluidsregeling met deze toets afstellen.
Geluidssterkteregeling
Druk op de kant om het geluidsniveau te verhogen en op de kant om het
geluidsniveau te verlagen.
• SPECIALE FUNCTIES
Loud: Dit is de Loudness toets voor het accentueren van de lage tonen.
• INSTELLING VAN DE KLOK
Druk voor meer dan 2 seconden op de “dsp” toets (6) totdat de tijd knippert.
Toets op de (5) om de minuten bij te stellen, en toets (4) voor de uren.
Druk na de instelling opnieuw op de “dsp” toets.
• LCD
Afleesvenster voor cd en radio funkties (17).
• RESET
Druk op de Reset toets (19) indien de radio of cd speler om ombekende reden niet
goed of op een vreemde manier funktioneerd.
GEBRUIK VAN DE RADIO
• MW/FM BANDKEUZE TOETS
Selekteer met deze toets de tussen de golflengte AM en FM zoals volgt:
• ZENDER ZOEKFUNKTIE
Gebruik deze knop om zenders op te zoeken.
• LOKAAL/VERAF TOETS (LO/DX)
Gebruik deze knop voor het doen versterken of verzwakken van het ontvangst op
de FM band alleen.
VOL BAS TRE BAL
(Volume) (Bass) (Treble) (Balance)
FM AM

10
AFSPELEN VAN EEN CD
• AFSPELEN VAN EEN CD
Steek een cd diep in de gleuf, met de labelkant boven. Duw de cd met de vinger
goed diep naar binnen, totdat het loopwerk de cd oppakt. Het afspelen begint bij
het begin van het eerste nummer. De aanduiding “load” (laden) verschijnt en
tracknummer en speelduur (minuten/seconden) worden op het digitale afleesvenster
getoond (aanduiding van verstreken tijd). Druk op de “Eject” toets voor het
verwijderen van de cd.
• HET OPZOEKEN VAN EEN NUMMER OP DE CD
Hoe zoekt u een bepaald nummer op de cd op?
Als u een bepaald stukje wilt opzoeken, drukt u op de -toegangstoets (15) (16).
Oftewel >> en << skip toetsen, totdat het gewenste tracknummer op het digitale
afleesvenster verschijnt.
• HERHALEN
Als u alleen maar éen muziekstuk van de cd wilt afspelen, drukt u op de repeat
(herhaal) Toets (9). Op het digitale afleesvenster verschijnt dan rpt.
Als u het herhaald afspelen wilt afbreken, drukt u de repeat (herhaal) toets nog eens
in. Tevens kunt u geprogrammeerd herhalen, door een muziekstuk op te zoeken
en daar de herhaal toets (rpt) (9) langer dan 2 seconden in te drukken.
• INTRO’S SNEL ELKAAR AFSPELEN
Als u snel de nummers op de cd wilt doornemen om uw keuze te bepalen, druk dan
op de Intro toets (10).
Het digitale afleesvenster zal dan “intro” te zien geven, en de tracknummer teller
toont.
Het nummer van het volgende muziekstuk. De laser pick-up gaat naar het begin
van dit.
Volgend stukje en het apparaat speelt dit begin (intro) gedurende 10 seconden.
Dan wordt het begin van het volgend stukje 10 seconden lang gespeeld, enz als u
uw keuze.
Hebt bepaald, drukt u de toets nog eens in, waardoor bij deze plaats op de cd
wordt Gestopt.

11
ELECTRISCHE INSTALLATIE
Sluit de radio aan volgens de hierna te vinden beschrijving.
Let wel, alvorens de radio voor de eerste keer aan te zetten, dat alle draden correct
zijn aangesloten om kortsluiting en beschadiging van de radio te voorkomen.
Indien er een ernstige fout wordt gemaakt betreffende de aansluiting, kan de aanspraak
op garantie mogelijk vervallen.
Zorg in ieder geval dat tijdens de montage de negatieve (–) accu klem wordt los
genomen.
AANSLUITSCHEMA
Zie de etiket op de bovenzijde van de radio.
WAARSCHUWING EN INSTALLATIE TIPS
A) Zorg dat er altijd spanning op de oranje backup draad staat i.v.m. o.a.het doorlopen
van de klok.
Indien er geen spanning staat op de oranje draad / of indien de oranje draad niet
is aangesloten, dan zult u geen informatie op het afleesvenster waarnemen.
B) Zorg dat de rode voedingsdraad geschakeld wordt via het kontakt.
C) Sluit altijd eerst de luidsprekers aan voordat u de spanningsdraden aanlegt.
Dit voorkomt schade bij eventuele kortsluiting van de luidsprekerdraden naar de
voeding.

12
UTILISATION (se référer à la figure A)
ALLUMAGE/EXTINCTION
Appuyer sur la touche PWR (1) pour allumer l’appareil, appuyer de nouveau pour l’éteindre.
RETRAIT DE LA FAÇADE
Appuyer sur la touche REL (2) pour enlever la façade amovible de l’autoradio.
REGLAGES DU SIGNAL AUDIO
Appuyer sur la touche SEL (3) pour sélectionner le mode du volume, des graves, des
aigus et de la balance. Utiliser les touches (4) et (5) pour régler à discrétion la
fonction sélectionnée. Si aucun réglage n’est effectué dans trois secondes, l’affichage
reviendra au mode normal de la radio.
Volume: Régler le niveau du volume à l’aide des touches (4) et (5).
REMARQUE: L’autoradio est réglé dans le mode du volume.
Graves: Appuyer une fois sur la touche SEL (3). Régler le niveau des tonalités graves
par les touches (4) et (5).
Aigus: Appuyer deux fois sur la touche SEL. Régler le niveau des tonalités aigües à
l’aide des touches (4) et (5).
Balance: Appuyer trois fois sur la touche SEL. Régler l’équilibre entre les haut-
parleurs droit et gauche à l’aide des touches (4) et (5).
LOUDNESS
Appuyer sur la touche RND/LOU (11) pour augmenter les tonalités graves.
REGLAGE DE L’HORLOGE
Appuyer sur la touche DSP (6) pour afficher l’horaire, si aucune touche n’est appuyée
dans 5 secondes, l’afficheur reviendra à l’affichage précédent. Maintenir appuyée la
touche DSP jusqu’à ce que l’horaire commence à clignoter. Utiliser les touches (4)
et (5) pour régler les heures et les minutes.
SELECTION DU MODE RADIO/CD
En mode CD, appuyer sur la touche BND (7) pour passer à l’écoute de la radio.
En mode radio, si un disque compact est inséré dans le compartiment, appuyer sur
la touche Play/Pause (12) pour passer au mode CD et commencer la lecture.
AFFICHEUR A CRISTAUX LIQUIDES
Sur l’afficheur (17) apparaissent la fréquence de la station radio accordée ou les
différentes fonctions sélectionnées.
TEMOIN LUMINEUX (LED)
Quand la façade n’est pas insérée, un témoin lumineux (LED) (18) clignotera sur
l’autoradio.
REMISE A ZERO DE L’AUTORADIO (RESET)
Appuyer sur la touche RESET (19) en cas de fonctionnement anormal de l’appareil.
Quand on appuie sur la touche de réinitialisation (RESET), tous les réglages et les
stations radio mémorisées seront effacés. La touche RESET peut être appuyée à
l’aide de n’importe quel objet pointu.
(Volume) (Graves) (Aigus) (Balance)
VOL BAS TRE BAL

13
ECOUTE DE LA RADIO
SELECTION DE LA BANDE
Appuyer sur la touche BND (7) pour changer la bande radio selon l’indication du
schéma suivant:
(modèle à 2 bandes)
SELECTION DE LA STATION RADIO
Tourner le bouton TUNE (8) dans le sens des aiguilles d’une montre ou dans le sens
contraire pour sélectionner la station radio souhaitée.
FONCTION LOCAL/DISTANT
Pendant l’écoute de la radio, appuyer sur la touche RPT/LOC (9) pour choisir entre la
fonction “locale” pour recevoir les stations radio avec le signal le plus fort, ou bien
“distant” pour accorder le mieux possible les stations avec un signal faible.
FONCTION MONO/STEREO
Pendant l’écoute de la radio, appuyer sur la touche INT/MON (10) pour sélectionner
entre le mode mono ou stéréo. Pour les stations avec un signal particulièrement
faible, il est conseillé le mode monophonique.
ECOUTE DU CD
FONCTIONNEMENT DU CD
Insérer un CD avec la face étiquetée tournée vers le haut à l’intérieur du compartiment
correspondant (13). La lecture du disque commencera automatiquement. S’il n’y a
pas de son, le disque a été inséré de manière incorrecte. Sur l’afficheur apparaissent
le numéro de la plage en cours de lecture et le temps de lecture. Pendant la lecture,
appuyer sur la touche Play/Pause (12) pour interrompre momentanément la lecture;
appuyer de nouveau pour la rétablir. Appuyer sur la touche “Eject” (14) pour éjecter
le disque du compartiment. L’autoradio passera automatiquement au mode radio.
SELECTION DES PLAGES
En mode CD, appuyer sur la touche MAN/SKIP – (15) ou + (16) pour revenir à la plage
précédente ou passer à la suivante. Le numéro de la plage en cours de lecture
s’affichera. Pendant l’écoute d’une plage, maintenir l’appui sur la touche MAN/SKIP
– (15) ou + (16) pour avancer ou reculer rapidement à l’intérieur de la même plage.
FONCTION DE REPETITION
En mode CD, appuyer sur la touche RPT/LOC (9) pour écouter continuellement la
plage en cours de lecture, appuyer une deuxième fois pour écouter tout le disque,
appuyer une troisièmen fois pour revenir au mode normal de lecture.
LECTURE ALEATOIRE (RANDOM)
Maintenir appuyée pendant plus de 1,5 seconde la touche RND/LOU (11) pour lire toutes les
plages du CD dans un ordre laissé au hasard. Appuyer de nouveau pour annuler la fonction.
FONCTION “INTRODUCTION”
Pendant l’écoute d’un CD, appuyer sur la touche INT/MON (10) pour écouter les
premières 10 secondes de chaque plage. Appuyer sur la touche INT/MON une autre
fois pour interrompre la fonction et revenir à la lecture normale du CD.
FM AM

14
INSTALLATION/RETRAIT
a) Insérer la clé fournie dans la fente (voir figure) et faire glisser l’autoradio de son
support.
b) Retirer l’autoradio de son support.
c) Enlever la façade amovible.
d) Enlever la lanière métallique placée derrière l’autoradio.
e) Enlever la clé de la fente.
f) Déconnecter tous les câbles de l’autoradio et de la prise de l’antenne.
CONNEXIONS ELECTRIQUES
REMARQUE: La mauvaise connexion des câbles ou l’installation incorrecte de
l’autoradio invalident la garantie du produit.
BLANC HAUT-PARLEUR GAUCHE ( + )
BLANC/NOIR HAUT-PARLEUR GAUCHE ( – )
GRIS HAUT-PARLEUR DROIT ( + )
GRIS/NOIR HAUT-PARLEUR DROIT ( – )
ORANGE BORNE POSITIVE BATTERIE ( B+ )
ROUGE CONTACTEUR D’ALLUMAGE VOITURE
NOIR BORNE NEGATIVE BATTERIE ( B– / MASSE )
JAUNE ANTENNE ELECTRIQUE
CARACTERISTIQUES TECHNIQUES
Alimentation 12V, masse négative
Séction CD Rapport S/B: > 60 dB
Séparation canaux: > 60 dB
Fréquences de réponse: 40 Hz - 15 KHz
Séction radio AM: 522/1620 KHz, sensibilité (S/B = 20 dB): 32 dB
FM: 87,5/108 MHz, sensibilité (S/B = 30 dB): 5 uV,
séparation stéréo: > 25 dB
CET AUTORADIO EST POURVU DE CONNECTEURS ISO
LES CARACTERISTIQUES TECHNIQUES PEUVENT ETRE MODIFIEES SANS
PREAVIS DE LA PART DU CONSTRUCTEUR.
SLEEVE
KEY SLOT
KEY
DASHBOARD

15
UTILIZZO DEL PRODOTTO (fare riferimento alla figura A)
ACCENSIONE/SPEGNIMENTO
Premere il tasto PWR (1) per accendere l’unità, ripremerlo per spegnerla.
RILASCIO DEL FRONTALINO
Premere il tasto REL (2) per estrarre il frontalino rimuovibile dell’autoradio.
IMPOSTAZIONI DEL SEGNALE AUDIO
Premere il tasto SEL (3) per selezionare le modalità volume, bassi, alti e bilanciamento.
Utilizzare i tasti (4) e (5) per regolare a proprio piacimento la funzione selezionata.
Se non viene variata nessuna impostazione per più di tre secondi, il visualizzatore
tornerà alla modalità radio normale.
Volume: Regolare il livello del volume tramite i tasti (4) e (5).
NOTA: Inizialmente l’autoradio è impostata nella modalità volume.
Toni bassi: Premere il tasto SEL (3) una volta. Regolare il livello dei toni bassi tramite
i tasti (4) e (5).
Toni alti: Premere il tasto SEL due volte. Regolare il livello dei toni alti tramite i tasti
(4) e (5).
Bilanciamento: Premere il tasto SEL tre volte. Regolare il bilanciamento tra gli
altoparlanti destro e sinistro con i tasti (4) e (5).
LOUDNESS
Premere il tasto RND/LOU (11) per potenziare i toni bassi.
REGOLAZIONE DELL’ OROLOGIO
Premere il tasto DSP (6) per far apparire l’orario nel display, se nessun tasto viene
premuto per 5 secondi, il display tornerà alla impostazione iniziale. Tenere premuto
il tasto DSP fino a che l’orario inizia a lampeg-giare. Utilizzare i tasti (4) e (5) per
regolare rispettivamente le ore e minuti.
SELEZIONE MODALITA’ RADIO/CD
In modalità CD, premere il tasto BND (7) per passare alla modalità radio. In modalità
radio, se un compact disc è inserito nell’apposito vano, premere il tasto Play/Pause
(12) per passare al modo Cd e iniziare la riproduzione.
VISUALIZZATORE A CRISTALLI LIQUIDI
Il visualizzatore (17) mostra la frequenza della stazione radio sintonizzata o le varie
funzioni selezionate.
INDICATORE LUMINOSO (LED)
Quando il frontalino non è inserito nell’unità, un indicatore luminoso (LED) (18),
lampeggia sull’autoradio.
RE-IMPOSTAZIONE DELL’UNITA’ (RESET)
Premere il tasto RESET (19) in caso di funzionamento anormale dell’unità.
Quando si preme il tasto reset tutte le impostazioni e le stazioni radio memorizzate
saranno cancellate. Il tasto reset può essere premuto con un qualsiasi oggetto
appuntito.
VOL BAS TRE BAL
(Volume) (Bassi) (Alti) (Bilanciamento)

ASCOLTO DELLA RADIO
SELEZIONE DELLA BANDA
Premere il tasto BND (7) per cambiare la banda radio come indicato nello schema seguente:
(mod. a 2 bande)
SELEZIONE DELLA STAZIONE RADIO
Ruotare la manopola TUNE (8) in senso orario e antiorario per selezionare la stazione
radio desiderata.
FUNZIONE LOCAL/DISTANT
Durante l’ascolto della radio, premere il tasto RPT/LOC (9) per scegliere tra la funzione
“locale” per ricevere le stazioni radio con il segnale migliore, oppure “distante” per
sintonizzare nel modo migliore possibile le stazioni con segnale più debole.
FUNZIONE MONO/STEREO
Durante l’ascolto della radio, premere il tasto INT/MON (10) per selezionare tra le
modalità mono o stereo nell’ascolto della stazione sintonizzata. Per stazioni con
segnale particolarmente debole si consiglia di selezio-nare la modalità mono.
ASCOLTO DEL CD
FUNZIONAMENTO DEL CD
Spingere un Cd con il lato dell’etichetta rivolto verso l’alto nell’apposita fessura (13).
La riproduzione del disco inizierà automaticamente. Se non si sente nessun suono il
CD non è stato inserito in modo corretto. Sul visualizzatore vengono mostrati i numero
del brano riprodotto ed il tempo di riproduzione. Durante la riproduzione premere il
tasto Play/Pause (12) per interrompere momentaneamente la riproduzione, premerlo
una seconda volta per riavviarla. Premere il tasto “Eject” (14) per espellere il compact
disc dall’unità. L’auto-radio commuterà automaticamente in modalità radio.
SELEZIONE DELLE TRACCE
Nella modalità Cd premere il tasto MAN/SKIP – (15) o + (16) per tornare alla traccia
precedente o passare alla traccia successiva. Il numero della traccia riprodotta viene
mostrato nel visualizzatore. Durante l’ascolto di un brano tenere premuto il tasto
MAN/SKIP – (15) o + (16) per spostarsi velocemente indietro o avanti all’interno dello
stesso brano.
FUNZIONE DI RIPETIZIONE
In modalità CD, premere il tasto RPT/LOC (9) per riascoltare continuamente il brano
in riproduzione, premerlo una seconda volta per ripetere l’intero CD, premere infine
una terza volta per tornare alla modalità normale di riproduzione.
RIPRODUZIONE CASUALE (RANDOM)
Tenere premuto per più di 1,5 secondi il tasto RND/LOU (11) per riprodurre tutte le
tracce del CD in modo casuale. Ripremerlo per annullare la funzione.
FUNZIONE “INTRODUZIONE”
Durante l’ascolto di un CD, premere il tasto INT/MON (10) per ascoltare i primi 10
secondi di ogni brano. Premere il tasto INT/MON una seconda volta per interrompere
la funzione e tornare alla normaleriprduzione del CD.
FM AM
16

INSTALLAZIONE/RIMOZIONE
a) Inserire la chiave in dotazione nella fessura (vedi figura) ed fare scivolare l'autoradio
dalla plancia.
b) Estrarre l'autoradio dalla plancia.
c) Rimuovere il frontalino estraibile.
d) Rimuovere l'asta metallica connessa dietro l'autoradio.
e) Togliere la chiave dalla fessura.
f) Sconnettere tutti i cavi dall'autoradio e dalla presa dell'antenna.
CONNESSIONI ELETTRICHE
NOTA: La non corretta connessione dei cavi o l'errata installazione dell'autoradio
non rendono valida la garanzia del prodotto.
BIANCO ALTOPARLANTE SINISTRO ( + )
BIANCO/NERO ALTOPARLANTE SINISTRO ( – )
GRIGIO ALTOPARLANTE DESTRO ( + )
GRIGIO/NERO ALTOPARLANTE DESTRO ( – )
ROSA TERMINALE BATTERIA POSITIVO ( B+ )
ARANCIO BLOCCHETTO CHIAVE ACCENSIONE
NERO TERMINALE NEGATIVO BATTERIA ( B– / MASSA )
GIALLO ANTENNA ELETTRICA
SPECIFICHE TECNICHE
Alimentazione 12V, negativo a massa
Sezione CD Rapporto S/N: > 60 dB
Separazione canali: > 60 dB
Frequenze di risposta: 40 Hz - 15 KHz
Sezione radio AM: 522 / 1620 KHz, sensibilità (S/N = 20 dB): 32 dB
FM: 87,5 / 108 MHz, sensibilità (S/N = 30 dB): 5 uV,
separazione stereo: > 25 dB
QUESTA AUTORADIO E’ PROVVISTA DI CONNETTORI ISO
LE SPECIFICHE POSSONO ESSERE MODIFICATE SENZA PREAVVISO DA PARTE
DEL COSTRUTTORE
SLEEVE
KEY SLOT
KEY
DASHBOARD
17

18
FUNCIONAMENTO GERAL (ver figure A)
LIGAR/DESLIGAR
Prima o botão PWR (1) para ligar a unidade. Prima de novo para desligá-lo.
RETIRAR O PAINEL
Prima o botão REL (2) para soltar o painel destacável.
SELCCIONAR O MODO DE AUDIO
Prima o botão SEL (3) para mudar o modo de àudio através dos modos de volume,
graves, agudos, equilibrio de canais e controle e frontal. Use os botões (4) e (5)
para ajustar o modo seleccionado. Quando o modo não for ajustado durante 3
segundos, o mostrador regressa ao modo normal de cd ou rádio.
Volume: Ajuste o nivel de volume usando os botões (4) e (5).
Nota: A unidade está inicialmente seleccionada para o modo de volume.
Graves: Prima o botão de SEL (3) uma vez. Ajuste o nivel de graves usando os
botões (4) e (5).
Agudos: Prima o botão de SEL (3) duas vezes. Ajuste o nivel de agudos usando os
botões (4) e (5).
Balance: Prima o botão de SEL (3) três vezes. Ajuste o balanceamento de som
entre os altifalantes esquerdos e direitos usando os botões (4) e (5).
LOUDNESS
Prima e solte o botão RND/LOU (11) imediatamente para reforçar a saida de graves.
ACERTO DE HORÁRIO
Prima o botão DSP (6) para mudar o mostrador para mostrador do relógio, se
nenhuma tecla fôr activada durante 5 segundos, irá automaticamente regressar ao
mostrador anterior. Prima o botão DSP (6) durante 3 segundos até o mostrador de
relógio piscar. Prima (5) para mudar os minutos ou (4) para mudar as horas.
MODO DE SELECÇÃO
Durante a operação de CD, prima o botão BND (7) para comutar para o modo de
rádio. Durante a operação de rádio, quando um disco compacto è inserido na
ranhura, prima o botão >II (12) para comutar para o modo de CD e começar a leitura.
MOSTRADOR DE CRISTAIS LIQUIDOS
Exibe no mostrador a frequência corrente e as funções activadas (17).
LED
Quando não está o painel frontal instalado, o LED indicador (18) está a piscar.
RESET
Prima o botão de RESET (19) para reiniciar a unidade em caso de observação de
funções anormais ou de mau funcionamento. Quando o reset fôr activado, todas as
estacões pré-programadas irão ser apagadas.
VOL BAS TRE BAL
(Volume) (Graves) (Agudos) (Balance)

19
FUNCIONAMENTO DO RÁDIO
SELECÇÃO DE BANDA
Prima o botão de BND (7) para mudar as bandas como em baixo:
(2 bandas)
SELECÇIONAR ESTAÇÃO
Rode o botão TUNE (8) no sentido dos ponteiros do relógio ou no sentido oposto
para escolher a estação desejada.
SELECÇIONAR LOCAL/DISTANTE
Em funcionamento rádio, prima o botão RPT/LOC (9) selecçione entre acerto local
para recepção de uma estação forte e acerto de distante para recepção de estações
fracas quando sintonizadas.
SELECÇÃO DE MONO/STEREO
Em funcionamento de rádio, prima o botão INT/MON (10) para selecção de recepção
para estações de rádio mono ou stereo. Pode por vezes melhorar a recepção de
estações de rádio distantes seleccionando a operação mono.
FUNCIONAMENTO DO CD
LEITURA DO DISCO
Empurre o disco compacto com a etiqueta virada para cima na ranhura de CD (13) e
irá ouvir um som com um click. Se não se ouvir nenhum som, o cd CD deve ter sido
mal inserido na entrada do disco. De seguida irá automáticamente tocar a primeira
faixa do disco. O mostrador irá indicar o numero de faixa e o tempo de leitura.
Durante a leitura, prima o botão >II button (12) para parar temporáriamente a leitura
ou pressione novamente para retomar a leitura. Prima o botão de eject (14) para
retirar o cd da ranhura. A unidade irá passar para funcionamento de rádio.
SELECÇÃO DE PISTAS
Em funcinamento de CD, prima os botões MAN/SKIP – (15) or + (16) para mover para
a faixa anterior ou próxima faixa. O numero de faixa aparece no mostrador.
Em funcionamento de CD, mantenha premidos os botões MAN/SKIP – (15) or + (16)
para leitura rápida para trás ou para a frente. A leitura de CD começa de quando
largou o botão.
REPETIÇÃO
Em funcionamento de CD, prima o botão RPT/LOC (9) para repetir continuamente a
mesma faixa. Prima mais uma vez para repetir continuamente o mesmo disco . Prima
uma terceira vez para sair do modo.
LEITURA EM ORDEM ALEATÓRIA
Mantenha premido o botão RND/LOU (11) por mais de 1.5 segundos para lêr todas
as faixas do CD corrente em ordem aleatória. Prima de novo para cancelar a função.
PREVISÃO DE TODAS AS FAIXAS
Durante o funcionamento de CD, prima o botão INT/MON (10) para lêr os primeiros
10 segundos de cada faixa no CD corrente. Prima de novo para parar a função e
retomar a leitura normal.
FM AM

20
INSTALAÇÃO
a) Insira a chave fornecida na ranhura como esta mostrado,e deslize a unidade para
fora do painel enquanto segura o aro.
b) Deslize a unidade para fora do painel.
c) Remova o painel destacável.
d) Remova a tira de metal atarrachada no painel traseiro da unidade.
e) Remova a chave da ranhura.
f) Desligue todos os fios da unidade e a ficha da antena.
LIGAÇÕES ELÉCTRICAS
NOTA: Operações ou ligações incorrectas irão fazer perder o direito à garantia
desta unidade.
BRANCO ALTIFALANTE ESQUERDO ( + )
BRANCO/PRETO ALTIFALANTE ESQUERDO ( – )
CINZENTO ALTIFALANTE DIREITO ( + )
CINZENTO/PRETO ALTIFALANTE DIREITO ( – )
ALARANJADO B+ (LIGAÇÃO À BATERIA)
VERMELHO LIGAÇAO À IGNIÇÃO. SW.
PRETO MASSA
AMARELO ANTENA ELECTRICA.
ESTE MODELO ESTÁ FORNECIDO COM CONECTORES ISO
ESPECIFICAÇÕES
FONTE DE ALIMENTAÇÃO DC 12V, massa negativa
LEITOR DE CD Relação sinal ruido: acima de 60 dB
Separação de canais: acima de 60 dB
Resposta de frequência: 40 Hz - 15 KHz
SECÇÃO DE RÁDIO AM: 522/1620 KHz, sensibilidade (S/N = 20 dB): 32 dB
FM: 87.5/108 MHz, sensibilidade (S/N = 30 dB): 5 µV,
separação stereo: > 25 dB
ESPECIFICAÇÕES SUJEITAS A ALTERAÇÃO SEM AVISO PRÉVIO
SLEEVE
KEY SLOT
KEY
DASHBOARD
Table of contents
Other Marquant Car Receiver manuals