marsden M-250 User manual

Marsden M-250 User Manual
Please take time to read these instructions before starting to use the scale.
Page 2 of 20
Contents
Introduction ............................................................................................................................................................................................2
Safety Instructions .................................................................................................................................................................................3
Cleaning.................................................................................................................................................................................................3
Disposing of the Scale ...........................................................................................................................................................................3
Intended Use..........................................................................................................................................................................................3
Explanation of Graphic Symbols............................................................................................................................................................4
Power Supply and Low Battery..............................................................................................................................................................5
Switching on the Scale...........................................................................................................................................................................6
Hold Function.........................................................................................................................................................................................7
Body Mass Index (BMI) Function...........................................................................................................................................................8
Tare and Pre-Set Tare Functions ...........................................................................................................................................................9
Setting the Date ...................................................................................................................................................................................10
Using the Scale with a Printer.............................................................................................................................................................. 11
Connecting the TP-2100 Thermal Printer ............................................................................................................................................ 11
Using the Scale with Wi-Fi/Bluetooth...................................................................................................................................................12
Bluetooth Connection...........................................................................................................................................................................12
Stand Assist Mechanism & Weighing ..................................................................................................................................................13
Levelling the scale ...............................................................................................................................................................................16
EMC Guidance and Manufacturer’s Declaration .................................................................................................................................17
Guidance and manufacturer’s declaration – electromagnetic immunity. .............................................................................................17
Error Messages....................................................................................................................................................................................19
Introduction
Thank you for purchasing a Marsden professional medical scale. This is a precision Class III weighing instrument and considerate
use will result in many years of accurate weighing. The scale has a maximum load capacity of 250kg which must not be exceeded.
Product Specification
Model
M-250
Accuracy Class
Class III
Dimensions
1060mm (l) x 660mm (w) x 1010mm (h)
Seat Dimensions
470mm (l) x 540mm (w)
Weight of Scale
56kg
Capacity
250kg
Graduations
100g
Power Supply / Rechargeable Battery Pack
Power Pack
6 x AA batteries*
12V 1A AC Adaptor
Adaptor Specifications
12V 1A 2.5mm tip +ve
Battery Life (scale)
Up to 3000 weigh ins (or 55 hours of continuous use) from full charge
Battery life (actuator)
Up to 150 lifts from full charge
Units of Measure
Kg
Minimum load
2kg
Stabilization Time
1-2 Seconds
Operating Temperature
0 to 40˚C
Function Keys
ON/OFF, HOLD, TARE, BMI, UNIT, 0-9
Indicator Display
2.5cm LCD display with 5 active digits
Actuator Load Capacity
6000N
Actuator Speed
4 ~ 30mm/s
Actuator Input Voltage
24V / 12V DC
Actuator Duty Cycle
2 minutes use/18 minutes on standby
Warranty Duration
8 Years

Page 3 of 20
Safety Instructions
Before putting the device into use, please read with care the information given in this user manual, which contains important
instructions for proper installation, use and maintenance of the device.
Marsden and/or the manufacturer shall not be liable for damages arising from failure to heed the following instructions:
•When using electrical components under increased safety requirements, always comply with appropriate regulations.
•Inappropriate installation/use will render the warranty null and void.
•Ensure the voltage marked on the power supply unit matches your mains supply.
•This device is designed for use indoors only.
•Observe the permissible ambient temperatures for use.
•The device meets the requirements for electromagnetic compatibility. Do not exceed the maximum values specified in the
applicable standards.
•Batteries should be kept away from small children. If swallowed, promptly seek urgent medical assistance.
If you have any problems with this scale, please contact Marsden/your local dealer/your service partner.
If a serious incident occurs in relation to this device, it should be reported to the manufacturer and the competent authority of the
Member State in which the user and/or patient is established.
Cleaning
•We recommend using alcohol-based wipes or similar when cleaning the scale.
•Please do not use corrosive liquids, large amounts of water or high-pressure washers.
•Always disconnect the scale from the mains power supply before cleaning.
Maintenance
•The scale does not require any routine maintenance. However, we recommend checking the scale’s accuracy at regular
intervals. If any inaccuracies occur, please contact your local dealer or service partner.
•If you are in the UK, service contracts are available from Marsden to keep your scale accurate and reliable for longer. Call
01709 364296 for more information.
Disposing of the Scale
•This product should not be treated as regular household waste but should be handed in to an electrical/electronic
equipment recycling centre.
•You can obtain further details from your local council, your municipal waste disposal company or from where you
purchased the product.
•Alternatively, you can return this product to Marsden –we will recycle this free of charge,
Intended Use
•This scale is intended for use to determine the weight of patients, supported by professional personnel and in rooms
intended for carrying out healthcare. The weighing value can be read after a stable weighing value has been obtained.
Before use, the scale must be checked by an authorised person to ensure it's in a suitable condition.
•Device is intended to measure one subject at a time.

Page 4 of 20
Explanation of Graphic Symbols
Caution, consult
accompanying
documents before use
Separate collection for
waste of electrical and
electronic equipment,
in accordance with
Directive 2002/96/EC
Manufacturer of medical
device
Manufacturing year of
medical device
Carefully read user
manual before
installation and usage,
and follow instructions
for use.
Medical electrical
equipment with Type B
applied part
Device catalogue
number
Authorized
representative in the
European Community
Manufacturer's batch or
lot number
Device is a medical
device
Serial number
Unique Device
Identifier
Device conforms to 93/42/EEC as amended by 2007/47/EC Medical
Device Directive. Four digit number refers to Notified Body.
Device complies with International Organization of Legal Metrology
(Class III) requirements (verified models only)
Device complies with EC directives (verified models only)
M: Conformity label in compliance with Directive 2014/31/EU for non-
automatic weighing instruments
19: Year in which conformity verification was performed and the CE
label was applied. (ex: 19=2019)
0122: Refers to Notified Body for metrology
Device complies with UK Regulation.
M: Non-Automatic Weighing Instruments Regulations 2016.
21: Year in which conformity verification was performed and the CE
label was applied. (ex: 21=2021)
0120: Refers to the Approved Body for metrology
Page 5 of 20
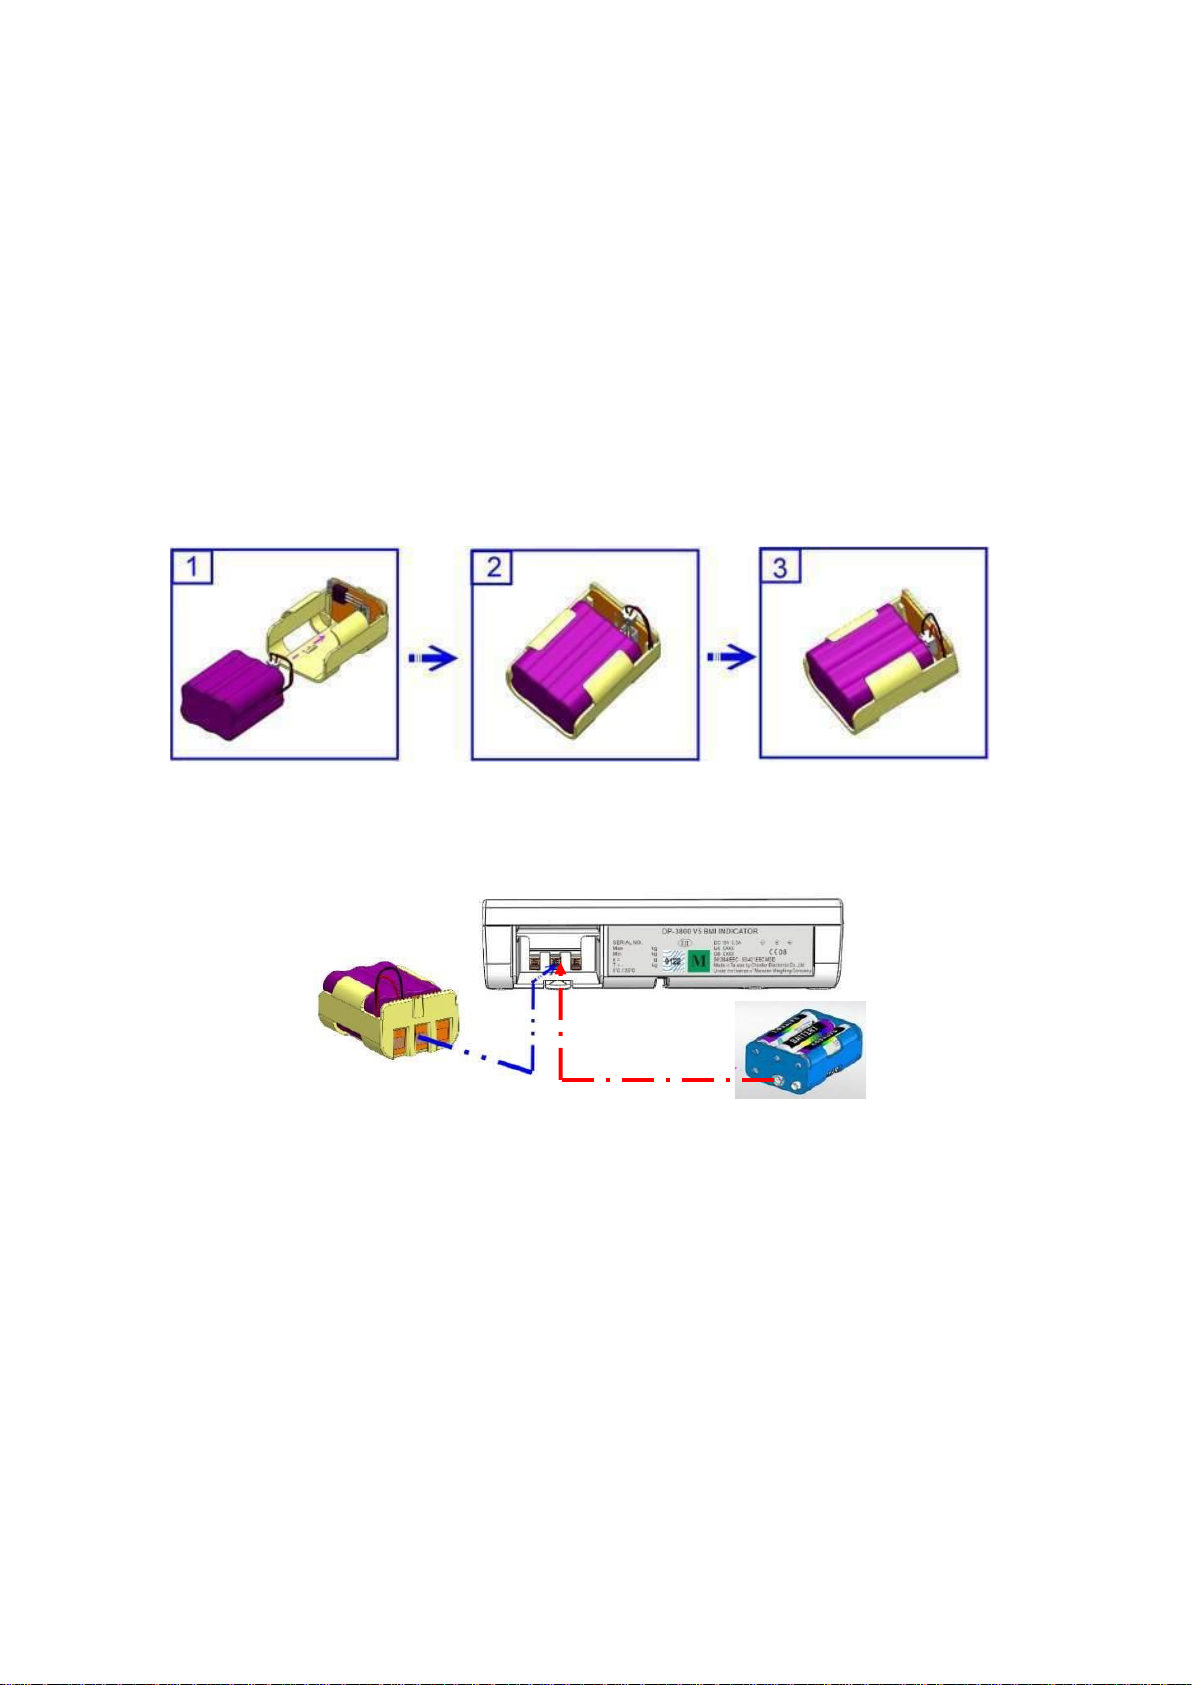
Power Supply and Low Battery
The indicator uses a rechargeable battery pack, a non-rechargeable battery pack, or can be powered from the mains via the AC
adaptor.
Make sure the battery pack is installed in the battery box of the indicator. Alternatively, plug the AC adaptor (12V 2A) into the port on
the side of the indicator.
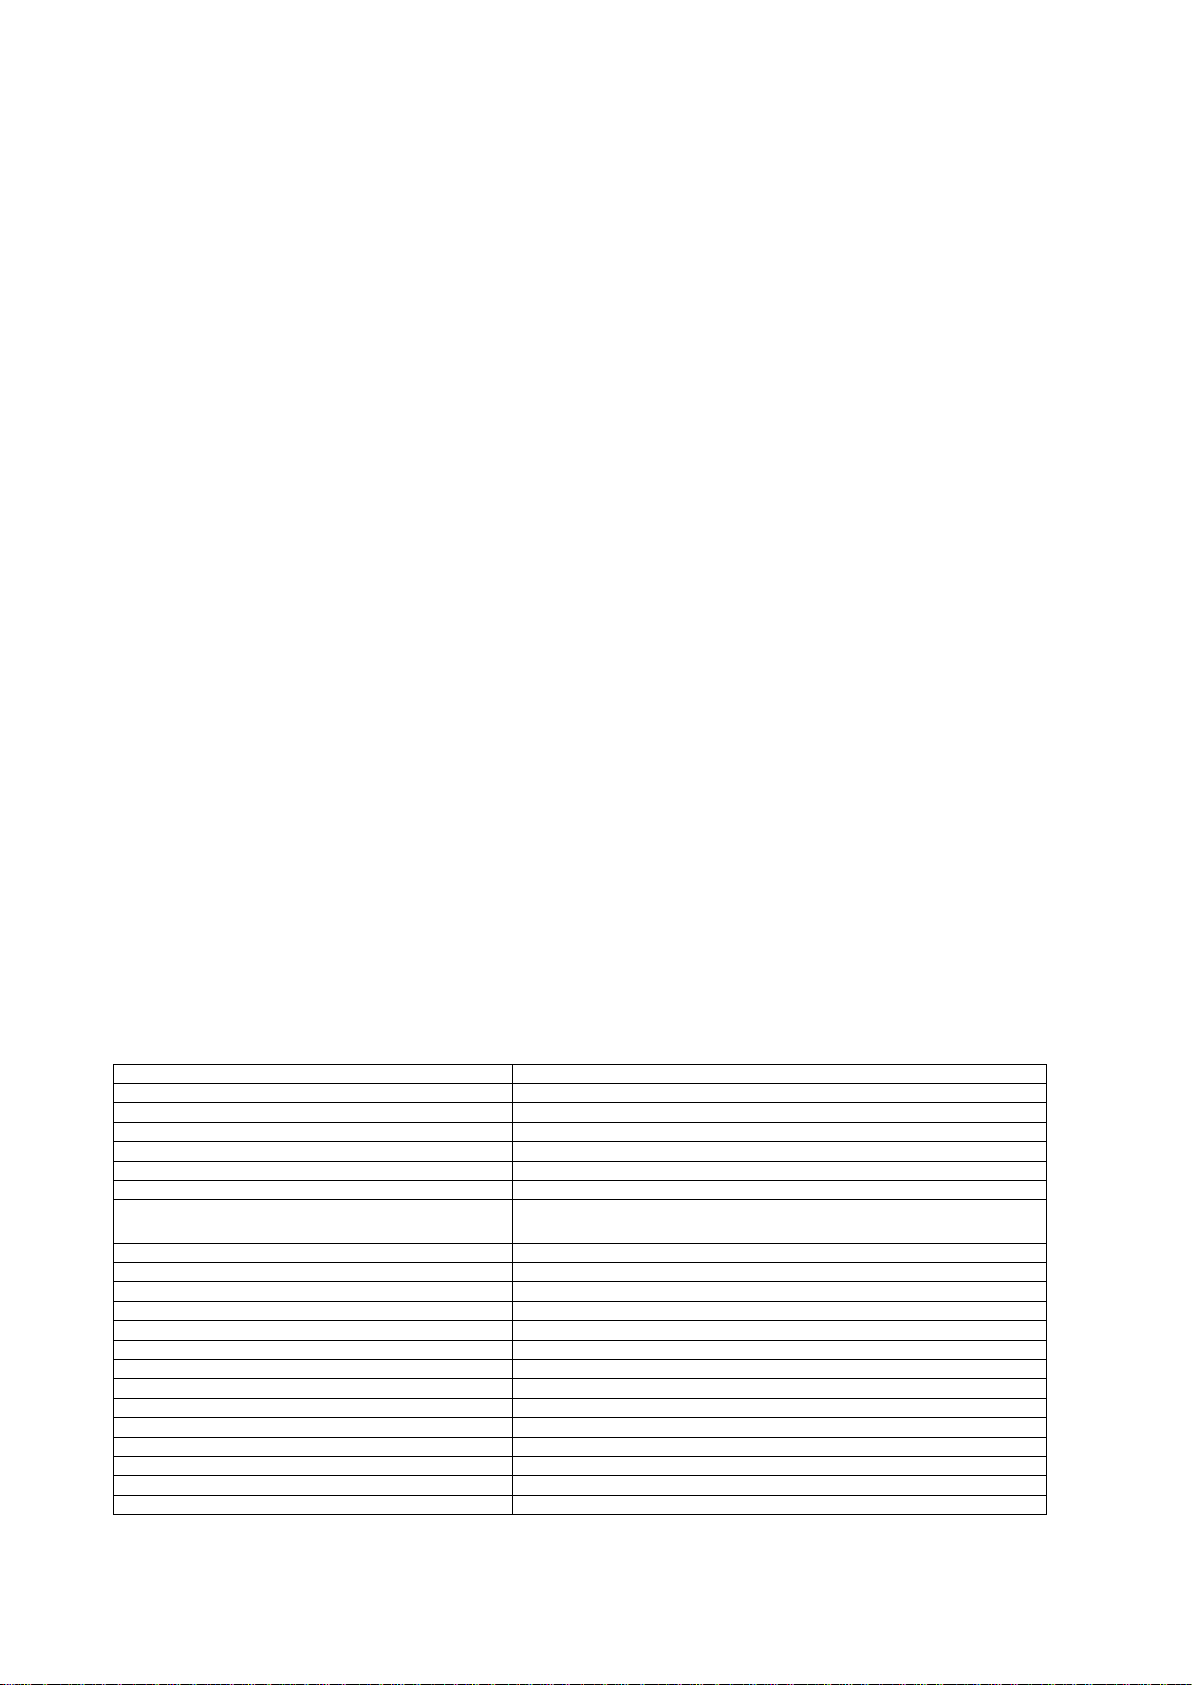
Installing and Replacing the Battery Pack
1. Take out the battery housing.
2. The rechargeable battery pack will slide into, or out of, the housing.
3. Check that the housing pin is connecting to the right point inside the indicator.
4. Place the housing back in the back of the indicator and close the battery housing cover.
Page 6 of 20
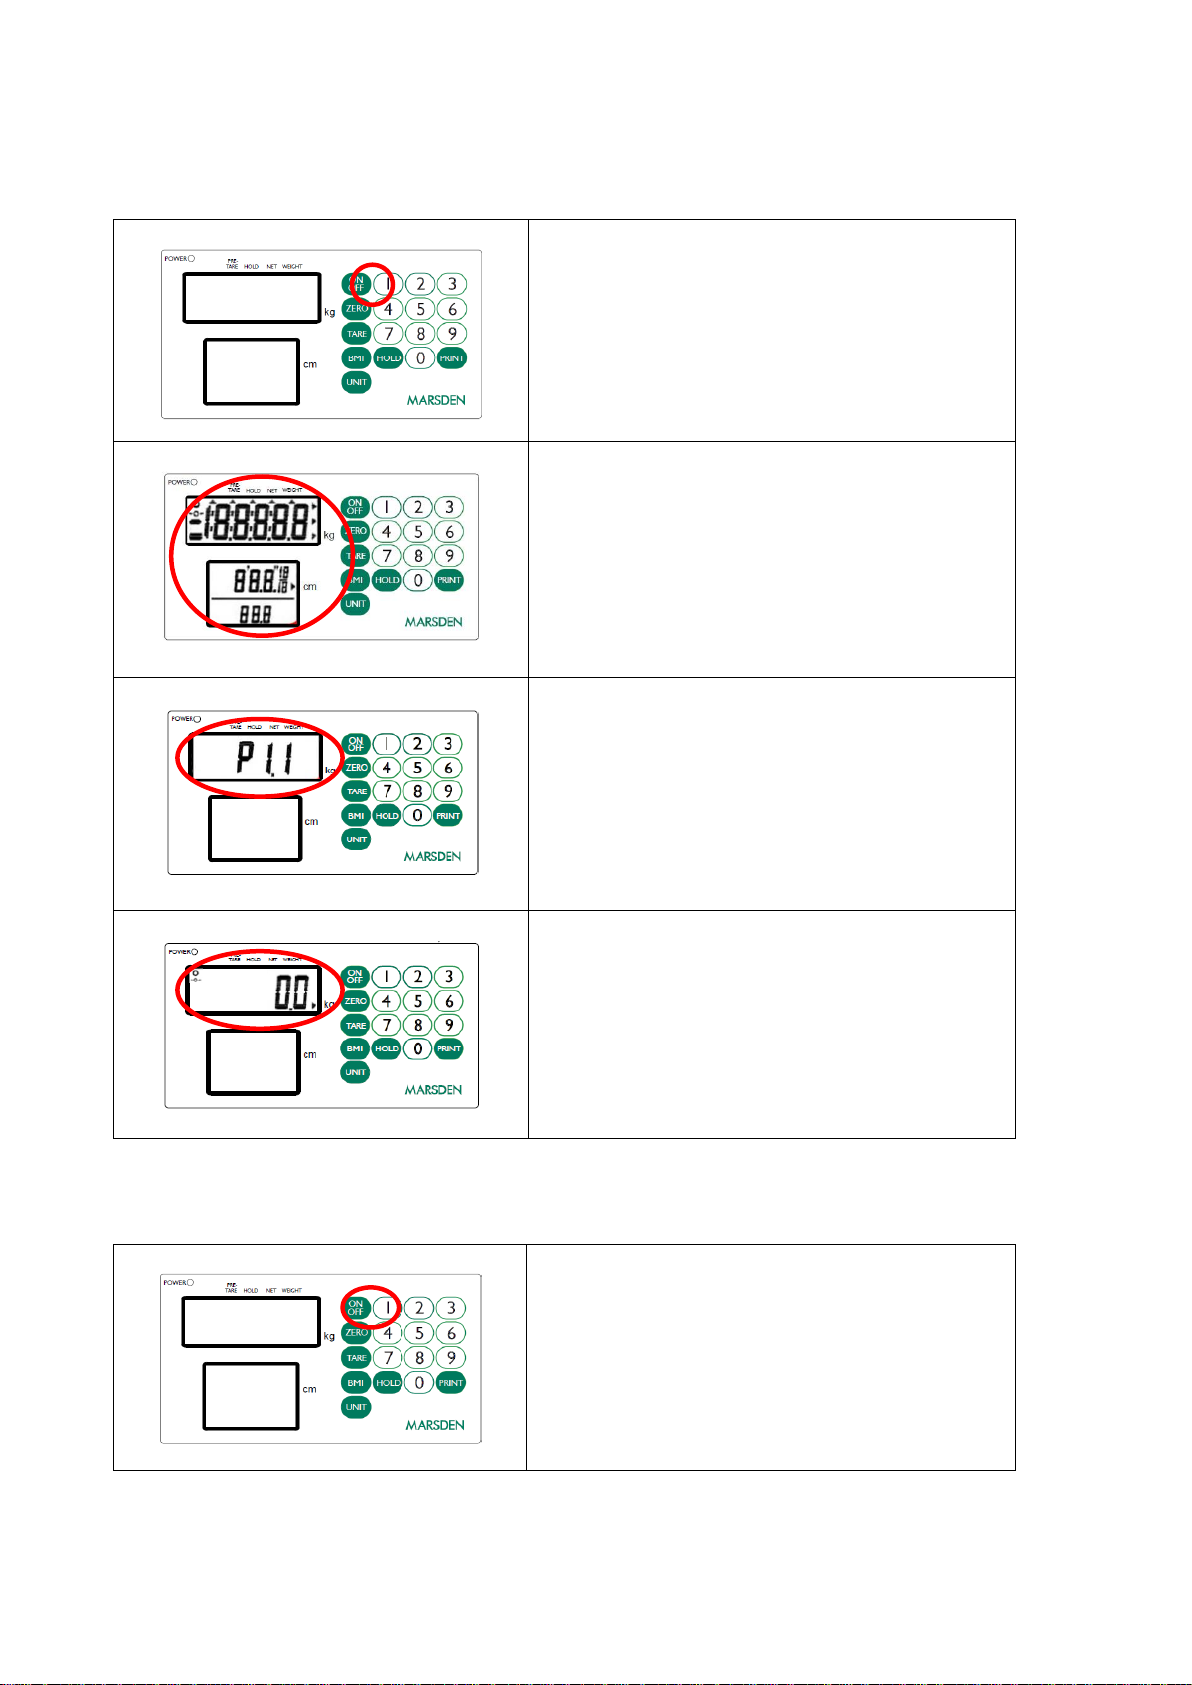
Switching on the Scale
Press the ON/OFF button firmly.
The scale will first test all of the display segments.
The scale will now show its current software version number.
The scale will now go into weighing mode and should show 0.0kg
on the display.
Switching off the Scale
Press the ON/OFF button when the scale is turned on. The scale
will now power down.
Page 7 of 20
Setting the Scale to Zero
If for any reason the scale shows a reading other than 0.0kg it can be
reset to zero.
Press the ZERO key once.
The scale will return to 0.0kg.
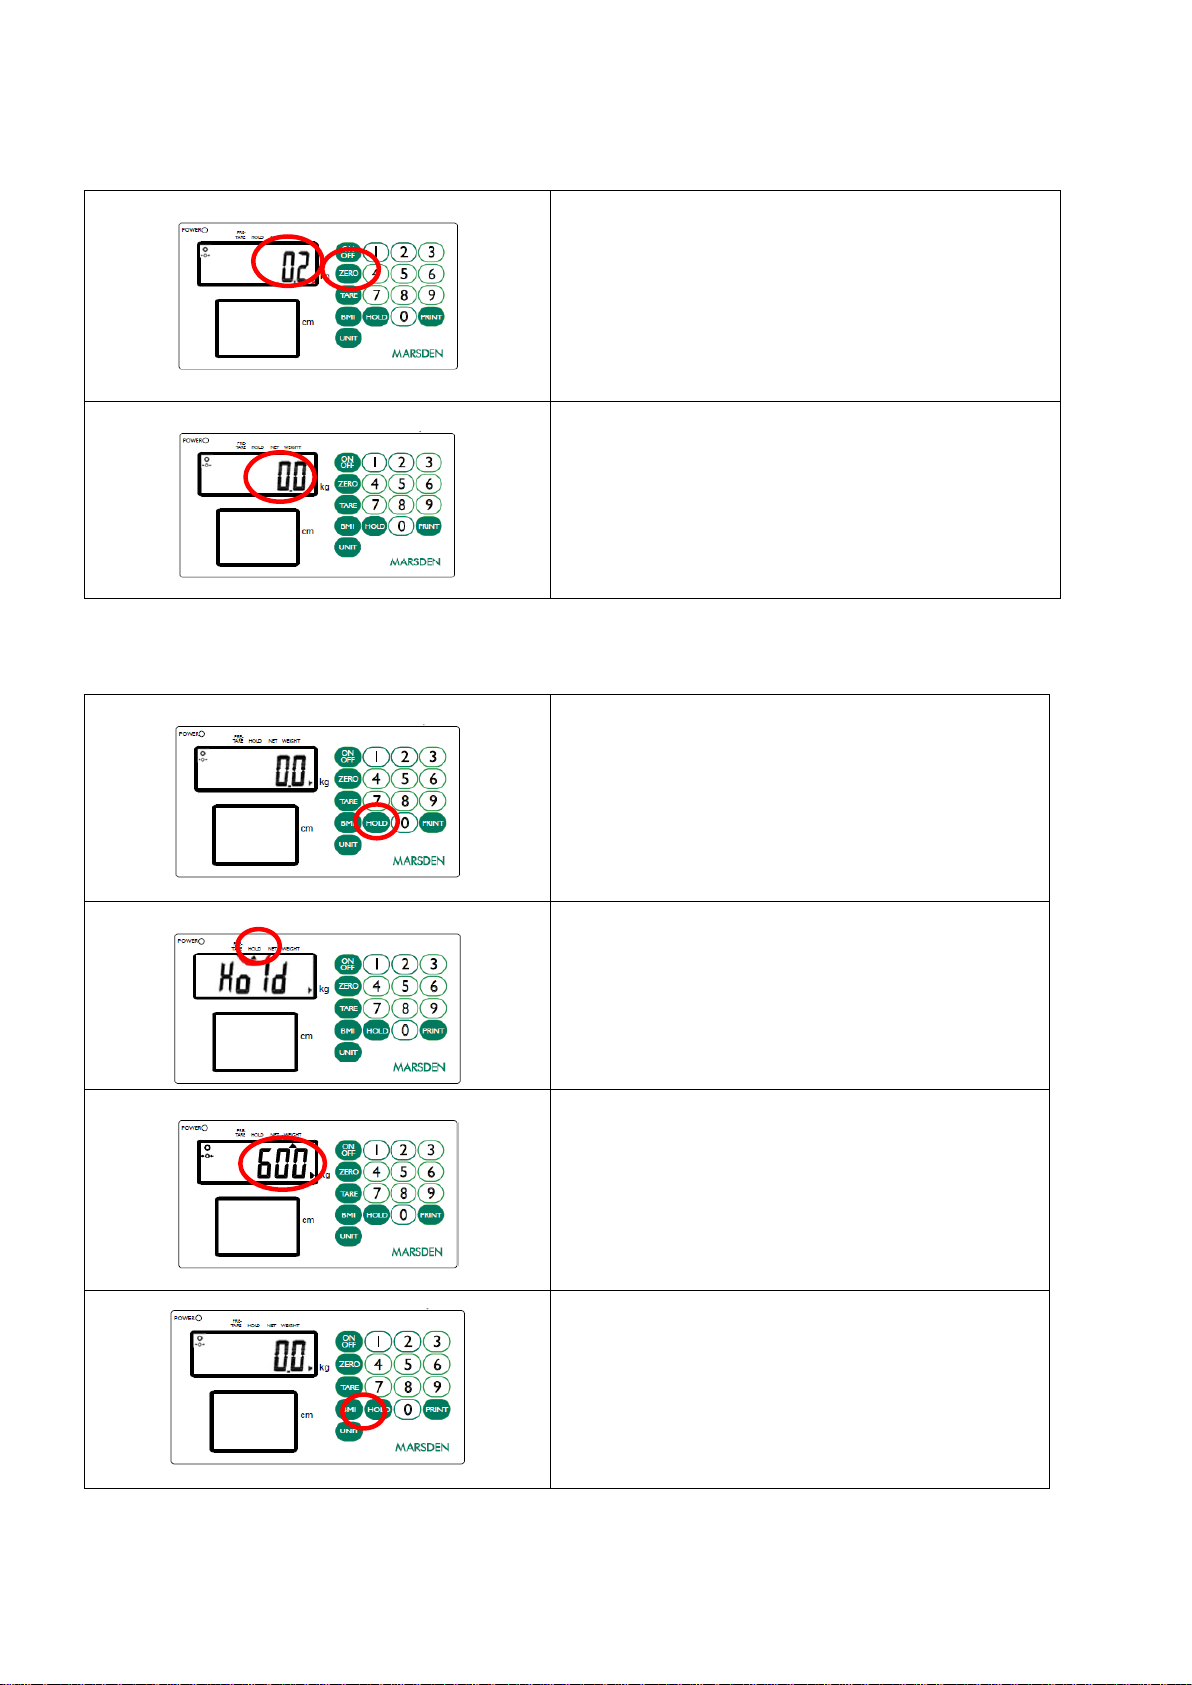
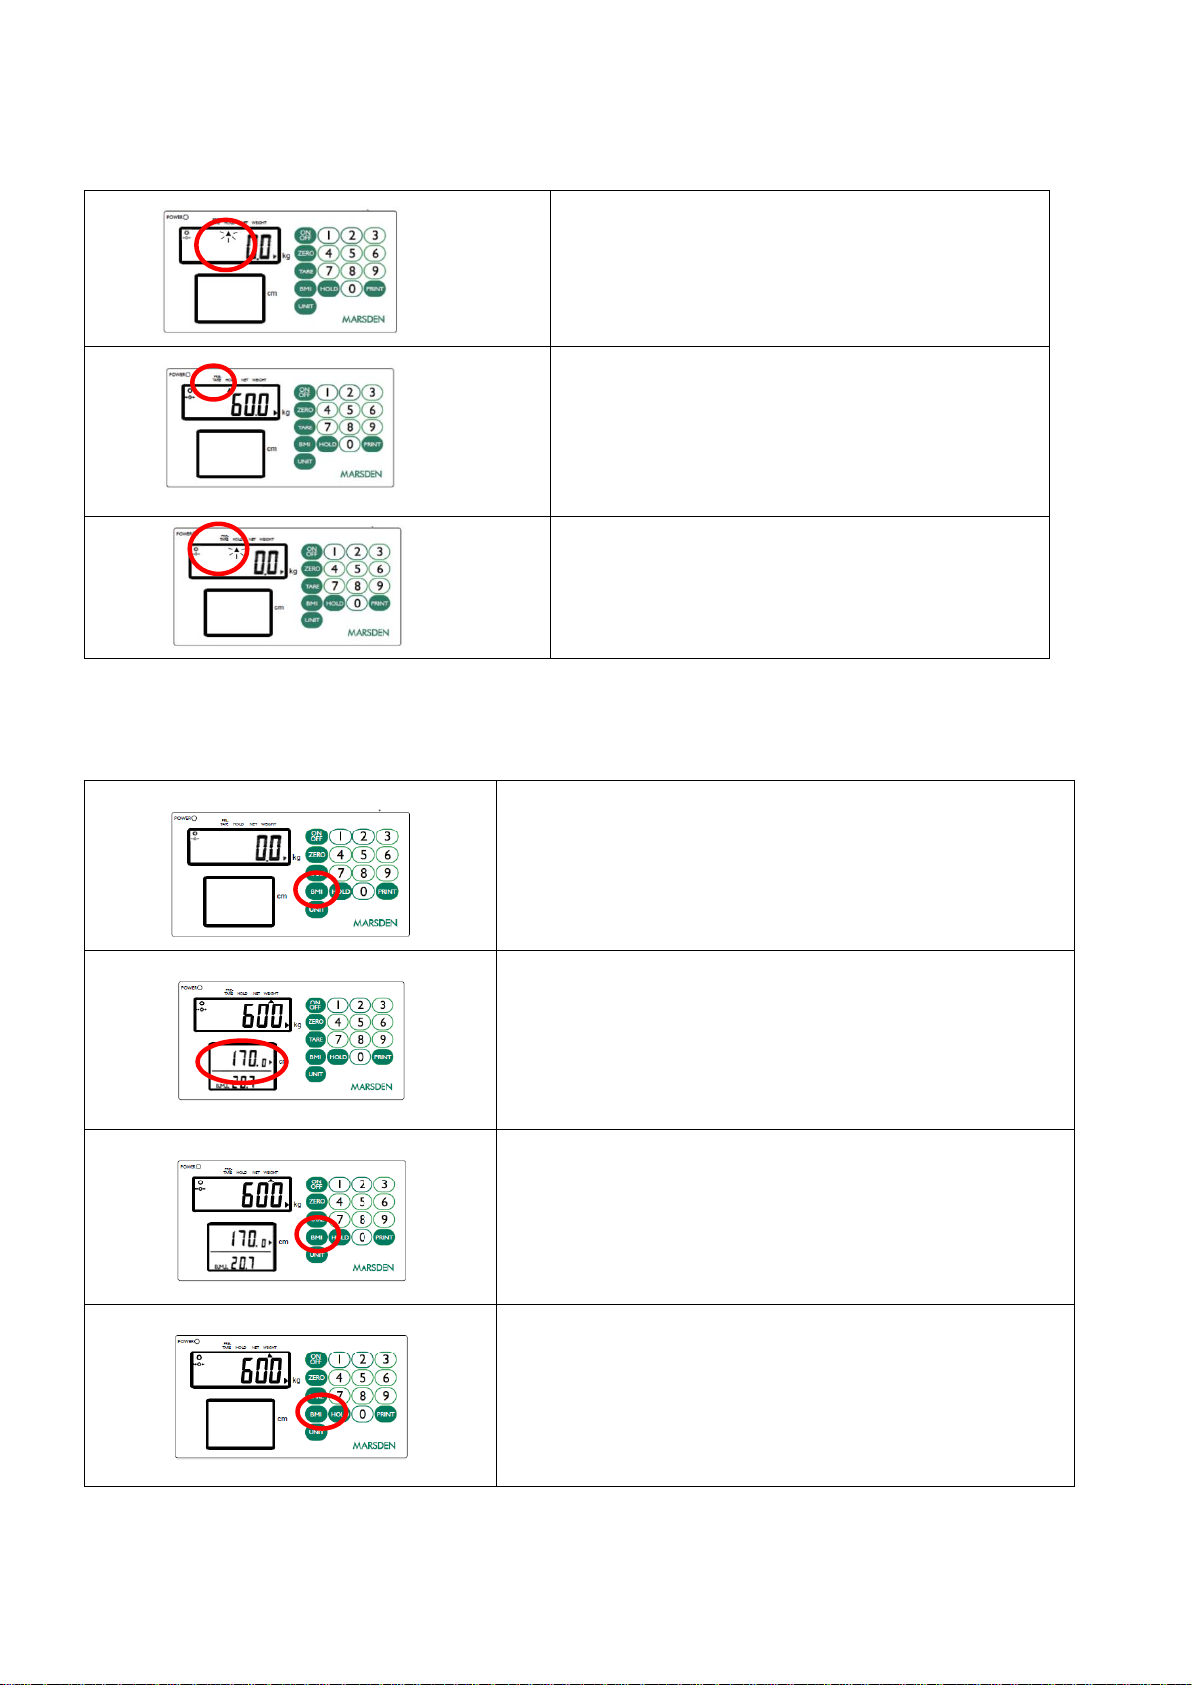
Hold Function
Press the HOLD button once.
Allow the patient to be wheeled onto the scale.
After a few seconds the scale will lock on the person’s
weight. When the patient leaves the scale, the weight
will remain on the display.
Press HOLD again to disable the Hold function and
return the scale to 0.0kg.
Page 8 of 20
Setting Auto Hold Function (Optional)
The display will have a flashing triangle mark under the HOLD
button once the scale is turned on.
Allow the patient to be wheeled onto the scale. The scale will
automatically lock on the patient’s weight to complete the hold
function. The triangle mark remains on the display during this
period.
When the patient leaves the scale and the scale returns to 0.0kg.,
the triangle mark will begin to flash again.
Body Mass Index (BMI) Function
In normal mode, press the BMI key to enter into BMI mode.
The display will show the last height entered and the extreme left digit will
flash. Enter the height by using the numeric keys. Press the ZERO key to
confirm the height. (NB: There will always be an active flashing digit in the
height display, unless HOLD is pressed).
Weigh the patient as normal. The display will show the weight, height and BMI
value. At this time, the weight and height can be freely changed, and the BMI
value will be automatically calculated according to the changed weight and
height.
Press the BMI key to return to normal weighing mode.
Page 9 of 20
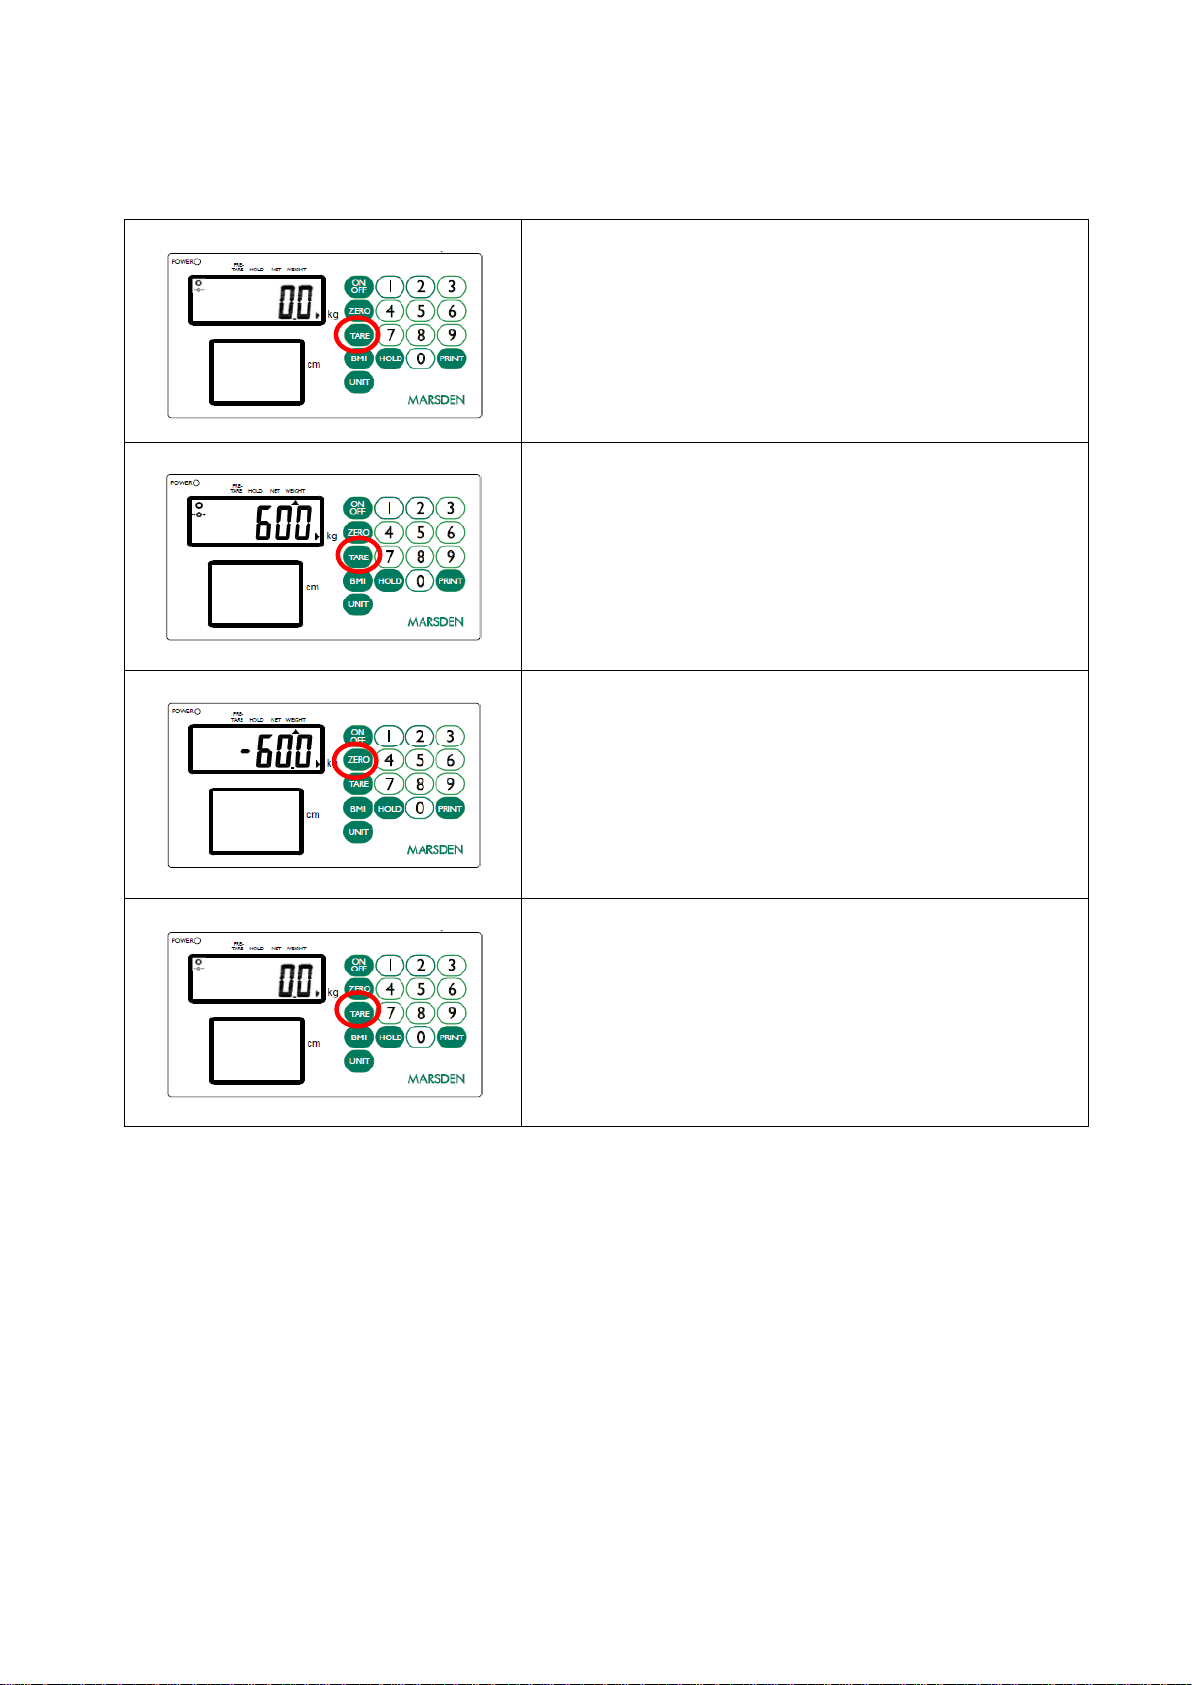
Tare and Pre-Set Tare Functions
Press the TARE key for three seconds to enter Preset Tare setting mode.
The display will show the last preset tare entered and the extreme left digit will
flash.
Enter the preset tare value by using the numeric keys, then press the TARE
key again to confirm the value.
Press the ZERO key to return to normal weighing mode.
To use the Tare function, add the item you wish to tare off to the scale, and
press the TARE key. The display will show zero, and then a minus number
when the item is removed from the scale.
Page 10 of 20
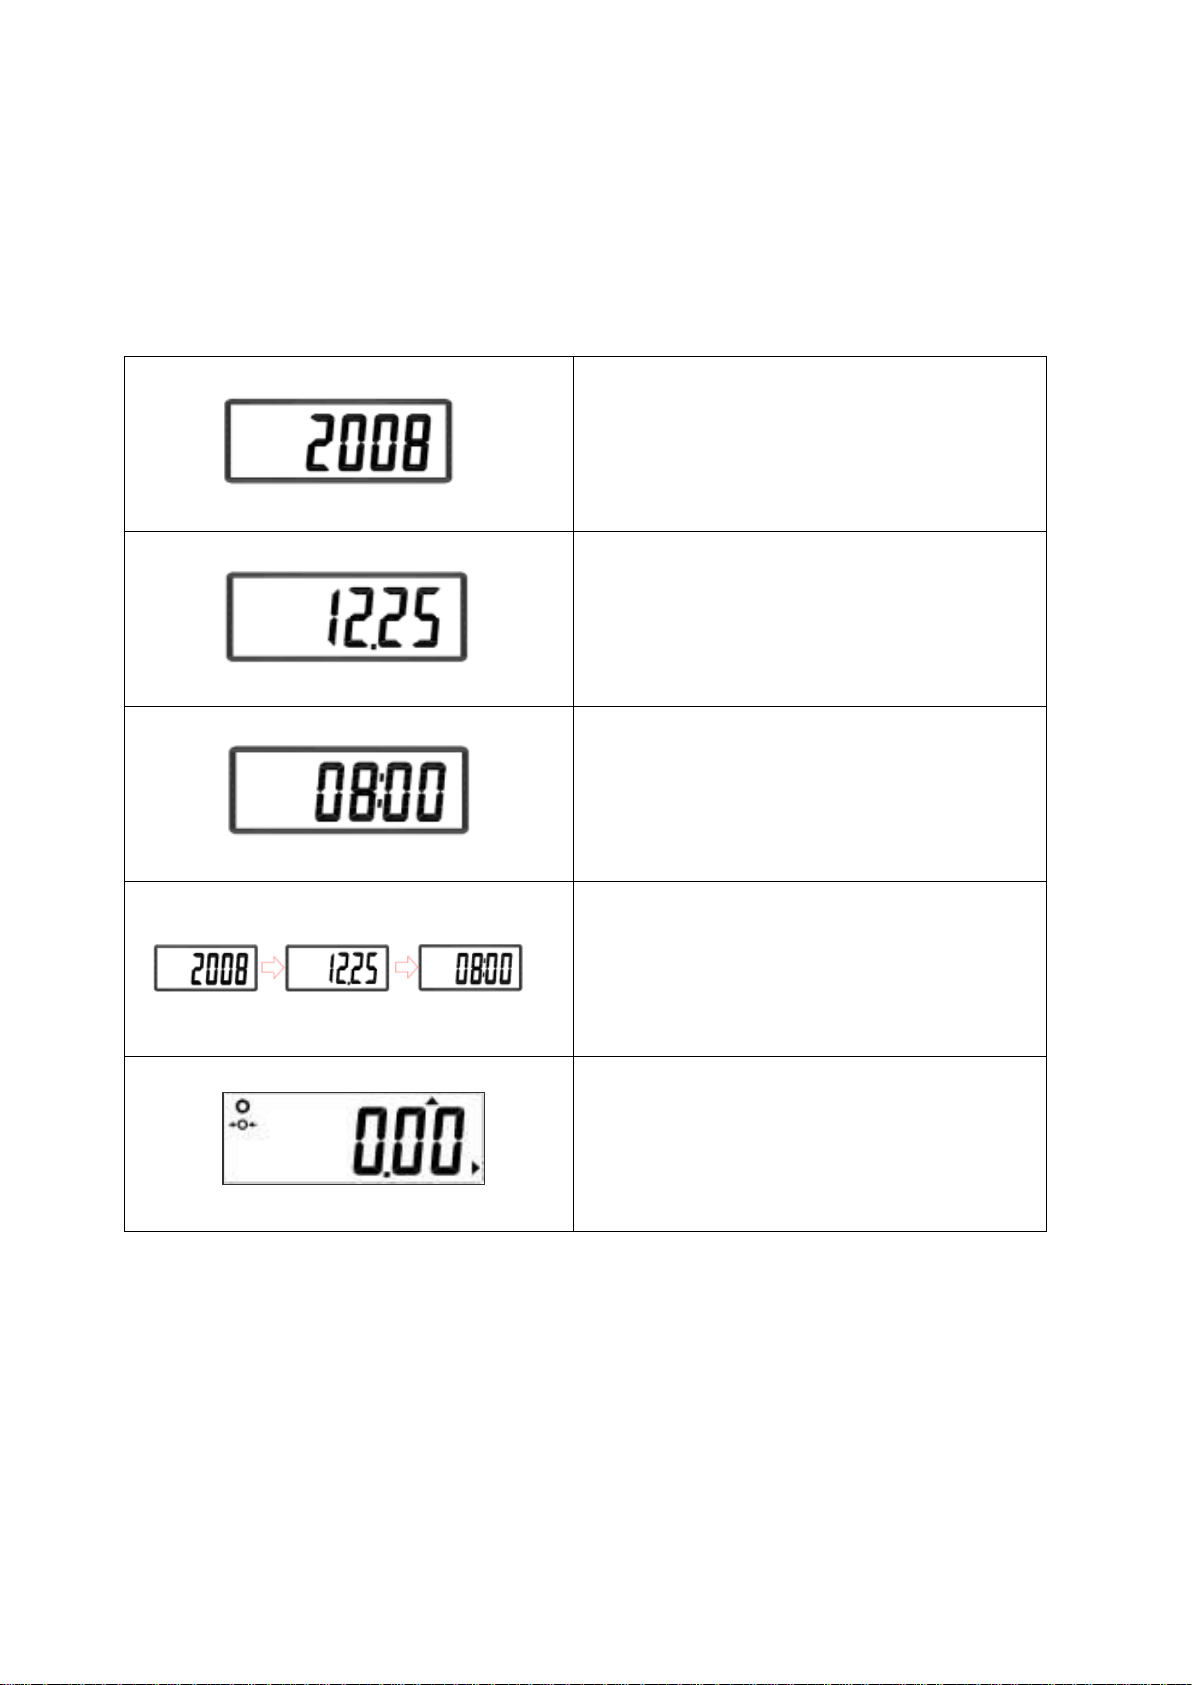
Setting the Date
Press HOLD for three seconds to access the time setting mode. The time period digit that is flashing can be changed by using the
numeric keys. The time period to be edited is selected by pressing HOLD.
E.g., To input 25 December 2008, 8:00 a.m.:
Enter the year. Press HOLD to confirm and access the date
editing field.
Enter the date. E.g. “12.25” for December 25th. Press HOLD to
confirm and access the time clock editing field.
Enter the time (24 hour clock only).
Press HOLD and the display shows: YYYY→MM.DD→HH:SS
Press HOLD to return to normal weighing mode.
Page 11 of 20
Using the Scale with a Printer
An optional Marsden external printer (model TP-2100)is available for all models. With theprinterfitted, the patient’s weight, height, and BMI
result can be printed.
Once the person has been weighed and their BMI calculated, simply press PRINT to produce the following ticket:
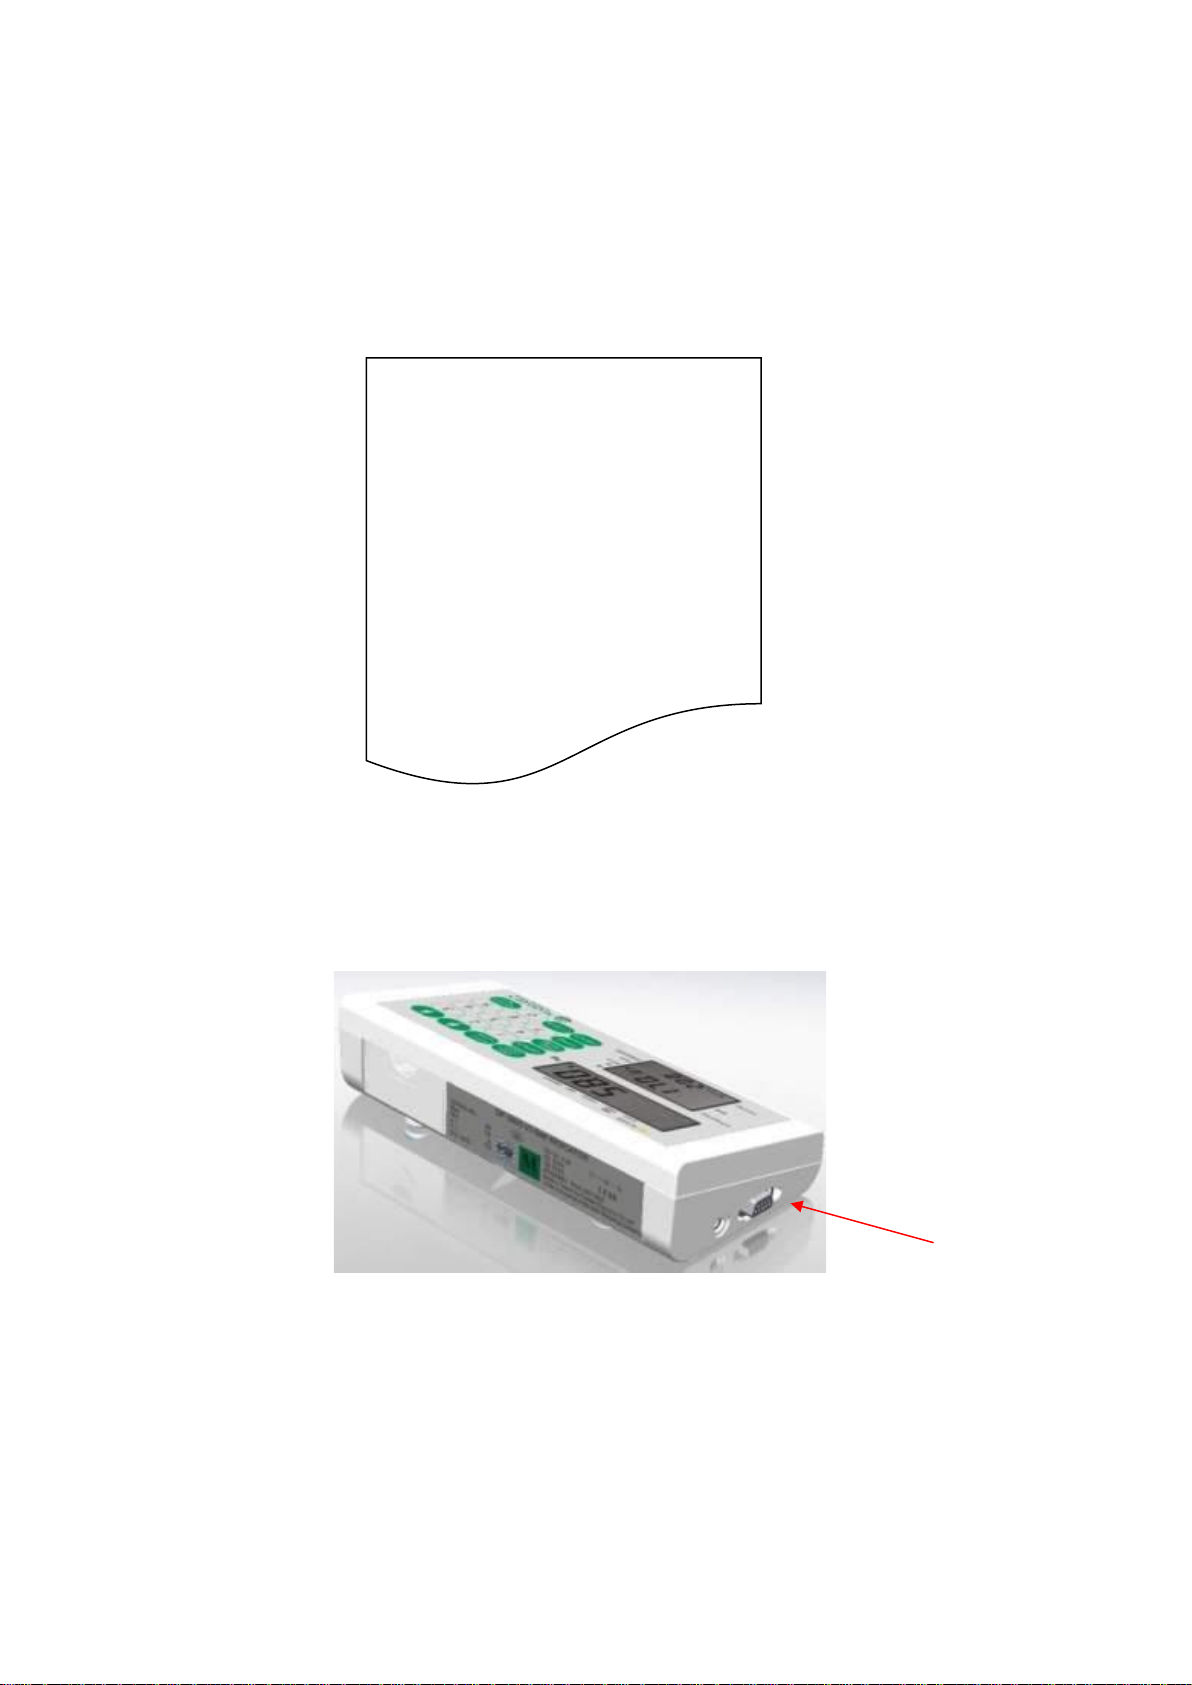
Connecting the TP-2100 Thermal Printer
Plug the cable to the printer, and then connect its 9D connector to the indicator.
GROSS WEIGHT 60.00kg
TARE WEIGHT 30.00kg
NET WEIGHT 30.00kg
PATIENT HEIGHT 100.0cm
PATIENT B.M.I 37. 5
29/12/2008 17:00
Page 12 of 20
Using the Scale with Wi-Fi/Bluetooth
If your scale has device connectivity, the universal wireless symbol will be on the main indicator display. If your scale does have Wi-
Fi or Bluetooth connectivity, we do not supply the software to capture the data from the weighing scale. We do however provide the
protocols for you to implement the devices into your own software.
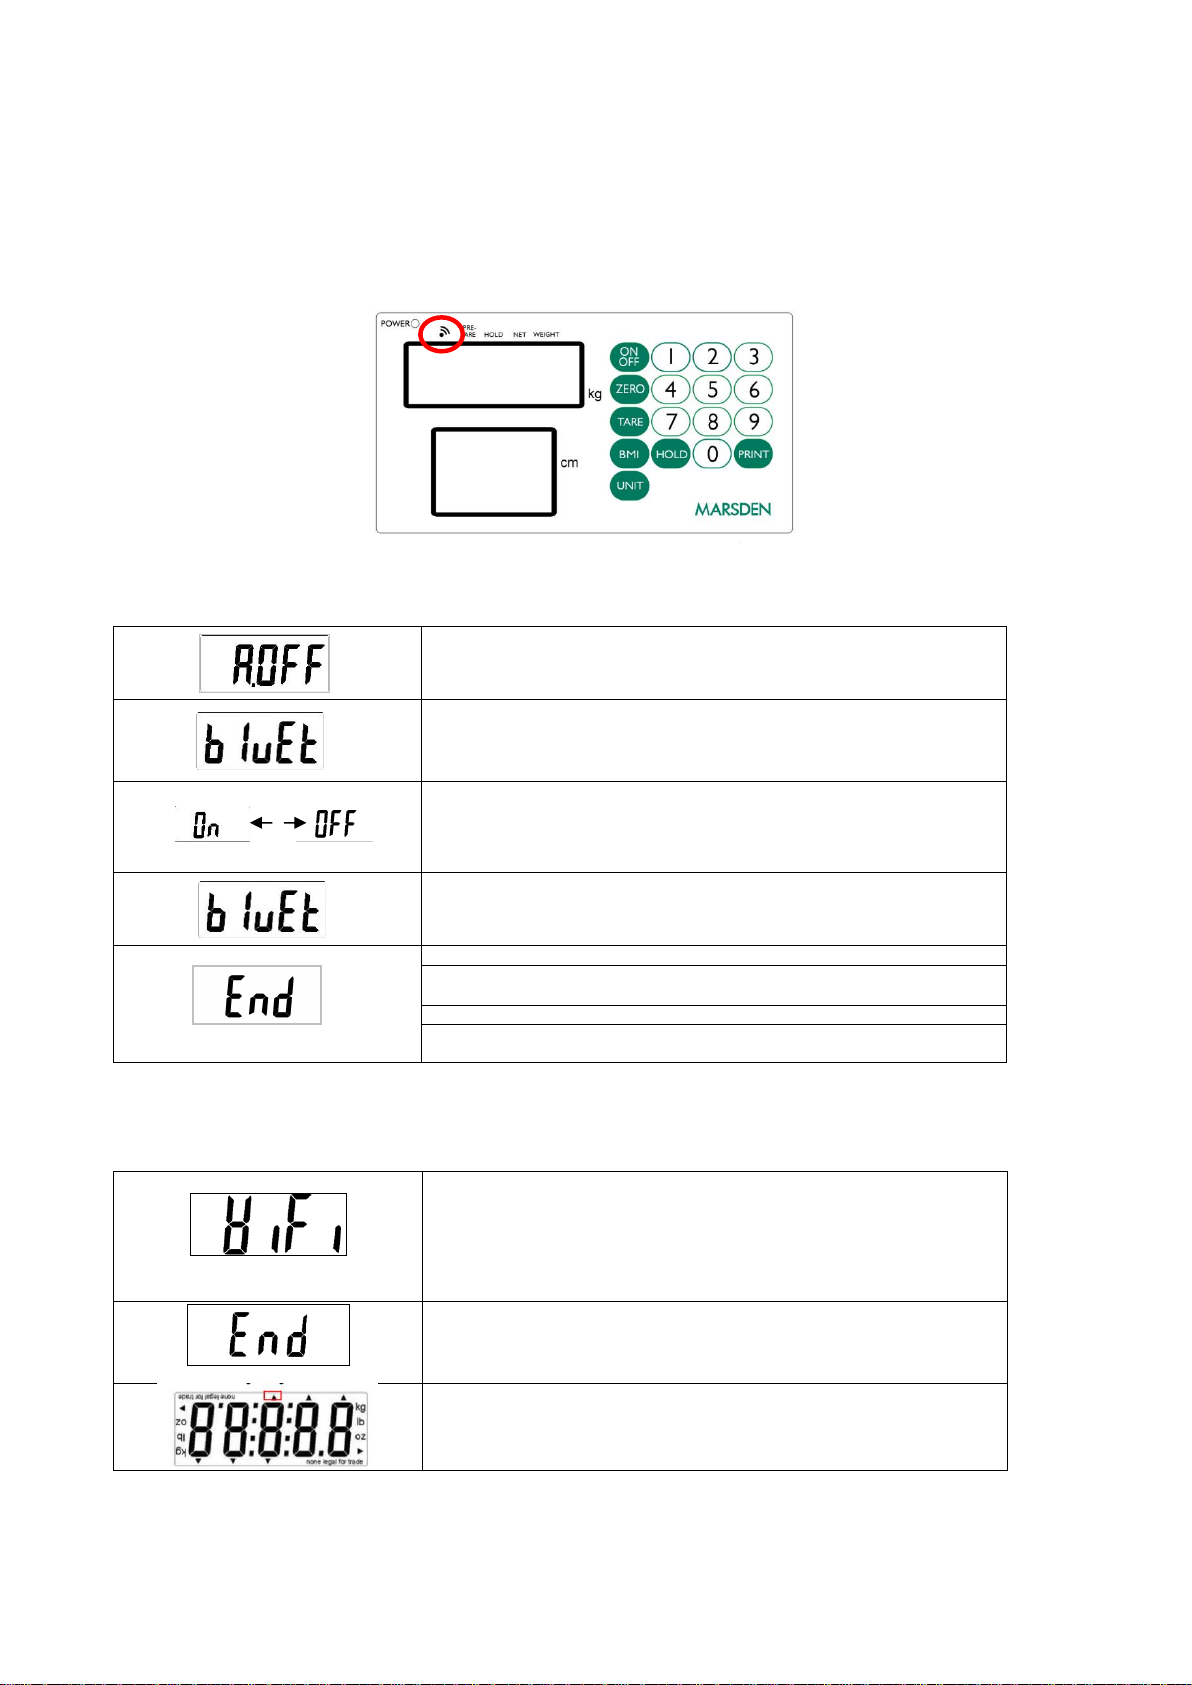
Bluetooth Connection
Long press ZERO for three seconds to enter the Setting mode and then display
the A-OFF menu.
Press TARE twice, and then press HOLD once to enter the Bluetooth setting
mode.
Using the HOLD button, select “ON” (enable) or “OFF” (disable).
Press TARE to confirm the setting.
Note: Disabling the Bluetooth function when not in use will reduce battery
power consumption.
Display the “bluEt” menu. Press TARE once.
Press HOLD to return to normal mode.
Search for the scale in your computer or device’s Bluetooth settings (procedure
may vary depending on device or system)
The scale will appear on the Bluetooth device list as “MARSDEN BT”.
Connect your device to “MARSDEN BT”, and the scale is ready to transmit data
wirelessly via Bluetooth.
Wi-Fi Connection
Turn the scale on and press the TARE key for 3 seconds to enter into settings.
Press the HOLD key several times until the display shows the information on
the left.
When the display shows the symbols shown on the left, press the TARE key to
see the status (ON/OFF).
If the display shows OFF, press the HOLD key once and it will change to ON.
Then press the TARE key to confirm the setting.
Press the HOLD key several times until END shows on the display.
When END is on the display, press the TARE keypad to enter normal weighing
mode.
If the highlighted triangular sign is not visible, Wi-Fi is turned off.
If the triangle is solid, the device is connecting.
When the triangle is blinking, the device is successfully connected.
Page 13 of 20
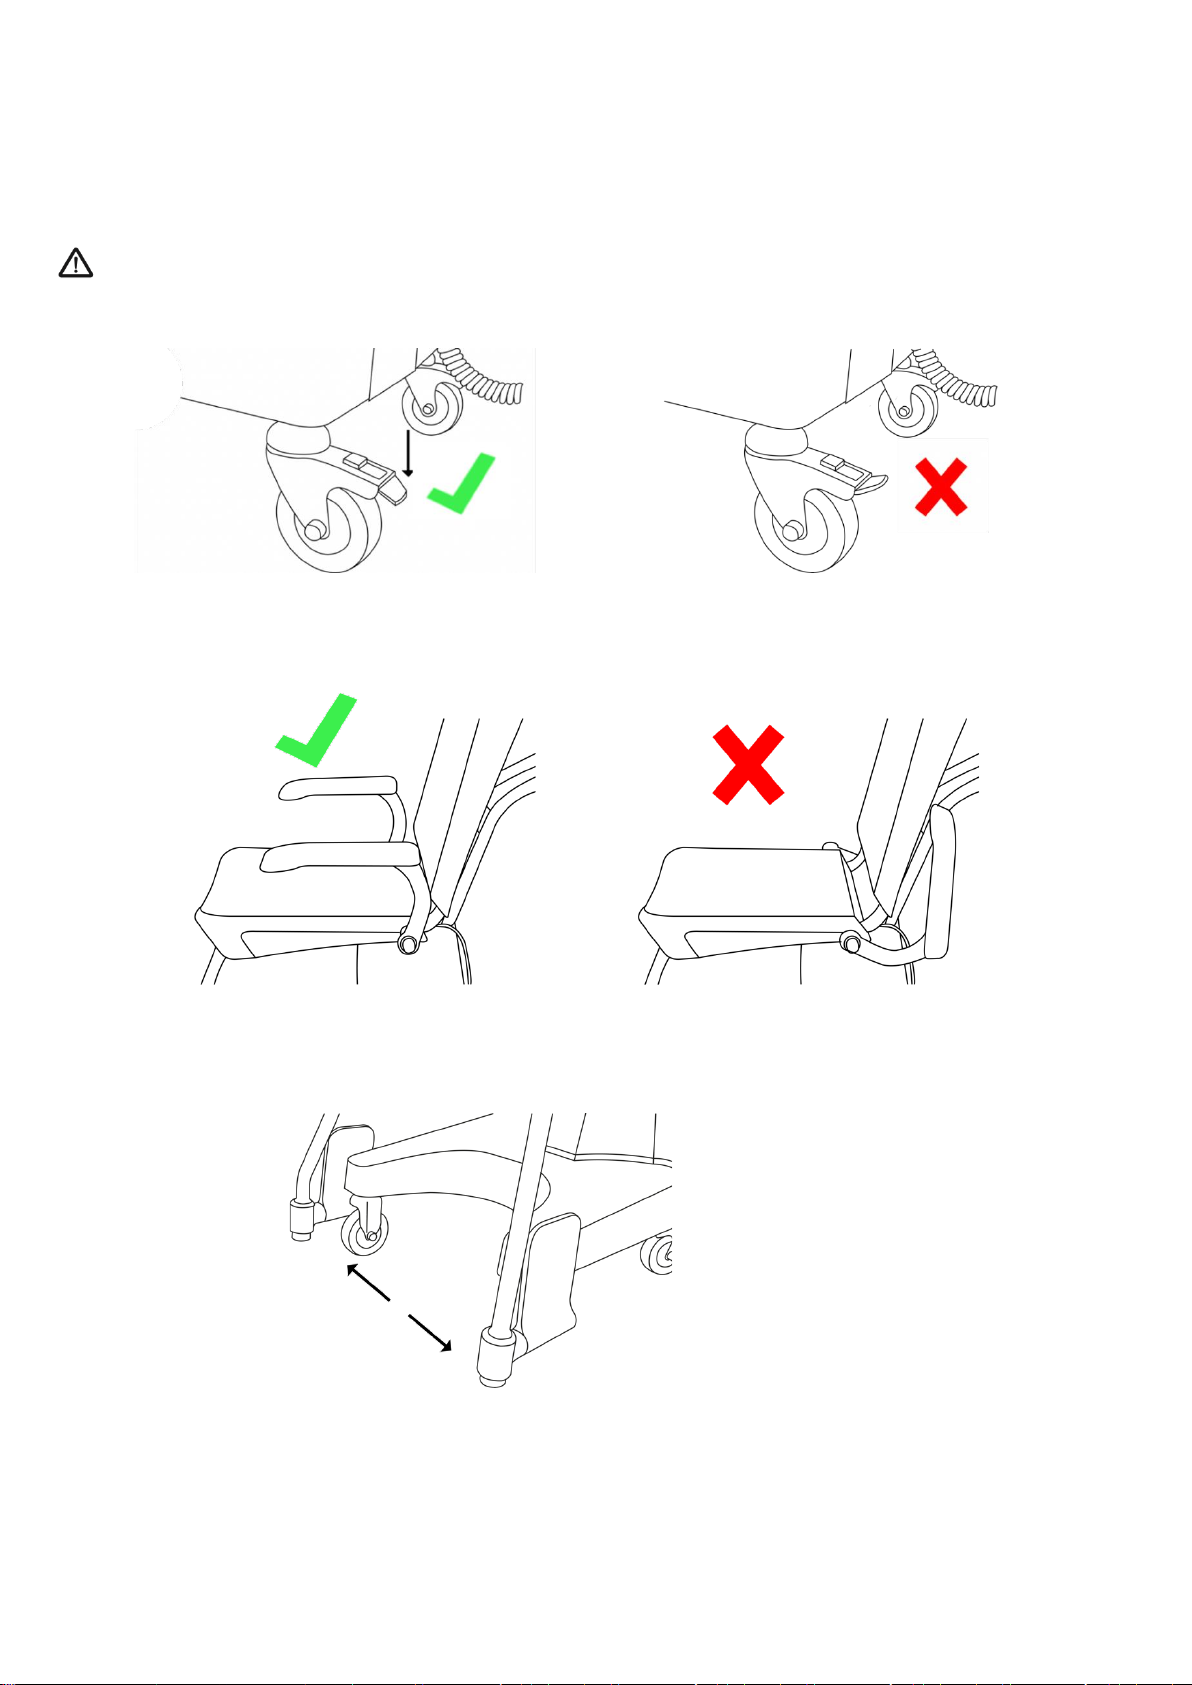
Stand Assist Mechanism & Weighing
The M-250’s seat base raises and lowers to assist with guiding an individual out of (and into) the seat.
Follow these guidelines for use, but always ensure you follow your local manual handling guidelines when assisting an individual into
or out of the M-250’s seat.
Before operation, ensure brakes on both rear wheels are applied.
Armrests must be in the lowered position before weighing.
Ensure footrests are rotated to the side.
Page 14 of 20
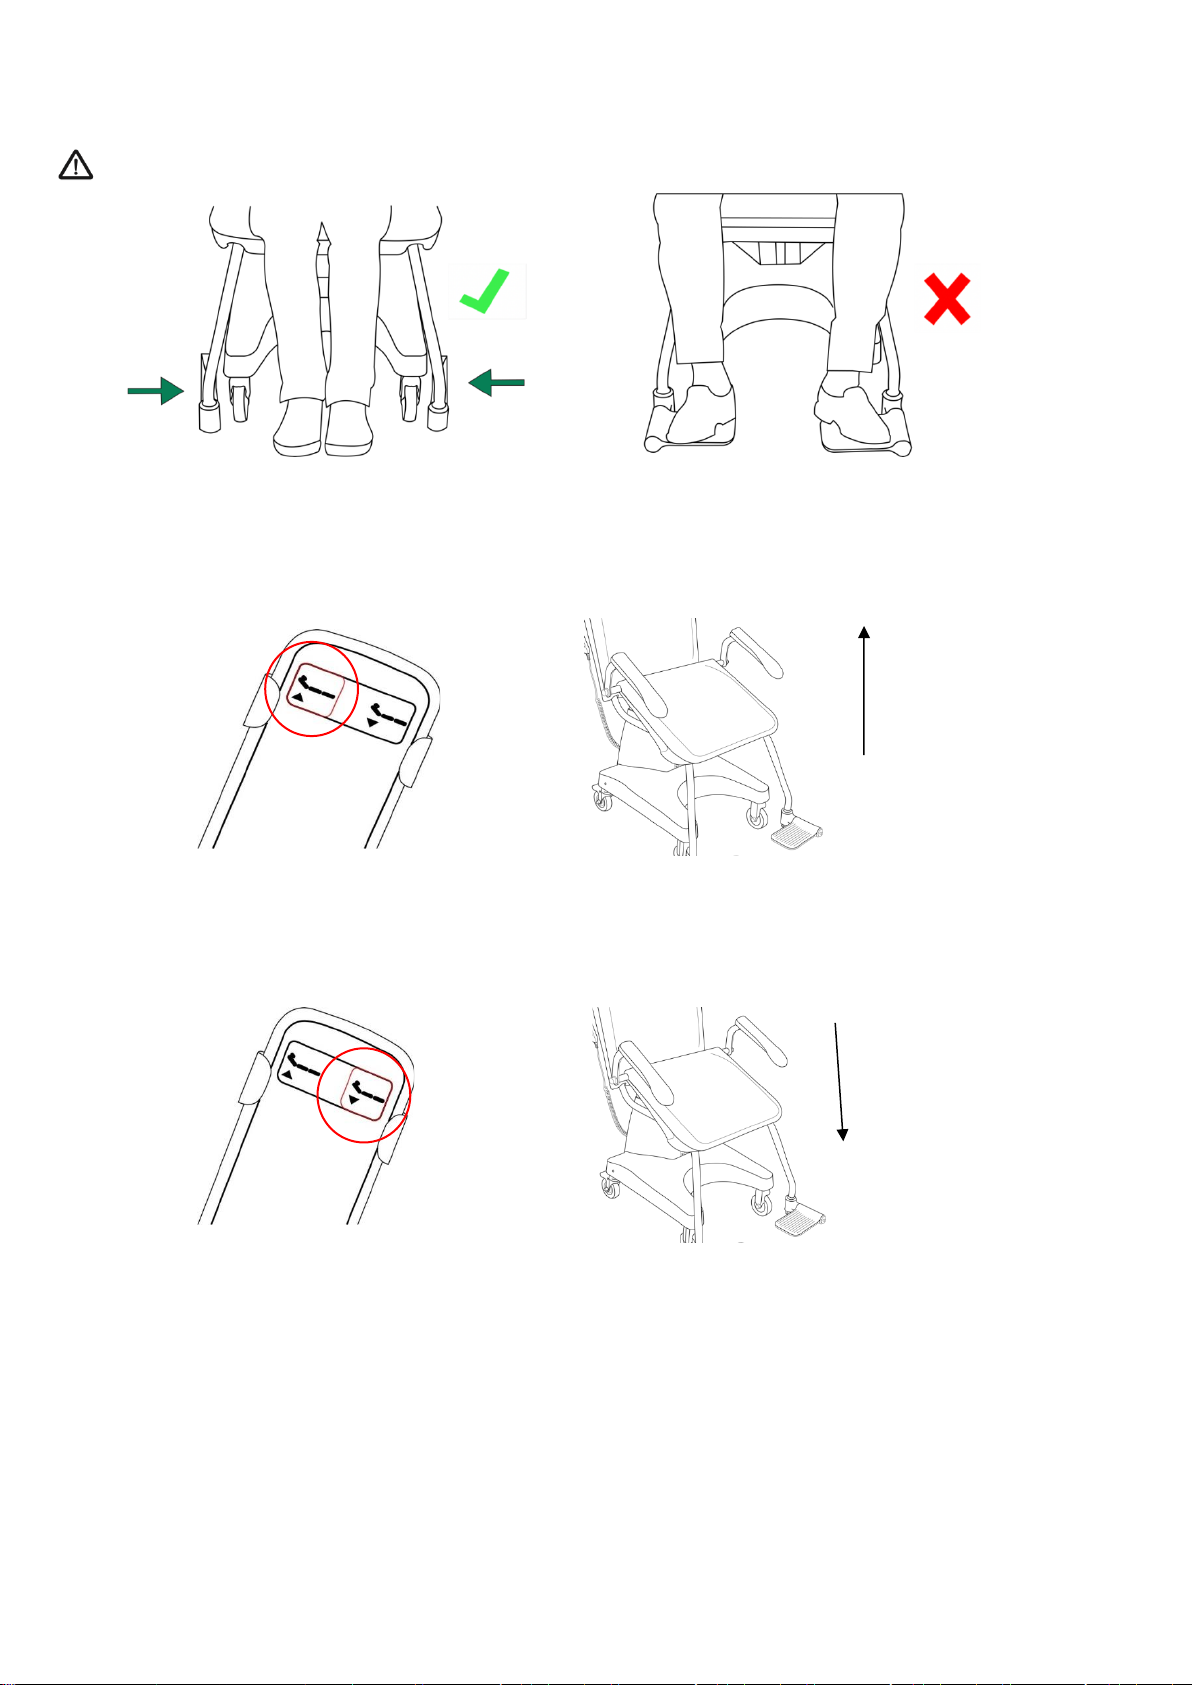
Prior to a patient or resident being seated, the patient’s feet must be firmly on the floor. Footrests must not be used to stand on.
They are for weighing purposes only.
To raise the seat base, press the UP button on the handheld remote.
To lower the seat, press the DOWN button on the handheld remote.
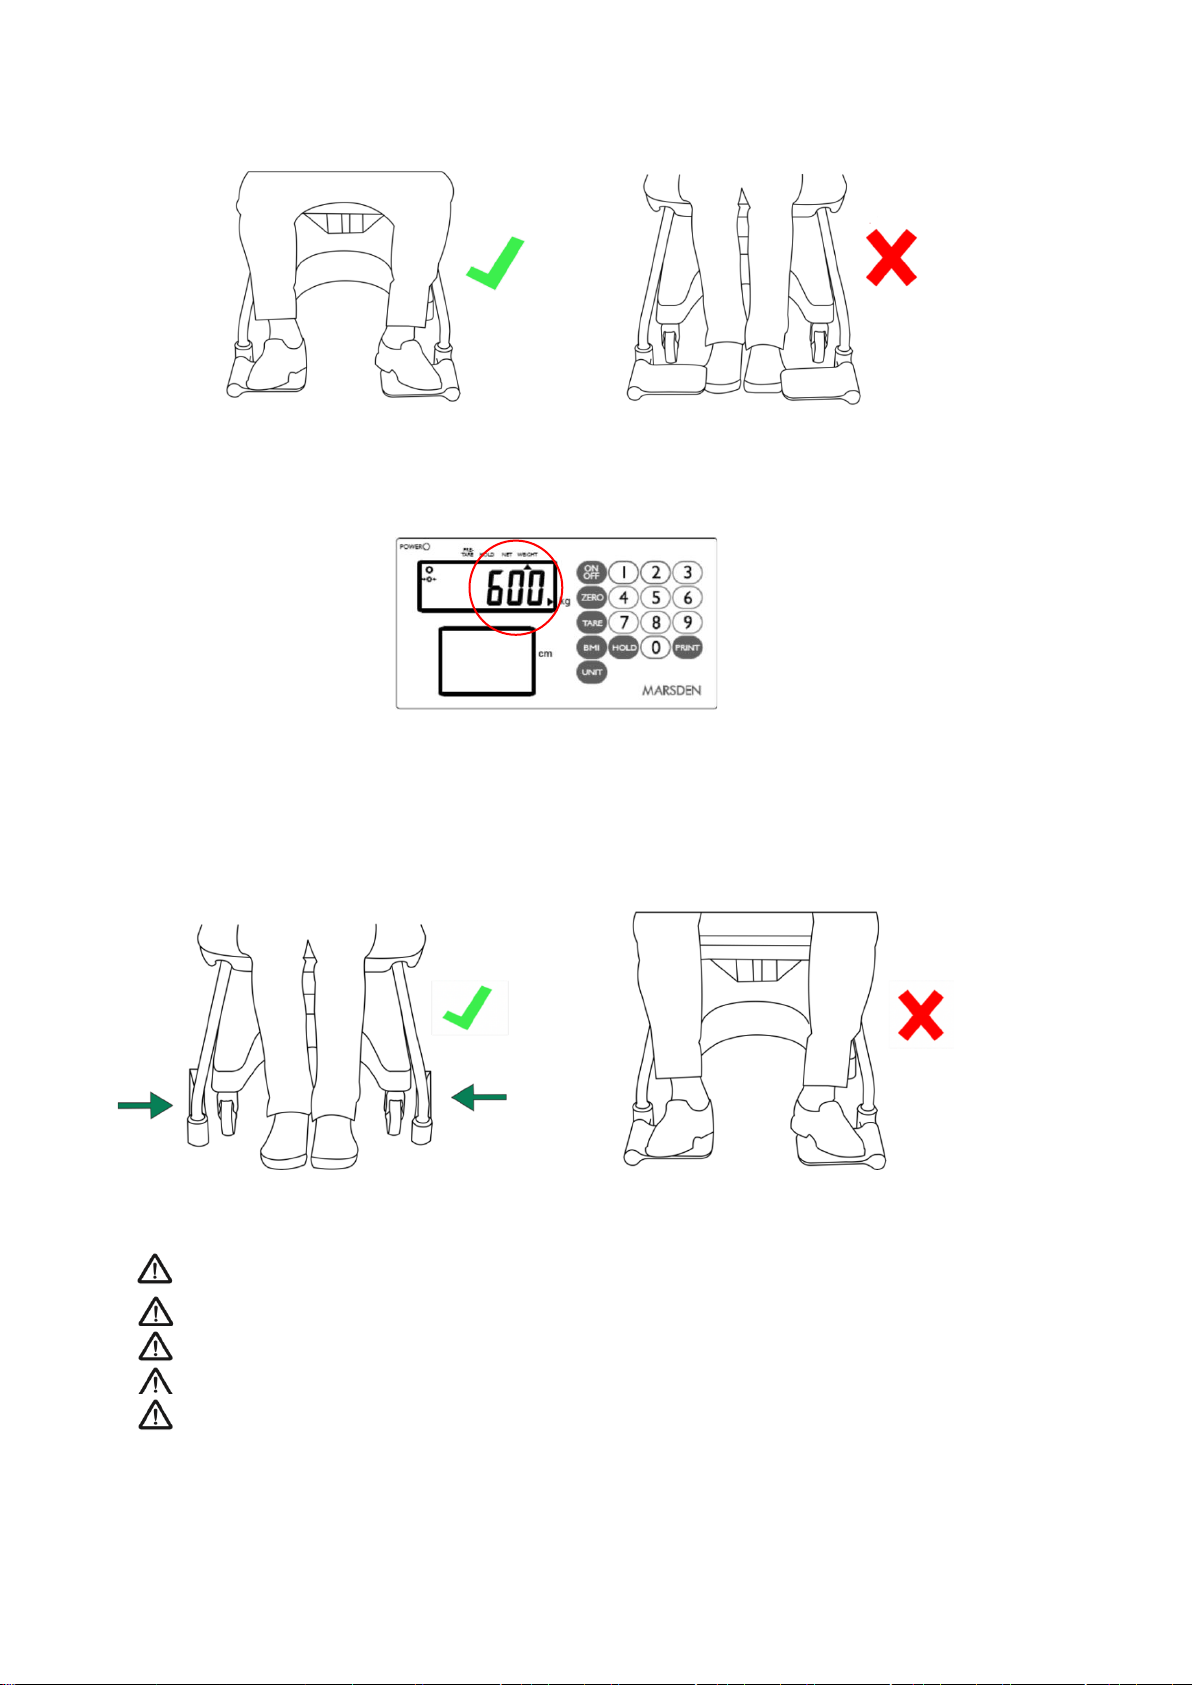
Once the patient or resident is seated, before observing the weight reading, ensure both feet are placed on the footrests.
Page 15 of 20
With seat base fully lowered, the patient in the seat and feet are on footrests, the weight reading can be observed.
Once the weight reading has been taken, and whilst the patient is being guided out of the seat, feet must be taken off the
footrests, footrests rotated out of the way and feet placed firmly on the ground.
Risk assessments must be carried out before using the scale.
Brakes must be applied on wheels before using the scale.
The seat must be fully lowered for a weight reading to be taken.
Please ensure that use of the M-250 meets your moving and handling/patient safety guidelines.
The M-250’s actuator (lifting/lowering mechanism) has a duty cycle. This means that the lifting/lowering mechanism can
be used continuously for two minutes followed by 18 minutes of inactivity.
Page 16 of 20
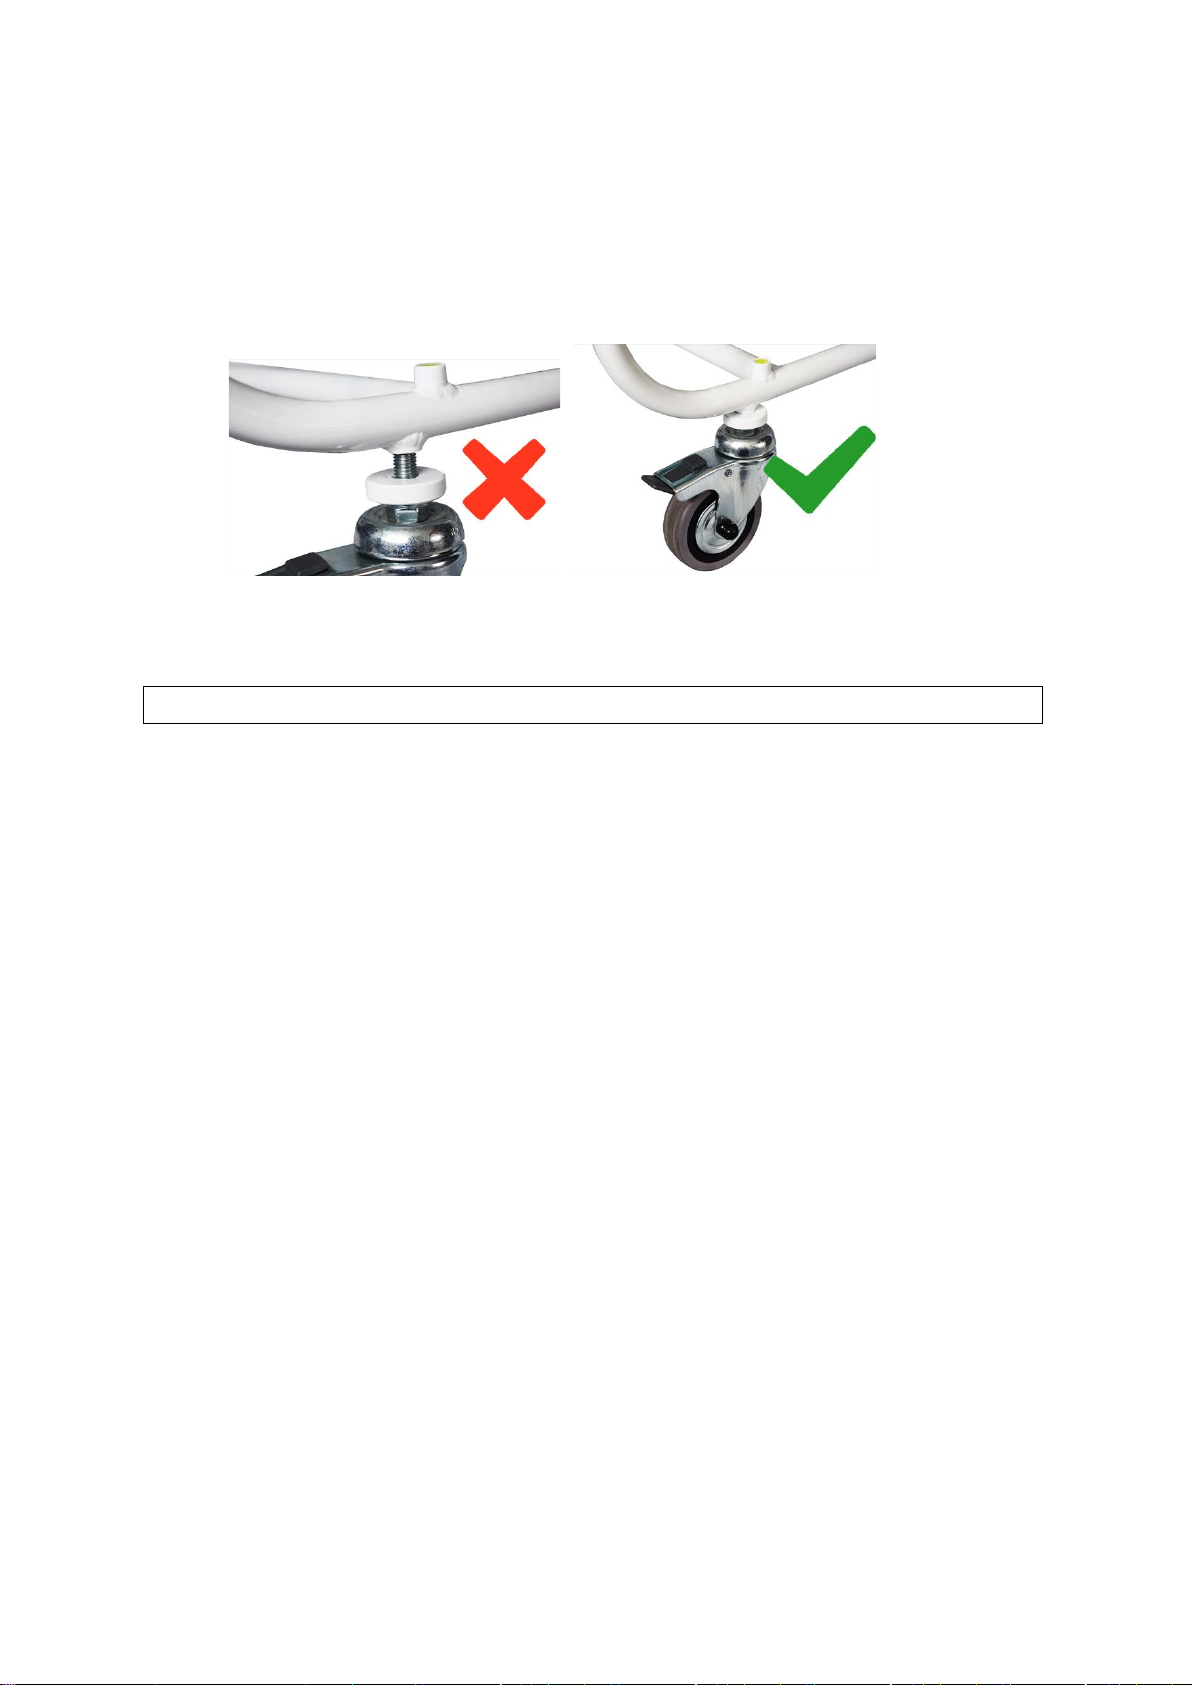
Levelling the scale
You can adjust the height of the chair scale by rotating the rear braked wheels. Please ensure there is always 15mm of thread inside
the frame, otherwise there is a risk the rear braked wheels will fall off.
For safety, at least 15mm of thread should always be inside the frame of the scale

Page 17 of 20
EMC Guidance and Manufacturer’s Declaration
Guidance and manufacturer’s declaration – electromagnet emissions.
The M-250 is intended for use in the electromagnetic environment specified below. The customer or user of this scale should ensure
that it is used in such environment.
Emission Test
Compliance
Electromagnetic environment-
guidance
RF emissions
CISPR 11
Group 1
This scale uses RF energy only for its
internal function. Therefore, its RF
emissions are very low and not likely to
cause any interference in nearby
electronic equipment.
RF emissions
CISPR 11
Class B
This scale is suitable for use in all
establishments, including domestic
establishments and those directly
connected to the public low-voltage
power supply network that supplies
buildings used for domestic purposes.
Harmonic emissions
IEC 61000-3-2
Class A
Voltage fluctuations/flicker emissions
IEC 61000-3-3
Compliance
Guidance and manufacturer’s declaration – electromagnetic immunity.
The M-250 is intended for use in the electromagnetic environment specified below. The customer or the user of this scale should
ensure that it is used in such an environment.
Immunity Test
IEC 60601 Test Level
Compliance Level
Electromagnetic Environment
Guidance
Electrostatic discharge
(ESD)
IEC 61000-4-2
6 kV contact
8 kV air
6 kV contact
8 kV air
Floors should be wood, cement or
ceramic tile. If floors are covered with
synthetic material, the relative humidity
should be at least 30%.
Electrical fast
transient/burst
IEC 61000-4-4
2 kV for power supply lines
+1 kV for input/output lines
2 kV for power
supply lines not
applicable
Mains power quality should be that of a
typical commercial or hospital
environment.
Surge IEC 61000-4-5
1kV line(s) to line(s) 2
kV line(s) to earth
1 kV differential
mode not applicable
Mains power quality should be that of a
typical commercial or hospital
environment.
Voltage Dips, short
interruptions and
voltage variations on
power supply input
lines IEC 61000-4-11
<5% UT (>95% dip in UT) for
0.5 cycle 40% UT (60% dip in
UT) for 5 cycles 70% UT (30%
dip in UT) for 25 cycles <5%
UT (>95% dip in UT) for 5s
<5% UT (95% dip in UT)
for 0.5 cycle 40% UT
(60% dip in UT) for 5
cycles 70% UT (30% dip
in UT) for 25 cycles <5%
UT (>95% dip in UT) for
5s
Mains power quality should be that of a
typical commercial or hospital
environment. If the user of this scale
requires continued operation during
power mains interruptions, it is
recommended that this scale is powered
from an uninterruptable power supply or
a battery.
Power frequency
(50/60 Hz) magnetic
field IEC 61000-4-8
3 A/m
3 A/m
The scale’s power frequency magnetic
fields should be at levels characteristic of
a typical location in a typical commercial
or hospital environment.
Note UT is the A.C mains voltage prior to application of the test level.
Guidance and manufacturer’s declaration – electromagnetic immunity.
This scale is intended for use in the electromagnetic environment specified below. The customer or the user of the scale should
ensure that it is used in such an environment.
Immunity Test
IEC 60601 test level
Compliance level
Electromagnetic environment-guidance
Conducted RF
IEC 61000-4-6
3 Vrms
150 KHx to 80 MHz
3 Vrms
Portable and mobile RF communications
equipment should be used no closer to any
part of the scale including cables, than the
recommended separation distance calculated
from the equation applicable to the frequency
of the transmitter.
Recommended separation distance:
d = 1,2 √P
Page 18 of 20
Radiated RF
IEC 61000-4-3
3 V/m 80 MHz to 2,5 GHz
3 V/m
d = 1,2 √P80MHz to 800 MHz
d = 2,3 √P800MHz to 2,5 GHz
Where P is the maximum output power rating
of the transmitter in watts (w) according to the
transmitter manufacturer and dis the
recommended separation distance in meters
(m).
Field strengths from fixed RF transmitters, as
determined by an electromagnetic site survey,
should be less than the compliance level in
each frequency range.
Interference may occur in the vicinity of
equipment marked with the following symbol:
NOTE1 At 80 MHz and 800 MHz, the higher frequency range applies.
NOTE2 These guidelines may not apply in all situations. Electromagnetic propagation is affected by absorption and reflection
from structures, objects and people.
A) Field strengths from fixed transmitters, such as base stations for radio (cellular/cordless)
telephones and land mobile radios, amateur radio, AM and FM radio broadcast and TV broadcast
cannot be predicted theoretically with accuracy. To assess the electromagnetic environment due to
fixed RF transmitters, an electromagnetic site survey should be considered. If the measured field
strength in the location in which the scale is used exceeds the application RF compliance level
above, the scale should be observed to verify normal operation. If abnormal performance is
observed, additional measures may be necessary, such as re-orienting or relocating the scale.
B) Over the frequency range 150 kHz to 80 MHz, field strengths should be less than 3 V/m.
Recommended separation distance between portable and mobile RF communications equipment and the M-250.
This scale is intended for use in an electromagnetic environment in which radiated RF disturbances are controlled. The customer or
the user of the scale can help prevent electromagnetic interference by maintaining a minimum distance between portable and
mobile RF communications equipment (transmitters) and the scale as recommended below, according to the maximum output
power of the communications equipment.
Rated maximum output
power of transmitter
W
Separation distance according to frequency of transmitter m
150 kHz to 80 MHz
d = 1,2√P
80 MHz to 800 MHz
d = 1,2√P
800 MHz to 2,5 GHz
d = 2,3√P
0.01
0.12
0.12
0.23
0.1
0.38
0.38
0.73
1
1.2
1.2
2.3
10
3.8
3.8
7.3
100
12
12
23
For transmitters rated at a maximum output power not listed above, the recommended separation distance d in meters (m) can be
estimated using the equation applicable to the frequency of the transmitter, where p is the maximum output rating of the transmitter in
watts (w) according to the transmitter manufacturer.
NOTE1) At 80 MHz and 800 MHz, the separation distance for the high frequency range applies.
NOTE2) These guidelines may not apply in all situations. Electromagnetic propagation is affected by absorption and reflection from
structures, objects and people.

Page 19 of 20
Error Messages
Low Battery
The scale’s alkaline AA type batteries are flat; please replace
the batteries.
Overload
This indicates that the scale’s load sensor(s) have been
overloaded. Reduce the loading and retry.
Counting Error
1. The signal from the load cells is too high. Please
remove any weight from the scale and try to power
on again. If the scale continues to show the error
message, it indicates a fault with the electronics or
wiring.
2. The signal from the load cells is too low. Please
remove any weight from the scale and try again. If
the scale continues to show the error message, it
indicates a fault with the electronics or wiring.
High/Low Zero Count
1. The scale is above its zero range. Please remove
any weight from the scale and power on again. If
the scale continues to show the error message, it
indicates a fault with the electronics.
2. The scale is below its zero range. Check there is
nothing jammed underneath the scale and power
on again. If the scale continues to show the error
message, it indicates a fault with the electronics.
EEPROM Error
This indicates there is a fault with the scale’s software and is
normally caused by a fault with the load cell or wiring. Contact
your local service representative.
EU Authorized Representative:
Distributor:
Marsden Weighing Machine Group Ltd,
Unit 1, Genesis Business Park, Sheffield Road, Rotherham,
UK, S60 1DX
EU Importer:
Marsden Weighing Machine Group Europe Ltd,
The Black Church, St. Mary's Place, Dublin 7, Dublin,
Ireland, D07 P4AX
Manufactured by:
Charder Electronic Co., Ltd.
No.103, Guozhong Rd., Dali Dist.,
Taichung City 41262 ,Taiwan (R.O.C.)

Page 20 of 20
MARSDEN
Unit 1, Genesis Business Park,
Sheffield Road, Rotherham,
S60 1DX
Telephone: + 44 (0) 1709 364296
Version 1.1
Table of contents
Other marsden Wheelchair manuals


