manuals.online logo
Brands
  1. Home
  2. •
  3. Brands
  4. •
  5. marset
  6. •
  7. Outdoor Light
  8. •
  9. marset Funiculi Fabric User manual

marset Funiculi Fabric User manual

This manual suits for next models

1

Other marset Outdoor Light manuals

marset Santorini C User manual

marset

marset Santorini C User manual

marset SCANTLING P73 & S User manual

marset

marset SCANTLING P73 & S User manual

marset Plaff-on! B IP65 User manual

marset

marset Plaff-on! B IP65 User manual

marset ZOC IP65 User manual

marset

marset ZOC IP65 User manual

marset FUNICULI User manual

marset

marset FUNICULI User manual

marset Santorini User manual

marset

marset Santorini User manual

marset Lab B35 User manual

marset

marset Lab B35 User manual

marset Ginger B IP65 User manual

marset

marset Ginger B IP65 User manual

marset MERCER User manual

marset

marset MERCER User manual

marset Joan Gaspar Vetra S User manual

marset

marset Joan Gaspar Vetra S User manual

marset Copernica P190 User manual

marset

marset Copernica P190 User manual

marset Jaima P207 User manual

marset

marset Jaima P207 User manual

marset Plaff-on! 16 IP65 User manual

marset

marset Plaff-on! 16 IP65 User manual

marset Santorini A Fixed Stem User manual

marset

marset Santorini A Fixed Stem User manual

marset Lluis Porqueras Funiculi A Fabric User manual

marset

marset Lluis Porqueras Funiculi A Fabric User manual

marset POLO User manual

marset

marset POLO User manual

marset Ginger 60/298 User manual

marset

marset Ginger 60/298 User manual

marset POLO User manual

marset

marset POLO User manual

marset Lluis Porqueras Funiculi fabric A User manual

marset

marset Lluis Porqueras Funiculi fabric A User manual

marset THEIA M & P User manual

marset

marset THEIA M & P User manual

marset kaschkasch Bolita User manual

marset

marset kaschkasch Bolita User manual

marset Lab 35 B User manual

marset

marset Lab 35 B User manual

marset kaschkasch Bolita User manual

marset

marset kaschkasch Bolita User manual

marset Lab 35/60 B User manual

marset

marset Lab 35/60 B User manual

Popular Outdoor Light manuals by other brands

Kichler Lighting HELEN 37536 instructions

Kichler Lighting

Kichler Lighting HELEN 37536 instructions

Thorn OXANE L installation instructions

Thorn

Thorn OXANE L installation instructions

esotec Solar Globe Light multicolor 20 operating instructions

esotec

esotec Solar Globe Light multicolor 20 operating instructions

mitzi HL200201 ELLIS Assembly and mounting instructions

mitzi

mitzi HL200201 ELLIS Assembly and mounting instructions

HEPER TILA S AFX 3 Module Installation & maintenance instructions

HEPER

HEPER TILA S AFX 3 Module Installation & maintenance instructions

Designplan TRON 180 installation instructions

Designplan

Designplan TRON 180 installation instructions

Sealey LED37 instructions

Sealey

Sealey LED37 instructions

nordlux VEJERS Mounting instruction

nordlux

nordlux VEJERS Mounting instruction

SImx ELITE LED LHTC637 installation instructions

SImx

SImx ELITE LED LHTC637 installation instructions

GEV CAROLINE 10833 manual

GEV

GEV CAROLINE 10833 manual

WE-EF PFL540 LED Installation and maintenance instructions

WE-EF

WE-EF PFL540 LED Installation and maintenance instructions

HEPER DOGO Side LW6048.585-US Installation & maintenance instructions

HEPER

HEPER DOGO Side LW6048.585-US Installation & maintenance instructions

BEGA 84 253 Installation and technical information

BEGA

BEGA 84 253 Installation and technical information

HEPER LW8034.003-US Installation & maintenance instructions

HEPER

HEPER LW8034.003-US Installation & maintenance instructions

HEPER MINIMO Installation & maintenance instructions

HEPER

HEPER MINIMO Installation & maintenance instructions

LIGMAN BAMBOO 3 installation manual

LIGMAN

LIGMAN BAMBOO 3 installation manual

Maretti TUBE CUBE WALL 14.4998.04 quick start guide

Maretti

Maretti TUBE CUBE WALL 14.4998.04 quick start guide

Maxim Lighting Carriage House VX 40428WGOB installation instructions

Maxim Lighting

Maxim Lighting Carriage House VX 40428WGOB installation instructions

manuals.online logo
manuals.online logoBrands
  • About & Mission
  • Contact us
  • Privacy Policy
  • Terms and Conditions

Copyright 2025 Manuals.Online. All Rights Reserved.

230 V - 50 Hz
· Este símbolo en su equipo o embalaje indica que el presente producto no puede ser tratado como
residuo doméstico normal, sino que debe entregarse en el correspondiente punto de recogida de equipos
eléctricos y electrónicos. Para recibir información detallada sobre el reciclaje de este producto, por favor,
contacte con su ayuntamiento, su punto de recogida más cercano o el distribuidor donde adquirió el
producto.
· This symbol on the product or its packaging indicates that it must not be treated as household waste.
It should, in fact, be handed in at a recognised collection point for recycling electrical and electronic
equipment. For more detailed information about the recycling of this product, please contact your local
city office, your household waste disposal service or the shop where you purchased the product.
· Le symbole représenté sur l’appareil ou l’emballage signifie que le produit ne peut être traité comme
un déchet domestique normal, et doit par conséquent être déposé dans un point de collecte réservé
aux appareils électriques et électroniques. Pour en savoir plus sur le recyclage de ce produit, veuillez
vous adresser auprès de votre mairie, afin de connaître le point de collecte le plus proche, ou contacter
le distributeur qui vous a vendu le produit.
· Dieses Symbol auf dem Produkt oder der Verpackung zeigt an, dass diese nicht als normaler Hausmüll
behandelt werden dürfen, sondern den entsprechenden Stellen für Sondermüll zugeführt werden
müssen. Für weitere Informationen zum Thema Sondermüll wenden Sie sich bitte an Ihre Stadtverwaltung,
die nächste Annahmestelle oder den Händler, bei dem Sie das Produkt erworben haben.
· Aislamiento básico más aislamiento reforzado. Toma de tierra: excluida.
· Basic insulation plus second insulation or both replaced by reinforced insulation. Earthing: excluded.
· Isolation de base + isolation renforcée. Prise de terre : exclue.
· Grundisolierung plus verstärkte Isolierung. Erdung: Exklusive.
Datos Técnicos
Luminaria para uso interior
Factor de Potencia: 1
Lámpara a utilizar:
Funiculí Fabric
E27 LED Standard 8W
Funiculí S Fabric
E14 LED 5W
Technical Data
Light fitting for indoor use only
Power Factor: 1
Bulb to be used:
Funiculí Fabric
E27 LED Standard 8W
Funiculí S Fabric
E14 LED 5W
Données techniques
Luminaire intérieur.
Facteur de puissance : 1
Ampoule :
Funiculí Fabric
E27 LED Standard 8W
Funiculí S Fabric
E14 LED 5W
Technische Daten
Leuchte für den Innenraum.
Leistungsfaktor: 1
Empfohlenes Leuchtmittel:
Funiculí Fabric
E27 LED Standard 8W
Funiculí S Fabric
E14 LED 5W
Funiculí Fabric /
Funiculí S Fabric
Instrucciones de montaje
Assembly Instructions
Instructions de montage
Montageanleitung
Lluís Porqueras
MARSET ILUMINACION SA · CTRA. DE RUBÍ, KM.284 · 08228 TERRASSA (BARCELONA) · SPAIN · WWW.MARSET.COM REV. 00
ADVERTENCIAS
1. Se recomienda que la instalación sea realizada por un profesional.
2. Desconectar la conexión a red antes de ser manipulada y realizar el cambio de bombilla sólo
cuando esta se haya enfriado.
3. Si el cable flexible o cordón de esta luminaria está dañado, deberá sustituirse exclusivamente por
el fabricante o su servicio técnico o una persona de cualificación equivalente con objeto de evitar
cualquier riesgo.
4. Utilizar un paño suave, humedecido con agua y detergente neutro si fuera necesario. No utilizar
alcohol o otros disolventes.
WARNING
1. It is recommended that a professional electrician be responsible for installing the light.
2. Disconnect power supply before installation and change the bulb only when cold.
3. If the wire or flexible cord is damaged,it must only be changed by the manufacturer, their Service
Dept. or qualified personnel in order to avoid risk.
4. Use a soft damp cloth, with soap or neutral detergent. Do not use alcohol or other solvents.
ATTENTION
1. Il est recommandé de faire exécuter l’installation par un professionnel.
2. Débranchez la connexion au réseau avant toute manipulation et ne changez l'ampoule que
lorsqu'elle a refroidi (dans le cas où le système comporte une ampoule).
3. Si le câble flexible ou fil du luminaire est endommagé, il conviendra de faire appel au fabricant, à
son service technique ou encore à une personne qualifiée pour le remplacer et éviter ainsi tout risque
fâcheux.
4. Pour nettoyer le luminaire, nous vous recommandons d’utiliser un chiffon doux humidifié d’eau et
de détergent neutre, le cas échéant. N’utilisez pas d’alcool ni d’autres types de dissolvants.
HINWEISE
1. Wir empfehlen, die Installation von einem Fachmann vornehmen zu lassen.
2. Unterbrechen Sie die Verbindung zum Netz vor Beginn der Arbeit, und tauschen sie die Glühbirne
nur aus, wenn diese abgekühlt ist (falls eine Glühbirne vorhanden ist).
3. Wird das Kabel der Leuchte beschädigt, darf dieses nur durch den Hersteller, dessen technischen
Service, oder eine entsprechend qualifizierte Person ausgetauscht werden, um eventuelle Risiken zu
vermeiden.
4. Zur Reinigung der Leuchte empfiehlt es sich, ein weiches Tuch zu verwenden und dieses, falls
nötig, mit Wasser und einem neutralen Reiniger zu befeuchten. Alkohol oder Lösungsmittel sind zur
Reinigung nicht geeignet.
1
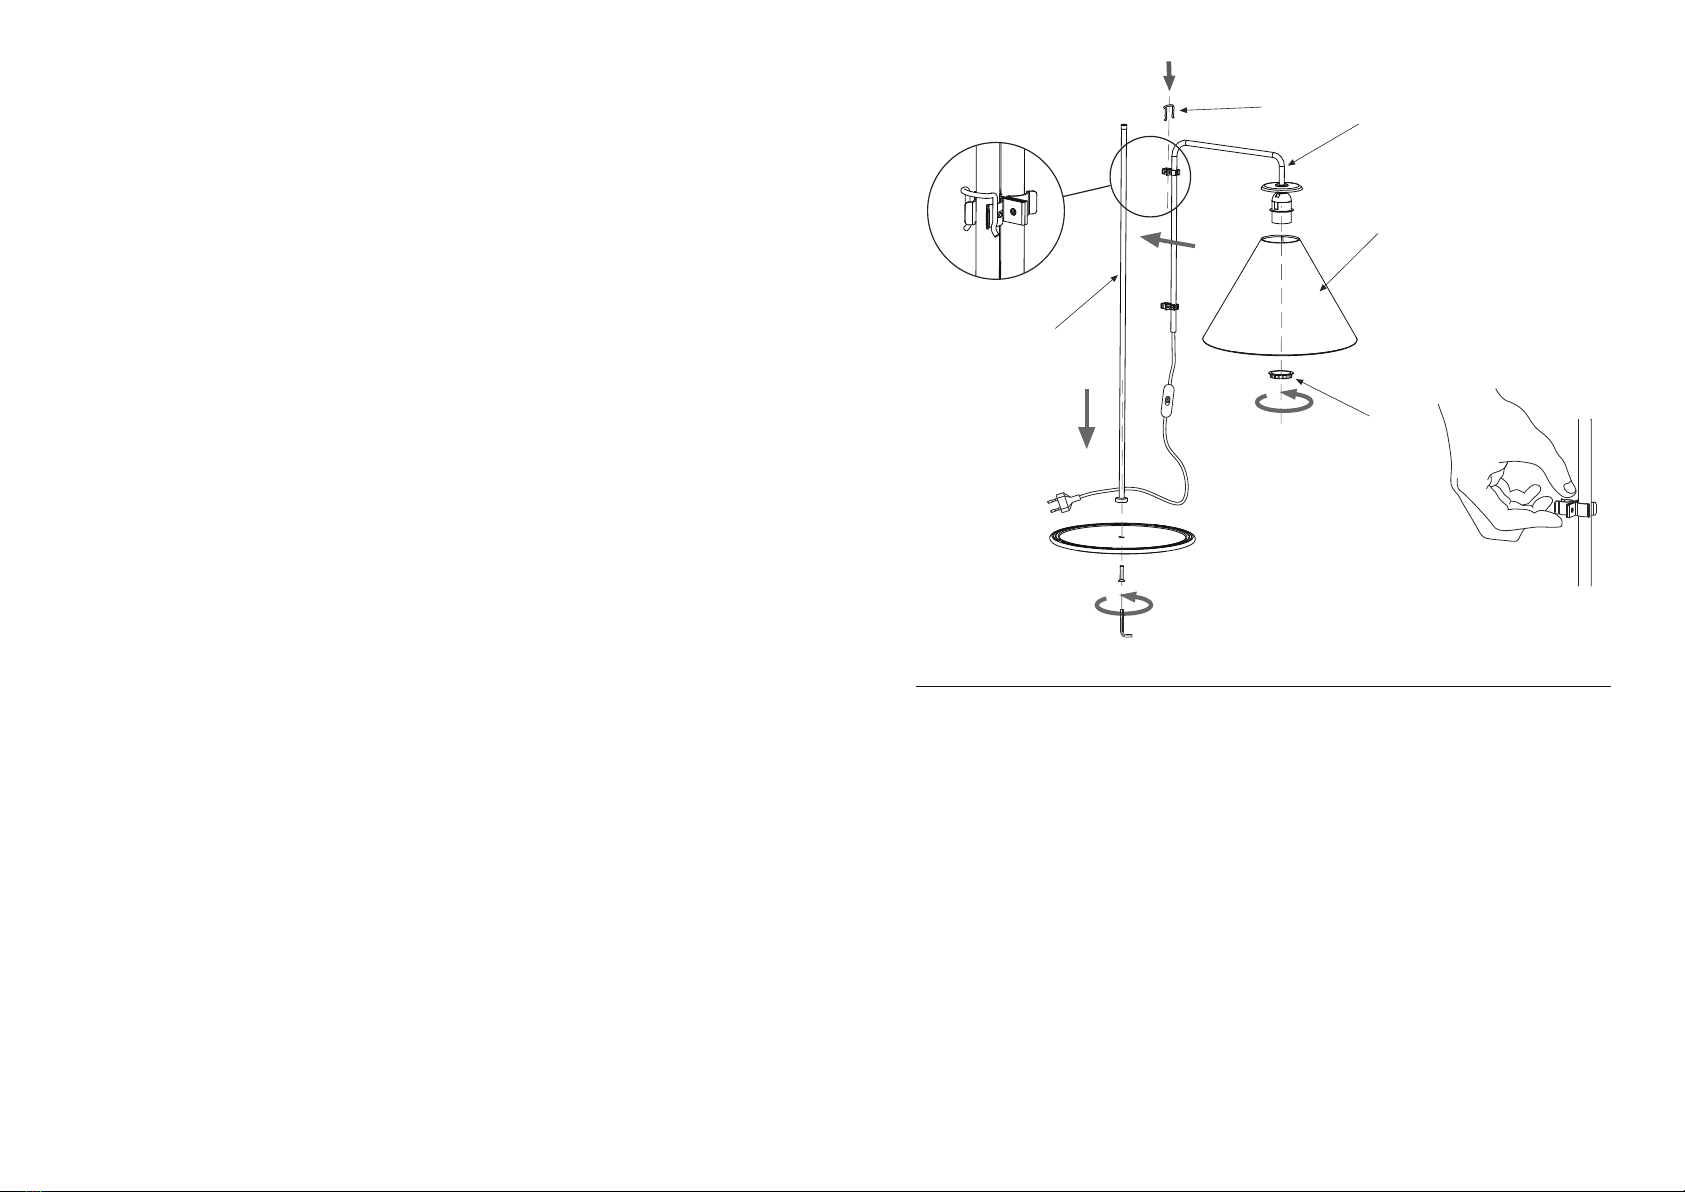
1.1. Fijar la tija (A) en la base con el tornillo
suministrado y ensamblar el soporte (B).
1.2. Fijar la pantalla (C) roscando la tuerca (D) y
colocar la bombilla recomendada. Colocar el
seguro (E) en las pinzas como muestra la Fig.
1.2.
ATENCIÓN!
No utilizar la pantalla sin el soporte.
Presionar las pinzas en el caso de que la pantalla
descienda, tal y como muestra la figura 1.3.
1.1. Attach the stem (A) to the base using the
screw provided and assembly the support (B).
1.2. Attach the shade (C) by means of the nut
(D) and insert an approved bulb. Place the lock
on the clips as shown in the Fig. 1.2.
WARNING!
Do not use the shade without the support.
Press the pins in case that shade falls down, as
shown in the sketch 1.3.
1.1. Fixez la tige (A) à la base avec le vis fournie et
montez le support (B).
1.2. Fixer l'écran (C) à l'aide de l’écrou (D) fournie
et placez l'ampoule recommandée. Placez le
verrou sur les clips comme indiqué sur la Fig.1.2.
ATTENTION !
N’utilisez pas l’écran sans le support.
Appuyez sur les pinces si l’écran descend,
comme indiqué à la figure 1.3.
1.1.
Befestigen Sie die Stütze (A) auf dem Fuß mit
der mitgelieferten Schraube und Setze die Halterung
zusammen (B).
1.2. Befestigen Sie den Lampenschirm (C) mit
der Schraubenmutter (D) und Setzen Sie die
empfohlene Glühbirne ein. Setzen Sie das
Schloss auf die Clips, wie in der Abbildung
gezeigt 1.2.
ACHTUNG!
Nutzen Sie den Lampenschirm nie ohne
Halterung. Stellen Sie die Klemme fest, falls der
Lampenschirm herunterrutscht, so wie auf
Abbildung 1.3.
Fig. 1.3.
D
C
A
B
E
Fig. 1.2.
E