Martin DT2S User manual

Important
MARTIN ENGINEERING HEREBY DISCLAIMS ANY LIABILITY FOR: DAMAGE DUE TO
CONTAMINATION OF THE MATERIAL; USER’S FAILURE TO INSPECT, MAINTAIN AND TAKE
REASONABLE CARE OF THE EQUIPMENT; INJURIES OR DAMAGE RESULTING FROM USE OR
APPLICATION OF THIS PRODUCT CONTRARY TO INSTRUCTIONS AND SPECIFICATIONS
CONTAINED HEREIN. MARTIN ENGINEERING’S LIABILITY SHALL BE LIMITED TO REPAIR
OR REPLACEMENT OF EQUIPMENT SHOWN TO BE DEFECTIVE.
Observe all safety rules given herein along with owner and Government standards and regulations. Know
and understand lockout/tagout procedures as defined by American National Standards Institute (ANSI)
z244.1-1982, American National Standard for Personnel Protection - Lockout/Tagout of Energy Sources -
Minimum Safety Requirements and Occupational Safety and Health Administration (OSHA) Federal
Register, Part IV, 29 CFR Part 1910, Control of Hazardous Energy Source (Lockout/Tagout); Final Rule.
The following symbols may be used in this manual:
DANGER
!
Danger: Immediate hazards that will result in severe personal injury or death.
WARNING
!
Warning: Hazards or unsafe practices that could result in personal injury.
CAUTION
!
Caution: Hazards or unsafe practices that could result in product or property damages.
IMPORTANT
Important: Instructions that must be followed to ensure proper installation/operation of equipment.
NOTE
Note: General statements to assist the reader.

Martin Engineering M3687-12/17 iMartin®DT2S Reversing Cleaner
Table of Contents
Section Page
List of Figures/Tables . . . . . . . . . . . . . . . . . . . . . . . . . . . . . . . . . . . . . . . . . . . . . . . . . . . . . . . . . . . . . ii
Introduction . . . . . . . . . . . . . . . . . . . . . . . . . . . . . . . . . . . . . . . . . . . . . . . . . . . . . . . . . . . . . . . . . . . . . 1
General . . . . . . . . . . . . . . . . . . . . . . . . . . . . . . . . . . . . . . . . . . . . . . . . . . . . . . . . . . . . . . . . . . . . . . 1
Installations Without Chutework . . . . . . . . . . . . . . . . . . . . . . . . . . . . . . . . . . . . . . . . . . . . . . . . . . 1
Belt Cleaner Inspection Access . . . . . . . . . . . . . . . . . . . . . . . . . . . . . . . . . . . . . . . . . . . . . . . . . . . 1
References . . . . . . . . . . . . . . . . . . . . . . . . . . . . . . . . . . . . . . . . . . . . . . . . . . . . . . . . . . . . . . . . . . . 1
Materials Required . . . . . . . . . . . . . . . . . . . . . . . . . . . . . . . . . . . . . . . . . . . . . . . . . . . . . . . . . . . . . 1
Urethane Shelf Life . . . . . . . . . . . . . . . . . . . . . . . . . . . . . . . . . . . . . . . . . . . . . . . . . . . . . . . . . . . . 2
Safety . . . . . . . . . . . . . . . . . . . . . . . . . . . . . . . . . . . . . . . . . . . . . . . . . . . . . . . . . . . . . . . . . . . . . . . 3
Before Installing Belt Cleaner . . . . . . . . . . . . . . . . . . . . . . . . . . . . . . . . . . . . . . . . . . . . . . . . . . . . . . . 4
Installing Belt Cleaner . . . . . . . . . . . . . . . . . . . . . . . . . . . . . . . . . . . . . . . . . . . . . . . . . . . . . . . . . . . . . 5
Converting Bottom Mount Spring Tensioners to Top Mount . . . . . . . . . . . . . . . . . . . . . . . . . . . . 5
Locating Cleaner Centerline . . . . . . . . . . . . . . . . . . . . . . . . . . . . . . . . . . . . . . . . . . . . . . . . . . . . . 7
Marking Chute Cutouts . . . . . . . . . . . . . . . . . . . . . . . . . . . . . . . . . . . . . . . . . . . . . . . . . . . . . . . . . 8
Adjusting the Spring Tensioner . . . . . . . . . . . . . . . . . . . . . . . . . . . . . . . . . . . . . . . . . . . . . . . . . . . 10
Adjusting the Air Tensioner . . . . . . . . . . . . . . . . . . . . . . . . . . . . . . . . . . . . . . . . . . . . . . . . . . . . . . 11
After Installing Belt Cleaner . . . . . . . . . . . . . . . . . . . . . . . . . . . . . . . . . . . . . . . . . . . . . . . . . . . . . . . . 13
Maintenance. . . . . . . . . . . . . . . . . . . . . . . . . . . . . . . . . . . . . . . . . . . . . . . . . . . . . . . . . . . . . . . . . . . . . 15
Routine Inspection/Tension . . . . . . . . . . . . . . . . . . . . . . . . . . . . . . . . . . . . . . . . . . . . . . . . . . . . . . 15
Blade Servicing . . . . . . . . . . . . . . . . . . . . . . . . . . . . . . . . . . . . . . . . . . . . . . . . . . . . . . . . . . . . . . . 15
Troubleshooting/Installation Checklist . . . . . . . . . . . . . . . . . . . . . . . . . . . . . . . . . . . . . . . . . . . . . . . . 17
Troubleshooting . . . . . . . . . . . . . . . . . . . . . . . . . . . . . . . . . . . . . . . . . . . . . . . . . . . . . . . . . . . . . . . 17
Installation Checklist . . . . . . . . . . . . . . . . . . . . . . . . . . . . . . . . . . . . . . . . . . . . . . . . . . . . . . . . . . . 17
Part Numbers . . . . . . . . . . . . . . . . . . . . . . . . . . . . . . . . . . . . . . . . . . . . . . . . . . . . . . . . . . . . . . . . . . . . 19
Table of Contents

Martin Engineering M3687-12/17 ii Martin®DT2S Reversing Cleaner
List of Figures
Figure Title Page
1 Spring Tensioner Conversion . . . . . . . . . . . . . . . . . . . . . . . . . . . . . . . . . . . . . . . . . . . 6
2 Primary Belt Direction . . . . . . . . . . . . . . . . . . . . . . . . . . . . . . . . . . . . . . . . . . . . . . . . 7
3 Chute Cutout Detail . . . . . . . . . . . . . . . . . . . . . . . . . . . . . . . . . . . . . . . . . . . . . . . . . . 8
4 Spring Tensioner Operation . . . . . . . . . . . . . . . . . . . . . . . . . . . . . . . . . . . . . . . . . . . . 10
5 Air Tensioner Operation . . . . . . . . . . . . . . . . . . . . . . . . . . . . . . . . . . . . . . . . . . . . . . . 12
6a Cleaner Changing Belt Line . . . . . . . . . . . . . . . . . . . . . . . . . . . . . . . . . . . . . . . . . . . . 13
6b Cleaner with Belt Support . . . . . . . . . . . . . . . . . . . . . . . . . . . . . . . . . . . . . . . . . . . . . 13
7 Martin®DT2S Reversing Cleaner with Air Tensioner,
P/N DT2S-XXXXXXXXA . . . . . . . . . . . . . . . . . . . . . . . . . . . . . . . . . . . . . . . . . . . . 21
8 Martin®DT2S Reversing Cleaner with Spring Tensioner,
P/N DT2S-XXXXXXXXS. . . . . . . . . . . . . . . . . . . . . . . . . . . . . . . . . . . . . . . . . . . . . 24
9 Martin®DT2S Reversing Cleaner Cartridge, P/N DT2SC-XXXXXXXXX. . . . . . . 28
10 Conveyor Products Warning Label, P/N 23395 . . . . . . . . . . . . . . . . . . . . . . . . . . . . . 31
11 Pinch Point Warning Label, P/N 30528 . . . . . . . . . . . . . . . . . . . . . . . . . . . . . . . . . . . 31
List of Tables
Table Title Page
I Urethane Shelf Life . . . . . . . . . . . . . . . . . . . . . . . . . . . . . . . . . . . . . . . . . . . . . . . . . . 2
II Recommended Spring Tension and Air Pressure . . . . . . . . . . . . . . . . . . . . . . . . . . . . 11
III Martin®DT2S Reversing Cleaner with Air Tensioner. . . . . . . . . . . . . . . . . . . . . . . . 22
IV Martin®DT2S Reversing Cleaner with Spring Tensioner . . . . . . . . . . . . . . . . . . . . . 26
V Martin®DT2S Reversing Cleaner Cartridge . . . . . . . . . . . . . . . . . . . . . . . . . . . . . . . 29
List of Figures/Tables

Martin Engineering M3687-12/17 1Martin®DT2S Reversing Cleaner
Introduction
General The Martin®DT2S Reversing Cleaner is used in conjunction with a head
pulley primary cleaner such as a Martin®Primary Cleaner.
The Martin®DT2S Reversing Cleaner contacts the belt as it leaves the head
pulley or another accessible position on the return belt with proper support.
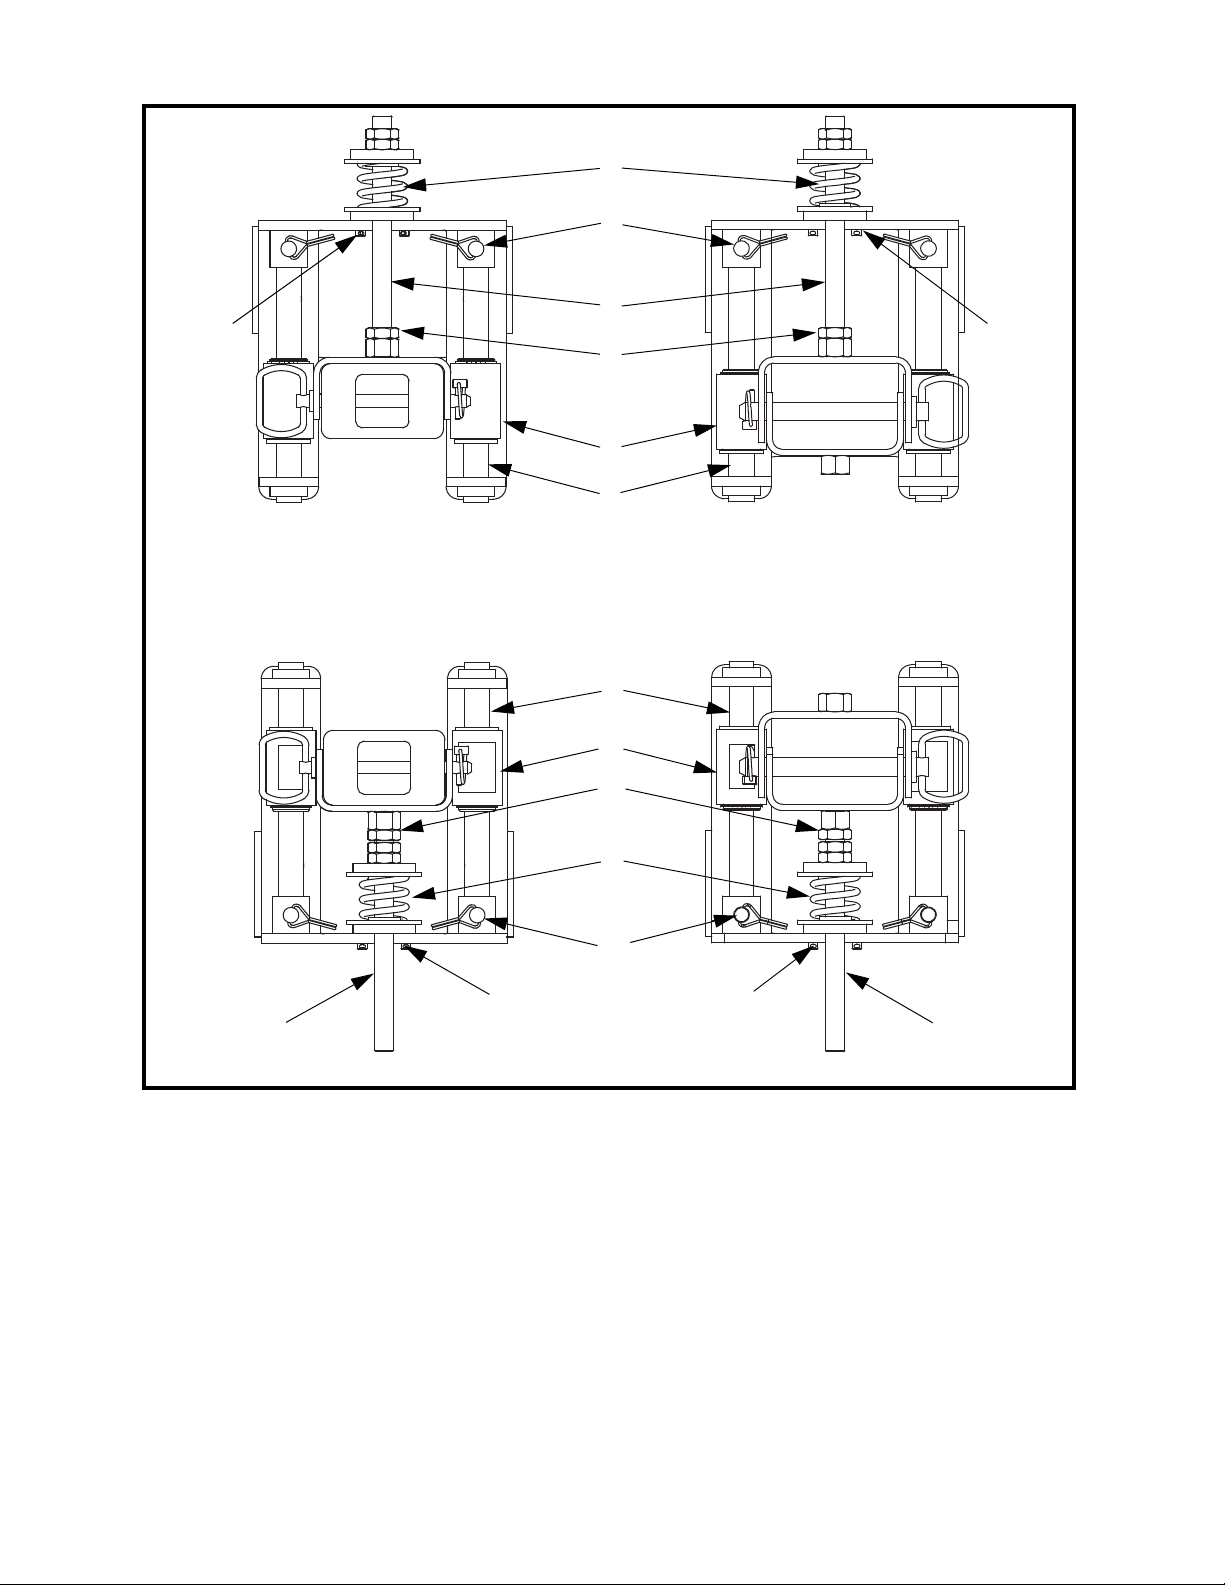
The blades of the Martin®DT2S Reversing Cleaner, when tensioned, lay in
the direction of belt travel giving a negative angle and presenting no snag or
danger to the belt or splices.
The Martin®DT2S Reversing Cleaner can be supplied or retrofitted with a
variety of cleaning blades.
If the material-handling process or product could be affected by
contamination from the use of these belt cleaners, the user is responsible for
taking the necessary steps to prevent contamination. Consult Martin
Engineering or a representative for alternate belt cleaners or belt cleaner
locations to use where contamination may be an issue.
Installations
Without
Chutework
These procedures were written for equipment that is being installed on
enclosed pulley chutework. If the pulley is not enclosed, the equipment should
be installed using the best available field resources and methods to ensure that
the critical dimensions are followed for proper installation.
The Martin®Reversing Hanger Mount Weldment, P/N 33282, can be used for
installations without chutework.
Belt Cleaner
Inspection Access
If the belt cleaner is installed on enclosed pulley chutework, a Martin®
Inspection Door should be installed. Martin®Inspection Doors are available
from Martin Engineering or your representative.
References The following documents are referenced in this manual:
• American National Standards Institute (ANSI) z244.1-1982, American
National Standard for Personnel Protection - Lockout/Tagout of Energy
Sources - Minimum Safety Requirements, American National Standards
Institute, Inc., 1430 Broadway, New York, NY 10018.
• Federal Register, Volume 54, Number 169, Part IV, 29 CFR Part 1910,
Control of Hazardous Energy Source (Lockout/Tagout); Final Rule,
Department of Labor, Occupational Safety and Health Administration
(OSHA), 32nd Floor, Room 3244, 230 South Dearborn Street,
Chicago, IL 60604.
•Martin®Inspection Door Operator’s Manual, P/N M3891.
Materials
Required
Only standard hand tools are required to install and service this equipment.
Introduction

Martin Engineering M3687-12/17 2Martin®DT2S Reversing Cleaner
Urethane Shelf
Life
IMPORTANT
Urethane put in service after exceeding it’s shelf life may wear
differently and deteriorate quicker than normal urethane.
NOTE
Code Date is written near bottom of blade as mm/dd/yy-x. In
addition to or in place of this date, you may see an imprinted
date medallion similar to the example shown. In this example,
“14” stands for the year 2014. The small circles represent the
quarter of the year. If three circles are “punched” the blade
was produced in the first quarter. If none of the circles are
“punched” the blade was produced in the fourth quarter. If
code date on your blade(s) is not legible or is missing, contact
Martin Engineering or a representative.
Table I. Urethane Shelf Life
14
Blade Color Shelf Life
Blue 1 Year from Code Date
Brown 2 Years from Code Date
Clear 1 Year from Code Date
Green 2 Years from Code Date
Orange 1 Year from Code Date
Introduction

Martin Engineering M3687-12/17 3Martin®DT2S Reversing Cleaner
Safety All safety rules defined in the above documents and all owner/employer safety
rules must be strictly followed when working on the belt cleaner.
DANGER
!
Do not touch or go near the conveyor belt or conveyor
accessories when the belt is running. Your body or clothing
can get caught and you can be pulled into the conveyor,
resulting in severe injury or death.
DANGER
!
Before installing, servicing, or adjusting the belt cleaner, turn
off and lockout / tagout / blockout / testout all energy sources
to the conveyor and conveyor accessories according to ANSI
standards. Failure to do so could result in serious injury or
death.
DANGER
!
If this equipment will be installed in an enclosed area, test the
gas level or dust content before using a cutting torch or
welding. Using a torch or welding in an area with gas or dust
may cause an explosion resulting in serious injury or death.
Follow local confined space procedures.
WARNING
!
Before using a cutting torch or welding the chute wall, cover
the conveyor belt with a fire retardant cover. Failure to do so
can allow the belt to catch fire. Follow local fire watch
procedures.
WARNING
!
Remove all tools from the installation area and conveyor belt
before turning on the conveyor. Failure to do so can cause
serious injury to personnel or damage to the belt and
conveyor.
WARNING
!
Mainframe with blade can be heavy and may require two
people to lift. Attempting to lift the belt cleaner without
assistance could result in injury.
Introduction

Martin Engineering M3687-12/17 4Martin®DT2S Reversing Cleaner
Before Installing Belt Cleaner
IMPORTANT
The delivery service is responsible for damage occurring in
transit. Martin Engineering CANNOT enter claims for
damages. Contact your transportation agent for more
information.
1. Inspect shipping container for damage. Report damage to delivery service
immediately and fill out delivery service’s claim form. Keep any damaged
goods subject to examination.
2. Remove belt cleaner from shipping container. Equipment in container
should include the following:
• Martin®DT2S Reversing Cleaner (mainframe, tensioner, and blades).
• Two Conveyor Products Warning Labels, P/N 23395.
• Two Pinch Point Warning Labels, P/N 30528.
DANGER
!
Before installing, servicing, or adjusting the belt cleaner, turn
off and lockout / tagout / blockout / testout all energy sources
to the conveyor and conveyor accessories according to ANSI
standards. Failure to do so could result in serious injury or
death.
3. Turn off and lockout / tagout / blockout / testout energy source according
to ANSI standards (see “References”).
DANGER
!
If this equipment will be installed in an enclosed area, test the
gas level or dust content before using a cutting torch or
welding. Using a torch or welding in an area with gas or dust
may cause an explosion resulting in serious injury or death.
Follow local confined space procedures.
4. If using a cutting torch or welding, test atmosphere for gas level or dust
content. Cover conveyor belt with fire retardant cover.
NOTE
The chute wall that is easiest to access is referred to as the
“operator side.” The other side of the chute is referred to as
the “far side.”
5. Determine which side of chute is easiest to access. Locate the operator
side tensioner on the most accessible chute wall and the far side tensioner
on the other side of the chute.
Before Installation

Martin Engineering M3687-12/17 5Martin®DT2S Reversing Cleaner
Installing Belt Cleaner
IMPORTANT
Read entire section before beginning work.
To install the belt cleaner, follow the procedures corresponding to the
following steps:
WARNING
!
If installation is to be done in an enclosed area, test
atmosphere for gas level or dust content. Follow all welding
and safety guidelines. Protect belt surface from weld splatter
with appropriate shield.
NOTE
For original equipment installation, where cleaner cutouts
and brackets have been fabricated into the chute during
construction, ignore steps 1, 2, and 3.
NOTE
Solid backing of the blade is essential to ensure proper
operation and efficient cleaning. Install the cleaner adjacent to
the head pulley or a flat pressure roller to obtain best cleaning
results. See Figure 2.
NOTE
For installation on enclosed head pulley chutework, draw all
dimension lines on chute wall. In applications where head
pulley is not enclosed, use the best available field resources
and/or methods to ensure that these critical dimensions are
followed for a proper installation.
Converting
Bottom Mount
Spring Tensioners
to Top Mount
1. If using spring tensioner, determine how much space is available for
spring tensioner installation. If necessary, convert bottom mount spring
tensioner to top mount before installing. See Figure 1.
Installation

Martin Engineering M3687-12/17 6Martin®DT2S Reversing Cleaner
Figure 1. Spring Tensioner Conversion
2. Convert operator side assembly as follows:
a. Loosen jam nut (C).
b. Remove cotter pins (F).
c. Remove threaded rod (G) and spring assembly (D) from slide
bracket (B).
d. Install jam nut (C) on opposite end of threaded rod.
e. Remove pins (E) and guide rods (A) from mount bracket.
f. Rotate slide bracket 180 degrees and reinstall guide rods and pins.
g. Rotate threaded rod and spring assembly 180 degrees and install on top
of mount plate. Install threaded rod into slide bracket.
h. Install cotter pins.
Top Mount Style
Bottom Mount Style
A
B
C
D
E
F
F
G
G
A
B
C
D
E
G
F
F
Operator Side AssemblyFar Side Assembly
Far Side Assembly Operator Side Assembly
Installation

Martin Engineering M3687-12/17 7Martin®DT2S Reversing Cleaner
3. Convert far side assembly as follows:
a. Loosen jam nut (C).
b. Remove cotter pins (F).
c. Remove threaded rod (G) and spring assembly (D) from slide
bracket (B).
d. Install jam nut (C) on opposite end of threaded rod.
e. Rotate threaded rod and spring assembly 180 degrees and install on top
of mount plate. Install threaded rod into slide bracket.
f. Install cotter pins.
Locating Cleaner
Centerline
1. On the return side of the belt, locate the tangent point at which the belt
leaves the head pulley. Measure a distance 2.0 in. (51 mm) and draw a line
perpendicular to the belt at this point. See Figure 2.
NOTE
For installation below pressure rollers, mark the vertical line
2 in. (51 mm) from the centerline of the roller. See Figure 2.
2. This line represents the centerline of the Martin®DT2S Reversing
Cleaner and the cleaner mount brackets.
Figure 2. Primary Belt Direction
2.0 in.
(51 mm)
2.0 in.
(51 mm)
BELT DIRECTION BELT DIRECTION
BELTDIRECTION
2.0in.
(51mm)
Installation

Martin Engineering M3687-12/17 8Martin®DT2S Reversing Cleaner
Figure 3. Chute Cutout Detail
Marking Chute
Cutouts
1. Using the previously marked line as the centerline, mark the chute cutout
and mount hole locations as shown in Figure 3. Repeat on both sides of
chute, ensuring the cutouts are accurately aligned with each other.
NOTE
The mount hole dimension below the belt differs for air- or
spring-tensioned models. Make sure that you are using correct
dimensions and verify cleaner position before proceeding.
5.00
(127)
7.00
(178)
4.50
(114)
4.50
(114)
8.67
(220)
Air Tensioner
5.00
(127)
7.00
(178)
10.00
(254)
6.00
(152)
4.50
(114)
Bottom Mount Spring Tensioner
Tensioner Bracket Mounting Holes = 9/16 in. (14 mm) dia.
5.00
(127)
7.00
(178)
4.50
(114)
2.75
(70)
Top Mount Spring Tensioner
10.00
(254)
2.56
(65)
2.56
(65)
2.47
(63)
Installation

Martin Engineering M3687-12/17 9Martin®DT2S Reversing Cleaner
2. At the selected mounting positions, cut the cleaner access slots and drill
the mount holes in each side of the chute. Dress and de-burr the holes and
cutouts.
3. If belt width is 54” or larger, replace 1-3/4” long spring, upper flat washer
and UHMW spring retainer with 2” long spring and 3/4” washer included.
4. Fit operator side mount bracket to the chute wall. Bolt mount to the chute
wall.
5. Repeat for far side mount bracket.
6. Fit the cleaner mainframe to the mounts. Slide the mainframe into one of
the mount brackets, through the cutout in the chute wall, then through the
cutout and mount on the opposite side.
NOTE
The mainframe has holes at one end. This is the end that fits
to the operator side mount.
7. Align the end of the mainframe with the outer edge of the operator side
mount bracket and refit the locking screw, taking care to fit the air line
bracket under the screw (air tensioner models only). At the far side mount,
tighten the lock screw onto the mainframe.
NOTE
The mainframe in most cases will have excess length. If
required, this excess can be trimmed from the far side end.
8. Slide the blade cartridge onto the mainframe from the operator side. If the
cartridge is too long, excess can be trimmed from the non-operator end.
If not already done, fit the cleaning blades to the cartridge. Center the
blades to the belt by loosening and re-positioning the blade end stops.
Insert the blade cartridge retaining pin.
9. With the cleaner tensioner in a fully retracted position, the cleaning blades
should be approximately .5 in.–.75 in. (13 mm–19 mm) clear of the
underside of the belt and this distance should be equal across the width of
the belt.
10. If necessary, loosen and adjust the mounts up or down to achieve this
clearance.
11. Once all clearances are correct, thoroughly check all mounting and
locking screws to ensure they are tight and the cleaner is secured.
12. For the air-tensioned model only, connect the air tube to the fittings in the
far side airbag on the underside of the mount bracket. See Figure 5.
13. Pass the tube through the mainframe. (Make sure tube is located
underneath handle.) Connect the tube to the tee air fitting in the operator
side airbag adjusting the tube length to suit by cutting.
14. Connect the other side of the tee fitting to the incoming regulated
compressed air supply or to the outlet of air regulator kit, if used. Connect
the plant air supply or air supply kit to the inlet side of the regulator kit.
Installation

Martin Engineering M3687-12/17 10 Martin®DT2S Reversing Cleaner
Adjusting the
Spring Tensioner
1. Loosen the lock nut above the spring. Repeat for both sides.
2. Turn adjusting nut (equally on both sides) until cleaner blades are lightly
touching the belt.
3. Ensure the blade position is equal across belt and blades are lightly
touching across belt width.
4. Continue turning the adjusting nut equally on both sides until the spring-
compressed length is the same as indicated in Table II.
5. Tighten the lock nuts against the adjusting nuts.
Figure 4. Spring Tensioner Operation
7.00
(178)
6.00
Lock Nut
Adjusting Nut
Threaded Rod
Belt Travel
(152)
10.38
(264)
4.50
(114) 11.26
(286)
Installation

Martin Engineering M3687-12/17 11 Martin®DT2S Reversing Cleaner
Table II. Recommended Spring Tension and Air Pressure
*For belt widths 54 in. and above, replace 1-3/4” long spring, upper flat washer and UHMW spring retainer
with 2” long spring and 3/4” washer included.
Adjusting the Air
Tensioner
The air tensioner utilizes an inflatable air bag on each cleaner mount to
provide the force to adjust the blades against the belt. Cleaner adjustments and
correct force are automatically applied by simple air pressure control. See
Figure 5.
1. Adjusting the air-tensioned Martin®DT2S Reversing Cleaner requires
supplying air at the appropriate pressure to the tensioner air bags. Refer
to Table II for recommended air pressure.
2. If using the Air Tensioner Air Regulator Kit, connect the plant air line to
the lockable ball valve on the outside of the enclosure. Turn on the air
supply and the ball valve to pressurize the tensioner. The cleaner will
automatically rise and the blades will contact the belt.
3. Adjust the pressure to the required level by unlocking and adjusting the
regulator inside the regulator kit. The regulator is self-relieving so the
pressure will stabilize. (It is advisable to wait a short while after each
adjustment to allow excess pressure to bleed.)
4. Once the correct pressure has been achieved, relock the regulator and
close the lid on the enclosure.
Belt Width
in. (mm)
Air Tensioner
psi (bar)
Spring Tensioner
Compressed Spring Length
in. (mm)
18 (457) 2 (0.14) 1.625 (41)
24 (610) 2 (0.14) 1.625 (41)
30 (762) 3 (0.21) 1.500 (38)
36 (914) 3 (0.21) 1.500 (38)
42 (1067) 4 (0.28) 1.500 (38)
48 (1219) 4 (0.28) 1.500 (38)
54* (1372) 5 (0.34) 1.750 (44)
60* (1524) 6 (0.41) 1.750 (44)
66* (1676) 6 (0.41) 1.750 (44)
72* (1829) 7 (0.49) 1.625 (41)
84* (2134) 7 (0.49) 1.625 (41)
96* (2438) 8 (0.55) 1.625 (41)
120* (3048) 10 (0.69) 1.500 (38)
Installation

Martin Engineering M3687-12/17 12 Martin®DT2S Reversing Cleaner
Figure 5. Air Tensioner Operation
Operator Side Far Side
AIR TENSIONER COMPACT
CONTROL UNIT
Regulator Gauge
Enclosure
Lockable Self-Relieving
Plant Air Inlet
Ball Valve
Installation

Martin Engineering M3687-12/17 13 Martin®DT2S Reversing Cleaner
After Installing Belt Cleaner
1. Thoroughly wipe chute wall clean above tensioner.
2. Place Conveyor Products Warning Label (P/N 23395) on outside chute
wall visible to belt cleaner operator.
3. Additional safety labels are available from CEMA. For more information
regarding CEMA safety labels visit www.cemanet.org.
4. After belt cleaner and tensioner are installed, measure from pulley shaft
to mainframe on both operator side and far side to make sure mainframe
is parallel to pulley.
5. Measure from center point of pulley to outside edge of first and last blade
to make sure blades are centered on belt.
6. Make sure cleaner is not changing belt line (Figure 6a). If it is, install
belt support ahead of blade-to-belt contact point (Figure 6b).
Figure 6a. Cleaner Changing Belt Line Figure 6b. Cleaner with Belt Support
WARNING
!
Failure to remove tools from installation area and conveyor
belt before turning on energy source can cause serious injury
to personnel and damage to belt.
7. Remove all tools and fire retardant cover from installation area and
conveyor belt.
Belt Line
Belt Line
After Installation

Martin Engineering M3687-12/17 14 Martin®DT2S Reversing Cleaner
DANGER
!
Do not touch or go near conveyor belt or conveyor accessories
when conveyor belt is running. Body or clothing can get
caught and pull body into conveyor belt, causing severe injury
or death.
8. Turn on conveyor belt for 1 hour.
DANGER
!
Before installing, servicing, or adjusting the belt cleaner, turn
off and lockout / tagout / blockout / testout all energy sources
to the conveyor and conveyor accessories according to ANSI
standards. Failure to do so could result in serious injury or
death.
9. After 1 hour of operation, turn off and lockout / tagout / blockout / testout
energy source according to ANSI standards (see “References”).
10. Make sure all fasteners are tight. Tighten if necessary.
11. Inspect belt cleaner for the following:
• Wear. (A small amount of “break-in” wear may be found.)
• Material buildup. (No material between blades and return side of
conveyor belt should be found.)
12. If wear, material buildup, or some other problem exists, see
“Troubleshooting/Installation Checklist.”
After Installation

Martin Engineering M3687-12/17 15 Martin®DT2S Reversing Cleaner
Maintenance
NOTE
Maintenance inspection should be performed weekly until a
maintenance schedule can be determined. Certain
applications and/or changing material conditions may require
more frequent maintenance inspections.
DANGER
!
Before installing, servicing, or adjusting the belt cleaner, turn
off and lockout / tagout / blockout / testout all energy sources
to the conveyor and conveyor accessories according to ANSI
standards. Failure to do so could result in serious injury or
death.
Routine
Inspection/
Tension
1. Inspect the condition of the cleaner. Open the inspection door (if fitted)
and observe the condition and action of the blades and cleaner.
2. If necessary, remove any material buildup from the blades or mainframe.
WARNING
!
Do not reach into the chute while the conveyor is running.
3. If necessary, adjust the cleaner tension. Refer to appropriate section for
tensioner used.
4. Make sure all fasteners are tight. Tighten if necessary.
5. Check blades for wear and replace if necessary.
6. Wipe warning labels clean. If labels are not readable, contact Martin
Engineering or a representative for replacements.
DANGER
!
Before installing, servicing, or adjusting the belt cleaner, turn
off and lockout / tagout / blockout / testout all energy sources
to the conveyor and conveyor accessories according to ANSI
standards. Failure to do so could result in serious injury or
death.
Blade Servicing 1. Undo tensioner and visually inspect blades.
a. If blades are clean and not excessively worn, re-tension cleaner.
b. If material buildup is still present or blades are worn excessively,
proceed.
2. When fully retracted, simply remove the retaining pin securing the blade
cartridge to the operator end of the mainframe. Grasp the handle and pull
the blade cartridge off the mainframe and away from the mount bracket.
Completely remove the blade cartridge from the mainframe and place it
in a suitable position for maintenance work to be carried out.
3. Clean and inspect the blades. If blades are excessively worn, replace with
new blades. Remove the blades from the cartridge by removing one of the
Maintenance

Martin Engineering M3687-12/17 16 Martin®DT2S Reversing Cleaner
end stops. Slide the blades out of the cartridge and replace by sliding in
new blades. Ensure the blades face in the correct direction. Re-fit the end
stop. These prevent belt damage by supporting the belt at the edge of the
cleaning blades. If removing both end stops, first mark their position in
the cartridge to ensure correct positioning of blades on re-assembly.
4. Re-install blade cartridge onto the cleaner mainframe and re-fit the
securing pin at the operator side. Re-tension the cleaner.
5. Remove equipment from service if there is any indication it is not
functioning properly. Call Martin Engineering or representative for
assistance. Do NOT return equipment to operation until the cause of the
problem has been identified and corrected.
6. Wipe all labels clean. If labels are not readable, contact Martin
Engineering or representative for replacements.
WARNING
!
Failure to remove tools from maintenance area and conveyor
belt before turning on energy source can cause serious injury
to personnel and damage to belt.
7. Remove all tools from maintenance area.
DANGER
!
Do not touch or go near conveyor belt or conveyor accessories
when conveyor belt is running. Body or clothing can get
caught and pulled into conveyor belt, causing severe injury or
death.
8. Start conveyor belt.
9. Observe cleaner action and blade effectiveness.
Maintenance
Other manuals for DT2S
1
Table of contents
Other Martin Industrial Equipment manuals