Mastercare Gen II Entree Bath User manual

Gen II Entree Bath - All Models
Operation Manual
Important Safety Instructions
Read & Follow All Instructions Thoroughly
Important safety instructions. Read and follow all instructions thoroughly.
CAUTION: The caution heading identifies important maintenance and operation
information. Failure to obey a caution warning may result in damage to the
Entree Bath and may void the warranty.

Generation II Entree Bath –All Models
OPERATION MANUAL
07-01-2018
Page 20 of 50
2071 14th Ave – Columbus, NE 68601
800-798-5867 FAX: 402-563-9102
www.mastercarebath.com
This page is intentionally left blank

Generation II Entree Bath –All Models
OPERATION MANUAL
07-01-2018
Page 21 of 50
2071 14th Ave – Columbus, NE 68601
800-798-5867 FAX: 402-563-9102
www.mastercarebath.com
WARNINGS
•Risk of accidental injury or drowning; children and impaired individuals should not use
hydromassage bathtub without trained adult supervision.
•To avoid injury; exercise care when entering or exiting the hydromassage bathtub.
•Do not use drugs or alcohol before or during the use of a hydromassage bathtub to
avoid unconsciousness and possible drowning.
•Risk of fetal injury, pregnant or possibly pregnant women should consult a physician
before using a hydromassage bathtub.
•Risk of hyperthermia and possible drowning; do not use a hydromassage bathtub
immediately following strenuous exercise.
•Risk of electrical shock; do not permit electrical appliances (such as a hair dryer, lamp,
telephone, radio or television) within 5 ft (1.5m) of the hydromassage bathtub.
•Proper electrical grounding must be performed by a licensed electrician following local,
state and federal codes. Test the ground fault circuit interrupter protecting this
appliance periodically in accordance with the manufacturer’s instructions.
•(For permanently connected units) a green colored terminal (or a wire connector
marked “g”, “gr”, “ground” or “grounding”) is provided within the terminal
compartment. To reduce the risk of electric shock, connect the terminal or connector
to the grounding terminal of your electric service or supply panel with a conductor
equivalent in size to the circuit conductors supplying this equipment.
•Risk of hyperthermia and/or possible drowning; water temperature in excess of 110oF
or 43 o C may be hazardous to your health. Check and adjust water temperature before
use.
•Risk of hyperthermia. People using medications and/or having an adverse medical
history should consult a physician before using a hydromassage bathtub.

Generation II Entree Bath –All Models
OPERATION MANUAL
07-01-2018
Page 22 of 50
2071 14th Ave – Columbus, NE 68601
800-798-5867 FAX: 402-563-9102
www.mastercarebath.com
FEATURES AND OPERATING CONTROLS
PLUMBING CONTROLS:
Mixing Valve: Adjusts the temperature of the mixed
water to the shower wand and tub fill spigot. Turn
counter clockwise for hotter and clockwise for colder
mixed water (accuracy must be checked periodically
per facility protocol).
Tub Fill and Shower Spray Control Valves: Turns
ON/OFF and controls the flow of mixed water to the
tub Fill Spigot and Shower Wand.
Solar Powered Thermometer: Digital readout
temperature of the mixed water to the shower wand
and tub fill spigot (Preset at factory: Field calibration
maintenance, see maintenance manual).
Solar Powered LCD
Thermometer
Gen II Mixing Valve
Tub Fill
Control Valve
Shower Spray
Control Valve
Fill Spigot
Shower Wand
Foot-End Controls
GFCI
(Ground Fault
Circuit
Interrupter)
Plumbing Controls
Emergency Open Door
Access Panel and Tool
Aromatherapy
Access Cap
Security Belt Knob
Emergency door
open button
Comfort Warm
(Optional feature)

Generation II Entree Bath –All Models
OPERATION MANUAL
07-01-2018
Page 23 of 50
2071 14th Ave – Columbus, NE 68601
800-798-5867 FAX: 402-563-9102
www.mastercarebath.com
FOOT-END CONTROL PANEL:
Emergency Door Open Button:In the case of an emergency, hold the
Emergency Door Open Button and the Door Open Button at the same time to
open the door. It will override the drain water sensors.
BathAire(SM) Control: See Basic Operation.
Door Open/Close Button:To open door, press and hold down the Door Open
Button until the door comes to a complete stop. To close the door, press and
hold down the transmitter close button until the door comes to a complete
stop.
CAUTION: Check for obstructions in the sensors, like wet wash cloth,
foot, etc.
CAUTION: Door will not open if drain sensors detect water in the tub
unless the Emergency Door Open Button is also pressed at the same
time.
CAUTION: Make sure the door comes to a complete stop to properly seal
the tub. Failure to do so may result in leaks. Contact Tech Support.
Thumb Screws: The thumb screws hold the service panel in place and are to
be removed only by authorized service personnel for service access.
BATHAIRE(SM) VARIABLE SPEED SYSTEM CONTROL BASIC OPERATION:
BathAire(SM) On/Off Button: The BathAire(SM) can be turned on or off by pressing the on/off button. Press the button once
and BathAire (SM) will turn on. Press the button once again and the BathAire(SM) will shut off.
BathAire(SM) More & Less Air/Heat Buttons: Once the BathAire(SM) is on, it is in an adjustment mode. BathAire(SM) turns on
at 60% of full volume. To increase or decrease the air volume, press the more or less air/heat button and hold down until
the desired level is achieved. The heat level is tied to the air volume and adjusted the same way.
BathAire(SM) Wave Mode: To create a wave effect: Press the wave button once for the long cycle, a second time for the
short cycle and a third time to return to normal operation. This will automatically increase and decrease the air volume
through the bath cycle.
BathAire(SM) Purge Cycle: The purge cycle comes on automatically 20 minutes after the BathAire(SM) system has been
turned off. It will then run for a period of one minute. This is a preset of the motor and cannot be turned off. It also is
programmed to cycle every 24 hours, so be aware it will run the purge cycle 24 hours after BathAire(SM) being energized.
BathAire(SM) Internal Timer: The BathAire(SM) system has an internal timer that shuts the BathAire(SM) off automatically
after it has run for twenty minutes. If it get turned off in the middle of a bath, it can be turned back on. The Purge cycle
will also operate 20 minutes after time shut off.
BathAire
Control Panel
Door Close
Door Open
Emergency
Door Open
Thumb Screw
Thumb Screw
Door Close
On/Off Button
More Air/Heat
Button
Less Air/Heat
Button
Wave Button

Generation II Entree Bath –All Models
OPERATION MANUAL
07-01-2018
Page 24 of 50
2071 14th Ave – Columbus, NE 68601
800-798-5867 FAX: 402-563-9102
www.mastercarebath.com
OPERATION
Before operating the Entree Bath, familiarize yourself with the
key features of the tub outlined in the drawings supplied with
these instructions (Video provided in the tub kit and viewable
on MasterCare website).
1. If Aromatherapy is desired, place selected scent sachet or
canister in the Aromatherapy holder and securely close the
access cap prior to turning on BathAire(SM). (See Aromatherapy
Section in this manual)
CAUTION: Do NOT remove beads from sachet. Never
place liquids in the Aromatherapy sachet holder.
2. Turn On The BathAire(SM) by pushing in on the BathAire(SM) On/Off
Touch Pad located on the lower left side deck of the tub. This will
warm up the environment inside the tub. You can increase or
decrease the air flow by pushing down on the plus (+) or minus (-)
section of the touch pad.
3. Place Individual into Entree Bath:
The Entree Bath operator must be trained by qualified facility
personnel. Recommended manufacturers procedures must be
utilized before they can be allowed to operate the Entree Bath
system. Refer to provided Video.
Verify door is in the fully opened position. Position the security
belt attached to the security belt knob on top of the tub deck and
move it out of the way. Position the comfort pad group as follows:
two rectangular pads parallel about three to four inches apart,
centered in the individual seating area and one rectangular pad
horizontally on the seat back at approximately the lumbar area of
the individual (see Aromatherapy, Comfort Pad and Belting
Procedures section)Transfer the individual onto the Entree Bath
seat using appropriate ergonomic transfer techniques or with a
modern lift/transfer device per facility protocol (Refer to section
Adjusting Entree Tub for Lift/Transfer Device section in this
manual)Make sure the individual's feet are positioned in the
center of the foot well.
The grab bar is intended for transferring, NOT for load bearing.
Use the grab bar only for stabilizing, NOT standing. Make sure
the individual's feet and hands are clear of all areas where the
door meets the outside tub surface during the closing procedure.
Never let a bather stand in the foot well!
4. Secure the Individual:
Secure the security belt firmly around the individual's chest by
inserting the security belt knob located behind the individual's
back through the appropriate hole at each end of the belt. Adjust
the belt and comfort pads as necessary for the individual's security
and comfort (see Aromatherapy, Comfort Pad and Belting
Procedures section, in this manual).
Security Belt
BathAire Variable
Speed Control
Door Close
Button
Door Open
Button
Comfort Pads
Emergency
Door Open
On/Off Button in BathAire(SM)
Variable Speed Control
Aromatherapy
Access Cap
Security Belt
Knob
Security Belt Knob

Generation II Entree Bath –All Models
OPERATION MANUAL
07-01-2018
Page 25 of 50
2071 14th Ave – Columbus, NE 68601
800-798-5867 FAX: 402-563-9102
www.mastercarebath.com
5. Tub Fill Procedures:
Push down on the Close button until the door is fully closed and
stops on its own. You will no longer hear the motor and the seal
will be compressed.
CAUTION: Prior to closing the door, ensure NO materials
I.E. towels, band aids, etc. are trapped between door and
tub. Make sure the door comes to a complete stop to
properly seal the tub. Failure to do so may result in leaks.
First, bring the water temperature up to normal bath temperature
by placing the shower wand inside the bath, turned toward the
side wall, away from the bather. Turn on the Shower Spray Valve.
Run the water until it reaches the desired temperature between
96°F to 105°F. Adjust as needed by turning the Mixing Valve
usually between hot or cold side. Turn off the Shower Wand Flow
Control Valve and replace the Shower Wand. Close the drain and
slowly turn the Tub Fill Control Valve knob counterclockwise to
open and test the water temperature again with your hand to
make sure it is safe and comfortable for the individual. Check the
temperature of the water with LCD Thermometer. Adjust water
temperature following the above instructions if needed. Fill tub 2-
4” below bottom of overflow or 1” below door seal or to the
bathers comfort; this allows for resident movement and
BathAire(SM) action. Add a minimum of ¼ oz of MasterCare’s Bath
Oil to the water from the Dispensing bottle. This will help reduce
foaming from soap, shampoo, etc.
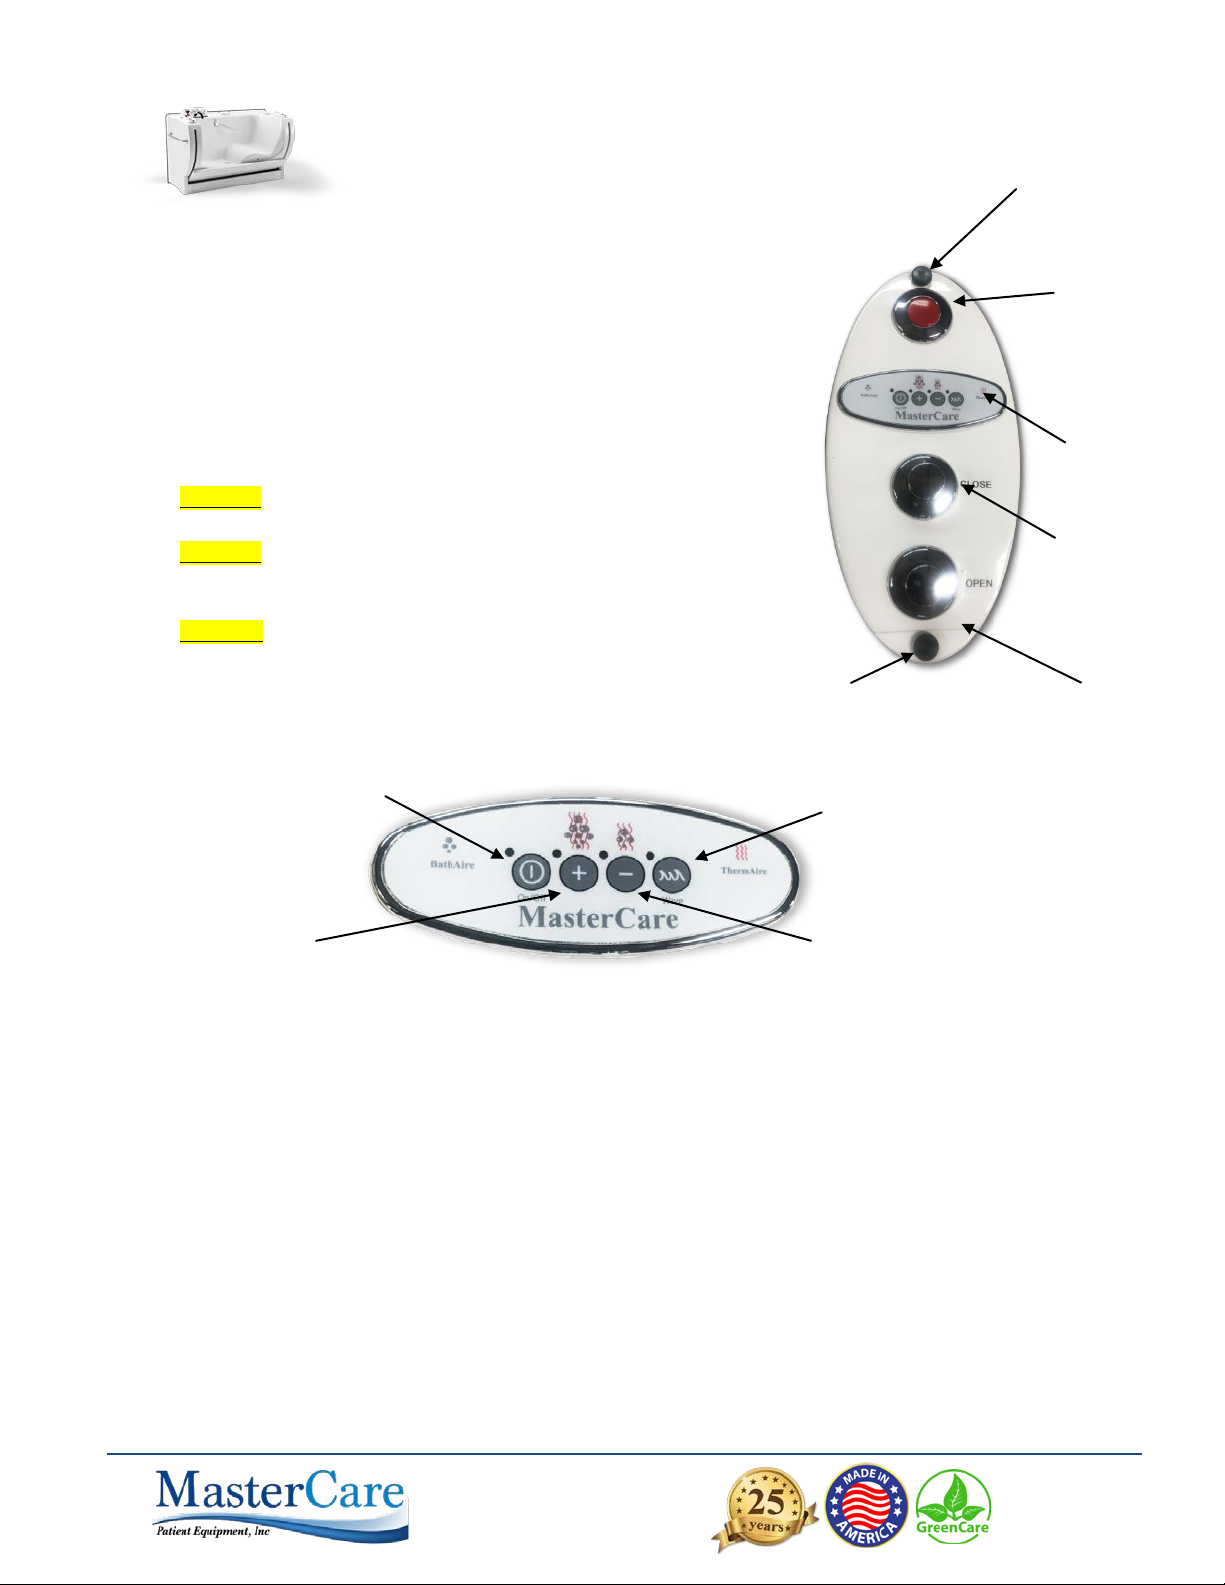
CAUTION: If there is water in the tub, the drain sensors
will not let the Door Switch be activated. This will
prevent accidental opening of the door when the tub is
full of water. If an emergency should arise, press and
hold the emergency button and the door open button
at the same time. (please refer to the Foot End Control
section)
6. Bathing Procedures:
During the normal bath cycle, you can shampoo the individual’s
hair and wash their body with MasterCare’s specially formulated
Shampoo and Body Wash. Bathe or assist the individual with their
hygiene needs. To rinse, lift the Shower Wand from its holder,
located on the tub deck, then direct the nozzle towards the open
water in the tub. Turn the Shower Wand on by turning the Shower
Spray Control Valve counter clockwise to full open. Adjust the
shower water temperature to the desired individual comfort level
using the Gen II Mixing Valve. Test the water temperature on your
wrist before showering the individual. Turn off Shower Spray
Control Valve when complete by turning knob clockwise. Return
Shower Wand to its holder.
The temperature of the bath water must
never exceed 110oF. If you are unable to
adjust to the normal level of 96oF to 105oF,
remove the individual and report the problem
to maintenance. DO NOT use bath until the
mixing valve is serviced to correct the
problem. Failure to heed this warning could
result in a scalding injury to the individual.
Bath Oil & Skin
Conditioner
Item: 90201
Shampoo &
Body Wash
Item: 90301
Solar Powered LCD
Thermometer
Gen II Mixing Valve
Tub Fill
Control Valve
Shower Spray
Control Valve
Fill Spigot
Drain Handle
(Also drains overflow)

Generation II Entree Bath –All Models
OPERATION MANUAL
07-01-2018
Page 26 of 50
2071 14th Ave – Columbus, NE 68601
800-798-5867 FAX: 402-563-9102
www.mastercarebath.com
7. End of Bath Cycle: Drain Tub
At the end of the bath cycle, while leaving the BathAire(SM) on
(it will reduce chilling and begin drying the tub), open the drain
by rotating the Drain Handle to open position. Allow the tub to
drain completely before opening the door.
Sensors in the drain will prevent the Open Door button from
functioning while there is water in the tub. (Check for other
objects obstructing the sensors, like wet wash cloth, patient
foot, etc.)
CAUTION: If an emergency arises, press and hold the
emergency button and the door open button at the same
time. (please refer to the Foot End Control section)
8. Open the door by pushing down on the Door Open Button.
Right after the initial door's rotating movement, stop opening
for three (3) seconds, allowing residual water to dissipate
down the drain. Continue to open the door and allow the door
to rotate to a fully open position until it stops on its own.
9. Press the On/Off button to turn off the BathAire(SM) system.
10. Dry as much of the individual as you can before removing
them from the tub by leaning the individual forward and towel
dry their back side and inside of the tub area behind the
individual. Lift each leg and towel dry the underside of the
legs/top of the seat, under legs and feet/foot well area under
feet. It is suggested that a bath mat or towel be placed on the
floor area under the seat area prior to this procedure. Remove
the chest belt from the individual. Transfer the individual out
of the Entree Bath seat using appropriate ergonomic transfer
techniques or with a modern lift/transfer device per facility
protocol. (see Adjusting Entree Tub for Lift/Transfer Device
section.)
After the individual is standing,
towel dry their posterior area
as needed. After appropriate
procedures are used to dress
or cover the individual,
complete the transfer of the
individual into the wheelchair if
required, back to the bedroom,
etc.
Note: If lift devices such as sit-
to-stand lifts or sling lifts are
used, follow recommended
manufacturer procedures.
The Grab Bar is NOT designed to support an individual’s body weight. The grab bar is
only intended to assist in transfer. Never let a bather stand in the foot well!
Drain Handle
(Also works as an overflow)
Sensor
BathAire(SM) Variable Speed
On/Off Button

Generation II Entree Bath –All Models
OPERATION MANUAL
07-01-2018
Page 27 of 50
2071 14th Ave – Columbus, NE 68601
800-798-5867 FAX: 402-563-9102
www.mastercarebath.com
Cleaning Procedures:
Turn on BathAire(SM).Push down on the Door Close button until
the door is fully closed and stops on its own. Make sure the
drain is open and use the shower wand to rinse all inside
surfaces and the seal area of the tub to remove residual organic
materials left over from the previous bath. Close the drain. Turn
on the water and fill the footwell with approximately one (1)
gallon of water. Using MasterCare's specially formulated
Disinfectant cleaner, dispense 2 oz (approximately 16 pumps)
into the foot well water. Using the special Long Handled Tub
Brush, scrub away any remaining organic materials sticking to
the inside tub surfaces, comfort pads and belt. Scrub the seal
area with the Seal Brush also included in the tub kit. Leave
disinfectant on surface for a minimum of 10 minutes per
manufactures requirements. Open the drain. Rinse all the inside
surfaces and seal area with clean water from the shower wand
at full pressure. Turn off BathAire(SM).Open the door all the
way. Allow all cleaned surfaces to dry naturally with the drain
open. The clean comfort pads can be placed in to the bottom of
the foot well to dry.
A) Never leave individual unattended during the entire
bathing procedure. B) All individuals must be assessed
before using the system, to determine if they will require
the assistance of two staff members to transfer into and
out of the bath or if one staff member is suitable for this procedure.
Individuals identified as needing the assistance of two staff members
must always be transferred with two staff members.
BathAire(SM) Purge Cycle:
BathAire(SM) will automatically turn on after the bath has been
idle for twenty (20) minutes and run for one (1) minute. This
will help the area around the aerators to dry.
Other Considerations:
CAUTION: When not being used, all Disinfectant Cleaner,
Bath Oil and Shampoo solutions used during the bathing
procedures must be stored in a secure area not accessible by
the patients.
It is recommended that a two person bathing team be
established for each shift with trained backups. Using the
team approach, with one member transferring the individuals
to and from the bathing area and the other operating the
bathing system, increases the efficiency of the bathing
operations.
It is recommended that the operations wall chart be posted
on the wall next to the control end of the tub for quick
reference by the operator of the Entree Bath system (One is
provided in the tub starter kit).
MasterCare
BathAire System
Disinfectant Cleaner
Item: 90101
Long Handled Tub Brush
BathAire (SM) Aerator
CAUTION: Failure to leave the door OPEN on
the tub when not in use will cause damage
to the seal and void the warranty for this
item.
Seal Brush

Generation II Entree Bath –All Models
OPERATION MANUAL
07-01-2018
Page 28 of 50
2071 14th Ave – Columbus, NE 68601
800-798-5867 FAX: 402-563-9102
www.mastercarebath.com
ADJUSTING THE ENTREE TUB FOR LIFT/TRANSFER DEVICES
For those cases when a lift/transfer device is needed:
11. Push down on the Door Open Button allowing the door to rotate to a fully open position until it stops on its own.
12. Remove the Kick Panel by removing the two thumb screws at either end of the panel.
Note: Clearance distance under the tub when the Kick Plate is removed for lift/transfer devices: 3.5"
CAUTION: Do not use equipment with bases equal to or greater than 3.5". Damage to tub may occur.
Thumb Screw
Thumb Screw
Kick Panel

Generation II Entree Bath –All Models
OPERATION MANUAL
07-01-2018
Page 29 of 50
2071 14th Ave – Columbus, NE 68601
800-798-5867 FAX: 402-563-9102
www.mastercarebath.com
EMERGENCY OPEN/CLOSE DOOR PROCEDURES
1. In the event of a medical emergency where it is needed to open the
door before the tub is totally empty: hold Emergency Door Open
Button and the Door Open Button at the same time to open the
door. It will override the drain water sensors.
2. In the event there is a power failure or a failure in the door actuator
system, first check to make sure the drain does not have any water. If
there is water in the drain, the drain sensors will deactivate the Door
Open Button. In most cases, the door can be opened with the yellow
handled 5/16" ball end Allen wrench driver. (see also GFCI Reset
Procedures.)
3. Remove the emergency door open/close access panel by removing the two thumb screws at either end of the panel.
Set the panel and thumb screws off to the side.
4. Locate the yellow handled 5/16” ball end allen wrench nested in a hole under the access panel.
5. Engage the ball end allen wrench through the open hole in the tub deck into the socket at the top of the actuator
screw shaft.
6. Turn the handle clockwise to lower the door.
7. Replace the Allen wrench and access panel when the power is restored.
Emergency Open
T-Handle Allen Wrench
Access Panel
T-Handle
Allen Wrench
Ball-End of 5/16"
Allen Wrench
Socket Head for
5/16" Allen Wrench
Top of Actuator
Screw Shaft
Thumb Screw
Thumb Screw
FOOT END CONTROL PANEL
Door Open
button
Emergency
Door Open
button

Generation II Entree Bath –All Models
OPERATION MANUAL
07-01-2018
Page 30 of 50
2071 14th Ave – Columbus, NE 68601
800-798-5867 FAX: 402-563-9102
www.mastercarebath.com
GFCI RESET PROCEDURES
All MasterCare bathing systems are equipped with onboard GFCI’s making them easy to access for your convenience. In
the event a power surge trips the GFCI, it can be accessed and reset using the following procedures:
GFCI (Ground Fault Circuit Interrupter) detects and interrupts electric faults to insure safety to all individuals.
Reset Button: trips and shuts down all power should a power surge, outage, faulty outlet, lightening etc have any affect
on the tub power system. It will then be pushed to restore power after a qualified individual deems it safe.
Test Button: insures the CGFI is working properly by allowing clear access for testing.
Self Testing GFCI will trip when unit is plugged in, must be reset.
Reset Button
Test Button
GFCI

Generation II Entree Bath –All Models
OPERATION MANUAL
07-01-2018
Page 31 of 50
2071 14th Ave – Columbus, NE 68601
800-798-5867 FAX: 402-563-9102
www.mastercarebath.com
AROMATHERAPY, COMFORT PAD AND BELTING PROCEDURES
Aromatherapy:
Before activating the BathAire(SM), remove the Aromatherapy Access Cap and insert a scented sachet or canister into the
receptacle. See Page 24.“DO NOT OPEN THE SACHET OR CANISTER”, DO NOT place loose beads or liquids in the sachet
holder. Securely close the cap prior to turning on BathAire(SM).
CAUTION: Running the BathAire(SM) without the Aromatherapy Access Cap securely in place will cause the system to lose
too much air and the aerators (hydromassage action) will not function properly. If the sachet will not easily fit into the
receptacle, slowly slide the zip tie up the sachet, making the sachet more elongated. DO NOT REMOVE THE ZIP TIE.
Comfort Pads:
•To Attach Pads: Make sure the suction cups are clean. Wetting the suction cups before attachment will make them
adhere better.
•Arrange the comfort pads as shown above with two pads parallel on the seat and one against the seat back in the
lumbar area. Press down firmly until all the air is out of all the suction cups. Other placement options may be desired
for positioning and comfort.
•To Remove Pads: Reach under the pad and grasp with both hands with fingers under the pad as far as they go.
•Pull gently up on one side until all the cups release. CAUTION: Do not pull up on pad by grasping it on the outside
and trying to pull up on all suction cups at the same time with a quick jerking or yanking motion. This may damage
the pad causing the foam pad to separate from suction cup base.
Security Belt & Pad:
•For those individuals that need additional security as assessed and approved by the managing nursing staff, thread
the security belt through the belt slots on the belt pad until it is at the midpoint. Thread the belt under each of the
bather's arms with the belt pad centered on their chest. Connect the belts to the security belt knob by looping one of
the holes of each end of the belt over the knob so belt pad is snug against the bather’s chest.
Pad Maintenance Tip:
a. Per manufacturer recommendations it is NOT advised to use conditioners on the pads and straps. Disinfect the pads
and straps with MasterCare Disinfectant according to the label and thoroughly rinse with water. Rotating the pads on
a daily basis will help prolong the life of the pads.
b. CAUTION: DO NOT use bleach to clean and/or disinfect the pads and straps. Also, some shampoos, bath
oils/additives and Betadines have substances in them that can stain some surfaces. Use only MasterCare
cleaner/disinfectant (Item: 90101), Master Care Bath Oil & Skin Conditioner (Item: 90201) and Shampoo & Body
Wash (Item: 90301)
Security Belt
Item: 11823
Belt Pad
Item: 12101
Comfort Pad
Item:12212
Aromatherapy Access Cap
Suggested Pad
Configuration
Security Belt Knob

Generation II Entree Bath –All Models
OPERATION MANUAL
07-01-2018
Page 32 of 50
2071 14th Ave – Columbus, NE 68601
800-798-5867 FAX: 402-563-9102
www.mastercarebath.com
This page is intentionally left blank

Generation II Entree Bath –All Models
OPERATION MANUAL
07-01-2018
Page 33 of 50
2071 14th Ave – Columbus, NE 68601
800-798-5867 FAX: 402-563-9102
www.mastercarebath.com
ENTREE BATH TRAINING CHECK LIST
After reviewing the operation and safety instructions in this manual, the Entree Bath can be operated and all components
can be identified.
OPERATION:
YES
NO
Turn On BathAire(SM) Control
Move Individual Into The Entree Bath
Secure Individual
Close Tub Door With Push Buttons
Close Drain With Open/Close Lever
Adjust Mixing Valve To Desired Temperature
Fill Tub with Tub Fill Valve
Use Liquids As Desired
Use Shower Wand With Shower Wand Control Valve
Open Drain With Open/Close Lever
After Water Is Drained, Open Tub Door With Push Buttons
Move Individual Out Of The Entree Bath
Return Individual To Room Or Desired Location
Remove Comfort Pads And Place In Foot Well
Use Disinfectant To Clean Tub And Pads
Rinse Disinfectant From The Tub And Pads
LOCATE & IDENTIFY:
LCD Thermometer
GFCI reset
Aromatherapy Access Cap & Canister
Wall Chart
T-Handle Allen Wrench
Casual Water Drain
Training Date:
Staff:
Supervisor:
Please, make copies of this training checklist for each staff member that will operate the Entree Bath.

Generation II Entree Bath –All Models
OPERATION MANUAL
07-01-2018
Page 34 of 50
2071 14th Ave – Columbus, NE 68601
800-798-5867 FAX: 402-563-9102
www.mastercarebath.com
This page is intentionally left blank
Other manuals for Gen II Entree Bath
2
Table of contents
Other Mastercare Bathtub manuals
Popular Bathtub manuals by other brands

PAA
PAA RONDO owner's manual

Cristalplant
Cristalplant Ottocento Assembly instructions

Swiss Madison
Swiss Madison SM-DB567 installation instructions

Sapho
Sapho G7800 Blanice Installation and user guide

Glacier bay
Glacier bay GBBA015 installation manual

American Standard
American Standard Williamsburg Elite Whirlpool 2805EC Specification sheet

DURAVIT
DURAVIT 2x3 760023 Mounting instructions

DURAVIT
DURAVIT Luv 700434 Series installation instructions

KERRA
KERRA MARIKA LUX Assembly and maintenance instructions

Kohler
Kohler K-711 Installation and care guide

Crane
Crane 2-918 NEU-VICTOR installation instructions

Kohler
Kohler Mariposa K-1242-LA Roughing-In Guide