manuals.online logo
Brands
  1. Home
  2. •
  3. Brands
  4. •
  5. MasterCraft
  6. •
  7. Floor Machine
  8. •
  9. MasterCraft 175 RPM Guide

MasterCraft 175 RPM Guide

175 RPM Floor Machine Manual - PN 344346 Rev C - Printed in USA 11/29/05
PAGE 1
SAVE THESE INSTRUCTIONS
This floor machine will afford you many years
of trouble free operating satisfaction if it is
given proper care. All parts have passed
rigid quality control standards before being
assembled to produce the finished product.
Prior to packaging, the units are again
inspected for assurance of flawless assem-
bly.
This floor machine was protectively packed
to prevent damage in shipment. We recom-
mend that upon delivery, remove the unit
from its carton and carefully inspect it for
any possible damage in transit.
If damage is discovered, immediately notify
the transportation company that delivered
your floor machine. As a shipper, we are
unable to act upon any claim for concealed
damage. You must originate any claim within
5 days of delivery.
These instructions are for your protection
and information. PLEASE READ CAREFUL-
LY! Failure to follow these precautions could
result in injury or discomfort.
Treat this floor machine as you would any
other high grade precision made product.
Throwing, dropping, unreasonable bumping
across thresholds and other misuse may
result in a damaged unit and invalidate the
warranty.
PLEASE READ
CAREFULLY
BEFORE
OPERATING
READ & FOLLOW ALL INSTRUCTIONS,
WARNINGS & CAUTIONS
BEFORE USING THIS FLOOR MACHINE
175 RPM
STANDARD
FLOOR MACHINE
SAFETY &
MAINTENANCE
MANUAL
This unit is intended for commercial use.
Improper connection of the equipment-grounding conductor can result in a risk of electrical shock.
Check with a qualified electrician or service person if you are in doubt as to whether the outlet is properly grounded.
DO NOT modify the plug provided with the machine. If it will not fit the outlet,
have a proper outlet installed by a qualified electrician.
NOTE: In Canada, the use of a temporary adaptor is not permitted by the Canadian Electrical Code.
1) DO NOT leave this machine plugged in
when not in use. Unplug from outlet when
not in use and/or before servicing.
2) Electric shock could occur if exposed to
rain. Store indoors.
3) This is NOT a toy. Close attention is nec-
essary when used around or near children.
4) Use only as described in this manual.
Use only manufacturer's recommended
attachments.
5) DO NOT use with damaged cord plug.
If the floor machine is not working as it
should because it has been dropped, dam-
aged, left outdoors, or dropped into water,
contact the manufacturer or authorized
service center.
6) DO NOT pull or carry by cord, use power
cord as a handle, close a door on cord, or
pull cord around sharp edges or corners.
DO NOT run floor machine over the cord.
Keep cord away from heated surfaces.
7) DO NOT handle the plug or operate with
wet hands.
8) DO NOT put any object into the motor
openings.
9) DO NOT unplug by pulling on cord. To
unplug, grasp plug, not the power cord.
10) Keep hair, loose clothing, fingers and
all parts of body away from moving parts.
11) DO NOT operate where oxygen or
anesthetics are used.
12) DO NOT use around flammable or
combustible liquids such as gasoline or use
in areas where they may be present.
13) DO NOT use an extension cord unless
absolutely necessary. If an extension cord is
used, then wire size must be #14 gauge or
thicker and should not exceed 50 feet in
length. Use only a 3 wire grounded exten-
sion cord to ensure grounding protection.
14) Replace damaged or worn parts imme-
diately with genuine original equipment
parts to maintain safety and protect your
limited warranty.
15) Floor sanding can result in an explosive
mixture of fine dust and air. Use a floor
sanding machine only in a well ventilated
area.
IMPORTANT
SAFETY
INSTRUCTIONS
To reduce the risk of fire, electric shock or injury;
Read all instructions before using this floor machine.
When using this floor machine, basic precautions should always be followed,
including the following:
PAGE 2
WARNING:
WARNING:
This floor machine must be grounded. If it
should malfunction or breakdown, grounding
provides a path of least resistance for elec-
trical current to reduce the risk of electric
shock. This machine is equipped with a cord
having an equipment-grounded plug. The
plug must be inserted into an appropriate
outlet that is properly installed and grounded
in accordance with all local codes and ordi-
nances
If repair or replacement of the cord or plug
is necessary, DO NOT connect the ground-
ing wire to either flat blade terminal. The
wire with insulation having an outer surface
that is green with or without yellow stripes
is the grounding wire.
Improper use of the
grounding plug can
result in a risk of
electrical shock.
DANGER:
GROUNDING
INSTRUCTIONS
GROUNDING
METHODS
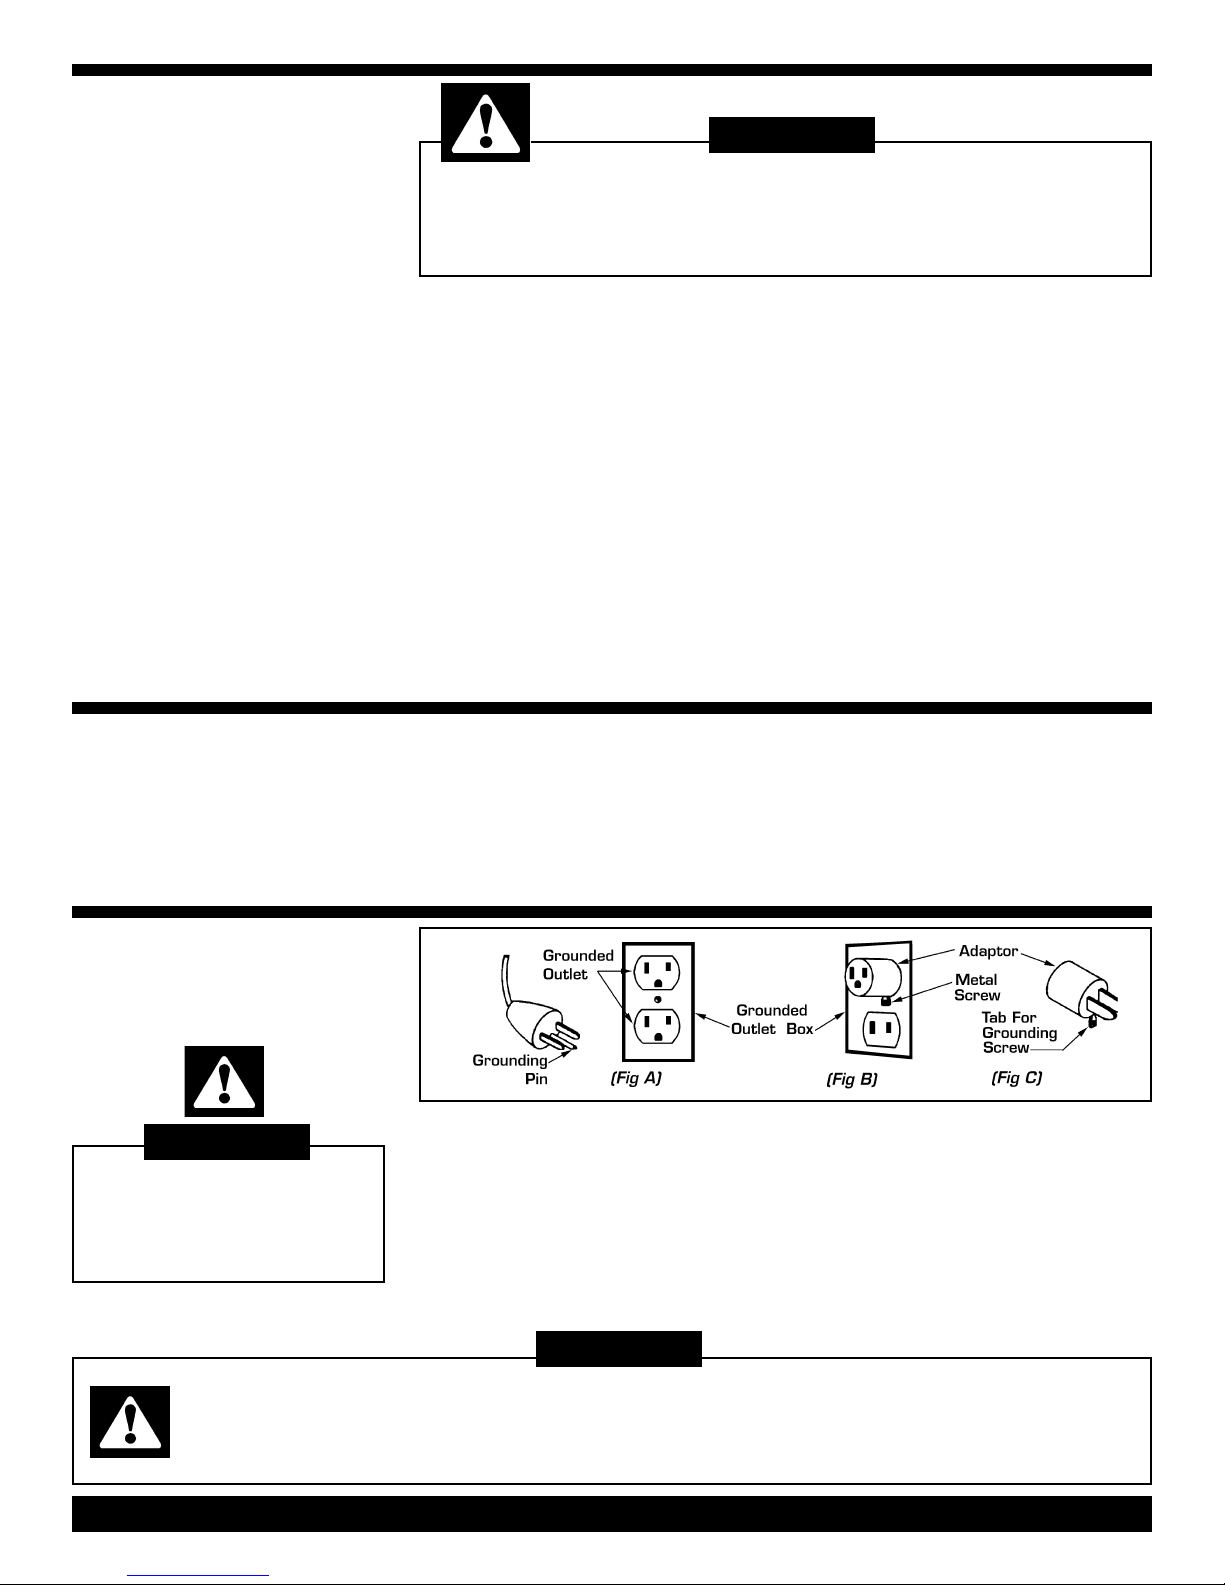
This floor machine is for use on a nominal
120 volt circuit, and has a grounding plug
that looks like the plug illustrated in (Fig A).
A temporary adaptor that looks like the
adaptor illustrated in (Fig B & C) may be
used to connect the plug to a 2-pole recep-
tacle as shown in (Fig A) if a properly
grounded outlet is not available.
The temporary adaptor should be used only
until a properly grounded outlet (Fig A) can
be installed by a qualified electrician. The
green color rigid ear, lug, or like extending
from the adaptor must be connected to a
permanent ground such as a properly
grounded outlet box cover. Whenever the
adaptor is used, it must be held in place by
the metal screw (Fig C).
This floor machine is designed for many
different floor cleaning applications. It is
important to select the correct brush or
floor pad depending upon the type of
cleaning operation you are doing.
When using floor pads, to achieve the
best results use clean pads and change
them as they load up.
Brush/Pad Installation:
1) Unplug the power cable and LOCK
the handle in the upright position.
2) Tilt the machine back until the handle
is laying on the floor and underside of
the machine is fully exposed.
3) Holding the pad driver/brush in both
hands, straddling the motor with your
back to the handle, bend over and fit the
three slots of the clutch plate over the
three lugs of the drive plate.
4) Turn the brush counterclockwise as
far as it will go. It is now seated and
ready for operation
Note: The brush/pad surface should be
flat and level on the floor.
Brush/Pad Removal:
Disengage clutch plate slots from drive
plate lugs by turning clockwise.
OPERATING INSTRUCTIONS
Never turn this floor machine ON with handle locked in the upright position.
DO NOT leave a plugged in floor machine unattended.
Always unplug the machine before leaving to prevent accidental startup.
Always install the brush/pad driver by hand.
“NEVER” lay brush/pad driver on the floor, position the machine
over it, and turn the machine ON to lock brush/pad driver in place.
This is called JUMPING the brush and is dangerous.
PAGE 3
CAUTION:
CAUTION:
BRUSH/PAD
DRIVER
INSTALLATION
CAUTION:
This floor machine is designed to move
from side to side. Begin operating at the
closest possible point to an electrical out-
let and work away from the outlet. This
will prevent running over the electrical
cord.
Note: Before installing the brush/pad
driver, plug in the machine and make
sure the motor is only running when the
triggers are activate and not before.
Setup for operation:
1) Install pad driver/brush (see instruc-
tions above) and plug in power cable.
2) Adjust the handle by pulling up on the
clamping lever located at the rear of the
machine.
3) Pull the handle toward you until you
reach a comfortable operating position.
4) Step down firmly on the clamping
lever and lock handle place.
Note: When transporting the machine
or attaching pad driver/brush, handle
must be LOCKED in the upright position.
5) Place your hands on the handle grips
and squeeze trigger locks beneath grips
to activate the motor and start the
brush operating.
To begin operating:
1) To move unit right, slowly apply slight
upward pressure. As the handle is
raised higher, the faster it will move to
the right.
2) To move unit left, slowly apply slight
pressure downward. As the handle is
lower, the faster it will move to the left
3) To move unit forward or backward,
keep brush/pad surface flat on the floor
and push or pull machine in the direction
required.
4) To stop the floor machine, release
triggers.
Machine wobbles or vibrates:
1) Adjust by turning the pad or brush
1
/
3
turn, then reinstall on machine.
2) Inspect the brush/pad driver for
warpage or out of round. Lay floor
machine down on handle with
brush/pad driver in place. With
machine running, observe if brush/pad
driver appears to wobble or is out of
round. Replace if this problem occurs.
1) After each use, wipe off all polished and
painted areas with a clean cloth.
2) Always remove the pad driver/brush when
the machine is not in operation, and hang on
a peg or lay flat on its back. NEVER store pad
driver/brush with the bristles down.
3) With floor machine unplugged, check
power cord for any breaks in the wire.
Breaks will most likely occur near the plug or
switch. Any breaks should be repaired or
replaced immediately.
FLOOR
MACHINE
MAINTENANCE
TROUBLE
SHOOTING
GUIDE
Address:
777 South Street
Newburgh NY 12550-0606
TEL:
(800) 835-7812
(845) 565-8850
FAX:
(800) 752-6883
(845) 565-9392
Internet Access
www.mastercraftusa.com
techsuppor[email protected]
175 RPM Floor Machine Manual - PN 344346 Rev C - Printed in USA 11/29/05
Always disconnect the power cable the from electrical outlet
when working on the floor machine.
PROBLEM: Motor won’t run.
CAUSE SOLUTION
1) Defective switch. 1) Check switch, replace if defective.
2) Defective power cord or wiring. 2) Check and replace if defective.
3) Defective motor. 4) Have motor checked by an authorized
service center.
4) Blown fuse or tripped circuit 4) Replace fuse or reset circuit breaker. If this
breaker at wall panel. does not correct the problem, have machine
checked by an authorized service center.
PROBLEM: Machine bogs down and runs slow.
CAUSE SOLUTION
1) Defective capacitor, rotor switch 1) Have machine checked by an authorized
or stationary switch. service center.
2) Circuit may be overloaded with 2) Plug machine in to a dedicated power outlet.
more than one appliance. If the problem still exists there could be a short.
Have the floor machine checked by an
authorized service center.
3) Low line voltage in building. 3) If wiring is old in the building have voltage
checked by the power company.
4) Pad loaded, heavily soiled. 4) Clean or replace pad.
PROBLEM: Motor runs, brush/driver won’t rotate.
CAUSE SOLUTION
1) Drive coupler is broken or 1) Contact the manufacturer or authorized
gear box is defective. service center.
PROBLEM: Noisy machine.
CAUSE SOLUTION
1) Defective motor or gear box. 1) Contact the manufacturer or authorized
service center.
PAGE 4
WARNING:
RISK OF EXPLOSION
THE MACHINE IS NOT INTENDED FOR FLOOR SANDING.
FLOOR SANDING CAN RESULT IN AN EXPLOSIVE MIXTURE
OF FIND DUST AND AIR.
WARNING:

Other MasterCraft Floor Machine manuals

MasterCraft MTHC16EHR-3450 Guide

MasterCraft

MasterCraft MTHC16EHR-3450 Guide

MasterCraft 1500 Contractors Guide

MasterCraft

MasterCraft 1500 Contractors Guide

MasterCraft QUARRYMASTER Guide

MasterCraft

MasterCraft QUARRYMASTER Guide

MasterCraft RA 605 IBCT User manual

MasterCraft

MasterCraft RA 605 IBCT User manual

MasterCraft X-405 Manual

MasterCraft

MasterCraft X-405 Manual

MasterCraft MTHC16EHR-WET Manual

MasterCraft

MasterCraft MTHC16EHR-WET Manual

MasterCraft FLOOR MACHINE Guide

MasterCraft

MasterCraft FLOOR MACHINE Guide

MasterCraft debrismaster Manual

MasterCraft

MasterCraft debrismaster Manual

MasterCraft TW411 Guide

MasterCraft

MasterCraft TW411 Guide

MasterCraft MTHC-16E-1760 Manual

MasterCraft

MasterCraft MTHC-16E-1760 Manual

MasterCraft MTHC-20JDLX Guide

MasterCraft

MasterCraft MTHC-20JDLX Guide

MasterCraft PowerDisc 165 Guide

MasterCraft

MasterCraft PowerDisc 165 Guide

MasterCraft MBS-1500 Manual

MasterCraft

MasterCraft MBS-1500 Manual

MasterCraft R44-180 User manual

MasterCraft

MasterCraft R44-180 User manual

MasterCraft X-612 Guide

MasterCraft

MasterCraft X-612 Guide

MasterCraft PA 505 IBCT User manual

MasterCraft

MasterCraft PA 505 IBCT User manual

MasterCraft 1000 Guide

MasterCraft

MasterCraft 1000 Guide

Popular Floor Machine manuals by other brands

Bartell B424 Owner's manual and parts book

Bartell

Bartell B424 Owner's manual and parts book

Nilfisk-ALTO SCRUBTEC 343.2 user manual

Nilfisk-ALTO

Nilfisk-ALTO SCRUBTEC 343.2 user manual

Nobles Quick Clean 1500 609640 Operator and parts manual

Nobles

Nobles Quick Clean 1500 609640 Operator and parts manual

Bona FlexiSand AMO310000 Manual and safety instructions

Bona

Bona FlexiSand AMO310000 Manual and safety instructions

Advance acoustic PACEMAKER 17 manual

Advance acoustic

Advance acoustic PACEMAKER 17 manual

Tennant BOSS 2000E Operator and parts manual

Tennant

Tennant BOSS 2000E Operator and parts manual

CleanFreak CPL17FB owner's manual

CleanFreak

CleanFreak CPL17FB owner's manual

Nilfisk-Advance BR 1100S Service manual

Nilfisk-Advance

Nilfisk-Advance BR 1100S Service manual

Taski ergodisc omni Instructions of use

Taski

Taski ergodisc omni Instructions of use

Tennant sentinel Operator's manual

Tennant

Tennant sentinel Operator's manual

U-Line H-10420 manual

U-Line

U-Line H-10420 manual

Polivac GASS38KOH Operation manual

Polivac

Polivac GASS38KOH Operation manual

Superabrasive Lavina 16-X-E user manual

Superabrasive

Superabrasive Lavina 16-X-E user manual

Advance acoustic SC2000 9087361020 Instructions for use

Advance acoustic

Advance acoustic SC2000 9087361020 Instructions for use

Nilfisk-Advance BR 850S SBG SPECIAL 56380630 850SC Instructions for use

Nilfisk-Advance

Nilfisk-Advance BR 850S SBG SPECIAL 56380630 850SC Instructions for use

SPE DFG500-2 operating instructions

SPE

SPE DFG500-2 operating instructions

Atco BALMORAL operating instructions

Atco

Atco BALMORAL operating instructions

HydraMaster RX-20 700-041-006 owner's manual

HydraMaster

HydraMaster RX-20 700-041-006 owner's manual

manuals.online logo
manuals.online logoBrands
  • About & Mission
  • Contact us
  • Privacy Policy
  • Terms and Conditions

Copyright 2025 Manuals.Online. All Rights Reserved.