manuals.online logo
Brands
  1. Home
  2. •
  3. Brands
  4. •
  5. Matco Tools
  6. •
  7. Tablet
  8. •
  9. Matco Tools MAXIMUS PRO HD User manual

Matco Tools MAXIMUS PRO HD User manual

MDMAXPROHD Scan Tool Included Accessory Checklist
A tablet for showing test
results.
MDMAXPROHD Scan
Tool
Diagnostic Cable
Connect the VCI dongle to
the vehicle’s OBD II DLC
port. It can be separated
into two parts: DB15F to
HD15F data cable and
HD15M to OBD II adapter.
To supply power to the
scan tool through
connection to AC outlet.
Power Adapter
Password Envelope
A piece of paper bearing
Product S/N and
Verification Code, which is
required for your VCI
activation.
A device for accessing
vehicle data.
Vehicle Communication
Interface (VCI) Dongle
The scan tool acts as the central processing system, which is used to receive and analyze the
live vehicle data from the VCI dongle and then output the test result.
2311226-16
2311226-16
VCI (Vehicle Communication Interface) Working Principle
1. Charging & Turning On
The MAXSYNC VCI dongle works as a heavy duty / medium duty / light duty vehicle
communication interface device, which is used to connect to the vehicle’s DLC (Data Link
Connector) port via the diagnostic cable to read the test data and then send it to the scan tool.
(To connect the diagnostic cable.)
DB-15 Diagnostic Connector
Data I/O Port
(To connect it to the scan tool to
perform diagnosis via the data cable.)
*Note: When the VCI dongle is connected to the scan tool via data cable, the system will
switch to USB mode automatically and the wireless communication will be disabled.
Internet
Commercial Vehicle
Diagnostic Cable
To Vehicle’s DLC Port
Wi-Fi
The following illustration demonstrates how the MAXIMUS PROHD diagnostic system
works.
1. Connect one end of the included power adapter to Type-C charging port of the scan tool,
then connect the other end to the AC outlet.
2. After charging is complete, disconnect the power adapter from the AC outlet. Pressthe
[POWER]button on the scan tool, the system starts initializing and then enters the home
screen.
*Warning: Please use the included power adapter to charge your tool. No responsibility
can be assumed for any damage or loss caused as a result of using power adapters other
than the one supplied.
*Note: If the VCI dongle is successfully activated, the scan tool
will automatically obtain the VCI ID and connect to it. In this case
it is not necessary for the user to manually configure it again. For
details on how to activate the VCI dongle, refer to Section 4.
Register & Update.
Type-C Charging Port
Data Transmission Port
Memory Card Slot
Ambient Light Sensor
Charging Indicator
Microphone
Microphone
Front Camera
Power/Screen
Lock Button
Volume Buttons
10.1" Touch Screen
Camera Flash
Rear Camera
Audio Speaker
Foldable Stand
Audio Speaker
(Reserved for and add-onmodules,
other USB devices use only.)
(Reserved for charging or transferring data.)
(To store the memory card
for storage extension.)
(Red means Charging, and
Green means Fully Charged.)
(Flip out it to any angle and work comfortable
at your desk, or hang it on steering wheel.)
VCI Dongle
or
MAXIMUS PROHD Scan Tool
3.97 Inch Touch Screen
*Warning: The VCI dongle
obtains power through the
vehicle's DLC (Data Link
Connector) via the diagnostic
cable. Do NOT connect the
DC-IN port to an external DC
power supply if the VCI
dongle can be powered up
normally.
If the pin of the DLC is
damaged or the DLC has
insufficient power, connect
the DC-IN port to an external
DC power supply.
No responsibility can be
assumed for any damage or
loss caused as a result of not
strictly following the above
method.
LAN/WAN Port DC-IN Port
(Reserved for other purposes. ) (See “*Warning”.)
Data Cable
Connect the VCI and scan
tool to perform vehicle
diagnosis.
Supply power to the VCI
through connection to
vehicle battery.
Battery Clamps Cable Adapter Cables
Connect the diagnostic
cable and vehicle’s non-
OBD II diagnostic socket.
Cigarette Lighter Cable
Supply power to the VCI
through connection to
cigarette lighter
receptacle.
MDMAXPROHD
Quick Start Guide
Quick Start Guide MDMAXPROHD
2. WLAN Setup
3. Register & Update
3. Register & Update(Cont.)
4. Changing Language
The following screen displays. Tap on
“REGISTER” to go to step 2. (Note:
must be connected to Wi-Fi to register).
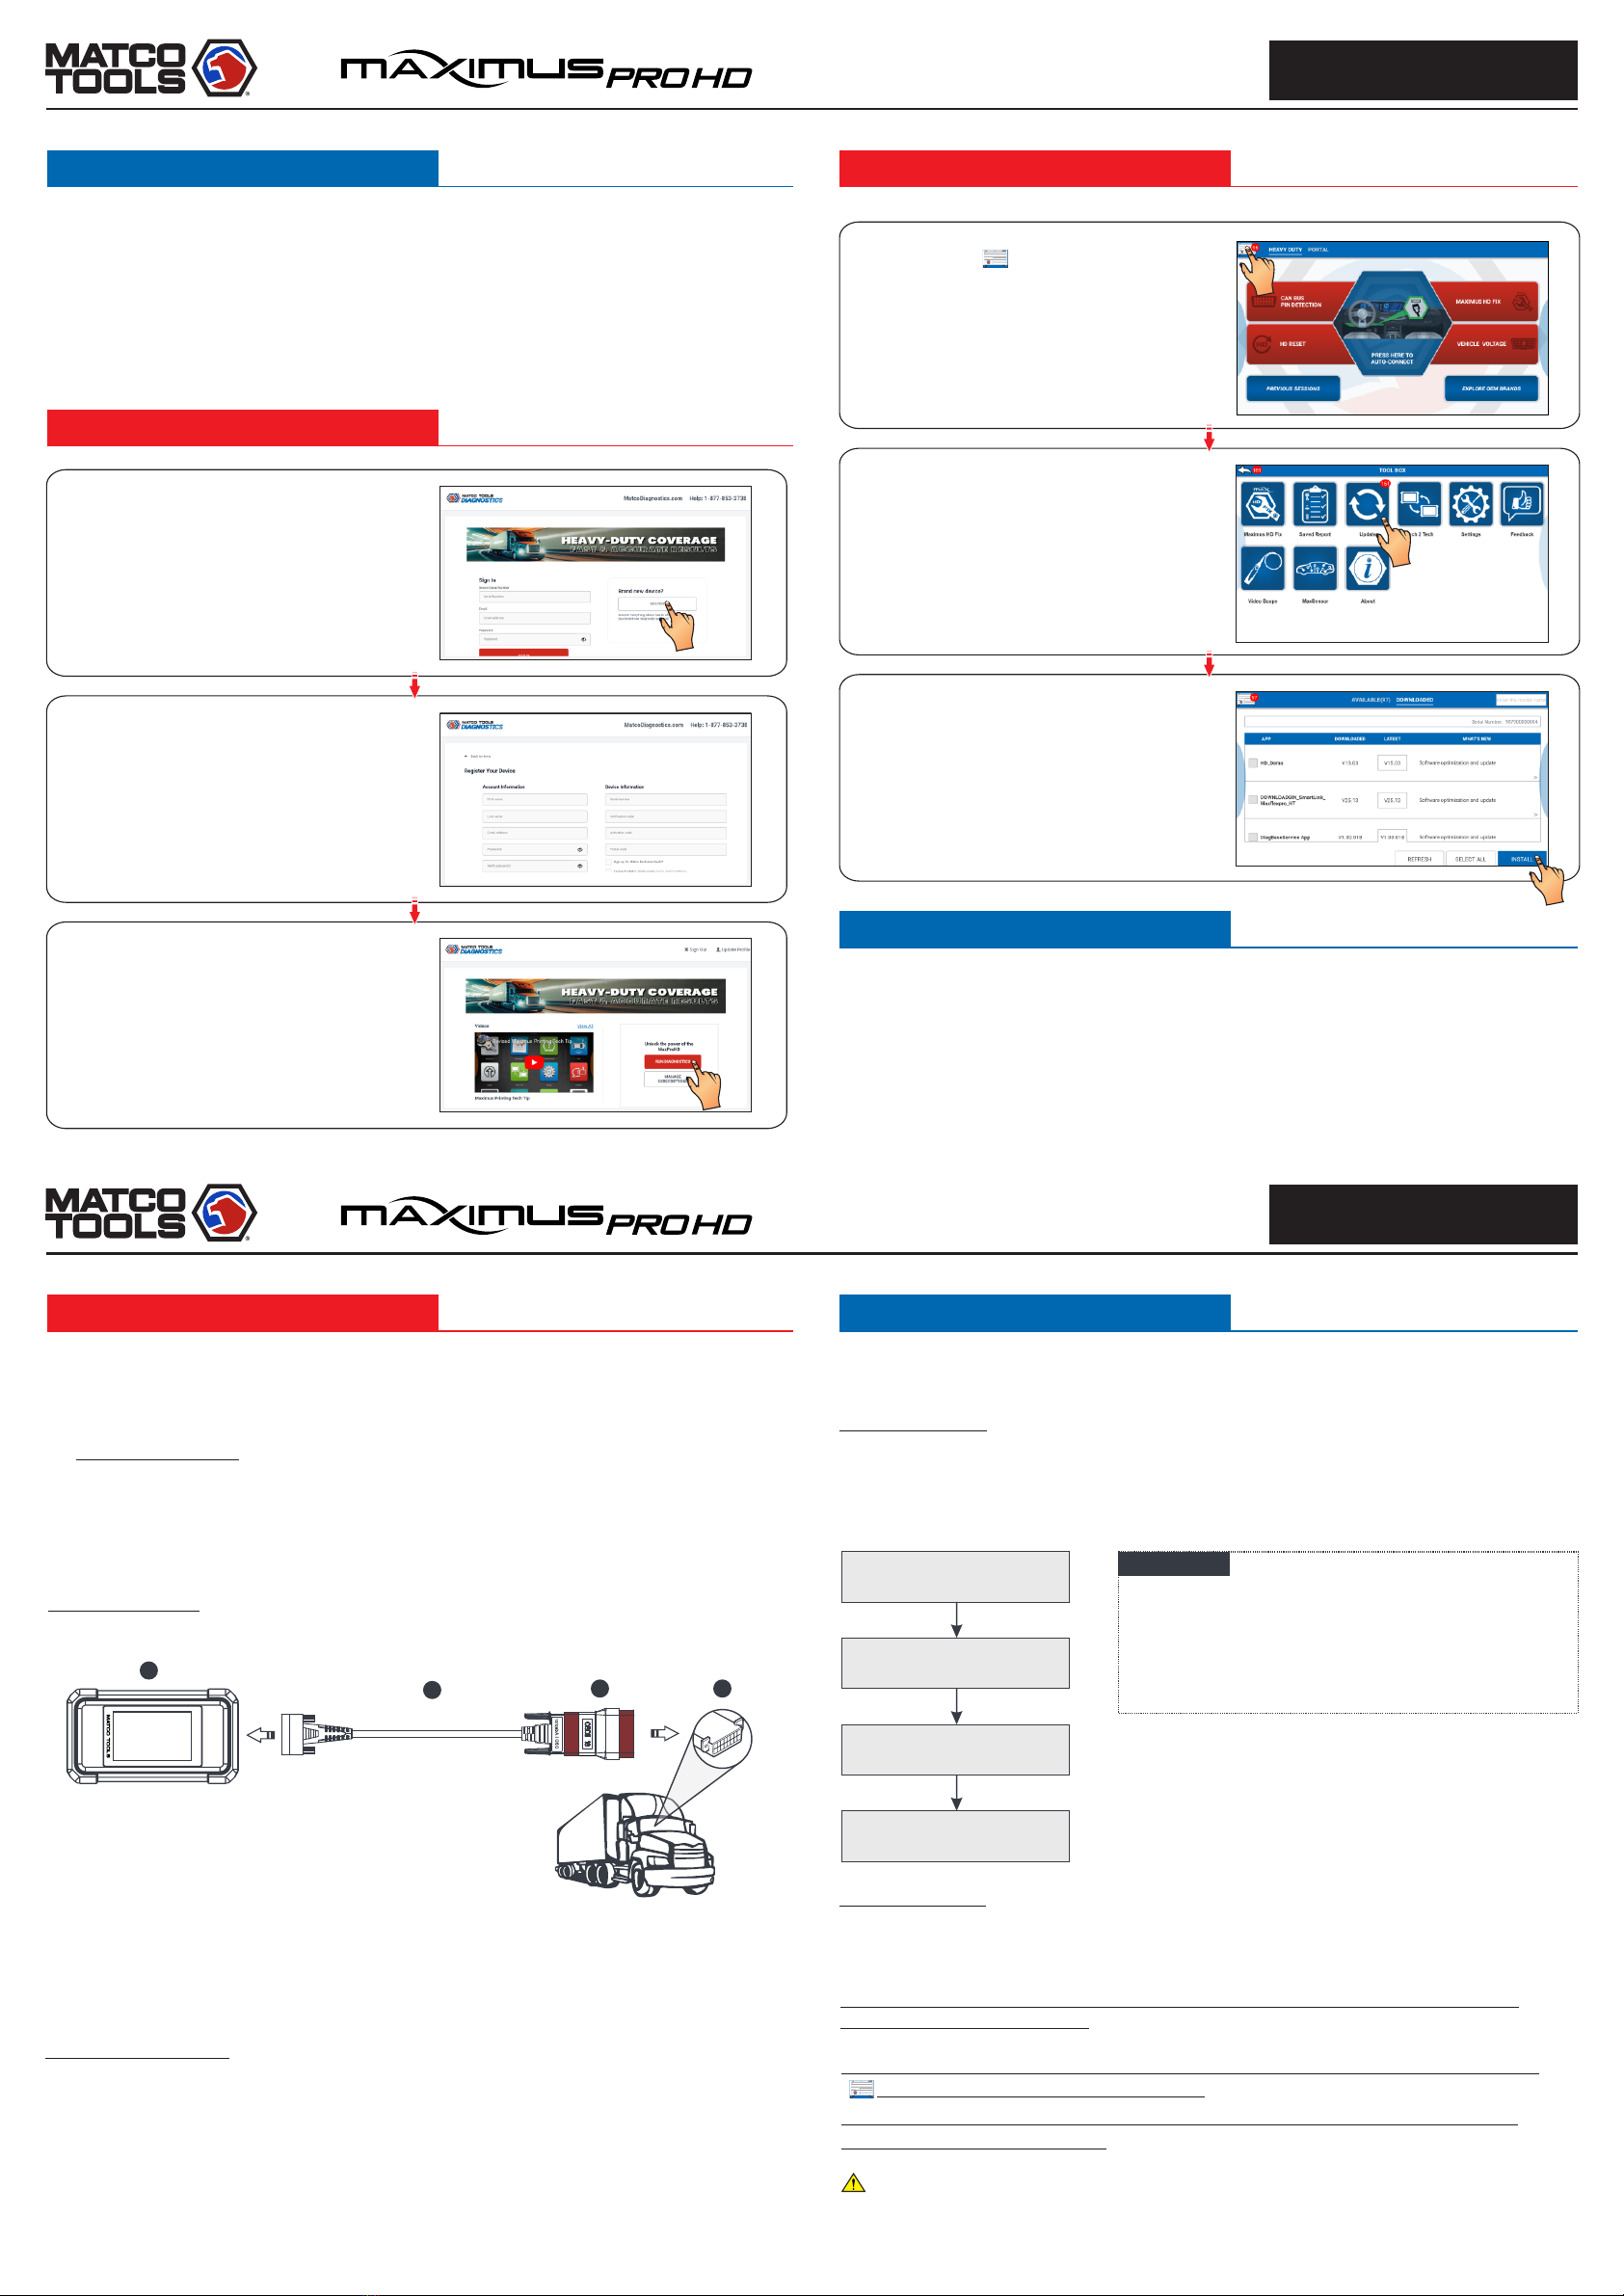
Step 1: On the home screen, tap on
Matco icon to run App.
Step 3: Tap on “RUN DIAGNOSTICS”
button to launch diagnostics.
Step 5: Tap on “UPDATE” button (*Note:
Red dot means new software is available).
Step 2: Tap on “ACTIVATE” button after
information* is entered.(*Note: Serial
number is a 12-digit number starting with
98 – you can find it on the back of your
tool. Verification code is an 8-digit number
stored in the Private & Confidential sheet.
Activation code is printed on the receipt,
or ask your dealer for it.)
Step 6: Make sure all brands are selected,
tap on “Install”.
Tap on “OK” button when update is
complete. (*Note: Download and
installation will take approximately 10
minutes depending on the internet
connection.)
Step 4: Tap on on the top left-hand
corner.
MDMAXPROHD supports multiple languages. To change the language of the tool, please do
the following:
2. Tap on “Add a language”, and then choose the desired language from the list.
3. Tap and hold the desired language and drag it to the top of the screen and then release it,
the system will change into the target language.
1. On the home screen, tap on Settings -> Language & Input -> Languages.
Once you're online, you can register your tool, update the diagnostic software and APK, surf
the Internet and send email on your network. Follow the steps below to proceed:
1. On the home screen, select Settings -> WLAN.
3. Select a wireless network. If the chosen network is open, the scan tool will connect
automatically. If the selected network is encrypted, a network password will need to be
entered.
2. Slide the WLAN switch to ON, the scan tool will start searching for all available wireless
networks.
Note:
To enjoy more capabilities and functions, it is
recommended you check for updates on a frequent basis
and keep synchronized with the latest available software.
Preparation
s Switch the ignition on.
s Vehicle battery voltage range should be 11V ~14V
or 18V~30V.
Before diagnosing, please make sure the following:
s Throttle should be in a closed position.
Pictures illustrated herein are for reference purpose only and this Quick Start Guide is
subject to change without notice.
Note: For more detailed operations, please refer to the In-App User Manual stored under
“ (Toolbox)” -> “About” -> “User Manual”.
MDMAXPROHD supports two kinds of diagnosis approaches: Manual Diagnosis and Remote
Diagnosis.
Manual Diagnosis:
For new users, please follow the operation chart shown below to get familiar with and start
using this tool.
In this mode, you have to diagnose a vehicle by performing the menu-driven command
manually.
Remote Diagnosis:
This option aims to help repair shops or professional technicians launch instant messaging
and remote diagnosis, making the repair job getting fixed faster.
5. Vehicle Connection 6. Start Diagnostics
Launch Matco App
Select vehicle
Select software version
and touch on “OK”
Follow the prompts
on the screen
The DLC (Data Link Connector) is typically a connector where diagnostic code readers
interface with the vehicle's on-board computer.
For commercial vehicles, it is usually located in the driver’s cab.
1. Locate Vehicle’s DLC Port
If the DLC cannot be found, refer to the service manual for the exact location.
2. Vehicle Connection
2311226-16
2311226-16
For non-OBDII vehicles, refer to the above figure to make connection.
2. Loosen the captive screws of the DB15F to HD15F data cable (2) and disconnect the
HD15M to OBD16 adapter (3) from the data cable.
3. Connect the data cable (2) with the target adapter on the above figure and tighten the
screws. Other steps shall also apply.
If you choose to perform vehicle diagnosis via data cable, connect one end of the data cable
into the VCI, and the other end into the data transmission port of the scan tool.
1. Select the appropriate adapter according to the vehicle's DLC port type (4).
For OBD II vehicles, use the included diagnostic cable (DB15F to HD15F data cable and
HD15M to OBD16 adapter) to connect the VCI to the vehicle's DLC port.
The method used to connect the VCI device to a vehicle's DLC depends on the vehicle's
configuration as follows:
1
234
4. Vehicle's DLC port
1. VCI
3. HD15M to OBD16 adapter
2. DB15F to HD15F data cable
If you have any questions on the operation of the unit, please contact Matco customer
service number: 877-853-3738.
MDMAXPROHD
Quick Start Guide
Quick Start Guide MDMAXPROHD
WARNING: This product can expose you to [Lead], which is known to the State of
California to cause cancer. For more information go to www.P65Warnings.ca.gov.

This manual suits for next models

1

Other Matco Tools Tablet manuals

Matco Tools MDMAX4 User manual

Matco Tools

Matco Tools MDMAX4 User manual

Matco Tools Maximus 4.0 User manual

Matco Tools

Matco Tools Maximus 4.0 User manual

Matco Tools MaxMe User manual

Matco Tools

Matco Tools MaxMe User manual

Matco Tools MDMAXFLEXPRO User manual

Matco Tools

Matco Tools MDMAXFLEXPRO User manual

Popular Tablet manuals by other brands

TechniSat TechniPad 8 instruction manual

TechniSat

TechniSat TechniPad 8 instruction manual

Manta MID707 user manual

Manta

Manta MID707 user manual

Sunstech TAB87QCBT user manual

Sunstech

Sunstech TAB87QCBT user manual

Vidao V9TAB16D user manual

Vidao

Vidao V9TAB16D user manual

Endress+Hauser Field Xpert SMT70 operating instructions

Endress+Hauser

Endress+Hauser Field Xpert SMT70 operating instructions

Huawei MediaPad T1 7.0 user guide

Huawei

Huawei MediaPad T1 7.0 user guide

Samsung SM-T817W user manual

Samsung

Samsung SM-T817W user manual

Acer B1-7A0 manual

Acer

Acer B1-7A0 manual

Denver TAQ-10465 user manual

Denver

Denver TAQ-10465 user manual

Panasonic JT-B1 series operating instructions

Panasonic

Panasonic JT-B1 series operating instructions

Venus Tablet quick start guide

Venus

Venus Tablet quick start guide

Lenovo TB-8506F Safety, warranty & quick start guide

Lenovo

Lenovo TB-8506F Safety, warranty & quick start guide

bq Elcano quick start guide

bq

bq Elcano quick start guide

TCL TAB10 5G manual

TCL

TCL TAB10 5G manual

Winbook TW102 quick start guide

Winbook

Winbook TW102 quick start guide

MP-Man MPDC8 BT user manual

MP-Man

MP-Man MPDC8 BT user manual

Partner EM-100 user manual

Partner

Partner EM-100 user manual

Allview Viva 803G user manual

Allview

Allview Viva 803G user manual

manuals.online logo
manuals.online logoBrands
  • About & Mission
  • Contact us
  • Privacy Policy
  • Terms and Conditions

Copyright 2025 Manuals.Online. All Rights Reserved.