Maverick MW-P54SS User manual

윈디31 메뉴얼 (150qn) 4도 2008.9.11 2:0 PM 페이지1

2 Trouble Shooting
Windy31 Quick Installation Guide
3
Contents
Introduction ···················· 4
Characteristics of Windy31 ············· 4
Scenario I/II ····················· 5
Features and Configuration ········· 6
Features ······················· 6
Configuration ···················· 6
Product Description ················· 6
Installation Requirements ·············· 7
Structure Diagram of Windy31 ··········· 7
Windows VISTA ················· 8
How To Install Windy31 ··············· 8
Configuring Windy31 Manager ··········· 10
Configuring Wireless LAN Adapter ········· 12
Windows XP···················· 14
How To Install Windy31··············· 14
Configuring Windy31 Manager ··········· 16
Configuring Wireless LAN Adapter ········· 18
Optional Configuration ············ 20
Connecting Wireless LAN in Windows VISTA ··· 20
Connecting Wireless LAN in Windows XP····· 25
Inputting IP Address Manually ··········· 28
Troubleshooting ················· 30
윈디31 메뉴얼 (150qn) 4도 2008.9.11 2:0 PM 페이지2

Wireless Broadband Router
4Introduction
Introduction
■■The world’’
s first USB-type wireless portable gateway that
combines a Wireless Router, Access Point (AP) and Wireless
LAN Adapter all in one!
■■All these three functions allow the users to truly experience
wireless freedom, as well as the convenience of portability.
■■Since it is as small as a regular thumb drive, users can virtually
carry it around anywhere with them.
■■It can conveniently be plugged right into your PC, PDA, or
laptop’’
s USB port
3-in-1 Wireless Broadband Router
1. Wireless Broadband Router
Windy31 is highly portable and user-friendly, allowing the host to
easily connect other Wi-Fi devices around, such as laptops,
PDAs, and Wi-Fi phones to the internet without complication of
wires.
2. Wireless LAN Adapter
Windy31 can conveniently be inserted into a USB port of a
computer. With Windy31, you can enjoy the wireless internet
service provided by any public places, such as cafe, library,
office, school, airport and etc.
3. Wireless Access Point (WAP)
Windy31 can wirelessly network up to 32 different clients
together by being plugged into a single host computer.
Manage all your local networks, easily share documents, and
best of all, go wireless!
Characteristics of WINDY31
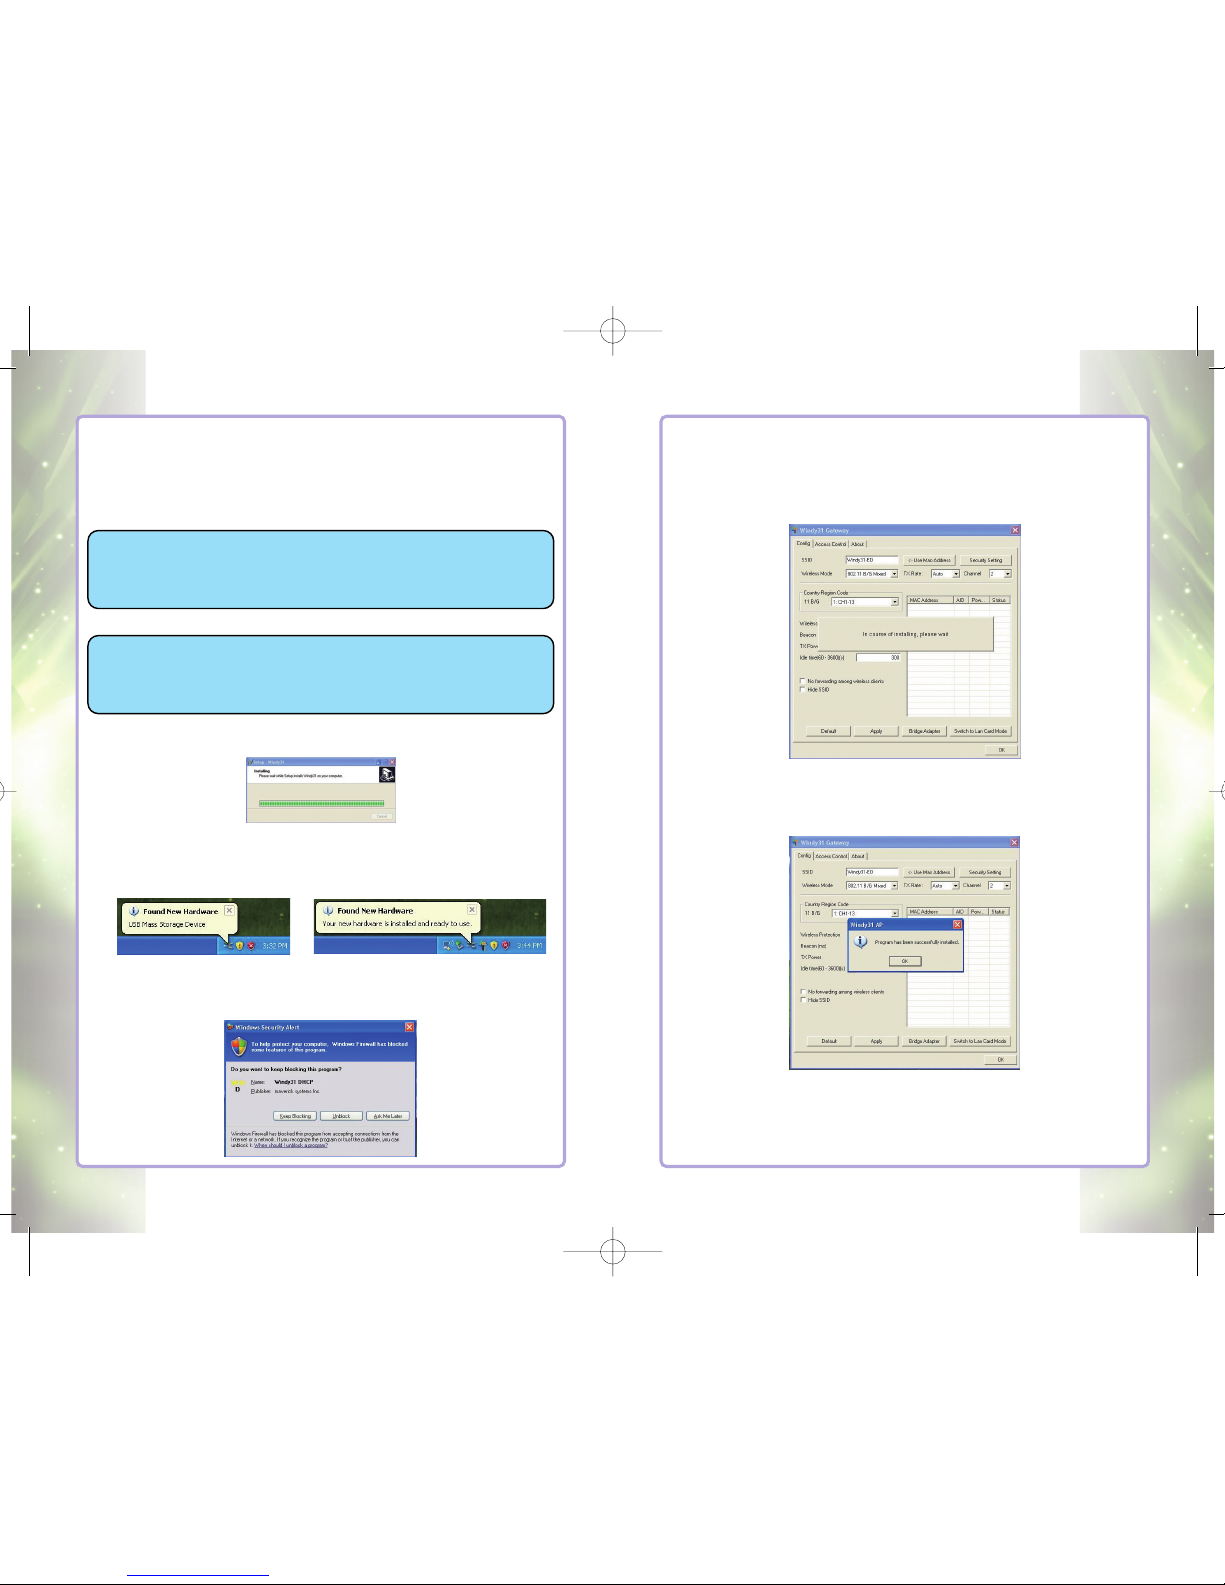
■■Auto-installation without a CD
■■Easy mode-changing from LAN/AP/Router
■■Convenient User-Interface
■■Windows Vista Compatible!
Windy31 Quick Installation Guide
Introduction 5
Scenario I
■■
If you want to access internet in public areas such as seminars,
tradeshows, libraries, hotels, or airports:
- Existing : Only a wireless internet service subscriber can
use the internet
- Windy31 : Plug the Windy31 into any computer that is
connected to the internet, and you can use the
internet service through your laptop
Scenario II
■■
If you want to share your wireless internet connection with friends
or co-workers without having to pay for additional lines at
places like airports, hotels, conference rooms, tradeshows, and etc.
- Existing : No choice for non-subscribers. You have to pay for
each user.
- Windy31 : Plug the Windy31 into the subscriber’s computer and
share the connection with friends and co-workers at
no additional cost.
Windy31 typical Configuration (at Home or Office)
윈디31 메뉴얼 (150qn) 4도 2008.9.11 2:0 PM 페이지4

Windy31 Quick Installation Guide
Features and configuration 7
Installation Requirements
■■Before installing Windy31, please make sure the minimum
requirements have been established:
- Intel Pentium IV or above
- 512M bytes system memory or above
- Windows XP/VISTA Operating Systems
( Support auto-installation for Windows XP or above )
- USB 1.1 or USB 2.0
- Requires more than 30Mbytes of usable hard disk space.
Structure Diagram of Windy31
Wireless Broadband Router
6Features and configuration
Features and configuration
Features
■■Convenient use anywhere, anytime, portable
- Slim and compact design to fit in one hand
(USB memory stick size)
- It only requires the host computer to be connected to
the internet.
■■Fast installation and easy setting
- Once Windy31 is inserted into a computer, it automatically
begins installation and configuration process.
(Separate installation CD and driver are unnecessary)
- Easy GUI-type setting screen
■■Speed
- Support Wireless 802.11b(11Mbps)/802.11g(54Mbps) speed
- Access control with WEP(64,128 bit) / WPA-PSK / WPA2-
PSK(ASE) and MAC address
Configuration
■■Please check Windy31 components as shown below.
Please contact the seller immediately if any component
is damaged or missing.
Product Description
USB type Broadband Router Extension Cable Quick Install Guide
윈디31 메뉴얼 (150qn) 4도 2008.9.11 2:0 PM 페이지6

Windy31 Quick Installation Guide
Windows VISTA 9
3) Please wait until “Windy31 Gateway Manager”window appears,
“Windy31 setting in-progress" and "setting complete" windows will be
displayed as shown below. This process will take a few minutes as it
installs Windy31 Gateway. (Installation time may differ according to
computer configuration)
4) In Step 3, After the “Program has been successfully installed“
message, click “OK”. Windy31 has completed the installation.
Connection method may differ according to Wireless LAN device, please
refer to Wireless LAN usage method. (For wireless device usage method,
please refer to wireless device product manual or please contact the
provider.)
Wireless Broadband Router
8Windows VISTA
Windows VISTA
Installing Windy31
■■Checklist before installing
Computer to be installed with Windy31 must have more than one
LAN Adapter.
Computer to be installed with Windy31 must have Internet
connection.
■■Installation
Please check your computer for Virus and Spyware before
installation. Some Viruses and Spywares may interfere with
automatic installation of Widny31 driver and utility programs
1) Insert Windy31 into USB port of your laptop or desktop PC,
and program will automatically run as shown below
2) Once the program is installed, the following screen will appear on
the bottom right of the screen, indicating that the USB deviceis
acknowledged and the installation of Windy31 is in progress.
During installation, Windows Security Alert may display“Keep blocking”&
“Unblock”pop-up for security reasons, please select the button“unblock”.
(If you select“keep blocking”, there will be no network connection.)
윈디31 메뉴얼 (150qn) 4도 2008.9.11 2:0 PM 페이지8

Windy31 Quick Installation Guide
Windows VISTA 11
■■Internet access by other users can be controlled in
““Access
Control””
menu of Windy31 Gateway below.
① Disable : Disable Access Policy.
② Allow All : All the Mac addresses listed in the table have
access to the internet.
③ Reject All : All the Mac addresses listed in the table
cannot access to the internet.
■■Software upgrade
Click“Auto Update”, to confirm that you are using the latest software. If
you are currently using an old software, the software update will appear.
Wireless Broadband Router
10 Windows VISTA
Configuring Windy31 Gateway Manager
■■Screen provided below is Windy31 Gateway Manager Setting.
For more information, Please refer to our website
[www.synetusa.com]
① SSID : Name to be used for wireless (Default is Windy31-XX)
② Channel : Assign wireless channel, automatically
③ Use Mac Address : Assign SSID as MAC address
④ Security Setting : Assign wireless security settings (Please
refer to the Installation guide for more details)
⑤ Wireless LAN connection list : List of wireless device's MAC
address connected to Windy31.
⑥ Bridge adapter : Allows Internet-connected network card change
⑦ Switch to LAN Card Mode : Button to use Windy31 as LAN Adapter
(In LAN Adapter mode, Windy31 Gateway functions cannot be used)
윈디31 메뉴얼 (150qn) 4도 2008.9.11 2:0 PM 페이지10

Windy31 Quick Installation Guide
Windows VISTA 13
■■Wireless LAN connection
→5. Select the Profile →6. Click Activate button
① Select AP to connect
② Activate : Connect to the selected AP with wireless
(Must click “Activate”button for using wireless Service)
③ Add : Add the Profile
④ Delete : Delete the Profile or disconnect wireless
connection
⑤ Edit : Modify profile configuration
■■Specific wireless connection status is shown under "Link
Status" tab
For more information, Please refer to our website
[www.synetusa.com]
Wireless Broadband Router
12 Windows VISTA
Configuring Wireless LAN Adapter
■■How to configure PC setting for using Windy31 as Wireless
LAN Adapter
For more information, please refer to our website
[www.synetusa.com]
■■Wireless LAN connection
1. Scan AP →2. Select AP →3. Add to Profile →4. Select profile Tab
① Select AP as connection mode from AP list
② Add to Profile : Add the selected AP to Profile
③ Profile : Menu to connect to AP using Added Profile
④ Rescan : Scan Wireless AP
⑤ Switch to Gateway mode : Switch to Windy31 mode
Wireless Router
윈디31 메뉴얼 (150qn) 4도 2008.9.11 2:0 PM 페이지12

Windy31 Quick Installation Guide
Windows XP 15
3) Please wait until “Windy31 Gateway Manager”window appears,
“Windy31 setting in-progress" and "setting complete" windows will
be displayed as shown below. This process will take a few
minutes as it installs Windy31 Gateway. (Installation period may
vary according to computer configuration)
4) In Step 3, once the message “Program has been successfully
installed“ appears, click “OK”. Windy31 has completed the
installation.
Connection method may vary according to Wireless LAN device, please
refer to Wireless LAN usage method. (For wireless device usage method,
please refer to wireless device product manual or please contact the
provider.)
Wireless Broadband Router
14 Windows XP
Windows XP
Installing Windy31
■■Checklist before installing
Computer to be installed with Windy31 must have more
than one LAN Adapter.
Computer to be installed with Windy31 must have Internet
connection.
■■Installation
Please check your computer for Virus and Spyware,
before installation. Some Viruses and Spywares may
interfere with automatic installation of Widny31 driver and
utility programs
1) Insert Windy31 into USB port of your laptop or desktop PC,
and program will automatically run as shown below.
2) Once the program is installed, the following message will appear
on the bottom right of the screen, indicating that the USB
device is acknowledged and the installation of Windy31 is in
progress.
During installation, Windows Security Alert may display“Keep blocking”&
“Unblock”pop-up for security reasons, please select the button“unblock”.
(If you select“keep blocking”, there will be no network connection.)
①②
윈디31 메뉴얼 (150qn) 4도 2008.9.11 2:0 PM 페이지14

Windy31 Quick Installation Guide
Windows XP 17
■■Internet access by other users can be controlled in
““Access
Control””
menu of Windy31 Gateway below.
① Disable : Disable Access Policy.
② Allow All : All the Mac addresses access to the internet
listed in the table can be accessed to the internet.
③ Reject All : All the Mac addresses listed in the table can
not be accessed to the internet.
■■Software upgrade
Click“Auto Update”, to confirm that you are using the latest software. If
you are currently using an old software, the software update will appear.
Wireless Broadband Router
16 Windows XP
Configuring Windy31 Gateway Manager
■■Screen shown below is Windy31 Gateway Manager Setting.
For more information, Please refer to our website
[www.synetusa.com]
① SSID :
Name to be used in wireless (Default is Windy31-XX)
② Wireless mode : Assign wireless LAN mode
(802.11b=11Mbps/802.11g=54Mbps)
③ Use Mac address : Assign SSID as MAC address .
④ Security Settings : Assign wireless security settings
(Please refer to the installation guide for more details)
⑤ Transmission rate : Designate transmission rate.
⑥ Channel : Assign wireless channel, automatically.
⑦
Area (Country code) : Assign channel range used by each country.
⑧ Wireless LAN connection list : List of wireless device's
MAC address connected to Windy31.
⑨
Bridge adapter : Allow Internet-connected network card change
⑩
Switch to LAN card mode : Button to use Windy31 as LAN Adapter.
(In LAN Adapter mode, Windy31 Gateway functions cannot be used)
윈디31 메뉴얼 (150qn) 4도 2008.9.11 2:0 PM 페이지16

Windy31 Quick Installation Guide
Windows XP 19
① Select AP to connect
② Add : Add to profile.
③ Delete : Delete Profile or disconnect wireless connection
④ Edit : Modify profile configuration
⑤ Activate : connect to the selected AP with wireless
(Must click “Activate”button for using wireless service)
■■Specific wireless connection status is shown under "Link
Status" tab
For more information, Please refer to our website
[www.synetusa.com]
Wireless Broadband Router
18 Windows XP
Configuring Wireless LAN Adapter
■■How to configure PC setting for using Windy31 as Wireless
LAN Adapter
For more information, please refer to our website
[www.synetusa.com]
■■Wireless LAN connection
1. Scan AP →2. Select AP →3. Connect
① Select AP as connection mode from AP list
② Rescan : Scan Wireless AP
③ Connect : Connect to selected AP with wireless
④ Add to Profile : Add the selected AP to Profile
⑤ Switch to Gateway mode : Switch to Windy31 Wireless
Router mode
윈디31 메뉴얼 (150qn) 4도 2008.9.11 2:0 PM 페이지18

Windy31 Quick Installation Guide
Trouble Shooting 21
Manage wireless networks →
Add a network that is in range of this computer →
Wireless Broadband Router
20 Trouble Shooting
Optional Configuration
Wireless LAN connection in Windows VISTA
■■To use wireless LAN service, Wireless LAN Adapter must be
installed in your computer.
- Wireless LAN connection program (WLAN Autoconfig)
is embedded in Windows VISTA.
-
If wireless service is not available, wireless LAN cannot be used.
- Please refer to Windows VISTA user manual for further
information on wireless LAN Autoconfig.
Please refer to the product manual of Wireless LAN Adapter you have
purchased or contact Wireless LAN Adapter manufacturers/sales
representatives for installing user's wireless LAN Adapter/application
program.
■■Optional Connection
Start →Control Panel →Network and Sharing Center →
윈디31 메뉴얼 (150qn) 4도 2008.9.11 2:0 PM 페이지20

Windy31 Quick Installation Guide
Trouble Shooting 23
Start →Control Panel →Network and Sharing Center →Manage wireless
networks
- If the message "This computer is connected to Unidentified
network" appears, click “Addition”button in wireless network
management and check the following service item.
Start →Control Panel →Administrative Tools →Services →
Wireless Broadband Router
22 Trouble Shooting
Windy31-XX →Connect →
→Close
- If the message "successfully connected to Windy31-xx."
appears, check the box "Save this network" then click "Close"
button to complete wireless network connection.
윈디31 메뉴얼 (150qn) 4도 2008.9.11 2:0 PM 페이지22

Windy31 Quick Installation Guide
Trouble Shooting 25
Wireless LAN connection in Windows XP
■■To use Wireless LAN Service, Wireless LAN adapter must be
installed in your computer.
- Wireless LAN connection program (Zero Configuration) is
embedded in Windows XP, but Windows 98/ME/2000 do not
support wireless connection program
- To use wireless LAN service in Windows 98/ME/2000,
please use wireless connection program provided by
wireless LAN adapter manufacturers
Please refer to the manual of Wireless LAN Adapter that you have
purchased and contact your wireless LAN Adapter suppliers or
manufacturers regarding installation of wireless LAN adapter in your PC.
■■Optional Connection
Start →Control Panel →Network and Internet Connection →
Network Connection →
Wireless Broadband Router
24 Trouble Shooting
→WLAN Autoconfig
- Confirm if service has begun normally after the selection
of "WLAN Autoconfig" in Services (Local).
윈디31 메뉴얼 (150qn) 4도 2008.9.11 2:0 PM 페이지24

Windy31 Quick Installation Guide
Trouble Shooting 27
→→Add →→Windy31-XX →→Connect →→
-If encryption function is active in Wireless AP(Windy31-xx),
Network key (password) will be asked when connected.
-If connection is established, then the message indicating
'connected' will be displayed on the right-side of SSID.
-Wireless network properties in Windows XP may display
different configuration screens according to patch versions
of Windows OS.
If the error message“Limited or no connectivity”appears, then directly
input IP address. (note : go to next page)
Wireless Broadband Router
26 Trouble Shooting
→Wireless Network Connection
- Right click on "Wireless Network Connections”then select
“View Available wireless Networks”.
윈디31 메뉴얼 (150qn) 4도 2008.9.11 2:0 PM 페이지26

Windy31 Quick Installation Guide
Trouble Shooting 29
■■In Internet Protocol (TCP/IP) Properties, select ””
Use the
following IP Address (S)””
, then directly input IP address.
-IP Address : IP address used in Windy31, is in between the
following IP range 192.168.33.2 to 192.168.33.254.
-Subnet Mask :
Windy31 uses C-class by default.(255.255.255.0)
-Default gateway :
Windy31 uses Default gateway.(192.168.33.1)
Wireless Broadband Router
28 Trouble Shooting
Inputting IP Address Manually
Start →Control Panel →Network and Internet Connection →Network
Connections →Wireless Network Connection
- Right click on "Wireless Network Connection“ then select
"Properties".
Internet Protocol (TCP/IP) →Properties
윈디31 메뉴얼 (150qn) 4도 2008.9.11 2:0 PM 페이지28

Windy31 Quick Installation Guide
Trouble Shooting 31
Setting:
Check the following setting status
Ensure its setting values are 91 or 00 as illustrated below:
"NoDriveTypeAutoRun"=dword:00000091 (Auto Execution on/default)
"NoDriveTypeAutoRun"=dword:00000000 (Auto Execution on)
"NoDriveTypeAutoRun"=dword:000000ff (Auto Execution off)
(1) Check log-in user’s setting
[HKEY_CURRENT_USER\Software\Microsoft\Windows\CurrentVersion
\Policies\Explorer]
(2) Check other user’s setting
[HKEY_USERS\(the relevant user’s stream)
\Software\Microsoft\Windows\CurrentVersion\Policies\Explorer]
(3) Check policies to be provided to new user
[HKEY_USERS\.DEFAULT\Software\Microsoft\Windows\CurrentVersion
\Policies\Explorer]
c. Group Policy (gpedit.msc) Setting
Check group policy settings through group policy MMC snap-in.
[start] →[run] →type in "gpedit.msc" and click“ok”→ [ Local
Computer Policy] →[User Configuration] →[Administration
Templates] →[system] →Double click“Turn off Autoplay”in the list
and select“Disabled”→ Click“Ok”
3. Virtual CD-ROM Drive does not show up, and Windy31 is
recognized as thumb drive.
Remove storage device from device management, rescan
hardware detection, and then reinstall. If you get the
same problem, please check the USB port.
If not recognized as thumb drive, then the product may be
defective. Please contact out Tech Support agent.
4. After internal error occurs and the installation complete
message does not show up, then automatically switches to LAN
adapter mode.
In Wireless LAN Adapter mode, click “Switch to Gateway
mode”button, if “Switch to Gateway mode”is not switched,
reinstall it.
Wireless Broadband Router
30 Trouble Shooting
Trouble Shootings
■■Please be sure to have Windy31 inserted in the computer that
is connected to Internet.
■■Please check your PC for any Viruses and Spywares before
installation. Some Viruses and Spywares may interfere with
automatic installation of Windy31 driver and utility programs.
1. Windy31 is plugged in but not detected by the computer.
First, disconnect and reconnect Windy31 to another USB port
or another computer. If there is still no response, please
contact our Tech Support agent.
2. Windy31 is detected but does not proceed to auto installation.
Please manually install with “Windy31install.exe”file that is
included in the virtual CD-ROM Drive. [Start] → [My Computer]
1) Check with each step of USB device recognition and
confirm the details of process at each stage.
If auto installation would not run by the insertion of
CD-ROM, it is needed to click on CD-ROM to run the
(Windy31Install.exe) program.
2) Enable CD-ROM AutoPlay function.
Confirm configuration status and Enable CD-ROM AutoPlay
[Basic setting] - Enable AutoPlay
[My Computer]-[Right click on the drive]-[Properties]- Press
[AutoPlay] tab, and select a content type and click “Ok”.
[Advanced Setting]
1. Registry Setting
a. Local unit Policy Setting
[Start] →[Run] →Type in“regedit”
[HKEY_LOCAL_MACHINE\SYSTEM\CurrentControlSet\Services\Cdro
m] →Double click "AutoRun“and make sure the Value Data is "1"
( "0" means that Autoplay is disabled)
b. User Unit Policy Setting
Note : If you have installed a certain software related to CD-ROM Drive
and uninstalled, it may affect AutoPlay setting on your PC.
윈디31 메뉴얼 (150qn) 4도 2008.9.11 2:0 PM 페이지30

Windy31 Quick Installation Guide
Trouble Shooting 33
2. Try reconnecting Windy31 to the host computer.
11. When Windy31 is connected to host computer, wireless signal
is weak and speed is slow.
Note: If Nero InCD/ DVD Ram Driver is installed in the host
computer, it may cause a conflict with Windy31 program.
Remove Nero InCD/DVD Ram driver from the host computer,
restart and reinstall Windy31.
12. No further process is made after installation of Windy31
program.
Make sure the device is in enabled mode.
[Start] → [Control Panel] → [System] → [Hardware] tab → [Device
Manager]
Right click on [Windy31] under Network Adapter and select
“Enable”as shown below.
13.
““svchost.exe””
error occurs during the usage of Windy31 or the
installation of Windy31 software.
Uninstall Windy31 program. Check your computer for any
viruses or spywares, and update the operating system with the
latest version. Then, reinstall Windy31.
Wireless Broadband Router
32 Trouble Shooting
5. During Installation, Windy31 enabler dialog box does not show
and installs as LAN Adapter mode.
Check service status in the windows service category WMI
(Windows Management Instrumentation). If there is problem in
WMI, Windy31 can’t be configured in the Windows service.
Please check your computer, below.
* [Control Panel] → [Administrative Tools] → [Service and
Application] (Services in Vista) → Check if [WMI control status]
runs correctly.
6. Windy31 is installed completely and trying to connect to
Windy31 from another wireless device, connection is blocked or
not established.
Check if Windy31 is installed at personal firewall software
operating computer such as, Zone Alarm, McAfee Personal
Firewall, My Firewall, Sygate Personal Firewall, and etc.
Temporarily deactivate firewall program then reconnect
Windy31.
* To allow internet connection in firewall software program, refer
to your firewall software’s Instruction Guide and User Manual.
7. Every time you restart your computer or reconnect Windy31,
Windy31 enabler automatically restarts.
If you restart your computer with Windy31 plugged-in, Windy31
Enabler automatically runs in order to check any changes in
the host PC network
8. Internet does not work on wireless client’’
s computer even
when it is connected to Windy31.
Please check IP Address of wireless client
[Start] → [Run] → type in “cmd”→ type “ipconfig/all”then you
can see IP address of wireless client. It must be 192.168.33.xxx
9. Wireless client cannot receive IP address even when firewall
and security setting is unblocked.
You must directly input IP address. Please refer to the
Installation Guide, “Directly input IP address, page 27,28.
10. Internet on wireless client’’
s computer is suddenly
disconnected.
1.
Make sure the power saving mode is turned off on host computer.
윈디31 메뉴얼 (150qn) 4도 2008.9.11 2:0 PM 페이지32

Windy31 Quick Installation Guide
Trouble Shooting 35
2) In occurrence of Internal Connection Error Code 80040201
The error means no IP address remains in Windy31 adapter
1. Restart the Host PC and type any random IP address into
Windy31 and see whether it gets stored. (to be done by
windy31 manager program information).
2. Confirming IP address stored, check whether WIndowsICS
gets on running.
Getting into ‘Local Network Property → Advanced’, select
Internet Sharing (select wireless network (windy31))
At this time, the IP address of wireless network (Windy31) as
shared is to be set as 192.168.0.1
3. If sharing setting runs properly, off with sharing and do GW
mode transfer.
4. If IP address fails to be stored, uninstall Windy31 and further
locate Windy31 in registry and completely remove it, and then try
to re-install.
Wireless Broadband Router
34 Trouble Shooting
14. Errors occur during Windy31 installation (Windy31 Enabler).
1) If Windows Network Device List shows blank (shown below).
Windy31 Enabler, in occurrence of internal connection Error code
8007030f, is installed as LAN card mode.
Set up Windows to enable following services.
[Start] → [Run] , type “MSCONFIG”into open the screen below.
The two items in the red box must be checked.
윈디31 메뉴얼 (150qn) 4도 2008.9.11 2:0 PM 페이지34

Windy31 Quick Installation Guide
Trouble Shooting 37
→ [Services] → [SharedAccess] → [Security]
Delete sub-key “Security” in registry, and restart computer. It is
important to delete Security registry sub key, if any. descriptor at
the time of computer re-booting.
By doing this, Windows Firewall can be started through generic
security descriptor at the time of computer re-booting.
If Windows Firewall service is controlled by execution of Microsoft
COM (Component Object Model), DCOM or Microsoft COM+
application, following steps are to be taken.
1. [Start] → [Run] → type regedit in the current box and click ok.
2. Locate registry sub key and click.
[HKEY_LOCAL_MACHINE] → [SOFTWARE] → [Classes] →
[AppID] → {ce166e40-1e72-45b9-94c9-3b2050e8f180}
3. Click Export on File Menu.
4. Key in ‘C:\reg_AppID_CLSID.reg’into File Name box and press
Store to store registry file.
5. {ce166e40-1e72-45b9-94c9-3b2050e8f180} Delete registry sub
key.
6. Press Import on File Menu.
7. Key in ‘ C:\reg_AppID_CLSID.reg’into File Name box and
press Open.
8. Press OK and finish registry editor.
9. Start with Windows Firewall/Internet Connection Sharing (ICS)
service.
For this, key in ‘ NET START Shared Access’at command
prompt and press Enter key.
16. Windy31 Enabler does not stop.
It failed to store the change of IP address. Uninstall Windy31 and
check if there are any spywares or viruses.
1) If Windy31 Enabler remains running between 40 to 49.
The host computer may have network problems. Check if
there are any spywares or viruses. Restart computer and
reinstall Windy31.
2) If Windy31 Enabler remains running between 50 to 59.
Wireless Broadband Router
36 Trouble Shooting
15. Windy31 Enabler does not appear after Windy31 program is
installed.
1) Windy31 Enabler will not appear if there is firewall or WMI error.
Confirm if Windows Service Pack 2 has been properly installed.
1. [Start] → [Run] → type “Winver”and make sure it is SP2.
2. [Control panel] → [Firewall] → all menus must be deactivated.
3. [Control panel] → [Program add/remove] → confirm SP2 is in
the list
4. [Internet Explorer] → [Tools] → [Internet Options] → [Privacy] →
uncheck “Block Pop-ups”
If the problem persists, restart in safe mode and reinstall
Windows Service Pack 2.
Failed to start Windows Firewall/internet connection sharing
(ICS), or if you get the following message (shown below).
[Start] → [Run] → type “cmd”and hit Enter.
Type the following command and press Enter.
“SC sdset SharedAccess”
D:(A;;CCLCSWRPWPDTLOCRRC;;;SY)(A;;CCDCLCSWRPWPDTLOCR
SDRCWDWO;;;BA)(A;;CCLCSWLOCRRC;;;AU)(A;;CCLCSWRPWPDTL
OCRRC;;;PU)
2) 1. [Start] → [Run] → type “regedit”and click ok.
2. [HKEY_LOCAL_MACHINE] → [SYSTEM] → [CurrentControlSet]
윈디31 메뉴얼 (150qn) 4도 2008.9.11 2:0 PM 페이지36

Windy31 Quick Installation Guide
Trouble Shooting 39
20. After the host computer is restarted, Windy31 Gateway
Manager program does not work.
1) Although it has Windy31 icon in the toolbars as shown below,
▶ The status is on stoppage with CD-ROM.
Open My Computer and have CD-ROM run.
2) If the setting screen does not appear even after recognizing of
USB device and running of Windy31 manager
▶It’s acting as LAN card mode. Click the icon and at Windy31
Manager setting menu click GW mode to switch. If Windy31
Manager Program does not run, force the file of
“windy31GW.exe”presently running *to end from processor
and re-execute it.
(* To end the processor: Simultaneously press the three keys
of Ctrl + Alt + Del, and select processor at Task Manager and
locate Windy31GW.exe to select and close it.)
Wireless Broadband Router
38 Trouble Shooting
The host computer failed to receive new IP address for
internet connection. Deactivate the firewall it there is any.
In the absence of firewall, please try to reinstall after removing
spywares and viruses.
3) If Windy31 Enabler remains running between 60 to 69.
→ Refer to Trouble Shooting No.15 -2).
4) If Windy31 Enabler remains running between 70 to 89.
→ Attempt quit Windy31 Enabler, and reinstall the program.
17. On Host PC, Internet cannot be connected after completion of
Windy31 installation.
1) If Windy31 is connected to wired LAN
▶ [Star] → [Control Panel] → [Network Connection] → [Local
Network Connection (Properties)] → [Internet Protocol
(Properties)] → Select “Obtain an IP Address automatically”
and “Obtain DNS Server address automatically”
2) If connected to wireless LAN
▶ [Start] → [Control Panel] → [Administrative Tools] → [Services]
→ Right Click on Wireless Zero Configuration (WZC) → select
“Restart”→ Restart the computer → Reinstall Windy31
(If WZC is stopped, wireless LAN cannot be activated)
(If “Use Windows to configure my wireless network settings”is not
checked, wireless AP search will not be displayed.)
윈디31 메뉴얼 (150qn) 4도 2008.9.11 2:0 PM 페이지38
Table of contents
Popular Gateway manuals by other brands

Hypermedia
Hypermedia HG-4000 3U product manual

CHAFFOTEAUX
CHAFFOTEAUX ChaffoLINK Assembly and operation instructions

Comm-Tec
Comm-Tec EIB user manual

XAVI Technologies Corp.
XAVI Technologies Corp. X8824r+ user manual

SIEB & MEYER
SIEB & MEYER Gateway 0362158A Original instructions

AT&T
AT&T 3800 Self-installation guide