MAVRIK STRIKERVR MAVRIK-PRO User manual

With the StrikerVR Mavrik-Pro, players will experience virtual reality like
never before—the future of VR gaming starts now. Its innovative recoil
and haptic technologies unlock incredible force eects that can simu-
late limitless tools and environments. You need to feel it to believe it.
For the latest product information, requirements, warranty, and anything
else please visit support.strikervr.com
MAVRIK-PRO / PRODUCT MANUAL

5MAVRIK-PRO OVERVIEW
6ACTIVE TOUCH
7QUICK START
8DEVICE MODES
10 CHARGING YOUR MAVRIK-PRO
13 SETUP & INTEGRATION
14 CARE & MAINTENANCE
15 ELECTRICAL SPECIFICATIONS
| STRIKERVR.COM
/ 3

TOP
BOTTOM
FRONT
BACK
EU POWER
ADAPTER
CHARGING
CABLE
UK
LEFT VIEW
20.5 in x 2.6 in x 7.6 in 3.3 LBS
520 mm x 66 mm x 193 mm 1.5 KG
STRIKERVR MAVRIK-PRO VR GAMING CONTROLLER
L
LH LS
F1
LT
PWR
USB-C
L
TRIG
F2
AT8
AT2
AT7
AT6 AT 1
AT5
AT4
AT3

|STRIKERVR.COM
MAVRIK-PRO OVERVIEW
ACTIVE TOUCH AREAS
AT1: Trigger Sense
AT2: Trigger Grip
AT3: Reload
AT4 : Front Hand Grip Face
AT5: Front Hand Grip
AT6: Under Touchpad Grip
AT7: Forward Bar Grip
AT8: Slide
USER BUTTONS
F1: Front Top Button
F2: Front Bottom Button
--
LT/RT: Left/Right Touchpad
L/R: Left/Right Side Button
--
TRIG: Trigger
PWR: Power Button
ACCESSORIES
Power Adapter
USB-C Charging Cable
UK Power Adapter Plug
EU Power Adapter Plug
OTHER
LH/RH: LED Halo
LS/RS: LED Strip
USB-C: Charging Port
GET THIS: Our USB-C powers both ways. Wanna charge your cell phone? Plug it into the Mavrik!
TOP
BOTTOM
FRONT
BACK
EU POWER
ADAPTER
CHARGING
CABLE
UK
LEFT VIEW
20.5 in x 2.6 in x 7.6 in 3.3 LBS
520 mm x 66 mm x 193 mm 1.5 KG
STRIKERVR MAVRIK-PRO VR GAMING CONTROLLER
L
LH LS
F1
LT
PWR
USB-C
L
TRIG
F2
AT8
AT2
AT7
AT6 AT 1
AT5
AT4
AT3
/5

Active Touch 8: Slide
ACTIVE TOUCH
Get in the game with Active Touch! The
Mavrik-Pro’s Active Touch technology unlocks
a new world of possibilities through unique
gameplay and user interaction.
Located strategically on the Mavrik-Pro at
the areas of optimal interaction, the Active
Touch enables innovative swipe and gesture
functions. It also allows for left/right-hand
recognition and alternative grip placements.
MAVRIK-PRO / PRODUCT MANUAL

Active Touch 8: Slide
QUICK START
First, ensure that nothing has been damaged during shipping and that all items are in the box.
1. To start-up the device push & hold the Power
button which is located on the back underside of
the Mavrik-Pro (see “Mavrik-Pro Overview” section).
2. The device will then begin its startup sequence
and you will hear / feel the movement of the
haptic engines. The startup sequence ends
when the LED Halo/Strip are softly glowing
and the haptic engines have ceased motion.
3. The Mavrik-Pro’s initial state is preprogrammed
with various demo blaster proles. Cycle
through these modes by utilizing the L / R Side
buttons. The haptic modes can be initialized by
squeezing the Trigger or interacting with Active
Touch areas.
4. See “Demo Blaster Proles” section (pg 8) for
additional information on individual proles.
GET THIS: Your Mavrik-Pro’s battery should be at 30-50% charge so you can test the goods immediately.
| STRIKERVR.COM
/ 7

DEVICE MODES
DEMO MODE
By default, device is set to demo mode for initial startup.
If no buttons have been pressed for 15 seconds, blaster
will blink blue, meaning it is advertising for connection.
CALIBRATION
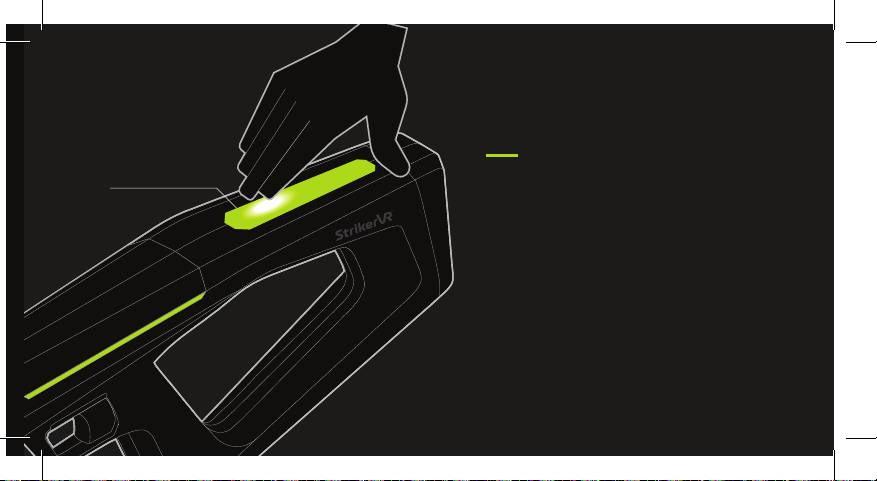
To Enter Calibration Mode: With the device ON, hold
both Front buttons (F1 & F2) and both Side buttons (L&
R) for 5 seconds. Device will restart following calibration.
UNPAIRING
To Clear Current Pairing: with the device OFF, hold both
Side buttons (L& R) and press Power button. Device will
blink blue 3 times then continue normal operation.
DEMO BLASTER PROFILES
Your Mavrik-Pro is package with prepro-
grammed blaster proles which are avail-
able at initial startup in “Demo Mode.”
Scan QR for a walk-through of each blaster. v
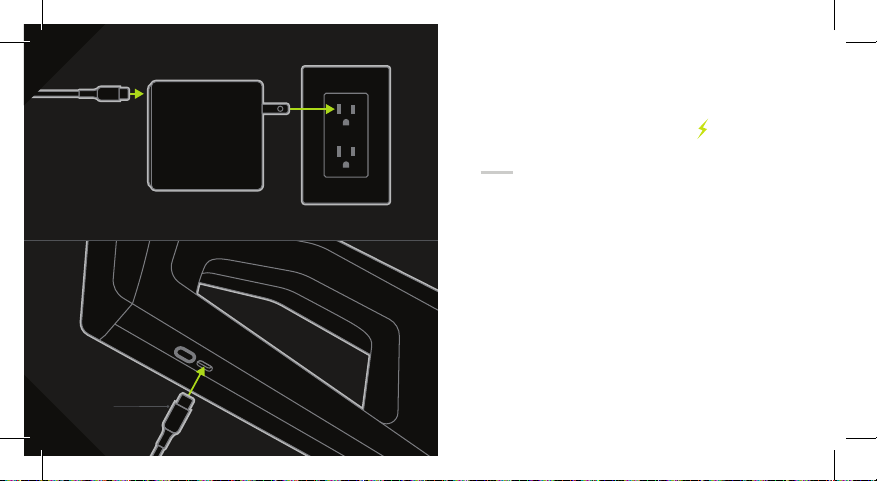
FIRMWARE UPDATE
To Enter Firmware Update Mode: With the device
OFF, depress both Touchpads (LT & RT) then press and
hold the Power button for 5 seconds. Device will restart
following rmware update.
MAVRIK-PRO / PRODUCT MANUAL

|STRIKERVR.COM
GET THIS: What are MetaSports? The next evolution of Esports, where the metaverse is your arena!
/9

CHARGING
CABLE
POWER ADAPTER
CHARGING
CABLE
1
2
R
CHARGING LEVELS
0%100% 20%40%60%80%
R
FULLY CHARGED
3
4
/ 11
MAVRIK-PRO / PRODUCT MANUAL
CHARGING YOUR
MAVRIK-PRO
Ok, so you’ve used all your blaster juice;
time to recharge.* Here’s how:
1. Unpack all the accessories, and then plug
the USB-C charging cable into the power
adapter and an available outlet. Make sure you
are utilizing the appropriate converter adapter.
2. Plug the other end of the charging cable into
the USB-C charging port located next to the
Power button.

CHARGING
CABLE
POWER ADAPTER
CHARGING
CABLE
1
2
R
CHARGING LEVELS
0%100% 20%40%60%80%
R
FULLY CHARGED
3
4
/ 11
MAVRIK-PRO / PRODUCT MANUAL
3. You should see an illuminated LED Halo and a
front to back lling movement on the LED Strip,
which means the batteries are charging. There
are 6 charging stages ranging from red to green.
4. When the charging motion ends, you should
see solid green ashing to white on the LED Halo
and Strip. This means the battery is fully charged.
Time to get your game on!
* Battery life is variable, depending on gameplay
GET THIS: To display current power level, momentarily
(<1 sec) press and release Power button

MODULAR TRACKING
The Mavrik-Pro features a removable
top plate which allows for installation
of various tracking mounts & modules.

TRACKING MOUNTS & MODULES
See individual Tracking Mount/Module manuals for setup
instructions. For complete listing of compatible HMD sys-
tems and Tracking Mounts/Modules, visit StrikerVR.com.
STRIKERVR SUPPORT CENTER
Scan QR or visit support.strikervr.com for all your setup
& integration needs, including:
• Developers Setup
• Blaster to HMD Pairing
• Tracking System Setup
• Device Manager
• Demo Experience Download
• Digital Asset Download
• Haptic Editor
S E T U P &
INTEGRATION
| STRIKERVR.COM
/ 13

CARE & MAINTENANCE
Unplug product from its power source before cleaning. Please only use clean and dry microber
cloths for cleaning the Mavrik-Pro Blaster & Accessories. Do not clean the device with any liquid or
chemical cleansers. Do not clean the surface of the device with alcohol or any other abrasive clean-
ing solution. Only use non-abrasive, alcohol free anti-bacterial wipes and wipe gently.
• Do not leave the Mavrik-Pro Blaster & Accessories
in direct sunlight. Exposure to direct sunlight can
damage the plastics over time by discoloring them
• As with any electronic devices, avoid exposure to
water or uids
• Operating Environment Temperature: 10-40°C / 50-104°F,
min. humidity 5%, max humidity 95% RH (non-condensing)
• Non-Operating (Shipping / Storage):
-30-65°C / -22 149°F, 85% RH
• Store components in a safe, climate-controlled
environment when not in use to minimize unintentional
damage or environmental exposure
MAVRIK-PRO / PRODUCT MANUAL

ELECTRICAL SPECIFICATIONS
COMPONENT R AT IN G CONTINUOUS OUTPUT POWER
Mavrik-Pro Blaster 100W 60W
Charging 100W 100W
Designed In New Orleans
©2022 All Rights Reserved StrikerVR, Inc.
| STRIKERVR.COM
/ 15

FCC warning:
Any Changes or modifications not expressly approved by the party responsible for compliance could void
the user's authority to operate the equipment.
Note: This equipment has been tested and found to comply with the limits for a Class B digital device,
pursuant to part 15 of the FCC Rules. These limits are designed to provide reasonable protection against
harmful interference in a residential installation. This equipment generates uses and can radiate radio
frequency energy and, if not installed and used in accordance with the instructions, may cause harmful
interference to radio communications. However, there is no guarantee that interference will not occur in a
particular installation. If this equipment does cause harmful interference to radio or television reception,
which can be determined by turning the equipment off and on, the user is encouraged to try to correct the
interference by one or more of the following measures:
-Reorient or relocate the receiving antenna.
-Increase the separation between the equipment and receiver.
-Connect the equipment into an outlet on a circuit different from that to which the receiver is connected.
-Consult the dealer or an experienced radio/TV technician for help.
This device complies with part 15 of the FCC Rules. Operation is subject to the following two conditions:
(1) This device may not cause harmful interference, and (2) this device must accept any interference
received, including interference that may cause undesired operation.
The device has been evaluated to meet general RF exposure requirement. The device can be used in
portable exposure condition without restriction.

STRIKERVR MAVRIK-PRO
// PRODUCT MANUAL
STRIKERVIRTUALRECOIL
STRIKERVR
STRIKERVR.COM SUPPOR[email protected]
Table of contents