4
ASSEMBLY
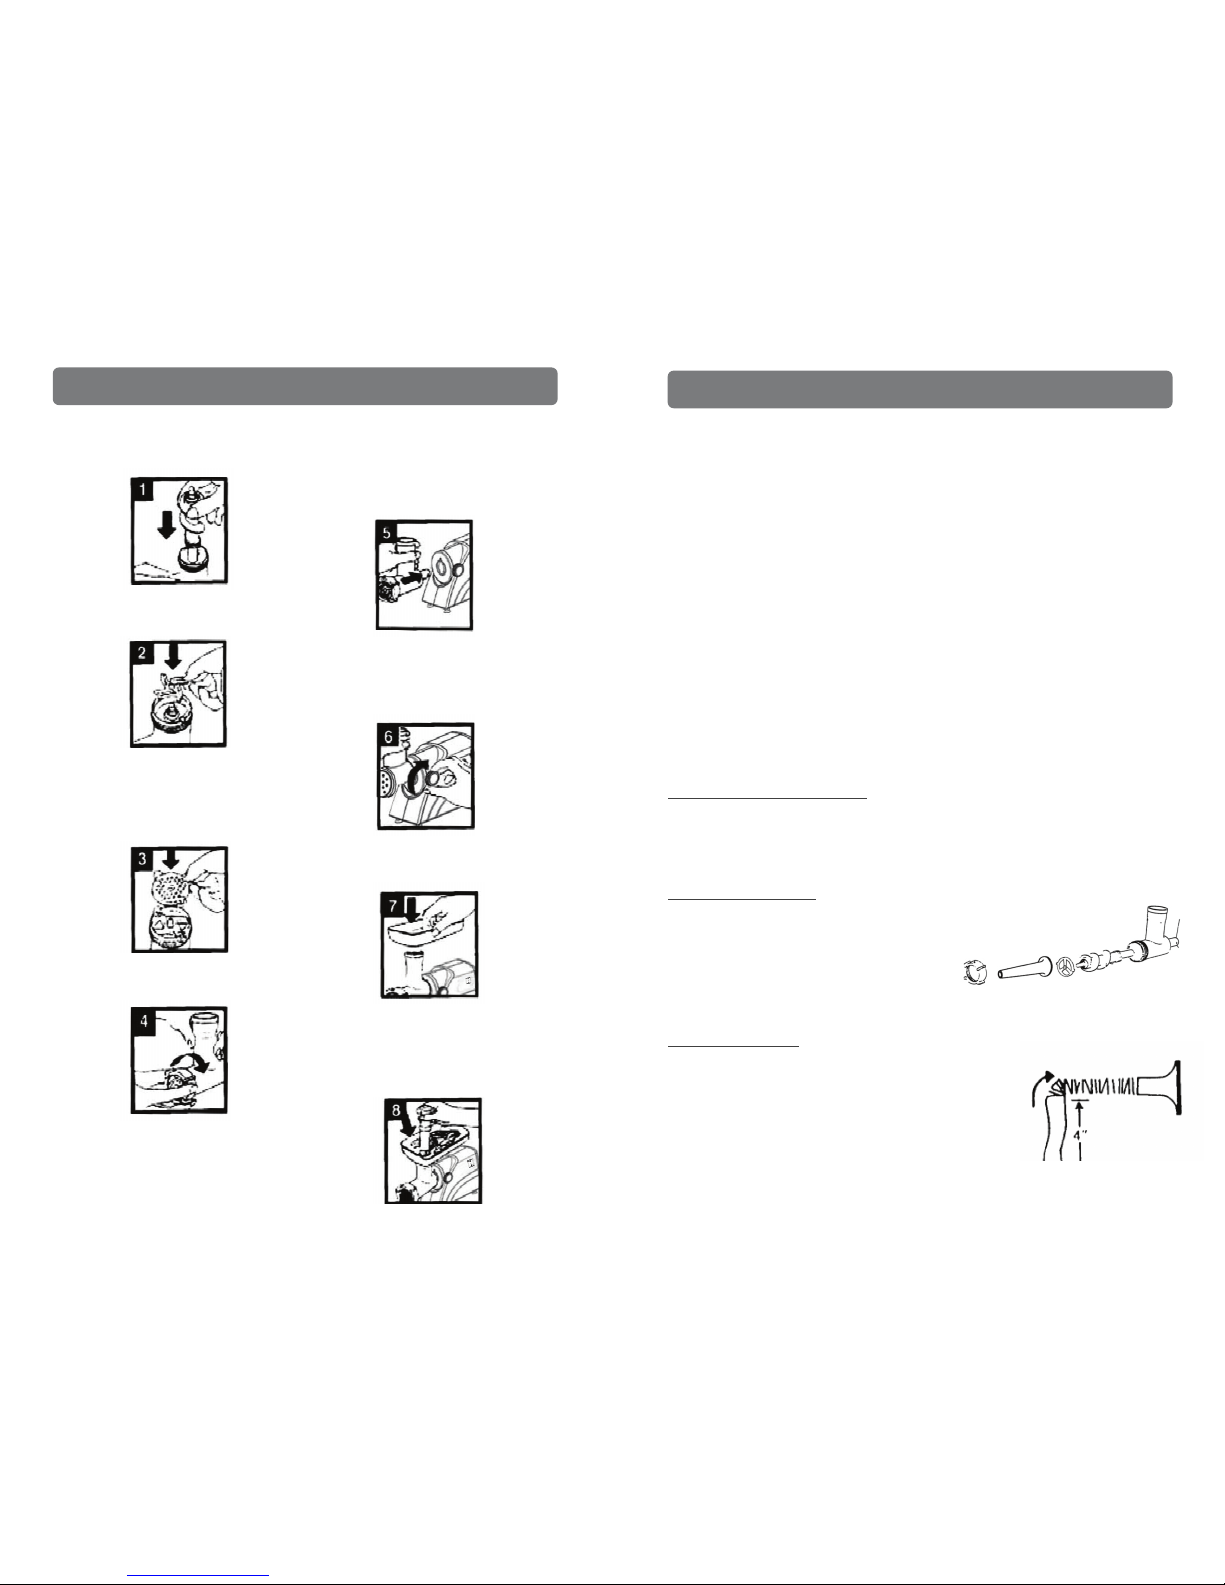
1. Insert the feed screw into the grinder
tube with the long end of the spindle
first. (See Figure 1)
2. Position the cutting blade onto the feed
screw with the flat cutting sides facing
out. (See Figure 2)
3. Position the desired cutting disc onto the
feed screw against the flat sides of the
cutting blade. Ensure the notches of the
cutting plate fit into the slots of the
grinder tube. (See Figure 3)
4. Securely attach the screw ring to the end
of the grinder tube. (See Figure 4)
5. Insert the grinder head into the motor
unit opening. Turn it slowly and push it
in until it is firmly seated. (See Figure 5)
¾Note: The locking knob may need to be
loosened to allow the grinder heat to be
fully inserted.
6. Secure the grinder head by turning
the locking knob until it is tight.
Caution not to screw too tightly or
the construction may crack. (See
Figure 6)
7. Position the feeding tray onto the
top of the feeding tube. (See Figure
7)
8. Use the food pusher to push food
gently, one piece at a time into the
feeding tube. Do not force the food
into the tube if there is obstruction.
(See Figure 8)
5
USING YOUR MEAT GRINDER
HOW TO USE THE SAUSAGE STUFFER
•You will need sausage casings, either natural or synthetic, which can be purchased from your
local meat market. If purchased dry, casings should be soaked briefly in a mixture of 2 cups of
water to 1 tablespoon of vinegar. Meats must be ground and seasoned before making sausage
links.
ATTACH SAUSAGE STUFFER
1. Insert the feed screw into the grinder tube.
2. Place the coarse cutting disc onto the feed screw.
This provides a bearing to position end of feed
screw.
3. Place sausage stuffer through screw ring.
Securely attach screw ring to grinder tube.
4. Insert the grinder tube into the main motor unit and tighten locking knob to secure.
TO STUFF THE CASINGS:
1. Cut casing into 2 or 3 feet lengths. Prick with a pin to allow
air to escape while stuffing.
2. Pull and gather the casing, except the last four inches, over
the stuffer attachment.
3. Stuff casing loosely as the meat will expand slightly when
cooking it.
4. As the casing begins to fill, tie the end securely with a string.
5. Twist the casing into desired link size and shape as the meat
fills it.
6. You can also twist and knot the casing directly, without using a string.
1. Place the assembled appliance on a stable
work surface so that the air vents at the
bottom and back remain unblocked.
2. Make sure the on/off switch is in the off
position. Insert the plug into an electrical
outlet.
3. Place a wide, shallow bowl or plate
beneath the grinder tube to catch the
food.
4. Switch the appliance to ON. The grinder
must ALWAYS be on before adding food
into the food tube.
¾NOTE: If the motor slows or stops, this
may be due to jammed food. Immediately
switch the grinder to OFF. Set the switch
to Reverse and then turn the grinder to ON
again. If the grinder should get jammed
again, you may need to switch it off,
unplug, disassemble the grinder head and
clean the internal parts.
CUTTING DISC SUGGESTIONS:
The following are suggested uses for each of
the cutting discs. Experiment to choose the
disc that best meets your tastes or recipes.
COARSE CUTTING DISC: For ground meat
used in chili or for vegetables.
MEDIUM CUTTING DISC: For ground meat
used in soups or for relishes.
(not included with model HA-3433A)
FINE CUTTING DISC: For spreads, pates, baby
food, and hamburger meat.
AFTER USE:
•Grinding stale bread pieces through the
machine may help remove food residue
left in the grinder after use.
•Switch the appliance to OFF and unplug
from the electrical outlet.
•Disassemble and clean all parts
immediately after each use.