manuals.online logo
Brands
  1. Home
  2. •
  3. Brands
  4. •
  5. Maxxair
  6. •
  7. Dehumidifier
  8. •
  9. Maxxair DH 065 BLU User manual

Maxxair DH 065 BLU User manual

Metal Dehumidifier
115v Model: DH 065 BLU
Owner’s Manual
Please read this owner’s manual
before operating and keep
safe for future reference
- 1 - VENTAMATI , LTD.
▪
1-800-433-1626
▪
ETL Listed 4005272
GENER L INFORM TION
Thank you for choosing our Metal Dehumidifier
This Owner’s Manual will provide you with valuable
information necessary for the proper care and maintenance of
your new dehumidifier.
Please take a few moments to read the instructions thoroughly
and familiarize yourself with all the features and operation of
this dehumidifier.
Unpackaging the dehumidifier
Please do not dispose of any packaging until you have checked
the appliance is operational.
After removing the packaging ensure the contents are intact
and complete. In the unlikely event of missing parts, contact
ustomer Service at 1-800-433-1626.
Do not leave children unattended with any of the packaging
since it is a potential source of danger. Disposal of all packaging
must be carried out responsibly & safely and in accordance
with your local authority regulations.
Always recycle the packaging material where possible. When
using any electrically powered product, basic safety
precautions should always be followed.
PLEASE READ THESE INSTR CTIONS CAREF LLY
BEFORE SING THE PROD CT.
VENTAMATI , LTD.
▪
1-800-433-1626
▪
ETL Listed 4005272 - 2 -
When using any electrical appliance,
Basic safety precautions should always be followed.
IMPORT NT INSTRUCTIONS
W RNING - to reduce the risk of fire, electrical shock or injury
to persons or property:
1Always operate the product from a power source of the
same voltage, frequency and rating as indicated on the
product identification plate.
2lose supervision is necessary when any product is used by
or near children the elderly or the infirm. Do not allow
children to use the appliance as a toy.
3This appliance is not intended for use by persons (including
children) with reduced physical, sensory or mental
capabilities or lack of experience and knowledge unless
they have been given supervision or instruction
concerning use of the appliance by a person responsible
for their safety.
4Do not operate any product with a damaged power cord or
plug, after the product malfunctions, dropped or damaged
in any way. Return the complete product to the place of
purchase for inspection, repair or replacement.
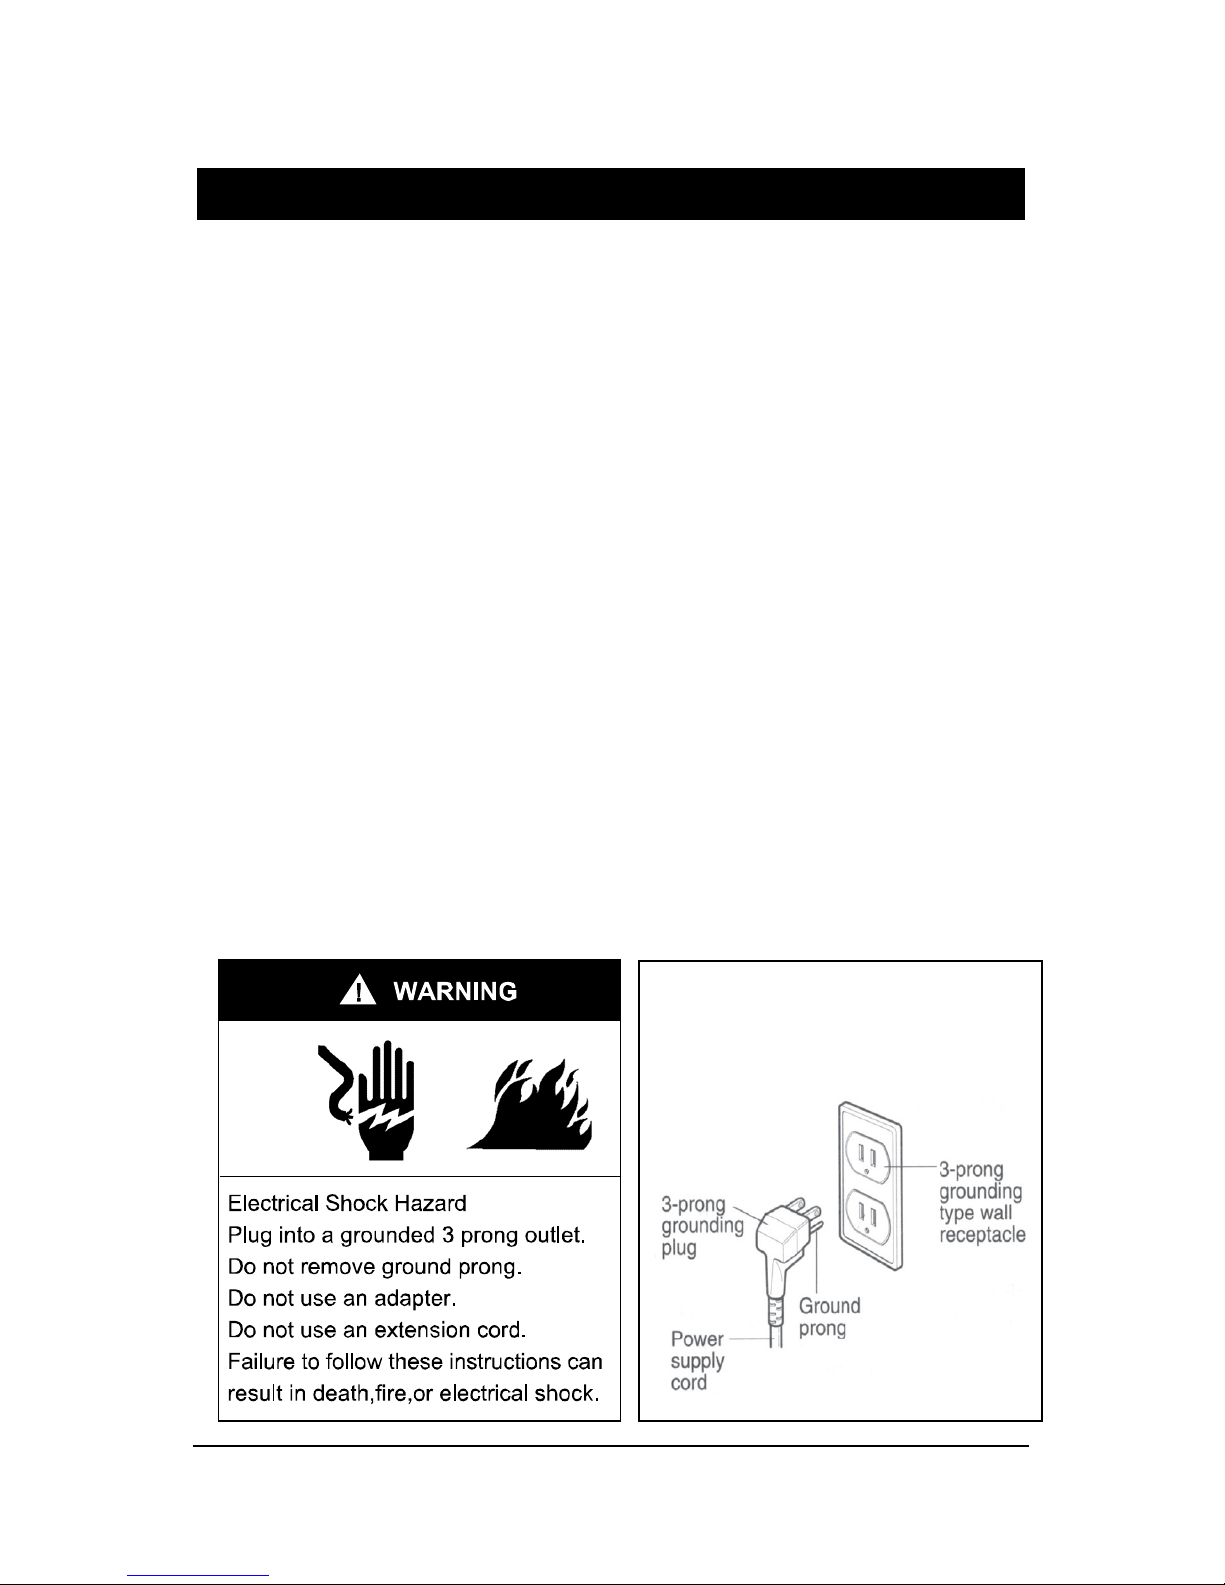
5To reduce the risk of electric shock, do not expose the unit
or flexible cord to moisture of any kind.
6Switch off and unplug from the power socket when not in
use, before assembling or before cleaning.
- 3 - VENTAMATI , LTD.
▪
1-800-433-1626
▪
ETL Listed 4005272
IMPORT NT INSTRUCTIONS
7Do not place objects on the product or allow objects to
obstruct the inlet or outlet openings, or operate in close
proximity to walls or curtains, etc.
8The use of attachments or accessories not recommended
or sold by the product distributor may cause injury to
persons or damage to property.
9Do not attempt to dismantle the appliance.
10 Do not operate the appliance on a metal surface.
11 Do not use the appliance in artificially hot or humid
conditions or allow to be used in a hazardous environment.
onsult the product Specifications section for approved
operating conditions.
12 Do not clean the appliance with organic solvent.
13 This Owner’s Manual is an integral part of the appliance
and should be stored for safe keeping and must always
accompany the appliance in the event of ownership
transfer or for reference to by a service engineer.
Typical 3 prong
plug and outlet
VENTAMATI , LTD.
▪
1-800-433-1626
▪
ETL Listed 4005272 - 4 -
ontrol panel Air intake metal grille
Wheel
Water pipe
and power cord
Storage location
Water pipe
Pull rod
Rating label
Water pipe
connector
(male)
PRODUCT IDENTIFIC TION
Water pump door
FIG. : FRONT
FIG.B: RE R
Air outlet
Power cord
- 5 - VENTAMATI , LTD.
▪
1-800-433-1626
▪
ETL Listed 4005272
SETTING UP INSTRUCTIONS
SETTING UP THE DEHUMIDIFIER
W RNING
No not obstruct the air intake or air outlet
IMPORT NT
Place dehumidifier in the upright position. When
transporting a dehumidifier to site, allow the
dehumidifier to stand for 30 minutes before switching
ON. This is necessary to allow the refrigerant system to
stabilize and avoid system damage.
PL CE IN ENCLOSED RE :
For best results, operate the
dehumidifier in an enclosed area to create a "drying chamber."
lose all doors and windows that open to external areas to
maximize the dehumidifier’s water removal efficiency. Keep
traffic through the drying chamber to a minimum. Place the
dehumidifier in the center of the room away from walls and
furnishings where airflow may be obstructed.
PROPER IRFLOW IS ESSENTI L: Do not place this dehumidifier
in a position where the front Air Intake Grill or rear Air Outlet is
blocked by walls, furniture or any other obstruction.
VENTAMATI , LTD.
▪
1-800-433-1626
▪
ETL Listed 4005272 - 6 -
Front
ir
Intake
Grill
SETTING UP INSTRUCTIONS
Illustration of correct positioning for best performance
ENSURE PROPER DR IN GE: This dehumidifier contains a
built-in pump that connects to a drainage hose which is stored
in the back of the unit. Uncoil the entire hose to ensure that
there are no kinks or restrictions and place the unattached end
into a drain or run to the outdoors. Ensure that water piped to
the outdoors does not create a slipping hazard. To avoid
damaging or overworking the pump, do not exceed a 10 foot
vertical lift height between the pump and drain.
KEEP CLEAR
10 FT. MAXIM M
DRAIN HEIGHT
To Drain
Rear Drain
Hose Outlet
Drain Hose
- 7 - VENTAMATI , LTD.
▪
1-800-433-1626
▪
ETL Listed 4005272
CONTROL P NEL
Digital Control Panel
 ON/OFF: Press once to turn the unit ON or OFF.
 PURGE: Press the “PURGE” key to empty water
from the pump reservoir. During normal operation the
pump purges automatically when the reservoir is full. Use
“PURGE” before moving the machine to avoid water
spillage. The pump will close automatically after forty
seconds continuous operation.
 FUNCTION: Press the “FUNCTION” key, The screen
will display ‘Humidity setting’ ‘Ambient humidity’ ‘Total
running hours’ ‘Ambient temperature’.
 REGUL TE: Press “REGUL TE” key to adjust humidity
or set total running hours and job hours or setting
fahrenheit and centigrade.
Long press “REGUL TE” key 5 seconds, The coil sensor
temperature will display. The screen will return to display
ambient humidity after coil sensor temperature cursor
flashing 3 seconds.
Coil Sensor Temperature
VENTAMATI , LTD.
▪
1-800-433-1626
▪
ETL Listed 4005272 - 8 -
CONTROL P NEL
The LCD displays symbols
 : Dehumidify ON.
 : Defrost ON.
 : Draining.
 : Fan start up.
 : Setting humidity.
 : Ambient humidity.
 : Total running hours.
 : Ambient temperature.
- 9 - VENTAMATI , LTD.
▪
1-800-433-1626
▪
ETL Listed 4005272
OPER TION
Plug in electrical cord
This dehumidifier must be plugged into a grounded
polarized 115 VA /60Hz outlet rated at least 15 amps.
Make sure the drain hose is connected and routed to
a safe location.
Plug in electrical cord, The screen will display standby:
Turn the unit ON
Press the “ON/OFF” key to turn the unit on.
If humidity setting is less than ambient humidity, the unit
will entry to dehumidify mode. The screen will display:
If humidity setting is greater than ambient humidity, the
unit will stop working after started 1 minute.
Turn the unit OFF
Press the “ON/OFF” key to turn the unit OFF. When the
unit turns OFF, The water pump will turn on automatically
for 40 seconds to drain the residual condensate water in
the dehumidifier. The screen will appear draining
cursor.
VENTAMATI , LTD.
▪
1-800-433-1626
▪
ETL Listed 4005272 - 10 -
OPER TION
IMPORT NT:
To avoid water spillage. Do not move the dehumidifier for at
least three minutes after turning the power off. Before
transporting, be sure to remove the external drain hose,
drain it carefully, and return it to the pocket provided on the
back of the unit.
Humidity setting
The factory setting is continuous. The humidity can be set in
the following manner:
1. Press the function key , The humidity setting the
cursor flashing.
2. Press the regulate key to setting the desired humidity
level. Increases or decreases are in increments of 5%.
Adjust humidity is between O, 25% and 90%.
3. Wait 3 seconds after setting the desired humidity is
completed, the unit will automatic recognition of
numerical.
NOTES:
1. When the adjusting humidity is between 26% and 90%.the
unit will stop working while reaching the setting humidity,
the screen will displays
- 11 - VENTAMATI , LTD.
▪
1-800-433-1626
▪
ETL Listed 4005272
OPER TION
2. When the adjust humidity is below 25% . the “CO” will be
displayed. The unit will entry to continuous dehumidify
mode .
Total running hours display and job hours display
setting
1. Press the function key three times. The cursor turns
to the total running hours , The total running hours the
cursor flashing.
2. Press the regulate key to switch to job hours.
3. Wait 3 seconds after switch to job hours is completed,
the unit will automatic recognition of numerical.
For example as follows:
Total running hours 200h Job hours 8h
NOTE:
The “Total running hours” field displays continuously during
operation. Like a car odometer, this shows the total number of
hours on the unit and cannot be manually reset outside the
factory.
VENTAMATI , LTD.
▪
1-800-433-1626
▪
ETL Listed 4005272 - 12 -
OPER TION
Centigrade and Fahrenheit setting
1. Press the function key twice, the cursor turns to the
centigrade , The centigrade the cursor flashing.
2. Press the regulate key to switch to fahrenheit.
3. Wait 3 seconds after switch to fahrenheit is completed,
the unit will automatic recognition of numerical.
For example as follows:
entigrade 25 Fahrenheit 77
- 13 - VENTAMATI , LTD.
▪
1-800-433-1626
▪
ETL Listed 4005272
M INTEN NCE
Cleaning Or Replaced Filter
NOTE: The working performance of the dehumidifier will be
greatly reduced if the filters are clogged. Check filter weekly.
Cleaning or replaced filter if get clogged.
Ensure the dehumidifier is turned OFF and plug is removed
from the power outlet before performing maintenance.
1. Loosen a screw
2. Remove the filter as shown.
3. Vacuum any debris from the filter.
4. Using lukewarm water and a mild detergent wash the filter
and allow to dry.
5. Once dry, re-install the filter into the dehumidifier.
The item 3、4 refer only to type of can cleaning filter .
Loosen a screw
VENTAMATI , LTD.
▪
1-800-433-1626
▪
ETL Listed 4005272 - 14 -
M INTEN NCE
Cleaning water pump
NOTE: Cleaning water pump once when unit running time
reach to 1000 hours.
Ensure the dehumidifier is turned OFF and plug is removed
from the power outlet before performing maintenance.
1. Press lock on the two side of water pump door, open the
door.
2. Remove 1pc screws to take apart press bar.
3. Pull water pipe to take apart water pump.
4. Remove 1pc screws to take apart water pump top cover .
5. Remove 4pcs screws to take apart water bottom cover .
6. leaning the water pump.
7. Re-install all.
- 15 - VENTAMATI , LTD.
▪
1-800-433-1626
▪
ETL Listed 4005272
STORING THE UNIT
Storing the unit
Follow the guidelines below when
storing the unit:
1. Prior to storing the unit, clean filters
and drain water from the unit.
2. Put the power cord to the power
cord storage location for back
of the unit.
3. Put the water pipe to the water
pipe storage location for back
of the unit.
4. If necessary, stack machines
as shown.
NOTE:
Do not stack more than 2 machines
high. Be sure to secure the machines
to ensure they do not fall or move.
VENTAMATI , LTD.
▪
1-800-433-1626
▪
ETL Listed 4005272 - 16 -
TROUBLE SHOOTING
F ULT C USE SOLUTION
Unit does not
operate
No power to machine.
Unit not switched on.
Plug in unit; check power at
outlet and at base of unit.
Switch unit on.
Fan not
turning
Obstructed air
outlet and
fan.
Remove obstruction.
Unit
operating,
but room not
dry
1. Not enough time
to dehumidify air.
2. Poor air movement
in room.
3. Excessive moist air
infiltration in room.
1. Allow more time for
drying.
2. Increase air movement
with fans.
3. Reduce outside air
infiltration into the room.
Unit collects
too little
water
1.Room air is dry.
2.Obstructed filter
and coils
3.Room temperature
is too low.
1. heck humidity with
hygrometer.
2. heck filter and coils;
clean as necessary.
3.Increase room
temperature.
W RNING:
DO NOT attempt to rectify faults using unqualified personnel.
If the problem you are experiencing is not listed here, call
1-800-433-1626.
- 17 - VENTAMATI , LTD.
▪
1-800-433-1626
▪
ETL Listed 4005272
TROUBLE SHOOTING
Fault codes
The table below shows error messages that the system may
report. If the display shows an “ER” message, first unplug the
unit and then plug it back in. This may reset the electronics and
no further action may be necessary. If an error message
reappears, use the table below to help identify the problem.
CODE ER1 ER2 ER4
Error
message
oil sensor error Humidity
sensor error
Water pump fault or
blockage
Display
Reading
Flashes every 1s Flashes every 1s Flashes every 1 s
Reason
1.the coil sensor
terminals are not
securely plugged in.
2.The coil sensor fault .
3.If not above question,
It maybe is display
panel P B fault.
1.The humidity sensor
terminals are not
securely plugged in.
2.The humidity sensor
fault . 3.If not above
question, It maybe is
display panel P B fault.
Water is not draining
from the pump
reservoir or there is a
lack of power to the
water pump.
Remedy
1. heck to ensure the
coil sensor terminal is
securely plugged in.
2.Replace the coil
sensor .
3.Replace display panel
P B
1. heck to ensure the
humidity sensor
terminal securely
plugged in.
2.Replace the humidity
sensor .
3.Replace display panel
P B
1. Make sure
maximum lift is not
exceeded. End of
hose should be no
higher than 3m
above the unit.
2. heck pump for
debris or blockage.
If these solutions do not correct the error, call 1-800-433-1626.
VENTAMATI , LTD.
▪
1-800-433-1626
▪
ETL Listed 4005272 - 18 -
SPECIFIC TION
Dehumidifying apacity
(90°F/ 90% RH): 140pints/day
Dehumidifying apacity
(AHAM onditions-86°F/ 80% RH): 100pints/day
Dehumidifying apacity
(AHAM onditions-80°F/ 60% RH): 65pints/day
Power Supply
(AHAM onditions-80°F/ 60% RH):
115V /60Hz,
720W/6.3A
Refrigerant: R410A/19oz (540g)
Working Temperature: 41°F~95°F
ontrols Electronic Touchpad
Process Air 300 FM
Unit Size(inch): 20x15x26.8
Packing Size(inch): 21.3x16.1x29.1
Net/Gross Weight( lbs): 82/93
- 19 - VENTAMATI , LTD.
▪
1-800-433-1626
▪
ETL Listed 4005272
W RR NTY
Ventamatic, Ltd. extends this warranty to the original retail purchaser of its model or, if
this unit is purchased and installed by a building contractor, then to the original owner of
the home. No subsequent purchaser of the unit or of a home in which it is installed is
entitled to any of the benefits of this warranty.
This product is warranted against defects in materials and workmanship for a period of
one (1) year from the date of original retail purchase. No other parts or components are
warranted. There is no warranty for defects caused by abuse, faulty installation, or the
like. Repairs or replacement parts supplied under this warranty are warranted only for
the period of this warranty; that is, one (1) year from the date of the original retail
purchase of the unit.
In the event of a defect or malfunction, we will replace or repair the defective part or
component only and return the new or repaired part to you freight prepaid. You must
bear all other expenses incurred in obtaining repairs, including labor required for field
repair or replacement, and the cost of shipping the defective part to us. You must also
bear the cost of repair to or replacement of any part or component and the shipping
charges incurred for the repair or replacement and return to you of any part or
component not covered by this warranty, including parts or components damaged by
you.
The company reserves the right to demand and receive written evidence of the date of
purchase before undertaking to perform its obligations under this warranty. You should,
therefore, retain your sales slip and attach a copy of it to the warranty claim.
In order to obtain the repair or replacement of this unit, you must select one of the
following methods:
A. Return to factory.
Return postage prepaid only the part or component which you believe to be defective to
the following address:
Ventamatic, Ltd
100 Washington Street
Mineral Wells, TX 76067

This manual suits for next models

3

Popular Dehumidifier manuals by other brands

Kroll T40 Dual operating instructions

Kroll

Kroll T40 Dual operating instructions

MALTEC DH-2200 Operation and maintenance manual

MALTEC

MALTEC DH-2200 Operation and maintenance manual

Danby DDR30B1WDB owner's manual

Danby

Danby DDR30B1WDB owner's manual

Daewoo COL1471 user manual

Daewoo

Daewoo COL1471 user manual

Phoenix 4800 E owner's manual

Phoenix

Phoenix 4800 E owner's manual

Abestorm Living Environment Series user manual

Abestorm

Abestorm Living Environment Series user manual

Mitsubishi DA25W-H user manual

Mitsubishi

Mitsubishi DA25W-H user manual

Midea MAD20S1QWT user manual

Midea

Midea MAD20S1QWT user manual

LG LHD45EL Specification sheet

LG

LG LHD45EL Specification sheet

GE AHM30 owner's manual

GE

GE AHM30 owner's manual

Drieaz PHD 200 owner's manual

Drieaz

Drieaz PHD 200 owner's manual

Honeywell DR90A3000 installation guide

Honeywell

Honeywell DR90A3000 installation guide

Zenith ZD30 Service manual

Zenith

Zenith ZD30 Service manual

Wilfa DRY CONNECTED instruction manual

Wilfa

Wilfa DRY CONNECTED instruction manual

SOLAC DH8935 Instructions for use

SOLAC

SOLAC DH8935 Instructions for use

Wood’s DS-40FS user manual

Wood’s

Wood’s DS-40FS user manual

EUROM 371086 instruction manual

EUROM

EUROM 371086 instruction manual

GE AHG30LH owner's manual

GE

GE AHG30LH owner's manual

manuals.online logo
manuals.online logoBrands
  • About & Mission
  • Contact us
  • Privacy Policy
  • Terms and Conditions

Copyright 2025 Manuals.Online. All Rights Reserved.