MAY FILIUS Pagoda User manual

Operating instructions: type FILIUS Pagoda
with DMZ118
Content:
page 02 Assembling and erecting the parasol
page 03 Assembly: Unpacking the parasol
page 05 Assembly: Erecting the parasol
page 07 Operation: Opening the parasol
page 08 Assembly: Aligning the parasol
page 09 Assembly: Theft and anti-twisting lock
page 10 Operation: Closing the parasol
page 12 General information
page 13 Assembly: Storing the parasol
page 14 Maintenance and cleaning
page 15 Assembly: Tools and aids
Thank you very much for purchasing a MAY parasol.
The following instructions include all information necessary for the correct assembly, operation and
maintenance of your MAY parasol. To guarantee absolute safety when handling your parasol,
please read these instructions carefully and then keep them for later reference.
Stand 36-2428
Deutsch / English / Français page 1 of 16

Non- observation of operating instructions can result in personal injuries or damage to property.
Please note that if these instructions are not observed, the manufacturer cannot assume any
liability or guarantee.
• Always follow the safety regulations.
• Should you not understand any part of these operating instructions, please contact your
MAY dealer.
Wind can damage your parasol. No guarantee possible.
• Always completely open or close the parasol. Never leave it merely half-opened, as it is
then not fully stable.
• Immediatelyclosetheparasolwheneverwindrises.
• Ifparasolsareerectedinanexposedlocation(e.g.inupcurrents,onslopingground,
in wind corridors, etc.) the weight of the base must be increased.
Assembling and erecting the parasol
1. Fasten the upper anchor tube to the lower tube with socket head screw.
A falling parasol can cause serious or even fatal injury.
If,duringassembly,theanchortubeslipsaway,itwillbeimpossibletoholdonto the parasol.
Itwillfalldownandpossiblycauseaseriousaccident.
• Makesureallanchortubescrewsandhingesfunctionproperly
• TightentheM16socketheadscrewwithatorqueof210Nm.
Screws that are not tightened correctly will work loose.
Ifscrewsarenottightenedfirmlyenough,therewillnotbesufficienttensile force to trigger
self-locking.Ifthescrewsaretightenedtoofirmlyandover-stressed,thescrewconnection
may slacken.
• Tightenthescrewmanuallyusingtheenclosedhexkeyandextension.Exertasmuchforce
as possible. With the enclosed tools there is virtually no risk of over-stressing.
• Thecorrecttorqueforatorquewrenchis210Nm.
Caution
Warning
Danger
Danger
2. Loosen the clamp there is sufficient clearance inside the anchor tube for the centre pole to be
inserted vertically.
Assembly: Unpacking the parasol
1. Remove bottom end cap of the front part of the cardboard sleeve. Use a cordless screwdriver with
aT30bittoremovethetorxscrews.
Caution
If the parasol is improperly withdrawn from the cardboard tube, the canopy fabric may
be damaged.
When the parasol is withdrawn, the metal brackets that fasten the tube caps can tear the fabric.
• Removeallmetalbracketsfromeitherendoftheprotectivetube before withdrawing the
parasol.
ref. 1.
ref. 2.
upper end cap
upper supporting cap lower supporting cap
lower end cap
page 2 of 16 Deutsch / English / Français
Stand 36-2428 Stand 36-2428
Deutsch / English / Français page 3 of 16

2. Removetheaccessorypackage(crank,MAY-protectivegloves),theprotectivesleeveandtheprintoutofthe
operating manual attached to the centre pole.
3. Remove the inner support cap the same way as the end cap.
4. Removethetopendcap.Thisisnotrequiredbuthelpfulasitavoidsthedevelopmentofavacuum
within the cardboard sleeve during pulling out the parasol. This would complicate pulling out the
parasol.
5. Holding the support pole, carefully pull the parasol out of the cardboard tube.
Pulling the parasol over rough surfaces (brinks, edges, uneven floors) damages the fabric.
• When withdrawing the parasol, place the cardboard tube on a working platform or trestle in
order to be away from the ground.
• Neverpulltheparasoloverbrinksoredges.
• Donotleantheparasolagainstanything.
If the parasol falls onto the ground, the canopy fabric gets damaged.
The best way to carry the parasol is on the shoulders.
•Avoid all risks of tripping on the route of transport. Clean the ground where the parasol is
to be positioned.
• Carrytheparasolwithatleast2persons.
If the parasol is laid directly onto the ground, the canopy fabric may get damaged.
When put on the ground, the canopy fabric may possibly get torn or scratched due to the weight
of the parasol.
• Ideally,theparasol should be safely anchored at once or laid on asoftsurface(e.g.amatorblanket)
• Avoidpointloads(stones,crushedrock,transporttrolleywithasmallrest).
Caution
Caution
Caution
Assembly: Erecting the parasol
1. Remove the foam package.
If a knife is used to remove the packaging, the protective sleeve and the canopy fabric may
get damaged.
• Donotuseaknifeoranyothersharpinstrumenttoremovethepackaging.
• Removetheadhesivetapebypullingattheendandwindingitup.
2. Remove the protective plastic sleeve. This transparent sleeve is only for transport.
Canopy may get dirty or damaged.
While erecting the parasol, always make sure the canopy is firmly tightened around the centre
pole and secured with the lashing strap. Otherwise the fabric may touch the ground and may
get dirty or damaged.
• Onlyremovethetransparentprotectionsleeveafteryouhaveputacleancarpetorcardboard
onto the floor.
• Thelashingstrapsmayonlyberemovedwhentheparasolisinverticalposition.
3. Use the enclosed MAY protection gloves to avoid the canopy is getting dirty.
4. Put the bottom of the centre pole onto the upper anchor tube.
Caution
Caution
page 4 of 16 Deutsch / English / Français
Stand 36-2428 Stand 36-2428
Deutsch / English / Français page 5 of 16
MAY setup aid

30°
5. Erect the parasol as following: One person pushes the bottom of the centre pole into the upper anchor
tube, the other person erects the parasol.
A falling parasol can cause serious or even fatal injury.
If,duringassembly,theparasolspinsroundintheanchortube,itmaybecomeuncontrollable,
fall and thus cause a serious accident.
• Ittakesatleast2adultstoerecttheparasol.
• Makesuretohaveonepersonavailablewhoisdedicatedtopushthe centre pole into the
upper anchor tube.
Do not allow the parasol to plummet into the anchor tube.
Simply dropping the pole into the anchor tube without control may have a detrimental effect on
the operating mechanism of the parasol.
• Slowlylowerthepoleintotheupperanchortubeuntilithasafirmholdon the bottom surface.
Danger
Caution
Opening the parasol: FILIUS with rope pull FS
1. Remove the strap from the canopy.
2. Pull the rope down vertically until the lower distribution flange is moved up against the 2 arresters,
this is necessary to achieve full tension of the canopy.
3.Pulltheropeoutwardstoanangleofapprox.30°andthenloosenthetensionsomewhat.
The rope should get wedged in the upper pulley block, thus ensuring that the parasol stays open.
If the parasol is not fully opened, it can get damaged by the wind.
• Alwaysopentheparasoltofulltension.
Warning
push
hold up
arrester
page 6 of 16 Deutsch / English / Français
Stand 36-2428 Stand 36-2428
Deutsch / English / Français page 7 of 16
lower distribution flange

Opening the parasol: FILIUS with crank drive FK
1. Remove the strap from the canopy.
2. Insertthehandcrankintothedesignatedboreofthecanopymechanismand open the parasol by
turning it clockwise. The runner must be moved against the 2 arresters, this is necessary to achieve
full tension of the canopy.
If the parasol is not fully anchored, it can cause serious or even fatal injury.
Wind may lift the parasol if the screw is not tightened at the upper anchor tube.
• MakesuretheM16screwattheupperanchortubeistightened.
If the hand crank is not fully inserted, it will wear.
• Alwaysinsertthehandcrankrightuptothelimitstop.
If the parasol is not fully opened, it can get damaged by the wind.
• Alwaysopentheparasoltofulltension.
Assembly: Aligning the parasol
1. Release the clamp of the anchor tube.
2. Opentheparasol.(seeaboveheading:“Openingtheparasol“)
The wind can lift the parasol out of the upper anchor foot.
• Iftheclampleverisloosened,opentheparasolonlyifthereisabsolutelynowind.
Caution
Caution
Warning
Danger
3. Turntheerectedparasolwithintheanchorfootuntiltherequiredpositionhasbeenreached.Aligned
paralleltothewallofthehouseisvisuallyappealing.Incaseofseveralparasolstheyshouldbe
positionedparallel.AtFILIUSwithcrankdriveFKshouldstickerandcrankpointinonedirection.
4. Tighten the clamp on the upper anchor tube.
Assembly: Theft and anti-twisting lock
1. Aligntheparasolintothepositionrequired(cf.paragraph“Aligningtheparasol“).
2. Drilltheboreholeforthetheftandanti-twistlockfromeithersidethroughboththeparasolpoleand
theinnertube,usingaØ12.5mmtwistdrill.Ifyouwanttodrilltheholeswithacordlessdrillyouneed
toreducetheforcerequired.Thereforewesuggesttostartwithasmallerdiameterandgradually
increase up to Ø 12.5 mm. We recommend to use Ø 5 mm, Ø 8 mm and Ø 11 mm drill bits.
3. Slip the bolt through the holes and mount the lock.
ref. 3.ref. 2.
page 8 of 16 Deutsch / English / Français
Stand 36-2428 Stand 36-2428
Deutsch / English / Français page 9 of 16
arrester
lower distribution flange

30°
Operation: Closing the parasol
1. FILIUSwithropepullFS: Pulltheropeoutwardstoanangleofapprox.30°.Whentheropeisnolonger
wedged in, pull it downward and loosen the tension.
FILIUSwithcrankdriveFK:Insertthecrankorthedrillbitintothedesignatedboreofthecanopy
mechanism and close the parasol by turning it anti-clockwise.
Fabric jammed between the spokes can cause abrasion and scouring marks.
No guarantee possible.
• Pullthecoveringfabricfrombetweenthespokesandfolditroundtheparasolpole in one
direction as you would with an ordinary portable umbrella.
Caution
2. Use the supplied lashing straps to secure the parasol, use a freestanding ladder if possible.
Wind can do damage to an unsecured parasol and may lead to abrasion of the canopy fabric.
No guarantee possible.
• Close the parasol and secure it with 3 lashing straps.
3. Pull the supplied protection sleeve over the parasol.
Wind may damage an unsecured canopy (rupture and chafe marks). No warranty.
Even if the parasol is closed and secured by the 3 lashing straps, there are still some parts of the
canopythatcannotbesecuredandthereforemoveinthewind.Inextremelywindyareasthis
damagesthecanopyatanearlystage.CanopymadefromMayTex-Polyespeciallytendtothis
kind of flutter damage.
• Pullaprotectionsleeveovertheclosedparasol.
Caution
Caution
page 10 of 16 Deutsch / English / Français
Stand 36-2428 Stand 36-2428
Deutsch / English / Français page 11 of 16

General information
1. Use the parasol only if it is in original condition.
Any constructional change may lead to damages.
Iftheoriginalconditionischanged,constructionalcomponentsmaycollide,thestabilitygets
reduced, opening and closing becomes complicated and the canopy or the metal base gets
damaged. Other components beside or below the parasol may also be affected. No warranty,
guarantee or liability.
• OnlyuseoriginalMAYspareparts.
• Donotmakeanyconstructivechanges,e.g.boreholes,exchangingscrews.
• Donotuseanyexternalmaterial.
• Donotattachanyitemsintotheparasol,e.g.decorationorelectricalequipment.
• Onlyusetheparasolifitisfreeofdamageandfullyfunctional.
• Repairsmayonlybedonebyauthorizedpersonnel.
2. Only use the parasol if the weather is permitting.
Extreme environmental impacts may cause personal injury and material damage.
Ifaparasolisexposedtoexcessivestrainitmaygetdamagedorevenruined.Thespokes,
the canopy or the centre pole may get damaged. Also, surrounding objects may be affected.
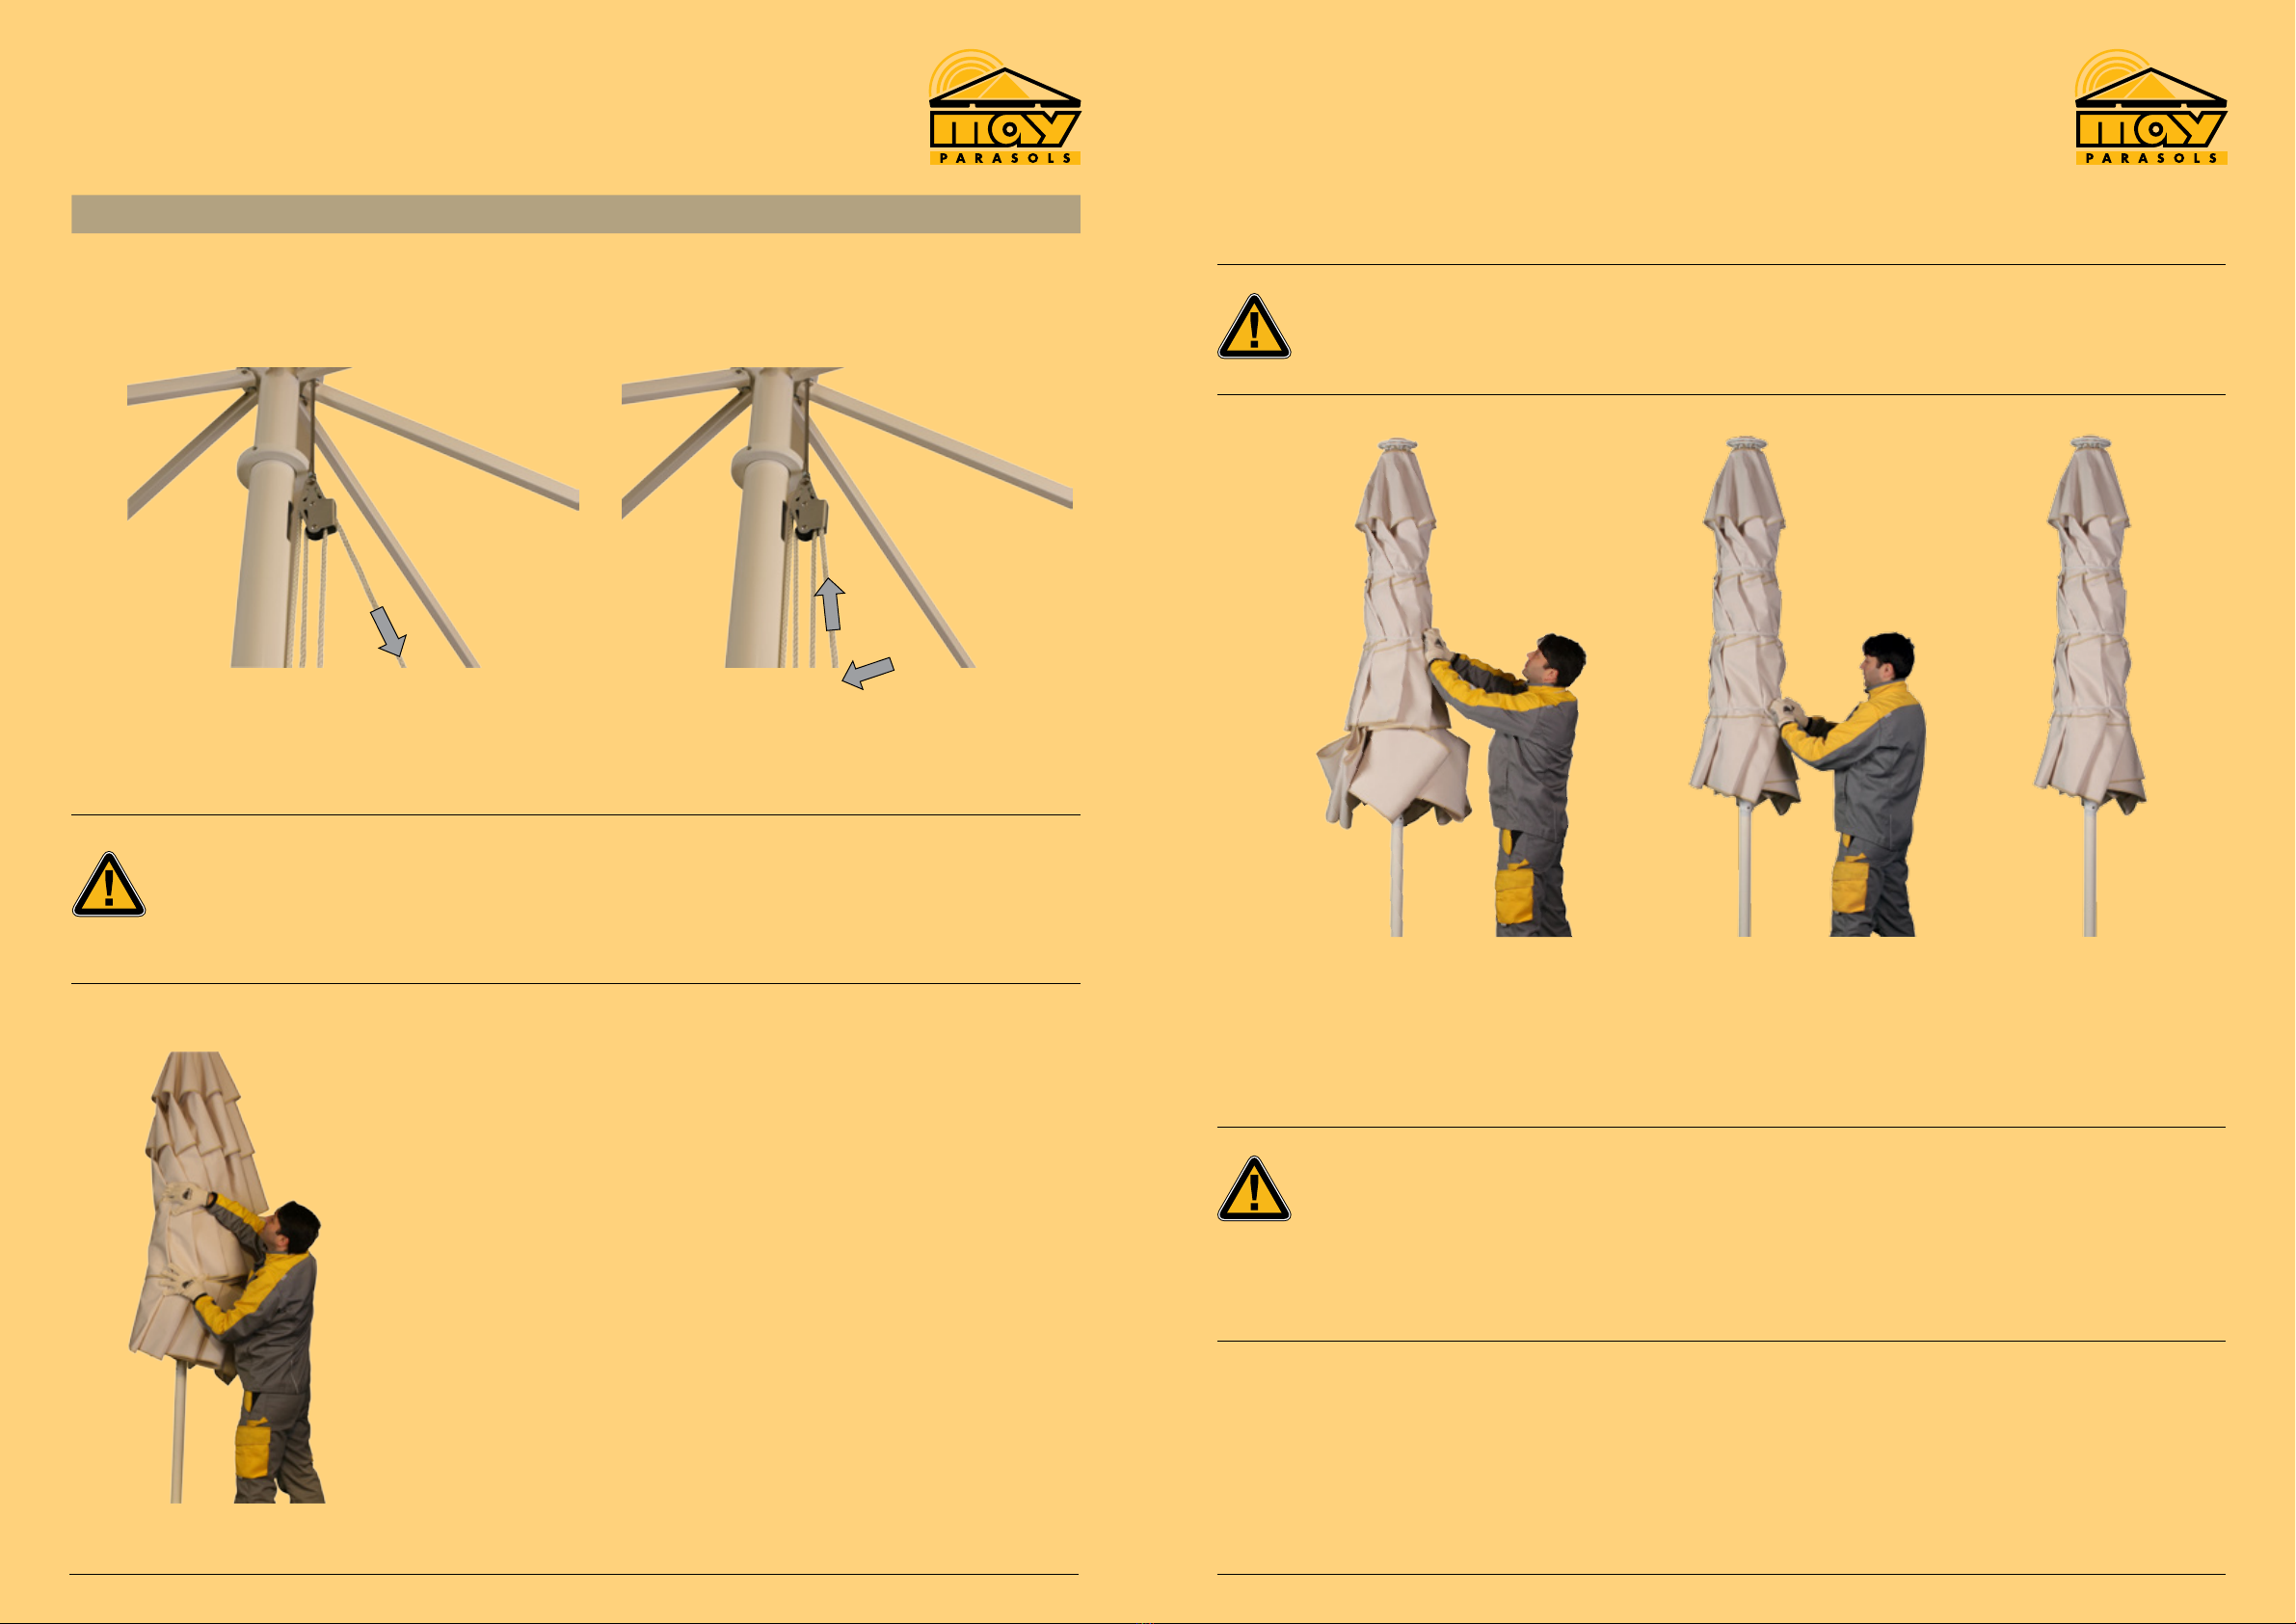
• After closing the parasol always secure it with the lashing strap.
• Closetheparasolincaseofthunderstorms,hailorextremerainshowers.
• Theparasolisnotmadeforsnowloads.Closetheparasolincaseofsnowandicing.
• Closetheparasolifunattended.
3. Keepawaychildrenfromthecrankduringopeningandclosingtheparasol.
4. Keeptheparasolawayfromopenfiresanditssparks.Deepfryersfromsurroundingboothscausedirt.
The canopy and the frame also get dirty from electric fires positioned directly below the parasol.
Exhaustfumesdepositasablacklubricatingfilmunderneaththeparasol.
5. CheckwithyourinsuranceifthereisanoptiontocoverstormdamageforyourFILIUS.
Stormdamage:Ifaparasolisnotprofessionallyclosedandsecured(asinstructedinthisinstruction
manual) it may damage the parasol.
Caution
Danger
page 12 of 16 Deutsch / English / Français
Stand 36-2428 Stand 36-2428
Deutsch / English / Français page 13 of 16
Assembly: Storing the parasol
Ifpossible,leavetheparasoloutsidethroughoutthewholeyear.Unprofessionalstoragemayratherlead
to damages than leaving the parasol outside.
There are several reasons for winter storage, e.g. if there is no vandalism protection given or if the city
administrationrequiresparasolremoval.Followinginstructionsmustbefollowedforstorage:
1. The canopy must be really dry for storage.
Improper storage may damage the canopy.
Ifthefollowinginstructionsarenotobserved,mildewmaystainthematerialorthesewing
thread may start to moulder.
• Makesuretheparasolisreallydry.
• Foldthefabriccorrectly,seepage10„closingtheparasol“.
• Pulltheprotectivesleeveovertheclosedparasol.
• Storetheparasolinadryroom.
• Ensureaconstantroomtemperaturetoavoidwatercondensation.
2. Make sure to avoid pressure marks at the canopy during storage.
Improper storage may damage the canopy.
Point loads from the tare weight or other subjects cause pressure marks and holes.
No guarantee possible!
• Removethefixationofthe(suspended)raingutterandthesidesheets,seeseparatemanual.
• Removeanyexternalcomponents,ifapplicable.
• Theweightofahorizontallystoredparasolmustbesupportedbyapossiblylargesurface.
Use the cardboard tubes in which the parasol was delivered. Push in the parasol to avoid point
loads.
• Incaseyoustoretheparasolinarackwithoutthecardboardtube,pleasemakesuretherack
is deep enough to provide sufficient seating.
• Themostsimpleandsafewaytostoreaparasolisinverticalposition.Justputtheparasol
intoapedestalframe.Ifthisunitisindoors,theparasolisprotectedfromwindandweather
and therefore the canopy lasts the winter without damage.
Caution
Caution

Maintenance and cleaning
1. Maintenance and cleaning should only be done by official MAY dealers.
2. Cleaning the canopy: Use a soft brush to remove dirt from the canopy, or use a high-pressure hose
(max.30°C,max.30bar,min.30cmdistancebetweennozzleandcanopy)andCleanoMay,
art. no. 350848. Afterwards rinse well with clear water so no soap residues remain on the fabric.
If not cleaned properly, the canopy fabric may get damaged.
• Followourcleaninginstructionsforcleaningyourparasol.
3. The MAY company will be pleased to overhaul your parasol and clean the canopy fabric for you.
However,thisisonlypossibleoff-season,i.e.fromOctobertoDecember.
4. Please contact your local retailer to clarify the transport to the May company.
5. Please keep in mind, the lead time for spare canopies and other spare parts is shorter during winter
than in spring and summer time.
Caution
3. Store the parasol away from mice.
Mice like to gnaw on textiles. This causes material damage.
Iftheparasolisnotprotectedfrommice,theymaydamagethecanopy.Pleasealwayscheck
each storage to make sure mice will not get in.
• Donotstoreaparasolinlyingpositiononthefloor.
• Crossarmracks(noconnectiontotheground)thataredoweledintothewallareagood
solution, as long as the distance to the ground is big enough, so mice cannot climb up.
• Aparasolthatisstoredinverticalpositionisprotectedfrommice,astheycannotclimbup
the centre pole.
Caution
page 14 of 16 Deutsch / English / Français
Stand 36-2428 Stand 36-2428
Deutsch / English / Français page 15 of 16
Assembly: Tools and aids
This chapter helps the technician to get optimally prepared. Use the following checklist to guarantee a
smoothandprofessionalassembly.Allitemsrequiredarelistedbelow.
Dependingonindividualcircumstancesitmaybehelpfultohaveyourregulartoolsandaidsavailableas
well.
Assembly:
•14mmhexagonkey(Allenkey,suppliedwiththedelivery)
•cordlessdrill(charged,withsparebatteryifpossible)
•T30bit,suitableforthecordlessdrill
•MAY-setupaid(articleno.352040)orachair
•softmat/carpet
•MAYprotectivegloves(supplied)
•torquewrench210Nm,suitablehexagonkey,14mm
•extensionfora14mmhexagonkey,minimumlength25cm
Only in case of theft lock:
•cordlessdrill(charged,withsparebatteryifpossible)
•centrepunchand200ghammer
•spiraldrill,sizesØ5mm,Ø8mm,Ø11mmandØ12.5mm
Cleaning:
•broomsuitableforcobblestone
•dustpanandbrush
•cleansingclothandCleanoMay(cleaner,articleno.350848)foraluminiummast
(importantincaseofrain)
•donotusethinnerforcleaning
•bearinmindthatthepackagingmustbedisposedafterassembly

page 16 of 16 Deutsch / English / Français
Stand 36-2428
This manual suits for next models
1
Table of contents
Other MAY Patio Furniture manuals

MAY
MAY ALBATROS AZ024 User manual

MAY
MAY FILIUS SCHATTELLO ALBATROS User manual

MAY
MAY SCHATTELLO SZ127 User manual

MAY
MAY DMZ411 User manual

MAY
MAY SCHATTELLO User manual

MAY
MAY SCHATTELLO SZ118 User manual

MAY
MAY RIALTO RG User manual

MAY
MAY MEZZO User manual

MAY
MAY PARASOLS AZ256 User manual

MAY
MAY SZ131 User manual
Popular Patio Furniture manuals by other brands

Costway
Costway Patiojoy HW65784 user manual

Treasure Garden
Treasure Garden BASE-13-00 Assembly guide

Shademaker
Shademaker BC05M Assembly guide

LAZBOY
LAZBOY 780-02673093-7 owner's manual

Tuuci
Tuuci ocean master MAX Series Assembly & operating instructions

Sunjoy
Sunjoy 3PC OPEN WEAVE WICKER CHAT SET A202012100 Assembly instructions