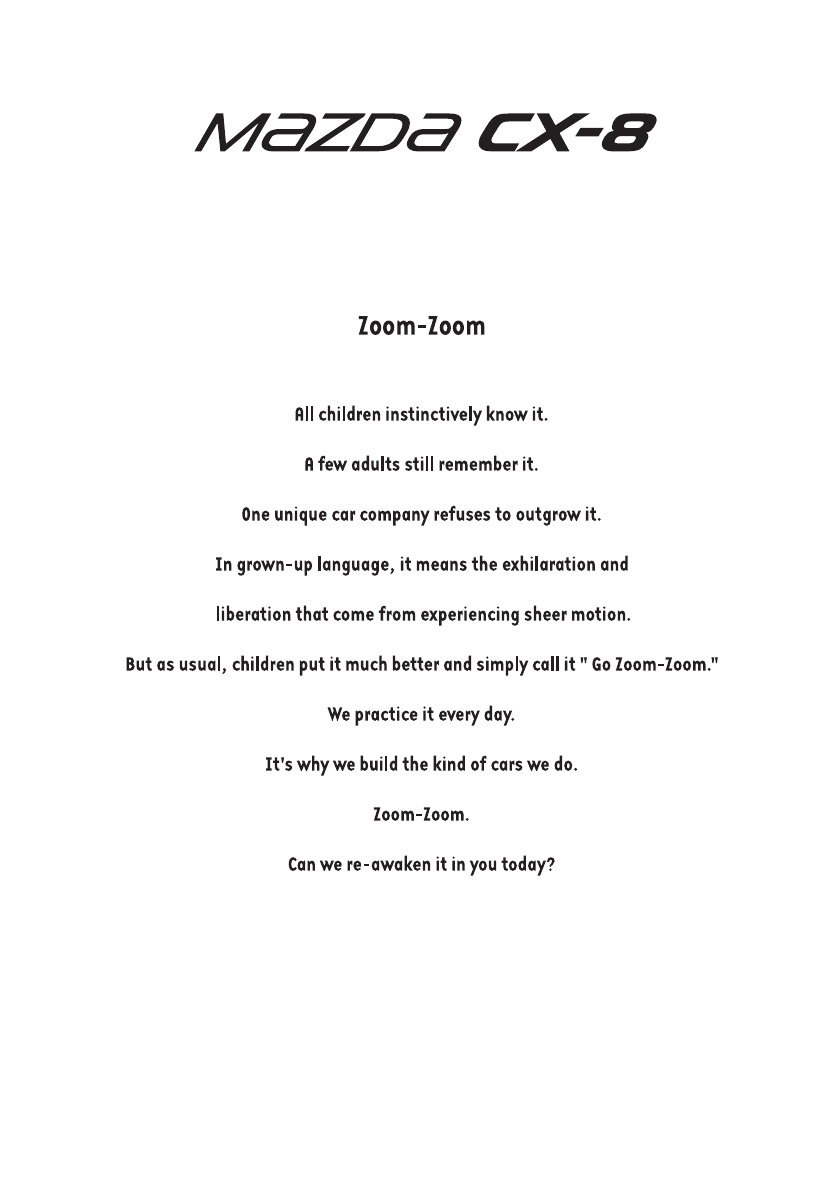
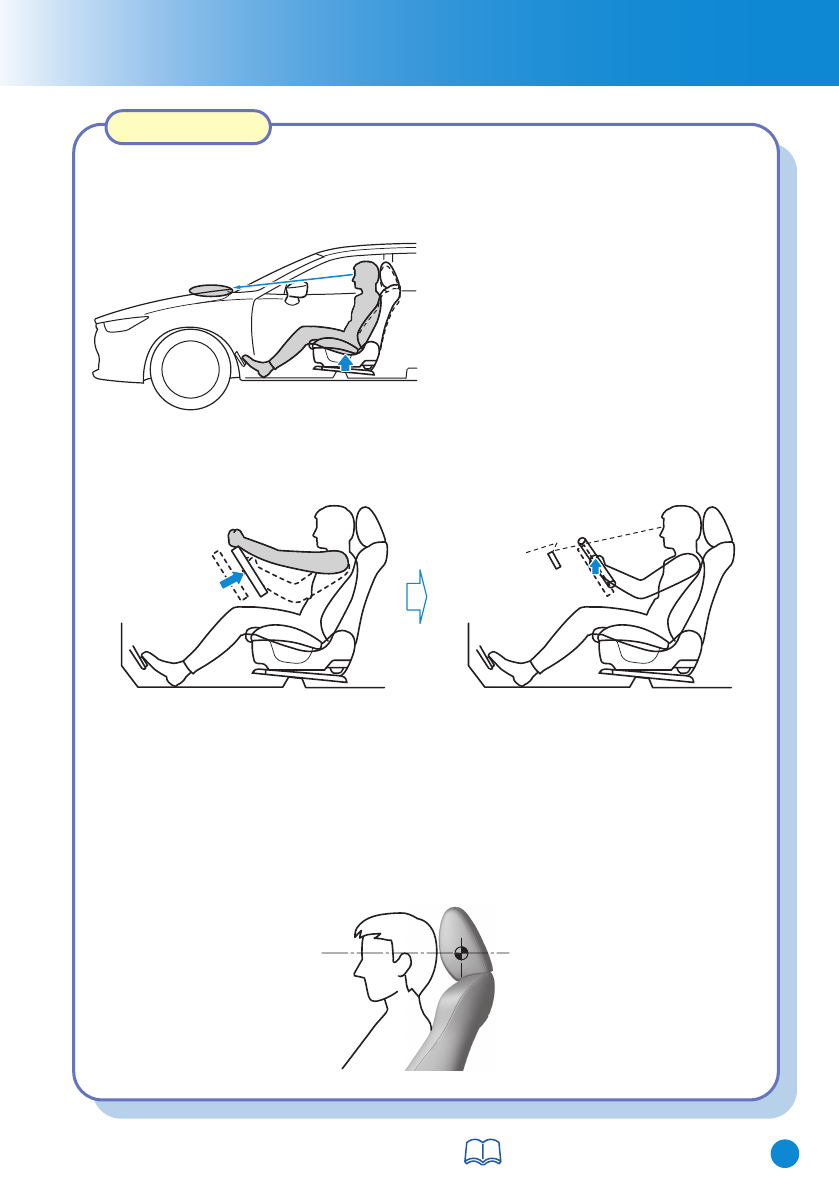
Mazda CX-8 User manual

CX-8_8HJ9-EI-19E_Edition2_QuickGuide.indb 1CX-8_8HJ9-EI-19E_Edition2_QuickGuide.indb 1 2020/04/15 9:02:082020/04/15 9:02:08

1
4
10
38
39
41
Quick GuideQuick Guide
This Quick Guide is provided as a simple explanation of how to operate some of the
features equipped on your Mazda CX-8.
Essential Safety Equipment
Before Driving
When Driving
Interior Features
Maintenance and Care
The meaning for each of the symbols used in the Quick Guide is as follows:
Detailed explanation pertaining to some information.
If Trouble Arises
For more information regarding the following sections, refer to the main owner's manual.
The content described in the quick guide may differ depending on the vehicle grade and
specification.
CX-8_8HJ9-EI-19E_Edition2_QuickGuide.indb 2CX-8_8HJ9-EI-19E_Edition2_QuickGuide.indb 2 2020/04/15 9:02:082020/04/15 9:02:08

1
Essential Safety Equipment
Lock release lever
Seat Operation
The adjustments for the driving position recommended by Mazda are done using
the following procedures.
Adjusting the Driver's Seat
Seat Slide
Height Adjustment
Seat Recline
Height Adjustment for
Front Edge of Seat
Bottom
Lumbar Support
Adjustment
Lower the lever, move the steering
wheel to the lowest position, and then
push it down and all the way back.
How to move the steering wheel to
its default position
Before making adjustments to the driving position recommended by Mazda
1. Slide the seat all the way back.
2. Lower the seat to its lowest
height.
3. Sit squarely in the seat and rest
your back against the seatback.
How to move a driver’s seat to
its default position
For details, refer to Section 2, “Seats”.
1. Moving the steering wheel and seat to their default positions.
2. Adjusting the seatback angle.
3. Adjusting the seat position forward and back.
4. Adjusting the seat height.
5. Adjusting the steering wheel position.
6. Adjusting the head restraint position.
CX-8_8HJ9-EI-19E_Edition2_QuickGuide.indb 3CX-8_8HJ9-EI-19E_Edition2_QuickGuide.indb 3 2020/04/15 9:02:082020/04/15 9:02:08

Essential Safety Equipment
Adjust the seatback to the angle providing a comfortable seated posture.
Adjust the seat to the position best for operating the accelerator and brake pedals.
For details, refer to Section 2, “Seats”.
Seat adjustment procedure for the driving position recommended by Mazda
Adjusting the seatback angle (reclining)
Adjusting the seat position forward and back (sliding)
With your posture slightly slouched,
move the seatback forward to the angle
where your waist feels slightly cramped.
Move the seatback backward to a
comfortable seated posture without any
feeling of cramping in your waist.
Place your left foot on the footrest, your
right foot between the accelerator and
brake pedals. With your heel set on the
floor, set your right foot on the brake
pedal and move the seat forward as far
as possible until you feel a slight
cramping in your ankle.
With your right foot set on the brake
pedal, move the seat back until you
no longer feel cramping in your
ankle. For the details, refer to the
owner’s manual.
Seat Operation
2
CX-8_8HJ9-EI-19E_Edition2_QuickGuide.indb 4CX-8_8HJ9-EI-19E_Edition2_QuickGuide.indb 4 2020/04/15 9:02:082020/04/15 9:02:08

Essential Safety Equipment
For details, refer to Section 2, “Seats”.
3
Seat Operation
Adjust the seat height to a position where you have a clear forward view and you
can drive the vehicle easily.
Adjusting the seat height
Adjusting the steering wheel position
Adjust the steering wheel to the position where it can be operated easily and the
gauges can be viewed easily.
With your back resting against the
seatback, extend both arms, place
them on the top of the steering wheel,
and pull the steering wheel towards
you to the position of your wrists.
Adjusting the head restraint position
Adjust the head restraint so that the centre is even with the top of the passenger's
ears.
Adjust the steering wheel height so that the
gauges can be viewed easily.
Raise the lever to securely lock the steering
wheel.
With your back resting against the
seatback, raise the seat to the height
where you can see the rear edge area of
the bonnet surface from the windscreen.
With the manual seat, if you raise the
seat height, the seat moves forward.
Adjust the seat forward or back again.
CX-8_8HJ9-EI-19E_Edition2_QuickGuide.indb 5CX-8_8HJ9-EI-19E_Edition2_QuickGuide.indb 5 2020/04/15 9:02:082020/04/15 9:02:08

Lock Unlock Opening the Liftgate
Operational range
Front doors Liftgate (Lock only)
Exterior aerial
80cm (31in)
80cm (31in)
80cm (31in) Exterior aerial
80cm (31in)
80cm (31in) Exterior aerial
80cm (31in)
Request switch
Request switch
Before Driving
Operational Range
The advanced keyless system operates only when the driver is in the vehicle or
within operational range while the key is being carried.
All doors and the liftgate can be locked/unlocked by pressing the request switch
on the front doors while the key is being carried.
Locking, Unlocking with Request Switch
4
The request switch on the liftgate can only be used to lock all doors and the
liftgate.
For details, refer to Section 3, “Keys” or “Doors and Locks”.
CX-8_8HJ9-EI-19E_Edition2_QuickGuide.indb 6CX-8_8HJ9-EI-19E_Edition2_QuickGuide.indb 6 2020/04/15 9:02:092020/04/15 9:02:09

5
Before Driving
Indicator light
Power liftgate
button
Power liftgate switch
Power liftgate
close switch
Power Liftgate
The power liftgate opens/closes electrically by operating the switches in the
vehicle or the buttons on the keyless entry system transmitter.
For details, refer to Section 3, “Doors and Locks”.
Operation from the driver's seat
(To open/close)
Press the power liftgate switch for
about one second or longer while the
liftgate is in the fully closed/open
position. The hazard warning lights
flash twice and the liftgate opens/closes
fully after the beep sound is heard.
Operation using the transmitter
Press the power liftgate button for one
second or longer. The hazard warning
lights flash twice and the liftgate
opens/closes after the beep sounds.
Operation from outside (To close)
Press the power liftgate close switch
while the liftgate is fully opened. The
hazard warning lights flash twice and
the liftgate closes automatically after
the beep sound is heard.
Operation using each switch
CX-8_8HJ9-EI-19E_Edition2_QuickGuide.indb 7CX-8_8HJ9-EI-19E_Edition2_QuickGuide.indb 7 2020/04/15 9:02:092020/04/15 9:02:09

6
Before Driving
Fuel Requirements and Capacities
Premium unleaded fuel (within
E20)*1
*1 For the details, refer to the owner’s manual.
Fuel
Research Octane Number
Capacity
95 or above
SKYACTIV-G 2.5
The vehicle will operate efficiently on diesel fuel with
specification EN590 or the equivalent.
When refuelling, always add at least 10 L (2.6 US gal, 2.2 Imp gal) of fuel.
Fuel Capacity
2WD:72.0 L (19.0 US gal, 15.8
Imp gal)
SKYACTIV-D 2.2
Regular unleaded fuel*1
90 or above
92 or above
4WD:74.0 L (19.5 US gal, 16.3
Imp gal)
For details, refer to Section 3, “Fuel and Emission”.
2WD:72.0 L (19.0 US gal, 15.8
Imp gal)
4WD:74.0 L (19.5 US gal, 16.3
Imp gal)
CX-8_8HJ9-EI-19E_Edition2_QuickGuide.indb 8CX-8_8HJ9-EI-19E_Edition2_QuickGuide.indb 8 2020/04/15 9:02:092020/04/15 9:02:09

Before Driving
7
Remote fuel-filler
flap release
Fuel-filler cap
Fuel-filler flap
For details, refer to Section 3, “Fuel and Emission”.
Refuelling
1. To open the fuel-filler flap, pull the remote
fuel-filler flap release.
Fuel-Filler Flap and Cap
2. To remove the fuel-filler cap, turn it
anticlockwise.
3. Attach the removed cap to the inner side of the
fuel-filler flap.
4. Insert the refuelling nozzle all the way and
begin refuelling. Pull out the refuelling nozzle
after the refuelling stops automatically.
5. To close the fuel-filler cap, turn it clockwise
until a click is heard.
6. To close, press the fuel-filler flap until it locks
securely.
CX-8_8HJ9-EI-19E_Edition2_QuickGuide.indb 9CX-8_8HJ9-EI-19E_Edition2_QuickGuide.indb 9 2020/04/15 9:02:092020/04/15 9:02:09

8
Before Driving
Centre position
Mirror switch
For details, refer to Section 3, “Mirrors”.
Outside Mirrors
1. Rotate the mirror switch to the left (L) or
right (R) to choose the left or right side
mirror.
2. Press the mirror switch in the appropriate
direction.
CX-8_8HJ9-EI-19E_Edition2_QuickGuide.indb 10CX-8_8HJ9-EI-19E_Edition2_QuickGuide.indb 10 2020/04/15 9:02:092020/04/15 9:02:09

9
Before Driving
Light sensor
Master control switches
Front passenger's window switch
Rear window switches
Close
Open
Front
passenger's
window
Right rear window
Driver's window
Left rear window
For details, refer to Section 3, “Mirrors” or “Windows”.
Rearview Mirror
Auto-dimming mirror
The auto-dimming mirror automatically reduces
the glare of headlights from vehicles at the rear
when the ignition is switched ON.
The auto-dimming function is cancelled when
the ignition is switched ON and the
shift/selector lever is in reverse (R).
Operation of the Power Windows
The window opens while the switch is pressed and it closes while the switch is
pulled up with the ignition switched ON.
The passenger windows may be opened or closed using the master control
switches on the driver's door.
CX-8_8HJ9-EI-19E_Edition2_QuickGuide.indb 11CX-8_8HJ9-EI-19E_Edition2_QuickGuide.indb 11 2020/04/15 9:02:092020/04/15 9:02:09

When Driving
Indicator light
Push button start
For details, refer to Section 4, “Start/Stop En
g
ine”.
(SKYACTIV-D 2.2)
• The starter does not rotate until the glow indicator light turns off.
• If the ignition is left switched ON for a long period of time without the engine
running after the glow plugs are warmed up, the glow plugs may warm up again
which will illuminate the glow indicator light.
1. Make sure the parking brake is on.
2. Continue to press the brake pedal firmly until
the engine has completely started.
4. Press the push button start after the push button
start indicator light (green) turns on.
• When starting the engine, do not release the brake pedal until the glow indicator
light in the instrument cluster turns off and the engine starts, after pressing the
push button start.
• If the brake pedal is released before the engine starts, depress the brake pedal
again and press the push button start to start the engine.
Starting the Engine
10
3. Put the vehicle in park (P). If you must
restart the engine while the vehicle is
moving, shift into neutral (N).
CX-8_8HJ9-EI-19E_Edition2_QuickGuide.indb 12CX-8_8HJ9-EI-19E_Edition2_QuickGuide.indb 12 2020/04/15 9:02:092020/04/15 9:02:09

When Driving
11
For details, refer to Section 4, “Start/Stop En
g
ine”.
Operation of i-stop Function
The i-stop function automatically stops the engine when the vehicle is stopped at a
traffic light or stuck in traffic, and then restarts the engine automatically to resume
driving. The system provides improved fuel economy, reduced exhaust gas
emissions, and eliminates idling noise while the engine is stopped.
NOTE
• The i-stop indicator light (green) turns on under the following conditions:
• When engine idling is stopped.
• The i-stop indicator light (green) turns off when the engine is restarted.
The i-stop function restart conditions differ depending on the system used.
CX-8_8HJ9-EI-19E_Edition2_QuickGuide.indb 13CX-8_8HJ9-EI-19E_Edition2_QuickGuide.indb 13 2020/04/15 9:02:092020/04/15 9:02:09

When Driving
12
i-stop OFF Switch
For details, refer to Section 4, “Start/Stop En
g
ine”.
i-stop warning light (amber)/i-stop indicator light (green)
i-stop Warning Beep
i-stop indicator light (green)
• The light turns on while engine idling is stopped and
turns off when the engine is restarted.
i-stop warning light (amber)
• The light turns on when the ignition is switched ON and
turns off when the engine is started.
• The light turns on when the i-stop OFF switch is
pressed and the system is turned off.
If the driver's door is opened while engine idling is stopped, the warning sound
operates to notify the driver that engine idling is stopped. It stops when the driver's
door is closed.
By pressing the switch until a beep sounds,
the i-stop function is turned off and the
i-stop warning light (amber)in the
instrument cluster turns on. By pressing the
switch again until the beep sounds, the
i-stop function becomes operational and the
i-stop warning light (amber) turns off.
CX-8_8HJ9-EI-19E_Edition2_QuickGuide.indb 14CX-8_8HJ9-EI-19E_Edition2_QuickGuide.indb 14 2020/04/15 9:02:092020/04/15 9:02:09

When Driving
Dust-proof sheet
Display
Optical
receiver
For details, refer to Section 4, “Instrument Cluster and Displa
y
”
Active Driving Display
The active driving display indicates the vehicle speed, system operation status, and
warnings.
Always adjust the display brightness and position with the vehicle stopped:
Adjusting the display brightness and position while driving the vehicle is dangerous as
doing so could distract your attention from the road ahead and lead to an accident.
WARNING
13
CX-8_8HJ9-EI-19E_Edition2_QuickGuide.indb 15CX-8_8HJ9-EI-19E_Edition2_QuickGuide.indb 15 2020/04/15 9:02:092020/04/15 9:02:09

When Driving
Warning Indication/Warning Lights
Signal Warning
Charging System Warning
Indication/Warning Light
Brake System Warning Light
Engine Oil Warning Light
High Engine Coolant Temperature
Warning Indication/Warning Light
Power Steering Malfunction
Indication/Malfunction Indicator Light
Electric Parking Brake (EPB)
Warning Indication/Warning Light
Master Warning Indication/Warning
Light
Check Engine Light
Automatic Transaxle Warning
Indication
4WD Warning Indication
Air Bag/Seat Belt Pretensioner
System Warning Light
Mazda Radar Cruise Control (MRCC)
Warning Indication
Lane-keep Assist System (LAS) & Lane
Departure Warning System (LDWS)
Warning Indication
Low Fuel Warning Indication
Seat Belt Warning Light (Front seat)
Seat Belt Warning Light (Rear seat)
Liftgate-Ajar Warning Indication
Signal Warning
ABS Warning Light
These lights turn on or flash to notify the user of the system operation status or a
system malfunction.
Engine Oil Level Warning Light
KEY Warning Indication
i-stop Warning Light
Driver Attention Alert (DAA)
Warning Indication
For details, refer to Section 4, “Instrument Cluster and Displa
y
”.
(Red)
(Amber/White)
(Amber)
(Amber)
(Amber)
(Amber)
Door-Ajar Warning Indication
Blind Spot Monitoring (BSM)
Warning Indication
(Amber)
Adaptive LED Headlights (ALH)
Warning Indication/Warning Light
Smart Brake Support/Smart City Brake
Support (SBS/SCBS) Warning
Indication
LED Headlight Warning Light
14
CX-8_8HJ9-EI-19E_Edition2_QuickGuide.indb 16CX-8_8HJ9-EI-19E_Edition2_QuickGuide.indb 16 2020/04/15 9:02:092020/04/15 9:02:09

When Driving
15
For details, refer to Section 4, “Instrument Cluster and Display”
Signal Indicator Lights
Seat Belt Indicator Light (Rear seat)
Security Indicator Light
Wrench Indication
Diesel Particulate Filter Indication
Low Engine Coolant Temperature
Indicator Light
Glow Indicator Light
Shift Position Indication
Lights-On Indication/Indicator Light
Headlight High-Beam Indicator Light
Fog Light Indicator Light
Adaptive LED Headlights (ALH)
Indicator Light
Blind Spot Monitoring (BSM) OFF
Indicator Light
Lane-keep Assist System (LAS) & Lane
Departure Warning System (LDWS)
Indication
Lane-keep Assist System (LAS) & Lane
Departure Warning System (LDWS)
OFF Indicator Light
Smart City Brake Support (SCBS)
Indication
Smart Brake Support/Smart City Brake
Support (SBS/SCBS) OFF Indicator
Light
Signal Indicator Lights
Direction Indicator/Hazard Warning
Indicator Lights
Electric Parking Brake (EPB)
Indication/Indicator Light
Select Mode Indication
TCS OFF Indicator Light
(Green)
Indication/Indicator Lights
(Blue)
(White)
Mazda Radar Cruise Control (MRCC)
Main Indication
AUTOHOLD Active Indicator Light
Mazda Radar Cruise Control (MRCC)
Main Indication
(Green)
Cruise Main Indication
Cruise Set Indication
(White)
(Green)
(Green) i-stop Indicator Light
TCS/DSC Indicator Light
CX-8_8HJ9-EI-19E_Edition2_QuickGuide.indb 17CX-8_8HJ9-EI-19E_Edition2_QuickGuide.indb 17 2020/04/15 9:02:102020/04/15 9:02:10

When Driving
16
Lock-release
button
Automatic Transaxle Controls
Drive Selection
For details, refer to Section 4, “Automatic Transaxle” or “Drive Selection”
Various Lockouts:
Indicates that you must depress the
brake pedal and hold in the
lock-release button to shift (The
ignition must be switched ON)
Indicates the selector lever can be
shifted freely into any position.
Indicates that you must hold in the
lock-release button to shift.
Drive selection is a system to switch the vehicle's drive mode. When the sport mode
is selected, vehicle's response against accelerator operation is enhanced. This
provides additional quick acceleration which may be needed to safely make
manoeuvres such as lane changes, merging onto freeways, or passing other vehicles.
Press the drive selection switch forward “ ( ) ” to select the sport mode. Pull
the drive selection switch back “ ( ) ” to cancel the sport mode.
Drive Selection Switch
Select Mode Indication
When the sport mode is selected, the
select mode indication turns on in the
instrument cluster.
CX-8_8HJ9-EI-19E_Edition2_QuickGuide.indb 18CX-8_8HJ9-EI-19E_Edition2_QuickGuide.indb 18 2020/04/15 9:02:102020/04/15 9:02:10

When Driving
17
Higher sensitivity
Less sensitivity
Switch
Centre
position
For details, refer to Section 4, “Switches and Controls”.
Operation of the Headlights
Operation of the Windscreen Wipers
Operation while pulling up lever
Low speed
Switch
Position Wiper operation
High speed
When the wiper lever
is in the
position, the rain
sensor senses the
amount of rainfall on
the windscreen and
turns the wipers on or
off automatically.
Auto control
Stop
CX-8_8HJ9-EI-19E_Edition2_QuickGuide.indb 19CX-8_8HJ9-EI-19E_Edition2_QuickGuide.indb 19 2020/04/15 9:02:102020/04/15 9:02:10

When Driving
18
Indicator light
For details, refer to Section 4, “Brake”
Electric Parking Brake (EPB)
The EPB equipment applies the parking
brake using an electric motor. When the
parking brake is applied, the EPB switch
indicator light turns on.
The parking brake can be applied regardless
of the ignition switch position.
When applying the parking brake
Securely depress the brake pedal and pull up
the EPB switch.
The EPB can be released while the ignition is switched ON or the engine is
running. When the parking brake is released, the EPB indicator light and the EPB
switch indicator light turn off.
When releasing the parking brake
The parking brake is applied and the EPB
indicator light and the EPB switch indicator
light turn on.
Parking brake manual release
Firmly depress the brake pedal and
press the EPB switch.
Parking brake automatic release
For the operation conditions, refer to the main owner's manual.
If the accelerator pedal is depressed with the parking brake applied and all of the
following conditions met, the parking brake is released automatically.
CX-8_8HJ9-EI-19E_Edition2_QuickGuide.indb 20CX-8_8HJ9-EI-19E_Edition2_QuickGuide.indb 20 2020/04/15 9:02:102020/04/15 9:02:10
Other manuals for CX-8
2
Table of contents
Other Mazda Automobile manuals

Mazda
Mazda 2007 MazdaSpeed6 User manual

Mazda
Mazda 2007 Mazdaspeed 3 Guide

Mazda
Mazda 2009 MX-5 Miata User manual

Mazda
Mazda 2012 5 User manual

Mazda
Mazda RX-7 1985 Reference manual

Mazda
Mazda 2015 CX-9 User manual

Mazda
Mazda CX-52017 User manual

Mazda
Mazda 2004 6 User manual

Mazda
Mazda CX-5 User manual

Mazda
Mazda CX-9 2021 User manual

Mazda
Mazda 2 User manual

Mazda
Mazda 2007 Mazdaspeed 3 User manual

Mazda
Mazda CX-3 User manual

Mazda
Mazda 1990 MIATA User manual

Mazda
Mazda 2013 MX-5 Miata Guide

Mazda
Mazda CX-9 2016 User manual

Mazda
Mazda 2009 Mazda5 User manual

Mazda
Mazda 2015 CX-5 User manual

Mazda
Mazda car Instruction manual

Mazda
Mazda 2008 Tribute User manual