MC 501 User manual

Dedication to Performance
ELECTRONIC
Made in Germany
Owner‘s Manual

Important Information!
Attention: Keep the unit away from high humidity, vibration, excessive dust and direct sunlight.
Excessive heat or cold will affect the unit´s functionality. The permitted operating temperature
is 10°C up to 50°C. Avoid extreme variations in temperature. Do not operate the unit near other
electric appliances (for instance neon light and motors). The unit should not be opened without
the assistance of a qualified technician.
KETI, CE-Marking
This product is in conformity with the EMC directive and low-voltage directive. Your MC component
complies with the household power and safety requirements in your area.
Warranty
MC affords a full warranty. Please pay attention to the details given in the warranty card which ac-
companies the unit. Warranty is only issued, if you send back the warranty card.

1
Contents
Page
2 A. General
2 1. Accessoires
2 2. Placement
2 3. Maintenance
3 B. mc 501 CD Player
3 1. mc 501 Views
3 1.2 Rear view
3 2. Basic functions
5 3. Remote control functions
8 C. mc 601 Preamplifier
8 1. mc 601 Views
9 2. Volume
9 3. Input selectors
9 4. On / Standby / Off
9 5. Display
10 6. Connections
11 D. mc 701 Integrated Amplifier
11 1. mc 701 Views
12 2. Volume
12 3. Input selectors
12 4. On / Standby / Off
12 5. Display
13 6. Connections
13 7. Connecting the amplifier to the speakers
14 E. mc 801 Power Amplifier
14 1. mc 801 Views
15 2. Connecting the power amplifier to the speakers
15 3. Connecting the power amplifier to the preamplifier
16 F. Operating the remote control
16 1. Replacement of the batteries
16 2. CD player controls
17 3. Pre / Integrated amplifier controls
17 G. Troubleshooting
17
17
18 H. Specifications
18 1. mc 501 CD Player
19 2. mc 601 Preamplifier
20 3. mc 701 Integrated Amplifier
21 4. mc 801 Power Amplifier
Contents

2
A. General
1. Accessories
Your new MC Elegance Line component comes with a multi-usable system remote control for your conve-
nience. It can be used to control any or all of the MC product range including the preamplifier, CD player,
power amplifier and integrated amplifier.
The system remote control is not included in the delivery of the MC power amplifier.
2. Placement
Please ensure that there is sufficient ventilation and flow of air on all sides of the unit. There must be a minimum
space of 2 cm (approx. 1”) above all MC amplifiers to allow for excessive heat to escape.
In case you wish to operate two or more amps, you can stack them, place them on shelves, or fit them under
a cabinet.
Notice: Never completely cover or operate the amp in a place with insufficient flow of air. If you do, the amp
may overheat.
3. Maintenance
Unplug the unit before cleaning!
To clean the exterior surfaces of your MC unit use a dry, soft cloth. To wipe off finger prints and other grease
spots, use a soft, wet cloth moistened with a mild detergent dissolved in water.
Caution: The cloth must never be dripping wet! If water or other fluids enter the cabinet, you risk to damage
the unit.
Never use scouring pads, steel wool, scouring powders or harsh chemical agents, alcohol, thinners, benzine,
insecticide or other volatile substances, as these will destroy the finish of the cabinet.
General

3
B. mc 501 CD Player
1.1 mc 501 front view
1.2 mc 501 rear view
resonance trap* display
function buttons
CD tray
power button
fuse holder connector for
power cord
XLR output
RCA output digital output
* made of 20 mm special material to absorb mechanical resonances and signal distortion.
mc 501

4
2. Basic functions
2.1 Turning the power on and inserting a CD
Turn the power on with the power button.
For about 2 seconds, the display flashes a signal. If no CD is in the player,
the signal “no disc” will light up.
To insert a CD, press the “open/close” button to open the CD tray. The
display will now show the word “open”.
Now insert the CD into the player with its printed surface upwards.
Never put more than one disc in the tray.
After that, press the “open/close” button again to close the CD tray.
When the disc begins to play, the display will show “reading“. This indi-
cates that the player is scanning the disc’s table of contents.
When this is over the display will show stop mode, the number of tracks
and the total playing time of the CD.
The CD player is now ready for playback.
2.2 Play a CD
To play the inserted CD, press the play button.
The display will show the number of the track that is playing, the symbol
for playback and the elapsed playing time of the track. The player counts
minutes and seconds upwards, beginning with 0:00 of each track.
If you have properly connected the MC 501 CD player to the other com-
ponents of your home stereo system, you will now hear the music.
2.3 Pause
If you intend to interrupt your listening pleasure for a moment, but want
to carry on from the same position, press the pause button: The time
counter stops.
To resume playback from the same position, press the pause button
again. The player returns to playback mode.
2.4 Skipping tracks
To skip one or more tracks of the CD, press the skip forward button once (1
x) for each track you want to skip until you have skip reached the desired
track.
To skip to any previous track, press the skip back button. If the skip back
duration of the current track is less than 5 seconds, the player will skip to
the previous track.
mc 501
no disc inserted
CD tray open
scanning CD data
stop mode
play
pause
skip forward
skip back

5
If the duration of the current track is more than 5 seconds, the player will
go back to the starting point of the current track.
To skip further back, press the skip back button several times consecu-
tively until the required track number is shown on the display.
While pressing the skip buttons, you will hear no music.
2.5 Stop playback
To stop playback press the stop button.
2.6 Removing the CD
If you wish to remove a CD from your MC 501 CD player, simply press the
“open/close“ button to open the CD tray. If you open the CD tray during
playback, the player stops automatically.
If there is no disc in the CD tray, “no disc” will appear on the display.
2.7 Upsampling
With the “24 bit/ 96kHz” button you can change the sample rate. When
“24 bit/ 96kHz” is activated, the blue LED indicator on the left site of the
display is on.
Note: The upsampling function will not work with emphasis tracks. If your
CD contains emphasis tracks, the display will show “emphasis”.
2.8 Display brightness
With the disp. off (“display off”) button you can change the display’s
brightness within 5 steps from maximum to off. If the display is switched
off, the “disp. off” indicator LED on the right site of the display is on.
3. Remote control functions
The following functions can only be utilized from the remote control.
3.1 Numeric buttons
The 10 numeric buttons on the remote control unit enable you to choose
individual titles on your CD directly. For track numbers 1-9, you simply
press the corresponding button.
For tracks with a number higher than 9, press the button for the first digit
and then for the second.
Example: If you want to play the track with number “14” on your CD, press
the “1” first and then the “4”.
mc 501
stop mode
no disc inserted
emphasis

6
3.2 Programming
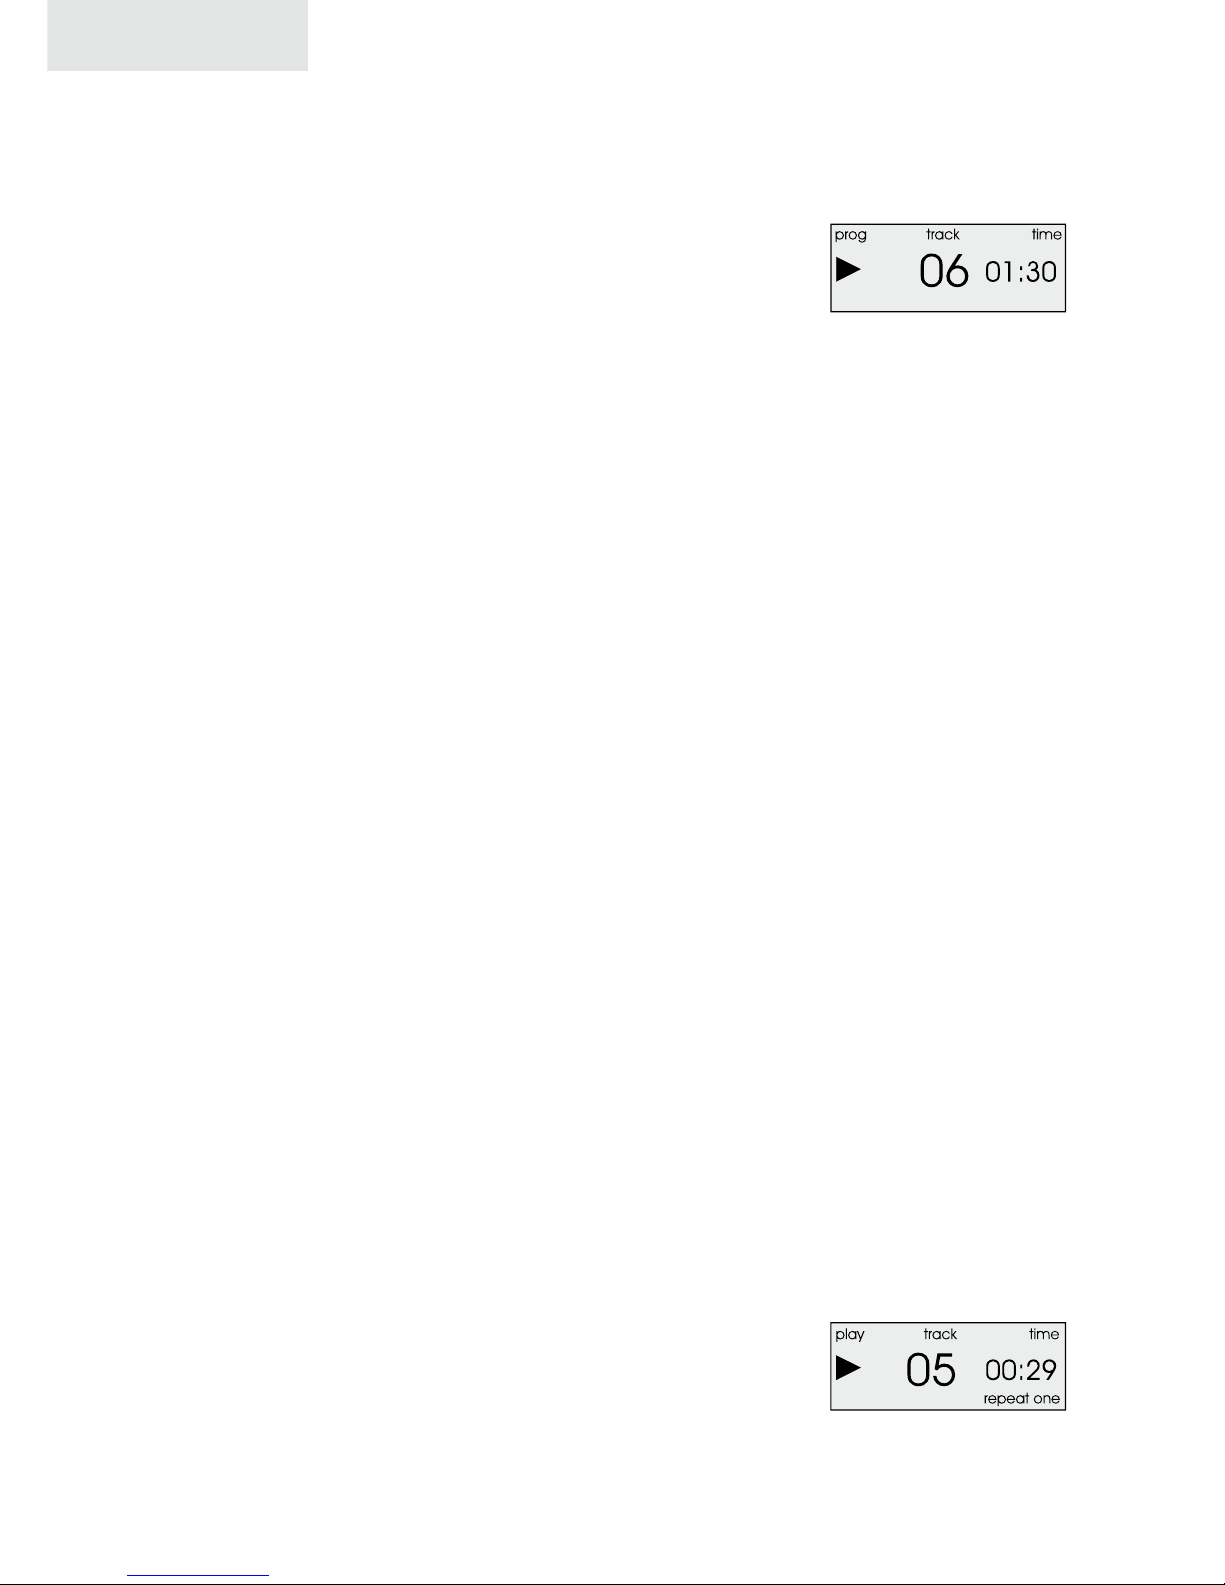
Apart from playing the complete CD or any number of its tracks in their
chronological order, you may easily draw up your own programs. To do
this, you simply enter the track numbers of the pieces you want to play in
the order in which they should be played. You can program a maximum
of 15 tracks.
With the player in stop mode press the program button (PROG). The dis-
play will show “prog”.
Use the numeric buttons to enter the numbers of the tracks in the order
you want to program them.
To start your program, press the play button.
During the play mode, the display will show the number and the elapsed
time of the current track.
To display the remaining time left of the current track, press the “time” but-
ton on your remote control once (1 x). By pressing the time button again,
you will get the remaining time of the program.
During program playback, you can skip titles by pressing the skip forward
and skip back buttons, just as you would during normal playback.
• If you accidentally entered a wrong track, simply press the stop but-
ton.
• To cancel the program play, press the stop button and then the
PROG button twice.
• If you want to interrupt the program playback, press the stop button
once. If you want to resume the program, re-press the play button.
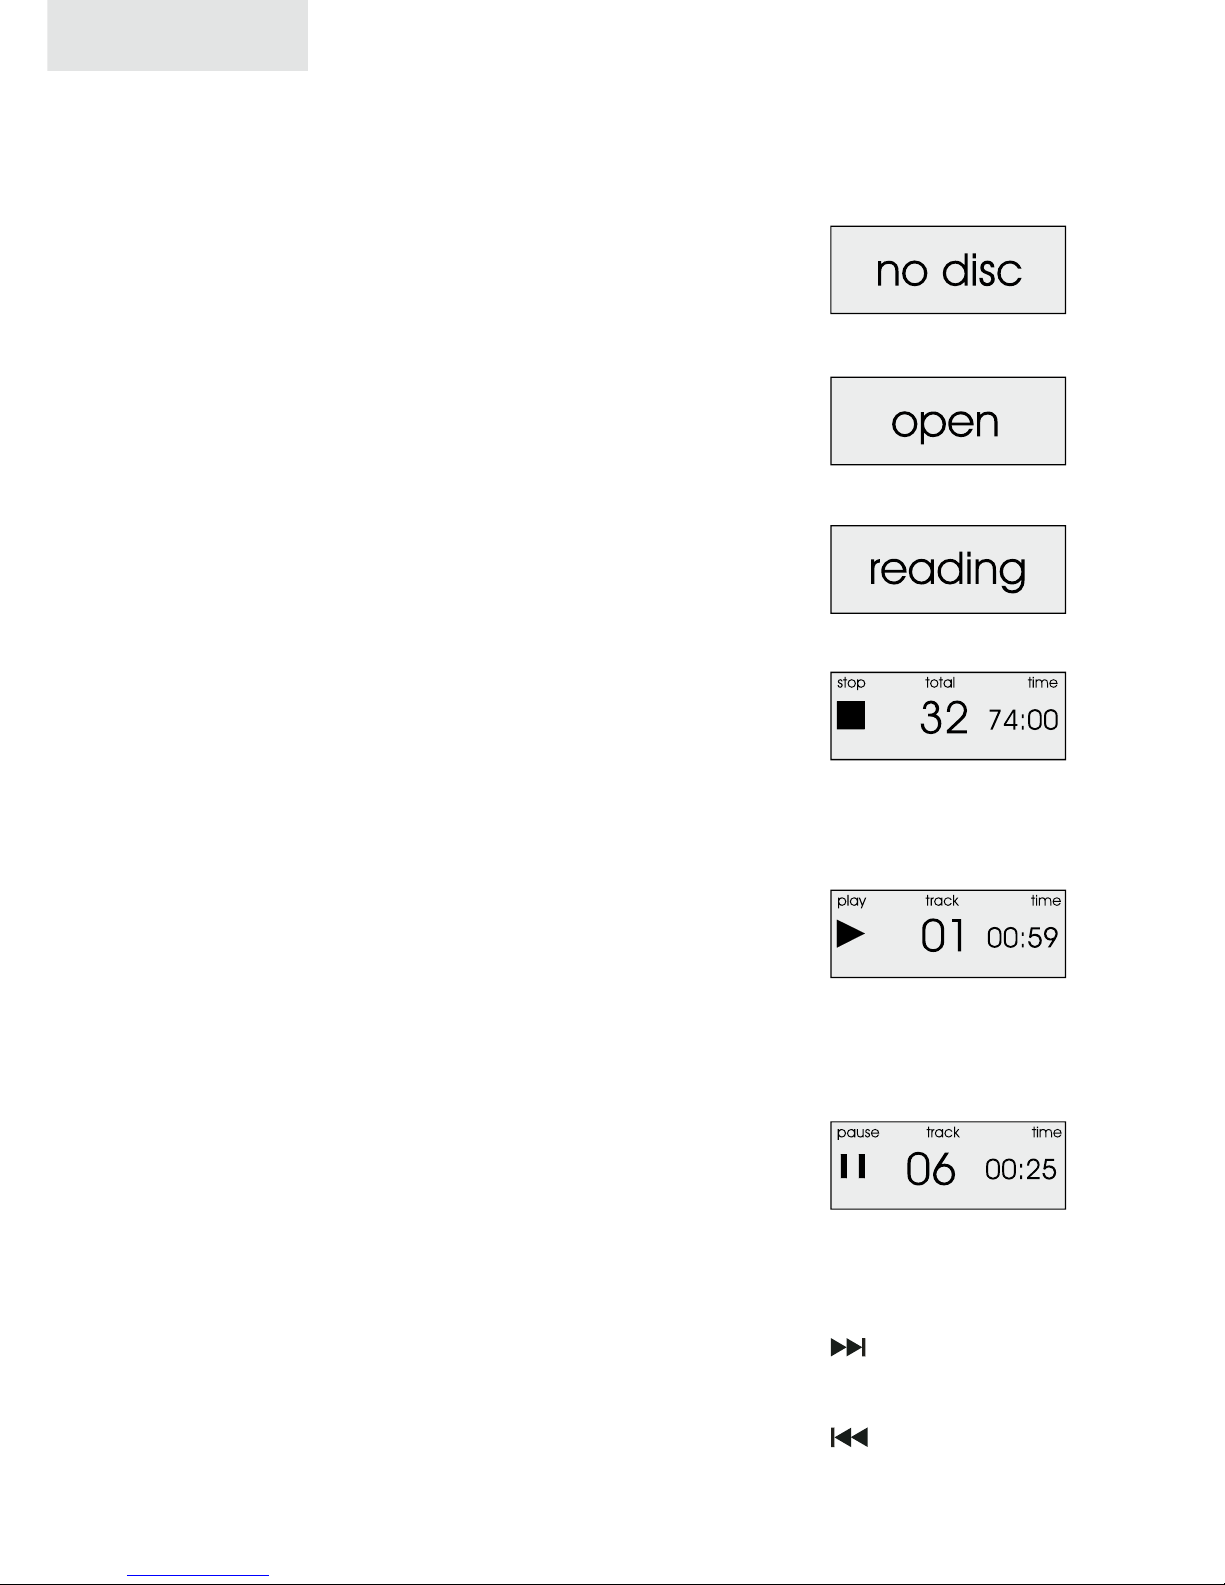
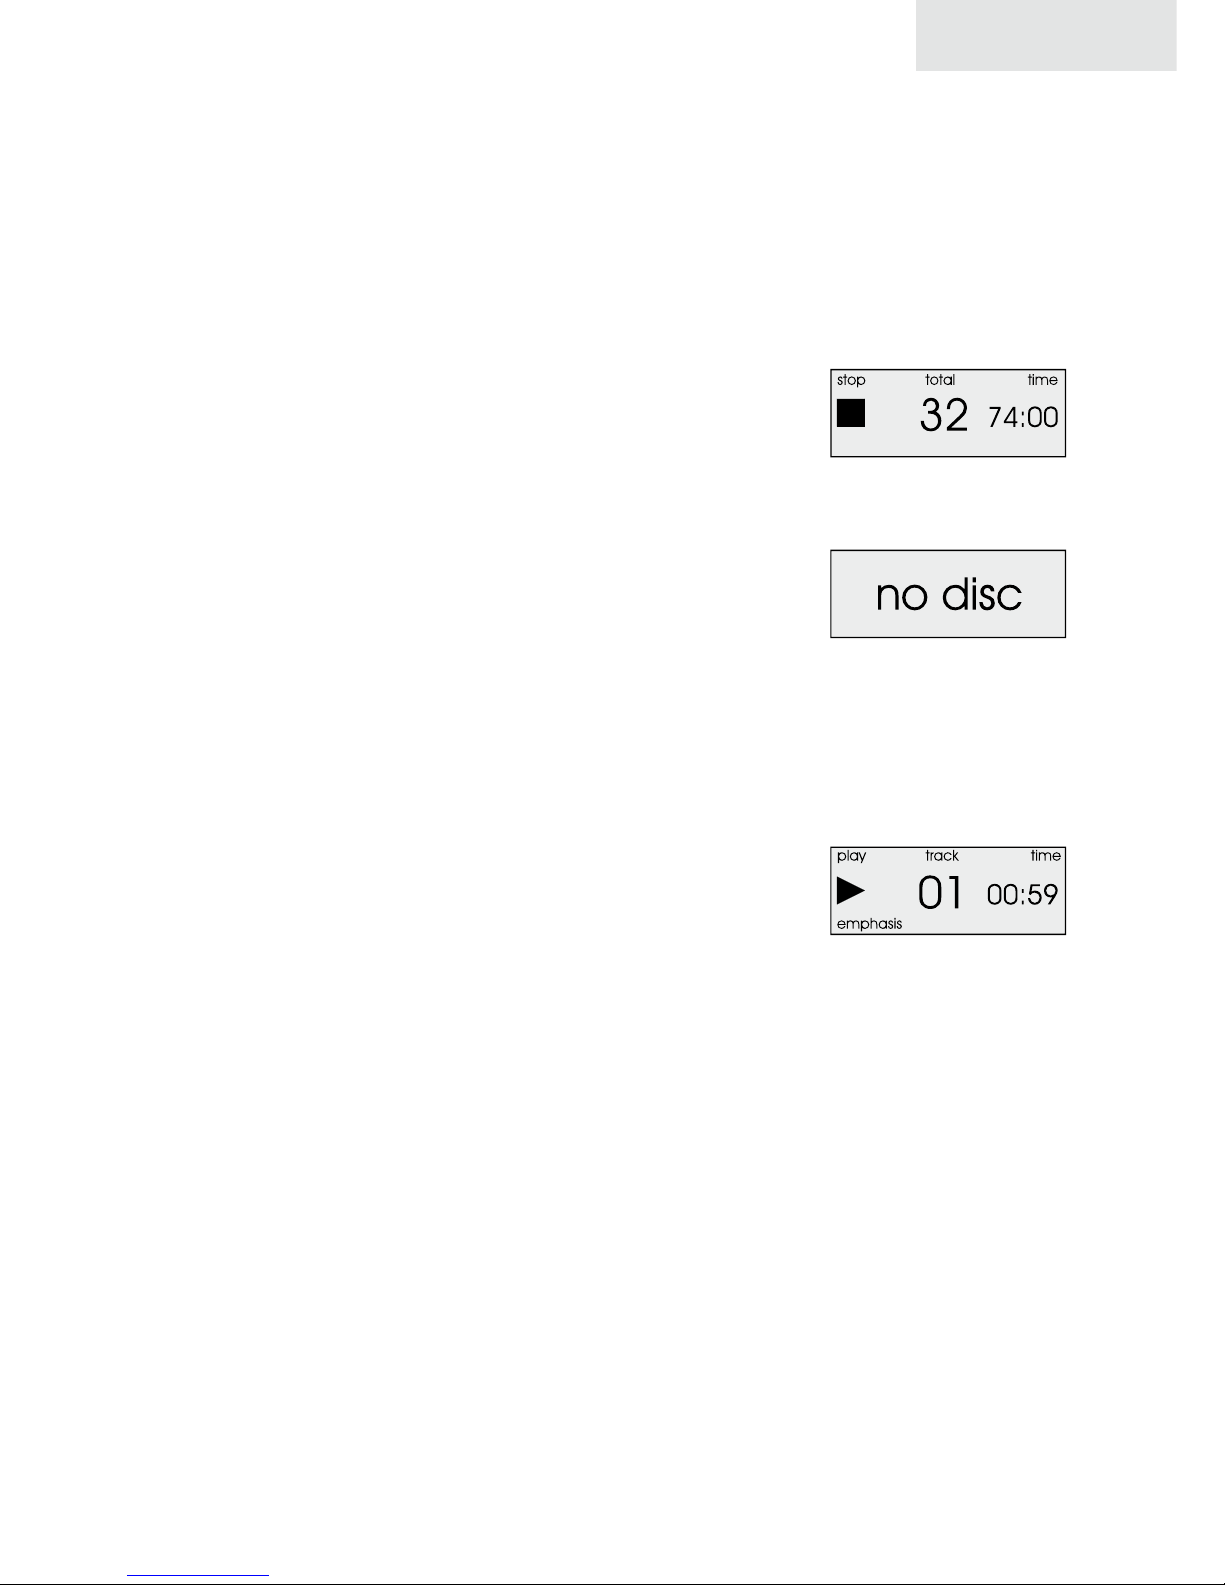
3.3 Time display modes
In the stop mode, the display shows the number of tracks on the CD as
well as the total playing time. During normal playback, the number of the
current track and the elapsed time for this track will appear.
You can change the time display mode by pressing the “time” button on
your remote control:
• One press will show the remaining time of the current track.
• Two presses will show the total remaining time of the CD; the time
counter will now count down the remaining minutes and seconds.
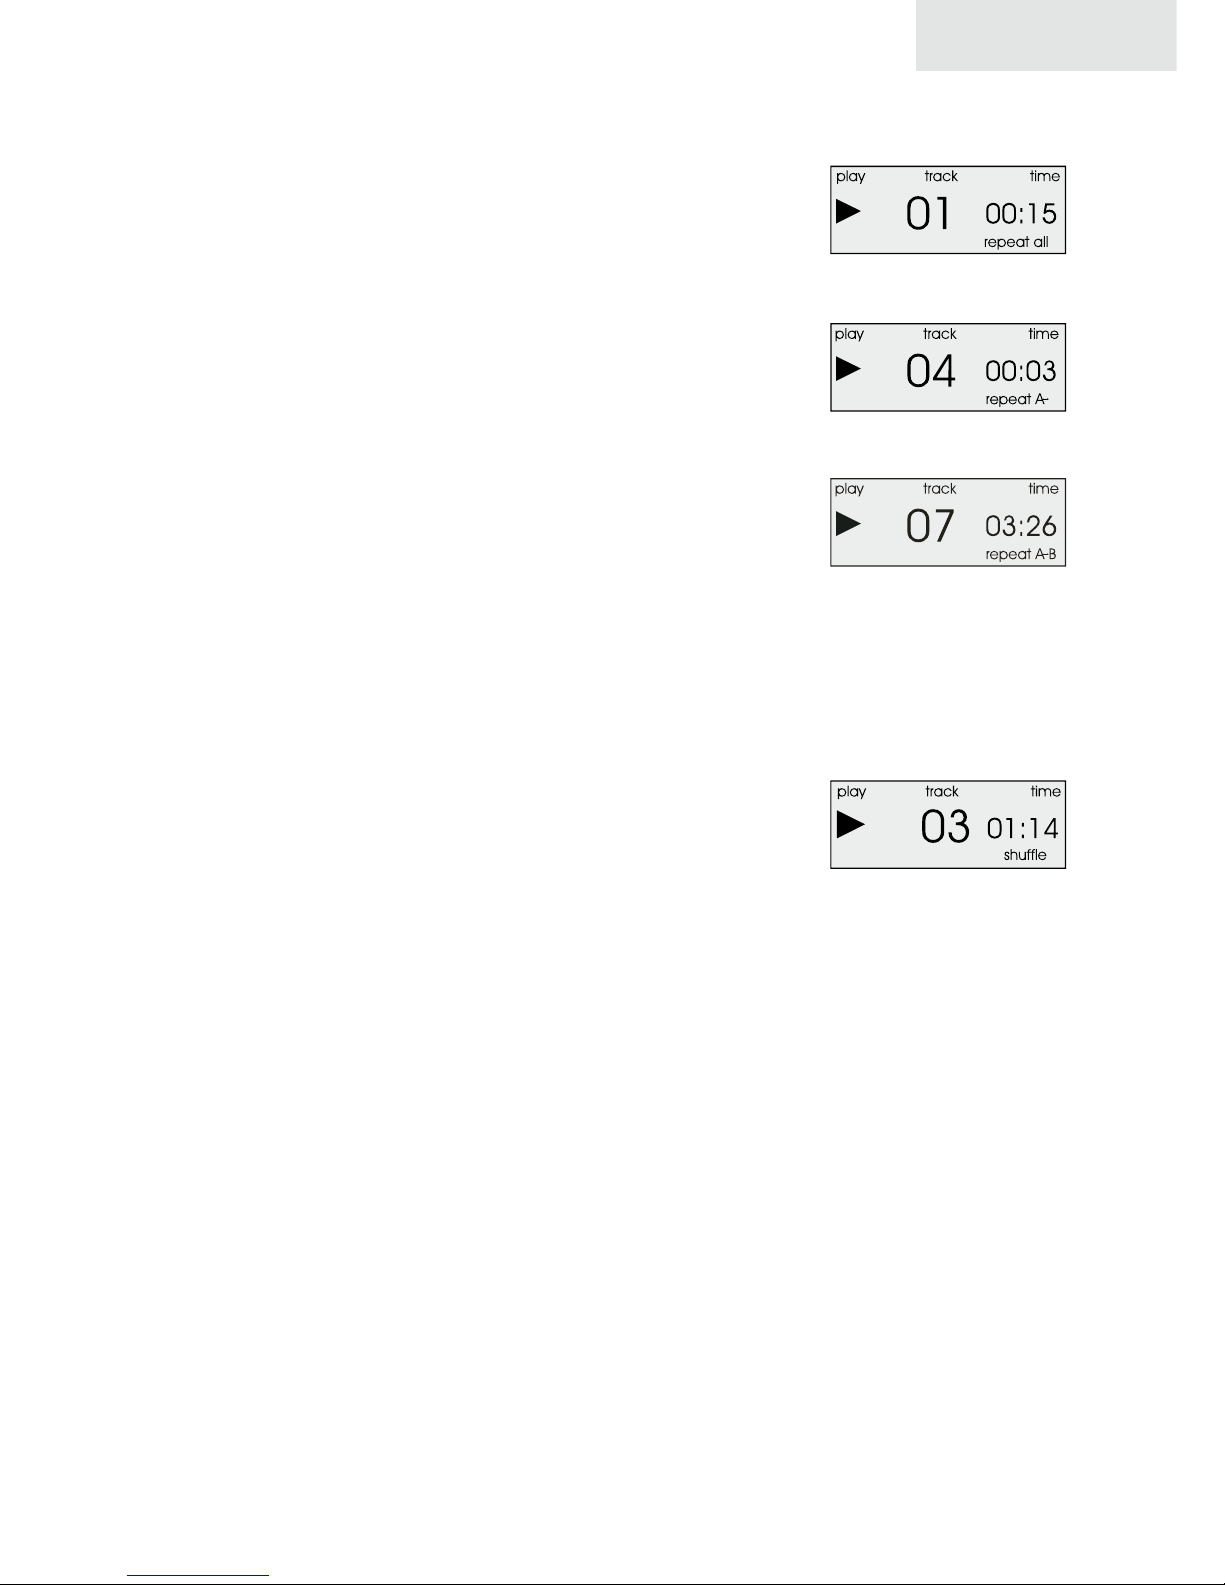
3.4 Repeat play (single track or all)
To repeat the current track, press the repeat button once. The display will
now show “repeat one” to specify that only one track (namely the current
one) will be repeated.
mc 501
program play
repeat current track

7
To continuously repeat the playback of all tracks of a CD, press the repeat
button twice during playback. The display will show “repeat all”.
Press the repeat button three times to cancel the repeat mode and return
to normal playback. The repeat indicator on the display will disappear.
3.5 A,B Repeat playback
The “A/B” button on your remote control identifies passages for repeat
playback. This button works only during playback.
To select the begin of a passage press the A/B button. When CD play
reaches the point you want to select as the end of your passage, press
the A/B button again.
After having entered the beginning and the end of a passage, the unit
will begin to repeat that same passage over and over.
Passage markers may also be identified during program play.
To delete a marker and proceed with normal CD play,
Press the “A/B” button again, or press the skip forward or skip back buttons,
or end the playback by pressing the stop button.
3.6 Shuffle (random play)
If you like to activate random play, press the “shuffle” button on your re-
mote control. To proceed with normal CD play, press the “shuffle” button
again.
3.7 Mute
If you like to turn off the sound without interrupting CD play, press the
“mute“ button on your remote control. In mute mode the CD continues
to play, but no sound signal is sent from the player. To engage the sound,
press the “mute” button again.
mc 501
repeat all
select passage begin
select passage end
shuffle

8
C. mc 601 Preamplifier
1.1 mc 601 front view
1.2 mc 601 rear view
display
input selectors
power button
fuse holder connector for
power cord
XLR input
processor input
volume control
RCA inputs fixed outground
connector
variable
outputs
RCA
variable
outputs
XLR
optional input
function buttons
mc 601

9
2. Volume
The MC 601 is equipped with a special potentiometer made for audio use. Press the right button for volume up
and the left button for volume down.
3. Input selectors
With the input selectors you can select one of the various sources connected to the preamplifier. The processor
input enables the connection of an extern sourround-decoder. Choosing this input will engage a signal to the
connected amplifier (Bypass). This gives the possibility to switch between audio (music replay) and video (DVD).
Plugged in Phono MM, Phono MC or CD-direct modules can be selected by using the option button.
Input selector Source
Balanced Balanced XLR input
CD 1 RCA, CD input, 10 kOhm
CD 2 RCA, CD input, 10 kOhm
Tuner RCA high level input, 50 kOhm
Aux RCA high level input, 50 kOhm
Option optional input for Phono MM, Phono MC
Processor Bypass for surround-processor, 10 kOhm
4. On / Standby / Off
The “on button“ on the front panel puts the preamp into standby and turns it back to “on” (this function can also
be accomplished by remote control). The blue LED on the display lights when the amplifier is in stand by mode.
To turn off the preamplifier completely (the unit is no longer connected to the mains and therefore does not
consume current), disconnect the power cord from the mains socket. This is recommended, when the pream-
plifier is not in use for a longer period of time.
5. Display
The display indicates the volume level as well as the input that is currently in use.
19,2
balanced standby
disp.off
function LED‘sinput indicator
volume
mc 601

10
5.1 Display brightness
The brightness of the display can be turned within 5 steps from maximum to off by using the “brightness” button.
If the display is turned off, the LED besides the “brightness” button is on.
Press the “brightness” button once to turn the display from off to maximum brightness.
5.2 Mute
With the “mute” button the amplifier can be muted. Instead of the currently used input the display will show
“mute”.
6. Connections
6.1 Inputs
The preamplifier is equipped with one balanced XLR and five single ended RCA inputs. Moreover the optional
input can be equipped with an optional module.
Attention: BYPASS / Processor: Never use this input for unregulated high level signals (e.g. CD player). High levels
may cause defects on connected amplifiers and speakers.
6.2 Outputs
One fixed output (FIXED OUT) and two groups of variable outputs are located on the back of the preamplifier.
FIXED OUT connectors are especially for audiotape or DAT.
Attention: FIXED OUT, on this output the volume can not be adjusted by the preamplifier’s volume control. Do
not connect a power amplifier directly.
mc 601

11
D. mc 701 Integrated Amplifier
1.1 mc 701 front view
1.2 mc 701 rear view
display
input selectors
power button
fuse holder connector for
power cord
optional input
processor input
volume control
RCA inputs fixed out
speaker terminals
right
function buttons
resonance trap*
* made of 20 mm special material to absorb mechanical resonances and signal distortion.
speaker terminals
left
mc 701
XLR input

12
2. Volume
The MC 701 is equipped with a special potentiometer made for audio use. Press the right button for volume up
and the left button for volume down.
3. Input selectors
With the input selectors you can select one of the various sources connected to the amplifier. The processor
input enables the connection of an extern sourround-decoder. Choosing this input will engage a signal to the
connected amplifier (Bypass). This gives the possibility to switch between audio (music replay) and video (DVD).
Input selector Source
Balanced Balanced XLR input
CD 1 RCA, CD input, 10 kOhm
CD 2 RCA, CD input, 10 kOhm
Tuner RCA high level input, 50 kOhm
Aux RCA high level input, 50 kOhm
Option optional input for Phono MM, Phono MC
Processor Bypass for surround-processor, 10 kOhm
4. On / Standby / Off
The “on button“ on the front panel puts the amplifier into standby and turns it back to “on” (this function can
also be accomplished by remote control). The blue LED located on the front panel lights when the amplifier is
in stand by mode.
To turn off the amplifier completely (the unit is no longer connected to the mains and therefore does not con-
sume current), disconnect the power cord from the mains socket. This is recommended, when the amplifier is
not in use for a longer period of time.
5. Display
The display indicates the volume level as well as the input that is currently in use.
19,2
balanced standby
disp.off
function LED‘sinput indicator
volume
mc 701

13
5.1 Display brightness
The brightness of the display can be turned within 5 steps from maximum to off by using the “brightness” button.
If the display is turned off, the LED besides the “brightness” button is on.
Press the “brightness” button once to turn the display from off to maximum brightness.
5.2 Mute
With the “mute” button the amplifier can be muted. Instead of the currently used input the display will show
“mute”.
6. Connections
6.1 Inputs
The amplifier is equipped with one balanced XLR and four single ended RCA inputs. Moreover the optional input
can be equipped with an optional module.
Attention: BYPASS / Processor: Never use this input for unregulated high level signals (e.g. CD player). High levels
may cause defects on connected amplifiers and speakers.
6.2 Outputs
Two speaker terminals and one fixed output (FIXED OUT) are located on the back of the preamplifier.
FIXED OUT connectors are especially for audiotape or DAT.
Attention: FIXED OUT, on this output the volume can not be adjusted by the preamplifier’s volume control. Do
not connect a power amplifier directly.
7. Connecting the amplifier to the speakers
There are two pairs of speaker terminals on the back of the amplifier. Two speakers can be connected to the
amplifier.
To connect the speakers only use high quality cables. Especially recommended are coaxial cables with high
copper quality.
Example for Connection:
SPEAKER SPEAKER
right speaker left speaker
integrated amplifier
mc 701

14
E. mc 801 Power Amplifier
1.1 mc 801 front view
1.2 mc 801 rear view
display
power button
XLR input
connector for
power cord
XLR input
control LED‘s
RCA input
power switch
speaker terminals
right
resonance trap*
* made of 20 mm special material to absorb mechanical resonances and signal distortion.
speaker terminals
left
RCA input
fuse holder
mc 801

15
2. Connecting the power amplifier to the speakers
There are two pairs of speaker terminals on the back of the amplifier. Two speakers can be connected to the
amplifier.
To connect the speakers only use high quality cables. Especially recommended are coaxial cables with high
copper quality.
Example for Connection:
3. Connecting the power amplifier to the preamplifier
To connect the power amplifier to the preamplifier you can either use the XRL or the RCA input.
Notice: Remove all cables from inputs not in use. Never use both XLR and RCA inputs at the same time.
Pin assignment of XLR plug
Examples for Connection:
Balanced input (use XLR cables) Unbalanced input (use RCA cables)
R
SPEAKER INPUT L
INPUT SPEAKER
right speaker left speaker
power amplifier
RINPUT L
INPUT
L
R
RL
OUT1 OUT2 BALANCED OUT OUTPUT
RINPUT L
INPUT
L
R
RL
OUT1 OUT2 BALANCED OUT OUTPUT
1
2
3
1 = earth (0V)
2 = + in phase
3 = - counter phase
RLRL
mc 801

16
F. Operating the remote control
1. Replacement of the batteries
First unsrew the four screws on the bottom of the remote control to remove the bottom plate. Inside the unit
you will find the bettery holder. Insert the batteries with correct +/- orientation. Replace the bottom plate and
re-screw it on the remote control.
Attention: Use only standard “AAA” batteries (1.5 V). Do not use old and new batteries together. If the perfor-
mance of your remote control becomes unsteady, always change the batteries. If you do not use the remote
control for an extended period of time, please remove the batteries. Dispose off batteries in an ecologically
friendly manner.
2. CD player controls
The CD button (1) activates the CD player. The other CD player related controls are as follows:
Button Function
2: preamp volume up
3: preamp volume down
4: skip back
5: skip forward
6: review (during playback)
7: fast forward (during playback
8: play
9: CD pause
10: CD stop
11: select title by number
12: press 1x: CD repeat
press 2x: active title repeat
press 3x: repeat off
13: specify passages for repeat playback (works only during playback)
14: program title
15: remaining time indicated in the display changes between active
title and entire CD
16: random play
1 2 3
4 5 6
7 8 9
0
1
5
OUT
PRE
REPEAT
MUTE T IME SHUFFLE STANDBY
DISP OFF
ERR LEV
A/B PROG
TUNER D/ACD
8
9
10
11
12 13
15 16 17
14
7
24
36
Remote Control

17
3. Pre / Integrated amplifier controls
The PRE button (1) activates the preamplifier or integrated amplifier. The other preamplifier related controls are
as follows:
Please note: The power amplifier volume can be controlled at any time.
G. Troubleshooting
1. Replacement of the fuses
The fuse holder is integrated in the main socket. It is located on the rear side of the unit. When replacing the
fuses, remember to:
• Pull the plug from the wall outlet first! If you do not, you will risk damage to the unit as well as to your life.
• Pull out the fuse holder, which is installed above or below the power connector on the back panel.
• The fuse holder contains 2 fuses (0.5 AT for 230 VA, and 1.0 AT for 110 VA). The left fuse is the active one, the
right one is in reserve. Exchange accordingly and put the fuse holder back in an re-plug the unit to the wall.
2. Change of main voltage
A change of the main voltage can only be done by an authorized dealer. This procedure is not a warranty ser-
vice. A change of the main voltage always requires a change of the fuses.
Warning: If opened by anybody other than qualified MC dealers, MC will not take responsibility for any damage
to machinery or life. And any warranty claims will bevoid!
Button Function
2: volume up
3: volume down
4: select input up
5: select input down
6: output group 1 on / off
7: output group 2 on / off
8: step through brightness levels of the display
9: Mute: turns sound on and off
10: switch to standby mode
24
36
1 2 3
4 5 6
7 8 9
0
1
5
OUT
PRE
REPEAT
MUTE TIME SHUFFLE STANDBY
DISP OFF
ERR LEV
A/B PROG
TUNER D/ACD
8
910
7
Remote Control

18
H. Specifications
1. mc 501 CD Player
D/A Converter Advanced segment architecture
Sampling (f) 44.1 kHz
96 kHz, upsampling mode
Resolution 16 bit linear
upsampling mode: 24 bit linear
Signal / Noise Ratio 109 dB / 111 dB
Digital Outputs RCA
Output Impedance 75 Ohm
Open circuit Voltage 1.5 Vp-p
Operating Voltage 0.5 Vp-p
Analog Outputs 1 RCA, 1 XLR
Frequency Range DC - 20 kHz, +0 / -0.5 dB
Signal to Noise >110 dB
Dynamic >96.5 dB
Channel Separation >110 dB @ 1kHz
THD 0.002% @ 1kHz
Output Impedance 100 Ohm
Power Consumption <50 VA
Line Voltage (factory setting) 230 / 115 Vac, 50 / 60 Hz
Weight 12 kg, 26 lbs
Dimensions (W x H x D) 450 x 142 x 410 mm
18 x 5.7 x 16 inch
Specifications
This manual suits for next models
3
Table of contents
Popular Music Equipment manuals by other brands

Roland
Roland TurboStart VS-880 Supplemental notes

Shure
Shure M92 LT Specifications

Sonica Instruments
Sonica Instruments SHAKUHACHI user manual

Wenger
Wenger Flex TechBridge Assembly instructions and owner's manual

Yamaha
Yamaha L-255 Assembly instructions

Acoustic Signature
Acoustic Signature TA-700 instruction manual