Mcc Aviation AROLLA 2 User manual

1
AROLLA 2 XXS, AROLLA 2 XS, AROLLA 2 S & AROLLA 2 M
Content
General information ................................................................................................................... 2
Required piloting skills .............................................................................................................. 2
General remarks about paragliding ............................................................................................ 2
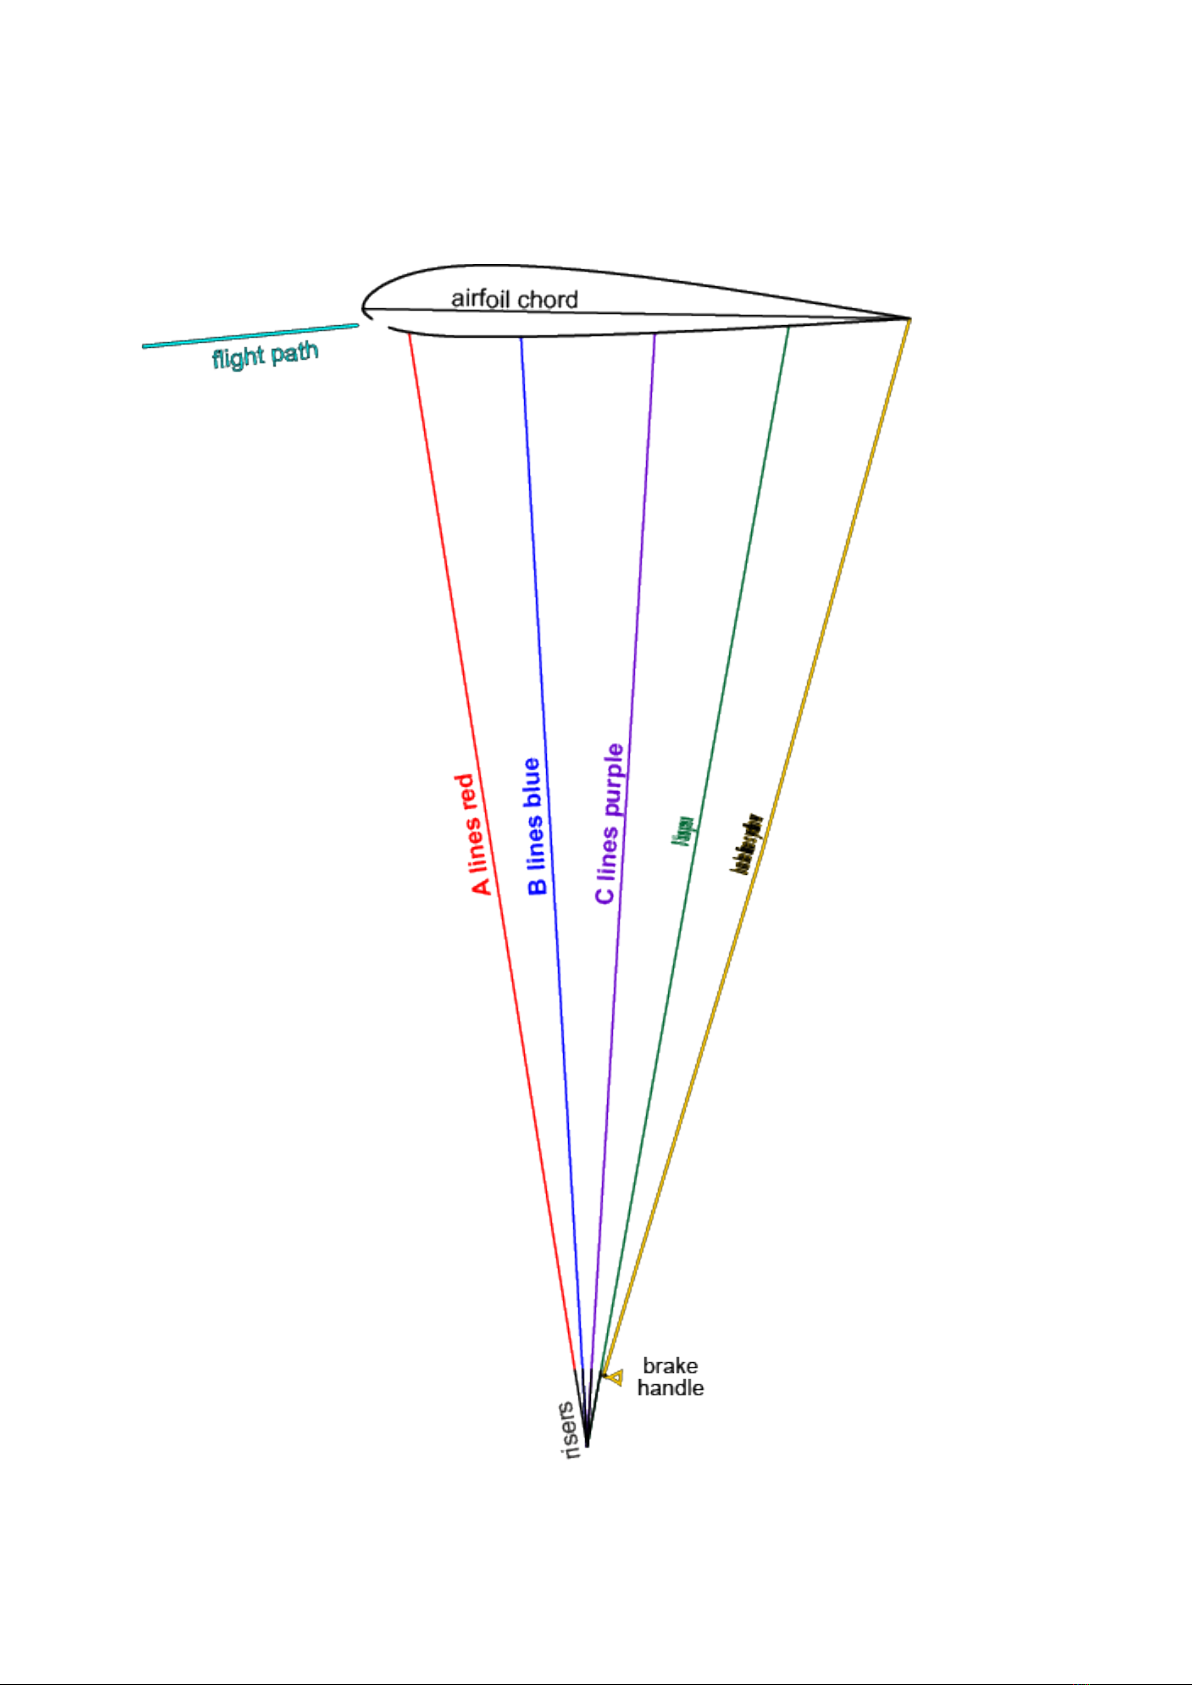
Sectional drawing of the AROLLA 2 ........................................................................................ 3
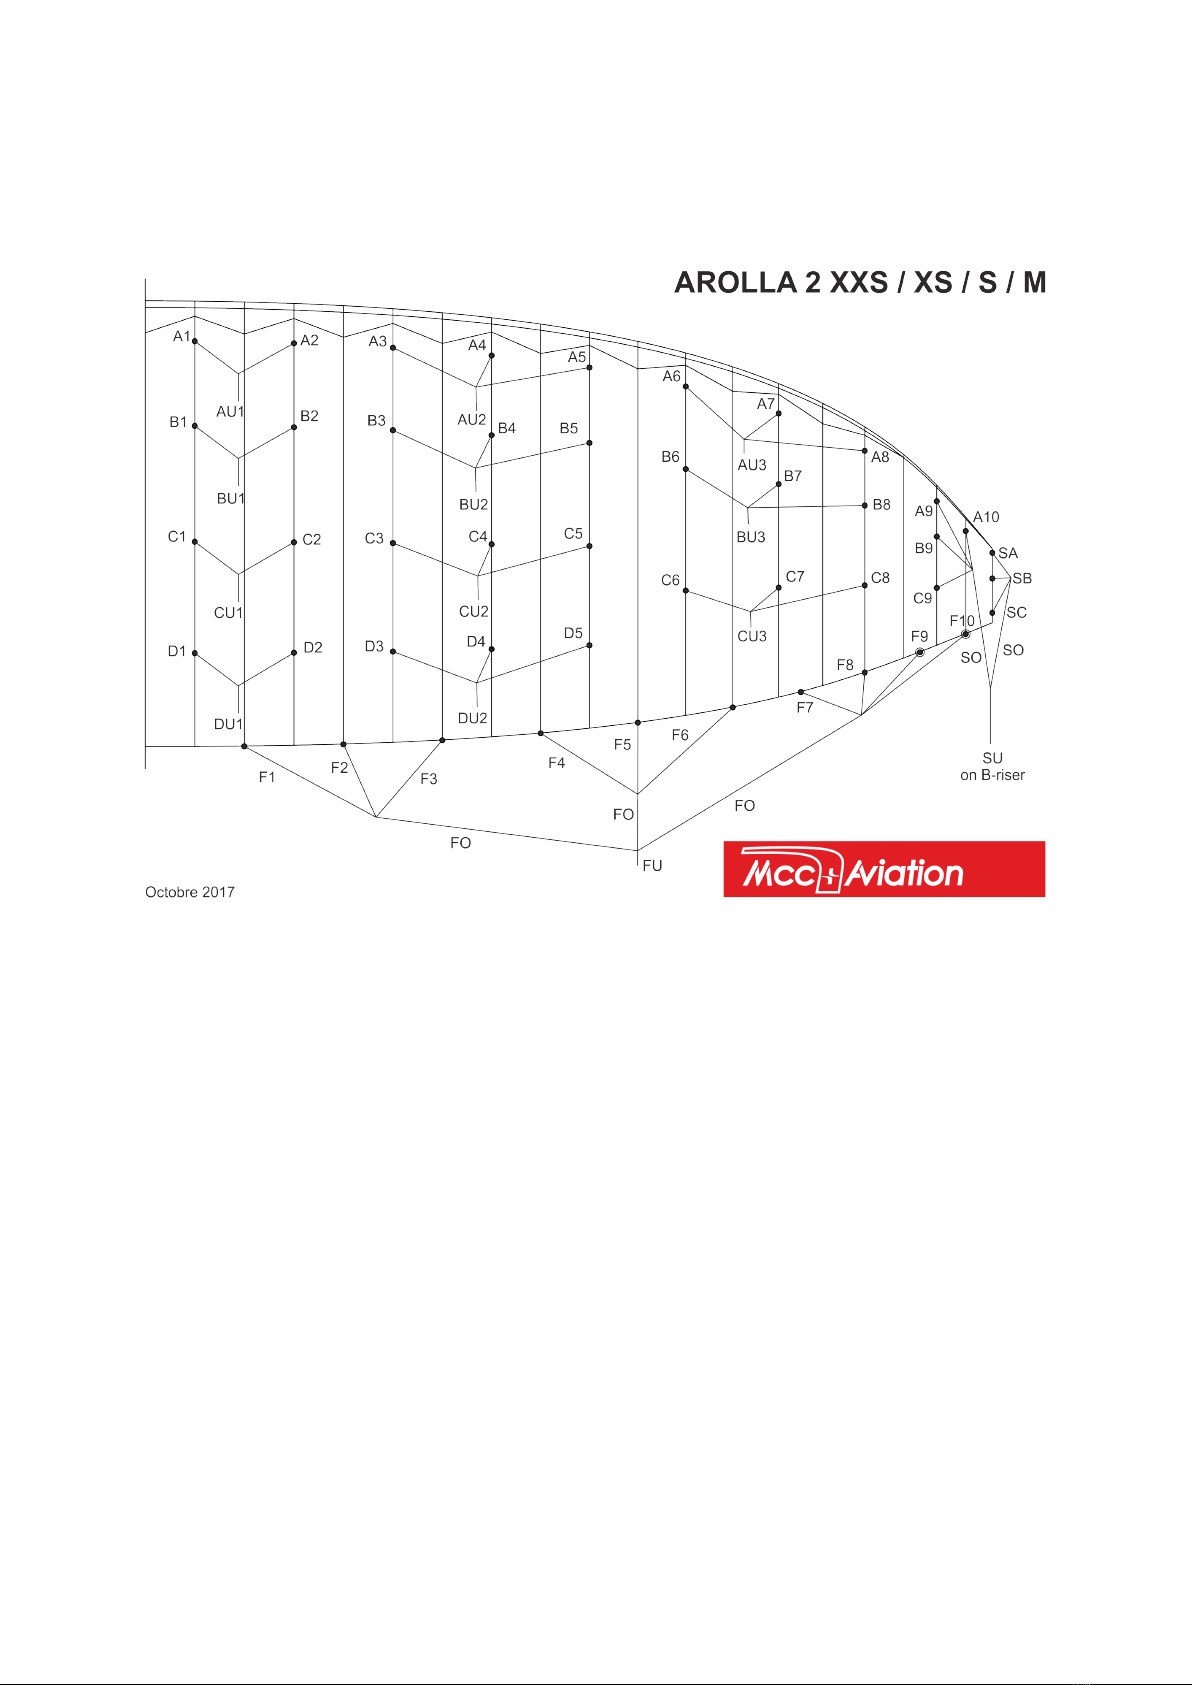
Plan of the lines.......................................................................................................................... 4
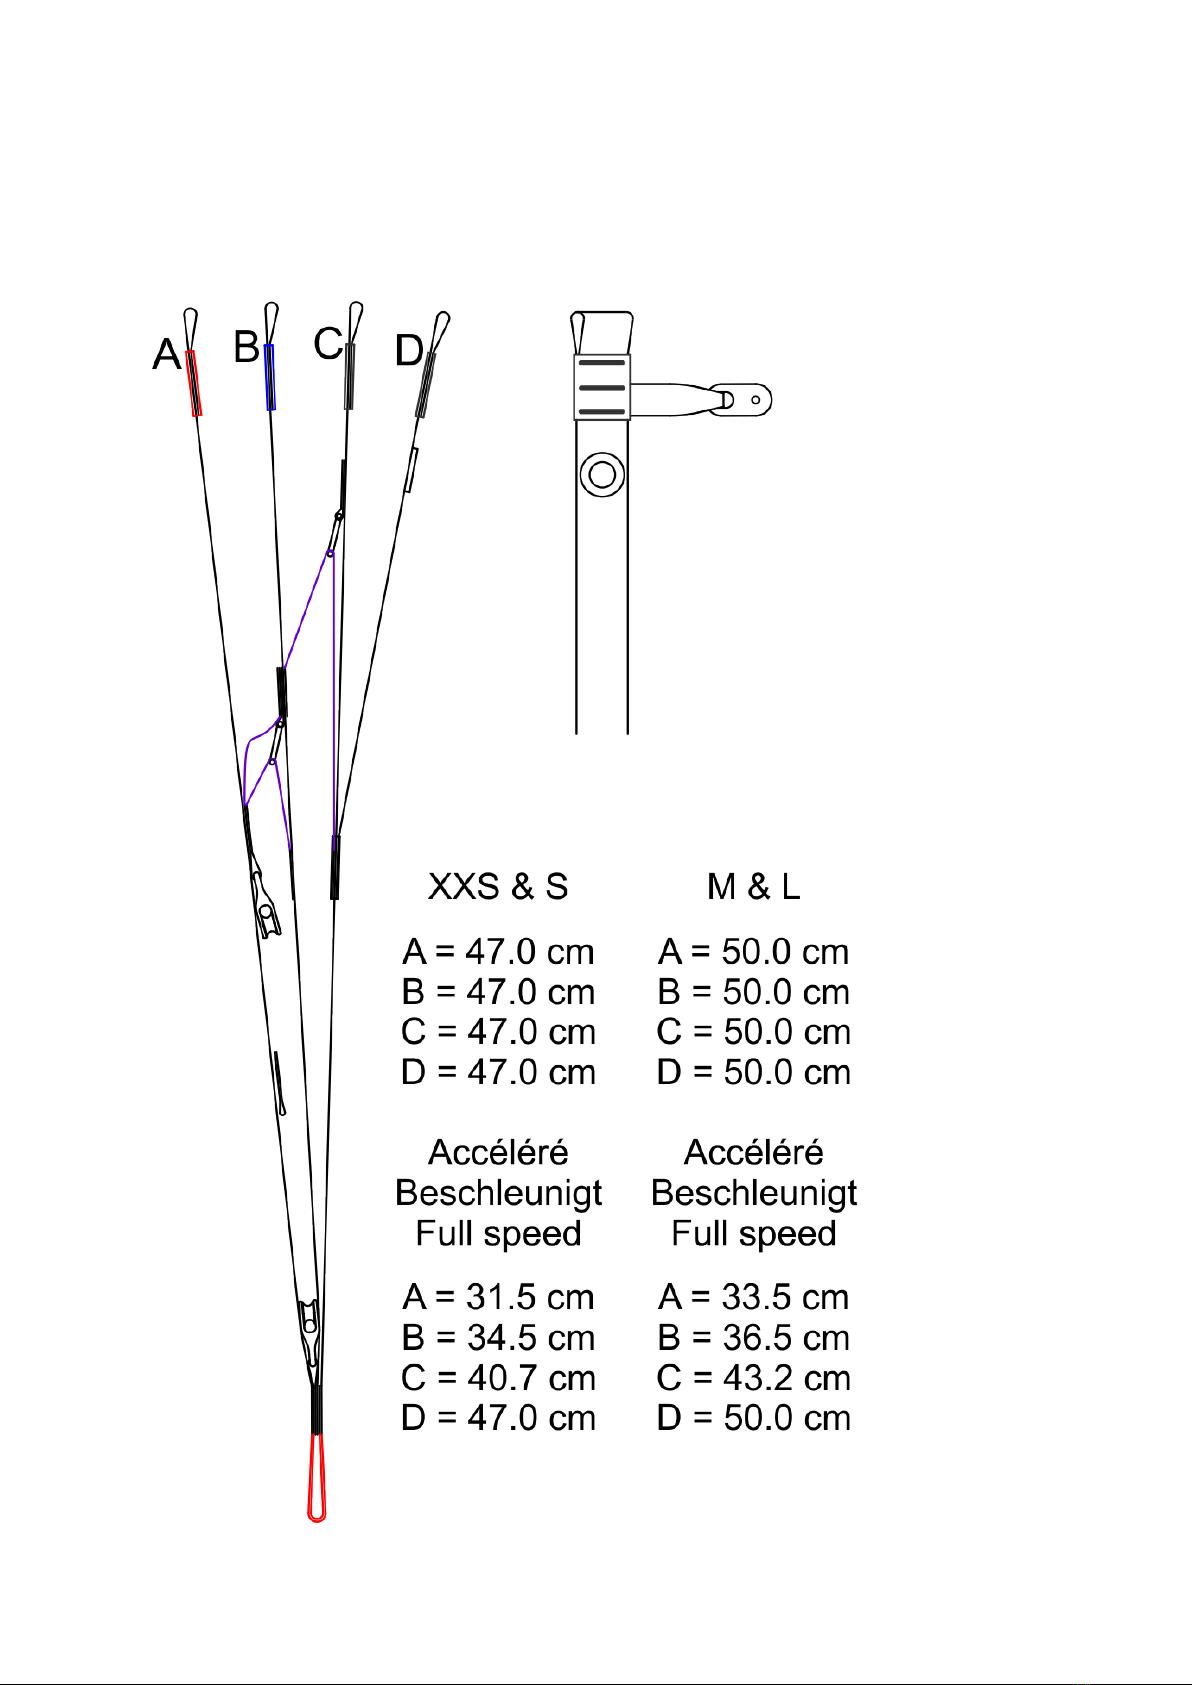
Drawing of the risers.................................................................................................................. 5
Technical date and information.................................................................................................. 6
Limits of use.......................................................................................................................... 7
Operating the AROLLA 2.......................................................................................................... 7
Preflight check of the paraglider ........................................................................................... 7
Take-off ................................................................................................................................. 7
Landind.................................................................................................................................. 8
Turning .................................................................................................................................. 8
Raped Descent Techniques ........................................................................................................ 8
Big Ears ................................................................................................................................. 8
Spiral dive.............................................................................................................................. 9
B-line Stall............................................................................................................................. 9
Performances & Use of Brakes................................................................................................ 10
Use of the Speed Barr .............................................................................................................. 10
Asymetric or Frontal Collapses................................................................................................ 10
Full Stall................................................................................................................................... 11
Steering without brakes............................................................................................................ 11
Special Steering........................................................................................................................ 11
Comments on Testing Procedures............................................................................................ 12
Harness Adjustment ................................................................................................................. 12
Advice on Maintenance ........................................................................................................... 12
Storage and Maintenance ......................................................................................................... 13
Repairs ..................................................................................................................................... 13
Paragliding and nature conservation ........................................................................................ 13
Checks ................................................................................................................................. 14
Checks before Delivery ....................................................................................................... 14
Periodic Checks and Repairs.................................................................................................... 14
Recycling ................................................................................................................................. 14
Guarantee ................................................................................................................................. 14

2
Owner’s manual for paragliders
AROLLA 2 XXS, XS, S & M
General information
Name of the model: AROLLA 2 XXS,AROLLA 2 XS,
AROLLA 2 S, AROLLA 2 M
Name & address of the manufacturer: Mcc Aviation SA
Route de Forel 34
CH-1091 Grandvaux
Suisse
www.mccaviation.ch
Used as a paraglider (see technical data) the AROLLA 2 is certified in A category ;
used as miniwing, AROLLA 2 is certified in B category according to EN 926-2: 2013,
EN 926-1: 2006 & LTF standards.
Owner’s manual version November 2017.
This manual meets the requirements of EN 926-2: 2013 regarding the content and
the information that have to be supplied to the endusers.
The last update of this manual is available on www.mccaviation.ch
Required piloting skills
The AROLLA 2 is a paraglider with good passive safety and forgiving flying
characteristics. It prooves to show some resistance to departures from normal flight.
Used as a paraglider (see technical data), the AROLLA 2 is a paraglider made for all
pilots including pilots in training.
Used as a miniwing, the AROLLA 2 is a paraglider made for pilots who have
completed their training, have been flying at least during two years and keep
practising on a regular basis. As a miniwing, the AROLLA 2 flies faster and isn’t
recommended in a phase of training.
General remarks abour paragliding
Paragliding is a risky sport ; a careful practise is therefore highly advisable. The pilot
must check the airworthyness of his equipment, and in particular of his paraglider
before each single take-off. The pilot is the only master aboard and flies at his own
risks.

3
Sectional drawing of the AROLLA 2

4
Plan of the lines

5
Drawing of the risers

6
Technical data and Information
- Number of cells: 38
- Number of risers: 4 risers (A, B, C & D)
- No trimmers on the certified models.
- Minimum brake range to stall point according EN 926-2: 2013 standard :
AROLLA 2 XXS & XS: 60 cm
AROLLA 2 S & M : 65 cm
- The setting of the lines and of the brakes must at all time remain within the
allowances, as required by the EN 926-2: 2013 standard (+/- 1 cm compared to
the total length as indicated on the list of lines and linesplan).
- Except for brakes and speed system, there is no other adjustable devices
available on the certified models.
- Lists of lines on request.
- AROLLA 2
XXS
XS
S
M
Take-off load (kg)
Paraglider EN-A*
48 - 65
50 - 70
63 - 87
79 - 103
Take-off load (kg)
Miniwing EN-B**
>65 - 90
>70 - 100
>87 - 110
>103 - 120
Weight of the paraglider (kg)
2.65
2.85
2.95
3.15
Layout area (m2)
20.56
22.23
24.05
26.01
Projected area (m2)
18.25
19.73
21.35
23.09
Layout span (m)
9.83
10.22
10.63
11.06
Projected span (m)
7.80
8.11
8.43
8.77
Layout aspect ratio
4.7
4.7
4.7
4.7
Projected aspect ratio
3.33
3.33
3.33
3.33
Min.-trim.-max. speed (km/h) EN-A*
23-37-45
23-37-45
23-37-45
23-37-45
Min.-trim.-max. speed (km/h) EN-B**
27-43-54
27-43-54
26-42-52
26-41-50
EN Certification
A* / B**
A* / B**
A* / B**
A* / B**

7
Limits of use
The AROLLA 2 paragliders are certified for solo free flight only. Weather and thermal
conditions must remain suitable for paragliding at any time and the very skills of the
pilot have to be taken into account to decide whether to fly or not. Moderate winds (4
on the Beaufort scale or 20-28 km/h) can already be tricky due to turbulence near the
ground on the leeward side behind obstacles or wind shears created by thermal
activity
Acrobatic manœuvres, which are manoeuvres during which the canopy dives in pitch
or roll over 30° from the trim straight glide shall not be considered as the normal use
of your AROLLA 2 paraglider.
The pilot must comply at any time with laws and regulations applicable to paragliding.
The pilot should also comply with the requirements resulting from the certification
(take-off load, dimensions of the harness, lines setting, brakes setting, etc.) and the
safety information provided by this manual.
The behaviour of the AROLLA 2 when used on the winch or with an engine
(paramotor) is not part of the certification according to the EN 926-2: 2013 standard.
Operating the AROLLA 2
The AROLLA 2 requires no special or unusual operating technique. However you’ll
find hereunder some useful reminder which might help you to become more familiar
with your new wing.
Preflight check of the paraglider
Check of the canopy: check the canopy for wears ; also check that the inner
structure (ribs and diagonals) is not damaged and that the seams are all right.
Check of the lines: check that the lines, including the seams and the end loops are
not damaged. Also check that the lines are not tangled and are perfectly sorted out.
Check of the rapid links: check that all the rapid links are screwed tight.
Contrôle of the risers: check that the risers are not damaged and are not twisted or
tangled. Check that the speed system can be operated freely and that the ropes are
long enough as to avoid unintended operation of the speed system. Check that the
brake handles are in correct position and that the brake lines run freely through the
barke pulleys.
Take-off
Lay out the paraglider with the leading edge in a horseshoe shape. Holding the A
risers close to the quick links move forward until the lines are tight.
You should now be perfectly centered in your wing. In nil wind or a light headwind,
with lines tight take several strides. AROLLA 2 will rapidly inflate and rise over your
head.
Do not pull the risers too hard, either forward or down as this could cause a collapse
of the leading edge. Simply follow them with your arms until the glider reaches its

8
angle of flight above your head.
It is important that the centre-of-gravity of your body remains in front of your feet
during inflation of the glider so that the load through the risers remains constant.
A controlled inflation avoids excessive need of the brakes and allows you to visually
check the wing and lines during the last phase of the launch, before acceleration to
takeoff speed.
Depending on the wind conditions or the slope, judicious use of the brakes may
assist a cleaner launch.
Landing
Due to the exceptional glide of AROLLA 2, caution is recommended during approach
and landing.
AROLLA 2 is an agile and sensitive glider. Each brake input may initiate a significant
glider reaction. It is therefore recommended that first flights are performed in a
familiar environment, on a large landing site and under stable meteorological
conditions.
An advantage of negative steering is that there is more time for manoeuvres to be
performed precisely, resulting in reduced pendular motion of the paraglider.
Reminder: Negative steering involves slowing the glider by applying brakes
symmetrically to about 30% of the maximum range, then effecting a turn by steadily
releasing the outside brake.
Speeding up just prior to landing allows a more effective flare and a gentler touch-
down in nil or light winds.
Turning
AROLLA 2 is designed to turn efficiently and will core thermals even without the need
for weight-shift piloting.
Negative steering (see above) slows the paraglider in certain phases of flight and
consequently reduces excessive roll during turn reversals.
Your glider is not only designed to turn rapidly (with approx. 30% brake) but also to
fly slowly in order to help identify areas of lift and to maintain a flatter turn to minimize
sink rate during the turn (with 15% brake).
Symmetrical brake-input at 20-30 % enables you to control the glider – to brake
further if the canopy pitches forward and to release if the canopy pitches backwards
Rapid Descent Techniques
As a general rule, in order to descend, fly away from areas of lift. If, for whatever
reason, you are taken unawares by the development of conditions, you may consider
using the following techniques to increase your sink rate.
Big Ears
AROLLA 2 is equiped with a split A riser system. Grasp the outside big ears A riser
on the Red coloured section and squeeze them outwards and downwards until the
wingtips fold back under the leading edge. We recommended that you perform each

9
“ear“ successively and not both simultaneously.
Keep the lines taut to stop the wingtips from reopening until the manoeuvre is
finished. Depending on the size of ‚big ears‘ initiated, the sink rate can increase by up
to 3–4 m/s. If necessary, it is possible to initiate small alterations in direction by
weight shift control.
As soon as the lines are released, the paraglider should spontaneously reopen.
However, you can speed reopening by „pumping“ the brakes in a single sweeping
movement. When pumping the brakes it is recommended that one side of the
paraglider be opened after the other. Pulling both brakes simultaneously to reopen
ears may result in a stall.
Spiral Drive
AROLLA 2 is a manoeuvrable wing that responds to pilot input precisely and
progressively.
To initiate a tight spiral apply one brake progressively to about 35% and hold it in this
position. The speed of rotation and the brake pressure will increase progressively
and the centrifugal force on the pilot will also increase.
The angle and speed of rotation can be decreased or increased by releasing or
depressing the brake by several centimeters respectively. Once mastered the spiral
dive allows you to descend at rates greater than 10 m/s. Extremely abrupt or badly
synchronised brake inputs or too-rapid initiation of the spiral may result in an
asymmetrical collapse and/or a spin.
CAUTION: A deep spiral is a radical manoeuvre. The kinetic energy generated must
be dissipated by slowly releasing the inside brake throughout, at least, one whole
revolution.

10
B-line Stall
Grasp the B risers at the quick links, and ease them down symmetrically. Do not
snatch them down.
The paraglider will enter a B-line stall and feel to drop backwards before the pilot
stabilises underneath the wing. The descent rate increases to 6 - 8 m/s.
To exit the B-line stall raise both hands together in a single, positive movement so
that the risers are at normal full extension again.
On releasing the B-risers, your AROLLA 2 should return immediately to normal flight.
An adjustment error, control error or certain aerological conditions may lead to a
prolonged deep stall phase. A push on the speed bar should initiate rapid exit from
the B-line stall state.
If the speed bar is not connected, pulling on the A-risers by 4–5 cm will have the
same result.
CAUTION: Unlike big ears and spiral dives (see above) a glider in a B-line stall is in a
true stalled position. For this reason, a B-line stall should never be performed close
to the ground
Performance & Use of Brakes
AROLLA 2‘s best glide is at trim speed (no brakes) – about 37-38 km/h. The
minimum sink rate is achieved by applying approx. 15% brake.
When using more than 30% brake the aerodynamics and the performance of the
glider deteriorate and the brake pressure rapidly increases.
With extremely high brake pressure there is a great risk of an impending stall which
occurs at full brake travel (100% brake).
In normal flying conditions the optimum brake position, in terms of performance and
safety, is within the top third of the braking range.
Use of Speed Bar
Your AROLLA 2 is equipped with a highly efficient speed system. For fitting and
positioning of the accelerator system and speed bar, consult the instructions provided
by your harness manufacturer.
Before each take-off check that the entire accelerator system works freely and that
the lines are long enough to prevent the speed bar from being activated involuntarily
in flight (lines too short).
If the harness is fitted with a front mounted reserve, the speed bar lines must pass
under the reserve container and the reserve bridle so that it can be deployed
correctly.
Use of the speed bar increases the maximum speed of the paraglider by up to 30%
of the trim speed. Whilst the AROLLA 2 remains stable at full speed, no paraglider is

11
immune from deflations in certain conditions and the deflation point can be sudden
when flying at high speed.
Use of the speed system does reduce the angle of attack and therefore there is an
increased risk of a frontal (or asymmetric) collapse. For this reason we do not advise
use of the speed bar near to the ground or in turbulent air.
Asymmetric or Frontal (Symmetric) Collapses
Despite tests showing that AROLLA 2 recovers spontaneously after collapses, active
piloting is recommended in the event of an asymmetric or frontal collapse. Active
piloting will reduce the loss of altitude and a change of direction.
•In the event of a frontal (symmetric) collapse: Before automatic reopening
occurs, bring both brakes down swiftly & symmetrically to speed up reopening of
the leading edge, then immediately bring your hands back up to normal flying
position.
•In the event of an asymmetric collapse: Keep the paraglider flying as straight
as possible by leaning away from the collapsed side and applying sufficient (just
enough, not too much) brake to maintain course. Speed up the reopening of the
closed side by a single, positive input on the collapsed side & repeat if
necessary.
Full Stall
Certain pilot behaviour or weather conditions can cause a full stall. This is a serious
deviation from normal flight and can be difficult to manage. If a stall occurs at less
than 100 m above the ground, throw your reserve parachute.
Main Causes of a Full Stall:
Poorly timed or excessive use of the brakes when the air speed of the wing is
reduced (e. g. when coming out of a spiral or speeding up after a B-line stall).
Rain-induced Deep or Full stall :
A soaked or heavily drenched leading edge (from rain or a cloud) can result in a full
stall or deep stall due to uneven airflow over the leading edge as a result of rain
drops and an increase of weight to the wing.
Whatever the cause, a stall can be either symmetrical or a symmetric (a spin). In
both cases the brake line travel becomes very short and even small input may
suddenly induce an airflow separation; in some cases even a gust or a sudden
thermal may change the angle of incidence enough to cause the deep stall.
If you find yourself flying in unavoidable rain we strongly recommend that you avoid
any sudden movements or radical brakeline input, that you do not pull Big Ears or B-
stall, and that you steer clear of turbulence and avoid a deep flare on landing.
In both cases the pilot has two possible courses of action:
•If the full stall happens above 100 m it is strongly recommended to initiate
standard stall recovery assuming the pilot is familiar with the process (i.e. a

12
complete execution of the full stall, stabilization of the wing and progressive lifting
of the hands to resume normal flight).
•If the full stall happens below 100 m or if the pilot is unfamiliar with stall recovery
the reserve parachute should be deployed immediately.
Steering without brakes
If a brake line or pulley breaks it is possible to steer AROLLA 2 using the C-risers
(rear risers). The movements should be finely controlled as the deformation of the
wing due to the traction on the C-risers is greater than that produced by using the
brakes.
Tip: Practice this method of steering to be prepared before a real brake failure!
Special steering
No other manœuvre or steering technique is recommended.
Comments on the Testing Procedures
All manoeuvres were carried out over water in a stable air mass with standard
temperature, humidity and pressure.
They were carried out by professional pilots trained to react to any problem in the
most appropriate manner.
Test reports are available on our website: www.mccaviation.ch and on the test
laboratory website : www.para-test.com
Harness Adjustment
During testing procedures, the pilots have been using ABS type harnesses with
following dimensions:
Taille
Distance from seatboard
to inner bottom of
carabiners
Distance between centerlines
of inner bottom of carabiners
AROLLA 2 XXS
39-42 cm
38-44 cm
AROLLA 2 XS
39-43 cm
38-46 cm
AROLLA 2 S
40-44 cm
40-48 cm
AROLLA 2 M
41-45 cm
42-50 cm
We recommend the use of a harness with adjustments as close as possible to those
used during the certification tests.
Excessive cross-bracing (chest strap very tight) increases the risk of risers twisting
during certain manoeuvres.
A looser setting may result in a tendency to fall towards the collapsed side.

13
Lower hang-points reduce the roll-stability of your harness and can slow reopening of
asymmetric collapses.
Slightly higher hang points have no influence on in-flight safety and can therefore be
tolerated.
Advice on Maintenance
•Avoid dropping the canoppy on its top surface or on its leading edge during
inflation or landing.
•Do not drag it across the ground when moving it.
•Do not expose it unnecessarily to sunlight.
•Choose a folding technique that doesn‘t damage the leading edge and that
doesn‘t crease the internal structure excessively.
•To maximize the life of your glider we do not recommend the use of stuff sacks:
the abrasion of the material will decrease the life expectancy of the fabric – in
particular its internal structure.
•Always use the protective bag to avoid direct contact with the harnesses and
buckles, and unwanted frictions inside the rucksack.
•Never store your paraglider when it is damp. If immersed in sea water, rinse it
thoroughly in fresh water. Do not use any detergents.
•If you do most of your flying near the sea, where the air is humid and salty, the
wing may age faster. In this case we suggest you have it checked more often
than prescribed in this manual.
•Empty any foreign bodies from your paraglider regularly, for example sand,
stones or animal or vegetable matter which may eventually decay. Twigs, sand,
pebbles, etc... damage tissue in successive folds, and organic debris of
vegetable or animal origin (insects) can promote mold growth.
AROLLA 2 is fitted with debris release slots at the wing tips. Debris can be shaken
from the closed cells through to the wing tip and the release slot opened to remove
particles. Check that you reseal the debris release slot when completed.
Storage and transport
Store your loosely packed glider in a cool (10-25°C) and dry (< 70% humidity) place.
Hot car boots or damp basements lead to damaging of the cloth.
A paraglider should always be dry when packed, but this is particularly important
after the last flight of the season. But even a completely dry wing should still be
stored open in a dry, clean and dark place.
If you do not have room for such winter storage we recommend you open all
compression straps on the bag as much as possible and leave the bag open so that
air can circulate around the packed canopy.
Make sure no vermin make their sleeping quarters in your wing, and keep it well
distant from solvents and acids. Petrol and other petrochemicals are especially
abrasive for nylon and will dissolve the cloth if allowed near.

14
High temperatures in combination with moisture are a particularly volatile mix that will
accelerate the hydrolysis process where the fibres and the coating are decomposed.
Repairs
Repairs should be achieved by a specialist. The use of ill fitted spare parts or
materials or a wrong repair process can be very dangerous on an aircraft. For safety
reasons, always have your paraglider repaired by a specialist.
Paragliding and nature conservation
Being a good pilot is not only knowing how to take-off, land and fly long distances, it
is also being conscious about the beautiful natural surrounding and behaving in a
way that helps to protect the environment. Take only pictures and memories and
leave at most footprints. Keep on the footpath, do not damage the vegetation and do
not disturb the wildlife.
Checks
Before delivery
Your paraglider has been carefuly checked thoughout the whole production process
in our production facility. It has been double-checked and measured in our workshop
in Grandvaux in Switzerland and it has been tested in flight by a professionnal test
pilot.
It is delivered with the standard lines and brakes settings which matches the settings
used during the certification flights.
Periodic checks and repairs
For your own safety, we advise you to have your paraglider checked at least once a
year or after 100 flight hours whichever is sooner and anytime there is a noticeable
change in its behaviour.
The checks must be done by Mcc Aviation in Grandvaux or by an authorised
representative. Our workshop is equiped as a production facility, with all machines,
original materials and spare parts and trained staff.
In France, the after-sales service is made by several professional workshops
throughout the country. Contact Mcc Aviation, They will provide you a list of
authorised worshops.
Recycling
Votre paraglider is mainly (99%) made with plastic materials (polyamide, polyester,
etc.) and with some metal parts (quick links, pulleys, rings), which can easily be put
aside.
Guarantee

15
Mcc Aviation new paragliders are covered by a guarantee according to the law (cf.
art. 197 CO or art.5 of the directive 1999/44/CE).
Mcc Aviation SA commits itself to correct a possible defect or replace the faulty
piece. The guarantee period starts from the date of delivery of the paraglider to the
authorized dealer.
The guarantee does not cover damage caused normal aging, by an accident, by
misuse or by neglecting the regular maintenance.
Mcc Aviation SA
Route de Forel 34
CH-1091 Grandvaux
www.mccaviation.ch
Table of contents
Other Mcc Aviation Aircraft manuals