McCulloch MC1255 User manual

Handheld Power Steamer
Limpiador A Vapor De Mano
Cuiseur Vapeur Portatifs
Owner’s Guide
Guía del Usuario
Mode D’emploi
Model MC1255
Modelo MC1255
Modéle MC1255
KEEP YOUR RECEIPT FOR WARRANTY PURPOSES
Please read all instructions before use.
GUARDE SU RECIBO A EFECTOS DE LA GARANTÍA
Lea todas las instrucciones antes de usarlo.
GARDEZ VOTRE REÇU AUX FINS DE LA GARANTIE
Veuillez lire toutes les instructions avant l’utilisation.
English p. 2
Español p. 14
Français p. 28

!
IMPORTANT SAFETY INSTRUCTIONS
READ ALL INSTRUCTIONS BEFORE USE
1. Unit Water Tank is designed to hold a maximum of 10 oz. (296 ml.) of water. Unplug
electricalcordbeforellingwithwater.
2. DO NOT leave your MC1255 Handheld Power Steamer unattended when plugged in or
not in use. Use only for its intended purpose as indicated in this manual.
3. This unit is not a toy. Close supervision is required when using unit near children, pets, and
plants. Steam produced by unit is hot and pressurized. Care must be taken to avoid burns or
other injuries. Never point nozzle at people or pets.
4. To reduce the risk of contact with hot water emitting from steam vents, hold appliance
away from body and check for signs of condensation or leakage.
5. DO NOT use this unit if electrical cord or outlet is damaged. DO NOT use unit if it is
not working properly or has been dropped, damaged or left outdoors. If such damage
occurs,DONOTdisassembleorattemptrepairs,takeunittoaqualiedserviceperson
forexaminationandrepair.Incorrectreassemblyorrepaircouldcauseariskofre,
electrical shock, or injury to persons when steam cleaner is used.
6. To reduce risk of electrical shock, DO NOT immerse in water or other liquids. DO
NOT use electrical cord as a handle. DO NOT allow cord to be crimped by closing it
in doors. DO NOT pull or stretch cord around sharp corners or edges.
7. Do not allow cord to touch hot surfaces. Let appliance cool completely before putting
away. Loop cord loosely around appliance when storing.
WARNING:Toreducetheriskofre,electricalshock,orinjury,thefollowing
basic safety precautions should always be followed when using an electrical
appliance.
2 |ENGLISH

!WARNING: To reduce the risk of electrical shock, this appliance has a three-
prongedplug.Thisplugwilltinapolarizedwalloutletonlyoneway.Iftheplug
doesnottfullyintheoutlet,contactalicensedelectriciantoinstallaproper
outlet. DO NOT attempt to modify the plug or defeat this safety feature.
8. DO NOT use this unit with extension cords or electrical outlets that have inadequate current
capacity. A three-prong outlet or a properly grounded adapter is necessary when using
MC1255 Handheld Power Steamer.
9. In order to unplug MC1255 Handheld Power Steamer, grasp plug and pull smoothly and
rmlyfromoutlet.DONOTattempttounplugunitbypullingortuggingoncord.
10. Use caution, as burns could occur from touching hot metal parts, hot water or steam.
11. MC1255 Handheld Power Steamer is only meant to be used with recommended MC1255
accessories. Other types of attachments are not to be used with Handheld Power Steamer.
Doing so may cause injuries or damage to unit.
12. Nozzle and attachments become hot during use. To avoid injuries, DO NOT touch nozzle
while using this appliance. DO NOT attempt to change attachments while unit is
emitting steam.
13.WhenllingyourHandheldPowerSteamer,onlywatershouldbeusedinunit.Other
cleaning agents will damage unit and can cause injuries.
14. DO NOT operate unit if steam opening is blocked. Should this occur, immediately
cease usage and unplug from electrical outlet.
15. Store your MC1255 Handheld Power Steamer in a cool, dry place.
Questions or comments?
•www.mccullochsteam.com
•1-800-711-6617 ENGLISH |3
SAVE THESE INSTRUCTIONS
FOR HOUSEHOld USE ONlY

The following features and accessories are included with your Handheld Power Steamer.
Carefully inspect packaging for all parts and accessories. To obtain possible missing parts,
refer to the Consumer Services section on page 12 of this manual.
Product Information
4 |ENGLISH
UNIT FEATURES
& ACCESSORIES
Power Light
Steam Trigger
Steam Level Switch
Fill Cap
Water Tank
Water Tank Window
Steam Outlet
3" Straight Jet Nozzle
Angled Jet Nozzle
Nylon Utility Brush
Wallpaper Remover
Funnel
1
2
3
4
5
6
7
8
9
10
11
12
6
12
1
2
3
4
5
7
8
9
10
11
A1255-002
A1255-001
A1255-003
A1255-004
A275-014

•ThePower Indicator Light (1) illuminates to indicate that the unit is powered on, and
that the heater is active.
•TheSteam Trigger (2) is pressed to activate the pump mechanism, which transfers water
from the Water Tank to the boiler. Steam will be released from the Steam Outlet a few
seconds after Steam Trigger is pressed. The Steam Trigger can be held down for a
sustainedowofsteam.
•TheSteam Level Switch(3)isusedtoadjusttheintensityoftheowofsteamfromthe
Steam Outlet. Slide the Steam Level Switch up to increase steam power, and slide it
down to decrease steam power.
•TheFill Cap(4)mustberemovedinordertolltheWaterTankwithwater.The
Fill Cap creates a tight seal to prevent spilling water.
•TheWater Tank (5) is the reservoir in which water is stored for use by the unit.
•TheWater Tank Window (6) clearly shows water level.
•TheSteam Outlet(7)emitsaowofhot,penetratingsteam.The3"StraightNozzle,
Angled Nozzle, Nylon Utility Brush and Wallpaper Remover all connect to the Steam Outlet.
Unit should only be used when nozzles or brushes are attached.
•The3" Straight Jet Nozzle (8) connects to the Steam Outlet, and is designed to focus the
spray of steam for maximum cleaning power. This is ideal for tile grouting, oven racks and
more.
•TheAngled Jet Nozzle (9) connects to the Steam Outlet and serves a similar function as
the3"StraightJetNozzle;however,itisdesignedforreachingdifcultanglesandareas
that the 3" Straight Jet Nozzle may not completely reach.
•TheNylon Utility Brush (10) connects to the Steam Outlet, and is designed to steam and
scrub smaller surface areas, including metal, tile and more.
•TheWallpaper Remover (11) connects to the Steam Outlet to quickly and easily remove
wallpaper or even painted over wallpaper without the use of chemicals.
•TheFunnel(12)foreasyrellingwithoutspills.
ENGLISH |5

BEFORE YOU BEGIN:
• DO NOT ll the steamer with any liquids
except clean water. (Distilled water
recommended for longer life)
• DO NOT use household cleaners, bleach or
any other chemicals with this steamer. Never
attach accessories while unit is emitting
steam.
• DO NOT ll the water tank while the steamer
is plugged in.
• DO NOT operate the steamer once the water
container is empty.
• DO NOT look directly down into the ll hole
when lling. Keep your free hand and others
at a safe distance.
USING THE ACCESSORIES
1. Make sure to align the tab on the accessory
with the slot in the bottom of the steam outlet.
NOTE: All accessories (nozzles and brushes)
attach to the steam outlet in the same manner.
2. Insert the accessory into the steam outlet. Turn
the accessory 1/4 turn counter-clockwise to
lock in place.
INSTALLING WALLPAPER REMOVER
1. Place Wallpaper Remover onto the Steam
Outlet.
2. Lock Wallpaper Remover by turning yellow lock
tab counter clockwise into the lock position.
Place support arm into recess at base of unit.
3. To remove, pull support arm out of base of unit
and turn yellow lock tab clockwise to unlock.
Pull Wallpaper Remover away from unit.
Handheld Power
Steamer Setup
6 |ENGLISH

ENGLISH |7
FILLING THE WATER TANK
• Unplug power cord from electrical outlet.
1.Removethellcap.
2.Usingthefunnel,llthewatertank.Replacethe
llcapwhenlledtodesiredlevel(10oz.).
NOTE: In order to get maximum steam time,
make sure the water tank is lled completely.
Make sure the unit is standing upright as shown.
USING THE STEAM TRIGGER
NOTE: After plugging in the power cord, allow
the unit to heat. After approximately 30 sec-
onds, you are ready to begin steaming.
1. Hold down the Steam Trigger to bring steam to
the Steam Outlet and out of the selected accessory.
NOTE: When pressing the Steam Trigger, it will
take a few seconds for the steamer to produce
steam. Likewise, the steamer will produce
steam for a few seconds after releasing the
Steam Trigger.
USING THE STEAM LEVEL SWITCH
1. You can control the amount of steam emitted by
using the Steam Level Switch.
•SlidetheswitchtowardHigh(+)inorderto
increasetheowofsteam.
•SlidetheswitchtowardLow(-)inorderto
decreasetheowofsteam.

GENERAL OPERATION
NOTE: Be sure Steam Outlet is free of any debris and any desired accessories are con-
nected before following these steps. If Steam Outlet shows any debris please refer to
Mineral Build-Up on page 10.
1.Pluggroundedpowercordintoaconvenientelectricaloutlet(makesuretorstremoveplastic
cover that protects plugs during shipping). Power Light will immediately illuminate.
CAUTION: This unit uses a grounded (3-prong) electrical plug. Use only in properly
installed 3-prong electrical outlets. Do not attempt to alter plug or circumvent this safety
feature in any way.
NOTE: Power Light is illuminated at all times while unit is plugged in. This unit has no On/
Off power switch; it will begin heating immediately upon being plugged in.
2. Allow unit approximately 30 seconds to heat up.
3.SetSteamLevelSwitchtodesiredintensityofsteamow.AdjustbetweenHigh(+)and
Low (-) steam settings to control the intensity of steam for the task at hand.
4. Direct towards surface you desire to steam, and press Steam Trigger.
NOTE: Pressing the Steam Trigger activates the unit’s pump. It will take a few seconds to
actually begin producing steam. The unit will continue to produce steam for another few
seconds after Steam Trigger is released.
5. To sanitize surfaces, press Steam Trigger and hold approximately 1/2 inch from surface for at
least 5 seconds (this will maximize the effectiveness of the steam cleaning).
CAUTION: Always be sure the Handheld Power Steamer and any accessories are pointed
in a safe direction (away from yourself, other people, pets, and plants) before pressing
Steam Trigger.
6.KeepSteamTriggerdepressedforacontinuousowofsteam.Usingaslightback-and-forth
motion over the area you are steaming to further enhance the cleaning process.
7.HolddowntheSteamTriggerasneededforsufcientsteamsupply.UsetheNylonUtility
Brush accessory to brush away dirt, grease, unwanted dried paint, etc. DO NOT
over-scrub the surface unless you are cleaning tiles or stone.
8. Use only clean tap water or distilled water (recommended) when using the steamer. No
detergents or any other additives are needed.
9. At the end of use, immediately unplug grounded power cord from electrical outlet. Follow
steps under Proper Storage procedure on page 10 of this manual.
Using Your Handheld
Power Steamer
8 |ENGLISH

WALLPAPER REMOVAL
1. For best results, use a scoring tool or a putty knife and gently score the wallpaper in a criss-
cross patter before removal. The perforations will allow the steam to penetrate the wallpaper.
2.Toremovewallpaper,holdtheWallpaperRemoveratagainstthescoredwallpaper.Pullthe
trigger and hold for 15-20 seconds (time needed may vary). Move the steam plate to a new
section and remove the steamed section with a scraper blade.
STEAM CLEANING TIPS - READ BEFORE STARTING
When using steam on delicate materials always check the suitability of materials before steam
cleaning. Steam is being generated at temperatures in excess of 212ºF (100ºC). DO NOT use
on any surfaces that cannot withstand this temperature. Always test in an area that is out of
view. DO NOT soak materials being cleaned. Too much steam can leave water marks or other
damage. Only a light application of steam is required.
Spot Treating:
• The Handheld Power Steamer may be used for treating light carpet and upholstery stains.
Note: Some upholstery and fabrics contain stain resistant treatments which may be
affected by steam cleaning. Check your upholstery manufacture for information.
•Trycleaningasmall,unseenareaofcarpet,toverifyanyunusualeffectsonfabric.Ifsodonot
try to clean light stains on carpet or upholstery.
Windows and Tiles:
•Antiqueandstainedglassmaybebrittleandmaycrackunderextremetemperatures.
•Donotuseonglasswhenthetemperatureisbelow32ºF(0ºC).Glassmaycrackincold
temperatures.
•Ifyourwindowhasbeentreatedorcoatedinanyway,checkwithmanufacturerbeforeusing
steamer.
ENGLISH |9

PROPER STORAGE
Preparing your Handheld Power Steamer for storage is quick and simple. When you have
nishedyoursteamingtasks,followthestepslistedbelow.
1. Unplug power cord from electrical outlet.
2. Allow unit to completely cool.
3. Remove all accessories from unit.
4. Remove Fill Cap and drain any remaining water from Water Tank into a sink or tub.
5. Store all attachments safely away, preferably near Handheld Power Steamer.
6. Store Handheld Power Steamer in a cool, dry location.
MINERAL BUILD-UP
A common problem with steam appliances is mineral build-up caused by high mineral content
in many municipal water supplies. The best way to avoid this issue is to use distilled water in
unit. If you are unable to use distilled water, we recommend you use this procedure monthly to
help avoid mineral build-up. Or if you notice a change in your steam output, we recommend this
procedure to reduce the mineral buildup.
To remove mineral build-up:
1. Unplug power cord from electrical outlet.
2. Allow unit to completely cool.
3. Remove all accessories from unit.
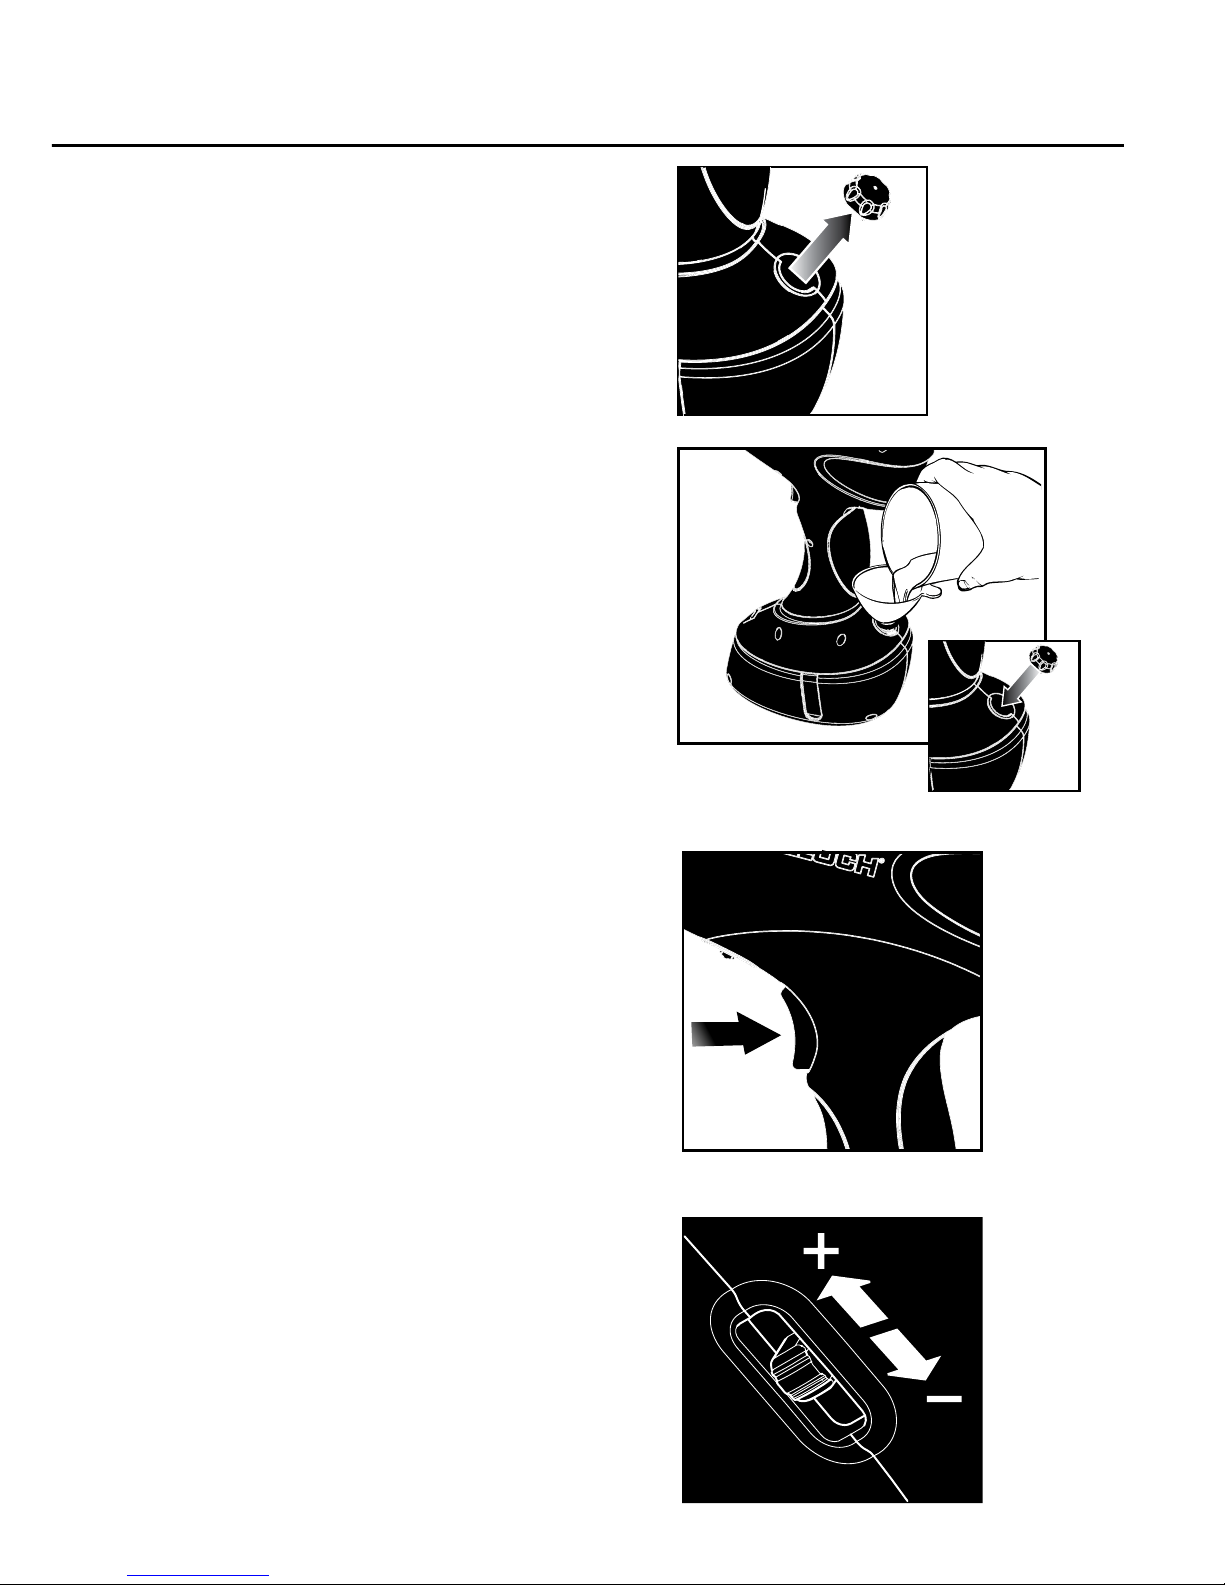
4. Insert tip of paper clip into opening of the Brass Outlet Tip to
remove mineral buildup in Brass Outlet Tip. This may also be
done to clean accessories such as the Nozzles.
5. Remove Fill Cap and drain any remaining water from Water
Tank into sink or tub.
6.SetSteamLevelSwitchtomaximumsetting(towards+).
7. Using a measuring cup, measure 8 oz. (236 ml) of distilled vinegar.
8. Slowly pour vinegar into Water Tank and replace Fill Cap.
9. Plug power cord into an electrical outlet and allow unit to heat up.
10. Hold down Steam Trigger to spray vinegar into a sink or tub. Continue to hold down Steam
Trigger until Water Tank is completely drained (approximately 8 minutes).
11. Unplug power cord from electrical outlet.
12. Fill Water Tank with fresh water and replace Fill Cap.
13. Plug power cord into an electrical outlet and allow unit to heat up.
14. Hold down Steam Trigger to spray water into a sink or tub. Continue to hold down Steam
Trigger until Water Tank is completely drained (approximately 8 minutes).
15.Thiswillushoutanyremainingvinegarsolutioninunit.Repeatsteps11-14untilvinegar
odor dissipates.
NOTE: If water drips from the Pressure Relief Valve or if you notice a reduction in your steam
pressure, verify the Brass Outlet Tip is clear of any mineral buildup. Remove Brass Outlet Tip by
turning counter clockwise. Clear any debris as mentioned in step 4 above. Replace Brass Outlet Tip
byturningclockwiseuntilnger-tightplus1/8thturn.Overtighteningwillcausedamagetothethreads.
IMPORTANT: On average, it is recommended that you follow the mineral buildup removal procedure
once per month (if unit is used once every week). More frequent use may require following the
procedure more often in order to keep your steamer operating at full potential. Do not exceed 20 hours
of use without cleaning out mineral buildup.
Storage & Care
10 |ENGLISH
Brass
Outlet
Tip
Pressure
Relief Valve

Troubleshooting
ENGLISH |11
PROBLEM POSSIBLE CAUSE SOLUTION
Unit fails to heat up. Unit is not plugged in. Plug into electrical
outlet.
Household Circuit Breaker /
Ground Fault Interrupter has
tripped or blown a fuse.
Reset Circuit Breaker /
Ground Fault Interrupter,
or replace fuse. If you
need assistance, contact
a licensed electrician.
Water Tank is empty. RellWaterTankusing
procedures on page 7 of
this manual.
Mineral build-up in unit. Follow Removing
Mineral Build-Up
procedure on page 10 of
this manual.
Steam output is intermittent. Mineral build-up in unit. It is normal for steam
pressure to drop
periodically for a few
seconds. If steam stays
off for longer periods,
follow Removing Mineral
Build-Up procedure on
page 10 of this manual.
Water drips from the Pressure
Relief Valve.
Mineral build-up in unit. Follow Removing
Mineral Build-Up
procedure on page 10 of
this manual.
The unit is heated, but does
not produce steam.

Product Support
CONSUMER SERVICES
For problems with your Handheld Power Steamer, please refer to the troubleshooting guide
located on page 11 of this manual. Additional inquiries should be directed to our consumer
support services through our website, www.mccullochsteam.com.
If you do not have internet access, you may also contact our Consumer Service Department by
telephone, at 1-800-711-6617.
NOTE: In order for our Consumer Service representatives to help you as quickly and ef-
ciently as possible, please have the following information ready before calling:
•Purchaseinformation(whereandwhenyoupurchasedthisproduct)
•Copyofpurchasereceipt/proofofpurchase
•Productserialnumber(locatedonelectricalspecicationlabelonbackofunit)
•Datecode(4-digitnumberlocatedonelectricalspecicationlabel)
PRODUCT SPECIFICATIONS
MC1255
120V
1300W
10 oz. (296 ml)
30 sec. (approximate)
12 min. (low) / 8 min. (high) (approximate)
2.8 lbs. (1.3 kg.)
11″x7.48″x3.94″(280mmx190mmx100mm)
MODEL
VOLTAGE
POWER
WATER CAPACITY
HEATING TIME
CONTINUOUS STEAM TIME
UNIT WEIGHT
UNIT DIMENSIONS
12 |ENGLISH
1-YEAR LIMITED WARRANTY
What is covered
McCulloch® is a licensed brand of Steamfast, a division of Vornado Air, LLC (“Steamfast”). Subject to the terms and condi-
tions of this 1-Year Limited Warranty (“Warranty”) as set forth below, Steamfast warrants to the original consumer or pur-
chaser (“Buyer”) that this McCulloch®-branded steam product, excluding all accessories and attachments, (the “Product”) is
to be free from defects in material and workmanship for a period of one (1) year from the date of purchase when used and
maintained in accordance with the Owner’s Guide (the “Warranty Period”).
IntheeventBuyernotiesSteamfastofadefectintheProductwithintheWarrantyPeriod,Steamfastwillreplacethe
Product and/or defective component parts, as applicable and necessary. Any such replacement will be made at no charge
to Buyer for parts or labor, provided that Buyer shall be responsible for all shipping and transportation costs associated with
returning the Product to Steamfast for inspection and covered replacement.
What is not covered
This Warranty shall not be applicable to damage or loss caused in whole or in part by:
•Repairs,modicationsoralterationstotheProductbyanyoneotherthanSteamfast.
•UseoroperationoftheProductoutsidethepermittedorintendedusesdescribedbySteamfastintheOwner’sGuide,or
other careless operation, handling, misuse, or abuse of the Product.
Warranty Information

ENGLISH |13
Warranty Information
•LackofpropermaintenanceortimelycleaningoftheProductasspeciedintheOwner’sGuide.
•UseoftheProductotherthanfornormalhouseholdpurposes.
•Normalwearandtear.
•Usedconsumableparts,accessoriesandattachments,including,butnotlimitedto,brushes,hangers,scrubpadsand
mop pads.
•UseofpartsandaccessoriesotherthanthoseproducedorrecommendedbySteamfast.
•Cosmeticdamage,suchasscratches,nicksanddents.
•Damagecausedbyaccident,water,ood,reorotheractsofnatureorexternalcauses.
Warranty limitations and exclusions
•NOOTHEREXPRESSWARRANTYISGIVENBYSTEAMFASTTOBUYERANDNOREPRESENTATIVEHASTHE
AUTHORITY TO MAKE REPRESENTATIONS OTHER THAN THOSE PROVIDED HEREIN.
•THEREARENOWARRANTIESWHICHEXTENDBEYONDTHEDESCRIPTIONONTHEFACEHEREOFANDALL
IMPLIED WARRANTIES, SPECIFICALLY THE IMPLIED WARRANTIES OF MERCHANTABILITY AND FITNESS FOR
APARTICULARPURPOSE,AREHEREBYEXPRESSLYLIMITEDTOTHEDURATIONOFTHEWARRANTYPERIOD,
UNLESS A SHORTER PERIOD IS PERMITTED BY LAW.
•STEAMFAST’SREPLACEMENTOFTHEPRODUCTISTHEEXCLUSIVEREMEDY.UNDERNOCIRCUMSTANCES
SHALL STEAMFAST BE LIABLE TO BUYER OR ANY OTHER PERSON FOR ANY INCIDENTAL, SPECIAL, CON-
SEQUENTIAL, OR OTHER DAMAGES, EVEN IF STEAMFAST HAS BEEN ADVISED OF OR COULD REASONABLY
FORESEE THE POSSIBILITY OF SUCH DAMAGES, INCLUDING, BUT NOT LIMITED TO, LOSS OF PROFITS OR
DAMAGE, WHETHER RISING OUT OF BREACH OF WARRANTY, BREACH OF CONTRACT OR UNDER ANY OTHER
THEORY OF LAW.
•THISWARRANTYGIVESBUYERSPECIFICLEGALRIGHTS.BUYERMAYALSOHAVEOTHERRIGHTSWHICH
VARYFROMSTATE-TO-STATE.SOMESTATESDONOTALLOWTHEEXCLUSIONORLIMITATIONOFINCIDENTAL
OR CONSEQUENTIAL DAMAGES, AND SOME STATES DO NOT ALLOW LIMITATIONS ON HOW LONG AN IMPLIED
WARRANTYLASTS,SOTHEABOVELIMITATIONOREXCLUSIONMAYNOTAPPLYTOBUYER.
How do you register the Warranty
Buyer must complete an application to register this Warranty within sixty (60) days following date of purchase. Buyer
may either visit Steamfast’s website at www.mccullochsteam.com and complete an online application or mail a completed
application to Steamfast. Failure to register this Warranty within sixty (60) days following date of purchase will render this
Warranty null and void.
Warranty service
tion (“RA”) form. Include the Product model number and serial number, as well as Buyer’s name, address, city, state, zip
code and phone number when contacting Steamfast for warranty service. Buyer may be required to provide the original
sales receipt for purposes of verifying date of purchase. After receiving the RA form, the Product must be shipped, postage
prepaid by Buyer, to:
Steamfast
Attn: Warranty & Repair
415 E. 13th Street
Andover, KS 67002
To assure proper handling, packages must be clearly marked with the RA number. Packages not clearly marked with the RA
number may be refused at the receiving dock.
Important: After receiving return authorization, carefully pack the Product to avoid damage in shipping. Damage in shipping
is not covered by the Warranty and shall be the sole responsibility of Buyer. Damage or loss not covered by this Warranty or
occurring outside the Warranty Period will require a fee to cover the cost of handling and shipping. All such fees and costs
shall be the sole responsibility of Buyer.
Please allow at least 1-2 weeks for return of the Product after it is received by Steamfast. For ease of recordkeeping, it is
recommended that Buyer staple or attached the original sales receipt to this Owner’s Guide and record the Product serial
number(locatedontheProductspecicationsdecal)here:
________________________________________________
©2013VornadoAir,LLC•Andover,KS67002
Specicationssubjecttochangewithoutnotice.Steamfast®isatrademarkownedbyVornadoAir,LLC.
Manufactured in China.
SteamfastConsumerServiceW:www.mccullochsteam.com•P:1-800-711-6617•

!
SAlVAGUARdIAS IMPORTANTES
LEA TODAS LAS INSTRUCIONES ANTES DE USAR SU
LIMPIADOR A VAPOR DE MANO
1. El Depósito de Agua de la Unidad ha sido diseñado para contener un máximo de 10 oz.
(296 ml.) de agua. Desenchufe el cordón eléctrico antes de llenarlo con agua.
2. NO DEJE su Limpiador a Vapor de Mano MC1255 desatendida cuando esté enchufado o
cuando no lo esté utilizando. Usélo sólo como está intencionado como indicado en
este manual.
3. Esta unidad no es un juguete. Se debe supervisar de cerca cuando use la unidad cerca de
niños, mascotas y plantas. El vapor que la unidad produce está caliente y presurizado. Se
debe tomar cuidado para evitar quemaduras u otras heridas. Nunca apunte con la boquilla a
personas o mascotas.
4. Para reducir el riesgo de contacto con agua caliente que se emite de la ventilación, mantenga
el aparato alejos del cuerpo y chequéelo el aparato por signos de condensación o agoteando.
5. NO USE esta unidad si el cordón eléctrico o el enchufe está dañado. NO USE la unidad si
no funciona apropiadamente o si ésta se ha caído, dañado, o dejado al aire libre. Si tal daño
ocurre, NO DESMONTELO o intente de hacer reparaciones, sino devuelva la unidad a un
técnico licenciado de servicio para examinación y reparaciones. El remontar o reparar
incorrectamente podría causar riesgo de fuego, choques eléctricos, y heridas a la gente
cuando se use el limpiador a vapor.
6. Para reducir el riesgo de choques eléctricos, NO LA SUMERJA en el agua. NO USE el
cordón eléctrico como asa. NO PERMITA que el cordón se rice por cerrarlo en las puertas.
NO TIRE NI ESTIRE el cordón cuando éste se encuentre alrededor de esquinas o
bordes puntiagudos.
7.Aseguresedemantenerelcordóneléctricoalejadodetodassuperciescalientes.Dejeque
el aparato se enfría completamente antes de almacenarlo. Ponga el cordón sueltamente
alrededor del aparato cuando lo almacena.
AVISO: Para reducir el riesgo de fuego, choques eléctricos o daños,
debe de siempre seguir las siguientes precauciones básicas de
seguridad cuando esté usando un aparato eléctrico.
14 |ESPAÑOL

!AVISO: Para reducir el riesgo de un choque eléctrico, éste aparato tiene
un enchufe de tres puntas. Este enchufe cabrá en un receptáculo de pared
polarizado de una sola manera. Si el enchufe no entra completamente en el re-
ceptáculo, contacte a un electricista licenciado para que instale un receptáculo
apropiado.NOTRATEdemodicarelenchufeoderrotar.
8. NO USE esta unidad con cordones de extensión ni con receptáculos eléctricos que tengan
una capacidad de electricidad inadecuada. Un receptáculo de tres puntas o un adaptador
bien conectado a tierra es necesario cuando esté usando El Limpiador a Vapor de
Mano MC1255.
9. Para desconectar el Limpiador a Vapor de Mano MC1255, apriete el enchufe y tire
suavementeyrmementedelreceptáculo.NOINTENTEdesconectarlaunidadtirandoo
arrastrando del cordón.
10. Tenga cuidado, ya que las quemaduras pueden suceder al tocar piezas calientes de metal,
agua caliente o vapor.
11. El Limpiador a Vapor de Mano MC1255 ha sido diseñado para ser utilizado solamente con
los accesorios recomendados del MC1255. No se deben usar otros tipos de accesorios con
el Limpiador a Vapor de Mano. El hacerlo podría causar heridas o daños a la unidad.
12. La boquilla y los accesorios se calientan durante el uso. Para evitar heridas, NO TOQUE la
boquilla mientras usa este aparato. NO TRATE DE cambiar los accesorios mientras la
unidad emita vapor.
13. Cuando llene su Limpiador a Vapor con agua, sólo debe usar agua en la unidad. Otros
agentes de limpieza dañarán la unidad y podrían causar lesiones.
14. NO UTILICE la unidad si la abertura del vapor está bloqueada. Si pasara esto, apague
inmediatamente la unidad y desconéctela.
15. Guarde su Limpiador a Vapor de Mano MC1255 en un lugar aireado y seco.
ESPAÑOL |15
¡CONSERVE ESTAS INSTRUCCIONES!
SÓLO PARA USO DOMÉSTICO
¿Preguntas o comentarios?
•www.mccullochsteam.com
•1.800.711.6617

Las siguientes características y accesorios se incluyen con su Limpiador a Vapor de Mano.
Revisecuidadosamenteelmaterialincluidoenelpaqueteparavericarqueseproporcio-
naron todas las piezas que se mencionan a continuación. Para obtener las piezas faltantes,
consulte la Asistencia para el Productoenlapágina24deestemanualandeobtenerla
información de contacto del Servicio de Atención al Cliente.
Información Del Producto
CARACTERÍSTICAS
Y ACCESORIOS
Luz Indicadora de Encendido
Gatillo de Vapor
Interruptor de Control
Tapa de Llenado
Tanque de Agua
Ventana del Tanque de Agua
Salida de Vapor
76.2 mm. Boquilla Recta
Boquilla Angulada
Cepillo Versátil de Nylon
Removedor de Empapelado
Embudo
1
2
3
4
5
6
7
8
9
10
11
12
6
12
1
2
3
4
5
7
8
9
10
A1255-002
A1255-001
A1255-003
A1255-005
16 |ESPAÑOL
11
A1255-004

•LaLuz Indicadora de Encendido (1) se ilumina cuando la unidad está encendida y que la
caldera está áctiva.
•ElGatillo de Vapor (2)esapretadoparaactivarelmecanismodelabomba,locualtransere
agua del Depósito de Agua a la caldera. Se despedirá el vapor de la Boquilla de Vapor unos
segundos depues de que se apreta el Gatillo de Vapor. Se puede man tener apretado el Ga-
tillodeVaporporunujosostenidodevapor.
•ElInterruptor de Control(3)ajustarlaintensidaddelujodevapordelaBoquilladeVapor.
Corra para arriba el Interruptor de Control de Vapor para aumentar la fuerza del vapor, y cór-
ralo para abajo para disminuar la fuerza del vapor.
NOTA: Para minimizar las manchas de agua, se debe ajustar el Interruptor de
Control de Vapor de la posición de intensidad más baja.
•LaTapa de Llenado (4) tiene que ser quitado para llenar el Depósito de Agua con agua. La
Tapa del Depósito de Agua hace un cierre hermético para evitar el derramar de agua.
•ElTanque de Agua (5) es donde se guarda el agua para el uso de la unidad.
•LaVentana del Tanque de Agua (6) muestra claramente el nivel de agua.
•LaSalida de Vapor(7)emiteunujodevaporcalienteypenetrante.LaBoquillaVersátil,
la Boquilla Recta, la Boquilla Angulada, y el Cepillo Versátil de Nylon conectan todos a la
Boquilla de Vapor. La unidad debe utilizarse solamente si las boquillas o los cepillos están
colocados.
•La76.2mm.Boquilla Recta (8) conecta a la Boquilla Versátil, y era diseñada para enfocar el
chorro de vapor por el poder máximo de limpieza. Esto es ideal para lechado de teclas, paril-
las de horno, y más.
•LaBoquilla Angulada (9) tiene función semejante; sin embargo, esta era diseñada para alcan-
zar los ángulos difíciles y los áreas que la Boquilla Recta no puede alcanzar bien.
•ElCepillo Versátil de Nylon (10) conecta a Salida de Vapor, y era diseñado para vaporizar y
refregarlossuperciesdeáreasmáspequeños,inclusivemetal,teclasymás.
•ElRemovedordeempapelado(11)seconectaalaSalidadevaporpararemoverdeforma
rápida y fácil el empapelado o la pintura sobre empapelado sin usar químicos.
•ElEmbudo (12) permite realizar recargas sencillas sin producir derrames.
ESPAÑOL |17

18 |ESPAÑOL
ANTES DE COMENZAR:
• NO llene el alimentador de vapor con otro
líquido que no sea agua limpia. (Se recomienda el
uso de agua destilada para prolongar la vida útil del
dispositivo).
• NO utilice limpiadores domésticos, lavandina
u otros químicos con este almacenador de vapor.
No conecte jamás accesorios mientras la unidad
está emitiendo vapor.
• NO llene el tanque de agua mientras el
alimentador de vapor está enchufado.
• NO opere el alimentador de vapor una
vezque el recipiente de agua esté vacío. Asegúrese
de usar guantes y protección para los ojos.
• NO mire directamente dentro del oricio de
llenado mientras esté llenando un dispositivo. Man-
tenga lejos su mano libre y otras personas.
USO DE LOS ACCESORIOS
1. Asegúresedealinearlachadelaccesoriocon
la ranura ubicada en la parte inferior de la salida de
vapor.
NOTA: Todos los accesorios (boquillas y cepillos) se
conectan a la salida de vapor de la misma manera.
2. Introduzca el accesorio en la salida de vapor.
Gire el accesorio 1/4 de vuelta hacia la izquierda para
que quede asegurado.
CÓMO INSTALAR EL REMOVEDOR DE
EMPAPELADO
1. Coloque el Removedor de empapelado en la Salida de
vapor.
2. Trabe el Removedor de empapelado girando la traba
en el sentido de las agujas del reloj. Coloque el brazo
de apoyo en la base de la unidad.
3. Para quitar, gire la traba en el sentido contrario a las
agujas del reloj y saque suavemente el Removedor de
empapelado de la unidad.
Limpiador A Vapor
DeManoConguración

ESPAÑOL |19
LLENADO DEL TANQUE DE AGUA
1. Retire la tapa de llenado.
2. Use el embudo para llenar el tanque de agua.
Vuelva a colocar la tapa de llenado cuando haya
llenado el tanque hasta el nivel deseado.
NOTA: Para obtener el máximo tiempo de va-
por, asegúrese de que el tanque de agua esté
totalmente lleno. Corrobore que la unidad se
encuentre en posición vertical, como se mues-
tra en el ejemplo.
USO DEL GATILLO
1.Puedecontrolarelujodevaporproveniente
del accesorio mediante la activación del gatillo
de vapor. Tire del gatillo para que el vapor salga
del accesorio seleccionado y llegue a la boquilla.
NOTA: Al tirar del gatillo, el alimentador de
vapor tardará algunos segundos en producir
vapor. De igual modo, el alimentador de vapor
producirá vapor durante algunos segundos
luego de soltar el gatillo.
USO DEL INTERRUPTOR DE MANDO
1. Puede controlar la cantidad de vapor emitido
mediante el interruptor de mando.
•Desliceelinterruptorendirecciónalaboquilla
devaporparaqueaumenteelujodevapor.
•Desliceelinterruptorendirecciónalgatillode
vaporparaquedisminuyaelujodevapor.
NOTA: Después de enchufar el cable de ali-
mentación, espere que la unidad se caliente.
Tras aproximadamente 30 segundos, podrá
comenzar a vaporizar.

Usando El Limpiador A
Vapor De Mano
OPERACIÓN GENERAL
NOTA: Verique que la Salida de vapor no tenga residuos y que los accesorios deseados
estén conectados antes de seguir estos pasos. Si la Salida de vapor tiene residuos, con-
sulte la sección Acumulación de minerales en la página 23.
1. Enchufe el cordón eléctrico a un receptáculo eléctrico conveniente (tenga cuidado de quitar la
cubierta plástica que protege los enchufes durante transporte). La Luz que Indica que el Va-
por Está Listo se iluminará inmediatamente.
AVISO: Esta unidad use un enchufe eléctrico terrizado (de 3 puntas). Úselo solamente
en un receptáculo de 3 puntas apropiadamente instalado. No intente alterar el enchufe ni
burlar de cualquier modo esta característica de seguridad.
NOTA: La Luz que Indica que el Vapor Está Listo siempre ilumina mientras la unidad está
enchufada. Esta unidad no tiene interruptor de encender/apagar; comenzará a calentarse
inmediatamente al momento que se enchufa.
2. Permitale a la unidad aproximadamente 30 segundos para calentarse.
3.SeleccionelaintensidaddeseadadelujodevaporconelInterruptordeControldeVapor.
Ajustelasconguracionesdevaporentrelosnivelesaltoybajoparacontrolarlaintensidad
de vapor en la tarea que está llevando a cabo.
4.Dirijaeldispositivohacialasuperciequedeseavaporizarypresioneelgatillodevapor.
NOTA: El apretar el Gatillo de Vapor activa la bomba de la unidad. Tomará otro par de
segundos para que la unidad comience a producir vapor. Ta unidad continuará produc-
iendo vapor durante otro par de segundos despues de soltar el Gatillo de Vapor.
5.Parasanitarlassupercies,dirijalaBoquilladeChorrodeVapor,aprieteelGatillodeVapory
sosténgaloaproximadamenteapulgadadelasupercieporlomenospor5segundos.Esto
asegurará que usted ha matado los gérmenes y bacteria (De este modo, maximizará la
efectividad de la limpieza a vapor).
ADVERTENCIA: Siempre asegúrese que la Boquilla de Chorro de Vapor y cualquier otros
accesorios están apuntando en una dirección segura (que no están apuntado hacía ust-
edmismo, otras personas, mascotas, ni plantas) antes de apretar el Gatillo de Vapor.
NOTA: No se recomienda utilizar el dispositivo sobre pisos de parqué u otras supercies
que puedan sufrir alteraciones o daños por la exposición al calor y la humedad.
6.MantengaapretadoelGatillodeVaporparaunujocontinuodevapor.Elusarunmovimiento
ligero de vaivén sobre el área que está vaporizando realzará el proceso de limpieza.
NOTA: Durante su uso puede notar una caída en la presión del vapor. Si pasa esto, suelte
el Gatillo de Vapor por 10-15 segundos. Para minimizar esto, se recomienda que no apri-
ete el Gatillo de Vapor más de 10-12 segundos a la vez, y que se permite unos segundos
de tiempo entre los estallidos de vapor.
7. Activeelgatillosegúnseanecesarioparasuministrarsucientevapor.Uselosaccesoriosde
cerdas suaves para limpiar suciedad, grasa, restos de pintura seca, etc. No restriegue en
20 |ESPAÑOL
Table of contents
Languages: