McDonald's Cornelius Refresh PRO 255 User manual
©McDonald’s Corporation · Planned Maintenance Manual BE 30, Revised May 2016
Hazards
These icons alert you to a possible risk of personal injury.
Equipment alerts
Look for this icon to find information about how to avoid damaging the
equipment while doing a procedure.
Tips
Look for this icon to find helpful tips about how to do a procedure.
BEVERAGE EQUIPMENT
BE 86
Cornelius
Soft-drink and Ice Dispenser
Model Refresh PRO 255
Daily maintenance tasks
BE 86 D1 Clean soft-drink
and ice dispenser
BE 86 D2 Clean and sanitize
beverage diffusers
and nozzles
Monthly maintenance tasks
BE 86 M1 Clean and sanitize
ice dispenser
Model: Refresh PRO 255
Cornelius Soft-drink and Ice Dispenser Model Refresh PRO 255
BE 86
Clean soft-drink and ice dispenser
Daily
BE 86 D1
©McDonald’s Corporation · Planned Maintenance Manual · Revised May, 2016 Page 1 of 2
Cornelius Soft-drink and Ice Dispenser Model Refresh PRO 255
Daily
BE 86 D1
Why
To break the bacteria cycle and keep the beverage diffusers clean.
Time required
5 minutes to prepare
15 minutes to complete
Time of day
At close.
For 24-hour restaurants: during low-volume periods at
night
Hazard icons
Tools and supplies
Bucket, clean and
sanitized towels
Bucket, soiled towels
Approved Multi-
surface Cleaner
Approved Specialty
Cleaner and Polish
No-scratch pad
Paper towels
Procedure
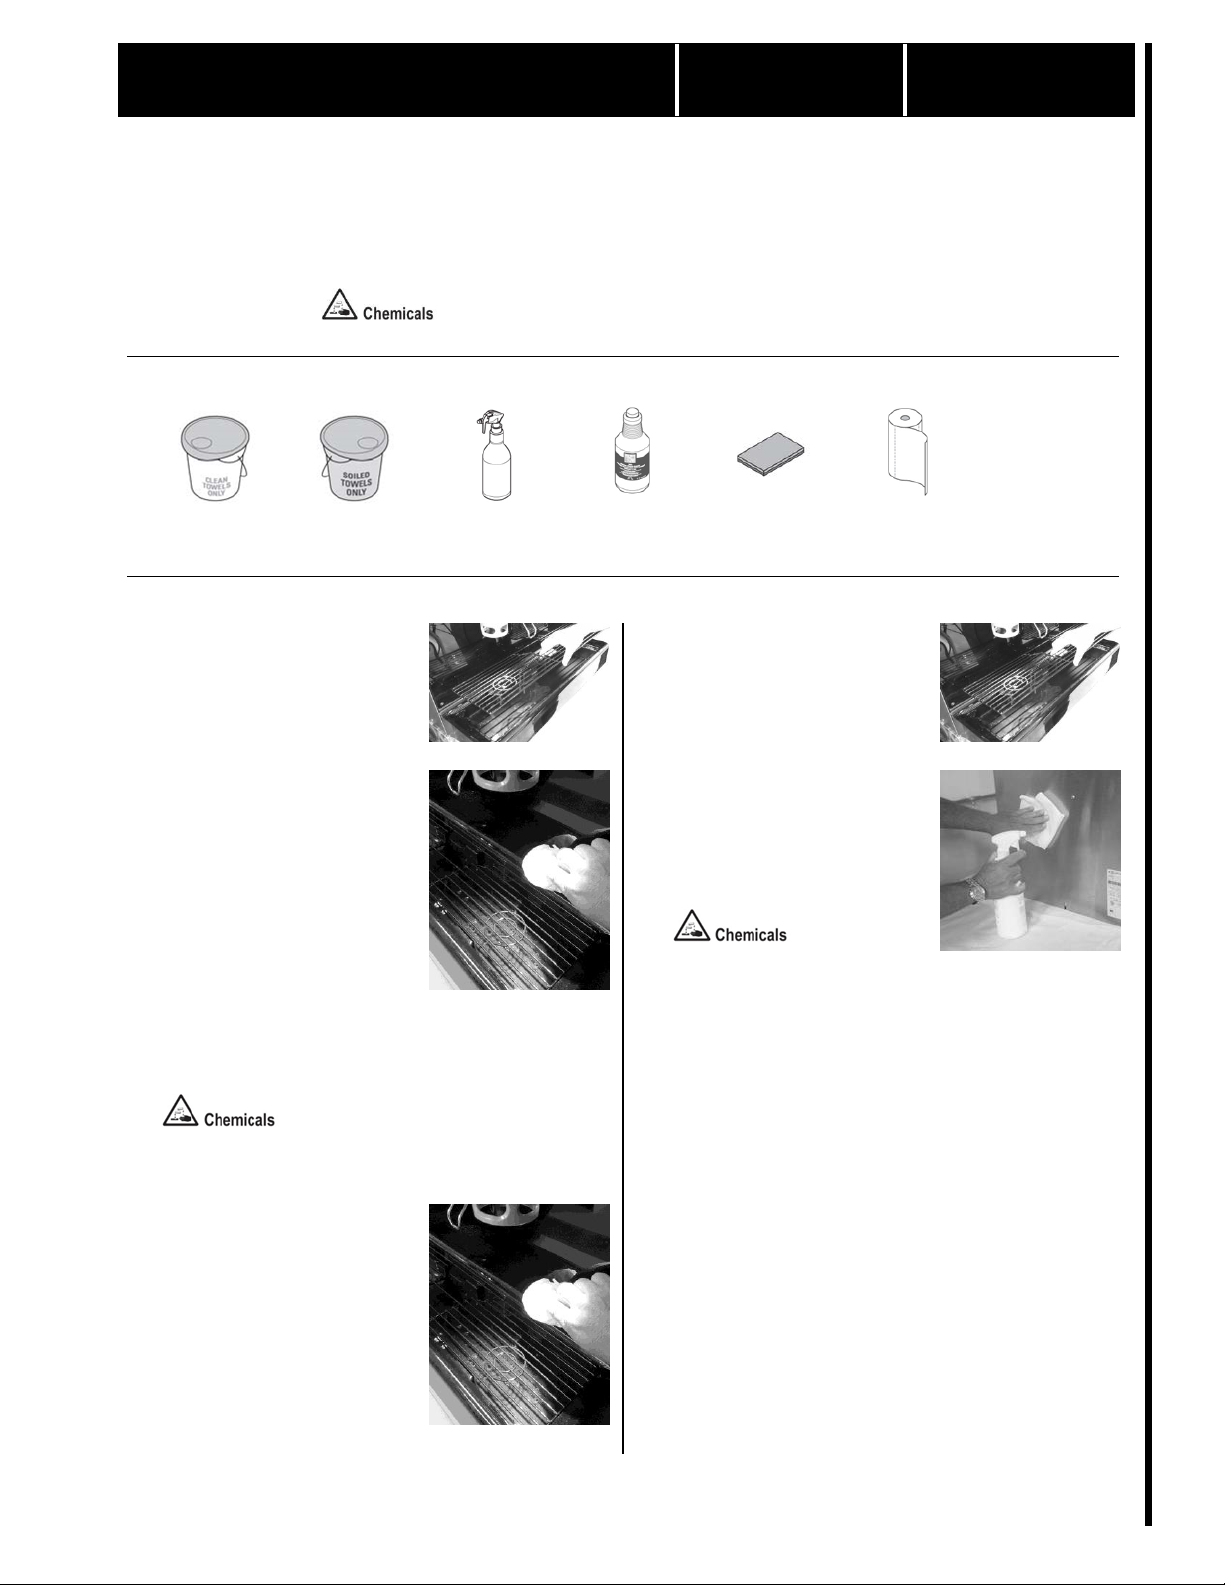
1
Remove cup rest.
Remove the cup rest from the
drip tray. Clear any ice or
other debris from the drip
tray.
2
Clean drip tray and splash
panel.
Wipe down the drip tray and
splash panel with a clean,
sanitizer-soaked towel
sprayed with multi-surface
cleaner. Flush the drip tray by
pouring a large cup of hot
water into the drip tray. Make
sure water is draining
properly from the drip tray.
Contact your factory
authorized service center if
the water is not draining.
Approved Multi-Surface
Cleaner
3
Clean cup rest.
Wipe the cup rest with a
clean, sanitizer-soaked towel
sprayed with approved multi-
surface cleaner solution.
4
Reinstall cup rest.
Reinstall the cup rest onto the
drip tray.
5
Clean outside of machine.
Wipe down the outside of the
machine with a clean,
sanitizer-soaked towel
sprayed with multi-surface
cleaner solution.
Approved Multi-Surface
Cleaner

(continued)
©McDonald’s Corporation · Planned Maintenance Manual · Revised May 2016 Page 2 of 2
Cornelius Soft-drink and Ice Dispenser Models Refresh PRO 255
Daily
BE 86 D1
6
Clean the touch screen
Display the Service screen by
tapping each corner of the
screen, starting in the upper
RH corner, continuing in a
counter clockwise rotation in
the form of a C.
Note: As each corner is
touched a small rectangular
confirmation momentarily
appears.
To enter the Service mode a
login keypad is displayed.
Enter the password (example:
1111), followed by Enter.
When the password is
confirmed, the Service UI
screen is displayed. Select
Screen cleaning button to
display Screen cleaning
screen. Touch the screen to
start countdown for cleaning.
This function disables the
touch screen during the
cleaning process.
Clean the screen with a clean,
sanitizer soaked towel and
multi-surface cleaner
solution. Wipe dry with a
clean, dry paper towel.
When cleaning is complete,
touch the Back button in the
lower right corner to return to
normal operation.
7
Apply stainless steel cleaner.
Apply specialty cleaner and
polish to all stainless steel
surfaces on the outside of the
machine. Wipe the surfaces
dry with a clean paper towel.
Use only approved specialty
cleaner and polish. Other
cleaners may contain chlorine
that will discolor stainless
steel.
Remove heavy discoloration
with a no-scratch pad. Using
plain steel wool pads will
scratch the surface and cause
rust stains.
Clean and sanitize beverage valve diffusers
and nozzles.
Daily
BE 86 D2
©McDonald’s Corporation · Planned Maintenance Manual · Revised May, 2016 Page 1 of 2
Cornelius Soft-drink and Ice Dispenser Model Refresh PRO 255
Daily
BE 86 D2
Why
To break the bacteria cycle and keep the beverage diffusers clean.
Time required
5 minutes to prepare
15 minutes to complete
Time of day
At close.
For 24-hour restaurants: during low-volume periods at
night
Hazard icons
Tools and supplies
Brush, nylon-bristled
Bucket with
Approved Sanitizer
Solution
Bucket, sanitizer-
soaked towels
Bucket, soiled towels
Procedure
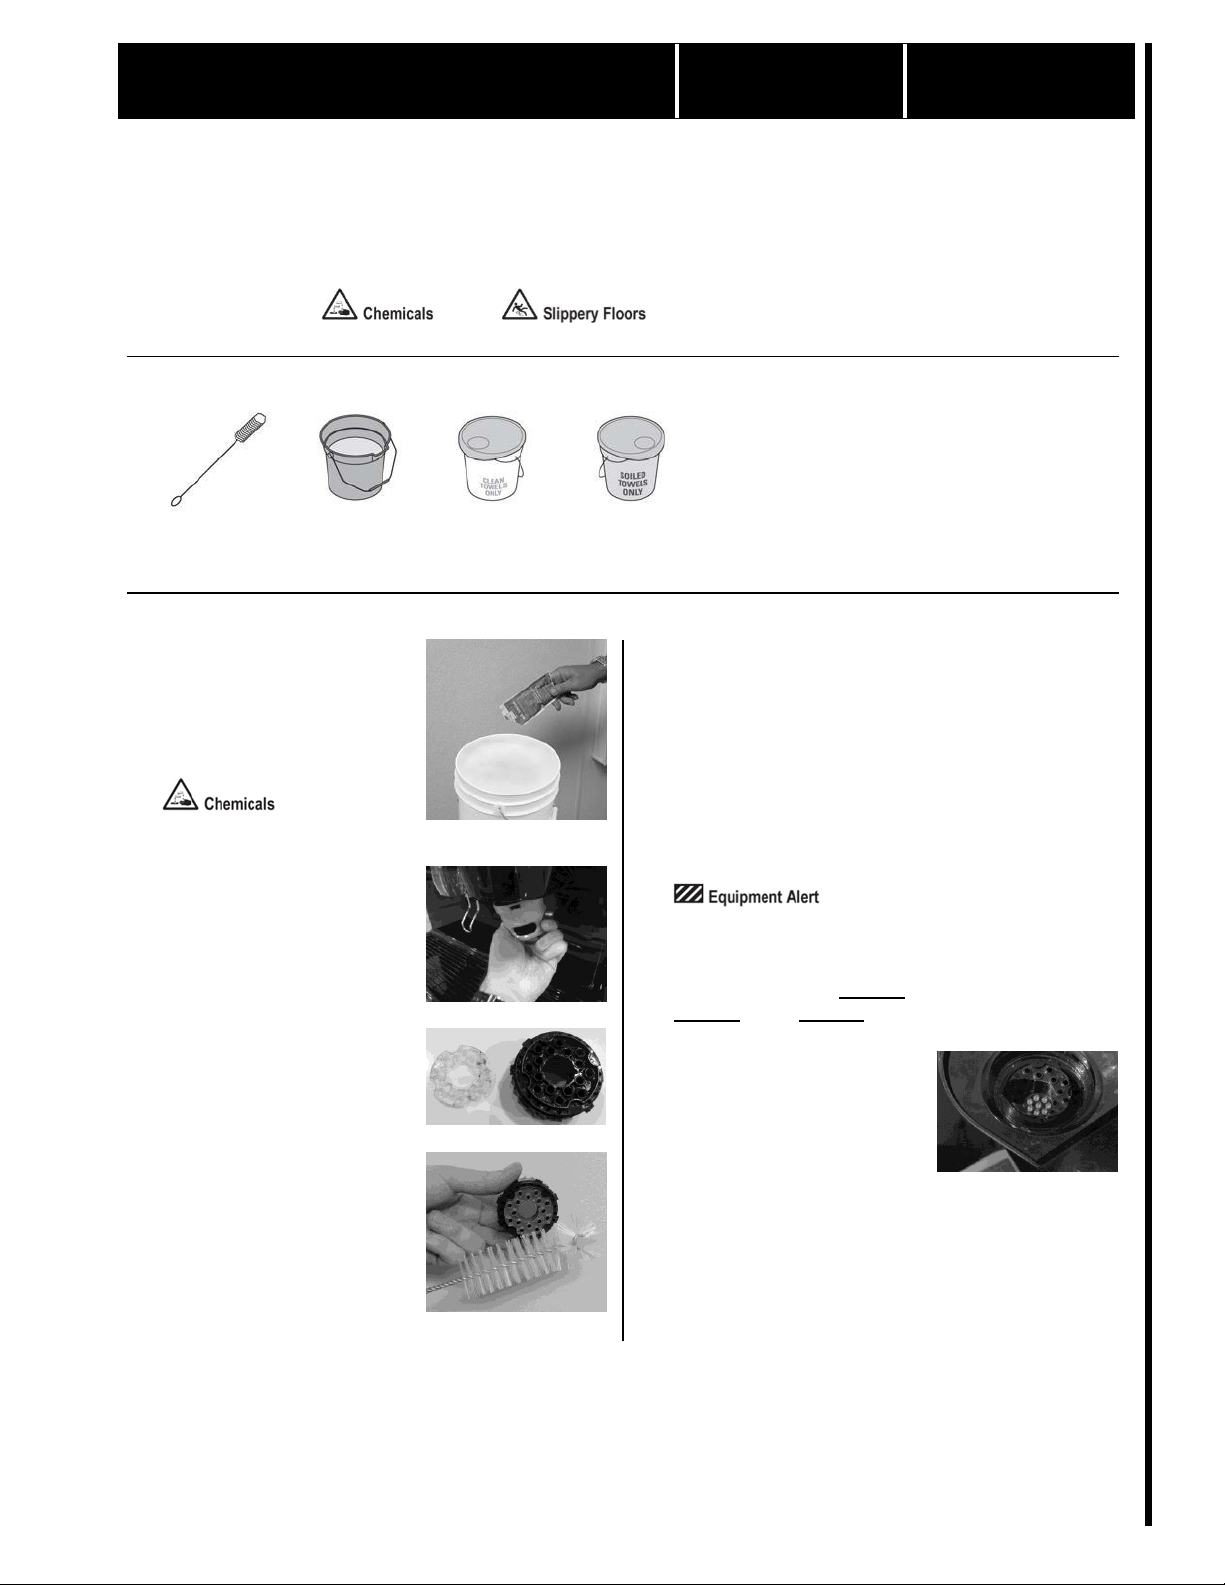
1
Mix sanitizer.
Fill a clean bucket with 2-1/2
gallons (11 liters) of
lukewarm water. Add 1
packet of approved sanitizer
and mix well.
Approved Sanitizer Solution
2
Clean nozzles and diffusers.
Remove the nozzles from the
dispenser by turning each
nozzle to the left and pulling
down the nozzle and diffuser.
Remove the diffusers by
pulling down and separating
the clear gasket from the
diffuser. Note the orientation.
Brush the diffusers, nozzles
and gaskets thoroughly with
the nylon bristle brush and
sanitizer solution. Rinse them
with water from the
dispenser.
3
Sanitize the nozzles, gaskets
and diffusers.
Wash hands following proper
handwashing procedures.
Put the nozzles, gaskets and
the diffusers in the sanitizer
solution for one minute.
Remove the nozzles, gaskets
and diffusers from the bucket
and allow them to air dry.
Do not let the nozzle and
diffuser soak in the
sanitizer solution for longer
than one minute to prevent
damage to the O-rings.
4
Clean diffuser area.
Wipe down the diffuser are
with a clean, sanitizer-soaked
towel. Brush the diffuser area
thoroughly with a nylon
bristled brush. Spray under
side of valves with sanitizer
solution. Allow to air dry.
Clean and sanitize beverage valve diffusers and nozzles (continued)
©McDonald’s Corporation · Planned Maintenance Manual · Revised May 2016 Page 2 of 2
Cornelius Soft-drink and Ice Dispenser Model Refresh PRO 255
Daily
BE 86 D2
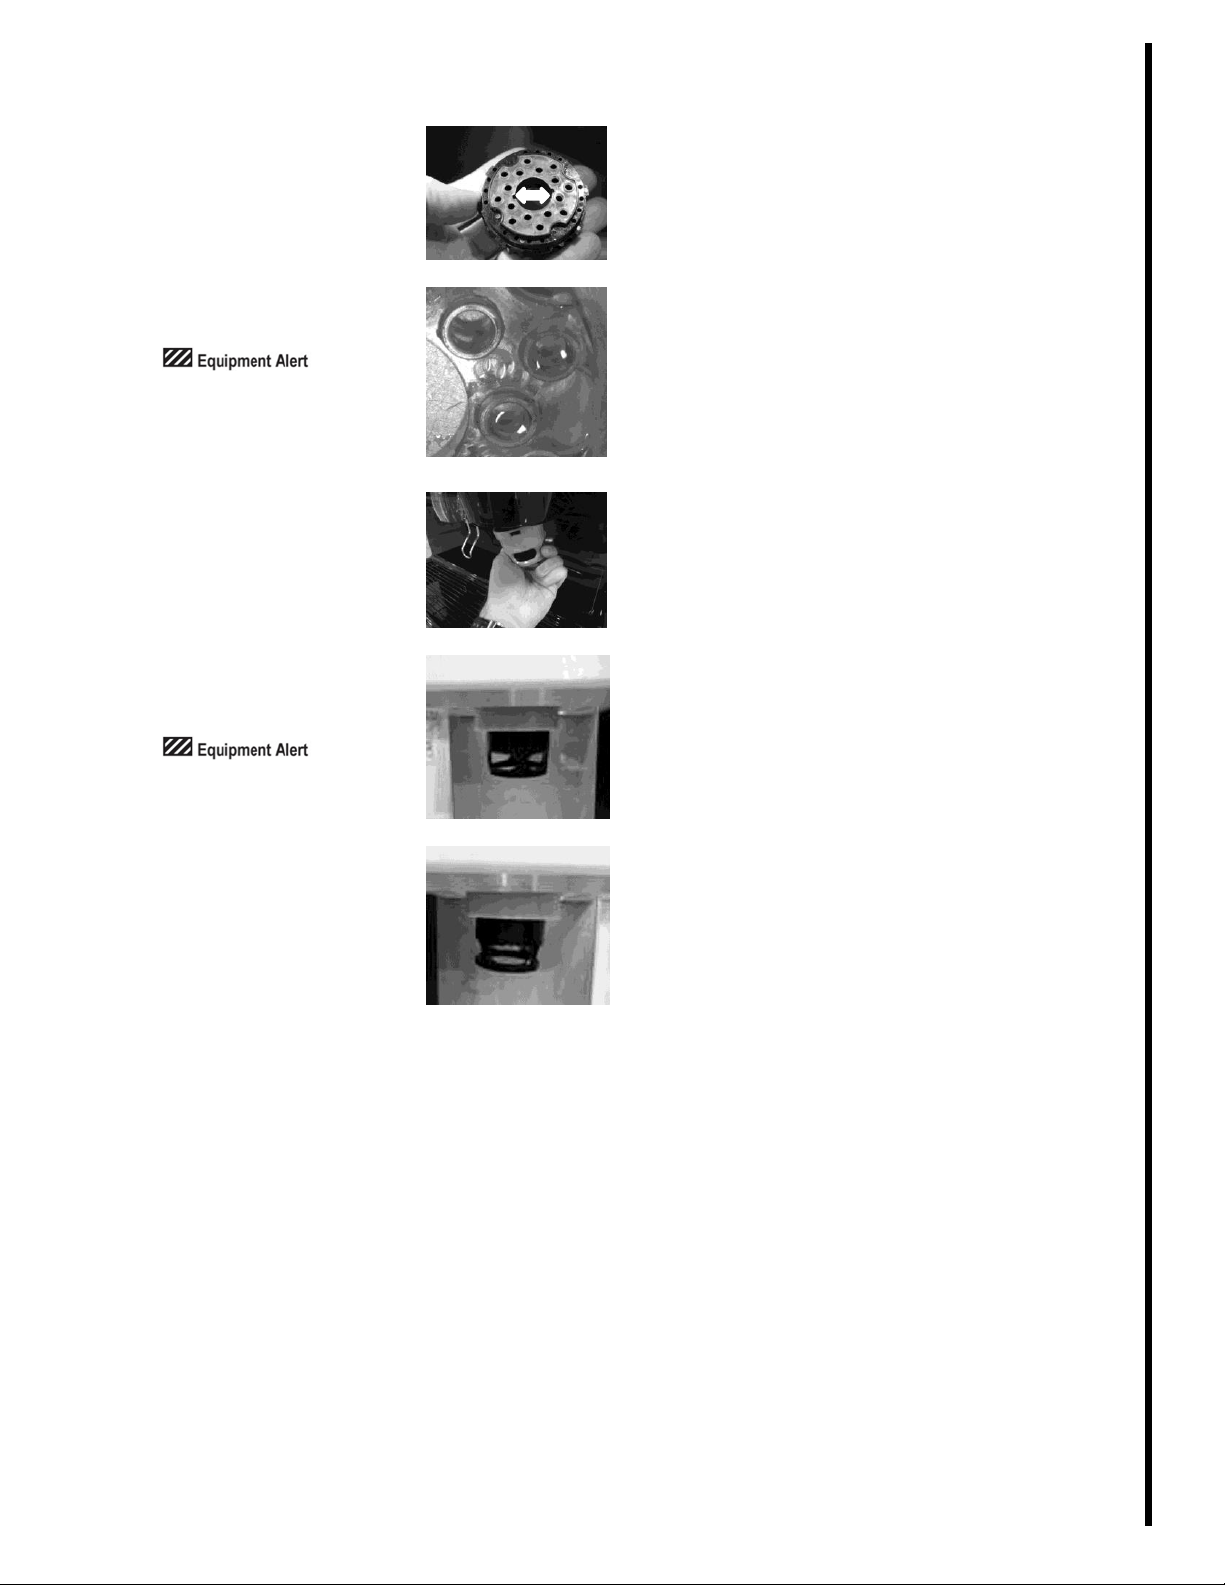
5
Install the gasket in the
diffuser.
Install the gasket into the
diffuser. Line up the locating
notches on inner circle of
both the gasket and the
diffuser. Push the silicone
gasket into the diffuser until
it sits flat.
Make sure that the raised side
of the gasket is visible when
re-inserting the diffuser into
the nozzle.
6
Reinstall nozzles and
diffusers.
With the gasket side up, align
the notches in the diffuser
with the ribs on nozzle base.
Push each diffuser back into
position, noting the
orientation. Reinstall each
nozzle by pushing the nozzle
up and turning it to the right.
Ensure that the nozzle is
installed straight or the
nozzle will leak and flavors
will mix in the nozzle.
Correct
Crooked

Clean and sanitize ice dispenser
Monthly
BE 86 M1
©McDonald’s Corporation · Planned Maintenance Manual · Revised June, 2016 Page 1 of 3
Cornelius Soft-drink and Ice Dispenser Model Refresh PRO 255
Monthly
BE 86 M1
Why
To break the bacteria cycle.
Time required
45 minutes to prepare
45 minutes to complete
Time of day
After close.
For 24-hour restaurants: during low-volume periods at
night
Hazard icons
Electricity Slippery Floors
Tools and supplies
Brush, nylon-
bristled
Bucket with
Sanitizer Solution
Bucket, clean and
sanitized towels
Bucket, soiled
towels
Ice scoop
Approved Multi-
surface Cleaner
Clean Spray
bottle
3-Compartment
Sink
Procedure
1
Mix sanitizer.
Fill a clean bucket with 2-1/2
gallons (11 liters) of luke-
warm water. Add 1 packet of
approved sanitizer and mix
well.
Sanitizer Solution
2
Shut down dispenser
Display the Service screen by
tapping each corner of the
screen, starting in the upper
RH corner, continuing in a
counter clockwise rotation in
the form of a C.
Note: As each corner is
touched a small rectangular
confirmation momentarily
appears.
To enter the Service mode a
login keypad is displayed.
Enter the password (example:
3333), followed by Enter.
When the password is
confirmed, the Service UI
screen is displayed. Select the
Shut Down button to shut
down the dispenser.
3
Unplug dispenser
Remove the power cord from
the outlet below the unit.
Electricity
4
Empty ice hopper.
Remove the top cover of the
ice hopper and set it in a safe
location. Use the cleaned and
sanitized ice scoop to remove
all ice from the hopper.
Discard the ice. If ice has
frozen in place, pour clean
drinking water slowly into the
hopper to melt the ice.
For units with top mounted
ice makers, the ice removal
time may be reduced by
shutting the ice maker off
several hours before starting
the cleaning process.
NEVER use sharp objects,
metal objects, abrasives or
solvents in the ice hopper, top
cover or agitator. All of these
items can damage the
equipment.
(continued)
©McDonald’s Corporation · Planned Maintenance Manual · Revised June 2016 Page 2 of 3
Cornelius Soft-drink and Ice Dispenser Models Refresh PRO 255
Monthly
BE 86 M1
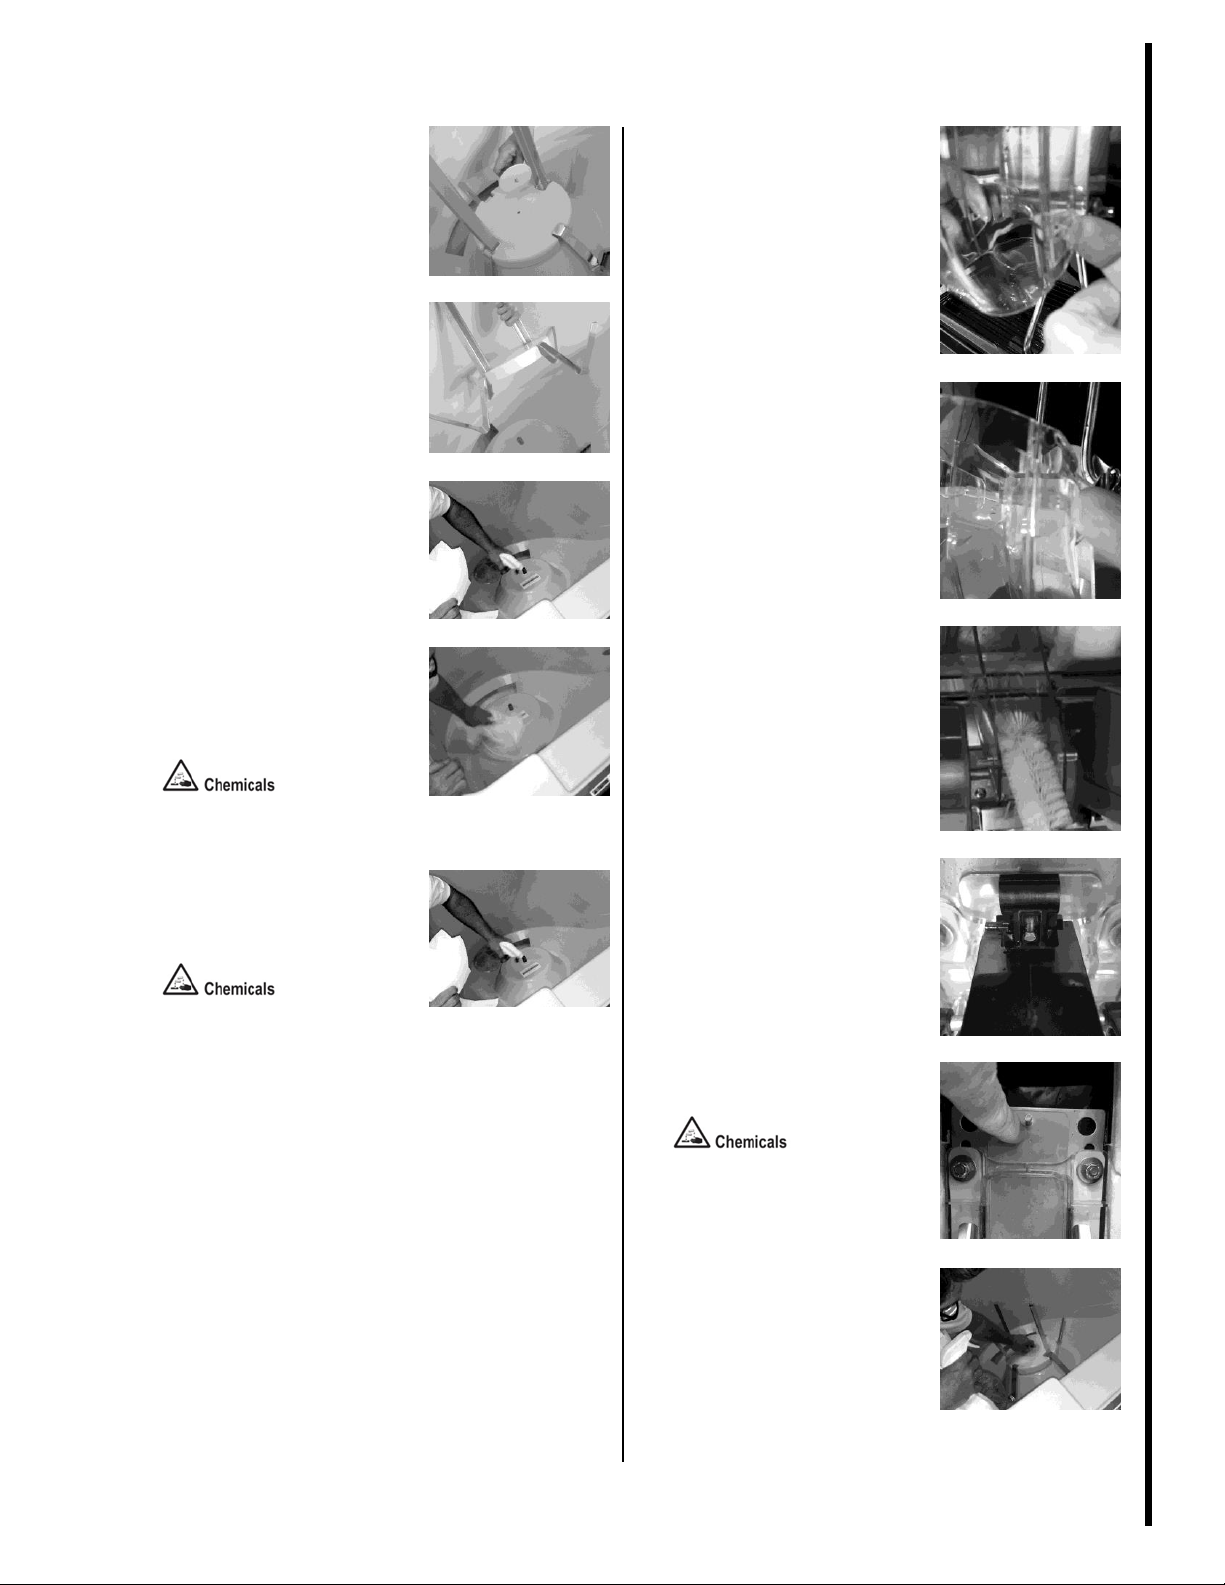
5
Remove the agitator retainer
and ice agitator assembly.
Turn the agitator retainer to
the left and remove the
retainer. Then remove the ice
agitator assembly. Set the
retainer and agitator aside in a
safe place.
6
Clean hopper, top cover,
agitator and agitator cover.
Take all removable parts and
wash, rinse and sanitize at the
3-compartment sink.
Spray the hopper with
approved multi-surface
solution. Wipe down the
inside of the ice hopper
thoroughly. Rinse the hopper
by wiping with a separate
clean, sanitizer-soaked towel.
Approved Multi-Surface
Cleaner
7
Sanitize the hopper.
Spray the inside of the hopper
with sanitizer solution and
allow it to air dry.
Sanitizer Solution
8
Clean ice chute
Open the touch screen door.
Remove the outer ice chute
assembly by spreading both
tabs at the bottom of the
chute. Once the chute is
unlatched, pull it slightly
forward at the top to separate
the magnet from ice gate stud
and lift it up to remove it.
Wash, rinse and sanitize the
outer ice chute assembly at
the three-compartment sink.
Allow to air dry.
Clean the inner chute with
approved multi-surface
solution and brush. Rinse
thoroughly and spray with
sanitizer. Allow to air dry.
After cleaning and sanitizing,
remove the ice gate from the
inner chute by sliding it
upward. Clean ice gate with
approved multi-surface
cleaner and brush, rinse
thoroughly and spray with,
sanitizer. Allow to air dry.
Slide the ice gate back into
the inner chute. Place the
outer ice chute assembly into
position from the top. Engage
the ice gate into the hole in
the black magnet.
Note: The tab on top of the
outer ice chute must be placed
under the top side of the inner
ice chute. Once properly
aligned snap the tabs back
into place.
Close the Touch screen door
and test the unit to assure
agitator turns when lever is
pressed.
Approved Multi-Surface
Cleaner, Sanitizer Solution
9
Replace the ice agitator and
agitator assembly.
Replace the clean and
sanitized ice agitator
assembly and the agitator
retainer.

(continued)
©McDonald’s Corporation · Planned Maintenance Manual · Revised June 2016 Page 3 of 3
Cornelius Soft-drink and Ice Dispenser Models Refresh PRO 255
Monthly
BE 86 M1
10
Turn the ice maker switch on.
Turn the dispenser unit key
switch, located on the right
side panel, to the “On”
position.
Allow the ice maker to
operate for about a half hour
to allow the hopper to fill.
11
Plug in the dispenser
Plug in the power cord to the
outlet below the unit.
Popular Dispenser manuals by other brands

Elkay
Elkay SmartWell Use and care guide

CWS
CWS Paradise Paper Slim Installation and operating instructions

Roca
Roca A818012 manual

Hanskamp
Hanskamp Black V anti-spill Installation and operating instructions

SILADENT
SILADENT DA 2000 Working Instruction

Avantco Equipment
Avantco Equipment 177HWD15G user manual

Dolphin
Dolphin BC633F Installation and maintenance guide

Servend
Servend CT-6 Installation, use & care manual

Bunn
Bunn LAFT Installation & operating guide

Sartorius
Sartorius BIOHIT Biofiller Operator instructions

HOR
HOR HOR-007ASSM user manual

START International
START International TDA025 instruction manual


