Meade AudioStar User manual

Instruction Manual
AudioStar™
27 Hubble, Irvine, California 92618
(800) 626-3233 www.meade.com

- 2 -
Contents
Handbox Feature......................................4
Introduction..............................................5
Initializing AudioStar................................5
AudioStar Manual Operation
Moving the Telescope.........................6
Keypad and Help Function.................6
LCD Screen and Hypertext ...............6
AudioStar Menus
AudioStar Structures..........................8
Menu Example...................................8
Telescope Training...................................8
Telescope Alignment...............................9
Easy Alignment........................................9
Finding Objects in the Sky
Guided Tour.......................................11
Synchronized Function.....................11
Telescope Status Display..................11
AudioStar Menus and Function
Object Menu Function......................13
Event Menu Function.......................13
Glossary Menu Function..................13
Utilities Menu Function.....................13
Setup Menu Function.......................14
Meade Customer Service
How to get in contact....................15
Meade Limited Warranty
One Year Limited Warranty........back

- 3 -
1
2
5
6
3
9
4
10
13
14
8
7
12
11
Fig. 1a: The AudioStar Handbox - Front View
Fig. 1b: The AudioStar Handbox - Back Detail
15
16

- 4 -
Handbox Features
1. Liquid Crystal Display (LCD) Screen - A 2 line, 16 character
each line, information screen. Brightness and contrast of the
screen is adjustable.
2. ENTER Key - Completes a data entry or selects an
AudioStar function.
3. MODE Key - Exits the current function and returns to the
previous menu. Press MODE instead of ENTER to void any
data input or feature selection. Pressing MODE for more than
2 seconds displays telescope status.
4. GO TO Key - Moves the telescope to selected objects or
coordinates.
5. Arrow Keys - Moves the telescope in any of four directions.
When data is entered, the arrow keys move the screen cursor.
6. Number Keys - Enters numeric data. When not used to enter
data, the number keys select telescope motor speeds (1 is
slowest, 9 is fastest).
Note: While the audio descriptions are playing, the “ 7”
& “9” keys adjust the speaker volume. Press “ 7” to
decrease the volume. Press “9” to increase the volume.
7. “0” Key - Enters data or turns the Utility Light on and off.
8. Scroll Up Key - Views menu options one entry at a time.
During a moving message, this key increases message speed.
9. Scroll Down Key -Views menu options one entry at a time.
During a moving message, this key decreases message speed.
10. “?” Key: When audio is playing the “?” key stops the audio, if
a second audio le is available, pressing the “?” key skips to
the next audio le.
When audio is not playing, the “?” key accesses the Help le.
Help provides on-screen information on how to accomplish
whatever task is currently active. Hold down the “?” key and
then follow the prompts on the display to access details of
AudioStar functions in the Help feature. The Help system is
essentially an on-screen instruction manual. If you have a
question about an AudioStar operation, e.g., INITIALIZATION,
ALIGNMENT, etc., hold down the “?” key and follow the
directions that scroll on the second line of the LCD screen.
When a word appears in [brackets], press “ENTER” to
access the AudioStar Glossary. A denition or more detailed
information is displayed. Press “MODE” to return to the
scrolling AudioStar Help display. When satised with the Help
provided, press “MODE” to return to the original screen and
continue with the chosen procedure.
11. Coil Cord Port - Connects the coil cord (13, Fig. 1a) to
AudioStar.
12. Serial Port - RS-232 cable port to AudioStar.
13. Coil Cord - Connects between AudioStar and the telescope.
14. Utility Light - Illuminates objects such as a watch or star chart.
Pressing the “0” key turns the utility light on and off.
15. Speaker Opening: Built-in speaker plays Astronomer Inside
audio content (15, Fig. 1b).
16. Hanger: Allows the handbox to be conveniently hung onto the
telescope, for easy access and storage.
WARNING: Never use AudioStar to move a telescope to look
at the Sun! Looking at or near the Sun will cause instant
and irreversible damage to your eye. Eye damage is often
painless, so there is no warning to the observer that damage
has occurred until it is too late. Do not point a telescope or its
viewfinder at or near the Sun. Do not look through a telescope
or its viewfinder as it is moving. Children should always have
adult supervision while observing.

- 5 -
Introduction
This manual describes applications of the AudioStar Computer
Controller with various models of Meade telescopes:
AudioStar assists the observer with a large variety of features,
including:
• Astronomer Inside™ audio content. Listen through its built-in
speaker as it tells you fun and informative descriptions of
over 500 night sky objects as you actually view them in the
eyepiece.
• Control the movement of the telescope to locate terrestrial and
astronomical objects.
• Catalog of events (e.g., Moon phases, meteor showers, etc.).
• Guided tours of the best objects based on date and location.
• AudioStar’s database includes over 30,000 astronomical
objects.
• A glossary of over 90 descriptions and definitions.
• A built in Help function by pressing the “?” key.
• Utilities including eyepiece magnification, alarms, battery
monitor, power saving functions, and more.
• Connect to a computer to remotely control the telescope.
This Instruction Manual begins by explaining the operation of
AudioStar in sequence from turning on power to locating the first
object in the sky. The telescope and manual should be used together
to complete this important series of operations. The balance of the
manual is a reference for additional functions.
The first time AudioStar power is applied, additional activities are
required. Pick a comfortable location and take the time necessary to
read each step carefully. When viewing is required, move to an open
area outside and continue operation.
Initializing AudioStar
This section describes how to initialize AudioStar. Perform this
procedure the first time you use AudioStar or after performing a
Reset. AudioStar will ask you to enter the current time and date
and to choose your observing location and you telescope’s model
number from the list it displays.
1. Tighten the vertical and horizontal locks.
2. Make sure that AudioStar is connected to the HBX port of the
telescope’s computer control panel.
3. Flip the telescope power switch to the ON position.
4. The AudioStar screen displays a copyright message, followed
by a short beep. The screen then displays “WELCOME TO
AUDIOSTAR”. The next screen asks you choose one of two
languages. Press either of the two scroll keys (Fig. 1a, #7) to
toggle between the two choices. Press the “ENTER” button to
make your selection. Note that the default language is English.
This prompt will occur only during an initial start-up, or after
resetting the handbox. Then AudioStar takes a few moments
to start you the system.
Copyright Screen Language Screen

- 6 -
5. Press the MODE key to enter AudioStar’s menu. The telescope
will then test its motor function by moving slightly in the horizontal
and vertical directions.
6. Next, enter your location by either zip code or city. Press the
1 key to enter by zip code or the 2 key to enter by city. If you
choose to enter your location by city, you will then be prompted
to enter the Country/State followed by the nearest city (listed
alphabetically) to your observing location. Use the scroll keys to
cycle through the database of countries, states and provinces.
Press ENTER when the correct location displays.
7. AudioStar then requests the status of Daylight Savings Time.
Press “1” for Yes or “2” for No. Note: Daylight Savings Time
may be referred to by a different name in various areas of
the world.
8. Finally, “Telescope Model” displays. Using the SCROLL KEYS,
cycle through the list of telescope models and press ENTER
when your model displays.
9. AudioStar then requests the current date. Use the Number keys
(6, Fig. 1a) to enter the digits for the date. Use the arrow keys
(5, Fig. 1a) to move back and forth from one number to the next
in the day display. Next, use the Right Arrow key to move to the
month position. Use the Scroll keys (7, Fig. 1a) to cycle through
the list of months. When the current month is displayed, use the
Right Arrow to move to the year position. Use the Number keys
to enter all four digits of the current year. Press ENTER when the
entire date has been entered.
10. AudioStar then requests the current time. Use the Number keys
to enter the time. (Use a “0” for the first digit if it is less than 10.)
Use the Arrow keys to move from one number to the next. Press
one of the Arrow keys to scroll to “AM” or “PM”. If you select the
blank choice that follows “AM” and “PM”, the clock displays the
time in a 24-hour (military time) format. Press ENTER to start the
clock.
11. System initialization is complete and AudioStar now displays
“Align: Easy”
AudioStar Initialization Complete: In future sessions, AudioStar
only requests the date and time during the power-on sequence. Other
items (such as motor calibration, site, and telescope model) remain
unchanged from the previous session.
After initializing, AudioStar pauses at the alignment menu. Alignment
relates objects in the sky to the position of the telescope. AudioStar
needs to be aligned accurately to find objects. Before proceeding with
alignment, a general explanation of AudioStar functions is helpful.
AudioStar Manual Operation
Moving the Telescope: The ARROW keys (5, Fig. 1a) move the
telescope in four directions; up, down, left, and right. The speed of
movement is changed by pressing a numeric key from 1 to 9, with 9
being the fastest. Speed settings remain until changed by pressing
a different number. Take time now to move the telescope using the
ARROW keys. Pick an object and point the telescope at it. Use a
slower speed when nearing the object to accurately center it in the
viewfinder and then in the eyepiece. These skills are useful when
training and aligning the telescope.
Keypad and Help Function: The AudioStar keypad has 20 keys. To
register a single keystroke, press and release a key firmly and briefly.
Holding a key for a longer period causes a repeated key entry. This is
useful for operations which require multiple keystrokes.
The Help (“?”) key (10, Fig. 1a), provides advice on operations, in the
form of a moving message.
LCD Screen and Hypertext: The AudioStar screen has 2 lines of 16
characters each. The top line is the current active function or menu
and the bottom line is the next level of options, data, or a message.

- 7 -
Solar System
Sunrise Constellation
Tour Objects SunsetDeep Sky
A… Moonrise
Ti merBMoonsetSatellite
Alarm C… Moon Phases User Object
Eyepiece
Display Options
Calc.
•
Meteor Shower Landmarks
Brightness Adj.
•
Solar Eclipses Identify
Browse
Contrast Adj.
•
Lunar Eclipses
Battery Alarm
•
Min. of Algol
Named
Landmark Survey
•
Autumn Equinox
SAO
Sleep Scope
•
Vernalquinox
Doubl
Park
Language
Audio Clip
Cord Wrap
Scope
Z
…
Winter Solstice
Va
Summer Solstice
Nearby
With
Easy
Date OneStar
Two Star
Daylight Saving
Telescope TelescopeModel
Targets Focal Length
Site Az. Ratio
Owner
Clone
Info Alt. Ratio
Mount
AZ/RA Percent
Alt/DEC Percent
Download
Train Drive
Statistic s
Tracking Rate
Reset
ReverseL/R
Reverse UP/Down
Quiet Slew
Max Elevation
Min AOS
Calibrate Motor
High Precision
Select Item
Object
Event
Guided Tour
Glossary
Utilitie
Setup
Align
Time
E
riabl
Named ObjectsMercury
Catalog
Galaxies Venus
e
ars
e
Planetary Neb. Jupiter
Star ClustersSaturn
Planet
Nebula
sM
s
Quasars Uranus
Black Holes Neptune
IC Object
sP
luto
NGCObjectsMoon
Caldwell Objects Asteroids
Messier Objects Comets
:
s
…
Star
Fig. 2: Audiostar Primary Menus and Options.
(press and hold for sec.
(press and hold for 2 sec.
)Telescope Status Display
RA/Dec
Alt/Az
Time
Timer
Battery
Focus
)“Enter to Sync.”
2
MODE
ENTER
The ENTER key (2,Fig. 1a) moves to
the right
The MODE key (3. Fig. 1a) moves to
the left
The up SCROLL key (8, Fig. 1a)
The down SCROLL key (9, Fig. 1a)
moves down
AUDIOSTAR MENU STRUCTURE KEY
ENTER
MODE
moves up

- 8 -
When a moving message appears the speed can be changed using
the SCROLL keys. To exit the message, press MODE briefly, unless
the message gives some other instruction. Sometimes embedded in
a moving message is a bracketed [word], referred to as “Hypertext.”
AudioStar Hypertext is similar to that used on the Internet. While a
Hypertext word is visible, press ENTER, and the definition of the
word appears, replacing the first message. After the new message
is complete, press MODE and return to the original message. If the
Hypertext is an object, like Jupiter, press GO TO while the word is
visible and the telescope moves and points at the object.
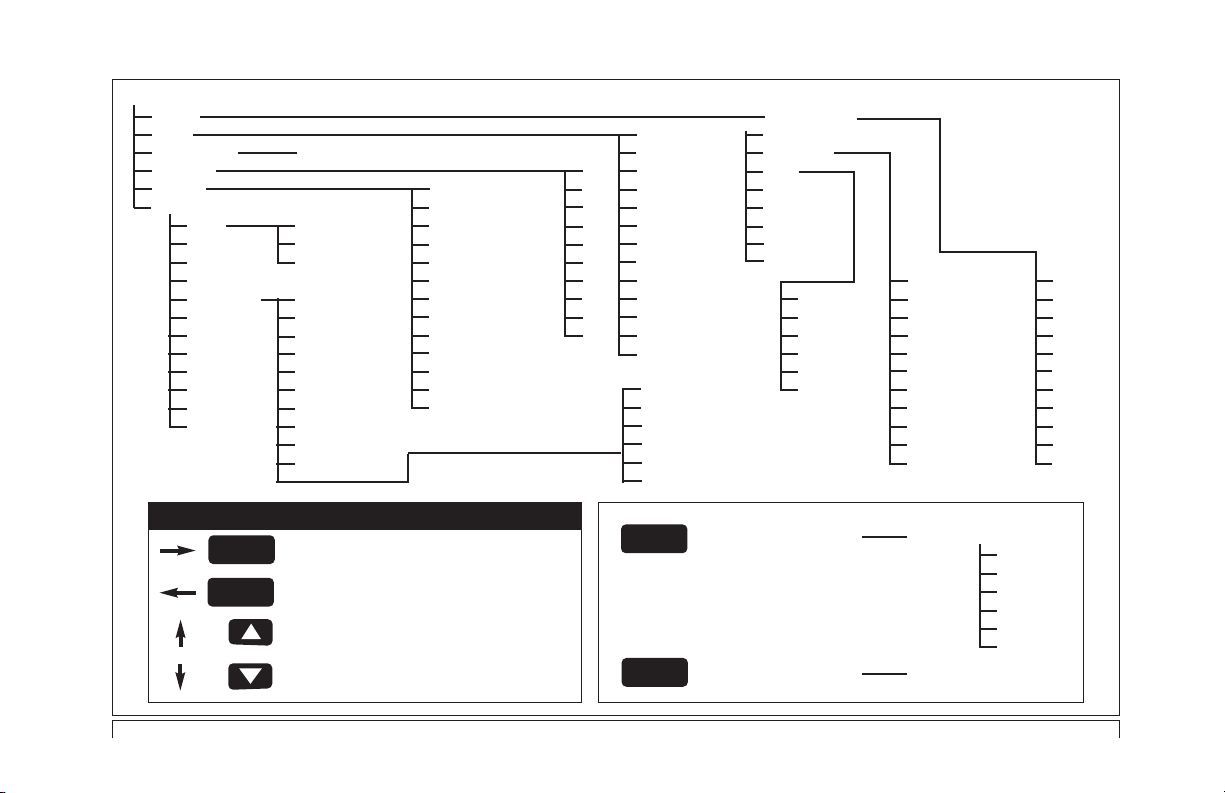
AudioStar Menus
AudioStar Menu Structures: AudioStar has menus with lists of
available features (see Figure 2). The menus are organized in
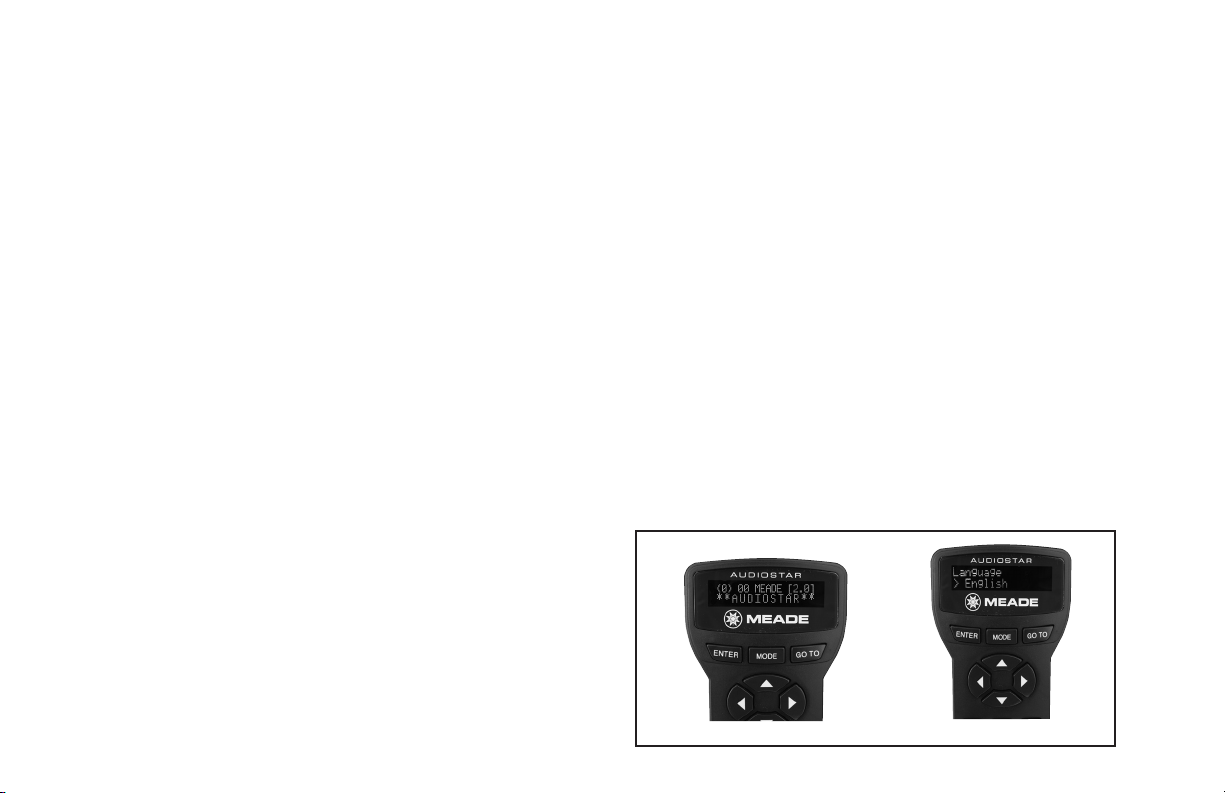
descending levels and are seen on the AudioStar screen (1, Fig.
1a). The top line of the screen is the currently active menu category
and the bottom line has the list of menu options that can be selected.
Four keys are used to navigate the menus; ENTER, MODE, and
both SCROLL keys. Pressing ENTER activates the item listed on
the bottom line (moving down a menu level) and moves it to the top
line. With the selected function on the top line, a new list of functions
can then be displayed on the bottom line. To go back to the previous
menu (moving up a menu level), press MODE. Pressing a SCROLL
key changes the menu item visible on the bottom line. Since only
one item of a menu list can be displayed on the bottom line, scrolling
makes the other choices visible.
Figure 2 shows the complete AudioStar menu structure showing the
paths that can be followed. From any point in the menu, pressing
ENTER moves along a menu line to the right. Pressing MODE
moves to the left along a menu line. Pressing the down SCROLL
key moves down menu lists and pressing the up SCROLL key
moves up.
Menu Example: Finding the sunset time is a good example of how
to use AudioStar menus. Begin by pressing MODE several times
until the screen reads “Select Item:” on the top line and “Object” on
the bottom line. Pressing MODE multiple times causes AudioStar to
move back to the “Object” menu. The main menu has six choices;
Object, Event, Guided Tour, Glossary, Utilities, and Setup.
Pressing a SCROLL keys makes each of these visible on the bottom
line of the screen. Press a SCROLL key until the bottom line reads,
“Event,” then press ENTER to select that menu. The top line now
reads “Event:” and the bottom line reads, “Sunrise” (the first item
in the “Event” menu). Use a SCROLL key to view the other items,
finishing with “Sunset” on the bottom line. Press ENTER to start
the sunset calculation which then displays the sunset time for the
current day.
To leave the “Sunset” function and return to the “Event” menu, press
MODE. Press MODE again to return to the main menu with the top
line reading, “Select Item:” and the bottom line “Event.” Use similar
sequences of the ENTER, MODE and SCROLL keys to explore
other functions in the AudioStar menu. Try other events or look up
words in the Glossary. Do not change any settings in the “Utilities” or
“Setup” menus until they have been explained later in this manual.
*Hint* To avoid changing any value, press MODE which returns
to the previous menu without making a change to any AudioStar
settings. Also use the Help (“?”) key for an explanation of any menu.
Telescope Training
AudioStar is not able to accurately point at objects unless it is
aligned and trained. Training AudioStar allows it to collect data about
the gears in the telescope motor system. Once training is complete,
AudioStar saves the data for later operations. Use great care in
training the AudioStar system to achieve maximum accuracy.
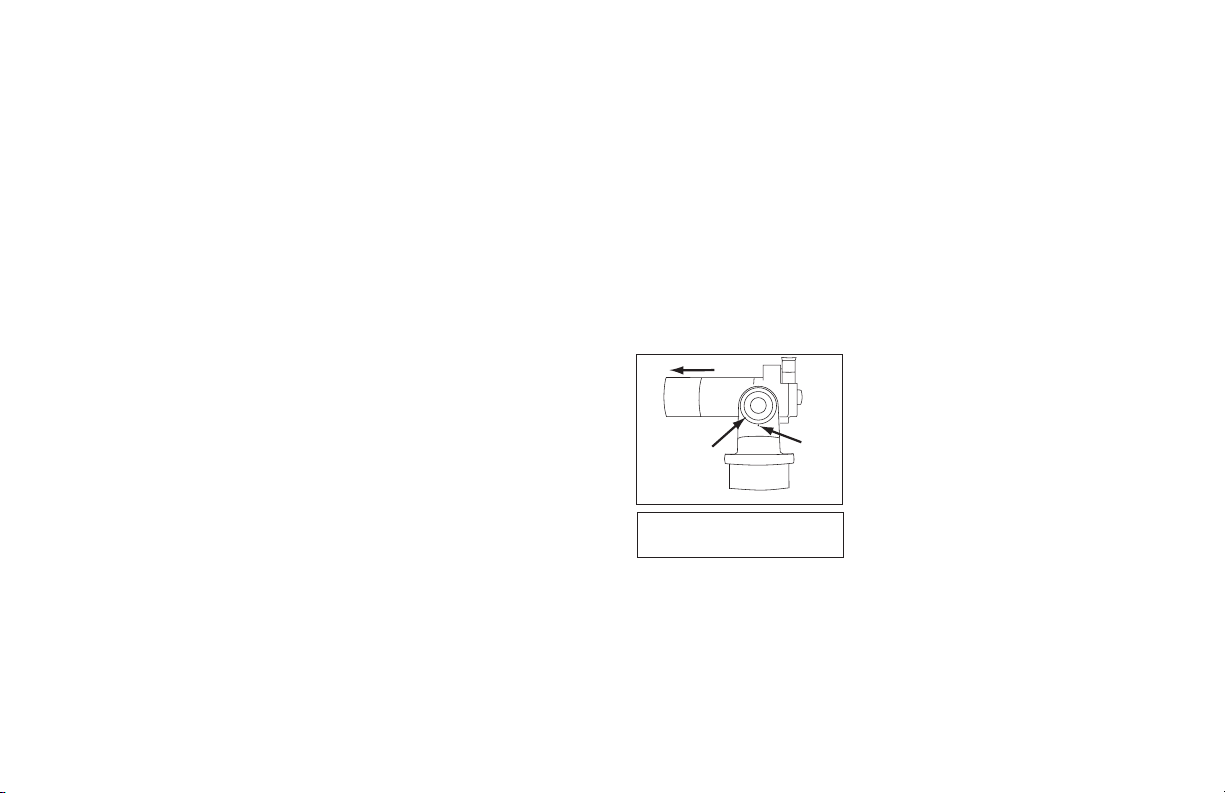
To train AudioStar, prepare the telescope for optical viewing by
removing dust covers and inserting an eyepiece. The viewfinder
should also be aligned and ready for use. Select a fixed land object
as a reference for the training process. Point the telescope at the
selected object and center it in the eyepiece. Press MODE until the

- 9 -
main menu is displayed (“Select Item:”). Press a SCROLL key until
“Setup” is on the bottom line, then press ENTER. With “Setup:” now
on the top line, press a SCROLL key until the bottom line reads
“Telescope,” then press ENTER. In the “Telescope” menu, press
a SCROLL key until “Train Drive” appears on the bottom line, then
press ENTER. The top line of the screen should read, “Train Drive:”
and the bottom line should read “Az. Train.”
Both telescope motors need to be trained separately. Start with
“Az. Train” by pressing ENTER and following the instructions given.
AudioStar moves the telescope away from the centered object
and asks that it be centered using only one ARROW key (all other
ARROW keys are disabled). After the object is centered, press
ENTER. AudioStar now moves the telescope in the other direction
and ask for the object to be centered again. Center the object and
press ENTER. The training for the Azimuth axis is complete.
AudioStar has returned to the “Train Drive:” menu. Select the
second motor using a SCROLL key until the bottom line reads, “Alt.
Train.” Press ENTER and follow instructions as before. This time,
the telescope moves up and down otherwise the training sequence
is the same as “Az. Train.” After completing “Alt. Train,” AudioStar is
ready for alignment and operation. Remember the accuracy of this
training determines how well AudioStar finds objects.
Telescope Alignment
Alignment is the method used to relate objects in the sky to the
position of the telescope. AudioStar has six methods of alignment,
three for Polar alignment and three for Alt/Az Alignment. The
simplest method to align is “Easy Align” in the Alt/Az mode.
Easy Alignment
After you initialize the system, AudioStar displays “Easy Align.” The
fastest and easiest way to start observing with AudioStar is with
Easy Alignment.
During Easy Alignment, AudioStar automatically picks two alignment
stars from its database of celestial objects. It will then slew the
telescope to a first alignment star. The user is asked to verify that
the telescope is pointed at the chosen star and then to center the
star in the eyepiece. The process is repeated with a second star to
complete the alignment.
1 Select Alignment: “Align Easy” displays. Press ENTER.
2. Set Home Position: AudioStar then prompts you to set the
telescope in the Alt/Az Alignment home position (see margin
note and Fig. 3). To set your telescope in the “Alt/Az” home
position:
• Loosen the telescope’s vertical lock.
• Level the optical tube with the horizon. Move the optical tube
until the pointer points at approximately “0” on the setting circle.
Tighten the vertical lock to a “firm
feel” only.Remove the 45° prism
and eyepiece from the rear cell port.
It may interfere with the alignment
procedure. After alignment, you may
replace the prism and eyepiece.
•Unlock the horizontal lock and
turn the telescope horizontally until
it points True North. Re-lock the
horizontal lock.
Note: Irregularities in the
earth’s magnetic field results in the direction of True North and
Magnetic North differing from each other and this difference
(called declination) will vary from location to location. As
a result, your compass points to Magnetic North, which is
different than True North. There are two (2) basic methods to
finding True North:
True
North
Declination
at 0˚
Pointer
Fig. 3: Alt/Az Alignment
Home Position.

- 10 -
Method #1: Finding True North using the North Star (Polaris):
To find True North, use the bubble level/compass and point the
telescope tube towards Magnetic North. Then refer to the diagram on
page 42 in your manual, which directs you to the North Star (Polaris).
Looking towards Magnetic North locate the Big Dipper; follow the two
stars in the bowl of the Big Dipper, as shown in diagram, to the North
Star. With the tube still level, rotate it so that it points towards the North
Star. Lock the horizontal lock. The tube is pointing True North and now
in the Alt/Az home position.
Method #2: Finding True North using a compass adjusted for local
declination:
True North and Magnetic North differ and will vary from location to
location. In order to correctly compensate for these differences you will
need to know the declination based on you location. Find your location
on the declination map of the United States (See Figure 4). Notice the
curved contour lines that are referenced with plus (+) and minus (-)
values.
Notice the thicker line in the middle of the map that has a value of zero.
Along this line, Magnetic North will point to True North; no compensation
will be necessary. Align your telescope tube so that it matches North as
indicated on the bubble level/compass.
Most of us are not so lucky and will have to compensate using the
declination value for our location. For those of you that live on the left
side of the thicker zero (0) value line your declination values will have
positive (+) values and said to be East Declination. Those of you located
to the right will have negative (-) values and said to be West Declination.
For example if you were located in San Francisco, your East Declination
value would be about 14 1/2 (San Francisco is located between the 15
and 14 lines). Using this value, Magnetic North would be 14 1/2 degrees
East of True North and you would align your telescope tube along this
line.
If you were located in New York City, your West Declination value would
be about -13 Using this value, Magnetic North would be minus (-) 13
degrees West of True North or 347° (360° - 13° = 347°) and you would
align your telescope tube along this line. Lock the horizontal lock. The
tube is pointing True North and now in the Alt/Az home position. Press
Enter
-12
-12
-12
-12
-12
-12
-12
194
-254
178
2
-220
-186
-8
-8
-8
-8
-8
-8
-8
-8
-8
-8
-8
-14
-176
-174
-170
-14
-160
-166
-4
-4
-14
-148
166
-152
-152
-146
164
-138
-134
-142
-136
-136
-130
-132
152
0
-14
142
140
138
16
136
132
128
126
124
-14
122
122
-14
-6
-2
-2
120
118
116
114
-6
-6
112
110
108
-6
-6
106
106
-6
-6
-6
104
-6
-6
102
-128
-126
100
100
-124
-124
98
98
-122
-122
-120
96
-118
-118
94
94
-116
-116
92
-114
-114
-112
-112
90
-110
88
88
-108
86
86
-106
-6
-6
-104
84
84
84
-102
-102
82
-100
-98
-98
-98
80
-96
78
78
-6
-10
-10
-94
-94
76
-92
-90
-90
-90
74
74
-88
72
-86
-86
-86
-10
-10
-10
70
70
-2
-2
-2
-84
-84
-82
-82
68
-10
-10
-10
-80
66
66
-78
-78
64
-76
-76
62
-74
-74
-72
60
60
-70
-70
58
58
58
-68
-68
-68
-10
-10
-10
56
56
-66
-66
-64
-64
54
54
54
-62
-62
52
52
-60
-60
50
50
50
-58
-56
-56
-56
48
48
-54
-54
46
46
-52
-52
44
44
44
-50
-50
-50
42
42
42
42
-48
-48
-48
-46
-46
-46
40
40
40
40
-44
-44
-44
38
38
38
-4
-4
-4
-4
-4
-42
-42
-42
-42
36
36
36
-40
-40
-40
34
34
34
-38
-38
-38
-38
-36
-36
-36
-36
-36
32
32
32
32
-34
-34
-34
-34
30
30
30
30
-32
-32
-32
-32
-32
-32
28
28
28
28
14
14
14
12
12
12
-30
-30
-30
-30
16
16
16
10
10
10
10
26
26
26
26
-28
-28
-28
-28
8
8
8
8
8
8
24
24
24
24
24
24
-26
-26
-26
-26
-26
6
6
6
6
6
4
4
4
4
4
4
-24
-24
-24
-24
-24
22
22
22
22
22
22
2
2
2
2
2
2
2
-22
-22
-22
-22
-22
-6
-6
-6
-6
-6
-6
-6
20
20
20
20
20
20
20
0
0
0
0
0
0
0
0
-20
-20
-20
-20
-20
-20
-20
-20
18
18
18
18
18
18
-2
-2
-2
-2
-2
-2
-2
-18
-18
-18
-18
-18
-18
-18
-4
-4
-4
-4
-4
-4
-4
-4
-16
-16
-16
-16
-16
-16
-14
-14
-5
-75
-10
-70
-65
-65
-5
-5
-15
-15
-20
-60
-60
-55
-55
-25
-20
-20
-50
-50
-50
-20
-20
-20
-45
-45
-45
-20
-30
-30
-30
-30
-25
-25
-25
-25
-25
-35
-30
-40
-15
-15
-15
-15
-15
-15
-30
-5
-40
-40
-35
-35
-35
-35
-10
-10
-10
-10
-10
-10
-10
-10
-5
-20
-5
-5
-5
-5
-5
10
15
5
5
30
30
10
10
10
5
5
5
5
30
15
15
15
15
15
15
15
15
15
20
20
20
20
20
20
25
15
10
10
10
10
10
10
10
10
25
25
25
20
20
25
5
5
5
5
5
0
0
0
0
0
0
0
0
0
0
0
80°W90°W100° W110°W120° W130° W
60°N
50°N
40°N
30°N
20°N
10°N
90°W100° W110°W
40°N
30°N
20°N
80°W
East Declination West Declination
Fig. 4: Magnetic Declination – North America
Fig. 4: The bubble level. Remove the eyepiece
from the 90° holder and drop in the bubble
level. Adjust the telescope tube the bubble
enters the center circle of the bubble level. Line
up the North - South line of the compass with
you telescope tube. Move the tube until the
tube points Magnetic North.

- 11 -
3. Center Alignment Stars: The AudioStar then slews to the first
star for alignment. It may not appear in the field of view in the
eyepiece. The alignment star should be easily recognized and
be the brightest star in the area of the sky where the telescope
is pointing. Use the Arrow keys to move the telescope until the
star is visible and centered in the eyepiece. Press ENTER.
Repeat procedure for the second alignment star.
NOTE: AudioStar locates alignment stars based on the
date, time, and location entered. The alignment stars
may change from night to night. All that is required
is for the observer to center the selected stars in the
eyepiece when prompted.
Fig 6: Locating Polaris
Note: The GO TO key also allows you to perform a “spiral search.”
A spiral search is useful when the telescope slews to an object, but
that object is not visible in the eyepiece after the telescope finishes
it search. (This sometimes occurs during an alignment procedure.)
Press GO TO when the slew is finished and the telescope starts
slewing in a spiral pattern at a very slow speed around the search
area. Look through the eyepiece and when the object does become
visible, press MODE to stop the spiral search. Then use the Arrow
keys to center the object.
Finding Objects in the Sky
With AudioStar aligned, it is possible to find any visible object in the
“Object” menu. Another option, is to take a Guided Tour.
Guided Tour picks the best objects available for viewing. To start a
guided tour, select the “Guided Tour” function from the main menu.
Use the SCROLL keys to view the list of tour objects and press
ENTER to select any object of interest. When selected, the object
name appears on the top line and information about the object
is on the bottom line. Object information includes: astronomical
coordinates, size, brightness, and more. All information can be seen
using the SCROLL keys. Some objects have a moving message
with a description of the object. If a moving message appears, use
MODE to exit the message when completed.
To direct AudioStar to point the telescope at a selected object, press
GO TO. The telescope moves at high speed toward the object. The
telescope slows as it approaches the object and eventually stops
and sounds a beep. The object should be visible in the eyepiece
of the telescope. To see more objects in the Guided Tour, press
MODE. Display a new object with the SCROLL keys and press
ENTER to select it. Use this method to view any of the Guided Tour
objects.
*Problem* If objects are not in the eyepiece after GO TO is pressed,
check the viewfinder to see if it is near the center. Under high
magnification, some objects may be slightly out of the field of view
and need some minor manual correction using the ARROW keys.
If the object was not close to center, there are several possibilities.
First, the telescope must sit on a stable surface or tripod. Second,
use only the ARROW keys or GO TO key to move the telescope or
alignment is lost.
Fig 7: Choose North
Alignment

- 12 -
Third, be sure the date, time, and site are accurately entered.
Fourth, make sure the telescope axis locks are firmly engaged
to prevent slippage of the internal clutch. Fifth, telescope training
must be accurate. Repeat very carefully all of the steps to train the
telescope. Last, the alignment procedure must be done accurately.
Make sure each step is done carefully and that alignment stars are
centered.
Synchronize Function: To improve the ability of AudioStar to
find objects, a “sync” function is included to make minor alignment
corrections. If an object is not centered in the eyepiece, press and
hold ENTER for two seconds. AudioStar requests that the selected
object be centered, then press ENTER again. This improves the
accuracy of alignment, particularly in the region of sky immediately
around the “sync” object.
Telescope Status Display: This is activated by pressing MODE for
more than 2 seconds. The screen shows values related to AudioStar
operation, and can be viewed by using the SCROLL keys.
The telescope can also be pointed at a particular location using
the ARROW keys and watching a location display. For automatic
movement of the telescope, press GO TO during a location display.
AudioStar requests the destination coordinates to be entered. Enter
the coordinates, then press ENTER. AudioStar moves the telescope
to that location. To exit the status display, press MODE.
AudioStar Menus and Function Reference
This section discusses each of the AudioStar menus and functions
(see Figure 1). To access any of the functions use the ENTER,
MODE and SCROLL keys as in previous operations.
A. Object Menu Options
The “Select Item: Object” menu contains a database of objects for
viewing, including astronomical, terrestrial and user-defined objects.
When an object has been selected it appears on the top line of the
screen. The bottom line contains information about the object which
is viewed using the SCROLL keys. Press GO TO and the telescope
points at the current object.
Solar System includes eight planets (Earth is not included) in order
out from the Sun, followed by the Moon, asteroids, and comets.
Constellation is a database of all 88 northern and southern
hemisphere constellations. When this menu option is chosen and a
constellation name appears on the first line of the screen, pressing
GO TO changes the second line to the name of the brightest star
in the constellation. Pressing GO TO again moves the telescope to
that star. Use the SCROLL keys to cycle through the stars in the
constellation from brightest to dimmest.
Deep Sky is a database of objects outside our solar system such as
nebulae, star clusters, galaxies, and quasars.
Star is a database of stars by different categories such as named,
double, variable, or nearby.
Satellite is a database of Earth-orbiting objects such as the
International Space Station, the Hubble Space Telescope, and
other satellites. This feature is recommended for advanced users
only since acquiring and tracking a fast moving object can be
complicated. Additionally, AudioStar needs fresh satellite data or it is
unable to accurately predict the appearance time and location. The
Meade web site (www.meade.com) provides updated information
on orbits and complete instructions on how to use this feature.

- 13 -
User Objects allows the user to define deep-sky objects of interest
that are not currently in the AudioStar database.
Landmarks stores terrestrial points of interest. To enter a new
landmark the telescope must be located and aligned exactly
as when other landmarks were entered. “Sync” on a reference
landmark, then move the telescope to the new landmark and enter
it into the AudioStar database.
Identify is used when an object is placed in the telescope eyepiece
and AudioStar identifies the object being observed.
B. Event Menu Options
The “Select Item: Event” menu provides access to dates and times
of astronomical events. Included are:
• Sunrise and Sunset displays the time that the Sun rises or
sets on the current date.
• Moonrise and Moonset displays the time that the Moon rises
or sets on the current date.
• Moon Phases displays the date and time of Full, New, 1st Qtr.,
and 3rd Qtr. Moon.
• Meteor Showers provides information about upcoming meteor
showers, including dates of the shower and when it is
scheduled to reach maximum.
• Solar Eclipse lists upcoming Solar Eclipses, including the date
and type of eclipse along with the location and time of the first
and last contacts of the lunar shadow across the Earth.
• Lunar Eclipse lists upcoming Lunar Eclipses.
• Min. (Minimum) of Algol is the minimum brightness of the
eclipsing binary star system, Algol. Every 2.8 days during a 10
hour period, Algol undergoes a major change in magnitude as
one of the two stars passes behind the other. The combined
magnitude of the two stars dips from +2.1 to a minimum of +3.4
halfway through the eclipse as the second star is hidden.
• Autumn and Vernal Equinox calculates fall or spring equinox.
• Winter and Summer Solstice calculates the winter or summer
solstice for the current year.
C. Glossary Menu Options
The “Select Item: Glossary” menu provides an alphabetical listing
of definitions and descriptions for common astronomical terms
and AudioStar functions. Press ENTER to access the Glossary
database. Use the SCROLL keys to scroll through the alphabet.
Press ENTER on the desired letter. Scroll to the desired entry, then
press ENTER to read the description.
D. Utilities Menu Options
The “Select Item: Utilities” menu provides access to several extra
features within AudioStar, including a countdown timer and an
alarm. Specific Utilities options include:
Timer selects a countdown timer. This feature is useful for things
such as astrophotography and in tracking satellites. To use the
Timer, press ENTER, then choose “Set” or “Start/Stop.”
Alarm selects a time for an alarm signal as a reminder function.
To use the Alarm, press ENTER, then choose “Set” or “Start/Stop.”
Eyepiece Calc calculates information about an eyepiece and how it
functions for the specific telescope to which AudioStar is connected.
Brightness Adj uses the scroll keys to adjust the brightness of the
screen. When complete, press ENTER.
Contrast Adj uses the scroll keys to adjust the contrast of the
screen. This feature is usually only required in very cold weather.
When complete, press ENTER.
Battery Alarm sounds when the batteries are nearing replacement.
If not desired, press the scroll key to change the screen from YES to
NO. Press ENTER and the beep no longer sounds.
Landmark Survey automatically moves the telescope to all user-
defined landmarks with a pause at each location. Use the ARROW
keys to manually locate the first landmark. Press and hold ENTER
for 2 seconds; the message “ENTER to Sync.” appears. Press

- 14 -
ENTER and this landmark is synchronized with all other landmarks.
Important Note: To accomplish a landmark survey, all landmarks
must have been entered into the AudioStar database from the same
reference point (i.e., the telescope must be in the exact same location
and mounted and aligned in the exact same way).
Sleep Scope is a power saving option that shuts down AudioStar and
the telescope without forgetting its alignment. Press ENTER to activate
the Sleep function and AudioStar goes dark but the internal clock
keeps running. Press any key, except ENTER, to re-activate.
Language: Select the English language or other pre-loaded language
and AudioStar will display text and audio descriptions in the selected
language. Pre-loaded languages cannot be changed.
Audio Clip: Select from Automatic or On Demand. The Automatic
setting will automatically play the object audio when a night sky object
is selected on the AudioStar. The On Demand feature requires the
user to press the “?” key once a night sky object is selected. Pressing
the “?” key will then play the audio presentations for the selected
object.
Park Scope is designed for a telescope that is not moved between
observing sessions. Align the telescope one time, then use this
function to park the telescope. Next time it is powered up, enter the
correct date and time — no alignment is required. Pressing ENTER
causes the telescope to move to its pre-determined Park position.
Once parked, the screen prompts to turn off power.
E. Setup Menu Options
The “Select Item: Setup” category primary function is to align the
telescope. However, there are numerous other features available
within “Setup.” These options are:
Align changes the alignment routine and North method.
Date changes the date currently used by AudioStar.
Time changes the time entered into AudioStar. Setting the
correct time is critical for AudioStar to properly calculate locations
and events.
Daylight Saving is used to set the status of Daylight Savings time.
Telescope accesses the telescope options, including:
•Telescope Model: Selects the model of telescope connected.
• Focal Length: Changes the focal length of the telescope by
typing in new numbers, then press ENTER.
• Az Ratio and Alt Ratio: The Az (Azimuth) ratio and Alt (Altitude)
ratio refers to the gears installed in the telescope motors. Do not
alter these numbers.
• Mount: Choose between Alt/Az mount or Polar Mount. A polar
mount requires that the telescope be physically polar aligned.
• Train Drive: Trains the telescope motor drive to locate objects
with more precision. This function is very important to accomplish
the first time AudioStar is connected to a telescope.
• Tracking Rate: Changes the speed at which the telescope tracks
targets in the sky. “Sidereal” is the rate that stars move across the
sky due to the Earth’s rotation, “Lunar” is the rate that the Moon
moves, and “Custom” allows entry of user-defined tracking rates.
• Reverse L/R: Reverses the functions of the left and right arrows
(i.e., the right key moves the telescope to the left).
• Reverse UP/DOWN: Reverses the functions of the up and down
arrows (i.e., the up key moves the telescope down).
NOTE: The reverse functions above are useful for observers in the
southern hemisphere (i.e., South America, Australia, Africa, etc.)
• Calibrate Motor: If the telescope motors appear to have any sort
of problem, use this option to retest the motors before doing a
“Reset.” This option is also used if AudioStar is moved between
telescopes to match AudioStar to the telescope.
• High Precision: If High Precision is turned on, when looking

- 15 -
for a faint celestial object (i.e., a nebula or galaxy) AudioStar slews
to a nearby bright star and requests “ENTER to Sync.” Center
the star in the eyepiece, then press ENTER. The telescope
then slews to the originally requested object.
Targets switches between Astronomical targets (motor drive on)
and Terrestrial targets (motor drive off).
Site allows access to the Site options including:
• Select: Displays the current site chosen during initialization.
Use the scroll keys to cycle through all available sites.
• Add: Adds a new observing site.
• Delete: Deletes a stored site.
• Edit: Edits a selected site, including: the name, latitude,
longitude, and time zone.
Owner Info accesses the owner information menu, including the
owner’s name and address.
Clone uploads information from one AudioStar to another. Three
options are available:
• Catalogs: Sends only the user-defined object information, such
as new satellite or comet information, to another AudioStar.
• Software: Sends only the basic AudioStar software. This
is useful if one user has downloaded a new version of the
AudioStar software from the Meade website (www.meade.
com) and wants to pass this new software along to friends.
• All: Everything is sent to another AudioStar.
Download transfers information from a personal computer or
another AudioStar as described above in Clone. Statistics provides
basic statistical data about AudioStar, including “Characters Free”
and “Version.”
Reset completely resets AudioStar. AudioStar requires initialization
again before proceeding with observations.
Meade Customer Service
If you have a question concerning your AudioStar Handbox , call
the Meade Instruments Customer Service Department at (800)
626-3233. Customer Service hours are 7:00 AM to 4:00 PM,
Pacic Time, Monday through Friday. In the unlikely event that your
AudioStar Handbox requires factory servicing or repairs, call the
Meade Customer Service Department rst, before returning the
AudioStar Handbox to the factory, giving full particulars as to the
nature of the problem, as well as your name, address and daytime
telephone number. The great majority of servicing issues can be
resolved by telephone, avoiding return of the telescope to the
factory.

© 2016 All Rights Reserved. Specifications subject to change without notice. Ver. 0716
® The name Meade and the Meade logo are trademarks registered with the United States Patent Office. Part Number 14-2001-01
27 Hubble, Irvine, California 92618
(800) 626-3233 www.meade.com
MEADE LIMITED WARRANTY
Every Meade telescope, spotting scope, and telescope accessory is warranted by Meade Instruments
Corporation (“Meade”) to be free of defects in materials and workmanship for a period of ONE YEAR
from the date of original purchase in the U.S.A. and Canada. Meade will repair or replace a product,
or part thereof, found by Meade to be defective, provided the defective part is returned to Meade,
freight-prepaid, with proof of purchase. This warranty applies to the original purchaser only and is
non-transferable. Meade products purchased outside North America are not included in this warranty,
but are covered under separate warranties issued by Meade international distributors.
RGA Number Required: Prior to the return of any product or part, a Return Goods Authorization
(RGA) number must be obtained from Meade by writing, or by calling (949) 451-1450. Each returned
part or product must include a written statement detailing the nature of the claimed defect, as well as
the owner’s name, address, and phone number.
This warranty is not valid in cases where the product has been abused or mishandled, where
unauthorized repairs have been attempted or performed, or where depreciation of the product is due
to normal wear-and-tear. Meade specifically disclaims special, indirect, or consequential damages or
lost profit which may result from a breach of this warranty. Any implied warranties which can not be
disclaimed are hereby limited to a term of one year from the date of original retail purchase.
This warranty gives you specific rights. You may have other rights which vary from state to state.
Meade reserves the right to change product specifications or to discontinue products without notice.
This warranty supersedes all previous Meade product warranties.
FCC NOTICE
This equipment has been tested and
found to comply with the limits of a CLASS
B digital device, pursuant to Part 15 of the
FCC Rules. These limits are designed to
provide reasonable protection against harmful
interference in a residential installation. This
equipment generates, uses, and can radiate
radio frequency energy and, if not installed
and used in accordance with the instructions,
may cause harmful interference to radio or
television reception, which can be determined
by turning the equipment off and on, the user is
encouraged to try to correct the interference by
one or more of the following measures:
• Reorient or relocate the receiving antenna.
• Increase the separation between the
equipment and the receiver.
• Connect the equipment into an outlet on a
circuit different from that of the receiver.
• Consult the dealer or an experienced radio/
television technician.
Any changes or modifications not expressly
approved by the manufacturer could void the
user’s authority to operate this equipment.
Other manuals for AudioStar
1
Table of contents
Other Meade Telescope manuals

Meade
Meade POLARIS SERIES User manual

Meade
Meade 4504 User manual

Meade
Meade LX200 CLASSIC Assembly instructions

Meade
Meade LX200 CLASSIC User manual

Meade
Meade 80EQ-AR User manual

Meade
Meade ETX-125AT User manual

Meade
Meade 102ACHR/500 User manual

Meade
Meade 2080/LX6 Wiring diagram

Meade
Meade Infinity 76 User manual

Meade
Meade LXD55 Series User manual

Meade
Meade MAX-ACF User manual

Meade
Meade LX50 User manual

Meade
Meade 2045 User manual

Meade
Meade 102ACHR/500 User manual

Meade
Meade ETX-105EC User manual

Meade
Meade LX85 Series User manual

Meade
Meade LX200-ACF User manual

Meade
Meade DSX User manual

Meade
Meade 114EQ-ASTR Mounting instructions

Meade
Meade 80EQ-AR User manual