Meade TE923W-M User manual

1
TE923W-M
PROFESSIONAL WEATHER STATION
WITH REMOTE CONTROL
USER MANUAL
MP12:5,80/11/4dmp.RLLEWYENOH)GNE(1MIW329ET 1

2
Table of Contents
Introduction .............................................................................................. 3
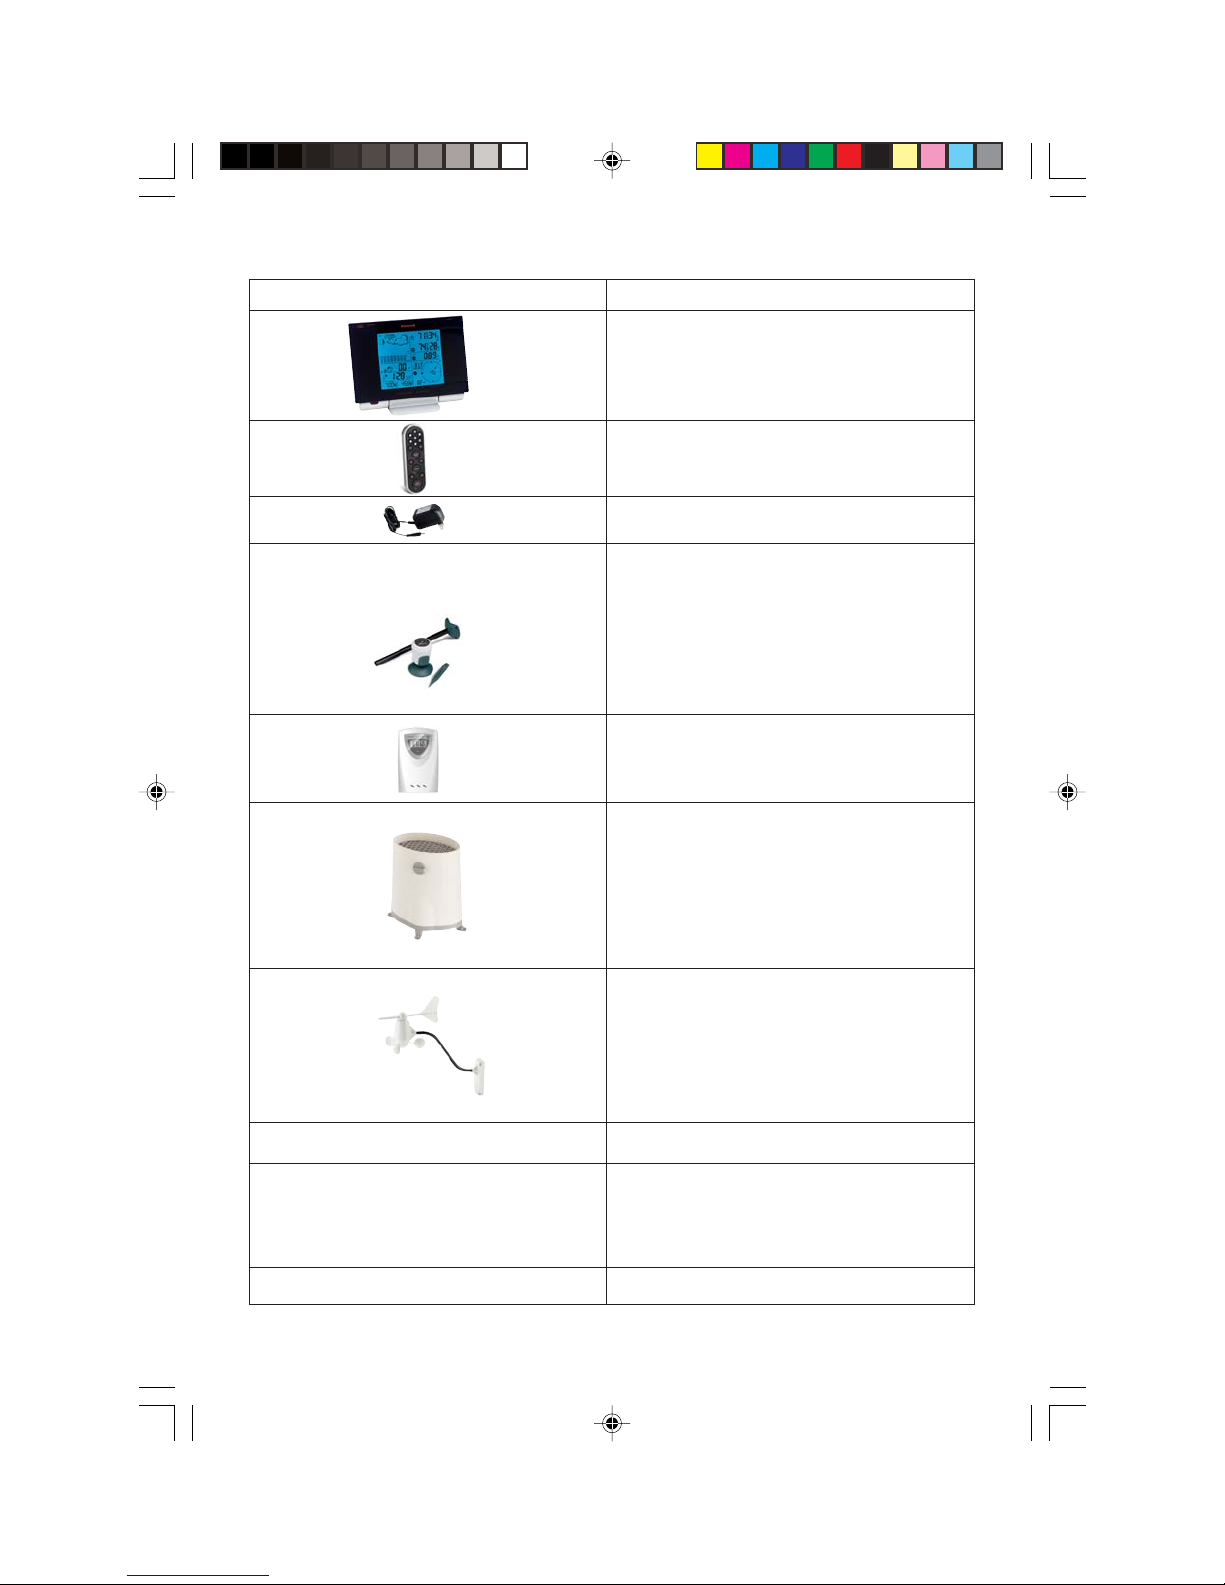
Standard Package Contents ...................................................................... 4
Installation ................................................................................................ 5
Before you begin ...................................................................................... 6
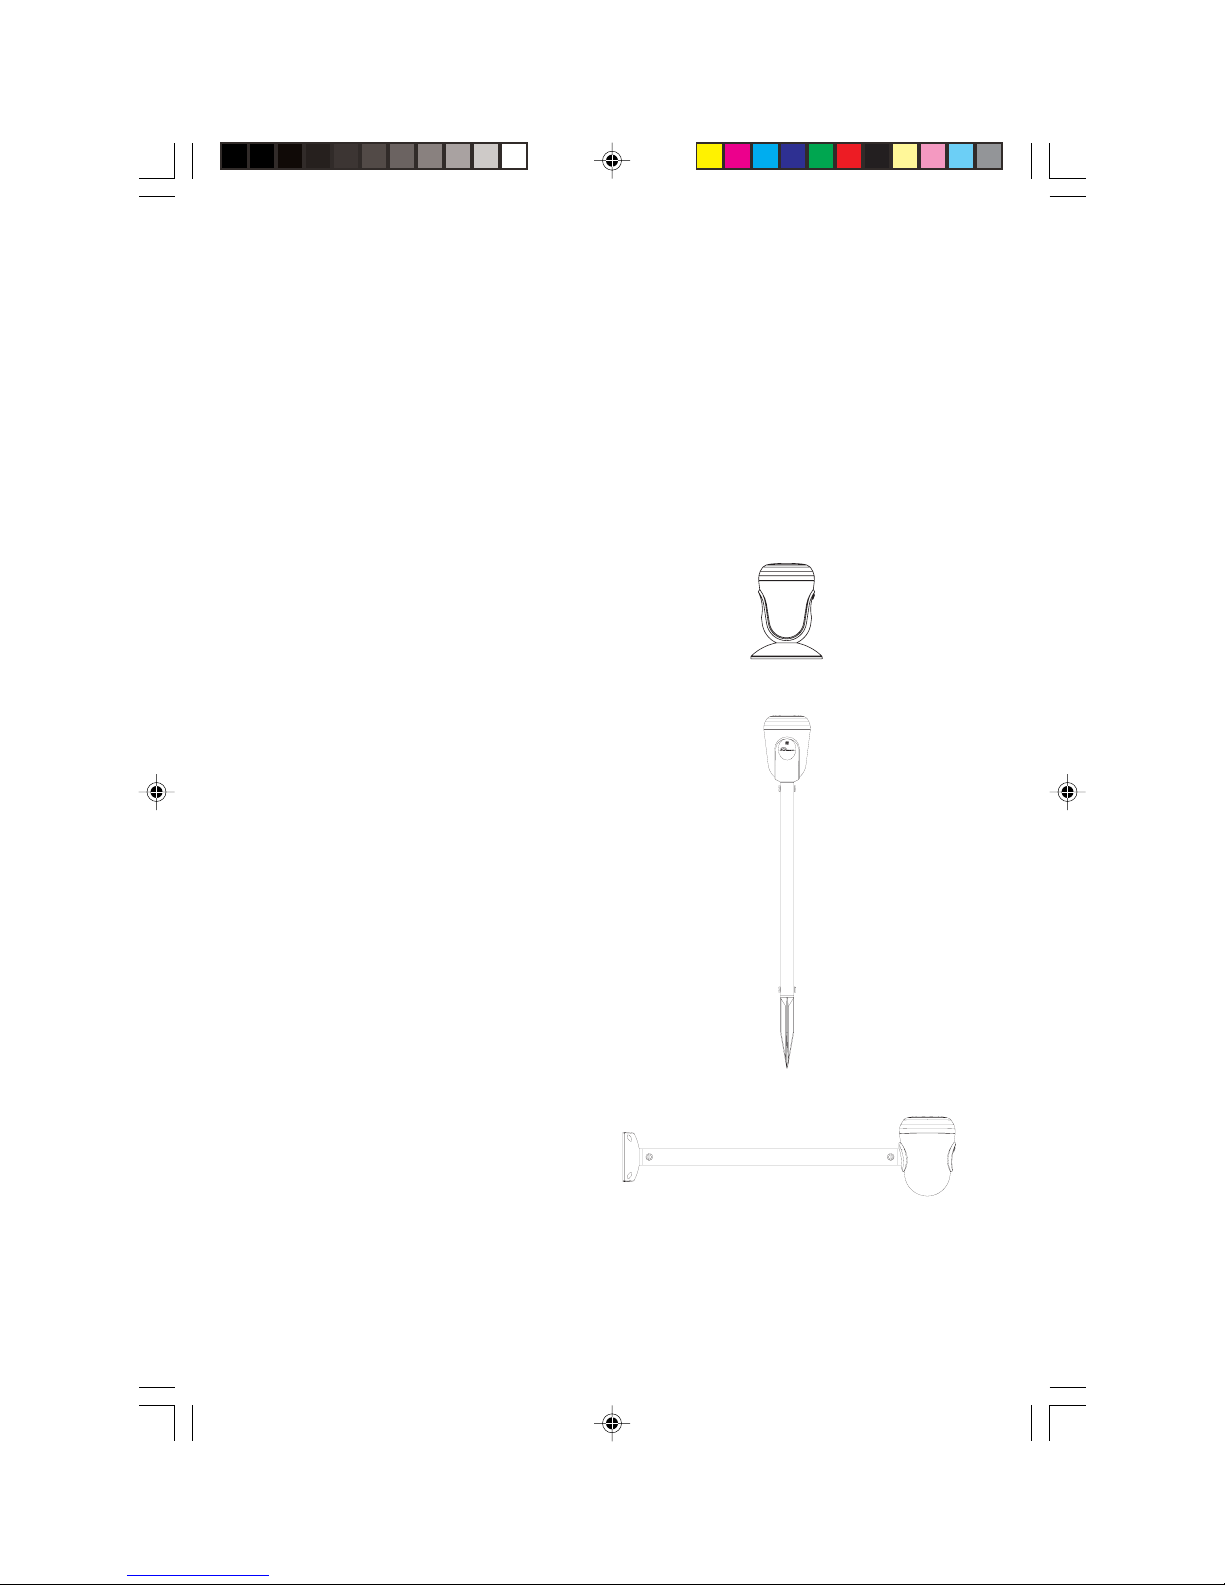
UV (Ultraviolet) Sensor............................................................................ 7
Thermo-Hygrometer Sensor ..................................................................... 9
Rain Gauge ............................................................................................. 10
Anemometer (wind sensor) .................................................................... 12
Main Unit ................................................................................................ 14
Battery installation .................................................................................. 15
Buttons and Controls .............................................................................. 15
Operating mode descriptions .................................................................. 18
Customizing your Weather Station ......................................................... 21
LED Backlight Options .......................................................................... 21
Connecting the Weather Station to a PC................................................. 21
Using Different Weather Modes ............................................................. 22
Pressure and Weather Forecast Mode ..................................................... 22
UV Mode ................................................................................................ 25
Clock and Alarm Mode .......................................................................... 25
Manual Settings ...................................................................................... 25
Sunrise/Sunset Mode .............................................................................. 29
Temperature and Humidity Mode........................................................... 30
Rain Mode .............................................................................................. 32
Wind Mode ............................................................................................. 33
Maintenance............................................................................................ 34
Troubleshooting ...................................................................................... 35
PRECAUTIONS..................................................................................... 35
Appendix - City Codes ........................................................................... 36
Specifications ......................................................................................... 40
FCC STATEMENT................................................................................. 42
DECLARATION OF CONFORMITY................................................... 42
STANDARD WARRANTY INFORMATION ....................................... 43
TE923W IM1(ENG) HONEYWELL R.pmd 4/11/08, 5:21 PM2

3
Introduction
MP12:5,80/11/4dmp.RLLEWYENOH)GNE(1MIW329ET 3
Thank you for selecting the Meade Instruments TE923WD-M Professional Weather Station with remote
control. This feature rich and easy-to-use product delivers a wide variety of time and weather data, such
as precise atomic time, perpetual calendar, air temperature, relative humidity, barometric pressure, wind
speed and direction, rainfall, UV levels and much more.
Meade Instruments is the world’s leading designer and manufacturer of telescopes for professional and
amateur astronomers - famous for its innovative, high performance telescopes at affordable prices.
Meade Instruments now brings that same passion innovation and high performance to its own line of
precision, feature rich weather stations.
In this package you will find:
• One Main Unit (receiver) (TE923WD-M)
• One IR Remote Control (TS607-M)
• One Rain Gauge (remote rain sensor/transmitter) (TS906-M)
• One Anemometer (remote wind sensor/transmitter) (TS805-M)
• One UV (ultraviolet) sensor (remote ultraviolet sensor/transmitter) (TS704-M)
• One Five-Channel Temperature & Humidity Sensor (transmitter) (TS34C-M)
• One CD disk with generic PC connection software with USB cable
• One 7.5V AC/DC Adapter
• Mounting Hardware with Allen Wrench
• One User Manual

4
Standard Package Contents
Picture Components
Main Unit
Remote Control
AC/DC 7.5V power adaptor
UV Sensor consists of:
Sensor Unit
U-Shaped Sensor holder
Circular Ground Stand
Stake Base
Wall-Mounting Base
Thermo Hygrometer Sensor
Rain Gauge consists of:
Funnel shaped top with battery
compartment
Rain Gauge bucket
Bucket see-saw mechanism
Protective screen
Anemometer consists of:
Wind Cups
Wind Vane
Anemometer arm
Anemometer base
PC Software
Mounting hardware
4 screws for securing rain gauge to the flat
surface;
4 screws for securing anemometer to vertical
surface
2m (6ft) USB cable PC connection cable
TE923W IM1(ENG) HONEYWELL R.pmd 4/11/08, 5:24 PM4

5
Required for installation (not included)
- Phillips screwdriver
- Mounting pole for anemometer (optional)
- Small paper clip for reset
Installation
The Professional Weather Station TE923W-M operates at 433MHz radio frequency
, so no wire installation is required between the main unit (receiver) and the remote weather
sensors (transmitters).
The remote weather sensors include a thermo-hygrometer (temperature and humidity) sensor, UV
(ultraviolet) sensor, anemometer (wind sensor) and a rain gauge (rain sensor). All data measured
by these remote sensors is transmitted to the main unit wirelessly, with the operating range up to
328 feet (100 meters) in open area.
Remote UV sensor, anemometer and a rain gauge must be placed outdoors to measure
weather elements.
Remote thermo-hygrometers can be placed indoors or outdoors, depending on the area where the
temperature and humidity are intended to be measured. If you intend measuring outdoor
temperature and humidity, place the remote sensor outdoors.
Note: It is critical to assemble and power up all of the remote weather sensors BEFORE setting
up the main unit.
Note: It is critical to power up and test communication between all of the weather sensors and the
main unit BEFORE permanently mounting them outside.
MP42:5,80/11/4dmp.RLLEWYENOH)GNE(1MIW329ET 5

6
Before you begin
• We recommend using alkaline batteries for the remote weather sensors and the main unit
when temperatures are above 32°F (0°C). We recommend using lithium batteries for the
remote weather sensors when temperatures are below 32°F (0°C).
• Avoid using rechargeable batteries. (Rechargeable batteries cannot maintain correct
power requirements).
•ALWAYS install batteries in the remote weather sensors before the main unit.
• Insert batteries matching the polarity in the battery compartment
• Remove and discard any factory applied protective plastic film affixed to the LCD display (if any).
• During an initial setup, place the main unit close to the remote weather sensors.
• After reception is established (all of the remote readings will appear on the main unit’s
display), position the remote sensors and the main unit within the effective transmission
range of up to 328 feet (100 meters). Ideally they should be placed within the line of sight
of the main unit. See placement tips in the user manual for each remote weather
sensor separately.
•Transmission range may be affected by trees, metal structures and electronic appliances.
• The main unit must be placed indoors.
• The effective operating range may be influenced by the surrounding building materials and
how the receiver (main unit) and transmitters (weather sensors) are positioned.
• Place the remote weather sensors so that they face the main unit (receiver), minimizing
obstructions such as doors, walls, and furniture.
Note: When the temperature falls below freezing, the batteries in the outdoor remote
weather sensors may have reduced voltage supply and a shorter effective range. We
recommend using lithium batteries at temperatures of 32°F (0°C) and below.
IMPORTANT: Make sure that the remote weather sensors are easily accessible for cleaning
and maintenance.
We recommend cleaning the remote weather sensors periodically, as the dirt and debris may
affect sensors accuracy.
MP42:5,80/11/4dmp.RLLEWYENOH)GNE(1MIW329ET 6

7
E
C
B
D
A
F
G
Ultraviolet (UV) Sensor TS704-M
FEATURES
• Ultraviolet light levels measurement
• Remote UV levels data transmission to the main unit via 433MHz signal
• 328 feet (100 meters) transmission range
• Low battery indicator
• Three different placement options – ground, stake and wall
A. LED INDICATOR
• Flashes once when the remote sensor transmits a reading to the main unit
• Flashes twice when battery power is low
B. BATTERY COMPARTMENT SCREW
Holds battery compartment door in place
C. U-SHAPED SENSOR HOLDER
Holds UV sensor in upright position
D. CURCULAR GROUND STAND
Secures sensors in the sensor holder on the flat surface
E. UV SENSOR LID
Covers UV sensor and seals battery compartment
F. BATTERY COMPARTMENT
Holds two AA-size batteries
G. BATTERY COMPARTMENT DOOR
Covers two AA-size batteries
MP42:5,80/11/4dmp.RLLEWYENOH)GNE(1MIW329ET 7

8
Assembly
• Snap the U-shaped sensor holder onto the UV sensor unit side grooves
• Insert the round end of the U-shaped holder into one of the mounting hardware pieces provided
Battery installation
• Unscrew the lid on top of the UV sensor unit.
• Remove the screw from the battery compartment door with a small Phillips screwdriver
• Insert two 2 “AA” size 1.5V batteries (not included) matching the polarities shown in the
battery compartment.
• Replace the battery compartment door and secure the screw
• Screw the UV sensor unit lid back
Mounting
There are three different options available for mounting the UV sensor: ground stand, stake and
wall mount.
Ground:
• Insert the U-shaped sensor holder round end into the
circular ground stand opening, matching 2 round holes
in the opening
• Secure the sensor in a location with a maximum sun
exposure throughout the day.
Stake:
• Snap the sharp stake end onto the metal bar and secure
with the screws provided.
• Insert the other end of the metal bar into the U-shaped
sensor holder and secure with the screws provided.
• Secure the sensor in a location with a maximum sun
exposure throughout the day.
Wall:
• Insert the wall mounting end into the metal bar
and secure with the screws provided.
• Snap the other end of the metal bar on to the
U-shaped sens or holder and secure with the
screwsprovided.
• Secure the sensor in a location with a maximum
sun exposure throughout the day.
Placement tips:
The UV sensor should be mounted in the area free of sunlight shadows or reflections from the
nearby objects.
Ground
Stake
Wall
TE923W IM1(ENG) HONEYWELL R.pmd 4/11/08, 5:24 PM8

9
A. LED INDICATOR
• Flashes once when the remote sensor transmits a reading to the main unit.
• Flashes twice when battery power is low.
B. BATTERY COMPARTMENT
Holds two AA-size batteries
C. RESET
Resets all readings (requires small paper clip.)
D. CHANNEL SWITCH
Selects the desired channel from 1 to 5
E. WALL-MOUNT RECESSED OPENING
Keeps the remote sensor on the wall
Note: Install the batteries and select the channel before mounting the sensor.
Battery installation
• Remove the screws from the battery compartment with a small Phillips screwdriver.
• Set the channel 1 through 5. The switch is located in the battery compartment. Channel 1 is
typically selected if only one remote sensor is being used.
• Install 2 “AA” size alkaline batteries (not included) matching the polarities shown in the battery
battery compartment.
• Replace the battery compartment door and secure the screws.
• Secure the thermo-hygrometer remote sensor in the desired location.
Mounting
•The remote thermo-hygrometer sensor can be placed on the flat surface or mounted on the wall
in vertical position
•Use the wall mount hardware and screws provided when mounting the thermo-hygrometer
sensor on the wall
Placement tips:
•The remote thermo-hygrometer sensor should be placed in the area with a free air circulation
and sheltered from the direct sunlight and an extreme weather conditions.
•Ideally, place the thermo-hygrometer sensor above the natural surfaces (such as a grassy lawn).
•Avoid placing the thermo-hygrometer sensor near sources of heat such as chimneys and heating
elements.
•Avoid any areas collecting and radiating a heat from the sun, such as metal, brick or concrete
structures, paving, patios and decks.
• The international standard for the valid air temperature measurements is 4 feet (1.25meters)
above the ground.
Thermo-Hygrometer Sensor TS34C-M
FEATURES
• Remote data transmission to the main unit via 433 MHz signal
• 328 feet (100 meters) transmission range without interference
• LCD display of measured temperature and humidity
• Five (5) transmission channels selection
• Case can be wall mounted using built-in hanger
MP42:5,80/11/4dmp.RLLEWYENOH)GNE(1MIW329ET 9

10
Rain Gauge TS906-M
FEATURES
• Precipitation measurement
• Remote rainfall data transmission to the main unit via 433 MHz signal
• 100 feet (30 meters) transmission range without interference
• Built-in installation level
• Non-corrosive protective screen
A. Rain gauge bucket
Contains electronic components
B. Knob
Secures the top on the rain gauge bucket
C. Rain gauge feet
Secures the rain gauge in place
D. Funnel-shaped top with battery compartment
Contains battery compartment and rainfall counting electronics
E. Battery compartment
Holds two AA-size batteries
F. Screws
Secure battery compartment cover
G. Built-in level with bubble
Ensures level rain gauge mounting for proper operation
H. Bucket see-saw mechanism
Collects the rainfall in one of its containers and self-empties once full
I. Protective screen
Protects the rain gauge funnel from debris
C
A
B
I
F
E
D
G
H
MP52:5,80/11/4dmp.RLLEWYENOH)GNE(1MIW329ET 10

11
Battery installation
• Unlock the funnel-shaped top on the rain gauge by turning both knobs on the sides in an anti-
clockwise direction.
• Remove the funnel-shaped top lifting it off the rain gauge bucket.
• Remove 7 small screws from the battery compartment cover using a small Phillips screwdriver
• Insert 2 “AA” size alkaline batteries (not included), matching the polarities as shown in the
battery compartment.
• Replace the battery compartment door and secure the screws.
• Insert the funnel-shaped top into the rain gauge bucket and secure it into place by turning the
knobs clockwise.
Mounting
• Make sure that the rain gauge bucket is level – check for bubble center, inside built-in level.
• Place the protective screen over the top to protect the rain gauge from the debris.
•Where practical, mount the rain gauge in place with wood screws (not included).
• Make sure that the rain gauge is in open area where precipitation falls directly into the gauge’s
bucket, ideally 2-3 feet above the ground.
Placement tips
•The rain gauge should be placed in an open area away from the walls, fences, trees and other
coverings which may reduce the amount of rain falling into the bucket. Additionally, trees and
rooftops may be sources of pollen and debris.
•To avoid the rain shadow effects, place the rain gauge horizontally, on the distance
corresponding to two to four times the height of any nearby obstruction.
•It is important to locate the unit where rain can flow freely away.
MP52:5,80/11/4dmp.RLLEWYENOH)GNE(1MIW329ET 11

12
B
A
C
D
G
FH
E
Anemometer (wind sensor) TS906
FEATURES
• Wind speed and wind direction measurement
• Remote wind speed and wind direction data transmission to the main unit via 433 MHz signal
• Operating range 100 feet (30 meters)
• Wall or pole mount
A. WIND VANE
Measures wind direction
B. WIND CUPS
Measures wind speed
C. ANEMOMETER BASE
• Holds battery compartment
• Allows mounting the anemometer vertically
D. ANEMOMETER ARM
Keeps anemometer assembly together
E. WIND CUPS SHAFT
Holds wind cups on the anemometer arm
F. BATTERY COMPARTMENT
Holds 2 AA-size batteries
G. WALL MOUNT SCREW OPENINGS
Allows securing the anemometer in place
H. BATTERY COVER
Allows securing 2 AA size batteries on the anemometer base
TE923W IM1(ENG) HONEYWELL R.pmd 4/11/08, 5:26 PM12

13
Assembly
• Slide the wind cups on to the anemometer rotating shaft. Do not use force.
• Insert the Allen Wrench (provided) into the wind cup set screw opening. Tighten the set screw
to secure wind cups to the rotating shaft.
• Test to ensure cups are securely fastened to the shaft.
Battery installation
•Remove four (4) screws from the battery compartment with a small Phillips screwdriver.
•Open the battery compartment and install 2 “AA” size alkaline batteries (not included)
matching the polarities shown.
•Replace the battery compartment door and secure the screws.
Aligning
• Point the wind direction vane to the north (use a compass or map if necessary).
• Press the button inside the “SET” opening located inside battery compartment with a paper clip
or similar tool. The “SET” selects a new direction for NORTH and, when pressed repeatedly,
alternates between the factory default NORTH and user selected NORTH.
• Select the factory set mode. It will be also a default setting in the future.
• Set current wind direction as NORTH.
Note: Repeat this procedure every time when changing the batteries.
Mounting
Mount the anemometer onto a vertical surface, using the fittings provided.
Placement tips:
• The anemometer should be mounted in an open area with a free air flow; away from the nearby
trees, buildings or other structures.
• For optimal performance, mount the anemometer at 33 feet (10meters) above the ground in
unobstructed area.
MP62:5,80/11/4dmp.RLLEWYENOH)GNE(1MIW329ET 13

14
Main Unit
The main unit measures pressure, indoor temperature, humidity, and receives atomic time data
from the US Atomic Clock and all remote weather sensors. It should be placed indoors.
FEATURES
Time
• Precise time and date set via RF signals from US Atomic clock
• 12 or 24 hour time format
• Manual adjustment of time and date
• Calendar displaying date with month and day in 6 languages English, German, French,
Italian, Spanish and Dutch
• Sunrise/set calculation for over 100 pre-programmed world cities in accordance with the
geographical information entered by the user
• Moon Phase calendar and historical data for the past and future 39 days
• Dual crescendo alarms with programmable snooze
Weather
• Weather forecast for the next 12 to 24 hour in seven large icons: Sunny, Partly Cloudy,
Cloudy, Light Rain, Heavy Rain, Unstable Weather and Snowy
• Barometric pressure in imperial or metric units
• Altitude adjustment for pressure compensation
• 24 hour barometric pressure history chart
• Multiple weather alerts including: Hi/Low temperature, Daily Rainfall, Hi wind gust and Hi
wind speed alerts
• Indoor/Outdoor Temperature & Humidity in up to 5 remote locations (additional
sensors required)
• Dew point and comfort level indicators
• Wind speed and wind gust averages and memory
• Wind direction
• Rainfall amount with minimum and maximum memory
• UV intensity with daily and weekly highs and lows
• 200 weather records without PC connection
• PC software (included) and USB port
• Operating range from 100 feet (30 meters) up to 328 feet (100 meters)
Display
• Light sensor detects low light conditions and LCD lights up automatically when adapter
is connected
• Infrared remote control of all display functions
Power - Main Unit
• AC/DC adapter for automatic remote control
• 4 AA batteries
Power - Infrared Remote Control
• 2 AAA batteries
MP62:5,80/11/4dmp.RLLEWYENOH)GNE(1MIW329ET 14

15
Battery installation
• Open the battery compartment door on the back of the main unit.
• Insert four (4) AA size batteries according to the polarities shown and replace the battery
compartment door.
• Connect 7.5V AC/DC adapter provided to the main display unit and plug into the wall power
outlet.
Note: The AC/DC adaptor connection is required for automatic backlight control and a
handheld remote control functions. If the main unit operates solely on the battery power, the
auto backlight control and handheld remote control functions will be disabled.
• When placing the main unit on the table or other horizontal surface, unfold the table stand
adjusting it to the desired viewing angle.
• When mounting the main unit on the wall or vertical surface, fold the table stand back into the
unit and use the mounting hardware provided.
Placement tips
• Make sure that the main unit is locating within the operating range of all remote weather
sensors.
• Ideally the remote weather sensors should be mounted within the line of sight of the main unit.
• Transmission range may be affected by trees, metal structures and electronic appliances.
• Test reception before permanently mounting all the remote weather sensors.
Avoid placing the main unit in the following areas:
• Direct sunlight and surfaces emitting and radiating heat, such as heating ducts or air
conditioners.
• Areas with interference from the wireless devices (such as cordless phones, radio headsets, baby
listening devices) and electronic appliances.
Operation
Once the main unit is powered, the display will show all available LCD segments for a moment.
IMPORTANT: All of the display functions will be locked, allowing setting your local altitude and
pressure parameters. The locked display will show the pressure icon and abbreviation “inHg”
flashing, indoor temperature and humidity readings, default time and default sunset/sunrise time.
If pressure and altitude are not configured during this time, the unit will self-calibrate in a few
minutes and show the default settings for the pressure and altitude (sea level) and all remote
weather sensors readings.
IMPORTANT: If not set during the initial setup, the altitude cannot be adjusted or set at any other
time. In order to set the altitude, you will have to restart the main unit completely.
TE923W IM1(ENG) HONEYWELL R.pmd 4/11/08, 5:26 PM15

16
To set the pressure & altitude units and program your altitude, use the handheld remote control or
main unit control panel:
Buttons and Controls
Most of the handheld remote control buttons are corresponding to the main unit controls.
To expose the main unit control buttons, press the OPEN button on the upper right corner of the
main unit and the controls’ cover door will open.
Main unit and handheld remote control adequate buttons
A.UP
B.DOWN
C. SET
D. MEMORY
E. HISTORY
F. ALARM/
CHART
G. CHANNEL
H. LIGHT/
SNOOZE
- Selects the next available mode anti-clockwise
Increases parameters
-
-
Selects the next available mode clockwise
- Decreases parameters
- Rotates display for current mode
- If depressed and hold, enters into the programming mode or changes
parameter’s units
- Confirms set parameters
- Allows displaying the moon phase, UV, temperature, humidity, rainfall
and wind memory records
- Allows displaying the sea-level pressure history
- Allows displaying the time alarms and alerts for the temperature, rainfall
and wind.
- If depressed and hold, allows entering into the alarm/alert
programming mode
- When depressed and hold in pressure and forecast mode, allows viewing
of the different bar charts
- Changes the temperature and humidity channel- Enables the temperature
and humidity channel auto-scan mode
- Enables a backlight for 5 seconds- Snoozes the alarms
A
B
C
D
E
F
GHI
MP62:5,80/11/4dmp.RLLEWYENOH)GNE(1MIW329ET 16

17
I. OPEN
J. LIGHT SENSOR– AUTO,
ON, OFF
K. SENSITIVITY– HIGH/
LOW
- Opens the control buttons panel on main unit
- Toggles the light sensor to automatic, on or off
setting
- Adjusts the light sensor sensitivity
Main unit only
Handheld remote control TS607 (Seletions)
Temperature and
Humidity Mode
Wind Mode
UV Mode
Pressure and Weather
Forecast Mode
Rain Mode
Sunrise/Sunset Mode
Clock and Alarm
Mode
Change Bar-chart
Display
- Selects the Temperature and Humidity Mode
- Selects the Wind Mode
- Selects the UV Mode
- Selects the Pressure and Weather Forecast Mode
- Selects the Rain Mode
- Selects the Sunrise/Sunset Mode
- Selects the Clock and Alarm Mode
- Selects 24 hour History Bar-chart.
- Alternates between Pressure, Channel 1 Temperature,
or Channel 1 Humidity
TE923W IM1(ENG) HONEYWELL R.pmd 4/11/08, 5:26 PM17

18
Operating mode descriptions
The main unit has seven (7) different modes (windows) each displaying the separate data
category. When a specific mode is selected the corresponding icon will start flashing.
Press UP button on the main unit or the handheld remote control to cycle through the modes
clockwise or DOWN anti-clockwise.
Pressure and Weather Forecast Window
Displays:
• Current pressure and history bar-chart
• Weather forecast
• Moon phase
Note: For altitude display of 99o this is actually 990 feet, etc.
UV Window
Displays:
• UV index or Minimum Ultraviolet Exposure
• Daily Maximum
• Weekly Maximum
• Remote UV sensor battery status
TE923W IM1(ENG) HONEYWELL R.pmd 4/11/08, 5:27 PM18

19
Indoor Temp.
Channel Temp.
Dew-point Tempature
Tempature and Humidity
Mode Icon
Min-Max Display
Temp. Alert
Channel and
Reception status
Sensor Battery Status
Cycling Display
Indoor Humidity
Comfort Level
Channel Humidity
Clock and Alarms Window
Displays:
• US Atomic Time clock with time and calendar
• Single alarm, weekday alarm and ice warning alarm (pre-alarm)
Sunrise/Sunset Window
Displays:
• Sunrise and sunset times
• Longitude and Latitude
Temperature and Humidity Window
Displays:
• Temperature and humidity readings for indoor and selected channel
• Comfort level indication
• Dew point temperature
• High and Low temperature alerts
• Remote Thermo-Hygrometer sensor battery status
TE923W IM1(ENG) HONEYWELL R.pmd 4/11/08, 5:27 PM19

20
Rain Window
Displays:
• Precipitation amount for the last hour, day, yesterday, last week and last month
• Rainfall alert
• Remote rain gauge battery status
Wind Window
Displays:
• Wind Chill temperature
• Temperature at place of anemometer
• Wind direction
• Wind speed
• Wind gust speed
• Alert for wind speed and wind gust speed
• Remote anemometer battery status
Needle
TE923W IM1(ENG) HONEYWELL R.pmd 4/11/08, 5:27 PM20
Table of contents
Other Meade Weather Station manuals
Popular Weather Station manuals by other brands

Duemmegi
Duemmegi Domino DFMETEO quick start guide

Ambient Weather
Ambient Weather WS-1900 user manual

La Crosse Technology
La Crosse Technology V22-WRTHV2 manual

Auriol
Auriol 4-LD3091 instruction manual

West System
West System VAERSTASJON WIFI instruction manual

Ambient Weather
Ambient Weather WS-1170 user manual

Renkforce
Renkforce 1208067 operating instructions

LEXIBOOK
LEXIBOOK MeteoClock Evolution Compact SM180 instruction manual

brennenstuhl
brennenstuhl WID 550 owner's manual

LEXIBOOK
LEXIBOOK SM1102 manual

BALDR
BALDR B0360WST2H2PR-V2 user manual

La Crosse Technology
La Crosse Technology WS-7091UD instruction manual