MECHA C2 Reference guide

© 2023 FANOTEC | MECHA C2 Quick Reference Card v.1
C2 Quick Reference Card
Your choice is appreciated!
C2 is the Fanotec's second generation of controllers, with OLED display,
external battery and support for two MECHA rotators.
Configurations like C2-P1-E2 and C2-E2-E2 are heavy-duty and
affordable dual-axis pan-tilt head solutions for full-size DSLRs and
lenses.
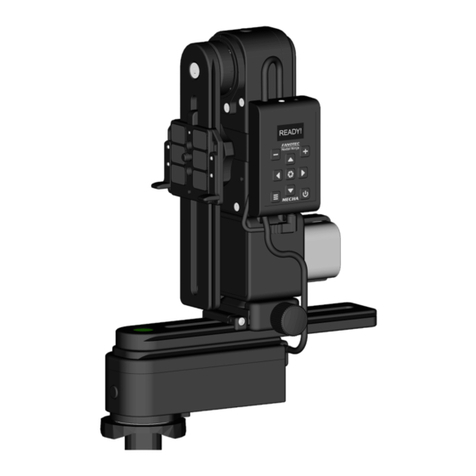
Get Your Equipment Ready
as shown in this image.
1 —Controller to upper rotator
built-in cable
2 —C2 controller
3 —Controller to lower rotator
built-in cable
4 —Upper rail
5 —Upper rotator
6 —Attachment strap
7 —External battery
8 —Lower rail
9 —Nadir adapter
10 —Lower rotator
Power on MECHA by long pressing the 0button. The power button
can also be used as an emergency stop.
!If the display is not showing anything, the battery may be
completely discharged and needs to be replaced.
Check which Working Mode is Set
1. After powering MECHA on, the display should
show the Preset (P) Menu, which means the SIMPLE
MODE is ON, and you can skip the next step.
2. If the display shows the rotators in use and the
IP address, the ADVANCED MODE is ON, and it is recommended to
switch to SIMPLE MODE. Long press the 8button to enter Menu
Mode, next press the 8button to switch to Config (C) Menu, then press
the Sbutton to change the first option to SIMPLE MODE.
Check the battery level by pressing 0. Press it again to exit.
Navigate through Config and Preset menus using the arrow buttons.
Switch between menus using the 8button.
Change and Check some Config Settings
OLED Brightness –Press the +button to enter edit mode, then use
either the +or 9button to adjust its value (from 1 to 255).
ROTATOR 1 is.../ ROTATOR 2 is... —Press either Sor +to enter edit
mode, then set the lower rotator / upper rotator.
ALWAYS ON NO POWER OFF —Press either Sor +to enter edit
mode, then set MECHA to shut down automatically after a certain
number of minutes of inactivity, or vice versa, to keep it always on.
USE NN IR is ON / OFF —Press the Sbutton to switch between the
two options. Choose ON to be able to use Nodal Ninja IR Remote.
FIRMWARE VERSION —Press the Sbutton to show the current
firmware version for all MCUs (microcontroller units) and connected
rotators. The first ‒MECHA's firmware ‒is the one you update over the
internet using the UPDATE options.
Simple Rotations
In the Preset (P) Menu, navigate to SIMPLE
ROTATIONS, then press S. The display will show:
Set POSITION, as in the image.
After pressing the first button, quickly press the second one. Use the
second button combination for rotation in the opposite direction.
Lower rotator Upper rotator
•45° rotations: 49, 5979, 69
•90° rotations: 4+, 5+7+, 6+
•180° rotations: 48, 5878, 68
Note that the rotation angle for the above button combinations
can be set in the Config (C) Menu: INTERVAL 1/2/3.
For continuous rotation press and hold the arrow buttons, one at a
time. For example, for continuous left rotation, press and hold 4.
When pressing 0to check the battery level, you can also use the
button combinations above for simple rotations.
Upper Rail Positions
The basic positions required for presets are:
Parked (1) —the upper rail is oriented vertically down.
Level (2) —the upper rail is in the horizontal position.
Raised (3) —the upper rail is oriented vertically upwards.

© 2023 FANOTEC | MECHA C2 Quick Reference Card v.1
Launch a Factory Preset Without a Camera Mounted
Use the 76 buttons to find the PANORAMA TEST PARKED option in
the Preset (P) Menu. This is a panorama preset consisting of 3 rows ‒ at
0° and +/- 45° ‒ 12 shots around, plus zenith and nadir shots, starting
from the parked position. Press Sto launch this preset and wait until
it is done, or press 0to cancel the execution.
Example of Creating Your Own Preset
In the Preset (P) Menu, find an empty option, then press +to enter
edit mode, then adjust the preset settings.
Use the 9+ buttons to adjust the current value. Use the 5button
to go to the next setting.
Here are some basic settings:
•Focal length (50mm –in the first image above) alternates with
Number of shots (12sh –in the second image above) and AUTO;
press 6to switch between the three parameters, and choose the
focal length this time.
•Number of camera trigger signals per position. T1 means 1 camera
trigger signal.
•Exposure (in seconds). E1/2 means an exposure of half a second.
•Image overlap (percent). Values in the range 5-80% are allowed.
•Coverage area: 360 180 for a full panorama.
•Position of the upper rail —Level (L) (when launching this preset,
make sure the upper rail is in the horizontal position).
•Direction of rotation: ? (unspecified).
Leave the other settings as they are in the template.
Press the 0button to cancel and exit edit mode, if necessary.
Confirm your settings and save by pressing the Sbutton.
As soon as a preset is saved, you can start shooting, or use it anytime
later. Press Sto launch the preset (or 9to delete it).
The display will show Set POSITION, meaning you can set the initial view
and position the upper rail before continuing, as shown in Simple
Rotations. Press Sif no change is needed.
If the direction of rotation is not specified in
preset (?), the display will show ROT. SENSE. Press
either 4or 5to continue.
Firmware Update Using a Hot-spot
•Set up a hot-spot with the name MECHA-UPDATE and (default)
password 87654321, in 2.4 GHz band on a 3G/4G/5G smartphone
with mobile data enabled and Internet available to it.
•Power on MECHA and wait until it reaches the idle status.
•Press the 8button to switch to the Config (C) Menu and find the
option UPDATE USING H-SPOT on page 8.
•Press the Sbutton to launch the update. MECHA starts scanning
the existing networks and you will hear two beeps when it connects
to the MECHA-UPDATE hot-spot.
•After update, deactivate the hot-spot and power MECHA off, then
power it on.
!The response shown on the display will be: ”No update found!”if
the update cannot be done at that time.
The update may take up to 5 minutes or more in case of slow Internet
connection.
Access the UI with Your Smartphone
•Set MECHA in AP mode using the Config option: Default Wi-Fi is AP /
STA / AP+STA / OFF.
•Tap the Settings icon on your device. Under Wireless and Networks,
make sure Wi-Fi is turned on, then tap Wi-Fi. Tap the network that
contains MECHA in its name to connect the smartphone to MECHA.
•The default password for MECHA’s network is 12345678.
•Access MECHA’s UI on the smartphone’s browser at: 192.168.8.1
Configuration page: 192.168.8.1/config
Row page: 192.168.8.1/row
C2 Interface: 192.168.8.1/c2
For more information, download the MECHA C2 User’s Guide:
https://www.nodalninja.com/Manuals/c2-guide.pdf
Youtube Tutorials ‒How to use MECHA's C2 Controller:
https://www.fanotec.com/list-c2
For support and troubleshooting, please visit our forum:
https://forum.nodalninja.com/
Nodal Ninja Youtube Channel ‒VR solutions:
https://www.youtube.com/@NodalNinja
Developed and manufactured by Fanotec International Limited.
https://www.fanotec.com/
MY NOTES:
MECHA
SSID
Sticker
Other manuals for C2
1
This manual suits for next models
2
Other MECHA Controllers manuals
Popular Controllers manuals by other brands
VALPES
VALPES VR Series Installation and operation manual
Danfoss
Danfoss AME 55 installation guide
EPH Controls
EPH Controls DETACH PRO B1PF Installation & operating instructions
Delta Current Control
Delta Current Control 2SPB quick start guide
Festo
Festo CMXR-C2 Brief overview
Bamo
Bamo BAMOPHOX 436 E instruction manual
