MECHA C2 User manual

i
MECHA C2 User’s Guide v.01.10
© 2021 FANOTEC
C2 USER’S GUIDE
September 2, 2021

ii
MECHA C2 User’s Guide v.02.8.2
© 2021 FANOTEC
Contents
WARNINGS...............................................................................7
Simple Mode
Introduction.......................................................... 9
MECHA Controller C2 Features ...........................................10
Before First Use...................................................11
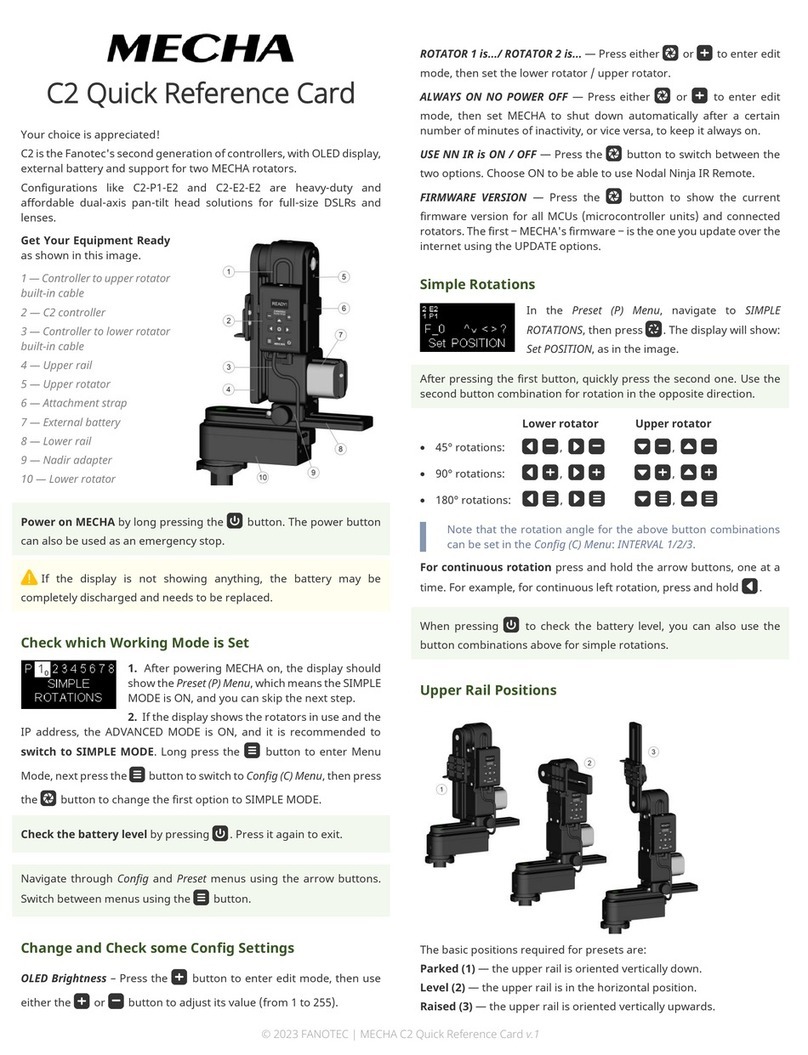
Get your equipment ready .............................................................11
Related Videos..................................................................................13
C2’s Buttons .....................................................................................14
Power On and Test ..........................................................................15
Check the Battery Level...................................................................16
Simple Rotations..............................................................................16
Firmware Update Using a Hot-spot....................................20
C2’s Menu Mode .................................................22
Using C2’s Menus .................................................................22
Creating a Preset in C2’s Menu Mode................................24
Panorama with Automatic Shooting Pattern Using C2’s
Menu ......................................................................................30
Panorama Using C2’s Menu..............................32
Setting the Rotators Using C2’s Menu..........................................32
Test Panoramas ....................................................................33
Test without Camera – Parked Position ........................................33
Test without Camera – Level Position ...........................................33
Test without Camera – Raised Position.........................................34
Panorama with Camera Mounted ......................................34

iii
MECHA C2 User’s Guide v.02.8.2
© 2021 FANOTEC
Basic Information About Shooting ...............................................35
Shooting in Step-by-Step Mode .....................................................36
Custom Partial Panorama Using Two Corners.............................36
C2’s Menu Options .............................................38
Preset (P) Menu ....................................................................38
Cong (C) Menu ....................................................................39
How to Access the UI..........................................47
About the User Interface .....................................................47
Set MECHA in AP, STA, or AP+STA Mode at - + ≡ on Display .....47
Access the User Interface (UI) with a Smartphone ..........48
Access the User Interface (UI) on Your Computer
Connected to a Wireless Network ......................................49
Test Using the UI.................................................50
UI Test ‒ Parked, Level, Raised.......................................................50
Advanced Mode
User Interface (UI)..............................................53
UI Controls.............................................................................53
Conguration Page.............................................64
Default Mode....................................................................................64
STA Mode ..........................................................................................66
Fixed Settings ...................................................................................66
Rotator Settings ...............................................................................67
Buzzer PWM and Start Page...........................................................68
IR Settings and more.......................................................................68
Reverse Direction of Rotations.......................................................70
Camera Settings...............................................................................70
Arrow Buttons ..................................................................................71

iv
MECHA C2 User’s Guide v.02.8.2
© 2021 FANOTEC
Favorite Codes..................................................................................73
Battery Voltage.................................................................................73
More from Server, zLM, Firmware, OLED......................................77
Technical Details ‒ IP Addresses, FW ............................................78
Backup and Restore Data ...............................................................79
Other Updating Methods...................................80
Firmware Update Using a Smartphone: Method 2 .........80
Working with Presets .........................................82
Programming a Preset Using Parameters.........................82
How to Create Your Own Presets Using the UI.................84
Default Presets.................................................................................84
Loading a Preset ..............................................................................85
Modifying a Preset...........................................................................88
Saving a Preset.................................................................................88
Preset Power Code .........................................................................89
Show your own presets in C2’s Preset Menu ....................90
Using a preset name as a base name ...........................................91
Directional preset name .................................................................92
MECHA’s Simple Scripting (MSS) ........................................93
Three Row Panorama + Nadir + Zenith (MSS)..............................93
Shooting Panorama Made Easy for Dual Axis..............................95
MSS Script Explained .......................................................................96
What Needs to be Changed, sometimes, in Real Situations ......98
Using Pause in MSS Script ..............................................................99
Let's Take a more Dense Approach with more Photos toward
Gigapixel Imagery..........................................................................100
Rewind after each ROW ................................................................101
Shooting in Horizontal Zigzag Pattern........................................101
Script for 2 Focal Lengths - MECHA Dual Axis ............................102
Download more Presets from Server............................... 103

v
MECHA C2 User’s Guide v.02.8.2
© 2021 FANOTEC
How to Set Both MECHA and Smartphone to Have
Internet Access........................................................104
Panorama Using MECHA’s Buttons......................106
Panorama with Automatic Shooting Pattern Using only the
MECHA’s Buttons........................................................................106
MECHA’s Current Codes ........................................108
Current Codes List ......................................................................108
Appendix
MECHA’s S (Shots) Language................................117
Three Row Panorama + Nadir + Zenith ‒ EXAMPLE 1 (SL) ................ 119
Three Row Panorama + Nadir + Zenith ‒ EXAMPLE 2 (SL) ................ 119
Panorama Using Loop in Script ‒ EXAMPLE 3 (SL) ............................ 122
Panorama with Extra Shots and Pause ‒ EXAMPLE 4 (SL)................ 122
C2 – C1 Differences and Similarities .....................124

MECHA C2 User’s Guide
Copyright © 2021 by Fanotec International Limited
All rights reserved. No part of this guide may be reproduced or transmitted
in any form by any means, electronic, mechanical, photocopying, recording,
or otherwise, without the prior written permission of the publisher. For
information on getting permission for reprints and excerpts, contact
How to use this User’s Guide
Welcome to the MECHA C2 User’s Guide!
C2 is our second generation of controllers, with OLED display, external
battery, and support for two MECHA rotators.
Before you start reading page-by-page, go section-by-section, looking at
titles, tables, highlighted paragraphs, images, etc. Although there is a lot of
information you have not read yet, this will clue you into what you are
about to read.
After that, go back to the beginning and read the Introduction and Before
First Use chapters. Please move on only after you become familiar with the
basic operations we present here, and leave aside the more complex
chapters and deepen the part that interests you more.
Even if you are an experienced user, please pay attention to the warnings.
If you find the firmware update and other operations difficult, you can
Let’s get started!
For firmware version 12295 or newer.
NOTE. Images shown in this guide may not be an exact
representation of the current firmware version.
Download the latest version of this guide from
https://www.nodalninja.com/Manuals/c2-guide.pdf
Web: www.nodalninja.com,www.fanotec.com
6
MECHA C2 User’s Guide v.02.8.2
© 2021 FANOTEC

7
MECHA C2 User’s Guide v.02.8.2
© 2021 FANOTEC
WARNINGS
WARNINGS to Dual Axis MECHA Users
●Test MECHA WITHOUT a camera mounted first!
●Please test for camera clearance before running any program.
●Test any preset supplied or adjusted WITHOUT a camera mounted FIRST,
especially when the clearance is not enough.
●CHECK for clearance with shutter cable attached!
●Use short cable with extreme caution.
●The power button, P, can always be used as an emergency stop, except
for the speed calibration procedure.
●If the movement is not as expected, or there is any danger for the
moving parts to hit something, please press
P
, the power button of
MECHA, to stop the movement immediately.
In this user guide, we assume that some settings on the
Configuration page – such as the rotation intervals for the
<>/\ buttons – have their default values.
So when we say „Press /then quickly press +for a rotation of
90°...”, this statement is valid if Arrow buttons Interval 2 is indeed
90°.
!

8
MECHA C2 User’s Guide v.02.8.2
© 2021 FANOTEC
Simple Mode
Before practicing what you read in this section, please make sure that C2
works in Simple Mode.
Power on MECHA by pressing the Pbutton for 3 to 5 seconds (long
press). It may take about 35-45 seconds to start, then MECHA reaches
the idle status and the display will show
1. either the Preset (P) Menu
2. or the rotators in use and the dynamic IP address.
Case 1. The display shows the Preset (P) Menu:
●Press the =button to switch to Config (C) Menu.
●If the first option in this menu is SIMPLE MODE, just leave it
unchanged. Otherwise, press the Sbutton to change it to
SIMPLE MODE.
Case 2. The display shows the rotators in use and the IP address:
●Long press the =button to enter Menu Mode.
●Press the =button to switch to Config (C) Menu.
●Press the Sbutton to change the first option to SIMPLE MODE.
📹https://youtu.be/gBGxE5Q11xI
Introducing Simple / Advanced Mode – MECHA C2

9
MECHA C2 User’s Guide v.02.8.2
© 2021 FANOTEC
Introduction
You may already know, from the
documentation available at this time,
that MECHA consists of a rotator (E1,
E2, or P1) and a controller (C1), and
is generally used to automate the
movement of various devices, such
as a panoramic head mounted on a
tripod or a turn table holding an
object for filming or photography.
Two such paired MECHA units –
MECHA Dual Axis Combo (DAC) – can
be used for dual axis applications, for
example, in panoramic photography.
The controller is the part of MECHA where
the buttons are located and that allows you
to send various commands to the rotators,
or to update the firmware, for example,
when you do not want to use the User
Interface (UI) for these purposes.
The new controller – C2 – which we present
in this user guide, is a dedicated dual-axis
controller with an OLED display and external
battery.
It is similar to C1 and can control the same
rotators – E1, E2, and P1 – so now you can
choose from the two controllers the one that
best suits your needs and preferences.
Please see C2 – C1 Differences and
Similarities for more details.
The OLED display can guide you through all the major operations and
settings, making C2 much more intuitive than the single-axis C1 controller
with LED indicators only.

The use of an external battery means you can carry spare batteries and
quickly refuel MECHA before or during a shooting session.
A power cable splitter (optional) is available for using 2 sets of batteries at
the same time for extended operation and/or changing batteries without a
pause.
MECHA Controller C2 Features
●Controlling two MECHA rotators.
●Compact with an OLED display.
●9 buttons for controls and inputs, including a button to trigger camera
shutter release.
●Shortcut keys to run presets stored in the memory, which can be
configured via the OLED display and web page interface.
●Wi-Fi remote control from smartphones, tablets, PCs by using simple
web page interface.
●Connection via a Wi-Fi access point and remote control over the internet.
●Over-the-air firmware update.
●Linking and controlling multiple controllers via Wi-Fi (future firmware
development).
●External power input (DC 9-19V, 2A rated, plug 1.7x4.0x9.5mm) for use
with different battery packs, or regulated power supplies for continuous
operation.
●CAM port to trigger camera focus and shutter release.
●Support any camera with a wired remote release port.
●Multipurpose AUX port for
○Commanding MECHA Start/Stop and other functions with a wired or
wireless RF remote.
○Commanding MECHA various functions with NN IR remote.
○Triggering a camera with an IR remote emitter.
○Camera shutter release confirmation.
10
MECHA C2 User’s Guide v.02.8.2
© 2021 FANOTEC

11
MECHA C2 User’s Guide v.02.8.2
© 2021 FANOTEC
Before First Use
Get your equipment ready
Note the numbers 1 and 2 printed on
the back of the controller, and then
connect the controller to the rotators as
follows:
●the end of the cable 1 to the lower
rotator
●the end of the cable 2 to the upper
rotator
⑤ ⑥ ①
1. Controller to lower
rotator built-in cable
2. Controller to upper
rotator built-in cable
3. Aux Port
4. Camera Trigger Port
5. DC Power Input port
6. USB Port (mainly for
programming and
troubleshooting)
④ ③ ②

The lower rotator is the rotator mounted under the lower rail of the device,
and the upper rotator is the vertical rotator, mounted on the upper rail.
Although the controller can be mounted in several ways, we recommend
that you mount it on the upper rotator, using its attachment strap, as shown
in the image below.
Upper
Rotator
Controller to Upper
Rotator built-in
cable
C2 Controller
Upper Rail
Controller to Lower
Rotator built-in
cable
Attachment strap
External
Battery
Lower
Rotator
Nadir
Adapter
Lower Rail
12
MECHA C2 User’s Guide v.02.8.2
© 2021 FANOTEC

13
MECHA C2 User’s Guide v.02.8.2
© 2021 FANOTEC
Related Videos
📹https://youtu.be/mY-aPgb-1ic
Installation Instruction for Dual-Axis MECHA C2-P1-E2 With NN6
(F9923)
📹https://youtu.be/X3AZjPZ-re4
Installation Instruction for Dual-Axis MECHA C2-E2 With NN6
(F9922)
📹https://youtu.be/iEyR3Jq9j34
Installation Instruction for Dual Axis Mecha C2-E1 With NN3 MK2
(F9920) First Batch
📹https://youtu.be/VKEyS24MNgY
Installation Instruction for Dual Axis MECHA C2-E1 With NN3 MK3
(F9921) First Batch
📹https://youtu.be/foEr50L0dZU
Power On and Test – MECHA C2

14
MECHA C2 User’s Guide v.02.8.2
© 2021 FANOTEC
C2’s Buttons
Here are some of the functions of the
buttons, to give you a quick overview, and
we will provide more details later when we
use the buttons.
-Minus button — use it to adjust values
in edit mode and delete editable presets;
hold it down to speed up the adjustment. It
is also needed for simple rotations.
+Plus button — use it to adjust values in
edit mode, create presets and enter edit
mode; hold it down to speed up the
adjustment. It is also needed for simple
rotations.
=Menu button — use it to switch from a menu to another and to show
information about parameters in edit mode.
<> Left and right buttons — menu navigation buttons. In edit mode,
they increase/decrease 10 times the current value of some parameters in
Config Menu. Use them to rotate the system manually to the left and to the
right, respectively, and also to specify the direction when launching a
preset.
/\ Up and down buttons — menu navigation buttons, control the up
and down movement of the upper rotator.
SCenter button — has a camera trigger function, confirms the execution
of a preset selected from the Preset Menu or confirms the adjustment of
values in edit mode. It can also be used to switch between pair options
(ON/OFF) and show details about the current option.
PPower button — use it to power on/off MECHA (long press), to confirm
or cancel some operations and show the battery percentage.
NOTE. The long press of the power button is only necessary at power
on/off. In all other cases, use a normal press.

Power On and Test
Position the upper rail as shown in the image on the right (parked
position), then power on MECHA and perform the test below without
mounting a camera.
TEST Without Camera Mounted
Use the \/ buttons to find the PANORAMA TEST PARKED option, which
tells the MECHA C2 to execute a panorama to the right, as follows: 12 shots
around, 3 rows ‒ at 0° and +/- 45° ‒ plus zenith and nadir, starting from
parked position.
●Press the Sbutton to launch the test and wait until the test is
performed and PANORAMA TEST PARKED is shown on the display again.
NOTE. The Pbutton can always be used as an emergency stop.
If the above test is not successful and you need assistance, please
!
Power on MECHA by pressing the P
button for 3 to 5 seconds (long press).
It may take about 35-45 seconds to
start, then MECHA reaches the idle
status and the display will show the
Preset (P) Menu:
Power off MECHA by pressing the power button for 3 to 5 seconds.
15
MECHA C2 User’s Guide v.02.8.2
© 2021 FANOTEC

16
MECHA C2 User’s Guide v.02.8.2
© 2021 FANOTEC
Check the Battery Level
Power on MECHA as shown above.
After that, press the Pbutton and notice the battery percentage shown
on the display. The battery symbol is shown in the upper left corner of the
display, alternating with the rotators in use. The dynamic IP address is
shown at the bottom of the display as well.
If necessary, replace the battery. Always use a 9-19V battery, according to
the technical specifications.
NOTE. When the BATTERY warning is shown on C2’s display, it can be
canceled with the -button.
Simple Rotations
Power on MECHA as shown above.
In the Preset (P) Menu, select – or navigate to – the first option, which is
SIMPLE ROTATIONS, then press the Sbutton to confirm. The display will
show: Set POSITION, as in the image above.
If the display is not showing anything, the battery may be
completely discharged and needs to be replaced.
!
📹https://youtu.be/7X6QS__4KYk
Check the Battery Level and Set Low Battery Warnings – MECHA C2

17
MECHA C2 User’s Guide v.02.8.2
© 2021 FANOTEC
1. For the lower rotator
●For 45° rotations:
○Press <then quickly press -.
○Press >then quickly press -, for the opposite direction.
●For 90° rotations:
○Press <then quickly press +.
○Press >then quickly press +, for the opposite direction.
●For 180° rotations:
○Press <then quickly press =.
○Press >then quickly press =, for the opposite direction.
2. For the upper rotator do the same, but use the up and down buttons
instead of the left and right buttons:
●For 45° rotations:
○Press \then quickly press -.
○Press /then quickly press -, for the opposite direction.
●For 90° rotations:
○Press \then quickly press +.
○Press /then quickly press +, for the opposite direction.
●For 180° rotations:
○Press \then quickly press =.
○Press /then quickly press =, for the opposite direction.
Note that the rotation angle for the above button combinations can be
set in the Config Menu or on the Configuration page.
3. For continuous rotation press and hold the arrow buttons, one at a
time. For example, for continuous left rotation, press and hold <.

18
MECHA C2 User’s Guide v.02.8.2
© 2021 FANOTEC
Use the Pbutton to exit.
When you press the Pbutton and the battery percentage is shown
on the display, you can also perform simple rotations.
📹https://youtu.be/0YVjtnbwnFM
Simple Rotations – MECHA C2
If the above simple rotations do not work as expected, the
rotators in use may not be set correctly (see Set the Rotator
Using C2’s Menu), or the intervals 1[-],2[+] and 3[=] are not the
default ones in the Config Menu or on the Configuration page.
!

19
MECHA C2 User’s Guide v.02.8.2
© 2021 FANOTEC
Parked, Level and Raised Positions
The Simple Rotations mentioned above are very helpful when the upper rail
needs to be in a certain position. The basic positions required for presets are
shown in the image below, and they are:
1. Parked — the most compact position, the upper rail is oriented vertically
down.
2. Level — the upper rail is in the horizontal position.
3. Raised — the opposite of parked, the upper rail is oriented vertically
upwards.
For example, if the current position is parked and the preset requires
raised, you can do this with one of the following Simple Rotations:
●Press /then quickly press +, and do this twice (90°x2=180°).
●Press /then quickly press =.
●Press and hold /until the upper rail reaches the desired position.
Adjust
the position
using /\
buttons
to match
the preset
before starting
the preset.
The naming conventions
for starting and ending positions
for dual axis presets available via
More from Server...
LevelParked Raised

20
MECHA C2 User’s Guide v.02.8.2
© 2021 FANOTEC
Firmware Update Using a Hot-spot
MECHA's firmware act as the device's complete operating system,
performing all control, monitoring and data manipulation functions, and it
is important to have the latest version installed to benefit from all the
features implemented in MECHA.
However, if you prefer not to update it at this time, or you are not
comfortable with the firmware update procedure, you can skip it for now
and read the next section.
Use this update method for version
(1)2201 or newer.
For this simple method of updating the
firmware, we assume that you know how
to set up a hot-spot on your 3G, 4G, or 5G
smartphone, a smartphone with mobile
data enabled and Internet available to it;
in other words, you can navigate the
Internet using that smartphone alone,
without the smartphone being connected
to a Wi-Fi.
●First, set up a hot-spot with the name
MECHA-UPDATE and (default)
password 87654321, in 2.4 GHz band.
●Press the Pbutton for about 3 to 5
seconds to power on MECHA, and wait until MECHA reaches the idle
status (and the Preset (P) Menu is shown on C2’s display).
●If MECHA doesn’t reach this status, then please power it off, by pressing
●Press the =button to switch to Config (C) Menu.
●Press the <button to select page 8.
●Press the \button several times, until UPDATE USING H-SPOT
appears on the display, as shown in the image below.
●Press the Sbutton to launch the update. Now MECHA starts scanning
the existing networks, and when it connects to the previously created
hot-spot, two beeps are heard. The UPDATE USING H-SPOT option will
update the firmware using the MECHA-UPDATE hot-spot you set.
●Now, deactivate the hot-spot, power MECHA off, then power it on.
Other manuals for C2
1
Table of contents
Other MECHA Controllers manuals
Popular Controllers manuals by other brands
Topworx
Topworx Valvetop DXP Installation, operation & maintenance manual

Truma
Truma MonoControl CS Gastank Operating instructions & installation instructions
Mitsubishi Electric
Mitsubishi Electric NZ2GN2S1-16D user manual

DOA
DOA AH 15 Safety and maintenance manual
BURK Technology
BURK Technology Plus-X AC-8 user guide
Russound
Russound A-BUS A-VC2 instruction manual
Victron energy
Victron energy BlueSolar PWM-Pro Series manual
Plum
Plum ecoMAX860P1-K STANDARD Installation and operating manual
AUTOTERM
AUTOTERM Comfort Control PU-CC quick start guide
DIG
DIG Irrigation-Mart 710 Series instruction manual
Datakom
Datakom DKG-255 user manual

Honeywell
Honeywell CENTRALINE EAGLE user guide
