Med-Fit Med-Fit 1 User manual

med fit
Med-Fit 1
Instruction Manual
Betrie sanleitung
Manuel d’instruction
Med-fit-1-instuctionmanual. xp_Layout 1 24/07/2020 09:43 Page cov1

.
Skin Preparation
Before Application of Self-Adhesive Electrodes
For est results please wash the area to e treated with a solution of
warm salt water (mix one ta lespoon of salt in warm water) and ru the
area with the salt solution.
The procedure will maximise the effect of the Tens when applied to areas
of the ody, where the skin may e particularly dry.
Apprêtement de la peau
Avant application des électrodes auto-adhésives
Pour o tenir de meilleurs résultats, veuillez laver votre peau dans les
zones à traiter avec de l’eau salée chaude (mélangez une cuillère à
soupe de sel à de l’eau chaude) et frottez la zone avec la solution.
La procédure permettra d’optimiser les effets de l’appareil TENS une fois
appliqué sur votre corps, aux endroits où la peau peut être
particulièrement sèche.
Vor ereitung der Haut
Vor An ringung der sel stkle enden Elektroden
Waschen Sie die zu ehandelnde Stelle mit einer Salzwasserlösung
(einen Esslöffel Salz in warmem Wasser auflösen) und rei en Sie die
Stelle mit der Salzlösung ein, um optimale Resultate zu erzielen.
Dieses Verfahren optimiert den Effekt der TENS-Behandlung an
Körperstellen, wo die Haut unter Umständen esonders trocken ist.
Med-fit-1-instuctionmanual. xp_Layout 1 24/07/2020 09:43 Page cov2

INDEX
Chapter Contents Page
2. Warnings & Precautions ...............................................2
1. General Description ......................................................1
3. Control Layout................................................................3
4. ..............................................4
5. Accessories ...................................................................5
6. Graphic Symbols ...........................................................6
7. Parameter Controls .......................................................6
8. Attachment of Electrodes Lead Wires ........................9
9. Preparation for use .......................................................10
10. Application of Re-usable Self Adhesive
Electrodes ......................................................................10
11. Adjusting The Controls ................................................11
12. Battery Information .......................................................14
14. Safety-technical Controls..............................................16
13. Maintenance Transportation and Storage ...................16
15. Conformity To Safety Standards .................................17
16. W arranty .........................................................................17
Manufacturer .................................................................17
Representative In The EU .............................................17
Med-fit-1-instuctionmanual. xp_Layout 1 24/07/2020 09:43 Page cov3

1
Chapter 2: WARNINGS & PRECAUTIONS
PLEASE NOTE:
It is imperative that patients read and understand the warnings and
precautions before using the unit. Do not allow your machine or
electrodes to be used by anyone else, as they are designed for sin-
gle patients use only. It is recommended that proper medical advice
-
therapist, Doctor or Nurse) prior to use, in order to ensure safe and
effective treatment. If you are taking any medication please carry on
as normal but seek advice from your clinician before using the device.
WARNING! PATIENTS WITH PACEMAKER MAY NOT BE TREATED
WITH TENS
• Do not use during pregnancy except during labour
• Do Not place electrodes over the Carotid Sinus
• Do Not use on broken or damaged skin
• Do Not place electrodes close to the eyes or in the mouth.
• Do Not use TENS whilst driving or operating machinery.
Chapter 1 : GENERAL DESCRIPTION
The MED-FIT 1 is a battery operated pulse generator that sends
electrical impulses to the body by means of electrodes attached to
the skin.
The device has two independently controllable channels. A pair of
electrodes can be connected to each channel.
The electronics of the MED-FIT 1 create electrical impulses whose
Intensity, duration, number per second and modulation may be
altered with the controls or switches. Dial controls are very easy to
use and
the slide cover prevents accidental changes to the settings.
1
Med-fit-1-instuctionmanual. xp_Layout 1 24/07/2020 09:43 Page 1
Tens is unsuitable and should not be used in the following situations.
•
Persons suffering from conditions where the circulation is impaired.
• Epilepsy, Heart Condition or any form of Malignancy.
• Patients with poor skin sensation and non-compliant patients who
are emotionally disturbed or have dementia.
• Over metal implants or in conjunction with sleep apnea or heart
monitors.
You should be aware that TENS units provide symptomatic relief
only and are not considered curative.
The degree of pain relief declines in some cases with time, TENS
may have less effect after extended use. To reduce the risk of de-
velopment of tolerance, the following measures may be taken:
• Frequent follow-ups.
• Teach the patient to use burst, modulated, and conventional
stimulation.
• Vary electrode placement.
• Vary the frequency
If none of the above are successful discontinue TENS for up to 2
weeks and then resume stimulation.
As with pain-killing medicines, TENS provides temporary pain relief,
which often lasts up to four hours after treatment. Treatment usually
lasts 30-60 minutes, 2-4 times daily.
The time taken to achieve pain relief varies from an immediate effect
up to about an hour. Some patients prefer continuous stimulation
while others prefer intermittent stimulation with different intervals.
Remove the electrodes and discontinue stimulation if you experi
ence skin irritation or discomfort.
2
Med-fit-1-instuctionmanual. xp_Layout 1 24/07/2020 09:43 Page 2

M
(
(
(
o
P
f
l
t
s
s
C
A
a
&
3
Chapter 3 : CONTROL LAYOUT
M
(
(
(
o
P
f
l
t
s
s
C
A
a
&
3
Med-fit-1-instuctionmanual. xp_Layout 1 24/07/2020 09:43 Page 3

Chapter 4 : TECHNICAL SPECIFICATIONS
MECHANISM TECHICAL DESCRIPTION
01 Channel Dual, isolated between channels
02 Pulse Amplitude Adjustable 0-80mA, Max output 80mA peak to peak
(15.8mA rms) into 500ohm load each channel.
03 Output Voltage Adjustable 0-40V, Max output 40V peak to peak
(7.9V rms) into 500ohm load each channel.
04 Wave Form Asymmetrical Bi-Phasic Square Pulse
05 Power supply One 9 Volt Battery, type 6F22
06 Size 95(H) x 65(W) x 23.5(T) mm
07 Weight 115 grams (battery included)
08 Pulse Rate Adjustable, from 2 Hz to 150 Hz
09 Pulse Width Adjustable, from 30µs to 260µs
10 Burst Mode Bursts occur twice per second. The pulse width is
(B Mode)
11 Modulation Pulse rate is automatically varied in a cyclic pattern
over a nominal 10 second interval (in max 150Hz).
Pulse rate decreases linearly, over a period of 4 seconds,
from the control setting value to a value which is 40%
less. The lower pulse rate will continue for 1 second and
then the pulse rate increases linearly over a period of 4
seconds to the original value. This will continue for 1
second and the cycle is then repeated
12 Operating Temperature : 0°~40°C
Condition Relative Humidity : 30%~75%
Atmosphere Pressure : 700Hpa~1060Hpa
13 Remark There may be up to a +/- 5% tolerance of pulse width
and pulse rate and +/- 20% tolerance of amplitude
& voltage.
M
(
(
(
o
P
f
l
t
s
s
C
A
a
&
4
Med-fit-1-instuctionmanual. xp_Layout 1 24/07/2020 09:43 Page 4
E
9
I
5
Chapter 5 : ACCESSORIES
Each set MED-FIT 1 are completed with standard accessories and
standard label as given below
I. Accessories
REF. NO. DESCRIPTION Q’TY
1. SA 10 50 X 50 mm Adhesive Electrodes 4 pieces
2. Electrodes Leads 2 pieces
3. 9 V Battery, type 6F22 1 piece
4. Instruction Manual 1 piece
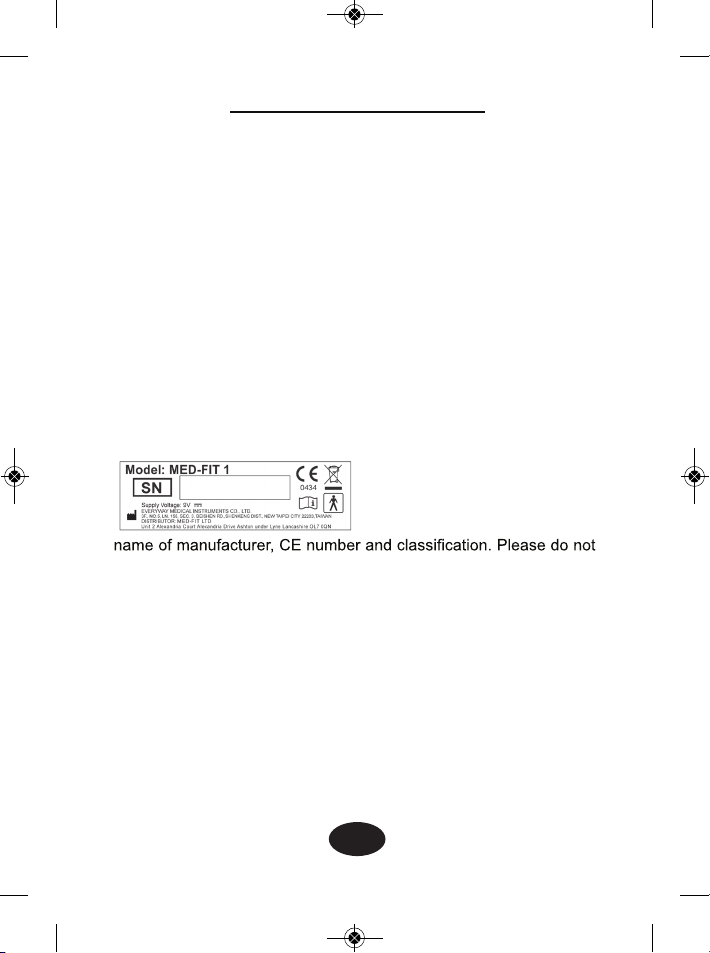
II. LABEL
The label attached to the back
of the unit contains important
information this model, serial
number, supply voltage, the
remove.
5
Med-fit-1-instuctionmanual. xp_Layout 1 24/07/2020 09:43 Page 5

E
9
I
Chapter 6 : GRAPHIC SYMBOLS
1. Note Operating Instructions
2. Degree of Electrical Protection BF
3. Do not insert the plug into AC power supply socket.
4. Direct Current (DC power source)
5. Consult Instructions for use
6. Manufacturer
7. Serial Number
Chapter 7 : PARAMETER CONTROLS
PULSE DURATION
Wider pulse duration settings will deliver stronger stimulation for
any given intensity setting. As mentioned in the Controls section, by
using a combination of intensity and pulse duration different groups
The choice of which pulse duration to use is partially dependent
upon the Treatment Mode and Protocol selected (refer to the
appropriate section).
E
9
I
6
Med-fit-1-instuctionmanual. xp_Layout 1 24/07/2020 09:43 Page 6

At h
H
7
PULSE RATE
The Pulse Rate (frequency, pulses per second or Hertz) is thought
to determine whether the spinal gating mechanism or the endorphin
release mechanism is activated.
As a rough guide the higher frequencies, those above 70Hz, will
activate the spinal gating mechanism. The patient will perceive a
"pins and needles" sensation.
Lower frequencies, those between 2-16Hz, will activate the
endorphin release mechanism. The patient will perceive a "tapping"
sensation.
It should be noted that individual patients vary in their response to
TENS and the practitioner should be prepared to experiment with
different settings in order to obtain the most effective response.
TREATMENT MODE
Normal or Conventional TENS offers the practitioners complete
control over all the various treatment parameters of the instrument.
Burst Mode is analogous to the Low Rate TENS technique except
the low frequency individual pulses are replaced by individual
"bursts" of 7-10 individual pulses. It is thus a combination of
Conventional TENS and Low Rate TENS. In Burst Mode, the
with the Frequency Rate control.
Modulated Mode attempts to prevent nerve accommodation by
continuously cycling the treatment intensity. When using Modulated
Mode increase the intensity only when the unit is at the maximum
intensity of the modulation cycle. If the intensity is increased during
a low intensity period of the cycle the resulting stimulation may
cause discomfort.
At h
H
7
Med-fit-1-instuctionmanual. xp_Layout 1 24/07/2020 09:43 Page 7

8
INTENSITY
Each patient responds differently to different levels of intensity, due
to varying degrees of tissue resistance, innnervation, skin thickness,
etc. Intensity instructions are therefore limited to the following
settings: Perception - The intensity is increased so that the patient
can feel the stimulation, but there is no muscular contraction.
Slight Contraction - Intensity is increased to a barely visible
.tniojaevomothguonegnortstonsitahtnoitcartnocralucsum
When using low pulse rate settings, this will show as individual
twitches. At higher pulse rates there will simply be increased
muscle tension. Strong muscular contraction is typically not used in
TENS therapy. However, muscular contraction may be useful if the
pain involves a cramped or spastic muscle.The TENS can be used
as a traditional muscle stimulator in the circumstances to quickly
break the spasm. Use a rapid pulse rate, wide pulse duration and
.)ecnarelottneitapnihtiwllits(noitcartnocelbisivotytisnetniehttes
Twenty or thirty minutes of such a tetanized muscular contraction
will generally break the spasm. In all cases, if the patient complains
that the stimulation is
uncomfortable, reduce intensity and/or cease stimulation.
TIME DURATION
The onset of pain relief should occur shortly after the intensity
setting has been determined. However, in some cases, pain relief
may take as long as 30 minutes to achieve especially when using
low-frequency TENS.TENS units are typically operated for long
periods of time, with a minimum of 20 - 30 minutes and in some
post-operative protocols, as long as 36 hours.
In general, pain relief will diminish within 30 minutes of the cessation
of stimulation. Pain relief obtained through low-frequency TENS
may last longer.
At h
H
8
Med-fit-1-instuctionmanual. xp_Layout 1 24/07/2020 09:43 Page 8
9
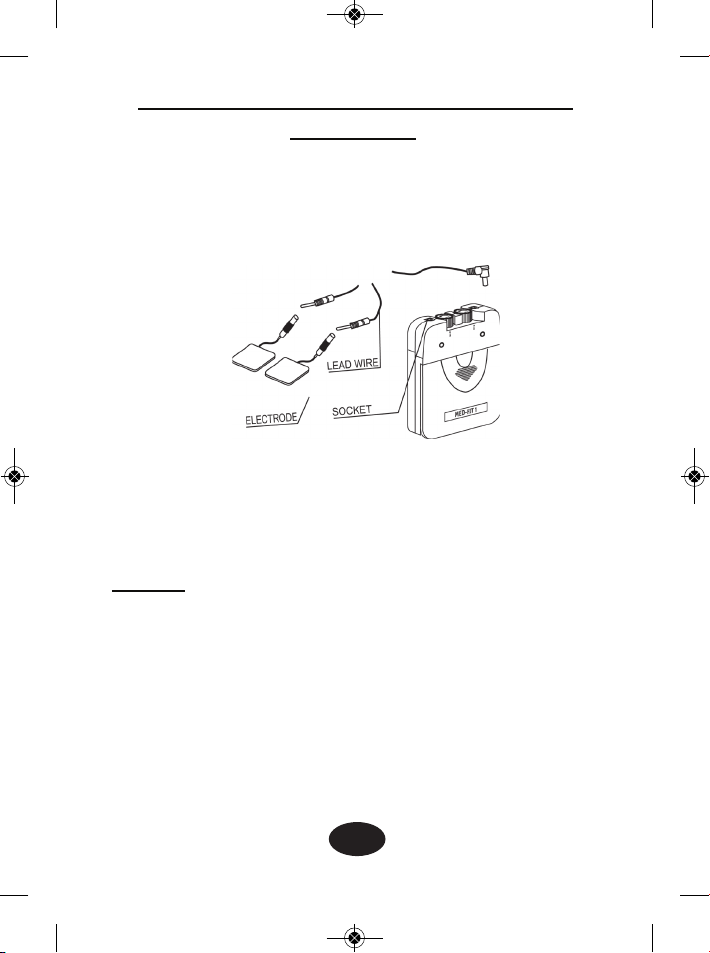
Chapter 8 : ATTACHMENT OF ELECTRODE
LEAD WIRES
The wires provided with the system insert into the jack sockets
located on top of the device. Holding the insulated portion of the
connector, push the plug into one of the jacks (see drawing); one or
two sets of wires may be used.
After connecting the wires to the stimulator, attach each wire to
.
seriwehthcateddnahcattauoynehweracekaT.edortcelena
Jerking the wire instead of holding the insulated connector body
may cause wire breakage.
CAUTION
Do not insert the plug of the patient lead wire into the AC power
supply socket.
9
Med-fit-1-instuctionmanual. xp_Layout 1 24/07/2020 09:43 Page 9

10
Chapter 9 : PREPARATION FOR USE
It is recommended that for persons with sensitive skin, the area is
prepared prior to the application of the self adhesive electrodes by
cleaning using soap and water or alcohol wipes and then drying
thoroughly. It is quite normal to see a reddening of the skin under-
neath the electrodes following treatment but this usually disappears
in less than 2 hours.
If the reddening persists we recommend PALS (BLUE) electrodes
Chapter 10 : APPLICATION OF RE-USABLE SELF
ADHESIVE ELECTRODES
Application
1.
Clean and dry the skin at the thoroughly with soap and water prior
to application of electrodes.
2. Insert the lead wire into the pin connector on the pre-wired
electrodes.
3. Remove the electrodes from the protective liner and apply the
Removal
1. Peel the electrodes from the skin; do not pull on the lead wires
because it may damage the electrodes.
2. Place the electrodes on the liner and remove the lead wire by
gently twisting and pulling.
Care and Storage
1.
Between uses, store the electrodes on their liner in the resealable
bag in a cool dry place.
2. The adhesive properties of the electrodes may be improved by
applying a few drops of cold water and allowing the electrode
surface to dry. Do NOT soak the electrodes.
10
Med-fit-1-instuctionmanual. xp_Layout 1 24/07/2020 09:43 Page 10

Ta
11
Chapter 11 : ADJUSTING THE CONTROLS
1. Slide Cover :
A sliding panel covers the controls for Pulse Width, Pulse Rate,
Mode Selector and Modulation Selector. Take advice from your
clinician regarding the settings and then leave the cover in place.
2. Display LED
The LED corresponding to the appropriate channel will light
whenever that channel is activated. At low frequencies each
individual pulse may be observed but at frequencies above 30 Hz
the LED will appear to be constantly illuminated.
Important
1. Do not apply to broken skin.
2. The electrodes should be discarded when they no longer adhere.
3. The electrodes are intended for single patient use only.
4. If irritation occurs, discontinue use and consult your clinician.
5. Read the instruction for use of self-adhesive electrodes before
application.
11
Med-fit-1-instuctionmanual. xp_Layout 1 24/07/2020 09:43 Page 11
12
Ta
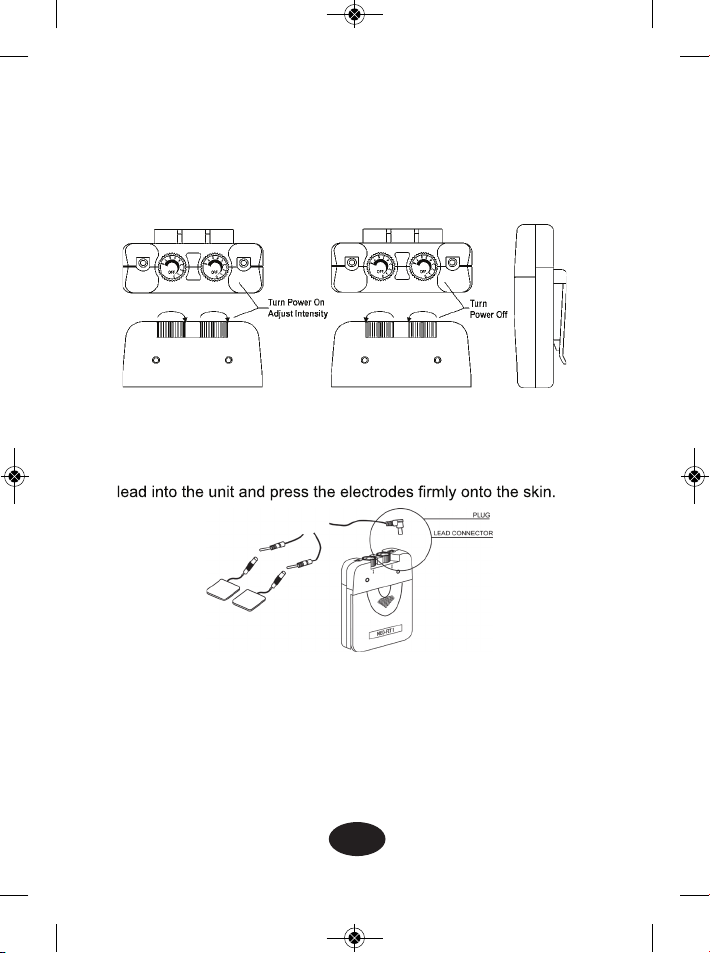
3.On/Off Switch and Intensity Control :
The unit is switched on by turning the appropriate channel control
clockwise. The LED will illuminate as described above. The output
intensity increases as the control is turned further clockwise. To
reduce the output intensity and/or switch off the unit the control is
turned anti-clockwise.
4.Lead Connector
Ensure that the unit is switched off. Connect the electrodes to the
lead by inserting the plugs into the electrode connectors. Plug the
Ta
12
Med-fit-1-instuctionmanual. xp_Layout 1 24/07/2020 09:43 Page 12

R
13
R
5. Mode Control
Expose the controls by sliding front cover down. This switch has 3
positions: B for Burst stimulation, N for Constant stimulation, and M
for modulated stimulation. Push the Mode Selector to the desired
position.
6.Pulse Rate Control:
This control determines the frequency (pulses per second). This dial
controls the frequency to both channels. Unless otherwise instructed
set the pulse rate to between 70 - 120 Hz.
7.Pulse Width Control:
This control adjusts the length of each electrical impulse. By
increasing the pulse width the strength and sensation of the
stimulus will be increased. By reducing the pulse width the strength
and sensation will be reduced. Unless otherwise instructed set the
control to between 70 - 120 µs.
13
Med-fit-1-instuctionmanual. xp_Layout 1 24/07/2020 09:43 Page 13
14
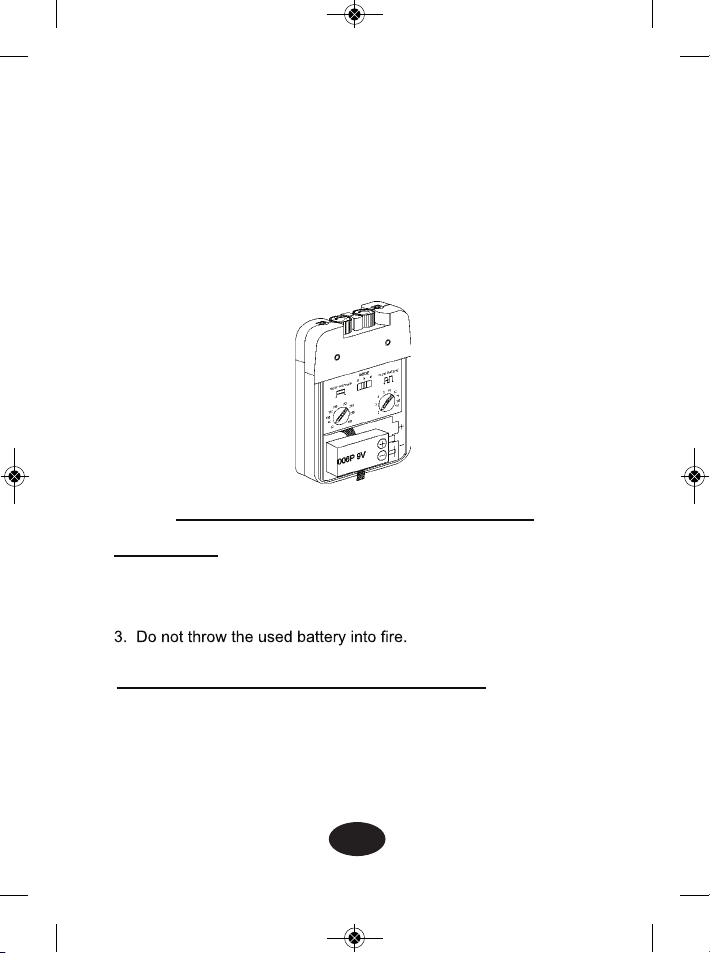
8.Check/Replace the Battery:
Over time, in order to ensure the functional safety of TENS,
changing the battery is necessary.
1. Make sure that both intensity controls are in the off position
2. Slide the battery compartment cover and remove.
3. Remove the battery from the compartment.
4.
Insert the battery into the compartment. Note the polarity indicated
on the battery and in the compartment.
5. Replace the battery compartment cover and slide to close
Chapter 12 : BATTERY INFORMATION
PRECATIONS
1.
Remove battery if equipment is not likely to be used for some time.
2. Please recycle the used battery in accordance with domestic
regulation.
If you use rechargeable batteries, please follow the instructions.
RECHARGEABLE BATTERIES(NOT INCLUDED)
Prior to the use of a new unit, the rechargeable battery should be
charged according to the battery manufacturer's instructions. Before
using the battery charger read all the instructions and cautionary
markings on the battery and in this instruction manual.
After being stored for 60 days or more, the batteries may lose their
charge. After long periods of storage, batteries should be charged
prior to use.
R
14
Med-fit-1-instuctionmanual. xp_Layout 1 24/07/2020 09:43 Page 14

c
O
16
BATTERY CHARGING
(1)
Plug the charger into any working 110 or 220/240v mains electrical
outlet.The use of any attachment not supplied with the charger
tric shock, or injury to persons.
(2) Follow the battery manufacturer's instructions for charging time.
(3)
After the battery manufacturer's recommended charging time has
been completed, unplug the charger and remove the battery.
(4) Batteries should always be stored in a fully charged state.
To ensure optimum battery performance, follow these guidelines:
(a) Although overcharging the batteries for up to 24 hours will not
damage them, repeated overcharging may decrease useful
battery life.
(b) Always store batteries in their charged condition. After a
battery has been discharged, recharge it as soon as possible.
If the battery is stored more than 60 days, it may need to be
recharged.
(c) Do not short the terminals of the battery. This will cause the
battery to get hot and can cause permanent damage. Avoid
storing the batteries in your pocket or purse where the terminals
may accidentally come into contact with coins, keys or any
metal objects.
(d) WARNINGS:
1. Do not attempt to charge any other types of batteries in your
charger, other than the nickel-cadmium rechargeable batteries.
Other types of batteries may leak or burst.
2. Do not incinerate the rechargeable battery as it may explode!
15
Med-fit-1-instuctionmanual. xp_Layout 1 24/07/2020 09:43 Page 15

15
Chapter 13 : MAINTENANCE, TRANSPORTATION
AND STORAGE OF TENS DEVICE
1.
ice.
Note: Do not smoke or work with open lights (for example, candles,
2. Stains and spots can be removed with a cleaning agent.
3.
Do not submerge the device in liquids or expose it to large amounts
of water.
4. Return the device to the carrying box with sponge foam to ensure
that the unit is well-protected before transportation.
5.
If the device is not to be used for a long period of time, remove the
batteries from the battery compartment (acid may leak from used
batteries and damage the device). Put the device and accesso-
ries in carrying box and keep it in cool dry place.
6. The packed EMS device should be stored and transported under
the temperature range of -20°C ~ + 60°C, relative humidity
20% ~ 95%, Atmosphere pressure 500hPa ~ 1060hPa.
Chapter 14 : SAFETY-TECHNICAL CONTROLS
For safety reasons, check your MED-FIT 1 each week based on
the following checklist.
1. Check the device for external damage.
- deformation of the housing.
- damaged or defective output sockets.
2. Check the device for defective operating elements.
- legibility of inscriptions and labels.
- make sure the inscriptions and labels are not distorted.
3. Check Led
- led must be illuminated when switched on.
4. Check the usability of accessories.
- patient cable undamaged.
- electrodes undamaged.
Please consult your distributor if there are any problems with device
and accessories.
c
O
c
O
16
Med-fit-1-instuctionmanual. xp_Layout 1 24/07/2020 09:43 Page 16

17
Chapter 16 : WARRANTY
AllMED-FIT 1 models carry a warranty of one year from the
date of delivery. The warranty applies to the stimulator only and
covers both parts and labour relating thereto.
Thewarranty does not apply to damage resulting from failure
to follow the operating instructions, accidents, abuse, alteration or
disassembly by unauthorized personnel.
Manufacturer:
Everyway Medical Instruments Co., Ltd.
3F., No.5, Ln. 155, Sec. 3, Beishen Rd.,
Shenkeng Dist., New Taipei City 22203,
Taiwan. (R.O.C.)
Representative in the EU:
REHAB EUROPA SL
SANT GERVASI DE CASSOLES, 96 3o4a
08022 BARCELONA, SPAIN.
INFORMATION FOR DISTRIBUTOR:
Please contact the above mentioned manufacturer for technical
support and documentation when necessary.
Chapter 15 : CONFORMITY TO SAFETY
STANDARDS
The MED-FIT 1 devices are in compliance with the
EN 60601-1-2:2001 and EN 60601-1:1990+A1:1993+A2:1995
+A13:1996 safety standards.
7601N60111
17
Med-fit-1-instuctionmanual. xp_Layout 1 24/07/2020 09:43 Page 17
Table of contents
Languages:


