MedeaWiz DV-S1 User manual

MedeaWiz® Sprite®
.
0 | P a g e
MedeaWiz® Sprite®
High Definition Video Player
User Manual
FW version 20161229
Manual version 1.08
Parts of this manual do not apply to earlier versions of firmware.
Find your Sprite’s FW version in the on-screen Setup Menu.
Please go to www.MedeaWiz.com for other versions.

MedeaWiz® Sprite®
.
1 | P a g e
Table of Contents
Introduction ..................................................................................................................................................2
What’s in the box..........................................................................................................................................3
Sprite® Quick Start Guide..............................................................................................................................4
On-Screen Menu for Setup ...........................................................................................................................5
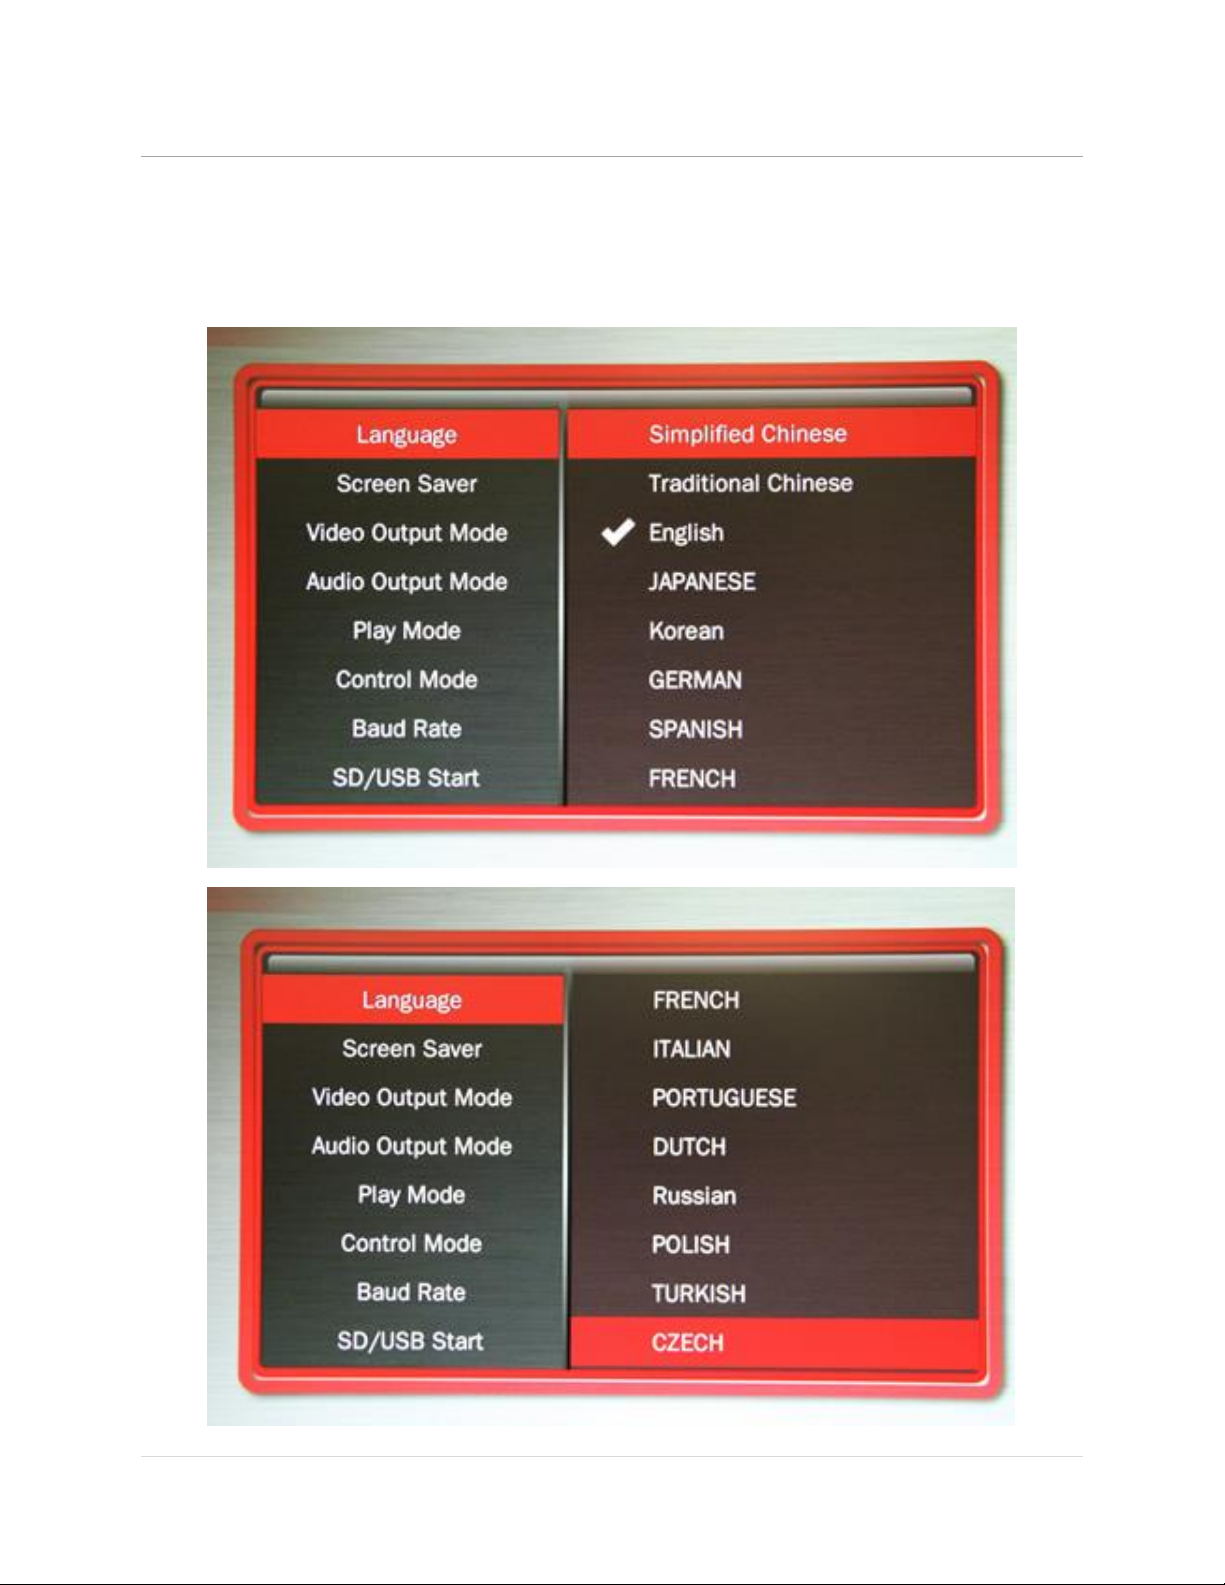
Menu Language.............................................................................................................................................6
Screen Saver..................................................................................................................................................7
Video Output Mode......................................................................................................................................8
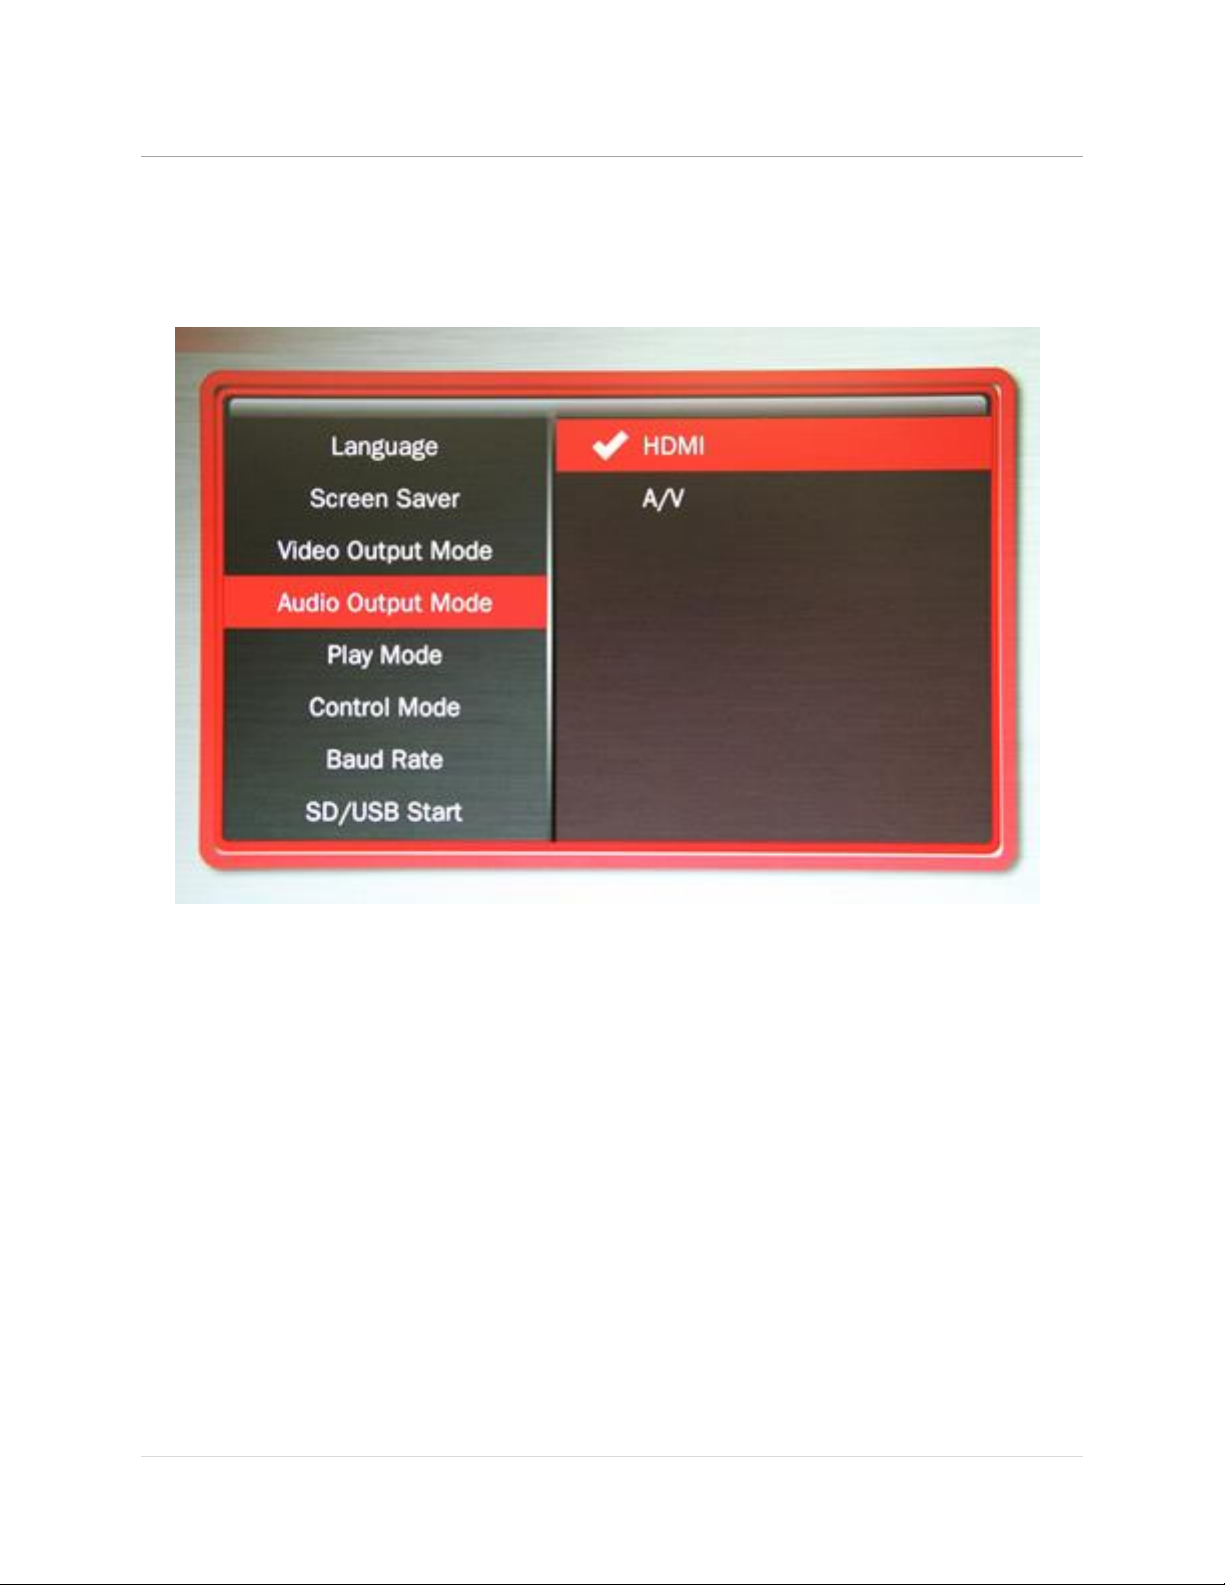
Audio Output Mode......................................................................................................................................9
Play Mode ...................................................................................................................................................10
Control Mode..............................................................................................................................................11
Baud Rate....................................................................................................................................................12
SD/ USB Start Mode....................................................................................................................................13
Restore Default Settings .............................................................................................................................14
Firmware Version........................................................................................................................................15
Firmware Revisions History.........................................................................................................................16
Firmware Upgrade ......................................................................................................................................17
Wiring Connections Rear Panel ..................................................................................................................18
Trigger Choices Explained...........................................................................................................................19
External Control –Wiring a Pushbutton to the I/O Port.............................................................................20
External Control - Wiring for Serial Communications to the I/O Port ........................................................21
PLC Output Interfacing................................................................................................................................22
Motion Sensor Wiring.................................................................................................................................23
Schematic of I/O on the Sprite circuit board ..............................................................................................24
Using the Hydra® interface with the Sprite® ..............................................................................................25
Serial Port Control from your Show Controller or Micro-processor...........................................................26
Serial Port Control Commands....................................................................................................................27
IR Remote Control.......................................................................................................................................29
Power Supply ..............................................................................................................................................30
Supported Video Formats...........................................................................................................................31
Trouble FAQ ................................................................................................................................................32
Support .......................................................................................................................................................35

MedeaWiz® Sprite®
.
2 | P a g e
Introduction
The MedeaWiz® Sprite® is a High Definition digital video repeater capable of HD 1080p HDMI
output with high quality stereo audio. It has a direct trigger input and a 2-way communications
serial port. The Sprite® will play a video or audio file in a circular loop, repeating when power is
applied. It will play different video or audio files by a trigger input or serial command, and then
return to the looping file.
The Sprite® has no black space when looping or changing files. It will hold the last frame of
video until the first frame quickly displays.
It is simple to set-up with an on-screen menu. No programming required. It has multiple
operating mode options to fit many needs.
In the trigger input modes, you can use a push button, other dry contact, motion sensor or a
voltage level change, with your choice of a High or a Low transition trigger. You can also choose
to allow an interrupt from a new trigger event, or to not allow an interruption of the file
playing. After a triggered file ends, the looping video will play again until a new trigger occurs.
In the Serial Control Mode you can have a looping video file and control up to 200 other video
files to play on command. Once the commanded video ends, the looping video will play again
until a new command is received. Serial Control can also be used with audio files.
The Hydra® accessory is available to use with the Sprite® in Serial Control Mode. It adds several
modes of operation with multiple trigger inputs, DMX 512 control, and 8 sinking outputs to
control lamps, relays and more.
The Sprite® also has basic “play all” file modes to play all files on the SD card or USB drive in
order or randomly when power is applied. Files will continue to play until power is removed.
A remote control is included for initial set up of the Sprite. Your settings are retained in
memory. Anytime power is applied the Sprite will automatically play according to the settings
you made.
The Sprite® is one of the most energy efficient “green” video repeaters available today. Using
only 5 Volt DC power at an average of 400 mA, it takes only about 2 Watts to run.
FCC, CE and RoHS certified.

MedeaWiz® Sprite®
.
3 | P a g e
What’s in the box
The Sprite® comes with
1) IR remote control
2) AC adaptor, universal 100 to 240 Volt AC input, regulated 5 Volt DC output
3) AV cable, 3.5mm 4 pole to RCA red, white and yellow
4) I/O plug, 3.5mm 4 pole to screw terminals

MedeaWiz® Sprite®
.
4 | P a g e
Sprite® Quick Start Guide
The MedeaWiz® Sprite® ships with the Video Output set to HDMI at 720p and the Control Mode
set to “Trigger Low No Interrupt” to use a pushbutton trigger.
Most users can simply connect their HDMI monitor and install their SD memory card, with files
named in the same way as the earlier model MedeaWiz players.
Example 1: You have one file that you need to run in a loop when power is turned on:
Name the file 000.xxx (where xxx is the proper file extension such as mpg, wmv, mp4, mt2s or
etc.)
Example 2: You have a looping file and also want to use the Trigger with a push button:
Name the looping file 000.xxx as above. Then name the trigger file 001.xxx
Example 3: You have a looping file and also want to use the Serial Port control:
Name the looping file 000.xxx as above. Then name the other files 001.xxx, 002.xxx, 003.xxx and
etc. in order.
Using the IR remote control, enter the on-screen menu by pressing the Setup key, and set the
Control Mode to Serial Control, and set the Baud Rate to match your external controller.
Always have a looping file named 000 if using any trigger input or serial control:
The 000 looping file can be a black video file if no video is wanted until a trigger or command.
We suggest the looping file be at least 30 seconds long.
Make sure you are using ZEROS and not the letter O in the file name. Do not put the files in a
folder. Only put media files on the SD card or USB drive.
You can download HD test files at http://www.highdefforum.com/high-definition-movies-
video-clips/6537-official-hd-video-clip-list.html

MedeaWiz® Sprite®
.
5 | P a g e
On-Screen Menu for Setup
Press the “Setup” button on the remote control to enter the on-screen menu. Use the orange
“Arrow” keys to navigate, the green “Enter” key to make a selection, and the yellow “Return”
key to go back one level. Pressing the “Return” key twice will exit the menu and begin file play.
Top Menu page showing current settings
Note the above menu picture is showing the factory default settings for firmware 20161229.
Other manuals for different versions of FW may be found at www.medeawiz.com

MedeaWiz® Sprite®
.
6 | P a g e
Menu Language
Select the language for the on-screen menu

MedeaWiz® Sprite®
.
7 | P a g e
Screen Saver
Select the time delay for the screen saver.
The Screen Saver is only active in the “Off” manual play mode. It is not active in other control
modes.

MedeaWiz® Sprite®
.
8 | P a g e
Video Output Mode
Select the video output needed to match your monitor.
Select NTSC to use the Composite video output from the 3.5 mm yellow AV jack using the
yellow RCA plug from the included A/V cable.
Select PAL for Composite video output from the 3.5 mm yellow AV jack for some areas other
than the Americas that use PAL video files and monitors.
The HDMI selections will route the video to the HDMI connector only.

MedeaWiz® Sprite®
.
9 | P a g e
Audio Output Mode
Select the audio output needed.
Select HDMI to route the audio through the HDMI cable to your monitor or amplifier with HDMI
input.
Select A/V to route the audio to the 3.5mm 4 pole AV jack and use the red and white RCA plugs
from the included A/V cable.
The audio output will require an amplifier or amplified speakers. It can’t directly drive
speakers
The Sprite is capable of high quality Stereo audio. It does not support surround sound.

MedeaWiz® Sprite®
.
10 | P a g e
Play Mode
Select the play mode needed for your application
Selections with no external input control:
Select Off to manually play files using the IR remote control.
Select Video to play all video files in a circular loop.
Select Audio to play all audio files in a circular loop.
Select Photo to play all photo files in a circular loop.
You may play audio files along with photos. Just add audio files to the SD / USB.
Selections with external input control:
Select Video Control Mode to loop video file 000.xxx and trigger / command other video
files to play.
Select Audio Control Mode to loop audio file 000.xxx and trigger / command other
audio files to play.
If you need to mix video and audio files, convert the audio files to video files and use
the Video Control Mode.

MedeaWiz® Sprite®
.
11 | P a g e
Control Mode
Select the external Control Mode for your application
Select Serial Control to use an 8X78 input expander or external show control device or micro
controller like a PIC, Atmel, Arduino, Raspberry Pi, or etc. using serial communications.
Select Trigger Low No Interrupt to use a pushbutton or other contact closure event. When
triggered, the file named 001 will play to the end with no interruption.
Select Trigger Low with Interrupt to use a pushbutton or other contact closure. When
triggered, the file named 001 will play and will re-start if re-triggered.
Select Trigger High No Interrupt to use a contact opening event. When triggered, the file
named 001 will play to the end with no interruption.
Select Trigger High with Interrupt to use a contact opening event. When triggered, the file
named 001 will play and will re-start if re-triggered.
If using Video Control Mode or Audio Control Mode
You must have at least 2 files. The loop file named 000 and a trigger file named 001
The loop file 000 will play continuously until a trigger is received, then the trigger file will play.
After the trigger file finishes, the loop file will play again until a new trigger occurs.

MedeaWiz® Sprite®
.
12 | P a g e
Baud Rate
Select the baud rate for the serial port.
Only applies if the setting Control Mode = Serial Control.
The baud rate is the speed of the serial communication and should match the settings on your
external controller.
The default is 9600 bps.
The Hydra input expander accessories are programmed to work with the Sprite at 9600 baud.

MedeaWiz® Sprite®
.
13 | P a g e
SD/ USB Start Mode
Select the memory device to start from
While files will play from the USB port from a USB drive, some HD video may not play well from
some USB drives. For high bit rate files we recommend using the SD port with an SD card of
sufficient speed to match your video file’s bit rate. For some HD video files a Class 4 may be ok,
while others may need a faster Class 6 or Class 10. Test your video.
Many SD cards are formatted FAT32 and will allow up to a 4GB file size. You may re-format to
NTFS to use larger files on an 8GB or larger SD card. Maximum size supported is 128GB.

MedeaWiz® Sprite®
.
14 | P a g e
Restore Default Settings
Reset the Sprite® back to the factory settings
Select Restore Default Setting and press the green Enter key on the remote control. Then when
the pop-up window appears, select “Yes”and press “Enter” to reset the Sprite® to the factory
settings.
You can reset the Sprite® to factory defaults without viewing the monitor by these steps:
1) Remove the power plug for 10 seconds and then restore power
2) Wait 10 seconds or longer for start-up to complete
3) Press the Setup key on the remote control
4) Press the down arrow key 7 times
5) Press Enter 2 times

MedeaWiz® Sprite®
.
15 | P a g e
Firmware Version
Displays the currently installed firmware version
We may provide other versions of the firmware in the future.
Check at http://www.MedeaWiz.com for updates.
Firmware versions have no effect on video or audio play quality.
The different versions have added control features including serial commands and new trigger
types, and fixed minor bugs. Find details about revisions on the following page.

MedeaWiz® Sprite®
.
16 | P a g e
Firmware Revisions History
Video quality is equal for all versions. Each new revision has only added control features.
There is no need to update firmware unless you require a certain control feature.
Version 20210416
Added the ability to trigger multiple files using any of the Trigger input types.
Each new valid trigger event will play the next file on disk, excluding the loop file 000.
The setting you choose for HDMI video output in the Setup Menu is now locked and will not
change due to communications from some monitors.
Default video output is set to 1080p60.
Serial Control feedback is again fast speed as in v.20181102.
Version 20200115
Added delayed trigger modes and play all files randomly modes.
Slowed the reporting feedback in the Serial Control Mode.
Version 20181102
Fixed the bug in the Audio Control Mode from last version.
Version 20180704
Added the multi-drop addressing and some serial commands.
The Audio Control Mode has a bug in any trigger mode.
Version 20161229
Added setup and control serial commands.
If you desire to use an older version of firmware, you may load the older version.

MedeaWiz® Sprite®
.
17 | P a g e
Firmware Upgrade
How to upgrade the Sprite® firmware
We may release upgraded firmware in the future. Please check http://www.medeawiz.com/ for
updates. You may also follow on Facebook to receive news about the Sprite at
https://www.facebook.com/MedeaWiz
1) Copy the new .img firmware file to a USB drive or SD card. Use an empty USB drive or SD
card, or one with your video files on it. Do not use one that contains items not intended for the
Sprite®.
2) Unplug the power to the Sprite®. Insert the USB drive or SD card into the Sprite®. Plug in the
power. Wait 10 seconds or more for the start-up to complete.
3) Using the IR remote control, press the blue File key.
4) Select the drive holding the files by using the orange Arrow keys and green Enter key.
Navigate to the .img firmware file.
5) Select the .img firmware file and press the green Enter key.
6) Select “Yes” and the press the green Enter key.
The power LED will go off. After a while the power LED will come on and the Sprite® will begin
playing a video file, if one is present.
This process will take a few minutes. Be patient.
We recommend that you leave your video files on the USB drive or SD card. In this case the
Sprite® will begin playing a file, confirming the update is completed.
Do not remove power or remove the USB drive or SD card until the update is competed.
Interrupting the process may result in a non-functional player. It is highly recommended to use
a UPS battery-backup power supply.
You may use either a SD memory card or a USB drive to update the firmware.
If you desire to use an older version of firmware, you may load the older version.

MedeaWiz® Sprite®
.
18 | P a g e
Wiring Connections Rear Panel
Left to right
1) Power input. Regulated 5 Volts DC only. Center positive.
2) AV output. Composite video, stereo audio left and right
3) HDMI high definition video with audio
4) Control Input / Output. Pushbutton / Trigger / Serial input and serial output

MedeaWiz® Sprite®
.
19 | P a g e
Trigger Choices Explained
Trigger Low requires a transition from a positive voltage down to ground.
Since the Sprite has an internal resistor holding the input at positive 3.3 Volts, you only need to
provide a ground to trigger. For example if you are using a push button wired from the input
terminal 2 to ground terminal 4 as shown on the following page, pressing the button applies the
ground to the input causing the transition and a valid trigger event.
Trigger High requires a transition from ground up to a positive voltage. Using the example
above, if the push button was held down normally, then released, the trigger would occur on
the release.
The Sprite requires a transition to occur on the input to cause a trigger. Holding the button
down or up will not cause another trigger because there must be a transition. Trigger Low
requires button up to down, and Trigger High requires button down to up.
Trigger with interrupt will allow a new valid trigger event to interrupt a triggered file currently
playing. If there is only one trigger file 001 on the SD, it will re-start file 001 at the beginning. If
there are more trigger files on the SD, it will start the next file playing*. There is an
approximately 1 second delay built in to prevent rapid re-staring of files.
Trigger No Interrupt will NOT allow a new valid trigger event to interrupt a triggered file
currently playing. The currently playing triggered file will play completely to the end before any
new trigger is allowed.
Trigger Delayed will delay playing the triggered file until the looping file 000 has completed.
When a valid trigger event occurs while file 000 is playing, the Sprite will wait until the end of
the 000 file to proceed with the triggered file. Once the triggered file is playing, there is no
interruption. It will play to the end. The Sprite will only allow a trigger event while the looping
file 000 is playing.
*Firmware version 20210416 allows multiple trigger files to be used. Each new valid trigger by the rules
above will cause the next file on the SD to play. After the last file has played, the next valid trigger will
play file 001. The looping file 000 is not considered a trigger file. For ease of use trigger files should be
named in order 001, 002, 003, and etc. up to 200. If you desire a random distribution of play, you may
place multiple copies of the files on the SD and randomly assign them to the sequenced number names.
Other manuals for DV-S1
1
Table of contents
Other MedeaWiz DVD Player manuals