Denver DVD-802 User manual

Table of Contents
Table of Contents
Table of Contents…………………………...………………………1-2
Front panel and Rear panel…………………………………………. 3
Basic matching connection……………………………………………4
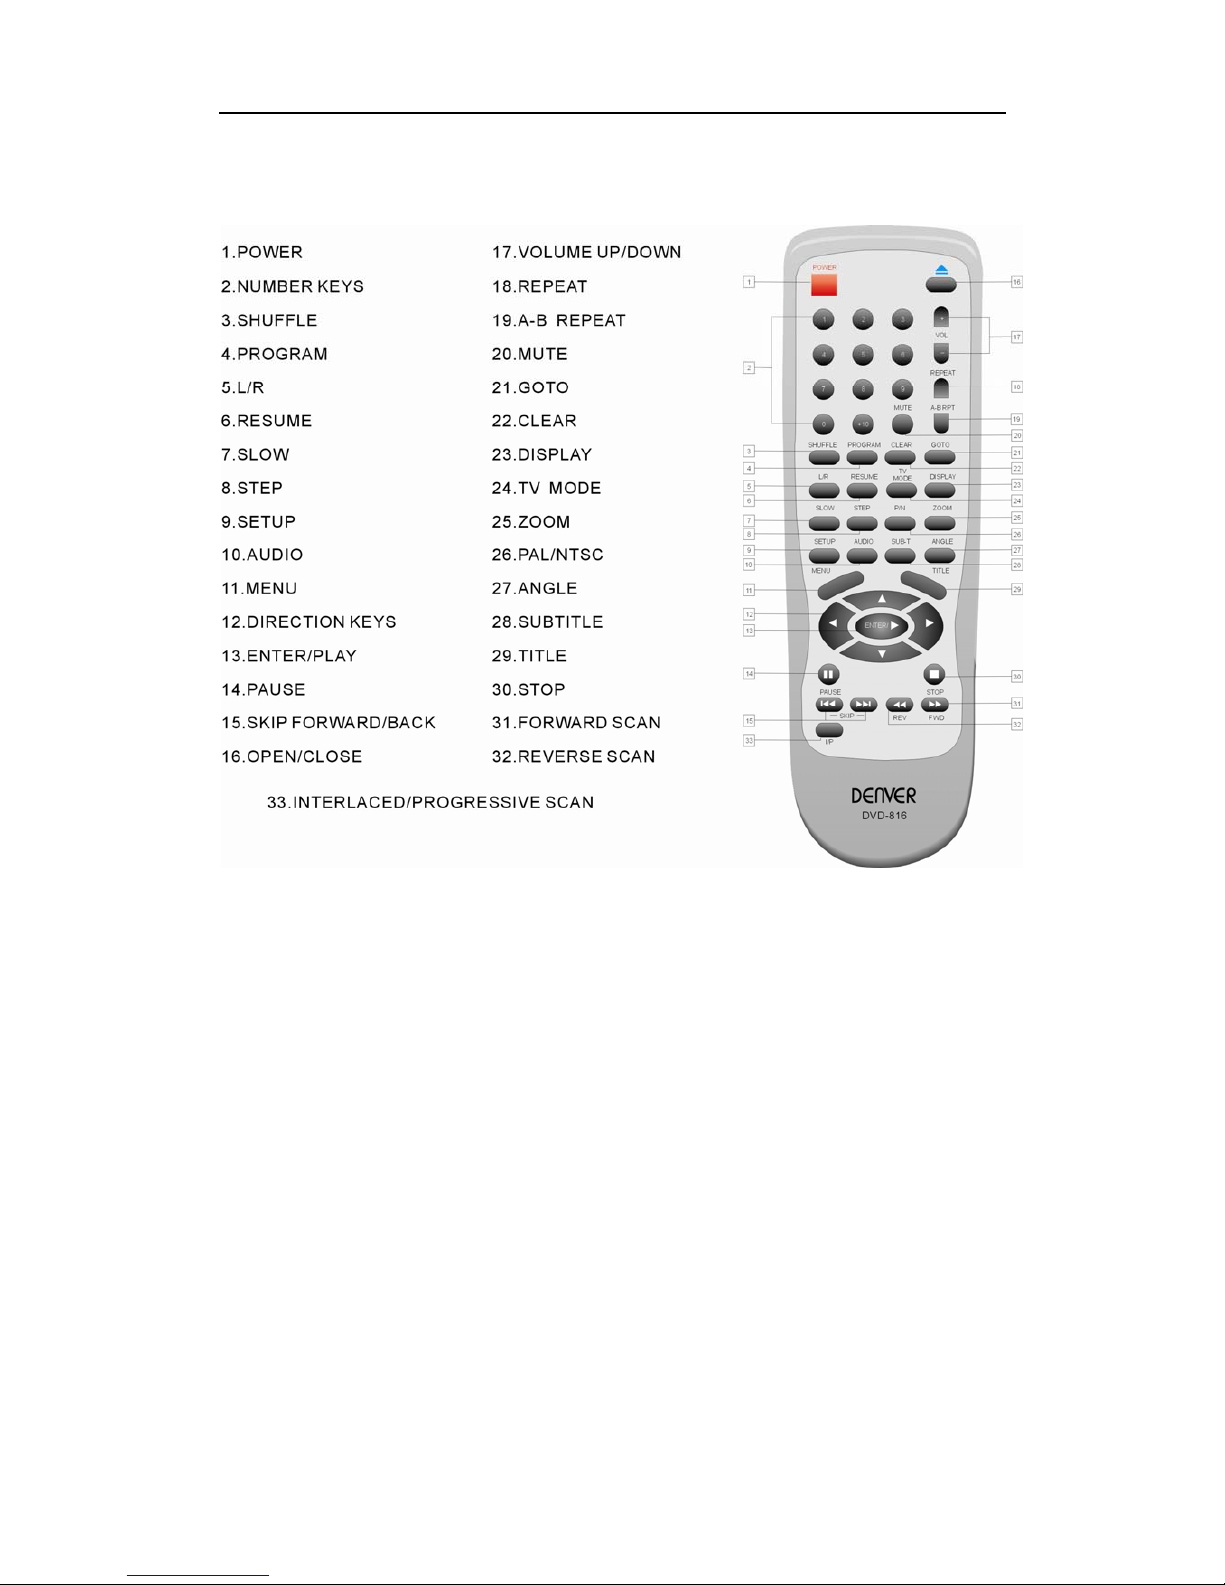
Remote controller………………………………………………………5
Chapter 1 Basic Operation…………………….….…….…………..6
1. Turn on your DVD player……………………………..………..………………………6
2. Place a disc into the tray…………………………………………………………………6
3. Playing discs……………………………………………………………………………...6
a Menu Play (compatible with DVD, SVCD, VCD2.0 discs)…………………….6-7)
)
)
…….9-10
b Title Play (compatible with DVD discs only)………………………………………7
c) Sequence Play (compatible with DVD, SVCD, VCD, CD-G, DTS-CD, HD-CD,
WMA, MP3/JPEG discs)……………………………………………………………7
d Program Play (compatible with DVD, SVCD, VCD, CD, CD-G, DTS-CD, HD-CD,
WMA, MP3/JPEG discs)………………………………………………….7
Chapter 2 Additional Operation
1. Selecting Tracks (compatible with DVD, SVCD, VCD, CD, CD-G, DTS-CD, HD-CD,
WMA, MP3/JPEG discs)………………………………………………………….8
2. Skipping Tracks (compatible with DVD, SVCD, VCD, CD, CD-G, DTS-CD, HD-CD,
WMA, MP3/JPEG discs)………………………………………………………….8
3. Multi speed Fast Motion Playback (compatible with DVD, SVCD, VCD, CD,
DTS-CD, WMA, MP3/JPEG discs)……………………………………………..……….8-9
4. Multi speed Slow Motion Playback (compatible with DVD, SVCD, VCD, CD,
CD-G, DTS-CD, HD-CD, WMA, MP3/JPEG discs)………………………………………9
5. Freeze Frame and Frame Advance (compatible with DVD, SVCD, VCD, CD,
CD-G, DTS-CD, HD-CD, WMA, MP3/JPEG discs)………………………………………9
6. Using the Repeat Feature (compatible with DVD, SVCD, VCD, CD, CD-G,
DTS-CD, HD-CD, WMA, MP3/JPEG discs)……………………………………
7. Using the Display Feature (compatible with DVD, SVCD, VCD, CD, CD-G,
DTS-CD, WMA, MP3/JPEG discs)…………………………………….……………….10
8. Using the Search Feature (compatible with DVD, SVCD, VCD, CD, DTS-CD,
HD-CD discs)………………………………………………………….……….….10-11
9. Shuffle Feature (Play the discs at random). (compatible with DVD, SVCD, CD,
CD-G, DTS-CD, HD-CD, WMA, MP3/JPEG discs)………………………………11
10. Changing the Soundtrack (compatible with SVCD, VCD, CD, CD-G, HD-CD,
WMA, MP3/JPEG discs)…………………………………………………………………11
1

Table of Contents
11. Changing the Audio Language (compatible with DVD, SVCD discs)…………11
12. Subtitles (compatible with DVD, SVCD discs)………………………………11-12
13. Changing the Camera Angle (compatible with DVD discs)……………………12
14. Changing the TV System (compatible with DVD, SVCD, VCD, CD, CD-G,
DTS-CD, HD-CD, WMA, MP3/JPEG discs)……………………………………………12
15. Mute the Audio Output (compatible with DVD, SVCD, VCD, CD, CD-G, DTS-CD,
HD-CD, WMA, MP3/JPEG discs)…………………………………………………….…12
16. Zoom In the Video Image(compatible with DVD, SVCD, VCD, JPEG discs)12-13
17. Repeat a Specific Segment on the Disc that You Define (compatible with DVD,
SVCD, VCD, CD, CD-G, DTS-CD, HD-CD, WMA, MP3 discs)……………………13
18. Volume control (compatible with DVD, SVCD, VCD, CD, CD-G, DTS-CD, HD-CD,
WMA, MP3/JPEG discs)…………………………………………...……………………13
Chapter 3 Playing WMA, MP3 and JPEG discs…………….14-15
Chapter 4 The Setup Menu System………………………….16-24
1. General Steps of Setup Menu……………………………………………………………..16
2. Setup Items Introduction………………………………………………………………16-24
a) System Setup………………………………………………………………. 16-19
b) Language Setup……………………………………………………………19-20
c) Audio Setup…………………………………………………………..……..20-21
d) Video Setup…….……………………………………………………………21-22
e) Speaker Setup………………………………………………………………22-23
f) Digital Setup…………………………………………………………………23-24
DVD Player User’s Manual………………….………………….25-26
1. Types of Discs Your DVD Player Will Play……………………..…………..……25
2. Remote Controller……………………………………….…..…………………..…25-26
3. VFD Illustration……………………….…..………………………………...……...26
2

Basic Operation
Front Panel
1.Power 6.Skipback
2. Door 7. Skip Forward
3.VFD Display 8. Open/Close
4.ReverseScan 9.Play
5.Forward Scan 10. Stop
Rear Panel
1. 5.1-channel front left-channel output
2. 5.1-channel front right-channel output
3. 5.1-channel bass output
4. Component signal Y output
5. Component signal Cb/Pb output
6. Component signal Cr/Pr output
7. Mixed video output
8. 5.1-channel surround left-channel output
9. 5.1-channel surround right-channel output
10. 5.1-channel middle-channel output
11. Left-channel output
12. Right-channel output
13. Audio coaxial output
14. S-video
15. Optical fiber output
16. Scart out
3

Basic Operation
Basic Matching connection
4

Basic Operation
Remote Controller
5

Basic Operation
Basic Operation
1. Turn On the TV and Your DVD Player
Press the Power button on the player or the remote controller, and “Read” appears on the TV
screen. If there hasn’t a disc in the DVD player, “No disc” will be displayed on both the screen
and the VFD.
to start playing.)
s:
2. Place A Disc
Press the Open / Close button on the remote controller or the front of the DVD player, and
“Open” appears on the screen. Then Place a disc gently into the tray with the disc’s label
facing up (double-sided discs have contents on both sides, so you can place either side up),
and press the Open / Close button again to close the disc tray, “Close” appears and the player
starts to read. Then the disc starts playing automatically. (Note: Of some certain type discs,
after reading out the type, the Play or Enter button should be pressed
3. Play
The contents of each disc menu vary according to how the disc was authored and what
features are included. The disc menu will be turned on for you to select, when Menu button
pressed. Also play and pause can be switched with the Pause button on the remote. Moreover,
such as menu play, title play, sequence play etc., these different play modes are offered.
a) Menu Play (compatible with DVD, SVCD, VCD2.0 discs)
I. Press Menu Button
zTV screen displays the DVD Root Menu when a DVD disc is loaded.
zWhen a SVCD or VCD 2.0 disc is loaded, SVCD or VCD 2.0 menu will be
displayed on the screen. (when Menu play is off).
zThe default setup of Menu Play is on when a SVCD or VCD2.0 disc is loaded.
II. When a DVD disc is loaded, you can press Arrow buttons to highlight the menu item
you want to choose;As SVCD or VCD2.0, you can press Numeric buttons to select a
track to play.
III. Press Enter or Play button, you can begin play with the highlighted.
IV. Return when playing: When a DVD disc is playing, press Menu button, and you can
return to Root Menu; As SVCD, VCD2.0, and Menu play is on, press Menu button,
you can return to the menu.
Note
Press Title button to select the Menu Play on/off.
V. Stop
1) When you press Stop button for the first time, the player turns into quasi stop
state. At the same time the OSD appears “Quasi Stop”. When press the Stop
button twice, it will return to the Menu.
2) In quasi stop state, the player remembers where you stopped, when you start
playing the disc again, the DVD player picked up where you left off.
3) In stop state, when you press Play, the player enters sequence playback mode.
zFor the disc protection, before you press Open / Close button to eject the disc
tray when playing, please press Stop button at first. After taking out the disc,
6

Basic Operation
press Open / Close again to close the tray.
zIf you’re not going to use the DVD player for a long time, be sure to remove the
electronic plug.
b) Title Play (compatible with DVD discs only)
I. During DVD playback, press Title button to display the DVD title content.
II. Press the Arrow buttons to highlight the title you want to choose, and press Enter;
Also you can press numeric buttons to choose.
III. The DVD player begins with the chapter 1 of the chosen title.
c) Sequence Play (compatible with DVD, SVCD, VCD, CD-G, DTS-CD, HD-CD,
WMA, MP3/JPEG discs)
I. When a SVCD or VCD disc is loaded and Menu is on, once Menu button pressed,
MENU switches off. Then the player can play in sequence playback mode; when
Menu button pressed twice, Menu play switches on.
II. Except for SVCD or VCD discs, in the stop state, when press Play button, the player
then enters sequence playback mode. This feature is effective to all the compatible
discs.
d) Program Play (compatible with DVD, SVCD, VCD, CD, CD-G, DTS-CD, HD-CD,
WMA, MP3/JPEG discs)
The Program Playback option allows you to enter the order in which you want chapters
or tracks to play, maximum to 16.
zProgram Menu:
If Menu Play is on, this operation will turn Menu Play off while the chapters /
tracks plays in programmed order.
zAccording to the highlight, use the Numeric buttons to enter the chapters / tracks in
the order you want them to play. Then press Play or use Arrow buttons to highlight
the “PLAY” item and press Enter. The chapters / tracks will play in the programmed
order.
You can program maximum 16 titles / chapters / tracks.
zAccording to the Direction Indicator on the menu, you can press Arrow buttons to
highlight where you want to enter.
zDuring Program Playback, if Program button pressed, the programmed order and the
contents will be displayed on the screen, and the Program Playback will be stopped;
Also you can press Stop and Play to resume normal playback.
zNotes:
To clear the programmed order, use Arrow buttons to highlight the “CLEAR”
item, then press Enter.
To modify the programmed order, use Arrow buttons to highlight the modifying
item and enter the new chapter / track you want to program directly.
zMeanwhile, the program indicator in the VFD illuminate, and the playing chapter /
track also illuminate.
7

Additional Operation
Chapter 2 Additional Operation
1. Selecting Tracks (compatible with DVD, SVCD, VCD, CD, CD-G, DTS-CD, HD-CD,
WMA, MP3/JPEG discs)
a) When playing a DVD disc, press Numeric buttons on the menu or title page to select
tracks; During DVD playback, you can input desired title number directly.
b) As a SVCD or VCD disc, during sequence playback, press Numeric buttons to select
tracks. (During Program Playback and MENU is on, you can only press Prev / Next
button to select)
c) As for CD, CD-G, HD-CD, DTS-CD discs, press Numeric buttons directly to select
tracks.
d) When playing WMA, MP3 / JPEG discs, press Numeric buttons to select different tracks
on current track list.
Notes: To select tracks from 1 to 10, press corresponding Numeric buttons (1-9, 10)
To select tracks above 10, press 10+ button. For example, to select the track 15,
press 10+ and 5 button.
If the selected track is not available, the input would be invalid.
2. Skipping Tracks (compatible with DVD, SVCD, VCD, CD, CD-G, DTS-CD, HD-CD,
WMA, MP3/JPEG discs)
a) To skip forward to the beginning of the next title / chapter / track on a disc, press Next on
the remote or the front of the player
b) To skip backward to the beginning of the preceding title / chapter / track on a disc, press
Prev on the remote or the front of the player.
zWhen playing the last chapter / track on a SVCD or VCD disc with Menu play off,
pressing Next button will stop the playback; When playing the first chapter / track.,
pressing Prev button will stop the playback; When stop, pressing Next / Prev button
will be invalid
zIf a DVD disc is loaded, it varies according to how the disc was configed.
3. Multi speed Fast Motion Playback (compatible with DVD, SVCD, VCD, CD,
DTS-CD, WMA, MP3/JPEG discs)
You can search in forward or reverse mode during playback.
a) Press the F.F button on the remote during playback to search through a disc. Press the
button again on the remote to search at the next speed. Fast Forward Playback has four
speeds: ×2, ×8, ×16, ×64×128. With each consecutive press of the button, the
search speed increases. If you press the button five times, Fast Forward Playback cycles
back to normal playback.
During DVD playback, when Fast Forward Playback gets to the beginning of the next
title / chapter, it resumes normal playback; During SVCD or VCD playback with MENU
on, when Fast Forward Playback gets to the beginning of the next track, it resumes
normal playback.
zPress Play button to resume normal playback.
zDuring CD, HD-CD, MP3, or WMA playback ,with the speed F.F ×2, the player
8

Additional Operation
has audio output.
b) Press the F.R button on the remote during playback to search through a disc. Press the
button again on the remote to search at the next speed. Fast Reverse Playback has four
speeds: ×2, ×8, ×16, ×64×128. With each consecutive press of the button, the
search speed increases. If you press the button five times, Fast Reverse Playback cycles
back to normal playback.
During DVD playback, when Fast Reverse Playback gets to the beginning of the playing
title / chapter, it resumes normal playback; During SVCD or VCD playback with Menu
Play on, when Fast Reverse Playback gets to the beginning of the playing track, it
resumes normal playback.
zPress Play button to resume normal playback.
zDuring CD, HD-CD, MP3, or WMA playback ,with the speed F.R ×2, the player
has audio output.
4. Multi speed Slow Motion Playback (compatible with DVD, SVCD, VCD, CD,
CD-G, DTS-CD, HD-CD, WMA, MP3/JPEG discs)
Press Slow button when pictures moving, you can enter Slow Motion Playback mode.
Press the Slow button on the remote during playback. Press the button again on the remote
to play at the next speed. Slow Motion Playback has six speeds: 1/2, 1/3, 1/4, 1/5, 1/6, 1/7.
With each consecutive press of the button, the play speed decreases. If you press the button
seven times, Slow Motion Playback cycles back to normal playback.
Press Play button to resume normal playback.
5. Freeze Frame and Frame Advance (compatible with DVD, SVCD, VCD, CD,
CD-G, DTS-CD, HD-CD, WMA, MP3/JPEG discs)
a) During CD, CD-G, HD-CD, DTS-CD, WMA or MP3 / JPEG playback, press Pause once
to freeze playback; Press the Pause button again or Play button to resume normal
playback.
b) During DVD, SVCD or VCD playback, press Pause once to freeze playback; Press of the
Pause button again to advance the picture one frame at a time; Press Play to resume
normal playback.
6. Using the Repeat Feature (compatible with DVD, SVCD, VCD, CD, CD-G, DTS-CD,
HD-CD, WMA, MP3/JPEG discs)
While a disc is playing, press Repeat button once, and the repeat banner appears to show
current repeat mode.
a) In SVCD, VCD, CD, CD-G, HD-CD, DTS-CD, WMA, or MP3 / JPEG sequence
playback mode, press Repeat button again to turn on repeat mode.
Press the button again on the remote to turn to the next repeat mode. There are three repeat
options: Off, Track Repeat, and Disc Repeat. With each consecutive press of the button, the
repeat mode switches. If you press the button four times, repeat mode cycles back to Off.
b) In DVD playback, press Repeat button again to turn on repeat mode.
There are three repeat options: Off, Chapter Repeat, and Title Repeat. With each
consecutive press of the button, the repeat mode switches. If you press the button four
9

Additional Operation
times, repeat mode cycles back to Off.
c) In WMA, MP3 / JPEG playback, press Repeat button again to turn on repeat mode.
There are four repeat options: Off, Track Repeat, Directory Repeat, and Disc Repeat.
With each consecutive press of the button, the repeat mode switches. If you press the
button five times, repeat mode cycles back to Off.
7. Using the Display Feature (compatible with DVD, SVCD, VCD, CD, CD-G,
DTS-CD, WMA, MP3/JPEG discs)
a) Loading and playing DVDs (two pages)
zPress Display button once to show the first page:
“Disc Type, Title * / * (the playing title / total titles), Chapter * / * (the
playing chapter / total chapters), Elapsed Time of the Disc”.
zPress the button again to show the second page:
“Language * / * (the serial number of playing language / the amount of optional
languages) or Off, Language Type, Audio Type, Subtitle * / * (the serial
number of playing subtitle / the amount of optional subtitles) or Off, Angle * / *
(the serial number of playing angle / the amount of optional angles) or Off”.
zPress the button for the third time, the display menu fades out.
b) Loading and playing SVCD discs (two pages)
zPress Display button once to show the first page:
“Disc Type, Track * / * (the playing track / total tracks), Mute, MENU,
Repeat Mode, Elapsed Time of the Playing Track”.
zPress the button again to show the second page:
“Language * / * (the serial number of playing language / the amount of optional
languages) or Off, Language Type, Audio Type, Subtitle * / * (the serial
number of playing subtitle / the amount of optional subtitles) or Off”.
zPress the button for the third time, the display menu fades out.
c) Loading and playing VCDs
zPress Display button once to show the first page:
“Disc Type, Track * / * (the playing track / total tracks), Mute, MENU,
Repeat Mode, Elapsed Time of the Playing Track”.
zPress the button again, the display menu fades out.
d) Loading and playing CD, CD-G, DTS-CD, HD-CD, WMA, MP3 / JPEG discs
zPress Display button once to show the first page:
“Disc Type, Track * / * (the playing track / total tracks), Mute, Repeat Mode,
Elapsed Time of the Playing Track”.
zPress the button again, the display menu fades out.
8. Using the Search Feature (compatible with DVD, SVCD, VCD, CD, DTS-CD,
HD-CD discs)
You can use Search feature to select a title / chapter / track number or go to a specific point
in a title. Firstly, press Search (Goto) button on the remote controller to bring up the search
menu and enter the edit state; Secondly, press Arrow buttons to highlight the title / chapter /
track number or the time option; Thirdly, use Numeric buttons to enter the title / chapter / track
10

Additional Operation
you want to play or the elapsed time you want to go to in that title; At last, press Enter button
to start playback. For example, entering 01:23:56 will start playback one hour, twenty-three
minutes and fifty-six seconds into the title. If the input number is illegal, the error information
“INVALID KEY ” will be displayed on the screen.
zNotes
I. This feature does not work in Program Play mode.
II. If Menu Play is on, it will turn off automatically when Search Playback starts.
III. When playing WMA, MP3 / JPEG discs, Search Feature does not work.
9. Shuffle Feature (Play the discs at random). (compatible with DVD, SVCD, CD,
CD-G, DTS-CD, HD-CD, WMA, MP3/JPEG discs)
Press the Shuffle button on the remote control during the playback.
The player will start to play the Chapter/tracks at random.
10. Changing the Soundtrack (compatible with SVCD, VCD, CD, CD-G, HD-CD,
WMA, MP3/JPEG discs)
Press the L / R button to display current soundtrack.
a) Press the button can switch soundtracks.
b) Press the button again on the remote to turn to next soundtrack.
I. When playing a SVCD or VCD disc, there are five soundtracks: Stereo (L/R), L/L,
R/R, L/L Auto A/D Detect, and R/R Auto A/D Detect. With each consecutive press
of the button, the soundtrack switches. If you press the button six times, soundtrack
cycles back to Stereo.
II. When playing a CD, CD-G, DTS-CD, HD-CD, WMA, or MP3 disc, there are three:
Stereo (L/R), L/L, and R/R.
Notes:
zSwitch to L/L Auto A/D Detect or R/R Auto A/D Detect to have various
antistrophes (you can have an antistrophe with the singing on the disc),
according to the contents on the disc).
zWhen playing a dual-language VCD movie disc, press the L / R button to select
the desired language.
11. Changing the Audio Language (compatible with DVD, SVCD discs)
During disc playback, press Language on the remote once, and the audio language info banner
appears.
When a DVD or SVCD is recorded whit multiple soundtracks, you can use the Language
feature to temporarily change the audio language (the language of the soundtrack)
There are 8 supported languages: English, Finnish, Spanish, Portuguese, German, Italian,
Swedish, Danish.With each consecutive press of the Language button, the audio
language switches and the corresponding serial number appears on the screen. For
example, “Language Icon: [1 English DTS 6CH] or [Off]” (the availability of the
languages are disc-dependent).
12. Subtitles (compatible with DVD, SVCD discs)
Press the Subtitle button on the remote once, and the subtitle info banner appears.
11

Additional Operation
When a DVD or SVCD is recorded with subtitles, you can use the Subtitle feature to view the
subtitles on-screen. By default, subtitles are off. The info banner will display Subtitle Off.
To display subtitles, press the Subtitle button again. The default language with its
corresponding serial number will be displayed in the info banner and subtitles will be displayed in
that language. There are 8 supported subtitles: Chinese, English, Japanese, French, Spanish,
Portuguese, Germany and Latin. With each consecutive press of the Subtitle button, the subtitle
switches. For example, “Language Icon: [1 English DTS 6CH] or [Off]” (the availability of the
subtitles are disc-dependent). To turn subtitles off, press the Subtitle button until Subtitle Off is
displayed.
13. Changing the Camera Angle (compatible with DVD discs)
During disc playback, press Angle on the remote once, and the angel icon appears.
Some DVDs contain multiple angles of a particular scene or sequence, so you can use the
Angle feature to view.
Press the Angle button again to go to the next camera angle. If multiple camera angles are
available, theAngle icon displays the current angle number and the number of angles available. For
example: “Angle Icon: [* / *] or [Off]”; 1 / 4 indicates that angle one is being displayed, and there
are four different angles available. (This feature is disc-dependent. If no additional camera angles
are available, the “Invalid Key” will be displayed.)
14. Changing the TV System (compatible with DVD, SVCD, VCD, CD, CD-G,
DTS-CD, HD-CD, WMA, MP3/JPEG discs)
Press P / N button on the remote to display current TV system.
Press the P/ N button again to change to the next TV system. There offers four systems: NTSC,
PAL60, PAL, and AUTO. With each consecutive press of the P / N button, the TV system switches.
If you press the button five times, the TV system cycles back..
Notes:
zIf AUTO TV system selected, it can auto reach the highest definition depends
on the disc.
zIf it isn’t full screen state (note: Wide Screen program would never reach full
screen state) or in black and white, press the P / N button to adapt TV System to
the TV set of NTSC or PAL.
zWhen playing in different TV system, some discs may not have their features
entirely fulfilled in some certain standard.
zAuto System of TV set is recommended.
15. Mute the Audio Output (compatible with DVD, SVCD, VCD, CD, CD-G, DTS-CD,
HD-CD, WMA, MP3/JPEG discs)
Pressing the Mute button allows you to reduce sound to an inaudible level, and “MUTE” will
be displayed on screen. Press the button again or press the Vol +/- button to return to the normal
condition.
Notes:
zWhen mute, the microphone also has no audio output.
zIf the player playback disc without sound, please try to press Mute button to
resume.
16. Zoom In the Video Image (compatible with DVD, SVCD, VCD, JPEG discs)
12

Additional Operation
a) The Zoom Function allows you to enlarge or zoom out the video image and to pan
though the image. Press Zoom repeatedly to activate the function and choose the
required zoom factor: Zoom 2, Zoom 3, Zoom 4, Zoom 1/2, Zoom 1/3, Zoom 1/4, Zoom
Off.
Notes:
zThis feature does not work when the Disc Menu appears.
b) Use the Arrow buttons to pan across the screen when the zoom factor is 2, 3 or 4.
17. Repeat a Specific Segment on the Disc that You Define (compatible with DVD,
SVCD, VCD, CD, CD-G, DTS-CD, HD-CD, WMA, MP3 discs)
a) During the normal or fast motion playback, press the A-B button once, and “REPEAT
A-” will appears on the screen. This indicates the start of the loop to be repeated.
b) During the normal of fast motion playback, press A-B again, and “REPEAT A-B” will
appears on the screen. It indicates the end of the loop.
zLooping will run from set point A to set point B until you turn off Repeat.
c) Press A-B again to cancel A-B loop mode.
zWhen playing a SVCD, VCD, or CD disc, you can repeat a specific segment only
in one track. When the next track begins, A-B Repeat turns off automatically.
zWhen playing a DVD disc, you can repeat a specific segment only in one title /
chapter.
18. Volume control (compatible with DVD, SVCD, VCD, CD, CD-G, DTS-CD, HD-CD,
WMA, MP3/JPEG discs)
zYou can press the Volume button on the front of TV set or the amplifier to control the
sound level.
zPressing the Vol+ button on the remote allow you to amplify the sound level; Pressing Vol-
will reduce the sound level.
Notes:
zDuring DVD PCM output playback, this feature does not work.
13

Playing WMA, MP3 and JPEG discs
Chapter 3 Playing WMA, MP3 and JPEG discs
Place a MP3 / JPEG disc into the tray, and the player will auto search the directories saved
MP3 / JPEG files. After searching, it will auto go to the first directory saved MP3 files (to the
disc containing both mp3 and jpeg files; To the disc containing single type of files, it will auto
go to the first directory) and play the first song in the directory (“01:” is highlighted).The
screen displays as the picture below:
Current
directory
name
Current MP3/JPEG file
name. If a JPEG file
playing, the name should be
*.jpg.
The playing file is
a JPEG picture.
File Switch Region: Displays the
file type of the playing and the
switching.
The playing file
is a MP3 music.
Use the Arrow buttons to enter the Directory Region and highlight the desired directory, then the
first track under it starts playback;Also you can use the Arrow buttons to enter the File Region and
select the file you want to play.
Notes:
I. Press the Left and Right arrow buttons, you can activate Directory Region, File Region and
File Switch Region separately.
II. The highlight in Directory Region and File Region is shown as the picture above; While it
14

Playing WMA, MP3 and JPEG discs
appears a transparent rectangle in File Switch Region.
III. In File Switch Region, you can press the Left and Right arrow buttons to switch the
highlight, then press Enter; the “M”, “P”, and “G” button is illustrated in the above
picture. For example, if a disc with MP3 and JPEG files but without any NES files is loaded,
the color of the letter “M” and “P” will appear to white and “G” black. If a MP3 file
playing, “M” turns darker.
IV. To the disc with WMA, MP3 and JPEG files, when playing a JPEG picture, press the Return
button to return to JPEG list.
V. You can press the Numeric buttons to select the file you want to play. For example, if you
desire the 15th track in current list, press the “10+” button once, then press “5”, the 15th
starts playback.
Notes: When playing a disc with MP3 files, video cannot be output while only digital audio
can.
VI. When playing JPEG pictures, press the Program button to choose the pictures switched
mode. There are 17 switch modes; Press Program repeatedly to activate the function and
choose the required switch mode: Spread from Up to Down, Spread from Down to Left,
Spread from Left to Right, Spread from Right to Left, Spread from Left Up to Right Down,
Spread from Right Up to Left Down, Spread Left Down to Right Up, Spread from Right
Down to Left Up, Spread from Center to Up / Down, Fold from Up / Down to Center, Fold
from Left / Right to Center, Horizontal Shutter, Vertical Shutter, Fold from the Corners to the
Center, Random Play, Off.
VII. When a picture playing or pausing, press the Arrow buttons to change the display angle:
Up: flip vertical
l
Down: flip horizonta
Left: rotate 90°counter-clockwise
Right: rotate 90
8
clockwise
VIII.When a picture playing or pausing, press the Menu button, the screen displays small
pictures. Up to 12 small pictures are displayed per screen. To view the next 12 pictures,
press the Next button to go forward and the Prev button to go to the previous page. You can
also select and play a picture in full screen by press that number on the remote.
15

DVD Player User’s Manual
Chapter 4 The Setup Menu System
1. General Steps of Setup Menu
a) Press the Setup button, the main setup menu appears.
zWhen the main menu displayed, the DVD system will auto pause.
b) Press the Left and Right arrow buttons to highlight the icon of the desired page, then
press the Down or Right arrow button to activate that page; For example, if you want to
setup the video page, press Right to highlight the video icon, the video page will be
displayed on the screen.
c) Press the Down arrow button to highlight the desired option. Press Enter or press Right to
select, the choices of that option appear on the right; For example, press the Down arrow
button to highlight the BRIGHTNESS option, then press Enter to select, the brightness
choices appear on the right.
d) Press the Arrow buttons to highlight the Exit Setup option, then press Enter or Setup
again to exit Setup Menu.
Notes:
zWhen setup, the pressing of the following buttons will turn off the setup menu, while the
choices that have been changed will be saved: P / N, Subtitle, Vol +/-, Title, Return, Play,
Stop, Resume, Pause / Step, Next, Prev,, Zoom, Preview, Goto, Program, Repeat, Angle,
language, Display, Mute, Setup.
2. Setup Items Introduction
a) SYSTEM SETUP
TV SYSTEM
According to the Color System of the TV, you can choose the TV System.
zAUTO: Choose this settings if your DVD player is connected to a multi-system TV.
zNTSC: Choose this settings if your DVD player is connected to a NTSC TV.
zPAL: Choose this settings if your DVD player is connected to a PAL TV.
zPAL60: Choose this settings if your DVD player is connected to a PAL60 TV.
The default setting is PAL.
16

DVD Player User’s Manual
SCREEN SAVER
If the screen saver is on, when your DVD player is in Stop, Open, or No Disc state, or
there is a frame frozen for more than 60sec, the screen saver will be displayed. This feature
can protect the screen from damage.
zON: Choose this setting to activate the screen saver.
zOFF: Choose this setting to cancel the screen saver
The default setting is ON.
VIDEO
zS-VIDEO: You can choose this option if the DVD Player connects to the TV
through S-Video adapter or compound video output.
zInterlace-YUV: Choose this setting if your DVD player is connected to a TV with Y,
Cb, Cr video cables.
zTV-RGB: Choose this setting if your DVD player is connected to a TV with an Scart
cable or composite video cables.
zP-SCAN: Choose this setting if your DVD player is connected to a progressive scan
TV with Y, Cb, Cr video cables.
Notes:
zWhen your DVD player output composite video, you can choose the setting
randomly.
zChoose TV-RGB / P-SCAN if your DVD player is connected to a progressive scan
TV.
TV TYPE
17

DVD Player User’s Manual
z16 : 9 (Wide Screen): Choose this setting if your DVD player is connected to a wide
screen TV. If you choose this setting and you don’t have a wide screen TV, the
images on the screen may appear distorted due to vertical compression.
z4 : 3 LB (Letter Box): Choosing this setting if your DVD player is connected to a
normal ratio TV. connector You’ll see the movies in their original aspect ratio
(height-to-width ratio). You’ll see the entire frame of the movie, but it will take up a
smaller portion of the screen vertically. The movie might appear with black bars at
the top and bottom of the screen.
z4 : 3 PS (Pan & Scan): Choosing this setting if your DVD player is connected to a
normal ratio TV. You can fill the movie to the entire screen of your TV. This might
mean that parts of the picture (the left and right edges) won’t be seen.
Notes:
zThe image display ratio is related to the recorded disc format. Some disc can not
display images in the aspect ratio you choose.
zIf you play a disc recorded in 4:3 format on a wide screen TV, black bars will appear
on the left and right side of the screen.
zYou must adjust the screen setting depending on the type of the television you have.
PASSWORD
The password option is initialized locked, and you cannot set the ratings limit or
change the password. In order for the Ratings feature work, the password mode must be
turned on. If you want to set the ratings limit, you will need to enter the default password,
which is 0000, then press Enter to confirm. To change the password, you will be
prompted for the old password, then be prompted for a new. Enter a 4-digit number (this
is your password).
at have been assigned a rating. This helps you control the types of DVDs that your
i
AFE.
RATING
The Rating feature is a rating limit system, like movie ratings. It works with DVD
discs th
fam ly watches.
zThere are two rating options: NO ADULT and KID S
18

DVD Player User’s Manual
zcel the rating limit.
The defau
Select the ADULT option to can
lt setting is ADULT.
zthe ratings limit; the rating limit doe
not work when the password option unlocked.
Choose this op tings.
Notes:
If the password option is locked, you cannot set
DEFAULT
tion to resume all the setup options to default set
languages: English, Finnish, Spanish, Portuguese, German,
Italian, Swedis
b) LANGUAGE SETUP
Highlight the OSD LANGUAGE option, and press the Arrow buttons to choose the OSD
language you prefer. Press Enter to confirm, and it will display OSD in that language;
There are 8 optional OSD
h, Danish.
Highlight the AUDIO LANG option, and press the Arrow buttons to choose the audio
language you prefer. Press Enter to confirm. If the disc you are playing has that language
available, it will output audio in that language; There are 8 optional aud
io languages:
English, Finnish, Spa edish, Danish.
nish, Portuguese, German, Italian, Sw
19

DVD Player User’s Manual
dio
languages: Englis , Swedish, Danish.
Highlight the SUBTITLE LANG option, and press the Arrow buttons to choose the
subtitle language you prefer. Press Enter to confirm. If the disc you are playing has that
language available, it will displays subtitles in that language; There are 8 optional au
h, Finnish, Spanish, Portuguese, German, Italian
Highlight the MENU LANG option, and press the Arrow buttons to choose the menu
language you prefer. Press Enter to confirm. If the disc you are playing has that language
available, it will displays menu in that language; There are 8 optional me
nu languages:
English, Finnis anish.
h, Spanish, Portuguese, German, Italian, Swedish, D
If your preferred language isn’t available, the disc’s default language will be played.
; There are 3 optional audio output modes:
zG: From the Coaxial Output jack and the Optical Output jack, no signal is
z
designed for a connection to a Dolby Digital, DTS ,
z
signal,
and it will be output from the Coaxial Output jack or Optical Output jack.
Notes:
z
c) AUDIO SETUP
Highlight the AUDIO OUT option, and press the Arrow buttons to choose the audio
output mode you prefer. Press Enter to confirm
ANALOG, SPDIF / RAW, and SPDIF/ PCM.
ANALO
output.
SPDIF/ RAW: Choose this setting if your DVD player is connected to a power
amplifier with a coaxial cable or an optical cable; When playing a disc recorded
with Dolby Digital, DTS and MPEG audio formats, the corresponding digital
signals will be output from the Coaxial Output jack or Optical Output jack. This
player’s digital output jacks are
or MPEG receiver or decoder.
SPDIF / PCM: Choose this setting if your DVD player is connected to a 2-channel
digital stereo amplifier; When playing a disc recorded with Dolby Digital and
MPEG audio formats, audio signals will be modulated into a 2-channel PCM
20
Table of contents
Other Denver DVD Player manuals

Denver
Denver DVU-1110 User manual

Denver
Denver MPG-1013 PLL User manual

Denver
Denver DVH-1019 MK2 User manual

Denver
Denver DVH-7787 User manual

Denver
Denver MTW-754 TWIN User manual

Denver
Denver DVD-826 User manual

Denver
Denver DVU-1008 User manual

Denver
Denver DVD-202 User manual

Denver
Denver DRS-1110 MK2 User manual

Denver
Denver DVH-1243 User manual

Denver
Denver DVD-948 User manual

Denver
Denver DWM-100 User manual

Denver
Denver DVH-7787 MK2 User manual

Denver
Denver DVD-7779 MK2 User manual

Denver
Denver DVU-1111 User manual

Denver
Denver DVH-7781 MK2 User manual

Denver
Denver DRS-1218 User manual

Denver
Denver DVD-7779 MK2 User manual

Denver
Denver DVD-766 User manual

Denver
Denver DVH-1239 MK2 User manual