Medela BabyWeigh II User manual

BabyWeigh™II
Scale / Balanza / Balance
Instructions for use
Mode d’emploi
Instrucciones de uso
Part Number: 0407020
Part Number: 0407023 (grams only)
Número de pieza: 0407020
Número de pieza: 0407023 (en gramos solamente)
Numéro de pièce: 0407020
Numéro de pièce: 0407023 (grammes uniquement)

2
When using electrical products, especially when children are present,
basic safety precautions should always be followed.
Please read all instructions before using this product.
Keep these instructions for future reference.
Warnings identify all instructions that are important for safety. Failure to
observe these instructions can lead to personal injury or damage to the
product. The following symbols and signal words show the significance
of the warnings:
1. Important Safeguards
1. To reduce the risk of electric shock or product damage, never
insert or remove the AC adapter with wet hands.
2. Do not under any circumstances dismantle or alter the
device, as this could result in electric shock or injury as well as
adversely affect the precision of measurements.
3. To prevent fire hazard, use only a correctly wired (120V AC)
outlet, and do not use a multiple outlet extension cable.
4. Always take the utmost care when placing a baby in the baby
tray. Ensure that there is no risk of the equipment tipping over.
5. Ensure the baby is lying down in the tray with minimal
movement. Excessive movement could result in a fall,
potentially causing serious injury.
Can lead to serious
injury or death.
iInformation
WARNING
CAUTION
NOTICE
Can lead to
minor injury.
iInformation
WARNING
CAUTION
NOTICE
i
Information
WARNING
CAUTION
NOTICE
iInformation
WARNING
CAUTION
NOTICE
Can lead to material
damage (not related
to personal injury).
Useful or important
information that is
not related to safety.
iInformation
WARNING
CAUTION
NOTICE

3
Please read all instructions before using this product.
Keep these instructions for future reference.
1. When connecting the BabyWeigh™II to a computer, ensure that
the computer conforms to IEC60950.
2. To help prevent the spread of infections, always clean the
equipment in-between different patient use. Clean the tray
and the housing as required with Cavicide®or commercially
available disinfectant.
3. Ensure the equipment is placed on a level and stable surface.
If the equipment is used when the scale is unstable because
not all feet are on the surface, there may be a risk of stumbling
or inaccurate measurement.
4. Only use the adapter supplied with this equipment
(PN 9207053 /101034772). Do not insert or remove the
plug by the cable.
5. When changing batteries, ensure that the new batteries
are inserted with the correct polarity, + and -. If the polarity
is incorrect, then the batteries may leak and damage the
equipment.
6. When carrying the equipment, unplug the AC adapter from the
wall and hold the main body firmly, using handles provided.
7. To avoid any risk of injury or malfunction, keep your fingers and
other objects away from the space between the inner-plate and
the scale.
8. Never jump on the scale, there may be a risk of stumbling and
malfunction of the equipment.
iInformation
WARNING
CAUTION
NOTICE
6. The baby tray is not designed to accommodate individuals
weighing more than 20 kg (44 lbs).
7. Infants must not be left unattended on the baby tray.
8. Do not sit on the edge of the scale, jump on it, or bounce on
the baby basket, as any resultant fall or slip may cause
serious injury.
iInformation
WARNING
CAUTION
NOTICE
(cont.)

4
i
Information
WARNING
CAUTION
NOTICE
1. Important Safeguards (cont.)
This is a precision manufactured and accurately calibrated
product. Please observe the following instructions.
1. Do not dismantle the scale housing. The baby tray may be
removed by following the instructions on page 8-11.
2. When not in use for a long time, unplug the AC adapter from
the wall socket.
3. Remove the batteries before storing the equipment for long
periods of time.
4. Do not wipe the equipment with corrosive chemicals (benzine,
cleaner, etc.). Use a neutral detergent to clean the equipment.
Do not spill water or chemical liquid on or in the unit. The
baby tray should be cleaned using Cavicide®or commercially
available disinfectant. Do not wash any part of the scale other
than the basket with water.
5. Avoid subjecting the equipment to excessive shocks or
vibrations.
6. If an unauthorized person attempts to disassemble or repair
any part of the unit, the warranty will become invalid. If the
unit malfunctions, please consult your Medela sales consultant
or customer service toll-free at 1-800-435-8316.
Please observe the following instructions for accurate
measurement.
1. Measurement may not be possible on a surface that is
strongly vibrating. In such cases transfer the equipment to a
stable surface with little or no vibration.
2. If the scale is moved, and the new location has a temperature
difference of more than 20 °C (36 °F) please allow at least 2
hours before using.
3. While taking measurements, do not use mobile phones,
microwave therapy equipment or other types of transmitters
near the scale as they may cause interference and
margin errors.
4. Avoid scale placement near heating/cooling vents, heating
appliances, areas of high airflow or direct sunlight.
5. When disposing of this unit, please do so in accordance with
local standards for industrial waste.
SAVE THESE INSTRUCTIONS
iInformation
WARNING
CAUTION
NOTICE

5
1. Important Safeguards
. . . . . . . . . . . . . . . . . . . . . . . . . . . . . . . . 2-4
2. Use and Storage Conditions
. . . . . . . . . . . . . . . . . . . . . . . . . . . . 6
3. Power Requirements . . . . . . . . . . . . . . . . . . . . . . . . . . . . . . . . . . . .
6
4. Explanation of Terminology . . . . . . . . . . . . . . . . . . . . . . . . . . . . .
7
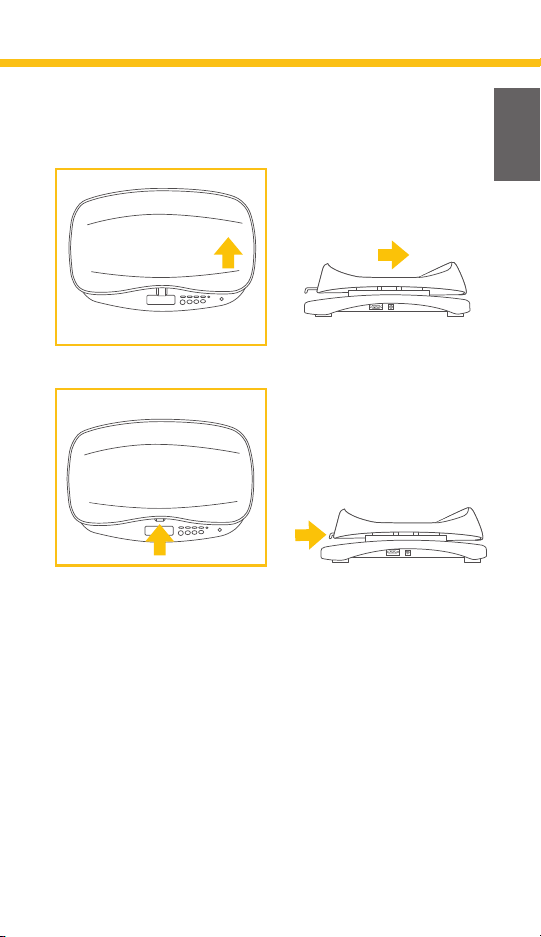
5. Baby Tray Attachment & Removal . . . . . . . . . . . . . . . . . . . .
8-11
6. Part Identification. . . . . . . . . . . . . . . . . . . . . . . . . . . . . . . . . . . . . .
12
7. Operator Interface. . . . . . . . . . . . . . . . . . . . . . . . . . . . . . . . .
13-15
8. Scale Setup. . . . . . . . . . . . . . . . . . . . . . . . . . . . . . . . . . . . . . . .
16-18
9. Instructions for Weighing . . . . . . . . . . . . . . . . . . . . . . . . . .
19-22
10. Calibration Procedure . . . . . . . . . . . . . . . . . . . . . . . . . . . .
23-24
11. Scale Settings Adjustment. . . . . . . . . . . . . . . . . . . . . . . . .
25-26
12. Troubleshooting . . . . . . . . . . . . . . . . . . . . . . . . . . . . . . . . . . . . . .
27
13. Data Output Format. . . . . . . . . . . . . . . . . . . . . . . . . . . . . .
28-31
14. Replacement Parts. . . . . . . . . . . . . . . . . . . . . . . . . . . . . . . . . . . .
32
15. Warranty Information . . . . . . . . . . . . . . . . . . . . . . . . . . . . . . . .
33
16. Technical Specifications. . . . . . . . . . . . . . . . . . . . . . . . . . . . . . .
34
17. References . . . . . . . . . . . . . . . . . . . . . . . . . . . . . . . . . . . . . . . . . . .
35
Accurately measuring infant milk intake during breastfeeding is
important in the management of hospitalized infants, as well as in
addressing breastfeeding concerns with healthy infants at home.
In the hospital, knowledge of milk intake improves clinical diagnosis
of feeding problems while providing essential information for precise
supplementation of infants at risk for under or over consumption1,2,3.
In the home, knowledge of milk intake ensures feeding adequacy
and enhances maternal satisfaction4,5.
Clinical indices of milk intake during breastfeeding, such as duration
of sucking, audible swallowing, and presence of maternal milk
ejection, are not accurate replacements for the evidence based
practice of test weighing before and after feeding. Using test
weights may also increase maternal satisfaction when compared to
using clinical indices to ensure adequate feeding5.
Table of Contents

6
Usage Conditions
Temperature Range for Use: +5 ºC to +35 ºC
(+41 ºF to +95 ºF)
Relative Humidity: 30% - 80% (non-condensing)
Storage Conditions
Temperature Range of Environment: -10 ºC to +50 ºC
(+14 ºF to +122 ºF)
Range of Relative Humidity: 10% - 90%
(non-condensing)
To avoid malfunctions, avoid storing the equipment where there
is direct sunlight, significant temperature changes, the risk of
dampness, a large amount of dust, in the vicinity of fires, or where
there is the risk of receiving vibrations or shocks. When in storage
do not put anything on the tray.
AC Adapter
Model BWII
Input Voltage 100 – 240 VAC 50-60 Hz/200 mA
Output Voltage 9 VDC ± 0.45 VDC
Rated Current 800 mA
Consumption Current 38 mA
Power Consumption 0.35 W max
Batteries
Model Batteries (AA x 4)
Consumption Current 20 mA
Power Consumption 0.12 W max
2. Use and Storage Conditions
3. Power Requirements

7
Usage Conditions
Temperature Range for Use: +5 ºC to +35 ºC
(+41 ºF to +95 ºF)
Relative Humidity: 30% - 80% (non-condensing)
Storage Conditions
Temperature Range of Environment: -10 ºC to +50 ºC
(+14 ºF to +122 ºF)
Range of Relative Humidity: 10% - 90%
(non-condensing)
To avoid malfunctions, avoid storing the equipment where there
is direct sunlight, significant temperature changes, the risk of
dampness, a large amount of dust, in the vicinity of fires, or where
there is the risk of receiving vibrations or shocks. When in storage
do not put anything on the tray.
AC Adapter
Model BWII
Input Voltage 100 – 240 VAC 50-60 Hz/200 mA
Output Voltage 9 VDC ± 0.45 VDC
Rated Current 800 mA
Consumption Current 38 mA
Power Consumption 0.35 W max
Batteries
Model Batteries (AA x 4)
Consumption Current 20 mA
Power Consumption 0.12 W max
• Capacity (Maximum Capacity): This shows the maximum
weight that can be measured by the scale.
•Increment (Minimum Graduation): This shows the interval of
the numeric value change on the digital display.
•Tare: The towel, blanket, etc., used when measuring the
infant weight is called “tare”. Measuring the infant weight
after subtracting the weight of the blanket is called “tare
weighing.”
•Pre-feed: Before feed or prior to feed.
•Post-feed: After feed or following feed.
4. Explanation of Terminology

8
5. Baby Tray Attachment & Removal
A. Attachment
The baby tray is not attached to the main unit when unpacked.
1. Pull the lever out.
2. Align the far edge of the
tray with the stickered line.

9
3. Slide the tray over the
platform until it stops and
you hear a “click.”
4. Make sure the tray is firmly
secured and then fix it to
the platform by pushing in
the lever until you hear a
“click.”.

10
B. Removal
The baby tray can be removed and washed.
5. Baby Tray Attachment & Removal (cont.)
1. Pull out the lever
2. While gently pushing down
the lever, slide out the tray
in the displayed direction.

11
• Once the tray is removed, take care not to insert a
finger or drop anything into the exposed opening.
3. Remove the tray once its
far edge is aligned with
the stickered line.
iInformation
WARNING
CAUTION
NOTICE

12
6. Part Identification
Adjusters (4)
Baby Tray
(for infant)
Tray Locking
Lever
Level GaugeOperation Keys
Display
Panel
Battery Cover
AC Adapter
Inlet
RS-232C
Connector
Bottom
Top

13
7. Operator Interface
Display panel
• The pointers ( the mark ) indicate active items.
• The backlight is on only when the AC adapter is used.
Operation keys
Symbols and their meaning
before
feed
after
feed
stabilized
net
lock
amount
fed
tare/zerooff
weight
lock off
reweigh
fed baby
units
g / lb. oz
reset
before
feed
after
feed
amount
fed
ON 123
* In gram only version (PN 0407023) of scale this button is disabled.
before
feed
after
feed
stabilized
net
lock
amount
fed
tare/zerooff
weight
lock off
reweigh
fed baby
units
g / lb. oz
reset
before
feed
after
feed
amount
fed
ON 123
*
Type B (applied part)
Class II Equipment
Direct Current
Output
CAUTION. Refer to the attached
Important Safeguards.

14
7. Operator Interface (cont.)
Display panel
Display panel descriptions:
before
feed
after
feed
stabilized
net
lock
amount
fed
tare/zerooff
weight
lock off
reweigh
fed baby
units
g / lb. oz
reset
before
feed
after
feed
amount
fed
ON 123
Stabilized The weight measurement has settled.
Net A tare weight is subtracted from current weight.
Lock Holding the stabilized weight.
Before feed Before feed weight displayed.
After feed After feed weight displayed.
Amount fed Weight of amount fed displayed.

15
Operation keys
Operation key functions:
before
feed
after
feed
stabilized
net
lock
amount
fed
tare/zerooff
weight
lock off
reweigh
fed baby
units
g / lb. oz
reset
before
feed
after
feed
amount
fed
ON 123
Tare/zero Sets the tare weight to zero.
Off Turns off the scale.
Weight lock off
Turns off weight lock mode until weight
is removed from scale. Weight lock
automatically turns on again when
scale displays zero.
Reweigh fed
baby
Redo post-feed weight. Clears post
feed weight and amount fed allowing
entry of new post feed weight and milk
intake calculation.
Units g/lb-oz
Switches between grams and pounds-
ounces. *In gram only version (PN
0407023) of scale this button is
disabled.
Reset
Turns on scale. Releases weight lock
and sets display to zero (Stored weights
remain in memory).
Before feed
Stores before feed weight in memory 1.
Displays before-feed weight once it has
been stored.
After feed
Stores after feed weight in memory 2.
Displays after-feed weight once it has
been stored.
Amount fed
Stores amount fed weight in memory
3. Displays the calculated feed amount
once the post-feed weight has been
stored.
tare/zero
off
weight
lock off
reweigh
fed baby
units
g / lb. oz
1
2
3

16
• When the batteries start to run low, “Lo” appears on display
panel as a warning. All (4 AA) batteries should be immediately
replaced with new ones.
8. Scale Setup
Power supply/battery
1. Turn the scale upside-
down, and turn the finger
screw on the battery
cover counterclockwise
(as indicated) to release
the screw.
2. Lift off the battery cover.
Rechargeable batteries are NOT recommended.
• A set of standard batteries should last about one year
(assuming four readings a day).
i
Information
WARNING
CAUTION
NOTICE

17
iInformation
WARNING
CAUTION
NOTICE
Using the AC adapter
1. Insert the AC adapter jack
into the AC adapter inlet
on the right side of the
main unit.
2. Plug the AC adapter into
the power outlet.
How to set up
Use the scale on a firm, flat and stable location.
•Do not position scale anywhere that is subject to direct
sunlight, near heating equipment, or directly in the path of
an air conditioner outlet, or other source of high airflow.
•Do not use scale anywhere that is subject to significant
temperature change.
•Do not position scale anywhere that is either damp or
subject to high humidity.
•After positioning the scale and before use, pick up the
baby tray from both sides to confirm that the tray is secure,
and not easily removed.
• Ensure that the tray locking lever is pushed in.
Content appearance
may vary from pictures.
• This equipment must be used with the included AC
adapter or 4 AA batteries.

18
8. Scale Setup (cont.)
Level gauge check
Level gauge
Level gauge - view from
above
Red Air bubble
Correct Incorrect
1. Place the scale on a
flat surface to ensure
accurate measurement.
2. Turn the four adjusters such
that the air bubble in the
level guide is positioned in
the center of the circle.
Confirm that all four
adjusters are in contact
with the surface.
Adjusters (4)

19
9. Instructions for Weighing
Considerations to follow prior to test-weighing
• Diaper should not be changed between the “before” and
“after” weights.
• Baby should wear the same clothing for “before” and
“after” weights.
• Use a bib, but do NOT include it in “before” and
“after” weights.
• To improve accuracy, bundle active infants and verify that all
blankets, clothing, and extremities are inside the basket and
not touching the side of the scale.
•Record weights in grams only.*
* Grams is closely equivalent to milliliters (mL) or cubic centimeters (cc). Meier PP, et al. A New Scale
for in-Home Test-Weighing for Mothers of Preterm and High Risk Infants. Journal of Human Lactation,
1994;10(3); 163-168.
BabyWeigh™II Operation Overview
Once you have setup the scale (section 8) operation is easy.
Here is an overview.
1. Perform before-feed weight (pg. 20).
The store weight in memory press the 1button
2. Perform after-feed weight (pg. 20-21).
The store weight in memory press the 2button
3. Calculate amount fed (pg 21).
To calculate press 3button.

20
9. Instructions for Weighing (cont.)
Instructions for Weighing
Setup:
1. Attach the tray and level the scale prior to weighing.
2. Press the button and wait until a ‘0’ appears in the
display. If using a blanket or pad on the scale, press
tare/zero
button to zero out the excess weight. Net will
be indicated.
Before-feed Weight (pre-weight):
1. Place baby on the scale,
holding one hand just
above baby. Wait until the
display indicates lock
(Beep sound). The value that
appears is the pre-weight.
2. Press the 1button to
store the pre-weight.
3. Remove baby from the scale, place baby in a safe location and
then record pre-weight.
Feed baby. Leave scale on during feeding.
After-feed Weight (post-weight):
1. If the scale has powered off, press the button and wait until
a ‘0’ appears in the display. The pre-weight is saved in memory,
even if the scale is powered off.
i
Information
WARNING
CAUTION
NOTICE
• Ensure the display has reset to ‘0’. If it has not, press the
button to zero out the display.
Other manuals for BabyWeigh II
2
Table of contents
Languages:
Other Medela Scale manuals