Medela BabyWeigh II User manual

Instruction Manual
Manual de instrucciones
Mode d’emploi
BabyWeigh™ II Scale
Part Number: 0407020
Part Number: 0407023 (grams only)
Número de pieza: 0407020
Número de pieza: 0407023 (en gramos solamente)
Numéro de pièce : 0407020
Numéro de pièce : 0407023 (grammes seulement)

Table of Contents
Important Safeguards
. . . . . . . . . . . . . . . . . . . . . . . . 2-6
Use and Storage Conditions
. . . . . . . . . . . . . . . . . . . .7
Power Requirements. . . . . . . . . . . . . . . . . . . . . . . . . .
7
Explanation of Terminology . . . . . . . . . . . . . . . . . . . .
8
Baby Tray Attachment & Removal . . . . . . . . . . . . .
9-12
Part Identication . . . . . . . . . . . . . . . . . . . . . . . . . . .
13
Operator Interface. . . . . . . . . . . . . . . . . . . . . . . . .
14-16
Scale Setup . . . . . . . . . . . . . . . . . . . . . . . . . . . . . .
17-19
Instructions for Weighing . . . . . . . . . . . . . . . . . . .
20-23
Calibration Procedure . . . . . . . . . . . . . . . . . . . . . .
24-25
Scale Settings Adjustment . . . . . . . . . . . . . . . . . .
26-27
Troubleshooting. . . . . . . . . . . . . . . . . . . . . . . . . . . . .
28
Data Output Format . . . . . . . . . . . . . . . . . . . . . . .
29-32
Replacement Parts . . . . . . . . . . . . . . . . . . . . . . . . . .
33
Warranty Information. . . . . . . . . . . . . . . . . . . . . . . . .
34
Technical Specications . . . . . . . . . . . . . . . . . . . . . .
35
References. . . . . . . . . . . . . . . . . . . . . . . . . . . . . . . . .
36
Accurately measuring infant milk intake during breastfeeding is
important in the management of hospitalized infants, as well as in
addressing breastfeeding concerns with healthy infants at home.
In the hospital, knowledge of milk intake improves clinical diagnosis
of feeding problems while providing essential information for precise
supplementation of infants at risk for under or over consumption1,2,3.
In the home, knowledge of milk intake ensures feeding adequacy and
enhances maternal satisfaction4,5.
Clinical indices of milk intake during breastfeeding, such as duration of
sucking, audible swallowing, and presence of maternal milk ejection,
are not accurate replacements for the evidence based practice of
test weighing before and after feeding. Using test weights may also
increase maternal satisfaction when compared to using clinical indices
to ensure adequate feeding5.

2
Índice
Medidas preventivas importantes
. . . . . . . . . . . . . . . . .38-40
Condiciones de uso y guardado
. . . . . . . . . . . . . . . . . . . . . 41
Requisitos eléctricos. . . . . . . . . . . . . . . . . . . . . . . . . . . . . . .
41
Explicación de los términos utilizados. . . . . . . . . . . . . . . . .
42
Cómo colocar y extraer la bandeja de pesaje . . . . . . .
43-46
Identicación de las piezas . . . . . . . . . . . . . . . . . . . . . . . . .
47
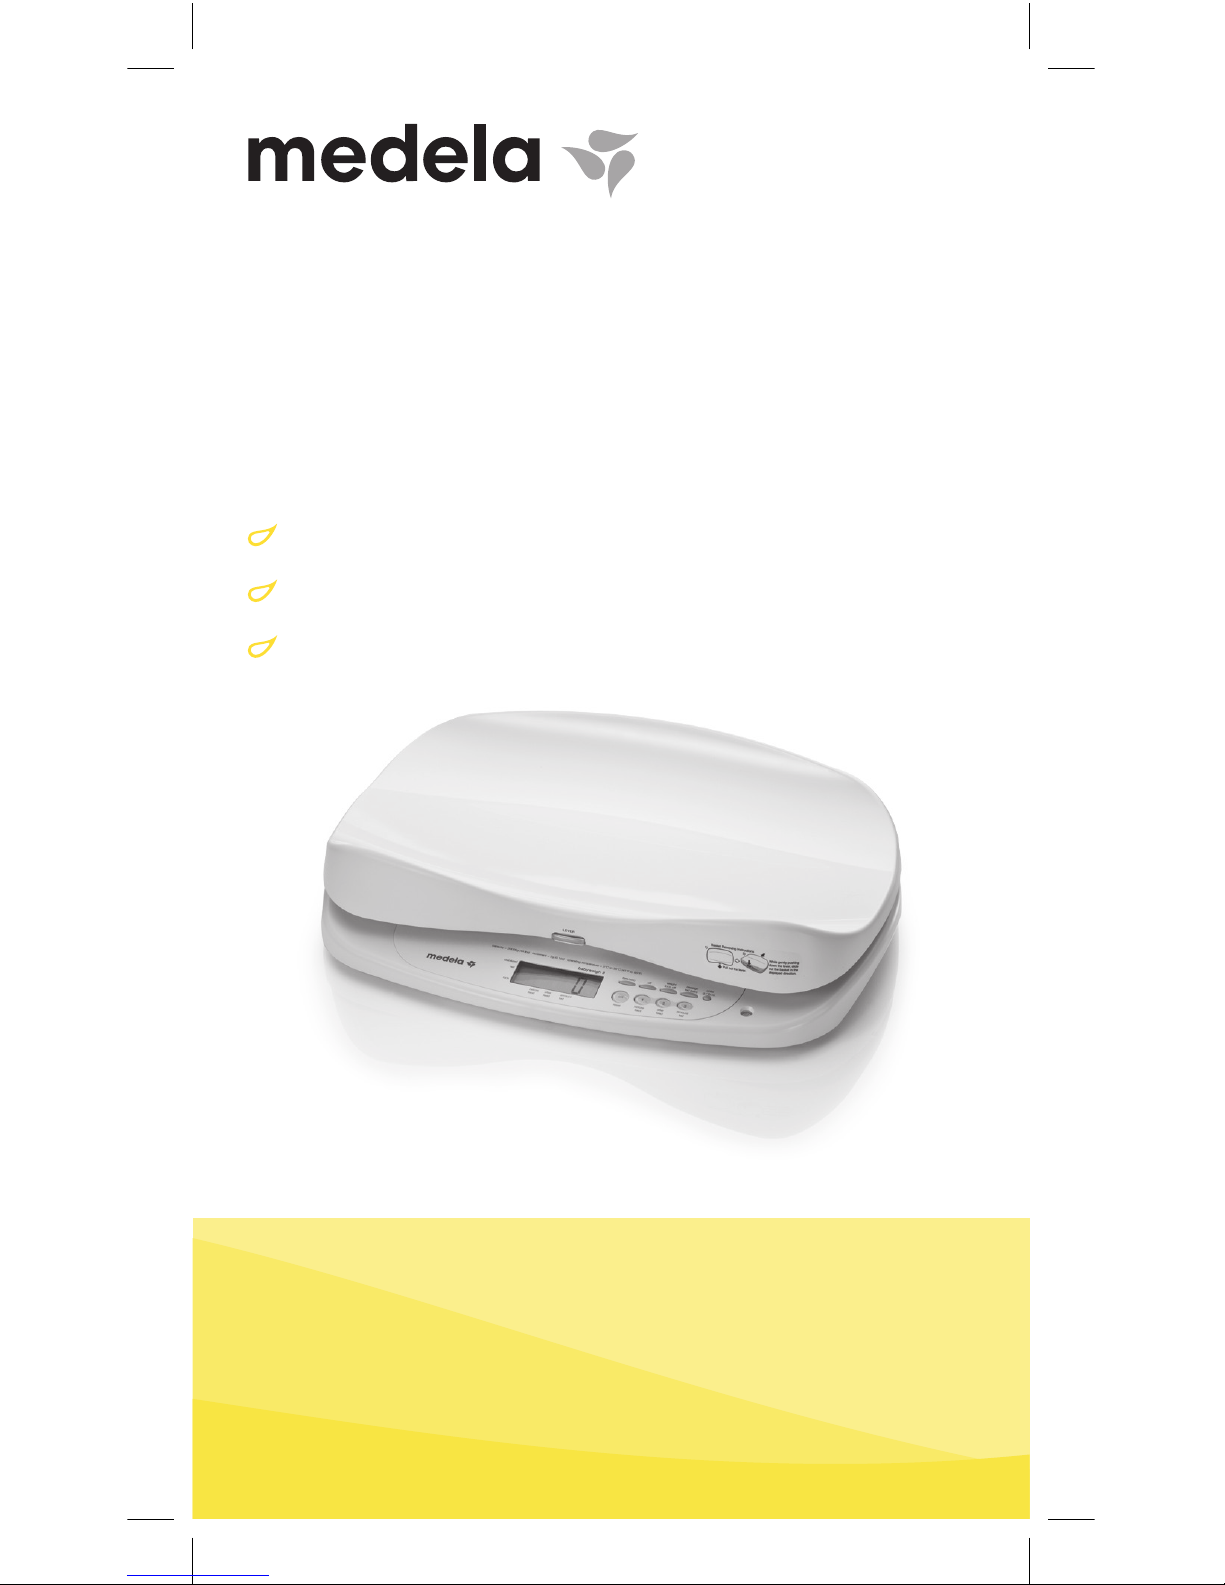
Interfaz del operador. . . . . . . . . . . . . . . . . . . . . . . . . . . .
48-50
Armado de la báscula. . . . . . . . . . . . . . . . . . . . . . . . . . .
51-53
Instrucciones para el pesaje. . . . . . . . . . . . . . . . . . . . . .
54-57
Procedimiento de calibración. . . . . . . . . . . . . . . . . . . . .
58-59
Cómo ajustar las conguraciones de la báscula . . . . .
60-61
Solución de problemas. . . . . . . . . . . . . . . . . . . . . . . . . . . . .
62
Formato de salida de datos . . . . . . . . . . . . . . . . . . . . . .
63-66
Piezas de reemplazo. . . . . . . . . . . . . . . . . . . . . . . . . . . . . . .
67
Información sobre la garantía. . . . . . . . . . . . . . . . . . . . . . . .
68
Especicaciones técnicas . . . . . . . . . . . . . . . . . . . . . . . . . .
69
Referencias . . . . . . . . . . . . . . . . . . . . . . . . . . . . . . . . . . . . . .
70
Determinar con exactitud la cantidad de leche que consume un
lactante durante el amamantamiento es importante no solo para
controlar a los bebés que están hospitalizados sino también para
abordar los problemas vinculados con la lactancia materna que tienen
los bebés sanos que se encuentran en el hogar.
En el hospital, saber cuál es el consumo de leche ayuda a obtener un
mejor diagnóstico clínico de los problemas de alimentación, además
de proporcionar información esencial para poder proveer el suplemento
alimenticio apropiado a los bebés que corren el riesgo de tener un
consumo por debajo o por encima del óptimo1, 2, 3.
En el hogar, saber cuál es el consumo de leche garantiza una
alimentación adecuada y aumenta la satisfacción de la madre4, 5.
Los índices clínicos respecto del consumo de leche durante el
amamantamiento, tales como el tiempo de succión, el ruido que el
bebé hace al tragar y la eyección de leche materna, no reemplazan
la exactitud empírica que implica controlar el peso del bebé antes y
después de alimentarlo. Además, es posible que este tipo de control
de peso aumente la satisfacción materna en comparación con el uso
de índices clínicos para garantizar una buena alimentación5.

3
Table des matières
Consignes de sécurité importantes
. . . . . . . . . . . 72-74
Conditions d’utilisation et de rangement
. . . . . . . . .75
Alimentation. . . . . . . . . . . . . . . . . . . . . . . . . . . . . . . . 7
5
Glossaire . . . . . . . . . . . . . . . . . . . . . . . . . . . . . . . . . . 7
6
Mise en place et dépose du plateau pour bébé
77-80
Nomenclature des pièces. . . . . . . . . . . . . . . . . . . . .
81
Interface opérateur . . . . . . . . . . . . . . . . . . . . . . . .
82-84
Préparation de la balance . . . . . . . . . . . . . . . . . .
85-87
Instructions pour la pesée . . . . . . . . . . . . . . . . . .
88-91
Étalonnage. . . . . . . . . . . . . . . . . . . . . . . . . . . . . . .
92-93
Réglages de la balance . . . . . . . . . . . . . . . . . . . .
94-95
Dépannage . . . . . . . . . . . . . . . . . . . . . . . . . . . . . . . .
96
Format de sortie des données . . . . . . . . . . . . .
97-100
Pièces de rechange . . . . . . . . . . . . . . . . . . . . . . . .
101
Informations sur la garantie . . . . . . . . . . . . . . . . . .
102
Caractéristiques techniques . . . . . . . . . . . . . . . . .
103
Références. . . . . . . . . . . . . . . . . . . . . . . . . . . . . . . .
104
La mesure précise de l’ingestion de lait maternel par le bébé pendant
l’allaitement est importante pour le traitement des nouveau-nés
hospitalisés, ainsi que pour répondre aux questions sur l’allaitement
dans le cas de nouveau-nés en bonne santé à la maison.
À l’hôpital, connaître la quantité de lait ingéré favorise un meilleur
diagnostic clinique des problèmes d’allaitement, et fournit également
des renseignements précieux pour supplémenter avec précision les
nouveau-nés à risque (sous-alimentés ou suralimentés)1,2,3.
À la maison, connaître la quantité de lait ingéré garantit un allaitement
adéquat : le contentement de la maman n’en sera que plus grand4,5.
Les indices cliniques d’ingestion de lait pendant l’allaitement, comme
la durée pendant laquelle le bébé suce, avale de manière audible,
et la présence d’éjection de lait maternel ne peuvent remplacer de
manière exacte la pratique fondée sur le pesage d’essai pendant et
après l’allaitement. Ces pesages augmentent également la satisfaction
maternelle, comparativement aux indices cliniques en vue de garantir
un allaitement adéquat5.

4
IMPORTANT
SAFEGUARDS
When using electrical devices, basic safety precautions should
always be followed, including the following:
READ ALL INSTRUCTIONS BEFORE USE
WARNING/CAUTION SYMBOLS
For optimum performance and safety, please familiarize yourself with the Caution
Symbols below. These symbols are designed to alert the user to potential hazards
when using this equipment. Ignoring these Caution Symbols may result in serious
injury to the patient or damage to the product. Please be sure to review before
proceeding with the INSTRUCTION MANUAL.
WARNING:
1. To reduce the risk of electric shock or product damage, never insert or remove
the AC adapter with wet hands.
2. Do not under any circumstances dismantle or alter the device, as this could
result in electric shock or injury as well as adversely affect the precision of
measurements.
3. To prevent fire hazard, use only a correctly wired outlet, and do not use a
multiple outlet extension cable.
WARNING – This symbol indicates the possibility of serious
injury if the product is mishandled or instructions are
ignored.
CAUTION – This symbol indicates the possibility of physical
injury or equipment damage if instructions are ignored.
This symbol indicates general precautions that should be
taken when using this product.

5
4. Ensure the baby is lying down in the tray with minimal movement. Excessive
movement could result in a fall, potentially causing serious injury.
5. The baby tray is not designed to accommodate individuals weighing more than
20 kg (44 lbs).
6. Infants must not be left unattended on the baby tray.
CAUTION:
1. When connecting the BabyWeigh™ II to a computer, ensure that the computer
conforms to IEC60950.
2. To help prevent the spread of infections, always clean the equipment after use.
Clean the tray and the housing as required with Cavicide® or commercially
available disinfectant.
3. Ensure the equipment is placed on a level and stable surface.
4. Always take the utmost care when placing a baby in the baby tray. Ensure that
there is no risk of the equipment tipping over.
5. Only use the adapter supplied with this equipment (PN 9207053).
6. When changing batteries, ensure that the new batteries are inserted with the
correct polarity, + and -. If the polarity is incorrect, then the batteries may leak
and damage the equipment.
7. When carrying the equipment, unplug the AC adapter from the wall and hold
the main body firmly, using handles provided.
8. To avoid any risk of injury or malfunction, keep your fingers and other objects
away from the space between the inner-plate and the scale.

6
Care & Maintenance
This is a precision manufactured and accurately calibrated product. Please
observe the following instructions.
1. Do not dismantle the scale housing. The baby tray may be removed by
following the instructions on page 9-12.
2. When not in use for a long time, unplug the AC adapter from the wall socket.
3. Remove the batteries before storing the equipment for long periods of time.
4. Do not wipe the equipment with corrosive chemicals. Use a neutral detergent
to clean the equipment. Do not spill water or chemical liquid on or in the unit.
The baby tray should be cleaned using Cavicide® or commercially available
disinfectant.
5. Avoid subjecting the equipment to excessive shocks or vibrations.
6. If an unauthorized person attempts to disassemble or repair any part of the
unit, the warranty will become invalid. If the unit malfunctions, please consult
your Medela sales consultant or customer service toll-free at 1-800-435-8316.
7. When disposing of this unit, please do so in accordance with local standards
for industrial waste.
Please observe the following instructions for accurate measurement.
1. Measurement may not be possible on a surface that is strongly vibrating. In
such cases transfer the equipment to a stable surface with little or no vibration.
2. If the scale is moved, and the new location has a temperature difference of
more than 20 °C (36 °F) please allow at least 2 hours before using.
3. While taking measurements, do not use mobile phones, microwave therapy
equipment or other types of transmitters near the scale as they may cause
interference.
4. Avoid scale placement near heating/cooling vents, heating appliances, areas of
high airflow or direct sunlight.
SAVE THESE INSTRUCTIONS

7
Usage Conditions
Temperature Range for Use: +5 ºC to +35 ºC
(+41 ºF to +95 ºF)
Relative Humidity: 30% - 80% (non-condensing)
Storage Conditions
Temperature Range of Environment: -10 ºC to +50 ºC
(+14 ºF to +122 ºF)
Range of Relative Humidity: 10% - 90%
(non-condensing)
To avoid malfunctions, avoid storing the equipment where
there is direct sunlight, significant temperature changes,
the risk of dampness, a large amount of dust, in the vicinity
of fires, or where there is the risk of receiving vibrations or
shocks. When in storage do not put anything on the tray.
Power Requirements
AC Adapter
Model BWII
Input Voltage 100 – 240 VAC 50-60 Hz/200 mA
Output Voltage 9 VDC ± 0.45 VDC
Rated Current 800 mA
Consumption Current 38 mA
Power Consumption 0.35 W max
Batteries
Model Batteries (AA x 4)
Consumption Current 20 mA
Power Consumption 0.12 W max

8
Usage Conditions
Temperature Range for Use: +5 ºC to +35 ºC
(+41 ºF to +95 ºF)
Relative Humidity: 30% - 80% (non-condensing)
Storage Conditions
Temperature Range of Environment: -10 ºC to +50 ºC
(+14 ºF to +122 ºF)
Range of Relative Humidity: 10% - 90%
(non-condensing)
To avoid malfunctions, avoid storing the equipment where
there is direct sunlight, significant temperature changes,
the risk of dampness, a large amount of dust, in the vicinity
of fires, or where there is the risk of receiving vibrations or
shocks. When in storage do not put anything on the tray.
Power Requirements
AC Adapter
Model BWII
Input Voltage 100 – 240 VAC 50-60 Hz/200 mA
Output Voltage 9 VDC ± 0.45 VDC
Rated Current 800 mA
Consumption Current 38 mA
Power Consumption 0.35 W max
Batteries
Model Batteries (AA x 4)
Consumption Current 20 mA
Power Consumption 0.12 W max
Explanation of Terminology
• Capacity (Maximum Capacity): This shows the
maximum weight that can be measured by the scale.
• Increment (Minimum Graduation): This shows the
interval of the numeric value change on the digital
display.
• Tare: The towel, blanket, etc., used when measuring
the infant weight is called “tare”. Measuring the infant
weight after subtracting the weight of the blanket is
called “tare weighing.”
• Pre-feed: Before feed or prior to feed.
• Post-feed: After feed or following feed.

9
Baby Tray Attachment & Removal
A. Attachment
The baby tray is not attached to the main unit when unpacked.
1. Pull the lever out.
2. Align the far edge of the
tray with the stickered line. Line

10
Baby Tray Attachment & Removal (cont.)
3. Slide the tray over the
platform until it stops and
you hear a “click.”
4. Make sure the tray is firmly
secured and then fix it to
the platform by pushing in
the lever until you hear a
“click.”

11
Baby Tray Attachment & Removal (cont.)
B. Removal
The baby tray can be removed and washed.
1. Pull out the lever
2. While gently pushing
down the lever, slide out
the tray in the displayed
direction.

12
Baby Tray Attachment & Removal (cont.)
3. Remove the tray once its
far edge is aligned with the
stickered line.
CAUTION: Once the tray is removed, take care not
to insert a finger or drop anything into the
exposed opening.
Line

13
Part Identification
Top
Bottom
Adjusters (4)
Baby Tray
(for infant)
Tray Locking
Lever
Level Gauge
Operation Keys
Display Panel
Battery Cover
AC Adapter
Inlet
RS-232C
Connector

14
Operator Interface
Display panel
• The pointers ( the mark ) indicate active items.
• The backlight is on only when the AC adapter is used.
Operation keys
Symbols and their meaning
before
feed
after
feed
stabilized
net
lock
amount
fed
tare/zero off
weight
lock off
reweigh
fed baby
units
g / lb. oz
reset
before
feed
after
feed
amount
fed
ON 123
before
feed
after
feed
stabilized
net
lock
amount
fed
tare/zero off
weight
lock off
reweigh
fed baby
units
g / lb. oz
reset
before
feed
after
feed
amount
fed
ON 123
Type B applied part
Class II Equipment
Direct Current
Output
Caution. Refer to the attached
Important Safeguards.
* In gram only version (PN 0407023) of scale this button is disabled.
*

15
Operator Interface (cont.)
Display panel
Display panel descriptions:
Stabilized – The weight measurement has settled.
Net – A tare weight is subtracted from current weight.
Lock – Holding the stabilized weight.
Before feed – Before feed weight displayed.
After feed – After feed weight displayed.
Amount fed – Weight of amount fed displayed.
before
feed
after
feed
stabilized
net
lock
amount
fed
tare/zero off
weight
lock off
reweigh
fed baby
units
g / lb. oz
reset
before
feed
after
feed
amount
fed
ON 123

16
Operator Interface (cont.)
Operation keys
Operation key functions:
tare/zero Tare/zero – Sets the tare weight to zero.
off Off – Turns off the scale.
weight
lock off Weight lock off – Turns off weight lock mode until
weight is removed from scale.
Weight lock automatically turns on
again when scale displays zero.
reweigh
fed baby Reweigh fed baby – Redo post-feed weight. Clears
post feed weight and amount fed
allowing entry of new post feed
weight and milk intake calculation.
units
g / lb. oz
Units g/lb-oz – Switches between grams and
pounds-ounces. *In gram only
version (PN 0407023) of scale this
button is disabled.
Reset – Turns on scale. Releases weight
lock and sets display to zero
(Stored weights remain in memory).
1 Before feed – Stores before feed weight in
memory 1. Displays before-feed
weight once it has been stored.
2 After feed – Stores after feed weight in memory
2. Displays after-feed weight once
it has been stored.
3 Amount fed – Stores amount fed weight in
memory 3. Displays the calculated
feed amount once the post-feed
weight has been stored.
before
feed
after
feed
stabilized
net
lock
amount
fed
tare/zero off
weight
lock off
reweigh
fed baby
units
g / lb. oz
reset
before
feed
after
feed
amount
fed
ON 123

17
Scale Setup
Power supply/battery
1. Turn the scale upside-
down, and turn the nger
screw on the battery
cover counterclockwise
(as indicated) to release
the screw.
2. Lift off the battery cover.
• When the batteries start to run low, “Lo” appears on
display panel as a warning. All (4 AA) batteries should be
immediately replaced with new ones.
NOTE: Rechargeable batteries are NOT recommended.
• A set of standard batteries should last about one year
(assuming four readings a day).

18
Scale Setup (cont.)
Using the AC adapter
1. Insert the AC adapter jack
into the AC adapter inlet on
the right side of the main unit.
2. Plug the AC adapter into the
power outlet.
CAUTION: This equipment must be used with the
included AC adapter or 4 AA batteries.
How to set up
Use the scale on a rm, at and stable location.
• Do not position scale
anywhere that is subject
to direct sunlight, near
heating equipment, or
directly in the path of an
air conditioner outlet,
or other source of high
air ow.
• Do not use scale anywhere
that is subject to signi cant temperature change.
• Do not position scale anywhere that is either damp or
subject to high humidity.
• After positioning the scale and before use, pick up the baby
tray from both sides to con rm that the tray is secure, and
not easily removed.
• Ensure that the tray locking lever is pushed in.

19
Scale Setup (cont.)
Level gauge check
1. Place the scale on a
at surface to ensure
accurate measurement.
2. Turn the four adjusters
such that the air bubble
in the level guide is
positioned in the center
of the circle. Conrm
that all four adjusters
are in contact with the
surface.
Level gauge
Adjusters (4)
View from above
Red Air bubble
Correct Incorrect
Other manuals for BabyWeigh II
2
This manual suits for next models
2
Table of contents
Languages:
Other Medela Scale manuals