Medeli DR2 User manual


FCC Information
NOTICE
FCC WARNING
GUIDELINES LAID DOWN BY FCC RULES FOR USE OF THE UNIT IN THE U.S.A. (not
applicable to other areas)
Changes or modifications not expressly approved by the party responsible for compliance
could void the user's authority to operate the equipment.
This equipment has been tested and found to comply with the limits for a Class B digital device,
pursuant to Part15 of the FCC Rules. These limits are designed to provide reasonable
protection against harmful interference in a residential installation. This equipment generates,
uses and can radiate radio frequency energy and,if not installed and used in accordance with
the instructions,may cause harmful interference to radio communications. However,there is
no guarantee that interference will not occur in a particular installation. If this equipment does
cause harmful interference to radio or television reception,which can be determined by turning
the equipment off and on,the user is encouraged to try to correct the interference by one or
more of the following measures:
Reorient or relocate the receiving antenna.
Increase the separation between the equipment and receiver.
Connect the equipment into anoutlet on a circuit different from that to which the receiver is
connected.
Consult the dealer or anexperienced radio / TV technician for help.
2

3
IMPORTANT NOTES
Thank you very much for purchasing this product . You are recommended to study this
manual carefully before using the unit.
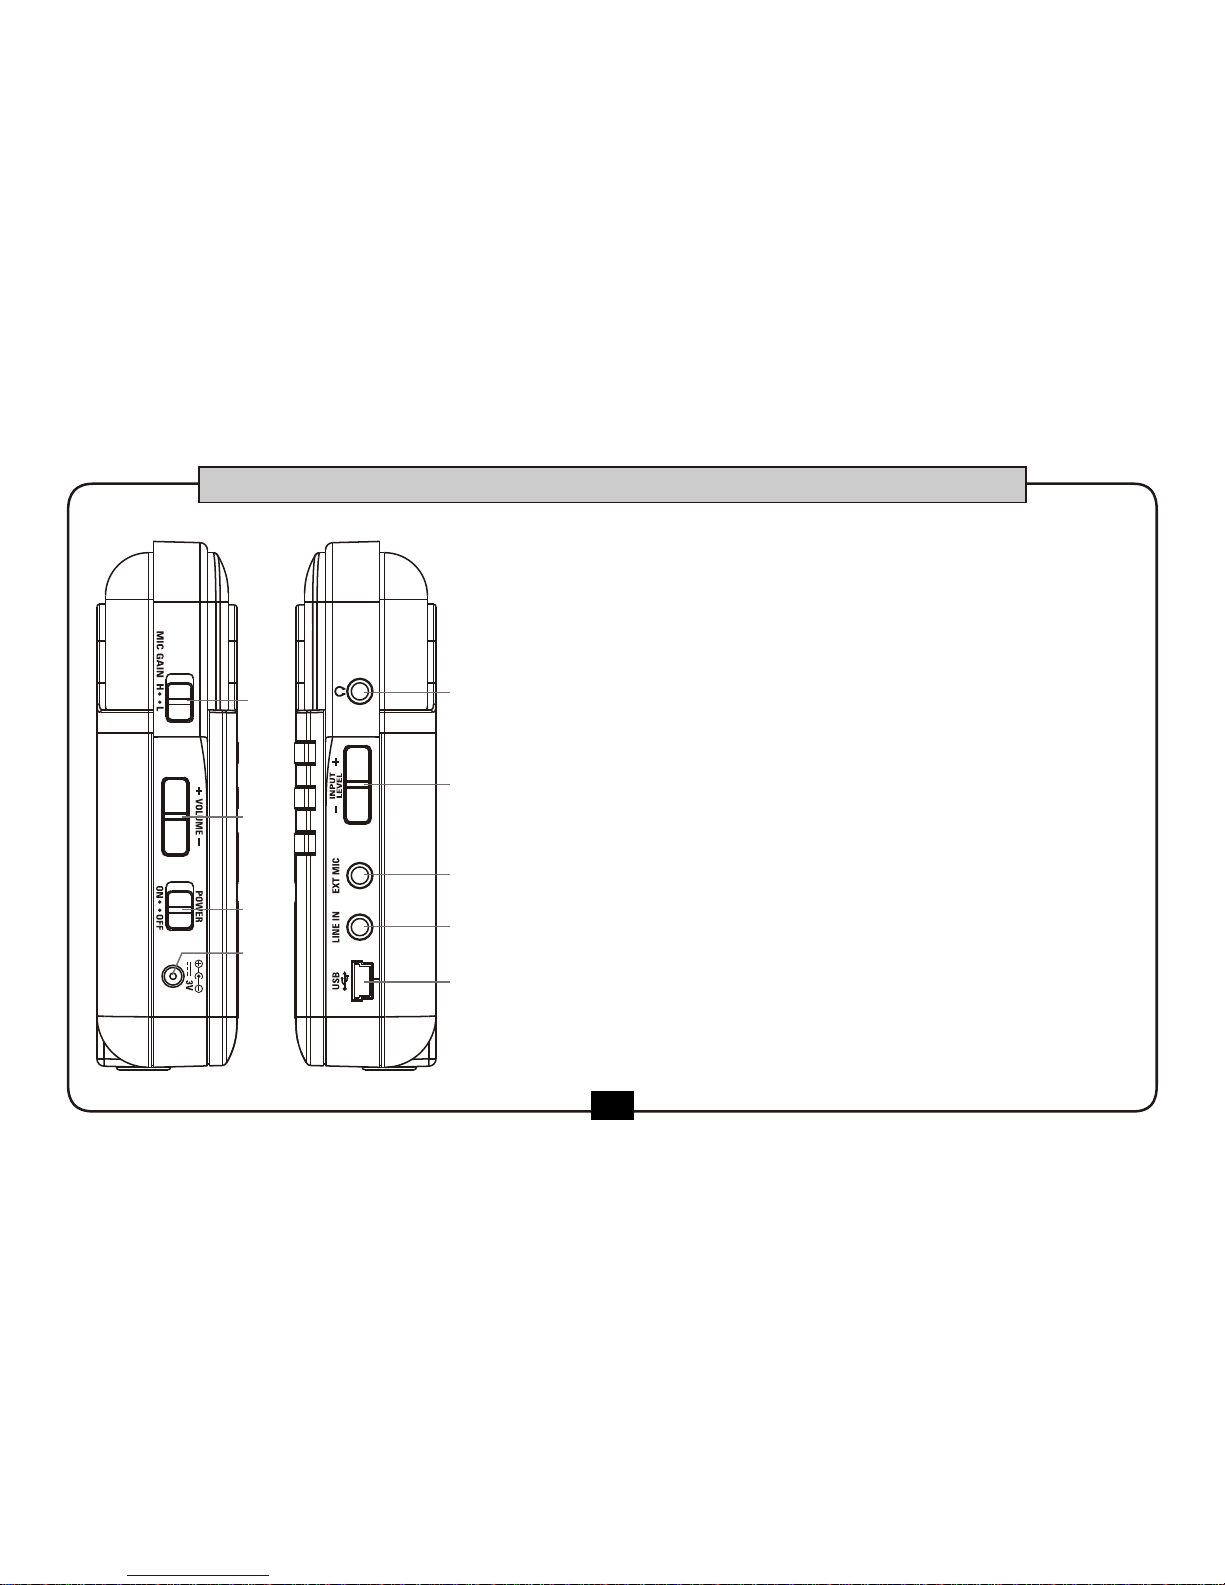
This unit could be operated either by a 3V battery or by a 3V center minus DC adaptor.
Before connection,please ensure the power supply has been properly installed and all power devi-
ces such as amplifiers must firstbe turned off,in order to avoid any malfunction.
Avoid using this unit together with same circuit of electronic products that will generate line noises.
Do not place this unittoo close to heat sources such as radiator and amplifier in order to prevent
damages like interference.
Do not expose this unit under excessive sunlight,water and moisture.
Strong vibration and shock will damage this unit.
Clean this unit with a soft and dry cloth. Aslightly dampened cloth with mild detergent might remove
stubborn dirt.
Never use thinners and alcohol for cleaning the unit.
Hold the unit firmly while unplugging the cables,never pull the audio cables with stress.
Note: If the recorder doesn t w
ork w
ell, p
lease p
ull t
he p
ower jack a
nd t
ake o
ut t
he
battery, then plug the power jack or put the battery in again to turn on the recorder.
The normal function of the product may be disturbed by Strong Electro Magnetic Interference.
If so, simply reset the productto resume normal operation by followingthe instruction manual.
In case the function could not resume, please use the product in other location.
Caution!

When to use DR2 ?
This product is suitable in the following situation
Sound sampling in an external or internal environment
Live recording
Conference recording
Course recording for students
Home Studio
Journalist and other situation need interview recording to record
This product provides high quality recording function and accurate
position for sound
It stores file in both wav and mp3
4

5
MAIN FEATURES
Stereo 4 mics recording,360 degree mode. Support mp3 and wav format.
16bit/24bit,44.1K and 48K sample rate.
Support SD/SDHC card up to 16G.
128*64 OLED display.
Bass compensate, 3D effect, Reverb Chorus Pitch and Delay effect.
MP3 voice cancelling.
Tuner function inside for guitar and bass player.
Easy to operate.

SIDE PANEL
FRONT PANEL
BATTERY REPLACEMENT DIAGRAM
MENU TREE
BASIC OPERATION
RECORDING SETUP
RECORDING
SETUP PLAYBACK
PLAYBACK
EFFECTS
FILE MANAGEMENT
UTILITY
SD CARD
MIC
SPEAKER
PHONES
CURRENT STATE PROTECT
SPECIFICATIONS
6
CONTENTS
7-8
9-10
11
12
13-26
13-15
16-19
20-22
23-26
27-30
31-34
35-38
39-40
41
41
41
43
42

1.POWER supplyjack:(DC in 3V center minus)
Connect an AC adaptor to this jack.
2.[POWER ON/OFF]button:
Turn the power on/off.
3.[VOLUME] button:
Adjust volume.
4. [MIC GAINH..L ] button:
Choose high levelmic input or low level input.
5.USB jack
:
Connect to computer.
67
SIDE PANEL
4
3
2
1
9
8
7
6
5

SIDE PANEL
4
3
2
1
9
8
7
6
5
6.LINE INjack:
Connect to any other audio device such as mp3 and
CD player.
7. EXT MICjack:
Connect the external microphone.
8. [INPUT LEVEL+/-]button:
You can also adjust the recording levelby
[INPUT LEVEL +] or [INPUT LEVEL-] button.
9. PHONES jack:
Connect a pairof stereo headphones to this jack.
8

69
10.[MENU] button:
Press [MENU] button to choose the menu.
11. [BACK/CANCEL] button:
Press [BACK/CANEL] goes back to the home screen.
Long press[BACK/CANCEL]button to hold on / off .
12. [REPEAT A B] button:
A-B repeat function allows you to specify point A
and point B and automatically play the section
between these two points repeatedly.
13. [EFFECT] button:
Effects button to choose.
LRLR
24bit WAVE/MP3
RECORDER
24bit WAVE/MP3
RECORDER
10
12
13
14
15
16
11
FRONT PANEL

14. [MONITOR] :
Headphone monitor output on/off.
Long press to turn on/off speaker while playing.
15. [REC] :
Record button
16. [Display]
A variety ofinformation about the unit appears
here.
17. [ ]/[ ]:
[PLAY/PAUSE] button / [Up] button .
18. [ ]/[ ] :
[STOP] button / [Down] button .
19. [ ]/[ ]
[F.F] button / [Right] button .
20.[ ]/[ ]
[REWIND] button / [Left] button .
LRLR
24bit WAVE/MP3
RECORDER
24bit WAVE/MP3
RECORDER
10
12
13
14
15
16
18 17
11
FRONT PANEL
17
18
19
20
6
10

11
Size AA,
Sum-3,R6 battery.

MENU TREE
File
Play Setup
Utility
Track Select
Play Mode
SD Card
Display
Information
Format
Effect
Effect Type
Open
Delete
Rename
Volume
Auto Gain
6
12
Main
Record Setup
Sample Rate
Record Format
Preset
Power
Auto Shutdown
Special
Time/Rate/Pitch
Level/Mix/Feedback
Vocal Enhance
Input Select
Brightness
Dim Light Time
Tuner
Calibration

13
BASIC OPERATION
At the main screen, press [MENU] button,
the following menu appears. This screen let
you select RECORD SETUP by [ ] or [ ]
button.
The screen now indicates five parameter
items: SAMPLE RATE REC FORMAT
INPUT SELEDT AUTO GAIN and
VOCAL ENHANCE . You can select them
by [ ] or [ ]button .
Press the [BACK/CANCEL]
button will return to the main menu .
RECORDING SETUP
00:00:00
00:02:22
DR2-0001.mp3
R
L
-48 0-6-12-24-36
STOP FX:off
1.RECORD SETUP
2.PLAY SETUP
3.EFFECT
4.FILE
5.UTILITY
MENU
SAMPLE RATE
RECORD FORMAT
Mp3 320kbps
INPUT SELECT
4 MICS
48kHZ
RECORD SETUP
SAMPLE RATE
48kHZ
RECORD FORMAT
INPUT SELECT
4 MICS
Mp3 320kbps
RECORD SETUP
1.RECORD SETUP
2.PLAY SETUP
3.EFFECT
4.FILE
5.UTILITY
MENU
00:00:00
00:02:22
DR2-0001.mp3
R
L
-48 0-6-12-24-36
STOP FX:off
1.
2.
3.

14
BASIC OPERATION
SAMPLE RATE is sample rateparameter .
you can use[ ] or [ ] button to choose
44.1kHz or 48kHz(default) samplerate.
SAMPLE RATE
1
REC FORMAT is the parameterfor
recording format. This product supports
to 9 formats:
WAV24bit WAV16bit MP3-320kbps
MP3-224kbps MP3-192kbps MP3-160
kbps MP3-128kbps MP3-96kbps and
MP3-64kbps .
You can use [ ] or [ ] button to
choose.The default isMP3-320kbps.
REC FORMAT
2
SAMPLE RATE
RECORD FORMAT
Mp3 320kbps
INPUT SELECT
4 MICS
48kHZ
RECORD SETUP
SAMPLE RATE
RECORD FORMAT
Mp3 320kbps
INPUT SELECT
4 MICS
44.1kHZ
RECORD SETUP
SAMPLE RATE
48kHZ
RECORD FORMAT
INPUT SELECT
4 MICS
Mp3 320kbps
RECORD SETUP
SAMPLE RATE
48kHZ
RECORD FORMAT
INPUT SELECT
4 MICS
Mp3 224kbps
RECORD SETUP

15
AUTO GAIN is the switchthat adjust
input sensitivity use [ ] or [ ] button
to choose ONor OFF .The default is ON.
AUTO GAIN
4
BASIC OPERATION
INPUT SELECT is parameter for number of
microphone to be choosed . select 2 MICS
record mode or4 MICS record mode by [ ]
or [ ]button The default is 4MICS.
INPUT SELECT
3
SAMPLE RATE
48kHZ
RECORD FORMAT
Mp3 320kbps
INPUT SELECT
4 MICS
RECORD SETUP
SAMPLE RATE
48kHZ
RECORD FORMAT
Mp3 320kbps
INPUT SELECT
2 MICS
RECORD SETUP
Note:If you use line in or ext mic, you can
choose 2 MIC for only external input or 4 MIC
with 2 back MIC and external input together.
VOCAL ENHANCE can enhance the
vocal band signal and make less the others
use [ ] or [ ]buttonto choose OFF LEVEL
ONE and LEVEL TWO .The default is OFF.
VOCAL ENHANCE
5
AUTO GAIN
ON
VOCAL ENHANCE
OFF
RECORD SETUP
AUTO GAIN
ON
VOCAL ENHANCE
LEVEL ONE
RECORD SETUP
AUTO GAIN
VOCAL ENHANCE
OFF
ON
RECORD SETUP
AUTO GAIN
VOCAL ENHANCE
OFF
OFF
RECORD SETUP

00:00:00
04:36:22
DR2-0001.mp3
R
L
-48 0-6-12-24-36
PUAS FX:off
16
RECORDING
At the main screen or file manage screen
(FILE) ,press the [REC] buttongoes into
standby record mode.
The [REC] buttonlightens and flashes.
We can see two highlightrecord levels are
scanning. This product detects the level
of the currently selected input source.
The current filename displays under the
record level (eg:DR2-xxxx.mp3or
DR2-xxxx.wav).
00:00:00
04:36:22
DR2-0001.mp3
R
L
-48 0-6-12-24-36
BASIC OPERATION
1.
2.
STOP FX:off

Adjust the record level bypressing
[INPUT LEVEL+] [INPUT LEVEL-]
button so thatthe highlight record level
reaches thehighest levelwithout the peak
indicator shown inred turning on .
00:00:00
04:36:22
DR2-0001.mp3
R
L
-48 0-6-12-24-36
PUAS FX:off
MIC GAIN: 16
6
17
BASIC OPERATION
3.

18
At the standby condition, Press [PLAY/
PAUSE] or [REC] button to start recording
The [REC] buttonlightens .
the time levelbegin to increase as recording
starts. The timeshow above indicate
the record time,and the time appeals on the
right side indicatesthe time left for record.
Note: the amountof record time available
depend on capacityof SD card.
You can also adjust the recording levelby
[INPUT LEVEL+] or [INPUT LEVEL-] button
while recording.
Note: if youuse the input MIC, the sound
of pressing thekey will simultaneously be
recorded.
00:00:01
04:36:21
DR2-0001.mp3
R
L
-48 0-6-12-24-36
REC FX:off
BASIC OPERATION
1.
2.

19
Adjust the outputvolume by pressing
[VOLUME+] or [VOLUME-] at the left
side.
Press [PLAY/PAUSE] button to pause the
recording . Pressthe [PLAY/PAUSE]
button again to continuerecording.
During recording ,press [STOP] button or
[REC] button to stop the record, Light on
[REC] button darkens,and the file will be
saved to the SD card.
00:02:11
04:36:21
DR2-0001.mp3
R
L
-48 0-6-12-24-36
VOLUME: 20
00:11:49
04:25:37
DR2-0001.mp3
R
L
-48 0-6-12-24-36
00:00:00
00:12:12
DR2-0001.mp3
R
L
-48 0-6-12-24-36
BASIC OPERATION
3.
4.
5.
REC FX:off
REC FX:off
STOP FX:off

20
SETUP PLAYBACK
At the home screen , press [MENU] button
to go into the main menu. Use [ ] or [ ]
button to choose play setup then
press [MENU] button to go into the playback
setup screen .
Use [ ]or [ ] button to editthe
parameters such as TRACK SELECT ,
BASS COMP , PLAY MODE and
VOLUME .
Press [BACK/CANEL] to go back to the
home screen.
00:00:00
00:02:22
DR2-0001.mp3
R
L
-48 0-6-12-24-36
1.RECORD SETUP
2.PLAY SETUP
3.EFFECT
4.FILE
5.UTILITY
MENU
TRACK SELECT
SPECIAL
OFF
PLAY MODE
ONCE
STEREO
PLAY SETUP
1.RECORD SETUP
3.EFFECT
4.FILE
5.UTILITY
2.PLAY SETUP
MENU
TRACK SELECT
STEREO
SPECIAL
PLAY MODE
ONCE
OFF
PLAY SETUP
BASIC OPERATION
1.
2.
3.
STOP FX:off
Table of contents