Medema Spinalus-2 User manual

User Manual
Spinalus-2
GB
medemagroup
2433-2017-B ver. 1.0.0 - December 2019

User guide 2433-2019-B 2 of 20 Version 1.0.0/2019
Medema Production A/S
Dealer:

User guide 2433-2019-B 3 of 20 Version 1.0.0/2019
Medema Production A/S
Contents
Spinalus-2 settings................................................................ 4
Stepless adjustment of seat depth ...................................... 5
Height adjustment of armrest............................................... 6
Adjusting the armrest cushion............................................. 8
Dismantling the armrest ....................................................... 9
Adjustment of the seat width ............................................... 9
Dynamic recline..................................................................... 13
Dynamic recline..................................................................... 14
Adjusting the headrest.......................................................... 15
Swing-away tting for Spinalus-2........................................ 15
Adjusting the tightness......................................................... 16
Adjusting backward/forward on armrest............................. 16
Adjusting the joystick ........................................................... 16
Joystick height adjustment .................................................. 17
Replace joystick .................................................................... 18
Switch joystick to opposite armrest.................................... 18

User guide 2433-2019-B 4 of 20 Version 1.0.0/2019
Medema Production A/S
Spinalus-2 settings
Adjusting the height of the backrest
The backrest can be ad-
justed up/down in several
sections.
The top part of the backrest
is, from the factory, mount-
ed in the top hole. Can be
moved one hole down
(30 mm)
The backrest itself is,
standard wise, mounted in
the middle adjusting hole.
From here it can be moved
25 mm up or down.
Adjusting holes for the top part of
the backrest.
Tool: open end wrench
13 mm
Adjusting holes for the backrest.
Tool: Torx T30
Spinalus-2
is designed to
stay safe to use for at least
10 years
User guide 2433-2019-B 5 of 20 Version 1.0.0/2019
Medema Production A/S
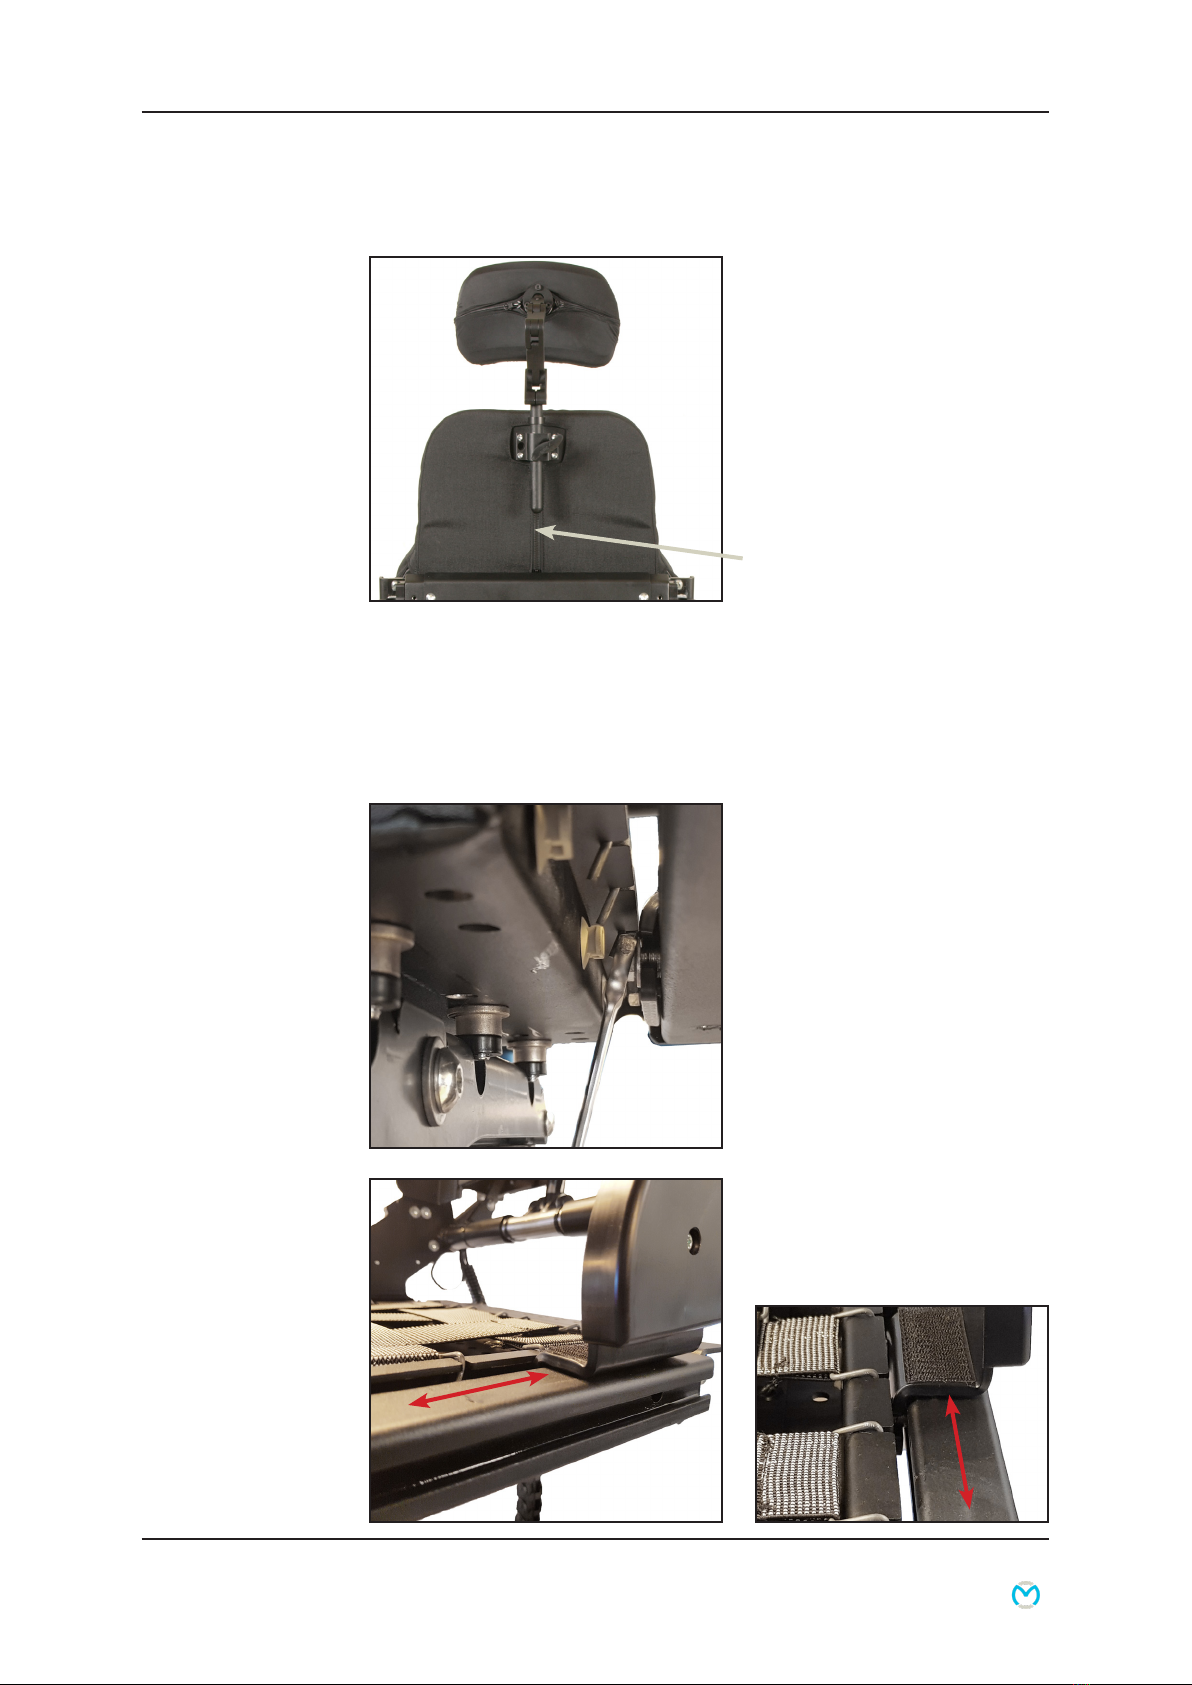
Stepless adjustment of seat depth
Seat depth are step less
adjusted between 35 and
55 cm.
Due to the construction of
the back, the seat depth
adjustment have no inu-
ence on the other geometry
in the backrest.
At the back of the backrest
is a zipper. Open the zipper
and strip the backrest cushion of from the top back frame.
Pull the cushion from the velcro, xed to the back frame. and it
is free.
The seat cushion is also xed with velcro in both sides, so lift it
off easily and remove it.
The backrest is xed to the
seat with two screws on
each side.
Loosen the screws on both
sides.
Tool: open end wrench 13 mm
Now the backrest can be
moved back/forward, to the
desired position.

User guide 2433-2019-B 6 of 20 Version 1.0.0/2019
Medema Production A/S
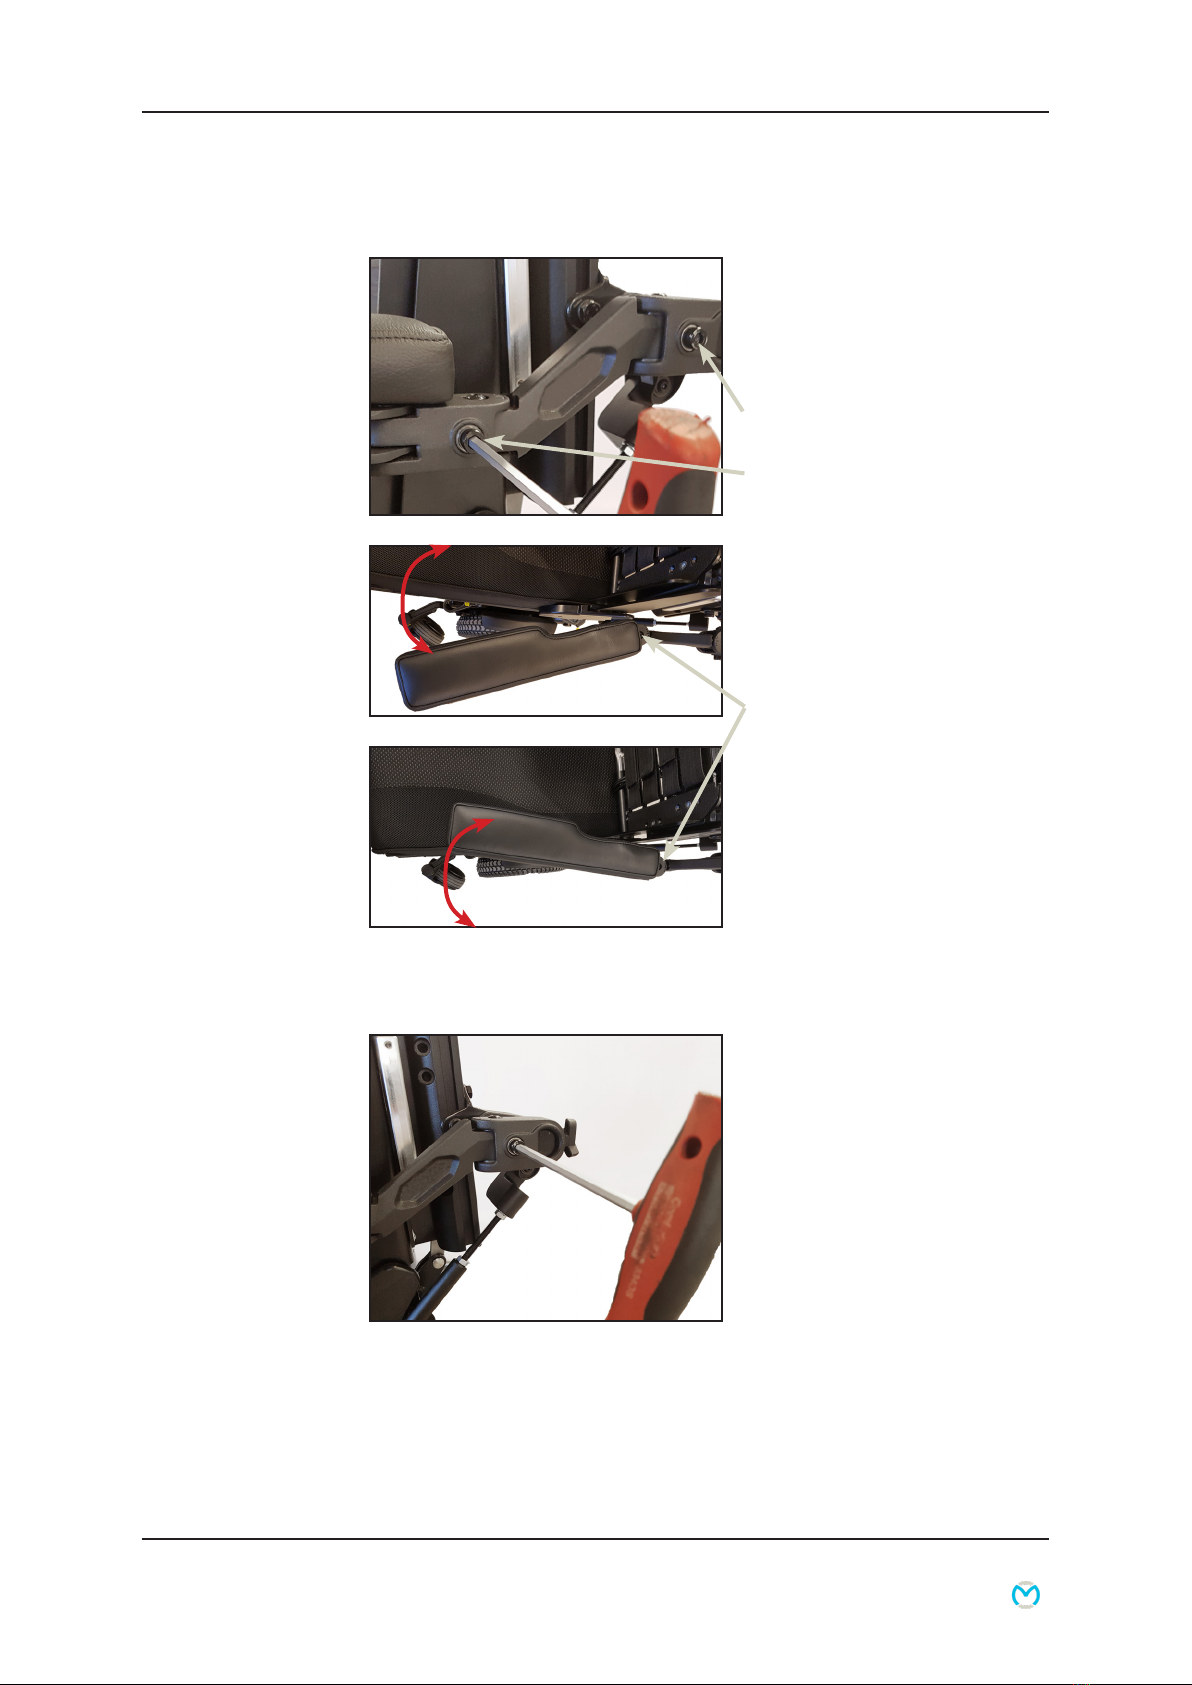
Height adjustment of armrest
The armrests runs in a rail,
can be adjusted step less
up/down. To adjust - loosen
three screws. Adjust armrest -
tighten the screws again.
Loosen these screws.
Tool: open end wrench 13 mm
Loosen these
screws.
It affects the angle on the
armrest, when it is adjusted
up/down.
Adjust the angle by:
• Loosen these two counter
nuts.
• Adjust the spindle. Screw
driver in top of spindle.
• Tighten the counter nuts
again.
Tool: open end wrench 12 mm
Allen key 6 mm
Spindle screw is
found down here.
User guide 2433-2019-B 7 of 20 Version 1.0.0/2019
Medema Production A/S
Use the tool in the second
joint, and the armrest angle
moves in/out from this
centre.
Tool: Allen key 6 mm
Adjusting the armrest angle in the rst joint
The armrest has two joints
to rotate about. We name
the joints, the rst and the
second joint.
The second joint.
The rst joint.
Tool: Allen key 6 mm
By turning the screw either
one or the other way, the
angle of the armrest moves
in/out.
Centre of angle.
Adjusting the armrest angle in the second joint

User guide 2433-2019-B 8 of 20 Version 1.0.0/2019
Medema Production A/S
Centre of angle
Centre of angle
Adjust the armrest cushion
back/forward on the arm-
rest.
• Lift up the armrest.
• Loosen the two screws.
• Adjust the armrest cush-
ion.
• Tighten the screws again.
Tool: Torx T25
Adjusting the armrest cushion
By turning the screw either
one or the other way, the
angle of the armrest moves
in/out.
Note!
When the armrest is adjust-
ed inward, it will at some
point, hit the seat.

User guide 2433-2019-B 9 of 20 Version 1.0.0/2019
Medema Production A/S
Dismantling the armrest
The armrests are xed with
a nger screw.
Loosen the nger screw.
Pull the armrest of. A new
one can be mounted in
reverse order.
Gripping area

User guide 2433-2019-B 10 of 20 Version 1.0.0/2019
Medema Production A/S
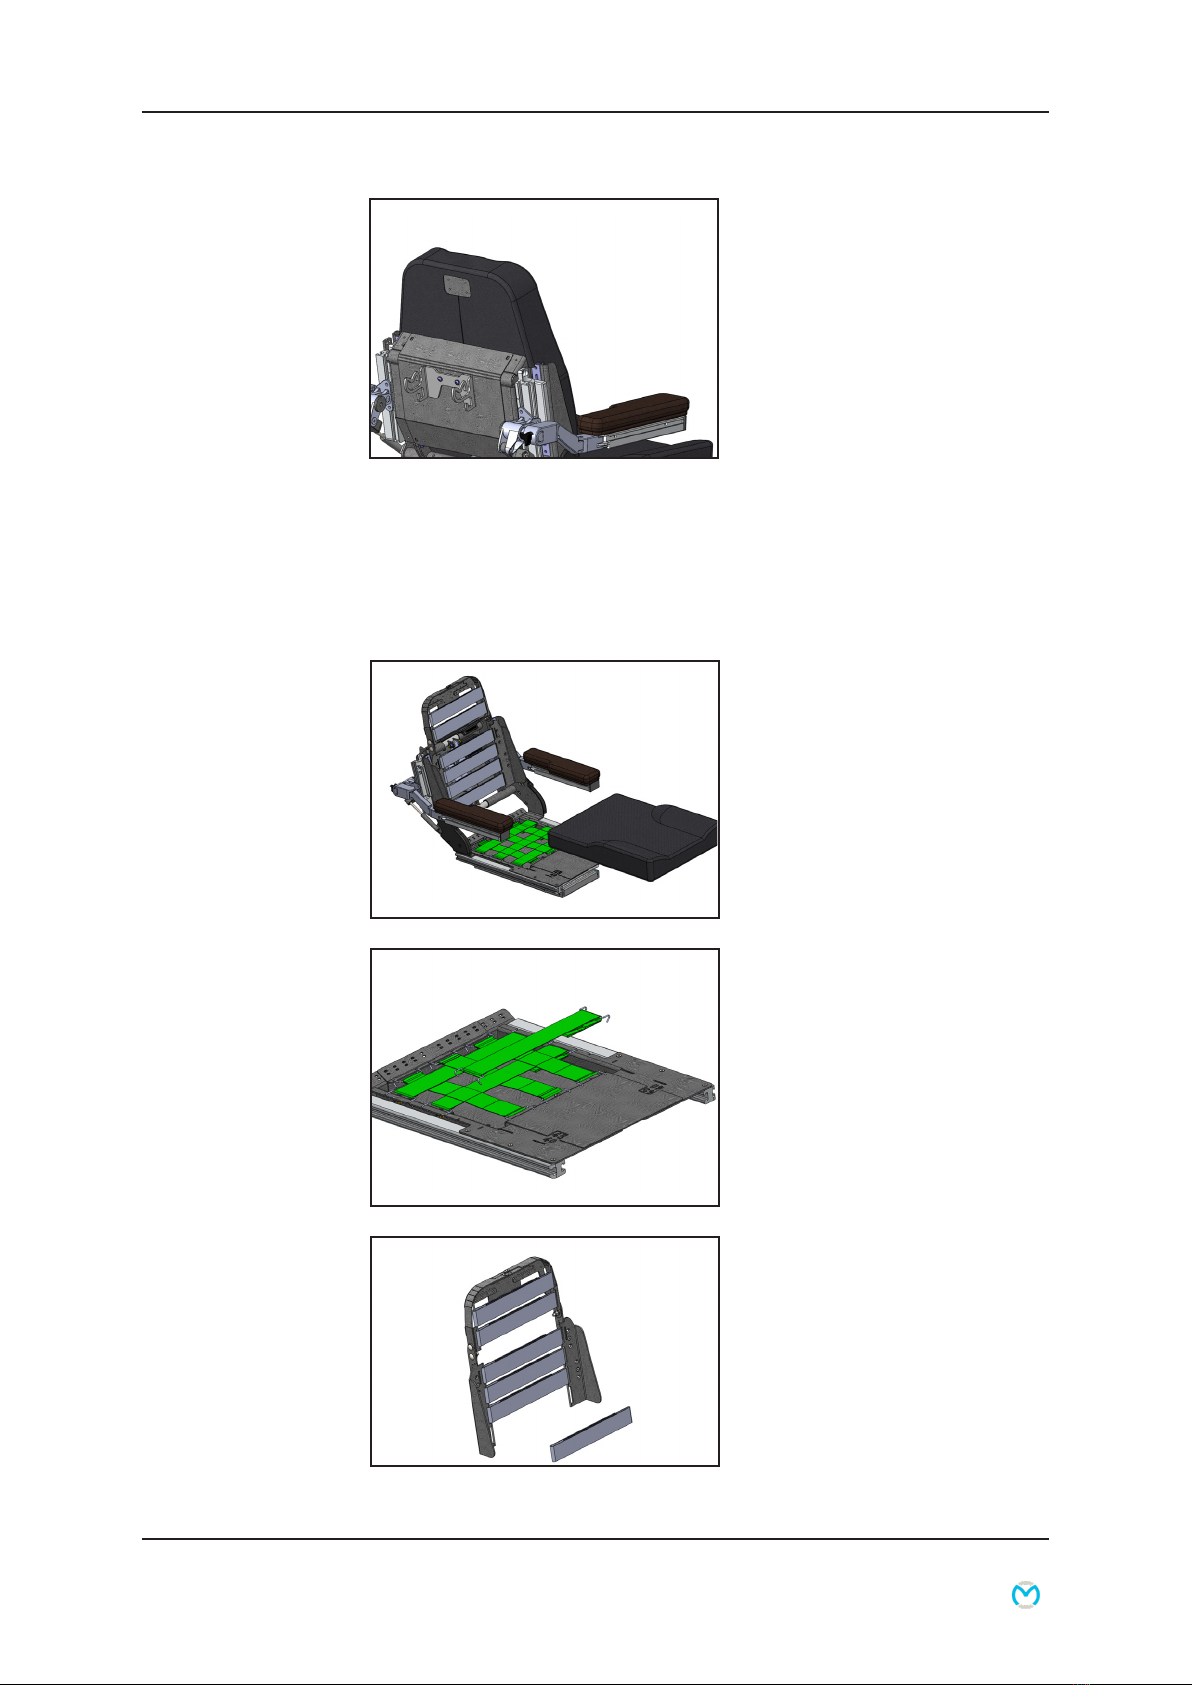
Adjustment of the seat width
The Spinalus-2 seating sys-
tem is full modular seating
system from 40 to 55 cm in
seat width. In steps of 5 cm.
When changing from one
seat width to another, all that
need to be changed, is the
cushions.
Under the seat, and back
cushions there is webbings
that can be adjusted for good comfort, and adjustable for var-
ies seat widths. The upper part of the backrest, can be angled
forward or backward.
The back has an adjustable dynamic recline which means that
the back moves down at the same time as it is angled back-
wards. It is a sliding function that compensate for change of
position and reduce the displacement.
The armrests follow the back and also have a dynamic move-
ment that ensures that they are held parallel when the back is
angled. The armrests are available in many different lengths
and can be adjusted steplessly back and forth.
The seat depth can be adjusted steplessly from 35 to 55 cm.
Due to the construction of the back, the seat depth regulation
has no inuence on the other geometry in the back.
Contact an authorized service technician if the width of the seat
is to be changed. More information can be found in the Service
Manual.
User guide 2433-2019-B 11 of 20 Version 1.0.0/2019
Medema Production A/S
The Spinalus-2 seating sys-
tem is full modular seating
system from 40 to 55 cm in
seat width. In steps of 5 cm.
Follow the instructions under-
neath to change the seat
width.
1: Release the back cushion.
On the back of the seat back there is a zipper. Open the zipper,
and the top of the back cushion is curled of the back frame. The
back cushion is fastened with velcro to the back frame, easy to
pull off.
2: Remove the seat cushion.
The seat cushion is xed
with Velcro, so it can just be
pulled off.
3: Adjust the webbing.
The webbing in the seat are
adjusted by dragging the
strap and lift the hanger off.
Adjust the strap and mount
the hanger again. Loosen
all the straps both length-
wise and crosswise.
Adjust the Velcro straps
in the back by loosen the
straps and drag them
trough the slots. Loosen all
the straps in the back.

User guide 2433-2019-B 12 of 20 Version 1.0.0/2019
Medema Production A/S
Remove the four screws that keep the cover in place.
5: Loosen the actuator box.
Loosen the actuator box by
removing the two screws,
that hold it in place. Now
there is access to the pinole
screws in the next step.
6: Loosen the axles for
actuator.
4: Remove the
cover plate in the
back.

User guide 2433-2019-B 13 of 20 Version 1.0.0/2019
Medema Production A/S
The back actuator is xed in both ends on a solid
axle.
To be able to adjust the seat width out or in the two
pinole screws on each side of the axle, in the top and
the bottom.
In total 8 pinole screws.
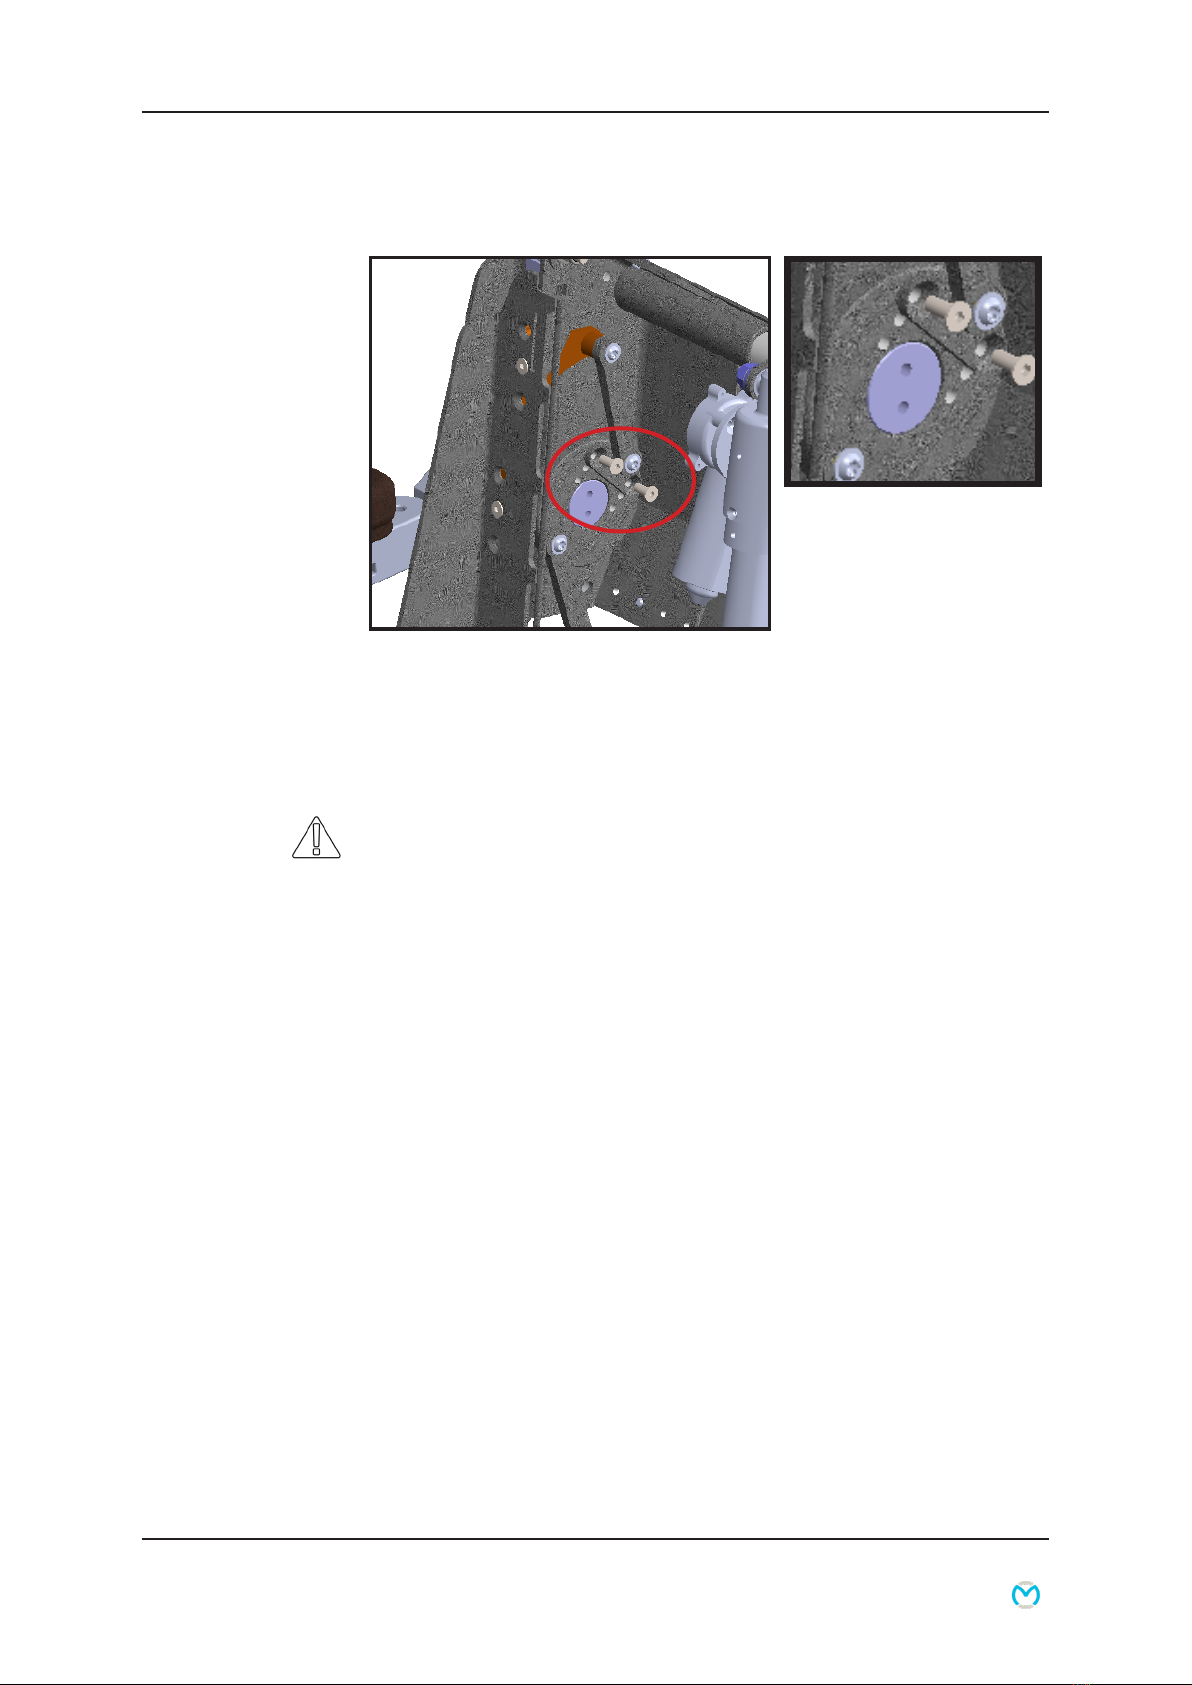
Dynamic recline
You can adjust how far the seat back moves down during re-
cline. Move the two screws (in both sides) as shown in the set
of holes.
Note!
The screws must be placed similar in both sides of the seat.
The closer to the center, the screws are mounted, the less the
back is lowered.
In the outer holes (as shown
in the picture) the seat back is
lowered 70 mm.
In the middle holes 50 mm
In the inner holes 30 mm
User guide 2433-2019-B 14 of 20 Version 1.0.0/2019
Medema Production A/S
Dynamic recline
You can adjust how far the seat back moves down during re-
cline. Move the two screws (in both sides) as shown in the set
of holes.
Note!
The screws must be placed similar in both sides of the seat.
The closer to the center, the screws are mounted, the less the
back is lowered.
In the outer holes (as shown
in the picture) the seat back is
lowered 70 mm.
In the middle holes 50 mm
In the inner holes 30 mm
1
3
2
User guide 2433-2019-B 15 of 20 Version 1.0.0/2019
Medema Production A/S
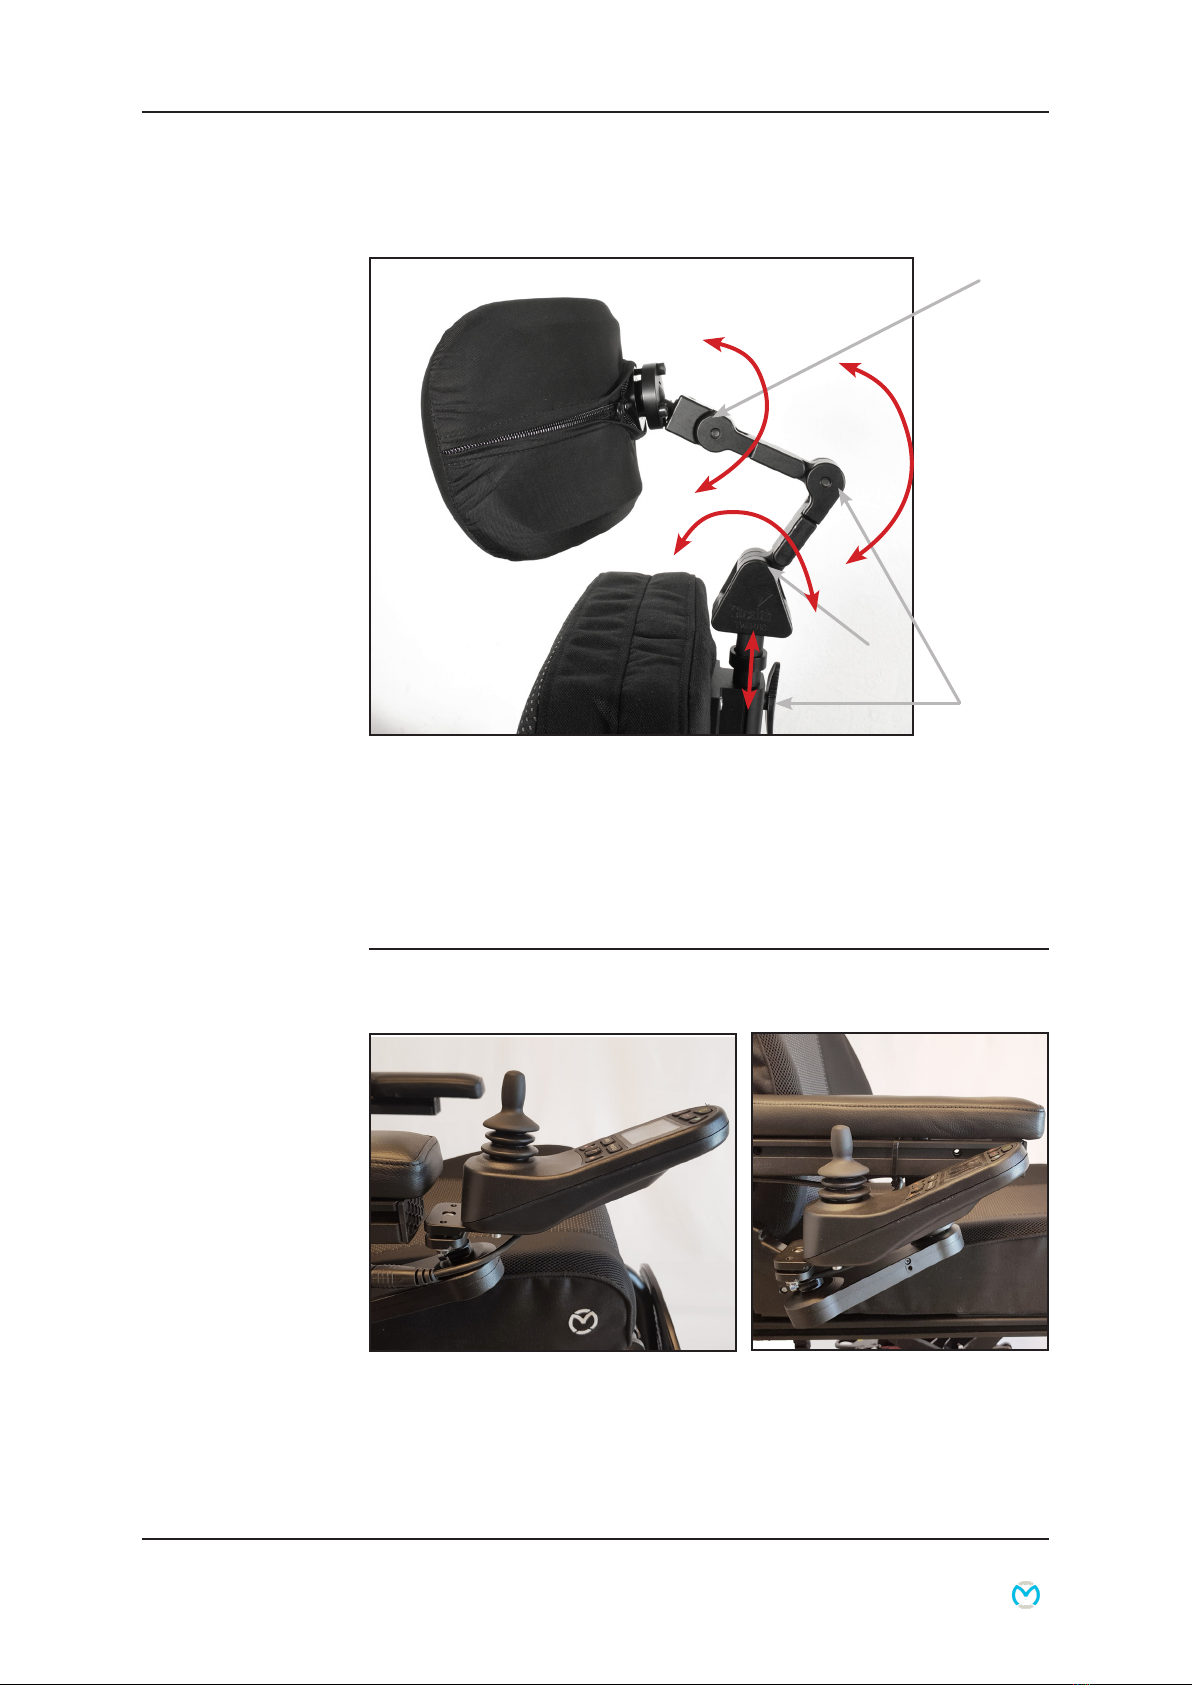
Adjusting the headrest
1 Height adjustment
2 Adjustment forward/back:
3 Headrest angle
Our Swing away tting for Spinalus-2 have many adjustment
features, to place the joystick to t you perfectly.
The Swing away is designed to stay safe to use for at least 10
years.
Swing-away tting for Spinalus-2
Tool
Allen key 4 mm for adjustment
Allen key 2,5 mm for the lock
To dismantle the headrest, loosen the nger screw (pos 1) and
lift of the headrest. The headrest is designed
to stay safe to use
for at least 10 years.
User guide 2433-2019-B 16 of 20 Version 1.0.0/2019
Medema Production A/S
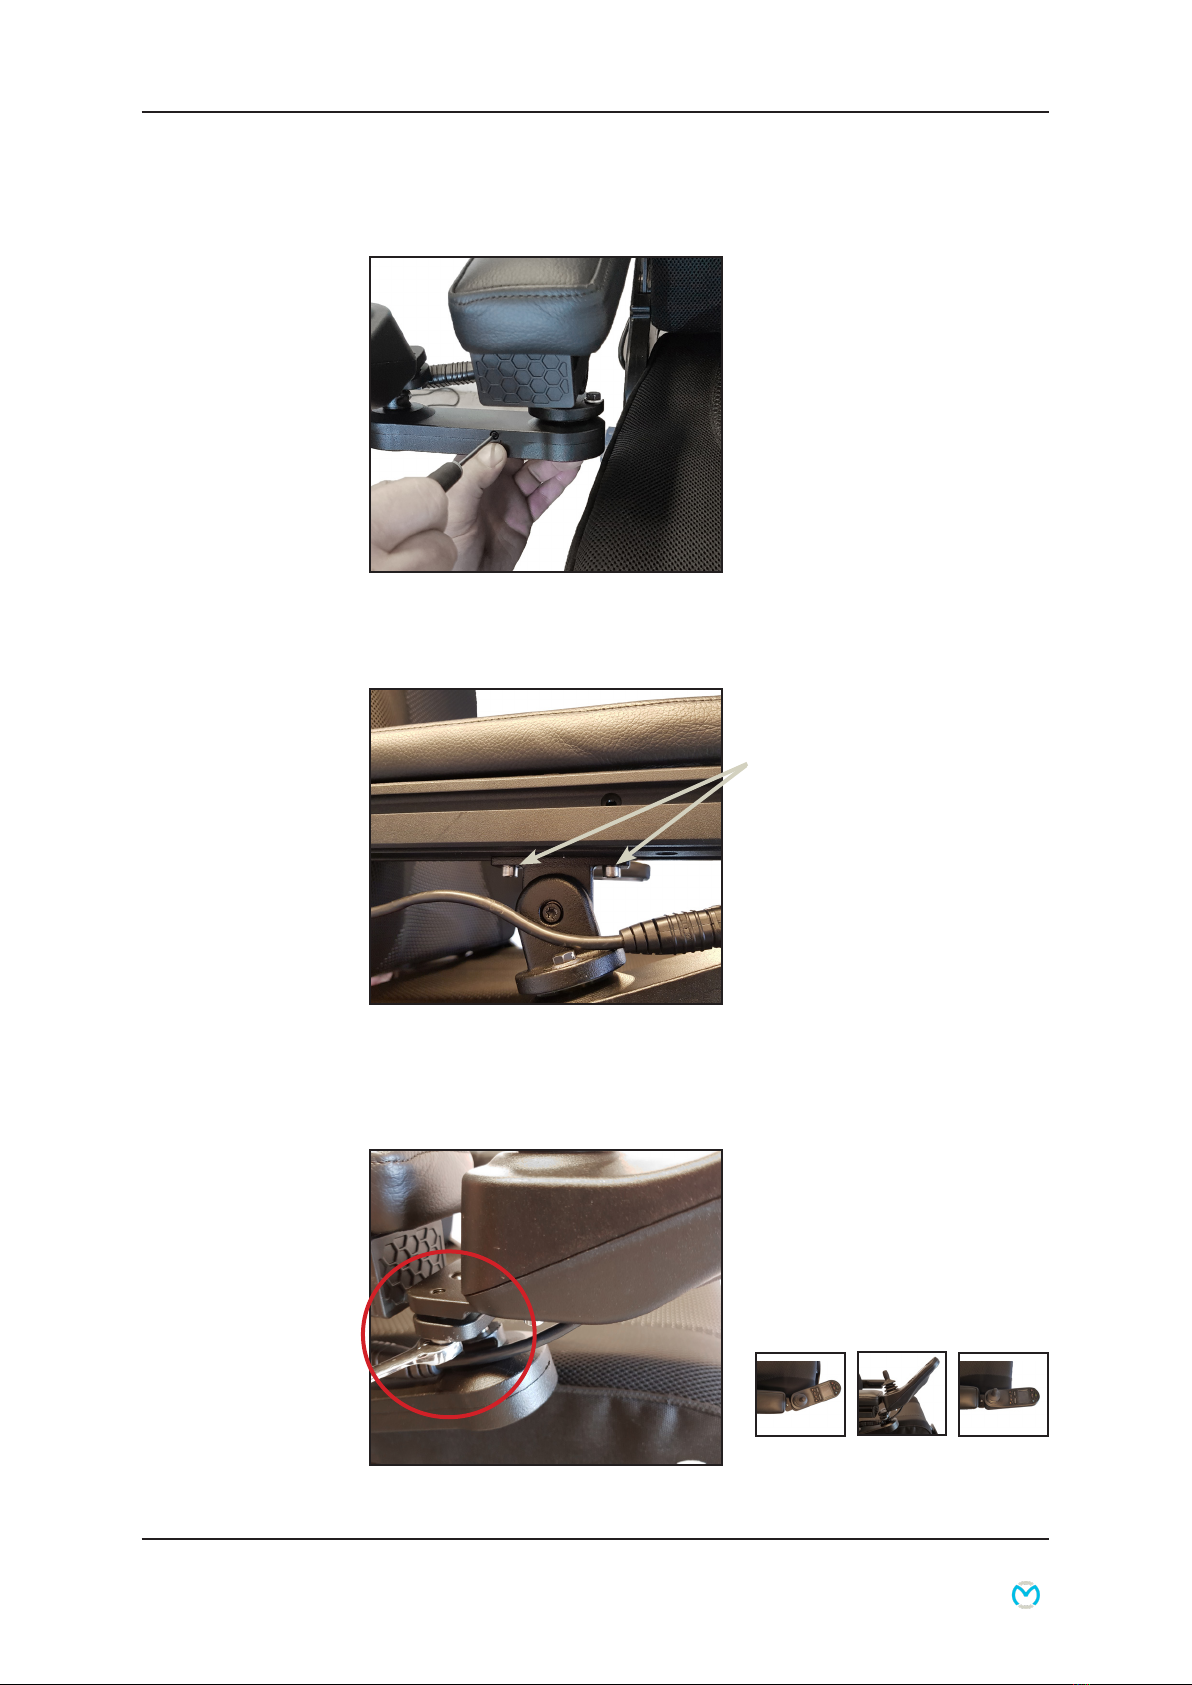
Adjusting the tightness
Here you adjust how easyly
the Swing away should re-
act to the push, when you
need it to swing away.
Tool: Torx T10
Adjusting backward/forward on armrest
Lift up the armrest.
Two screws keep the Swing
away bracket xed to the
armrest.
Loosen the screws.
Pull / push the Joystick and
Swing away to the desired
position. Tighten the screws
again.
Tool: Allen key 5 mm
Adjusting the joystick
The Joystick bracket is
attached to a ball joint. By
loosen one or both screws
it is possible to twist and
turn the joystick to desired
position.

User guide 2433-2019-B 17 of 20 Version 1.0.0/2019
Medema Production A/S
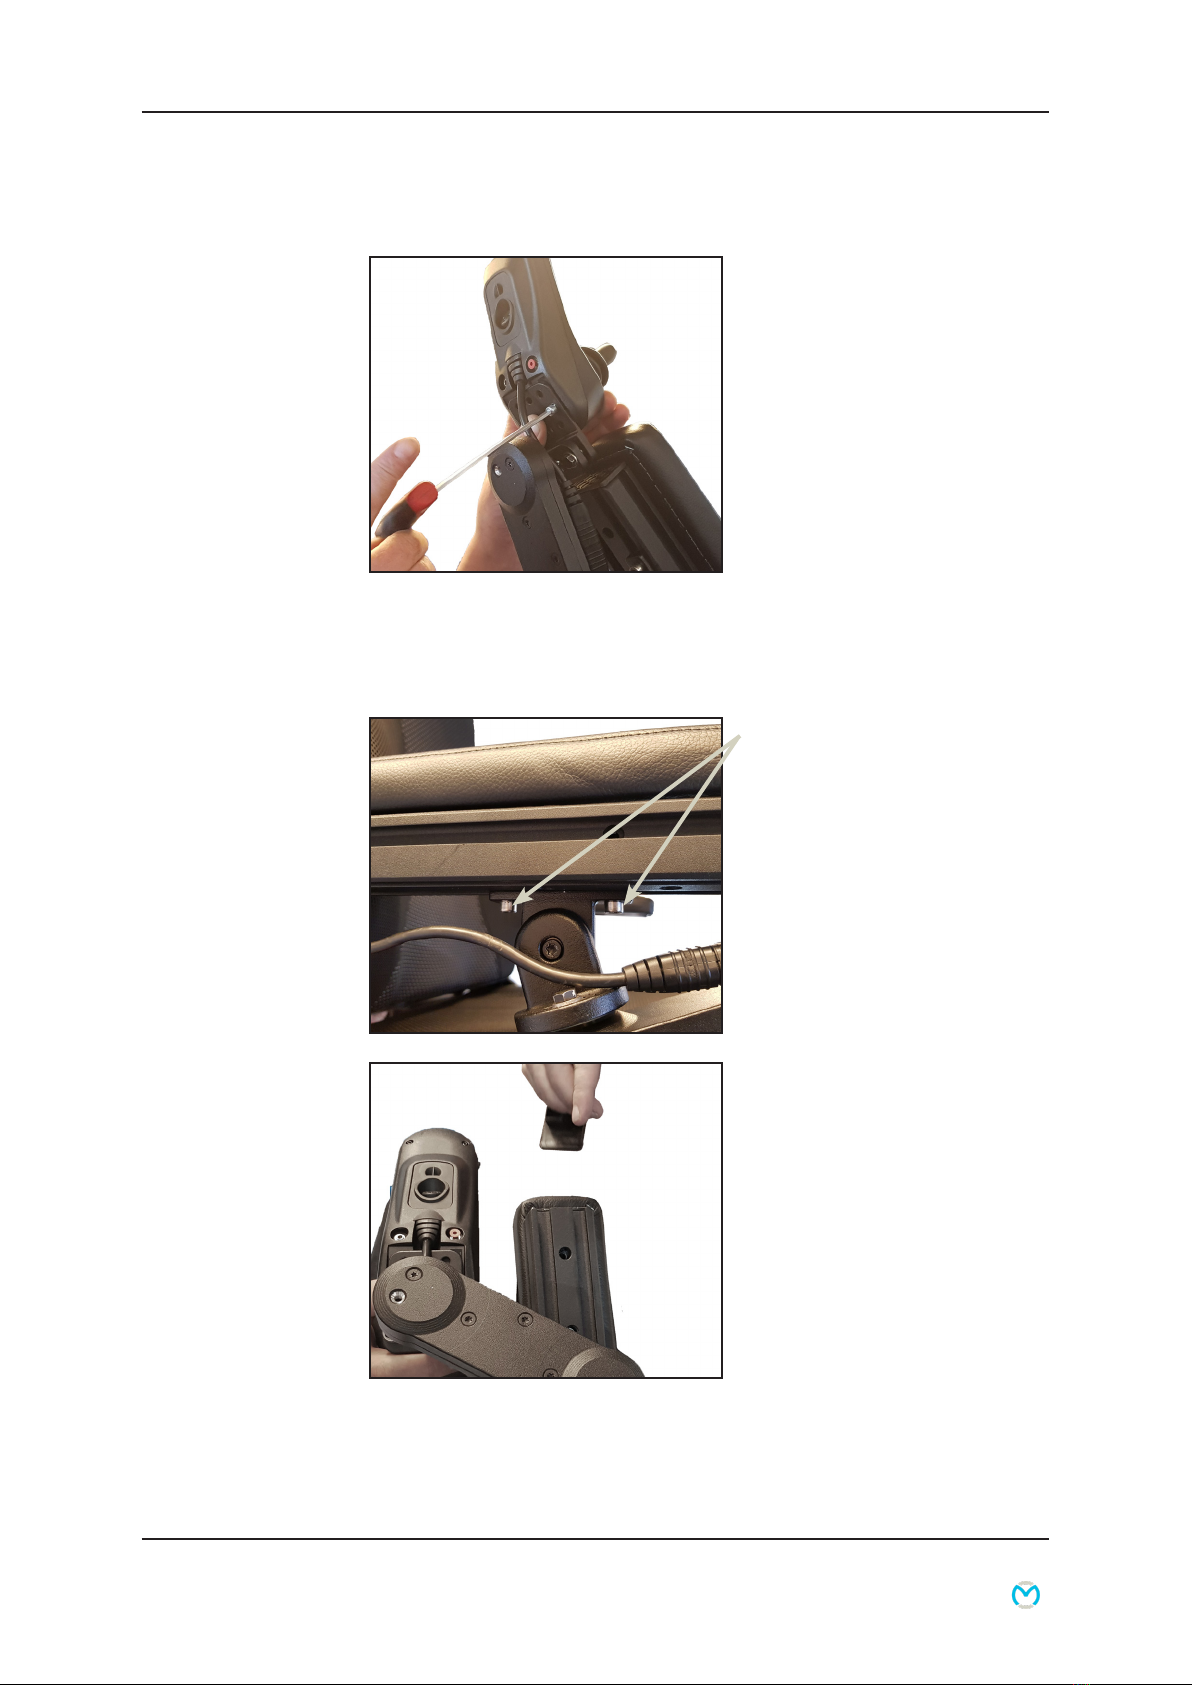
Joystick height adjustment
By loosening this screw,
the joystick can be adjust-
ed up / down, with center in
this axis.
Tool: Torx T30
This setting also affects
how far the joystick folds
under the armrest.
Find the right location.
And tighten the screw
again.
Tool: Torx T30
User guide 2433-2019-B 18 of 20 Version 1.0.0/2019
Medema Production A/S
Replace joystick
The Joystick is attached to
a bracket with two screws
Remove the two screws,
and unplug the plug.
Mount a new in reverse
order.
Remember!
To x the cabel again with
cable ties.
Tool: Allen key 4 mm
Switch joystick to opposite armrest
Remove the two screws
that hold the swing away
module.
Disassemble the plug.
Remove the end plug on
the rail.
Let the swing away module
slide off the rail.
Place it in reverse order on
the other armrest.
User guide 2433-2019-B 19 of 20 Version 1.0.0/2019
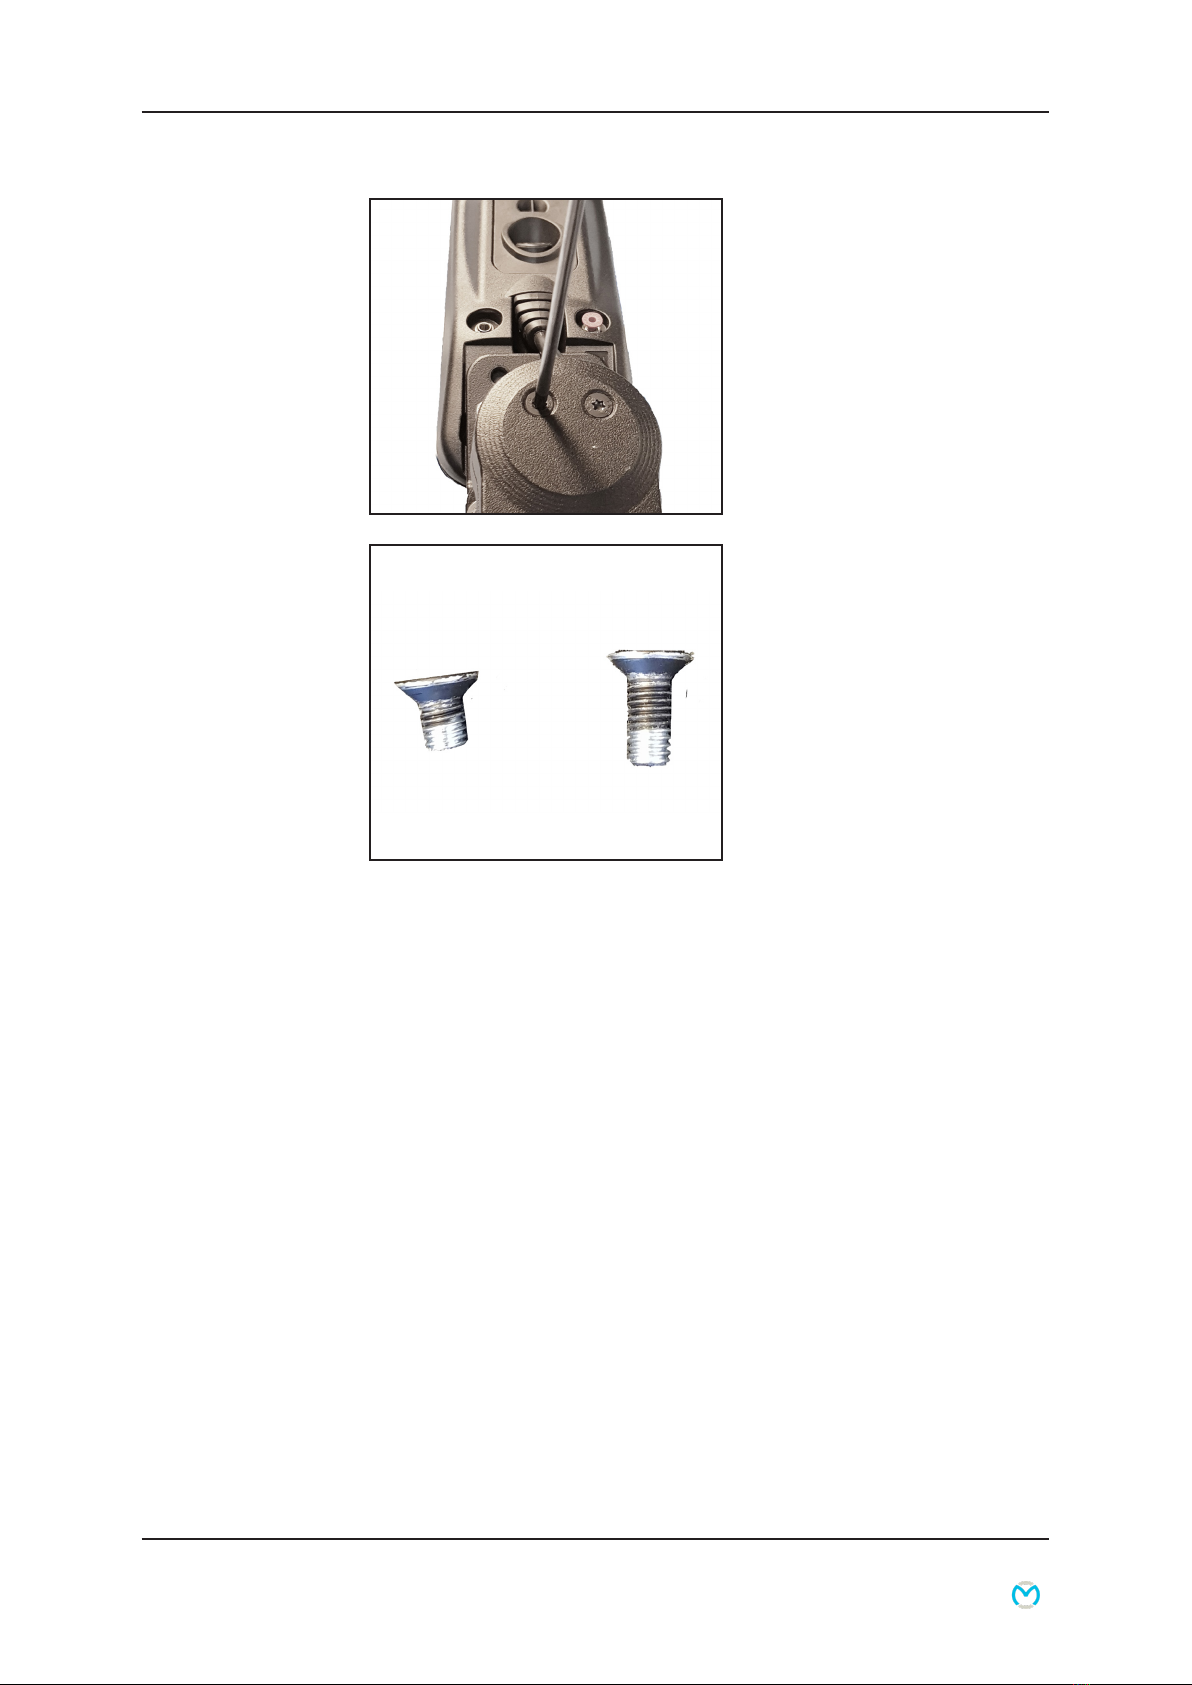
Medema Production A/S
In order to make the Swing
away, swing to the other
side, switch these two
screws around.
Tool: Torx T25
They have different length.
The longest screw should
be to the right if the Swing
away is mounted on the
right armrest. And opposite
on the left side.
Fix the cable with cable
ties.

medemagroup
Table of contents
Other Medema Wheelchair manuals


