Medic Therapeutics ELITE User manual

ELITE FOLDING TREADMILL
User Manual
Please read this user manual carefully prior to using the treadmill.

CONTENT
1 Safety Instructions ................................................................. 1
2 Quality Assurance Commitment ...
........................................
2
3 Package Components and Technical Specifications ...
.......
.. 2
4 Product Introduction .........................................
.................
... 4
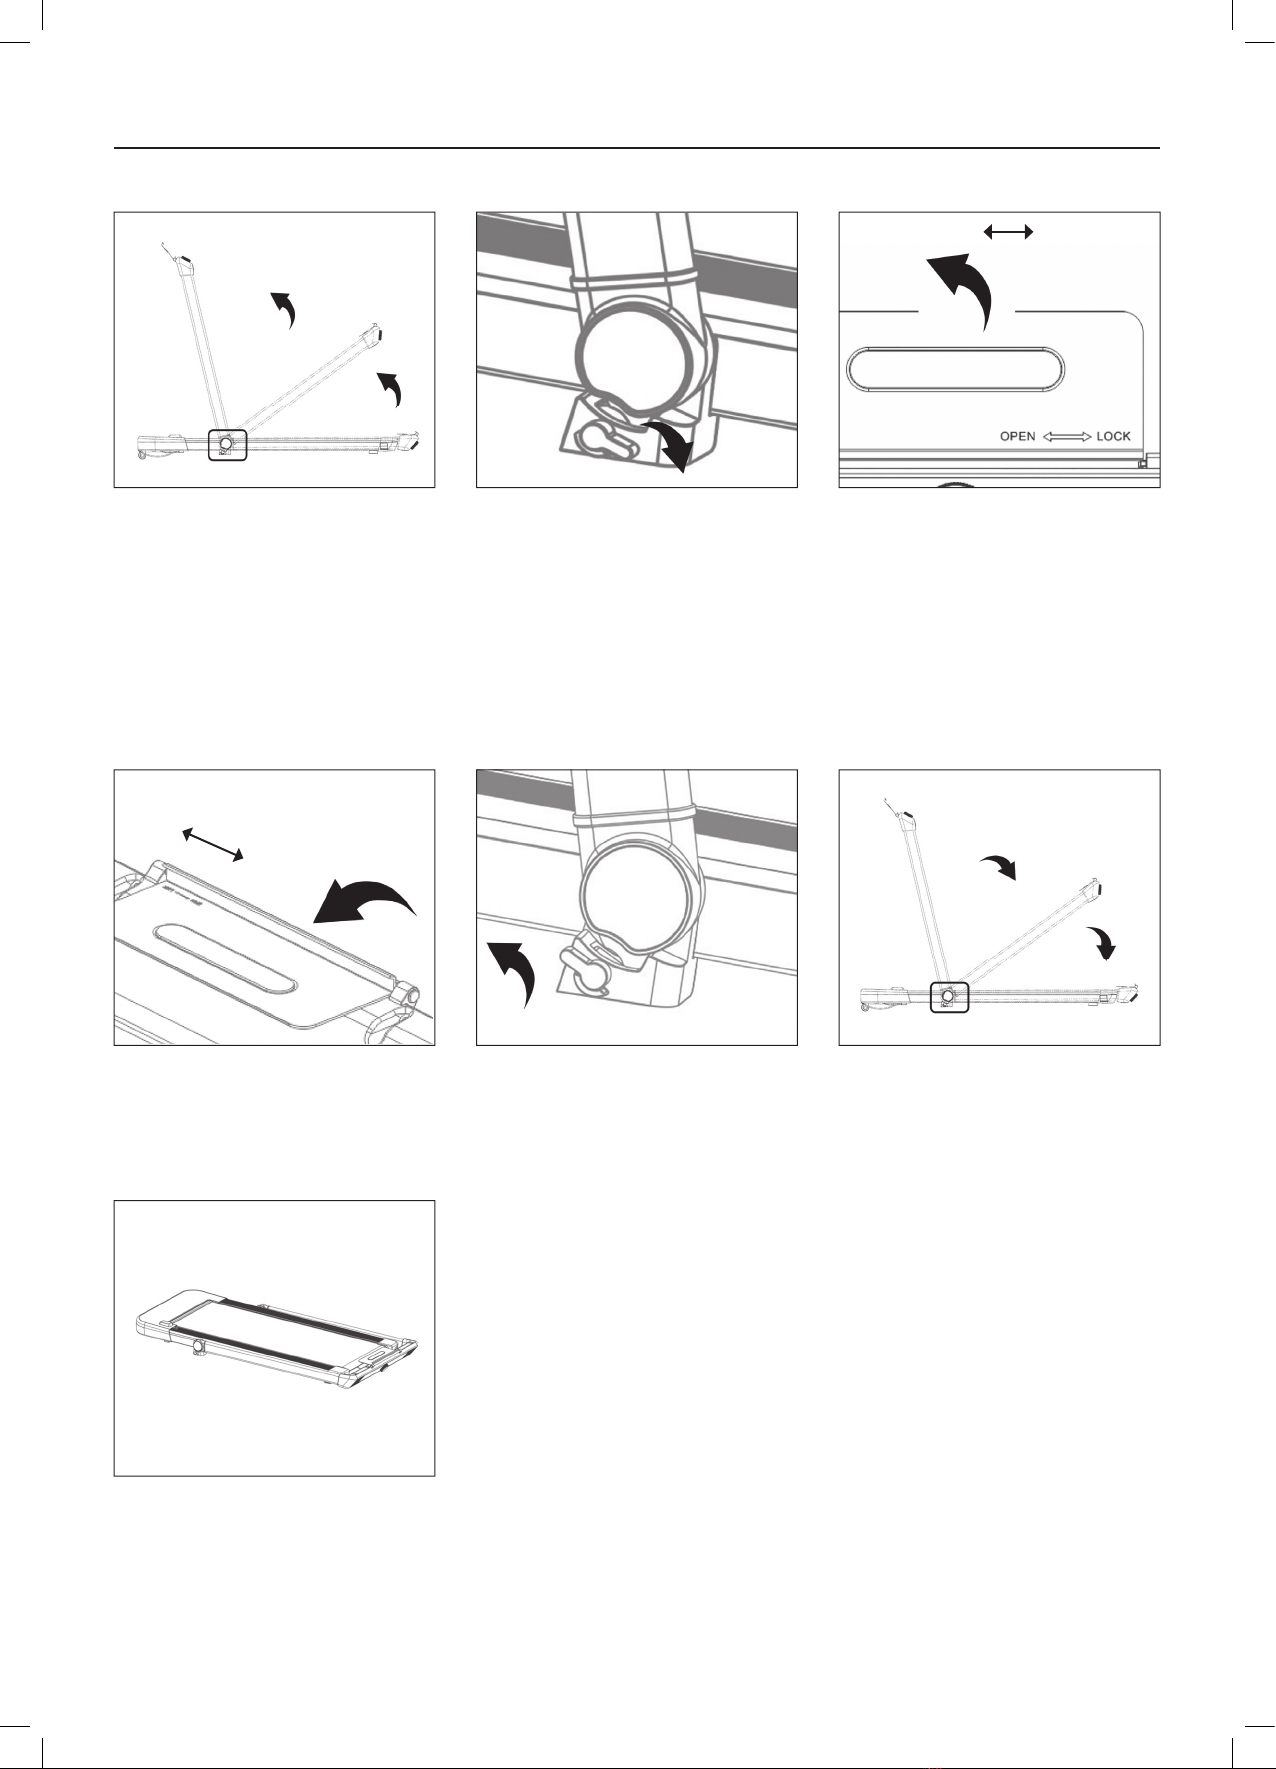
5 Assembly instructions ....
.....................................................
.. 5
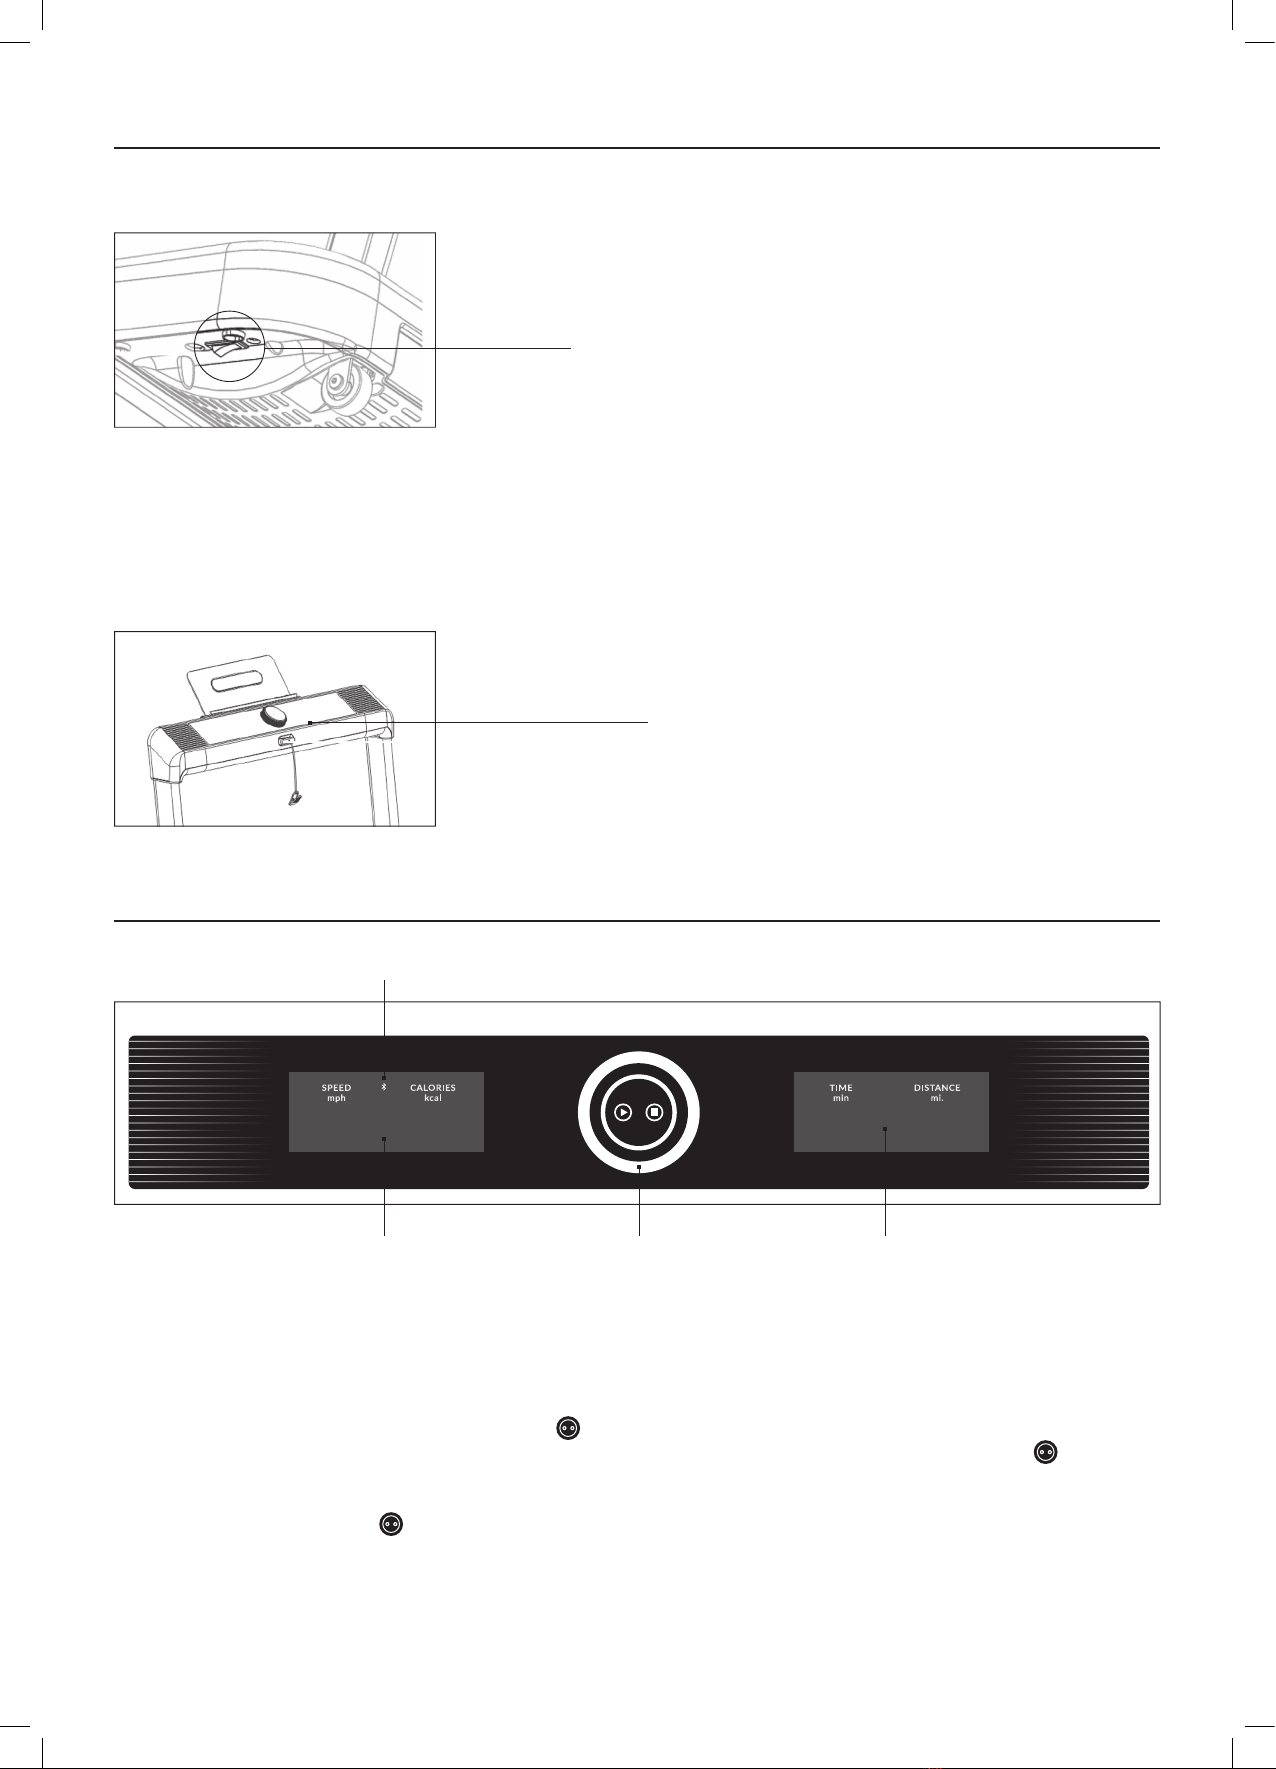
6 How to Use Treadmill ...........
..............................................
... 6
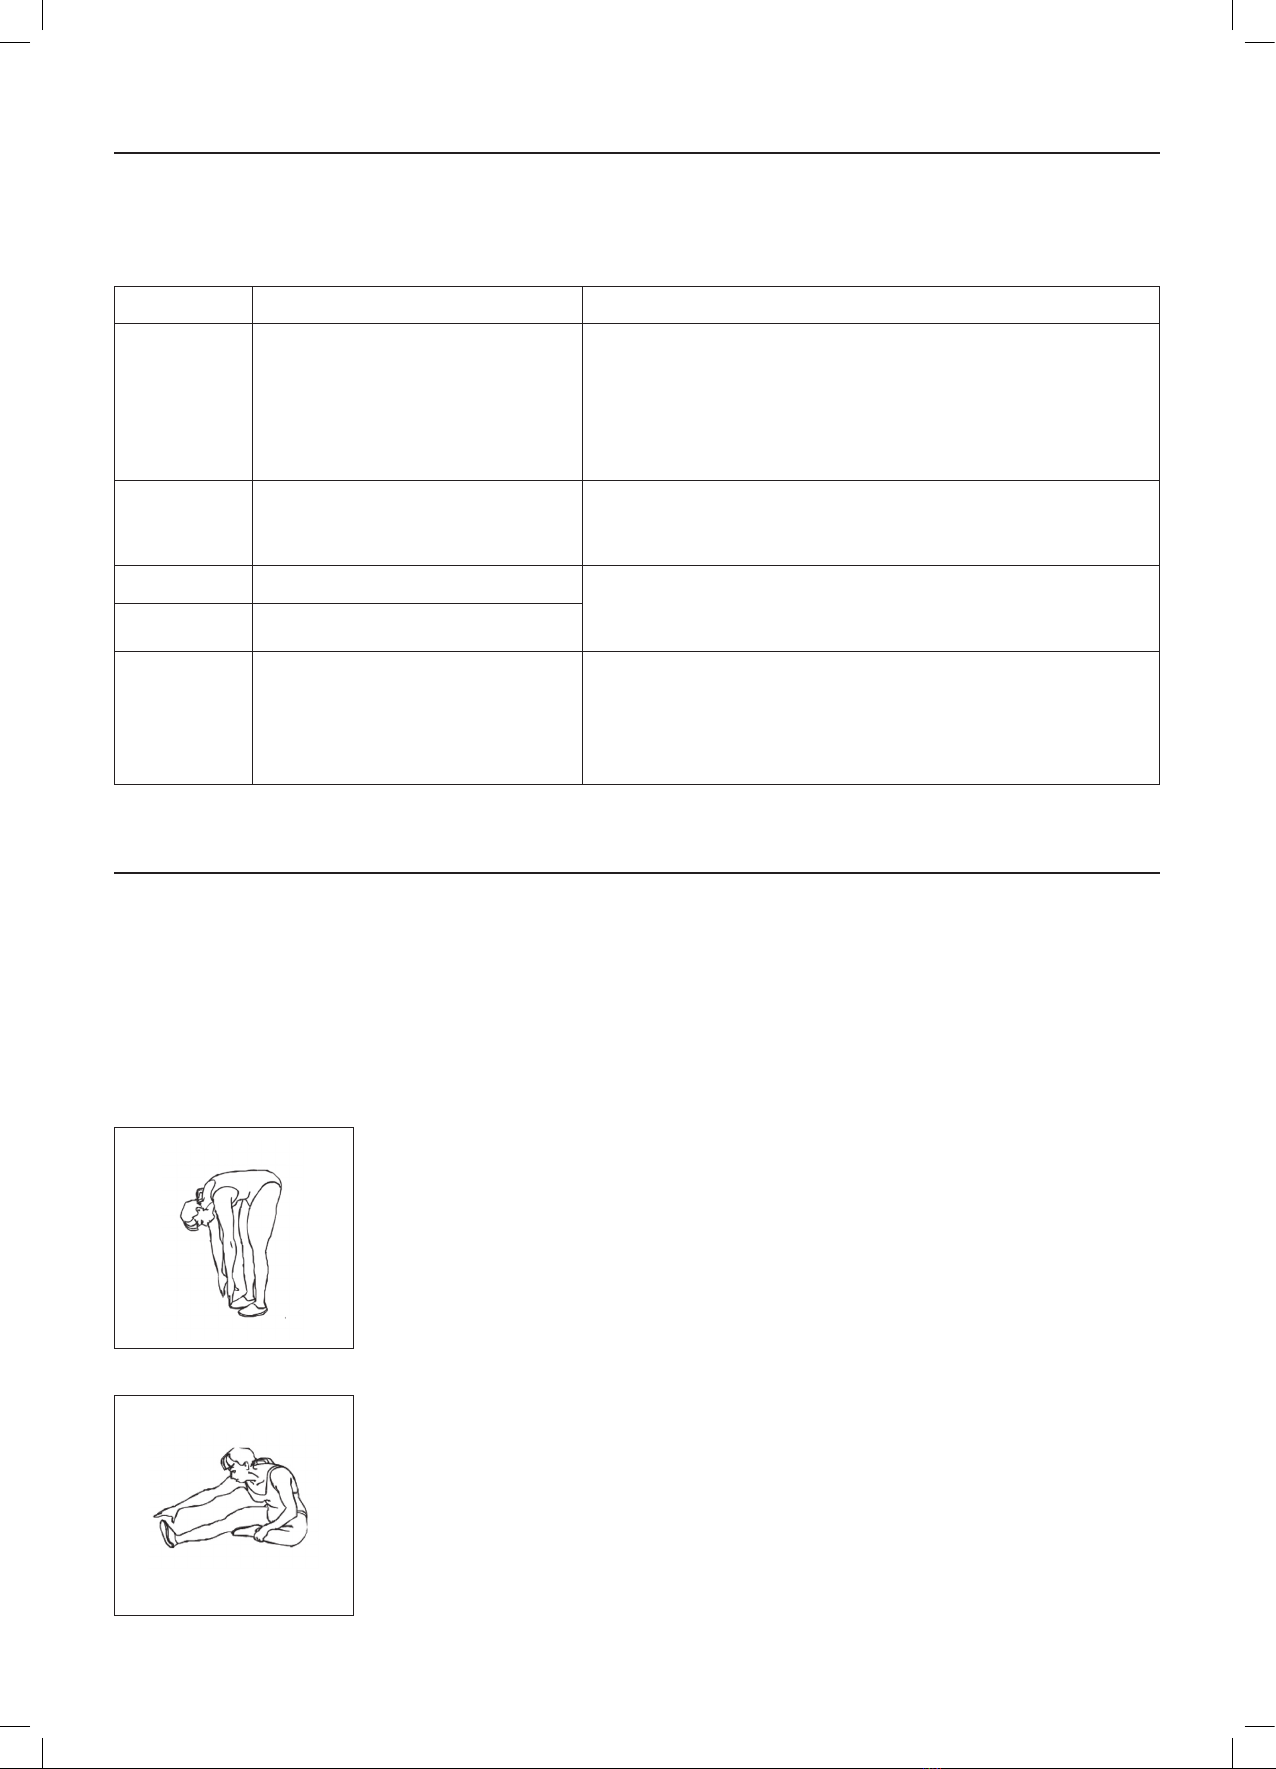
7 How to Use Display Panel ............
..............................
.......... 6
8 Maintenance Guide ...........
.................................................
... 7
9 Troubleshooting Codes .........
.............................................
... 9
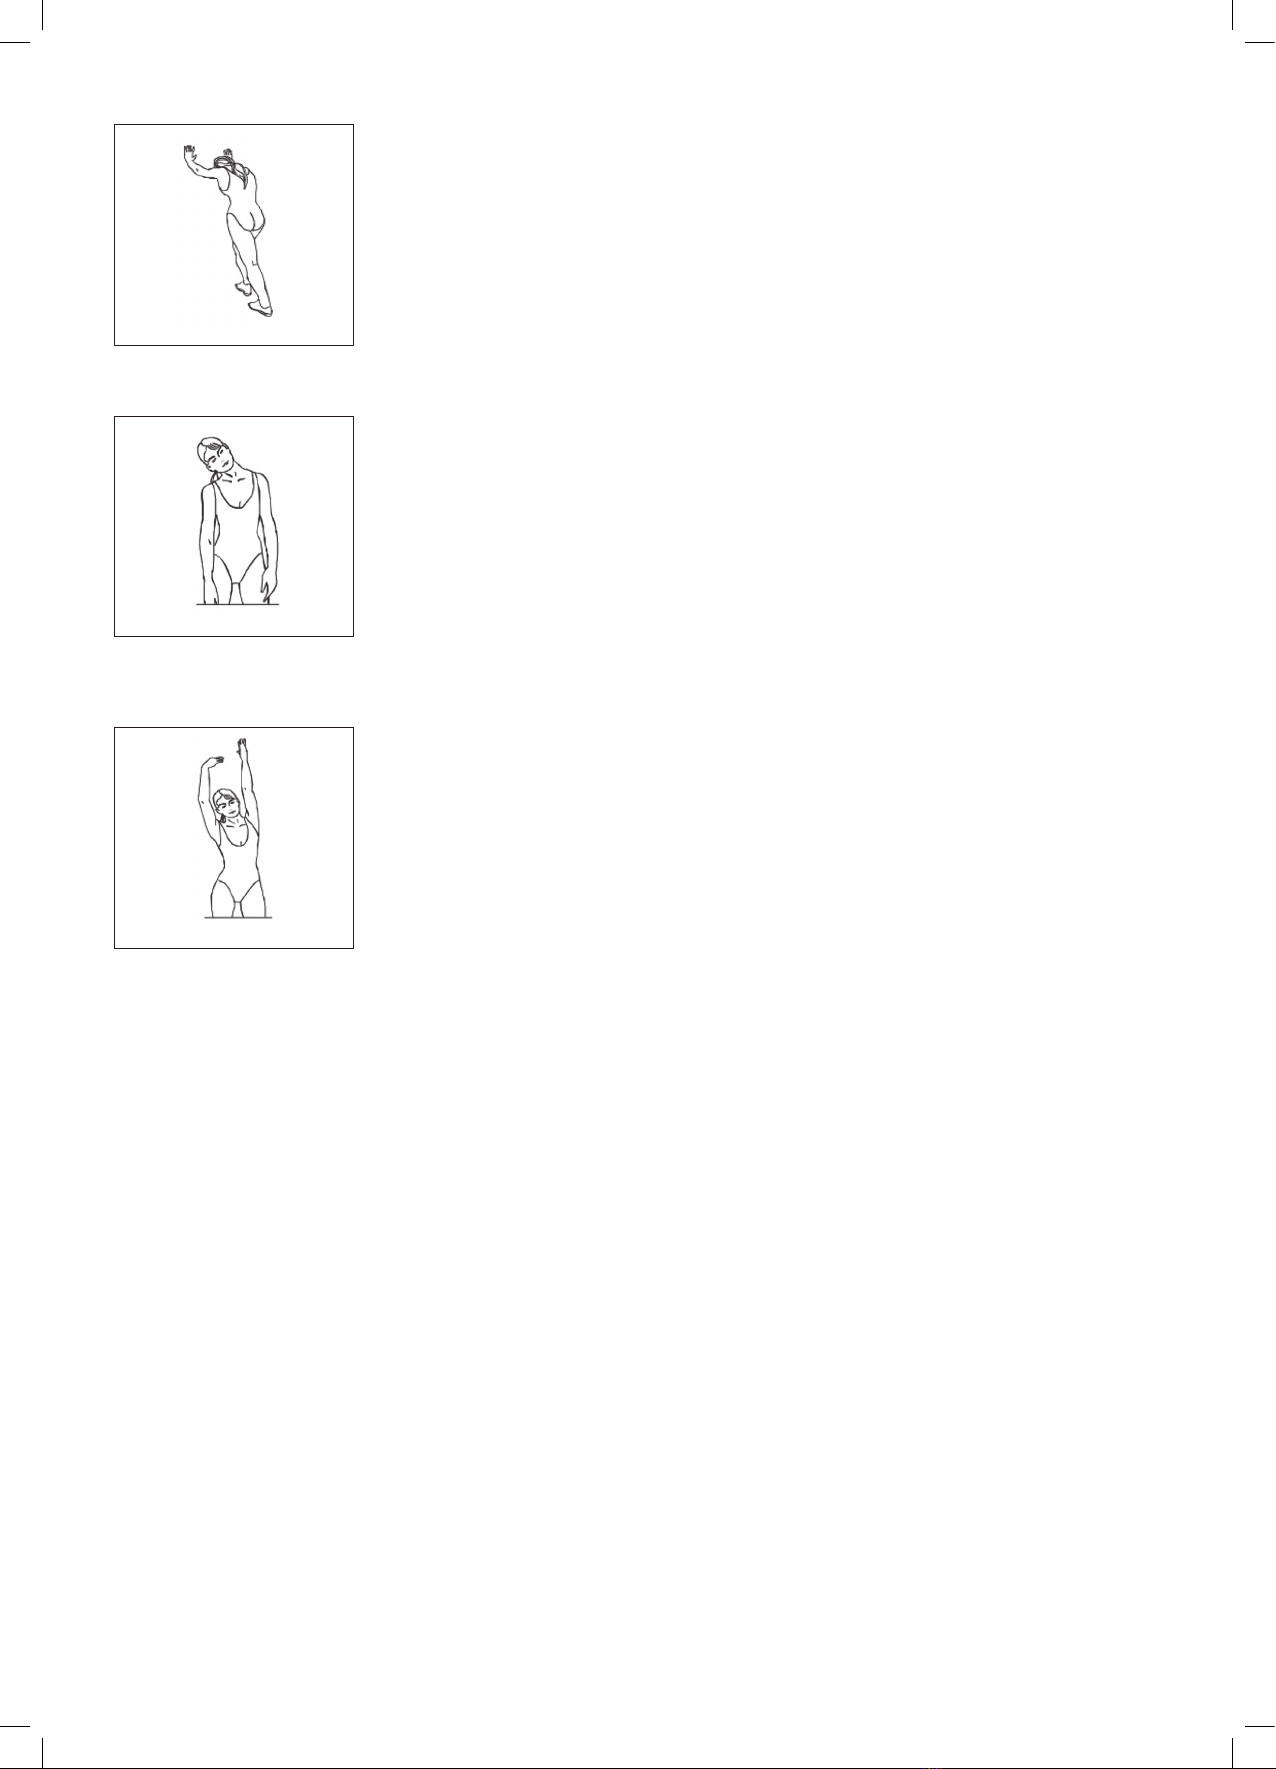
10 Warm-up Exercise ..…………….…………………………..…................ 9
1. SAFETY INSTRUCTIONS
• To ensure your safety and avoid accidents, please read the instructions carefully before use.
• This product is for indoor use only; please do not make it or use it outdoors. The treadmill should be placed in a
flat and clean space, do not put it on top of a thick carpet or near water. There should be a 3-6 ft open safety area
behind the treadmill.
• This product is not designed for people or children with limited physical or mental capacities, or people with zero
experience and knowledge, unless they are supervised and instructed by an adult responsible for their safety.
• If the power cord is damaged, in order to avoid any danger, it must be replaced by the manufacturer or professional
maintenance personnel.
• Power plug can only be connected to a 100V-120V AC voltage power socket. Please use the power socket with a safe
ground line. The installation and grounding of the plug must be consistent with the parameters of the user’s area.
• Check all parts before use to ensure that they are securely placed and locked in.
• When using the product, please wear comfortable and tight clothing to help avoid any accidents such as tripping or
clothes getting tangled while in use. Don’t let children or pets come near to avoid accidents.
• Avoid touching all moving parts of this product with your hands. Do not place hands or feet in the space under the
running belt.
• This equipment is designed for home use only. It is not suitable for professional training and testing. It cannot be
used for medical purposes.
• The heart rate display of this product does not provide data for medical purposes.
• This product should be used by only one person at a time.
• Before cleaning and maintenance, please shut down the treadmill and unplug the power plug.
• Shut down the machine and unplug the power plug when the product is not in use.
• It is strictly forbidden to replace any spare parts privately.
• Maximum user weight limit is 240 lbs. (108kg). If the user weighs more than 240 lbs. (108kg), it is not recommended
that you use this product. Severe injury could occur if the user exceeds the weight limits stated here. This product
has not been designed for users who exceed this weight limit.
2

2. QUALITY ASSURANCE COMMITMENT
• This product is made of high quality materials.
• In normal use, if there is a problem, please read warranty section of this user manual for details.
• The warranty will not cover the following reported issues:
o Damage caused by external factors.
o Use non-original accessories.
o Privately hired maintenance.
o User manual safety and instructions were not followed.
3. PACKAGE COMPONENTS AND TECHNICAL SPECIFICATIONS
PACKAGE COMPONENTS
Parts Name Sketch (for reference) QTY
Medic Therapeutics Special Edition Elite Folding Treadmill 1
User Manual 1
Inner Hexagon Spanner 1
Silicone oil 1
TECHNICAL SPECIFICATIONS
Packing Dimension: 61.8 x 29.9 x 6.5 Inches
Folded Dimensions: 58.7 x 26.4 x4.9 Inches
Unfolded Dimensions: 54.33 x 26.4 x 43.9 Inches
Running Area: 17 x 42.5 Inches
Maximum Power: 550 W
Speed Range: 0.6 – 7.6 MPH
Maximum Weight Limit: 240 Lbs.
Net/Gross Weight: 57.32 / 68.35 Lbs.
3

4. PRODUCT INTRODUCTION
4
Display panel
Bracket
Speed Adjustment Button
Safety lock switch
Motor cover
Running belt
Pedal strip
Rear protection cover
Power switch
Rear protection cover
Locking switch
Motor lower cover
Column handrail
Speaker

5. ASSEMBLY INSTRUCTION
STEPS FOR COLUMN HANDRAIL ASSEMBLY
1. Open the packing box, remove the relevant accessories and machine from the box, and place the machine on a flat
surface floor to properly begin product assembly.
2. Lift up the handle until it reaches its maximum point and cannot move any further.
3. Hold the column handrail tube with one hand and turn the locking switch back and forth in the other hand until it
clicks and securely locks into position. Both the left and right sides operate in the same manner.
4. Push the bracket in to the OPEN direction, push it slightly outward and then release it to allow it to LOCK to its
maximum limit.
STEPS TO FOLD DOWN
1. Push the bracket to the OPEN direction, rotate it inward, and then release it to LOCK position to keep it in place.
2. Hold the column handrail tube with one hand, and turn the lock switch forward to loosen the locking switch with
the other hand. Both the left and right sides operate the same.
3. Once both sides are loose push column handrails down to fold them. Product will lay flat
5
Open Lock
Open
Loose
Lock

6
6. HOW TO USE TREADMILL
Plug in the power cord and turn on the power switch. The switch will light up and the machine will make a “beep”
sound, notifying the user that the product has been turned on. Lighting on the display panel will turn on as well.
SAFETY LOCK
The treadmill will only work if the safety lock key is completely placed in the slot on the dashboard.
Take the clip end section of the safety lock key and attach it to you clothing. In the unlikely event of an accident, pull
off the safety lock key to immediately stop the motor. If you want to continue using the treadmill, put the safety lock
key back in
7. HOW TO USE DISPLAY PANEL
OPERATION FUNCTION
Turn on the power, all windows will light up for 2 seconds then the machine will automatically go on standby mode.
Once the safety lock key is set in place, press the “ ” button. A three second countdown will begin. Once the time
is up the treadmill’s running belt will start moving at the lowest speed. To increase the speed, rotate the “ ” knob
clockwise. To decrease the speed, rotate counterclockwise.
To stop the treadmill press the “ ” button or disconnect the safety lock key and the treadmill will slowly come to a full stop.
Bluetooth
Speed, calorie
display window
Start/stop speed increase
and decrease knob
Time, distance
display window
Safety lock
Power switch
1.6 0739 18 180
SPEED
mph
TIME
min
DISTANCE
mi.
CALORIES
kcal

7
When the your device is connected to the treadmill’s Bluetooth, press the volume down button during playback to
decrease the volume; press the volume up button to increase the volume; press the music pause button to pause music
playback, and press it again to resume music playback.
Dormancy Mode
When there is no operation detected for more than 5 minutes once the treadmill has been stopped, the system will shut
down all the displays and enter dormancy mode. Press “ ” button to reactivate the treadmill again.
Emergency Stop Switch Function
At any time that the safety lock key is removed, the treadmill will quickly decrease speed to a complete stop and all
data will be cleared to 0. The corresponding windows will display “ -------“
All normal operations must be carried out with the safety lock key properly locked in.
Mobile phone Bluetooth music connection operation
How to connect to the treadmill’s Bluetooth:
1. Open up Bluetooth paring settings on your device.
2. Find a network named “MT TRADEMILL”; select and pair to your device.
3. Music can be controlled from your device and will play through the treadmill’s speakers
Note: Bluetooth music will be automatically connected next time after the first connection to
Bluetooth.
To disconnect, revisit the network on your mobile phone’s Bluetooth settings and select the “Unpair” option.
8. MAINTENANCE GUIDE
Warning: Be sure to unplug the power plug of the machine before maintaining the product.
• Use cloth to clean product surface.
• Full cleaning will prolong the service life of the product.
• Clean the dust regularly to keep all parts clean. Clean the exposed parts on both sides of the running belt. This
will reduce the accumulation of impurities in the running belt. User must keep their sneakers clean. Avoid placing
foreign objects beneath the running belt and damaging the running board and belt. The surface of the running belt
should be scrubbed with a soapy wet cloth.
• Please be careful not to splash water on the electrical components or under the running belt.
• Check and lock all parts of the treadmill regularly, replace defective parts and/or leave the equipment idle for repair.
1. ADJUSTING THE RUNNING BELT
• Running with a Left Bias
Adjustment method: With the power turned off, take the included 5mm hexagon spanner and turn the left rear roller
bolt 1/4 to the right to tighten the running belt. Turn the power on the treadmill and test the running belt to make sure
that it is centered. Follow this method until the running belt is loosely adjusted to the center.
Tight

8
• Running with a Right Bias
Adjustment method: With the power turned off, take the included 5mm hexagon spanner and turn the right rear roller
bolt 1/4 turn to the right to tighten the running belt. Turn the power on the treadmill and test the running belt to make
sure that it is centered. Follow this method until the running belt is loosely adjusted to the center.
• Tightening Your Running Belt
The running belt will become loose after using it for a period of time. If the running belt is too loose it can cause it to
slip out of place during use.
Adjustment method: With the power turned off, take the included 5mm hexagon spanner and turn the left and right bolts
of the rear drum 1/4 turn to the right at the same time to tighten the running belt. Turn the power on of the treadmill
and test the tightness of the running belt. Follow this method until the tightness of the running belt is moderate.
Note: When you use a treadmill, the pressure on the running belt is not balanced due to the different force exerted by
both feet when running, causing the running belt to deviate from the center. This kind of deviation is normal. When the
treadmill is not in use the running belt will return to the center.
The running belt cannot be adjusted too tight. This will damage the running belt, increase the pressure on the front/
rear rollers, cause damage to the roller bearings, elicit abnormal noises from the machine and/or other problems.
2. ADD LUBRICATING OIL
Note: Please turn off the power of the machine before lubricating the running belt.
The treadmill is lubricated when it leaves the factory. But it is necessary to check the lubricity of the treadmill
frequently to keep it in its best condition. The treadmill must be lubricated after half a year of use or 80 hours of
operation.
After every 30 hours or 30 days of use, pull the starting belt from the side and reach out to touch the surface of the
treadmill. If you feel the silicone oil, you don’t need to add lubricating oil; if you touch the surface and there is a strong
dry feeling, please follow the instructions below to add lubricating oil.
Note: Only use special lubricants for treadmills.
•
The refueling position is on the lower surface in the middle of the running belt.
(As shown on the right)
• Cut the tip of the lubricant bottle with a small opening to be able to insert it.
• Raise the running belt and insert the tip of the lubricant bottle under the
running belt, allowing the lubricant to be inserted into the middle of the
running board. Put down the running belt and press down with your hand
directly above the area where the lubricant was inserted. Slide the running
belt to spread the oil evenly on the running board.
• After turning on the treadmill, wait one minute for the oil to be applied
evenly, and then you may use the treadmill.
Tight
Tight

9
9. TROUBLESHOOTING CODES
The treadmill will only work if the safety lock key is completely placed in the slot on the dashboard.
Take the clip end section of the safety lock key and attach it to your clothing. In the unlikely event of an accident, pull off the
safety lock key to immediately stop the motor. If you want to continue using the treadmill, put the safety lock key back in.
10. WARM-UP EXERCISE
It is always recommended to start off your workout by stretching prior to exercising. A successful exercise plan must
include warm-up, aerobic and cool-down exercises. The recommended number of times to exercise should be at least
two to three times a week. After a few months, it is recommended to increase the number of times to exercise to four
to five days a week.
Warming-up is an important part of your fitness exercise routine. Moderate warm-ups can help prepare your body for
intense exercise sessions; they allow for your muscles to properly stretch and can help improve blood circulation/pulse
(which helps deliver more oxygen to the muscles). Repeated warm-up exercise can also reduce muscle soreness after an
aerobic exercise. We recommend the following warm-up and cool-down exercises:
1. STRETCH DOWNWARD:
Bend your knees slightly and bend your body forward slowly. Relax your back and
shoulders and touch your toes with both hands. Hold for 10 to 15 seconds, then relax.
Repeat three times.
2. STRETCH YOUR ANKLES:
Sit on a clean cushion and straighten one leg. Put the other leg inward so that it is
close to the straight leg. Try to touch your toes with your hands. Keep it for 10 to 15
seconds, then relax. Repeat each leg three times.
Code Causes Resoluons
E01 Poor connecon between power sup-
ply and controller
1. Check that the connecon between the power supply and the
controller is properly connected
2. The main IC of the controller is not making proper contact and
needs to be ghtened
3. The controller power supply is abnormal. The controller needs to
be replaced
E02 Explosion and impact proof protecon 1. If the motor is exposed or it has been badly damaged, replace the
motor or check the connecon terminals
2. Power cord is damaged, replace the cord or the controller
E05 Over current protecon 1. The weight place on top surpasses the treadmill’s weight capacity
2. The motor is damaged for overworking its limit. The motor needs
to be replaced
E06 Overload protecon
E07 Display panel communicaon error 1. Check if the connecon between the power cord and the
connecon have a poor connecon.
2. The power cord is not properly connected to power outlet. Unplug
and re-insert.
3. The controller’s power supply is abnormal and needs to be replaced
Figure 1
Figure 2

3. EXTENSION OF THE CALF AND FOOT TENDONS:
Stand in front of a wall, facing it, and leave enough room to lean your body forward.
Place your hands against the wall move the left leg forward and slightly bend the knee.
The right leg remains straight in its original spot. Hold it for 10 to 15 seconds, then
relax. Repeat each leg three times.
4. HEAD MOVEMENT:
1-tilt your head to the right and feel the left neck muscle stretch
2-tilt your head back and feel the front neck muscle stretch
3-tilt head to the left and feel the right neck muscle stretch
4-tilt your head to forward and feel the back neck muscle stretch. Relax and repeat
three times.
5. WAIST MOVEMENT:
Slowly lift up both arms and stretch them over your head. Stretch your right arm up as
far as possible towards the ceiling and hold for 1 second then go back to original stand.
Repeat the same action on the left arm. Relax and repeat three times.
Figure 3
Figure 4
Figure 5

WARRANTY:
Limited Lifetime Warranty
Medic Therapeutics Special Edition Elite Folding Treadmill is backed by a limited lifetime manufacturer’s warranty.
Medic Therapeutics will repair or replace your device at any time should it fail due to a defect in material or
workmanship, subject to the certain limitations.
This limited warranty does not cover any damage that results from unauthorized or improper use, service, or repair.
Further, it does not cover damage caused by accident, impact, negligence, or normal wear and tear. Should you discover
your Medic Therapeutics Special Edition Elite Folding Treadmill is not functioning properly, please send your device to
our repair center for evaluation. If your product cannot be repaired or serviced, we will reserve the right to change it for
a similar or newer model.
Please note that a flat rate of $195.00 will be charged to cover a service evaluation fee and return shipping of your
device. All warranty claims must be accompanied by a copy of your proof of purchase from an authorized retailer.
Please send your device, proof of purchase, and a check or money order in the amount of $195.00 made out to Medic
Therapeutics to:
Address:
Medic Therapeutics Service Center
3069 Taft Street
Hollywood, FL 33009
Contact:
warranty@medictherapeutics.com

Table of contents
Other Medic Therapeutics Treadmill manuals