Medicare LIS SMART BG-102 User manual
METER USER GUIDE
1. Package Contents
2. App Software
3. About Alternative Site Testing (AST)
4. Getting To Know Your System
5. PBGM- display
6. Test Strip
7. Setting Meter
8. Memory Recall
9. Replacing The Battery
10. Prepare For Blood Sampling
11. Performing Blood Test
12. Understanding Your Test Result
13. Control Solution Testing
14. Caring For Your Meter And Test Strip
15. Performance Characteristics
16. System Specifications
17. Display Messages And Problem-Solving Guide
18. Trademark
Important :
1. Call your doctor immediately if you experience symptoms that are not consistent with your
blood glucose test results.
2. When the app program displays "This mobile device does not support" warning, Please
stop using than contact your customer service.
1. Please download the Medicare program before use and read the manual within the
Medicare.
2. PBGM blood glucose meters can be connected to App, blood glucose curves can be
reviewd in a mobile device.
3. PBGM blood glucose meters can be connected App, the blood sugar value of the mobile
devices, is sent to the family doctor or a cloud device.
4. PBGM support Android and iOS (iphone OS) systems.
5. Android system please go to Google Play, download Medicare APP : PBGM.
6. iOS system please go to Apple store, download Medicare APP : Connect.
7. To know which mobile devices it supports, please see the manual description of the
Medicare software - Model Compatibility table.
The PBGM meter Complete package:
1.PBGM Blood Glucose Meter x1
2.PBGM Blood Glucose Test Strips x10*
3.Control Solution x1*
4.Lancing Device x1*
5.Lancet x10*
6.Carry bag x1
Important
There are important limitations for doing AST. Please consult
your healthcare professional before you perform AST.
What is AST ?
Alternative Site Testing (AST) means you can use parts of
the body other than your fingertips to check your blood
glucose levels. The system allows you to test from the palm,
forearm, upper arm, calf or thigh, with equivalent results to
fingertip testing.
What is the advantage ?
Fingertips feel pain more readily because they are full of nerve endings (receptors). At
other body sites, nerve endings are not so numerous and you will not feel as much
pain as you will experience at the fingertip.
When to use AST ?
Food, medication, illness, stress and exercise can affect blood glucose levels. Capil-
lary blood at fingertip reflects these changes faster than capillary blood at other sites.
Therefore, if you are testing blood glucose level during or immediately after meal,
physical exercise or stressful event, take the blood sample from your fingertip only.
Use AST only :
1.In a pre-meal or fasting state (more than 2 hours since the last meal).
2.Two hours or more after taking insulin.
3.Two hours or more after exercise.
4.During steady state blood glucose conditions.
Do NOT use AST if :
1.You have reason to believe you have hypoglycemia or hyperglycemia.
2.Your routine glucose results are often fluctuating.
3.You are pregnant.
How to increase the accuracy ?
Stimulating blood perfusion by rubbing the puncture site prior to blood extraction has
a significant influence on the glucose value obtained.
Blood from the site without rubbing exhibits a measurably different glucose concentra-
tion than blood from the fingertip. When the puncture site was rubbed prior to blood
extraction, the difference was significantly reduced.
IMPORTANT :
To increase the accuracy when using AST, rub the puncture site more than 20
seconds before extracting blood.
7.Meter user guide x1
8.App user guide x1
9.Test strip manual x1*
10.Control Solution manual x1*
11.CR2032 battery x1
12.QuckGuidex1*
13.Warranty Cardx1*
Notes : The simple package version of this product does not cotain the parts
marked with an asterisk (*).
1. Package Contents 3. About Alternative Site Testing (AST)
4. Getting To Know Your System
9. Replacing The Battery
2. App Software
5. PBGM- display
6. Test Strip 7. Setting Meter
8. Memory Recall
Please install battery first and set correct time and date before you begin to test
SETTING TIME AND DATE
Important :
Use only PBGM meter test strips and control solutions with your PBGM meter. Use other
test strips and control solutions with this meter can produce inaccurate results.
1. Display :Shows test results and messages.
2. Headphone plug: Connect your mobile device to use App.
3. Strip slot :Insert the test strip here. The meter will turn on
automatically.
4. Headphone plug Cover: Protect the headphone plug shell.
5. Battery compartment :Holds ONE 3v Lithium battery (battery type
CR2032). Please install battery into meter before you start to
test.
6. Meter label :Each meter has its meter number on it. Do not alter
or tear the label off.
1. Under Mobile Medicare mode, METER after each inserted
into the phone, it will do automatic calibration date and
time, display more positive time.
2. Correct date and time from the mobile phone to calibrate
the METER time.
3. See detailed Medicare-user guide.
1. Blood drop symbol : Flashes when sample should beapplied.
2. Strip symbol : Appears when the meter is turned on.
3. Unit of measure : Appears with the test result in.
4. Battery symbol : Appears when battery is weak.
5. Thermometer symbol : Appears when ambient temperature is
above or below the acceptable range needed for testing.
6. 8888 : Test result.
1. Absorbent channel : Apply a drop of blood here.
2. Confirmation window : This is where we confirm if enough blood
is applied for has been drawn into strip.
3. Test strip handle : Hold this part to insert the test strip into the
meter slot.
4. Contact bars : Insert this end into strip slot.
1. Unit of measure is set mg/dL in the factory.
2. Set the meter measurement unit followed by the Medicare
setting function.
3. Medicare measurement units reference blood glucose
meter settings.
4. See detailed Medicare-user guide.
*Set the Unit of Measurement (mg/dL or mmol/L)
The PBGM meter system uses the latest technology to provide you with easy and
comfortable testing. The system requires only a 0.3 μL of blood sample to complete
the testing in only 6 seconds.
1. Under Medicare software mode, the memory of the meter data is
downloaded to the phone, it will automatically remove all records
of blood glucose values.
2. The memory of the meter is downloaded to the phone, then it will
be cleared.
3. See detailed Medicare-user guide.
1. Under Medicare software mode, the memory of the meter
entirely.
2. See detailed Medicare-user guide.
IMPORTANT :
1 . The initial setting of the factory is mg/dL.
2 . If you use the wrong unit of measure, probably due to the detection of false values caused by medica-
tion errors, please consult your doctor, and then follow these steps to set up.
■Recall the Memory
The PBGM meter automatically stores 100 test results, When the memory is full,
the oldest one memory value will be overwritten.
■ Deleting the Memory
The PBGM meter comes with ONE Lithium battery (battery type CR2032) .
Battery life will vary depending on usage, so always keep a spare battery on hand. The
battery should last about 1000 tests or 12 months when testing 3 times a day.
When the battery symbol appears on the meter display, battery is getting low. You will still be
able to test with low battery, but you should replace it as soon as possible.
When battery symbol and E-b shows up in the meter display, the meter will no longer give
results and you must replace the battery immediately. Please always have one spare battery
with you to ensure that you can replace the battery anytime.
1. Make sure the meter is turned off. Let the front of the meter
rest in the palm of your hand. Slide battery cover open.
2. Insert new battery (battery type CR2032), being sure to
align the plus (+) side up.
3. Close battery cover.
NOTE:
1. Replacing the battery does not affect the test result stored in memory. However the time and date may
need to re-set by Medicare.(read the Medicare user guide )
2. As with all small objects, the battery should be kept away from small children as a safety precaution. If the
battery is swallowed, seek medical assistance immediately.
3. Batteries might leak chemicals if not used for a long time. Remove the batteries if you are not going to
use the device for extended (i.e., 3 months or more ).
4. Please discard the used or dead batteries properly according to the regulations of your country.
How to replace the battery
QR Code:
1.
2.
4.
3.
SYMBOLS DESCRIPTION
OK Biotech Co., Ltd.
No. 91,Sec.2,Gong Dao 5th Road,
30070 Hsinchu City,TAIWAN
MDSS GmbH
Schiffgraben 41, 30175 Hannover,
GERMANY
L-Tac Medicare Pte Ltd
25 Mandai Estate #07-11
Innovation Place Tower 1
Singapore 729930
Tel: +65 6334 2273
Fax:+65 6863 8190
www.medicare-l-tac.com.sg
10-62-6519-0003 V1-AUG14
BLOOD GLUCOSE
MONITORING SYSTEM
BG-102
Smart
PLEASE READ THIS BEFORE USING.
The following basic safety precautions should always be taken.
1. Close supervision is necessary when the device is used by, on, or
near children and handicapped persons.
2. The meter and lancing device are for single patient use. Do not share
them with anyone including other family members! Do not use on
multiple patients!
3. All parts of the kit are considered biohazardous and can potentially
transmit infectious diseases, even after you have performed cleaning
and disinfection.
4. Use the device only for the intended use described in this manual.
5. Do not use test strips and control solutions which are not supplied by
the manufacturer.
6. Do not use the device if it is not working properly, or if it has suffered
any damage.
7. Before using any product to test your blood glucose, read all
instructions.
8. Thoroughly practice the test. Do all quality control checks as directed
and consult with a diabetes healthcare professional.
9. Before starting measurements, please install battery, and download
the Prodigy iConnect app program to set correct time and date,
measurement unit and/or remove memory.
10. Use only Prodigy test strip and control solution with your Prodigy
iConnect meter. Using other test strips and control solutions with this
meter can produce inaccurate results.
11. Keep this user guide with you.
Intended Use
The system is intended for use outside the body (in vitro diagnostic use
only). It should be used only for testing blood glucose (blood sugar) and
only with fresh capillary whole blood samples. The system is intended for
use in the home and in clinical settings. It should not be used for the
diagnosis of diabetes or for the testing of newborns.
Principle of Measurement
Blood glucose is measured by an electrical current that is produced when a
blood samples mixes with the reagent (special chemicals) of the test strip.
The electrical current changes with the amount of glucose in the blood
sample.
The meter measures the strength of the electrical current, calculates your
blood glucose level and then displays your result in either milligrams of
glucose per deciliter (mg/dL) or millimoles of glucose per liter (mmol/L).
Caution
1. The user should not take any decision of medical relevance without first
consulting his or her medical practitioner.
2. Call your doctor immediately if you experience symptoms that are not
consistent with your blood glucose test results.
3. High altitudes above than 3,402 meter (11,161 ft) may affect the test
results.
4. Temperatures outside the range of 10°C to 40°C (50°F to 104°F) may
affect the test results. Do not test beyond of temperature range.
5. Do not use this meter near cellular or cordless telephones in a call,
walkie-talkies, garage door openers, radio transmitters, or other electrical
or electronic equipment that are sources of electromagnetic, radiation, as
these may interfere with the proper operation of the meter.
IMPORTANT HEALTH-RELATED INFORMATION
1. Apply only capillary whole blood sample to test your blood glucose.
Applying other substances or plasma, serum will cause wrong results.
2. Severe dehydration and excessive water loss may cause false low
results. If you believe you are suffering from severe dehydration,
consult your healthcare professional immediately.
3. Test results below 60 mg/dL (3.3 mmol/L)*1 indicates low blood
glucose(hypoglycemia). Test results greater than 240 mg/dL (13.3
mmol/L)*2 indicates high blood glucose (hyperglycemia).If your results
are below 60 mg/dL (3.3 mmol/L) or above 240 mg/dL (13.3 mmol/L),
repeat the test, and if the results are still below 60 mg/dL (3.3 mmol/L)
or above 240 mg/dL (13.3 mmol/L), consult your healthcare
professional immediately.
REFERENCE:
* 1 : Kahn, R. and Weir, G.: Joslinis Diabetes Mellitus, 13thed Philadelphia : Lea
and Febiger (1994), 489.
* 2 : Krall, L.P. and Beaser, R. S.: Joslin Diabetes Manual. Philadelphia : Lea and
Febiger(1989), 261-263.
Compounds Highest concentrations
tested at which no
interference occured
Compounds Highest concentrations
tested at which no
interference occured
Acetaminophen ≦8.0 mg/dL (0.53 mmol/L) Hydroxyurea ≦3.0 mg/dL (0.39 mmol/L)
Ascorbic Acid ≦5.0 mg/dL (0.28 mmol/L) Ibuprofen ≦50 mg/dL (2.42 mmol/L)
Aspirin ≦60 mg/dL (3.33 mmol/L) Icodextrin ≦13 mg/dL (0.01 mmol/L)
Bilirubin ≦90 mg/dL (1.54 mmol/L) L-dopa ≦10 mg/dL (0.51 mmol/L)
Cholesterol ≦500 mg/dL (12.9 mmol/L) Maltose ≦900 mg/dL (26.3 mmol/L)
Creatinine ≦5.0 mg/dL (0.44 mmol/L) Methyldopa ≦3.0 mg/dL (0.13 mmol/L)
Dopamine ≦2.0 mg/dL (0.11 mmol/L) Pralidoxime Iodide≦25 mg/dL (0.94 mmol/L)
EDTA ≦ 360 mg/dL (12.3 mmol/L) Salicylate ≦60 mg/dL (4.34 mmol/L)
Galactose ≦900 mg/dL (50 mmol/L) Tolazamide ≦100 mg/dL (3.21 mmol/L)
Gentisic Acid ≦5.0 mg/dL (0.32 mmol/L) Tolbutamide ≦400 mg/dL (14.8 mmol/L)
Glutathione ≦ 53 mg/dL (1.72 mmol/L) Triglycerides ≦2,000 mg/dL (22.6 mmol/L)
Haemoglobin ≦ 500 mg/dL (0.08 mmol/L) Uric Acid ≦8.0 mg/dL (0.48 mmol/L)
Heparin ≦ 8,000 U/dL Xylose ≦100 mg/dL (6.66 mmol/L)
4. Inaccurate results may occur in severely hypotensive individuals or
patients in shock. Inaccurate low results may occur for individuals
experiencing a hyperglycemic-hyperosmolar state, with or without
ketosis. Critically ill patients should not be tested with blood glucose
meters.
5. Abnormal red blood cell counts (hematocrit level below 20% or above
60%) may cause false results. Please consult your healthcare
professional if you do not know your hematocrit level.
6. Interference: Reducing substances occurring in the blood naturally
(uric acid, bilirubin) or from therapeutic treatments (ascorbic acid,
acetaminophen) will not significantly affect iConnect test results.
However, elevated concentrations of these substances may affect test
results. The compounds listed in the tables were found to have no
affect at the concentration indicated.
METER USER GUIDE
BLOOD GLUCOSE
MONITORING SYSTEM
BG-102
Smart
Important:
1. Call your doctor immediately if you experience symptoms that are not consistent
with your blood glucose test results.
2. When the app program displays "This mobile device does not support"
warning, please stop using and contact your customer service.
1. Your Medicare LiS Smart blood glucose meter can be connected to Smart
BGM app program. Through this app, the blood glucose curves can be
reviewed in the mobile device.
2. The Medicare Smart BGM app supports Andriod and iOS system, please
download the APP program to your mobile device before use, and read
the APP instruction manual in the app.
3. For Android system user, please go to Google play, download app :
Smart BGM.
4. For iOS system user, please go to Apple store, download app:
Smart BGM.
5. To know which mobile device it supports, please see the Smart BGM
USER GUIDE- Mobile Compatibility Table for details.
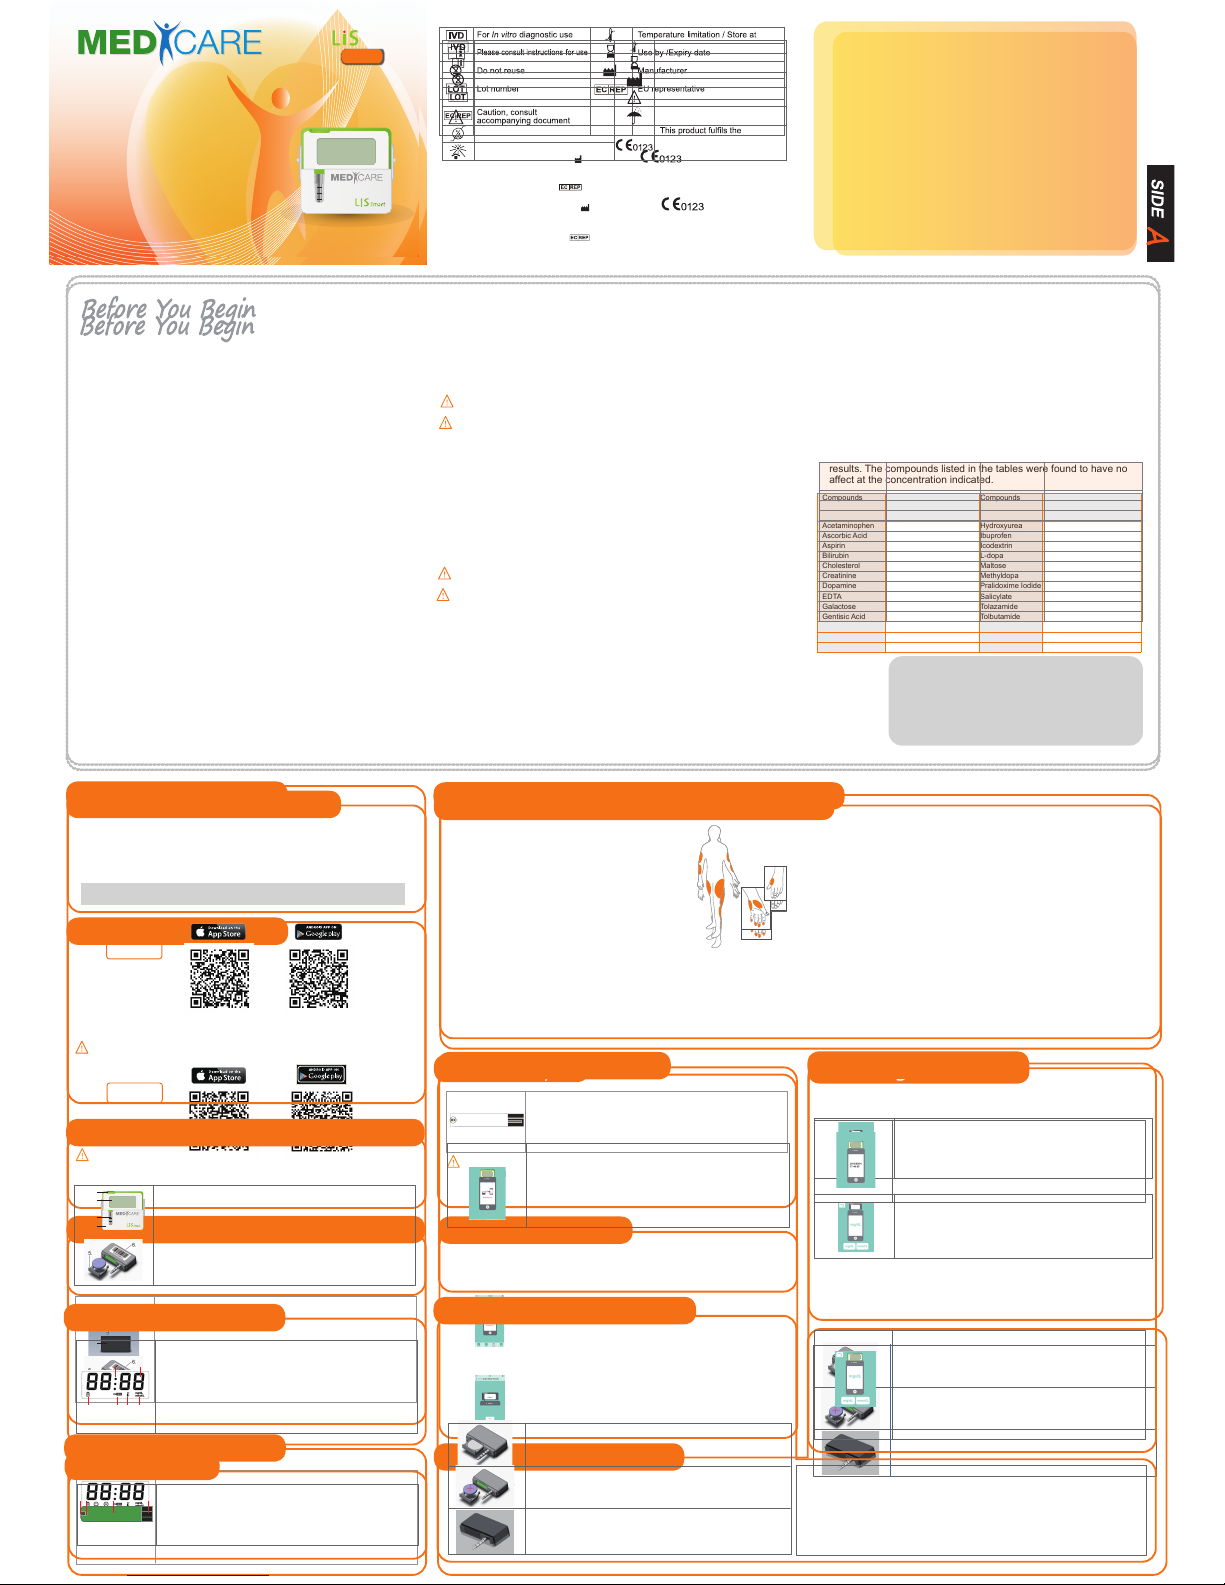
Important
There are important limitations for doing AST. Please consult
your healthcare professional before you perform AST.
What is AST?
Alternative Site Testing (AST) means you can use parts of
the body other than your fingertips to check your blood
glucose levels. The system allows you to test from the palm,
forearm, upper arm, calf or thigh, with equivalent results to
fingertip testing.
What is the advantage?
Fingertips feel pain more readily because they are full of nerve endings (receptors). At
other body sites, nerve endings are not so numerous and you will not feel as much
pain as you will experience at the fingertip.
When to use AST?
Food, medication, illness, stress and exercise can affect blood glucose levels. Capil-
lary blood at fingertip reflects these changes faster than capillary blood at other sites.
Therefore, if you are testing blood glucose level during or immediately after meal,
physical exercise or stressful event, take the blood sample from your fingertip only.
Use AST only :
1. In a pre-meal or fasting state (more than 2 hours since the last meal).
2. Two hours or more after taking insulin.
3. Two hours or more after exercise.
4. During steady state blood glucose conditions.
Do NOT use AST if :
1. You have reason to believe you have hypoglycemia or hyperglycemia.
2. Your routine glucose results are often fluctuating.
3. You are pregnant.
How to increase the accuracy ?
Stimulating blood perfusion by rubbing the puncture site prior to blood extraction
has a significant influence on the glucose value obtained.
Blood from the site without rubbing exhibits a measurably different glucose concen-
tration than blood from the fingertip. When the puncture site was rubbed prior to
blood extraction, the difference was significantly reduced.
IMPORTANT :
To increase the accuracy when using AST, rub the puncture site more than 20
seconds before extracting blood.
3. About Alternative Site Testing (AST)
4. Getting To Know Your System
9. Replacing The Battery
2.App Software
5. Medicare- display
6. Test Strip
7. Setting Meter
8. Memory Download
Setting the Unit of Measurement : Medicare LiS Smart meter can display
test result in milligram per deciliter (mg/dL) or millimoles per liter (mmol/L).
Your meter has been preset at the factory with the standard unit measure-
ment used where you live. The measurement unit of Medicare meter can
only be setting through Medicare APP program. When you turn off the
meter or replace the battery, the unit will not be changed. Use of the wrong
unit of measure may cause you to misinterpret your blood glucose level,
and may lead to incorrect treatment. Please always consult with your
healthcare professionals first if you want to reset the unit of measure.
Setting Time and Date
1. Display: Shows test results and messages.
2. Headphone plug: Connect your mobile device to use app.
3. Strip slot: Insert the test strip here. The meter will turn
on automatically.
4. Headphone plug Cover: Protect the headphone plug shell.
5. Battery compartment: Holds ONE 3v Lithium battery
(battery type CR2032). Please install battery into meter
before you start to test.
6. Meter label: Each meter has its meter number on it.
Do not alter or tear the label off.
1. Call up Medicare Smart BGM App on your mobile
device, and connect your meter to mobile device.
2. After connect, your meter will automatically
calibrate its time and date according to your
mobile device’s time and date.
3. Please refer to your Medicare Smart BGM USER
GUIDE for details of setting.
1. Blood drop symbol : Flashes when sample should
be applied.
2. Battery symbol : Appears when battery is weak.
3. Strip symbol : Appears when the meter is turned on.
4. Thermometer symbol : Appears when ambient
temperature is above or below the acceptable range
needed for testing.
5. Unit of measure : Appears with the test result.
6. Number digits: For showing test results and messages.
1. Absorbent channel : Apply a drop of blood here.
2. Confirmation window : This is where we confirm if
enough blood is applied for has been drawn into strip.
3. Test strip handle : Hold this part to insert the test strip
into the meter slot.
4. Contact bars : Insert this end into strip slot.
1. Call up Medicare Smart BGM on your mobile
device, and connect your meter to mobile device.
2. After connect, tap the screen icon “ “ , you will
enter the setting function.
3. Touching the Screen "Config", will enter to meter
settings. Select the unit of mg/dL or mmol/L and
wait until it complete setting.
4. Please refer to your Medicare Mobile APP
instruction manual for details of setting.
Set the Unit of Measurement (mg/dL or mmol/L)
The Medicare LiS Smart meter system uses the latest technology to provide you with
easy and comfortable testing. The system requires only a 0.3 μL of blood sample to
complete the testing in only 6 seconds.
1. Call up Medicare APP on your mobile device, and
connect your meter to mobile device.
2. After connect, tap the screen icon “ “ to enter setting
function. Then touching the Screen "Config", to enter
meter settings.
3. Touching the screen "download meter records", the
meter will start to download. Wait till you see the display
shows “download OK” message.
Recall the Memory
The Medicare meter can store 100 test results with time and date. When the memory
is full, the oldest memory value will be overwritten. The memory can only be reviewed
under the Medicare APP program. If you test blood glucose without connecting mobile
device, you have to download the meter data to your mobile device followed by below
procedure:
The Medicare meter comes with ONE Lithium battery (battery type CR2032).
Battery life will vary depending on usage, so always keep a spare battery on hand.
The battery should last about 1000 tests or 12 months when testing 3 times a day.
When the battery symbol appears on the meter display, battery is getting low. You
will still be able to test with low battery, but you should replace it as soon as possible.
When battery symbol and Eb shows up in the meter display, the meter will no longer
give results and you must replace the battery immediately. Please always have one
spare battery with you to ensure that you can replace the battery anytime.
1. Make sure the meter is turned off. Let the front of the meter
rest in the palm of your hand. Slide battery cover open.
2. Insert new battery (battery type CR2032), being sure to
align the plus (+) side up.
3. Close battery cover.
NOTE:
1. Replacing the battery does not affect the test result stored in memory. However the
time and date may need to re-set by app.(Read the Smart BGM User Guide.)
2. As with all small objects, the battery should be kept away from small children as a
safety precaution. If the battery is swallowed, seek medical assistance immediately.
3. Batteries might leak chemicals if not used for a long time. Remove the batteries if
you are not going to use the device for a long period of time (i.e., 3 months or more).
4. Please discard the used or dead batteries properly according to the regulations of
your country.
How to replace the battery
QR Code:
1.
2.
4.
3.
1
3 5
6
2 4
Important:
1. Please do not disconnect or remove meter from mobile device during
download.
2. Please refer to your Medicare Mobile APP instruction manual for details
about download, delete and reviewing your meter memory.
Setting time and date : The time and date of Medicare meter can only be
setting through Medicare APP program.
PLEASE READ THIS BEFORE USING.
The following basic safety precautions should always be taken.
1. Close supervision is necessary when the device is used by, on, or
near children and handicapped persons.
2. The meter and lancing device are for single patient use. Do not share
them with anyone including other family members! Do not use on
multiple patients!
3. All parts of the kit are considered biohazardous and can potentially
transmit infectious diseases, even after you have performed cleaning
and disinfection.
4. Use the device only for the intended use described in this manual.
5. Do not use test strips and control solutions which are not supplied by
the manufacturer.
6. Do not use the device if it is not working properly, or if it has suffered
any damage.
7. Before using any product to test your blood glucose, read all
instructions.
8. Thoroughly practice the test. Do all quality control checks as directed
and consult with a diabetes healthcare professional.
9. Before starting measurements, please install battery, and download
the Smart BGM app program to set correct time and date,
measurement unit and/or remove memory.
10. Use only Medicare test strip and control solution with your Medicare
LiS Smart meter. Using other test strips and control solutions with this
meter can produce inaccurate results.
11. Keep this user guide with you.
Intended Use
The system is intended for use outside the body (in vitro diagnostic use
only). It should be used only for testing blood glucose (blood sugar) and
only with fresh capillary whole blood samples. The system is intended for
use in the home and in clinical settings. It should not be used for the
diagnosis of diabetes or for the testing of newborns.
Principle of Measurement
Blood glucose is measured by an electrical current that is produced when a
blood samples mixes with the reagent (special chemicals) of the test strip.
The electrical current changes with the amount of glucose in the blood
sample.
The meter measures the strength of the electrical current, calculates your
blood glucose level and then displays your result in either milligrams of
glucose per deciliter (mg/dL) or millimoles of glucose per liter (mmol/L).
Caution
1. The user should not take any decision of medical relevance without first
consulting his or her medical practitioner.
2. Call your doctor immediately if you experience symptoms that are not
consistent with your blood glucose test results.
3. High altitudes above than 3,402 meter (11,161 ft) may affect the test
results.
4. Temperatures outside the range of 10°C to 40°C (50°F to 104°F) may
affect the test results. Do not test beyond of temperature range.
5. Do not use this meter near cellular or cordless telephones in a call,
walkie-talkies, garage door openers, radio transmitters, or other electrical
or electronic equipment that are sources of electromagnetic, radiation, as
these may interfere with the proper operation of the meter.
IMPORTANT HEALTH-RELATED INFORMATION
1. Apply only capillary whole blood sample to test your blood glucose.
Applying other substances or plasma, serum will cause wrong results.
2. Severe dehydration and excessive water loss may cause false low
results. If you believe you are suffering from severe dehydration,
consult your healthcare professional immediately.
3. Test results below 60 mg/dL (3.3 mmol/L)*1 indicates low blood
glucose(hypoglycemia). Test results greater than 240 mg/dL (13.3
mmol/L)*2 indicates high blood glucose (hyperglycemia).If your results
are below 60 mg/dL (3.3 mmol/L) or above 240 mg/dL (13.3 mmol/L),
repeat the test, and if the results are still below 60 mg/dL (3.3 mmol/L)
or above 240 mg/dL (13.3 mmol/L), consult your healthcare
professional immediately.
4. Inaccurate results may occur in severely hypotensive individuals or
patients in shock. Inaccurate low results may occur for individuals
SYMBOLS DESCRIPTION
REFERENCE:
* 1: Kahn, R. and Weir, G.: Joslinis Diabetes Mellitus,
13thed Philadelphia : Lea and Febiger (1994), 489.
* 2: Krall, L.P. and Beaser, R. S.: Joslin Diabetes Manual.
Philadelphia : Lea and Febiger(1989), 261-263.
1. Before You Begin
2. App Software
3. About Alternative Site Testing (AST)
4. Getting To Know Your System
5. Medicare- display
6. Test Strip
7. Setting Meter
8. Memory Recall
9. Replacing The Battery
10. Prepare For Blood Sampling
11. Performing Blood Test
12. Understanding Your Test Result
13. Control Solution Testing
14. Caring For Your Meter And Test Strip
15. Performance Characteristics
16. System Specifications
17. Display Messages And Problem-Solving Guide
18. Trademark
10-62-6519-0003 V2-JUL15
Compounds Highest concentrations
tested at which no
interference occured
Compounds Highest concentrations
tested at which no
interference occured
Acetaminophen ≦8.0 mg/dL (0.53 mmol/L) Hydroxyurea ≦3.0 mg/dL (0.39 mmol/L)
Ascorbic Acid ≦5.0 mg/dL (0.28 mmol/L) Ibuprofen ≦50 mg/dL (2.42 mmol/L)
Aspirin ≦60 mg/dL (3.33 mmol/L) Icodextrin ≦13 mg/dL (0.01 mmol/L)
Bilirubin ≦90 mg/dL (1.54 mmol/L) L-dopa ≦10 mg/dL (0.51 mmol/L)
Cholesterol ≦500 mg/dL (12.9 mmol/L) Maltose ≦900 mg/dL (26.3 mmol/L)
Creatinine ≦5.0 mg/dL (0.44 mmol/L) Methyldopa ≦3.0 mg/dL (0.13 mmol/L)
Dopamine ≦2.0 mg/dL (0.11 mmol/L) Pralidoxime Iodide≦25 mg/dL (0.94 mmol/L)
EDTA ≦ 360 mg/dL (12.3 mmol/L) Salicylate ≦60 mg/dL (4.34 mmol/L)
Galactose ≦900 mg/dL (50 mmol/L) Tolazamide ≦100 mg/dL (3.21 mmol/L)
Gentisic Acid ≦5.0 mg/dL (0.32 mmol/L) Tolbutamide ≦400 mg/dL (14.8 mmol/L)
Glutathione ≦ 53 mg/dL (1.72 mmol/L) Triglycerides ≦2,000 mg/dL (22.6 mmol/L)
Haemoglobin ≦ 500 mg/dL (0.08 mmol/L) Uric Acid ≦8.0 mg/dL (0.48 mmol/L)
Heparin ≦ 8,000 U/dL Xylose ≦100 mg/dL (6.66 mmol/L)
experiencing a hyperglycemic-hyperosmolar state, with or without
ketosis. Critically ill patients should not be tested with blood glucose
meters.
5. Abnormal red blood cell counts (hematocrit level below 20% or above
60%) may cause false results. Please consult your healthcare
professional if you do not know your hematocrit level.
6. Interference: Reducing substances occurring in the blood naturally
(uric acid, bilirubin) or from therapeutic treatments (ascorbic acid,
acetaminophen) will not significantly affect Medicare test results.
However, elevated concentrations of these substances may affect test
results. The compounds listed in the tables were found to have no
affect at the concentration indicated.
1 2 3 4
L-Tac Medicare Pte Ltd
25 Mandai Estate #07-11
Innovation Place Tower 1
Singapore 729930
Tel: +65 6863 8191
Fax:+65 6863 8190
www.medicare-l-tac.com.sg
Customer Service: +65 6334 2273
OK Biotech Co., Ltd.
No. 91, Sec. 2, Gongdao 5th Road,
30070 Hsinchu City,TAIWAN
MDSS GmbH
Schiffgraben 41, 30175 Hannover, GERMANY
For
in vitro
diagnostic use. Temperature limitation / Store at.
Please consult instructions for use. Use by /Expiry date.
Do not reuse. Manufacturer.
Lot number. Caution, consult accompanying
document.
EU representative. Keep dry.
Humidity limitation. requirements of Directive 98/79/
EC
in vitro
diagnostic medical
device.
Keep away from sunlight.

12. Understanding Your Test Result
14.
Caring For Your Meter And Test Strip
15. Performance Characteristics
16. System Specifications
17. Display Messages And
Problem-Solving Guide
▪Adjustable Lancing Device
Your lancing device and lancets are used for obtaining capillary blood samples from
the puncture site
▪Lancet
3. Select and Lance a Puncture Site
*For Fingertip
Hold the prepared lancing device firmly against
the side of your fingertip. Press release button.
*For AST
Please refer to the “About Alternative Site
Testing (AST)” Section. Please consult your
healthcare professional before obtaining blood
from site other than your fingertip.
4. Obtain a Blood Sample : Gently massage your
finger or puncture site to obtain the required
blood volume. To perform the test, you need
only 0.3 μL of blood sample. Do not smear the
blood sample. To obtain best accurate result,
wipe off the first drop of blood and gently
squeeze another drop of blood.
5. Apply Blood Sample : Apply the blood sample
to the opening of absorbent channel of test strip
until the confirmation window is fully covered
with blood. Then the meter begins to count
down and displays the test result in 6 seconds.
1. Wash Your Hands and the Puncture Site :
Wash your hands in warm, soapy water.
Rinse and dry completely. Warm your
fingers to increase blood flow.
2. Insert Test Strip : Remove a new test strip from
vial. Be sure to tightly replace vial cap after
removing test strips. Insert test strip immedi
-ately into strip slot as illustrated. The meter
turns on automatically. When the blood symbol
is blinking, you are ready to perform a test.
1. Screw off the cap of lancing device. Insert a
lancet into the lancet holder and push down
until it is fully seated
2. Twist off the protective cap until it separates
from the lancet.
▪Setting your Lancing Device
3. Replace the lancing device cap and set the
puncture depth to the desired number.
NOTE:
The depth selector offers 5 levels of skin
1-2 : for soft or thin skin
3 : for average skin
4-5 : for thick or calloused skin
4. Pull back the cocking control until it makes a
click, and then release. If it does not click, the
device may have been cocked when the lancet
was inserted.
6. Read Your Result :
The result is displayed in 6 sec. This is only for
reference.For any medical action or drug prescription,
please consult with your wealthcare perffactional.
7. Remove Strip to Turn Meter Off : Your blood
glucose result is automatically stored in the
meter memory. Turn the meter off by removing
the test strip. Discard the used strip and lancet
safely in a puncture resistant container
The normal blood glucode range is 70 to 105 mg/dL (3.9 to 5.8 mmol/L) for a fasting,
non-diabetic adult, but less than 140mg/dL (7.8 mmol/L) two hours after meals.
Consult your healthcare professional to find out your target blood glucose value.
If your blood glucose result seems unusually high or low ,or inconsistent with your
pervious result , check the following :
1.Was the blood sample applied immediately to the test strip after removing it from
the vial?
2.Was the volume of the blood sample sufficient?
3.Was the test strip vial cap tightly sealed?
4.Was the test strip used before the expiration date?
5.Were the test strips stored away from extreme temperatures in vey cold or hot
weather or from areas of hight humidity ?
The run a control test with Medicare control solution. if the control test result is within
the acceptable range. review testing procedure and repeat your blood glucose test
with a new test strip, if your blood glucose value is still inconsistent with your previous
results, glucose trend, or how you feel, contact your doctor immediately for help.
PBGM control solution contains a known amount of glucose that reacts with
PBGM test strips. By testing your control solution and comparing the test results
with the expected range printed on the test strip vial label, you can make sure that
the meter and the test strips are working properly together as a system and that
you are performing the test correctly. It is very important that you do this simple
check routinely to make sure you get accurate results.
▪Why perform a control solution test?
1. To ensure that your meter and test strip are working properly together.
2. To allow you to practice testing without using your own blood.
▪When should the control solution test be performed?
1. When you first get your PBGM meter. Before use this system to test your blood,
you can practice the procedure by using control solution. When you can do
three tests in a row that are within the expected range, you are ready to test
your blood.
2. Once a week (to make sure that you continue to get accurate results).
3. When you begin using a new vial of test strips.
4. Whenever you suspect that the meter or test strips are not working properly.
5. When your blood glucose test results are not consistent with how you feel, or
when you think your results are not accurate.
6. When test strips are exposed to extreme environmental conditions.
7. If you drop the meter.
8. when replace the battery.
▪Important Control Solution Information
1. Check the expiration date on the control solution bottle. Do not use if expired.
2. Control solution, meter, and test strips should come to room temperature
(68-77 oF/20-25oC) before testing.
3. Shake the bottle before use, discard the first drop of control solution after
squeezing, wipes off the dispenser tip to avoid contaminations. These steps
ensure you will get a good sample and an accurate result.
4. Record the discard date on the bottle when you open a new bottle of control solution.
NOTE :
1. There are two levels of control solution (normal and high) available to
purchase. Please contact with your local distributor when required.
2. The control solution range printed on the test strip vial is for PBGM Control
Solution only. It is used to test meter and strip performance. It is not
recommended range for your blood glucose level.
1.In Medicare mode
2.Insert Test Strip : Insert a new test strip into the
strip slot, the meter will activate.
3.See detailed Medicare-user guide.
Squeeze a drop of Control Solution : Shake
control solution bottle well. Remove the cap.
Squeeze bottle, discard the first drop and wipe off
the dispenser tip with a clean tissue paper or
cotton swab. Squeeze a drop on a clean non-
absorbent surface.
▪How to Perform a Control Test
Apply Control Solution : Apply the drop to the
opening of the strip absorbent channel until the
confirmation window is filled. The meter begins to
count down.
Check if the test result is in range: After the meter
counts down from 6 to 1, the test result shows up.
Compare the test result with the range printed on
the test strip vial. The result should fall within the
printed range.
After the test, touch test solution map, the display
“0”, it is delete the test blood glucose values, are
not stored in memory, this will not affect your
blood sugar curve values.
Important :
1. The meter when used alone, each time control solution test, the test results
will be stored in the meter's memory. Its control solution test results will affect
your future confusion and memory back and read and calculate the mean
blood glucose values.
2. DO NOT APPLY THE CONTROL SOLUTION DIRECTLY TO THE TEST
STRIP! Overdosed solution may give inaccurate result.
3. Repeat test if test result falls outside the control range stated on the test strip
label. If subsequent test remains to produce unacceptable result, the meter or
test strip may be faulty. DO NOT use the system. Contact us or your local
distributor for help.
To avoid the meter and test strips getting dirt, dust or other contaminants,
please wash and dry your hands thoroughly before use.
▪Cleaning
Your meter does not require special maintenance. As long as no blood or control
solution comes in direct contact with the meter, there is no special cleaning
required.
To clean the meter exterior, wipe with a cloth moistened with tap water or a mild
cleaning agent, then dry the device with a soft and dry cloth. Do not flush with
water.
Do not use organic solvents to clean the meter. Your meter is a precision instru-
ment. Please handle it with care.
ACCURACY:≧95% of the individual glucose results fall within ± 15 mg/dL(0.83
mmol/L) at glucose concentration < 75 mg/dL(or 4.2 mmol/L) and within ± 20%
at glucose concentration ≧75 mg/dL(or 4.2 mmol/L), compared with glucose
analyzer YSI 2300.
PRECISION :
CVs(%) of intermediate precision and repeatability where less than 5%
▪Storage
1. Meter Storage
* Storage condition: -20oC~50oC (-4oF~122oF), below 90% relative humidity.
* Avoid dropping and strong impact.
* Avoid direct sunlight and humidity.
2. Strip Storage
* Storage condition: 4oC~40oC (39oF~104oF), and 10~85% relative humidity.
Do not refrigerate.
* Store your test strips in their original vial only. Do not transfer to other
container.
* Store test strip packages in a cool and dry place. Keep away from direct
sunlight and heat.
* After removing a test strip from the vial, immediately replace the vial cap and
close it tightly.
* You may touch the test strip anywhere with clean, dry hands when removing it
from the vial or inserting it into the meter.
* Use each test strip immediately after removing it from the vial.
* Do not bend, cut, or alter a test strip in any way.
* Keep the strip vial away from children since the cap and the test strip can be a
potential choking hazard. If swallowed, please seek medical assistance immed
iately.
3. Control solution storage
* Storage condition: Store the control solution tightly closed at temperatures
below 86oC (30oC). Do not refrigerate
Model Name
Assay Method
Test Sample
Test Result
Alternative Site Testing
Sample Size
Measuring Time
Measuring Range
Acceptable Hematocrit Range
Operating Condition
Storage/Transportation Condition
Memory Capacity
Power Supply
Battery Life
Automatic shut-off
Dimensions
Weight
PBGM
Electrochemical biosensor
Capillary Whole Blood
Referenced to plasma glucose value
YES (palm, forearm, upper arm, calf, or thigh)
0.3 μL
6 seconds
20 – 600 mg/dL (1.1-33.3 mmol/L)
20~60%
10°C~40°C(50°F~104°F), between 10-85% R. H.
4°C~40°C(39°F~104°F), between 10-85% R. H
100 test results with time and date
One 3-volt Lithium Battery (battery type CR2032)
Approximately 1,000 tests
In 3 minutes
47 x 48 x 13 mm
20g
11. Prerforming Blood Test
The following is a summary of some display messages and symbols.
These messages help to identify certain problems but do not appear in all cases
when a problem has occurred.
Improper use may cause an inaccurate result without producing an error message.
In the event of a problem, refer to information under ‘‘action to take’’.
1. Microsoft and Windows, are either registered trademarks or trademarks of
Microsoft Corporation in the United States and/or other countries.
2. Apple, Apple store, iOS, iPad, iPhone, iCloud..are either registered trade-
marks or trademarks of Apple Computer, Inc. in the United States and/or
other countries.
3. GOOGLE Driver Android Google play, are either registered trademarks or
trademarks of Apple Computer, Inc. in the United States and/or other coun-
tries.
4. This software or user guide described other company and product names
are trademarks of their respective companies or companies or registered
trademark holders.
10. Prepare For Blood Sampling
If some parts of the display are
not working. Contact your local
distributor for help
DISPLAY DESCRIPTION
Display check
The meter is ready for blood
applying into test strip.
Blinking Blood
Display result
Test result
High or low blood glucose levels
can indicate a possibly serious
medical condition. If this is not
confirmed by the way you feel,
review proper testing procedure
and perform a control test.
Repeat blood test, if the display
still appears, please call medi-
cal assistance immediately.
Replace battery now.
Battery is dead.
The meter is not working. Move
to an area with temperature
between 10oC to 40oC (50oF -
104oF) and wait at least 30
minutes. Do not artificially heat
or cool the meter.
You have to:
1.Repeat test with a new test
strip.
2.Contact your local distributor
for help.
The meter is connected to mobile
devices,
The meter is waiting for Medicare.
Medicare software and meter to
do mutual recognition,will show
Lin.When link success , auto-
matic adjust setting the date and
time of meter.
Meter into Medicare mode
Automatic shut-off
ACTION TO TAKE
Test result is higher
than 600 mg/dL
(33.3 mmol/L).
Test result is lower
than 20 mg/dL (1.1
mmol/L)
Temperature is below
the operating range
Temperature is above
the operating range.
Maybe:
1.Used strip or moist
ened strip
2.Defective meter.
when the jack of
meter insert mobile
device
Meter linking
Medicare
Meter in Medicare
mode
Meter OFF mode
Date and time are
not set and calibration
Before starting measurements,
please install the batteries, do
download the Medicare auto-
matically set the date time.
No responses
when the test strip
is inserted into the
meter
Maybe:
1.Battery is dead.
2.Wrong test strip is
inserted.
3.Meter is defective.
You have to:
1.Replace battery.
2.Insert the test strip correctly.
3.Contact your local distributor
for help.
No responses
when blood sample
is applied to the
test strip.
Maybe:
1.Blood sample is not
sufficient.
2.Meter is defective.
You have to:
1.Repeat test with sufficient
sample.
2.Contact your local distributor
for help.
13. Control Solution Testing
18. Trademark
1. Lancet is for single use only.
2. Keep lancing device and lancets clean.
3. Use caution when removing the used lancet from the device and when disposing
the used lancet.
IMPORTANT :
The meter and lancing device are for single patient use.
Do NOT share them with anyone including other family members !
Do NOT use on multiple patients !
Important Lancing Device and Lancets Information
12.
Understanding Your Test Result
14.
Caring For Your Meter And Test Strip
15. Performance Characteristics
16. System Specifications
17. Display Messages And
Problem-Solving Guide
Adjustable Lancing Device
Your lancing device and lancets are used for obtaining capillary blood samples from
the puncture site.
Lancet
3. Select and Lance a Puncture Site
*For Fingertip
Hold the prepared lancing device firmly against
the side of your fingertip. Press release button.
*For AST
Please refer to the “About Alternative Site
Testing (AST)” Section. Please consult your
healthcare professional before obtaining blood
from site other than your fingertip.
4. Obtain a Blood Sample : Gently massage your
finger or puncture site to obtain the required
blood volume. To perform the test, you need
only 0.3 μL of blood sample. Do not smear the
blood sample. To obtain best accurate result,
wipe off the first drop of blood and gently
squeeze another drop of blood.
5. Apply Blood Sample : Apply the blood sample
to the opening of absorbent channel of test strip
until the confirmation window is fully covered
with blood. Then the meter begins to count
down and displays the test result in 6 seconds.
1. Wash Your Hands and the Puncture Site :
Wash your hands in warm, soapy water.
Rinse and dry completely. Warm your
fingers to increase blood flow.
2. Insert Test Strip : Remove a new test strip from
vial. Be sure to tightly replace vial cap after
removing test strips. Insert test strip immedi
-ately into strip slot as illustrated. The meter
turns on automatically. When the blood symbol
is blinking, you are ready to perform a test.
Important Lancing Device and Lancets Information
6. Read Your Result :
The result is displayed in 6 sec. For any medical
action or drug prescription, please consult with your
wealthcare perffactional.
7. Remove Strip to Turn Meter Off :
Your blood glucose result is automatically stored in
the meter memory. Turn the meter off by removing
the test strip. Discard the used strip and lancet
safely in a puncture resistant container
The normal blood glucose range is below 100 mg/dL (5.6 mmol/L) for a fasting,
non-diabetic adult, but less than 140 mg/dL (7.8 mmol/L) two hours after meals.
Consult your healthcare professional to find out your target blood glucose value.
If your blood glucose result seems unusually high or low,or inconsistent with your
pervious result , check the following :
1. Was the blood sample applied immediately to the test strip after removing it
from the vial?
2. Was the volume of the blood sample sufficient?
3. Was the test strip vial cap tightly sealed?
4. Was the test strip used before the expiration date?
5. Were the test strips stored away from extreme temperatures in vey cold or hot
weather or from areas of hight humidity ?
The run a control test with Medicare control solution. if the control test result is
within the acceptable range. review testing procedure and repeat your blood
glucose test with a new test strip, if your blood glucose value is still inconsistent
with your previous results, glucose trend, or how you feel, contact your doctor
immediately for help.
REFERENCE:
*American Diabetes Association Website (http://www.diabetes.org)
Medicare control solution contains a known amount of glucose that reacts with
Medicare test strips. By testing your control solution and comparing the test
results with the expected range printed on the test strip vial label, you can make
sure that the meter and the test strips are working properly together as a system
and that you are performing the test correctly. It is very important that you do this
simple check routinely to make sure you get accurate results.
Why perform a control solution test ?
1. To ensure that your meter and test strip are working properly together.
2. To allow you to practice testing without using your own blood.
When should the control solution test be performed ?
1. When you first get your Medicare LiS Smart meter. Before use this system to
test your blood, you can practice the procedure by using control solution. When
you can do three tests in a row that are within the expected range, you are
ready to test your blood.
2. Once a week (to make sure that you continue to get accurate results)
3. When you begin using a new vial of test strips.
4. Whenever you suspect that the meter or test strips are not working properly.
5. When your blood glucose test results are not consistent with how you feel,
or when you think your results are not accurate.
6. When test strips are exposed to extreme environmental conditions.
7. If you drop the meter.
8. when replace the battery
Important Control Solution Information
1. Check the expiration date on the control solution bottle. Do not use if expired.
2. Control solution, meter, and test strips should come to room temperature
(68-77°F/20-25°C) before testing.
3. Shake the bottle before use, discard the first drop of control solution after
squeezing, wipes off the dispenser tip to avoid contaminations. These steps
ensure you will get a good sample and an accurate result.
4. Record the discard date on the bottle when you open a new bottle of control solution.
1. Call up Medicare Smart BGM App on your
mobile device, and connect your meter to
mobile device.
2. After connecting the meter and mobile device,
insert test strip to strip slot, the meter will
activate.
3. Squeeze a drop of Control Solution : Shake
control solution bottle well. Remove the cap.
Squeeze bottle, discard the first drop and
wipe off the dispenser tip with a clean tissue
paper or cotton swab. Squeeze a drop on a
clean non-absorbent surface.
How to Perform a Control Test
4. Apply Control Solution : Apply the drop to the
opening of the strip absorbent channel until
the confirmation window is filled. The meter
begins to count down.
5. Check if the test result is in range: After the
meter counts down from 6 to 1, the test result
shows up. Compare the test result with the
range printed on the test strip vial. The result
should fall within the printed range.
6. Tap the control solution icon, the reading will
become “0” as figure which means your
control solution reading has been deleted.
7. Remove the used strips from meter.
Important:
1. When you do the control solution test with meter alone (NOT connected with
your mobile device under APP program), the control test result will be stored in
the meter. We recommend you do the control solution ONLY under APP
program and delete the control solution reading every time when you finish
test.
2. Please refer to your Medicare Mobile APP instruction manual for details about
control solution setting.
3. Repeat test if test result falls outside the control range stated on the test strip
label. If subsequent test remains to produce unacceptable result, the meter
or test strip may be faulty. DO NOT use the system. Contact us or your local
distributor for help.
To avoid the meter and test strips getting dirt, dust or other contaminants,
please wash and dry your hands thoroughly before use.
Cleaning
Your meter does not require special maintenance. As long as no blood or control
solution comes in direct contact with the meter, there is no special cleaning
required.
To clean the meter exterior, wipe with a cloth moistened with tap water or a mild
cleaning agent, then dry the device with a soft and dry cloth. Do not flush with
water.
Do not use organic solvents to clean the meter. Your meter is a precision instru-
ment. Please handle it with care.
ACCURACY:
95 % of the measured glucose values shall fall within either ±15 mg/dL (± 0.83
mmol/L) of the average measured values of the reference measurement proce-
dure at glucose concentrations <100 mg/dL (< 5.55 mmol/L) or within ± 15 % at
glucose concentrations ≧100 mg/dL ( ≧5.55 mmol/L).
PRECISION:
CVs (%) of intermediate precision and repeatability were less than 5%.
Storage
1. Meter Storage
* Storage condition: -20oC~50oC (-4oF~122oF), below 90% relative humidity.
* Avoid dropping and strong impact.
* Avoid direct sunlight and humidity.
2. Strip Storage
* Storage condition: 4oC~40oC (39oF~104oF), and 10~85% relative humidity.
Do not freeze.
* Store your test strips in their original vial only. Do not transfer to other
container.
* Store test strip packages in a cool and dry place. Keep away from direct
sunlight and heat.
* After removing a test strip from the vial, immediately replace the vial cap and
close it tightly.
* You may touch the test strip anywhere with clean, dry hands when removing it
from the vial or inserting it into the meter.
* Use each test strip immediately after removing it from the vial.
* Do not bend, cut, or alter a test strip in any way.
* Keep the strip vial away from children since the cap and the test strip can be a
potential choking hazard. If swallowed, please seek medical assistance immed
iately.
3. Control solution storage
* Storage condition: Store the control solution tightly closed at temperatures
between 4°C (39°F) and 30°C (86°F). Do not freeze.
Model Name
Assay Method
Test Sample
Test Result
Alternative Site Testing
Sample Size
Measuring Time
Measuring Range
Acceptable Hematocrit Range
Operating Condition
Storage/Transportation Condition
Memory Capacity
Power Supply
Battery Life
Automatic shut-off
Dimensions
Weight
LiS Smart
Electrochemical biosensor
Capillary Whole Blood
Referenced to plasma glucose value
YES (palm, forearm, upper arm, calf, or thigh)
0.3 μL
6 seconds
20~600 mg/dL (1.1~33.3 mmol/L)
20~60%
10°C~40°C (50°F~104°F), 10~85% R. H.
4°C~40°C (39°F~104°F), 10~85% R. H
100 test results with time and date
One 3-volt Lithium Battery (battery type CR2032)
Approximately 1,000 tests
In 3 minutes
48 x 47 x 13 mm
20g
11.Prerforming Blood Test
10. Prepare For Blood Sampling
18. Trademark
mg/dL
1. Screw off the cap of lancing device. Insert a
lancet into the lancet holder and push down
until it is fully seated
2. Twist off the protective cap until it separates
from the lancet.
Setting your Lancing Device
3. Replace the lancing device cap and set the
puncture depth to the desired number.
NOTE:
The depth selector offers 5 levels of skin
1-2 : for soft or thin skin
3 : for average skin
4-5 : for thick or calloused skin
4. Pull back the cocking control until it makes a
click, and then release. If it does not click, the
device may have been cocked when the lancet
was inserted.
The following is a summary of some display messages and symbols.
These messages help to identify certain problems but do not appear in all cases
when a problem has occurred.
Improper use may cause an inaccurate result without producing an error message.
In the event of a problem, refer to information under ‘‘action to take’’.
If some parts of the display are not
working. Contact your local distribu-
tor for help
DISPLAY DESCRIPTION
Display check
The meter is ready for blood
applying into test strip.
Blinking Blood
Display result
Test result
High or low blood glucose levels can
indicate a possibly serious medical
condition. If you get a "Hi" result,
repeat the test with a new strip. If the
result is still "Hi" contact your
healthcare provider immediately. If
you get a “Lo” result, contact your
healthcare provider immediately.
Replace battery now.
Battery is dead.
The meter is not working. Move to
an area with temperature between
10°C to 40°C (50°F - 104°F) and
wait at least 30 minutes. Do not
artificially heat or cool the meter.
You have to:
1.Repeat test with a new test strip.
2.Contact your local distributor for help.
The meter is connected to mobile
devices,
The meter is waiting for app.
Wait until the linking process is done.
Operate the meter with the app.
Meter is shutting off.
ACTION TO TAKE
Test result is higher than
600 mg/dL (33.3
mmol/L).
Test result is lower
than 20 mg/dL (1.1
mmol/L).
Temperature is below
the operating range.
Temperature is above
the operating range.
Maybe:
1.Used strip or moistened
strip
2.Defective meter.
When the jack of
meter insert mobile
device.
Meter linking app
Meter in app mode
Meter OFF mode
Date and time are
not set or calibrated
Launch the app, and connect the meter to the
mobile device to automatically set the date
time.
No responses when the
test strip is inserted into
the meter
Maybe:
1. Battery is dead.
2. Wrong test strip is inserted.
3. Meter is defective.
You have to:
1. Replace battery.
2. Insert the test strip correctly.
3. Contact your local distributor for help.
No responses when
blood sample is applied
to the test strip.
Maybe:
1. Blood sample is not sufficient.
2. Meter is defective.
You have to:
1. Repeat test with sufficient sample.
2. Contact your local distributor for help.
1. Microsoft and Windows, are either registered trademarks or trademarks of
Microsoft Corporation in the United States and/or other countries.
2. Apple, Apple store, iOS, iPad, iPhone, iCloud..are either registered
trademarks or trademarks of Apple Computer, Inc. in the United
States and/or other countries.
3. GOOGLE Drive, Android, Google Play, are either registered
trademarks or trademarks of Apple Computer, Inc. in the United
States and/or other countries.
4. Other company and product names this software or user guide described
are trademarks of their respective companies or companies or registered
trademark holders.
1. Lancet is for single use only.
2. Keep lancing device and lancets clean.
3. Use caution when removing the used lancet from the device and when disposing
the used lancet.
IMPORTANT :
The meter and lancing device are for single patient use.
Do NOT share them with anyone including other family members !
Do NOT use on multiple patients !
Incorrect
Correct
13.Control Solution Testing
45
12
4 5
Other Medicare Blood Glucose Meter manuals


