Medicomp TelePatch User manual

TelePatch Monitoring System
Holter Patient Guide
Most Advanced & Convenient Ambulatory Cardiac Monitoring
HOLTER
PATIENT
GUIDE
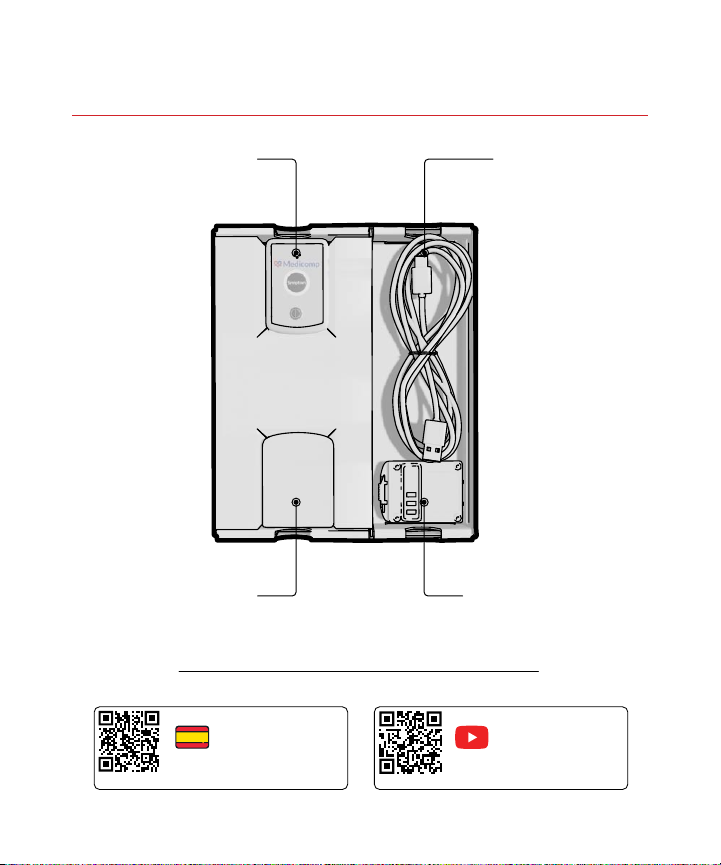
Universal Pendant Charging Cable
Battery Charger
Find Electrode Patches inside the box.
Additional Battery
ESPAÑOL
www.medicompinc.com/es/GuiaHolter
For reference videos, visit:
www.medicompinc.com/HolterVideo
Encuentra esta guía en Español
VIDEO
2
Inside the box

Welcome To TelePatch
The most advanced heart monitoring system
Your doctor has prescribed a Holter study using the Medicomp
TelePatch Monitor.
This guide will walk you through hooking up the monitor, using it
during daily activities, recording symptoms when they occur, and
returning the monitor at the end of the study.
This study will record
your heart’s electrical activity
and can help your doctor discover any
heart irregularities, called arrhythmias.
ECG recordings are sent to Medicomp, where highly trained
Certied Cardiac Technicians analyze your ECG data and create
reports for your doctor. You should wear the monitor and go about
your normal daily activities; you can even shower with the device.
If at any point you feel a symptom or irregular heartbeat, simply
press the Symptom button. It is a simple process and should not
interfere with your daily activities.
Begin wearing your monitor immediately, and you will wear the
monitor 24-hours a day for the length of your prescribed test. The
instructions included in this Patient Guide will guide you on how
to use the monitor. At the end of the study take the device off and
follow the instructions for promptly returning it.
If you have questions after reviewing this guide, please contact
Medicomp at 877-996-5553.
3

Table of Contents
Inside the box 2
Welcome To TelePatch 3
TelePatch Holter Monitoring Kit Contents 5
Preparing Your Skin 6
Putting the Device On 7
Starting Your Holter Study 8
Lighting and Sound Guide 9
Replacing Electrode Patch 10
Battery Changing & Charging 11
Showering and Drying 12
Do’s and Don’ts 13
Making a Symptom Recording 14
Procedure Ending Instructions 15
Returning the Monitor Kit 16
4

!
TelePatch Holter Monitoring Kit
Contents
Universal Pendant
Battery Charger,
Charging Cable and Plug Battery
Electrode Patch
X 2
X 2
A Patient Guide and Diary may also be included.
5

Preparing Your Skin
The location for the Patch is just left of the center of the chest, as
highlighted. All of the materials used in Medicomp products and
patches are latex-free and hypoallergenic. The Protective Skin
Pad is included in the Patch packaging. If you have known skin
sensitivities, please contact your physician.
!
Find Location
Wash with Plain Soap (No
Lotion/Oil), Shave and Dry
Wipe Location with
Protective Skin Pad
Dry 60 Seconds
6
1
3
2
4

Putting the Device On
!
Align Patch in center of chest and avoid shoulder fold as shown.
Take care not to insert the Pendant upside down. Be sure the slightly
curved end of the Pendant — the end at the bottom below the Power
Button — is ush against the matching beveled part of the Cradle.
Insert Battery Insert Pendant Peel Backing
Adhere to Chest Remove Tabs Do Not Move Patch
Over to Shoulder Area
7
5
8
6 7
9
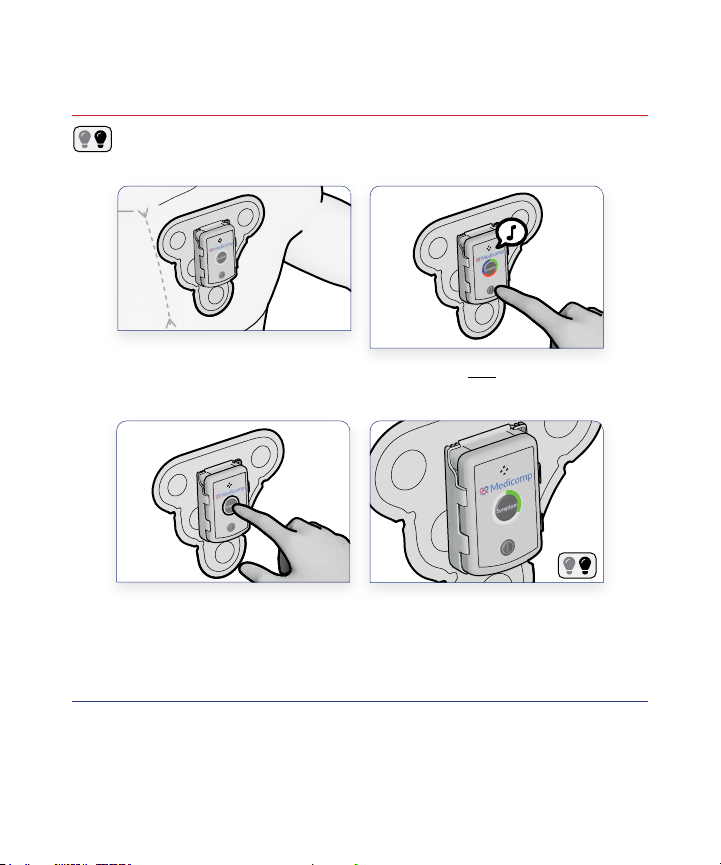
Starting Your Holter Study
Conrm the GREEN light is ashing SLOWLY. If the monitor
displays any other ashing lights or audible sounds, please call
Medicomp’s Patient Support at (877) 996-5553.
When Electrode Patch is
Attached in the Proper
Position on the Chest
Press the Symptom
Button 3 Times
Power ON the
Universal Pendant
Green Light Flashes
Every 2 Seconds
Flashing Light
!
8
1
2 3

If the Check Pendant blue light starts ashing, remove Pendant,
wipe front and back of Pendant and inside of Patch Cradle with a
clean dry cloth, and insert Pendant back in securely.
Lighting and Sound Guide
Power On
Monitoring - Good
Check Pendant
Power Off
Symptom Press
Change Battery
Flashing Light
!
9
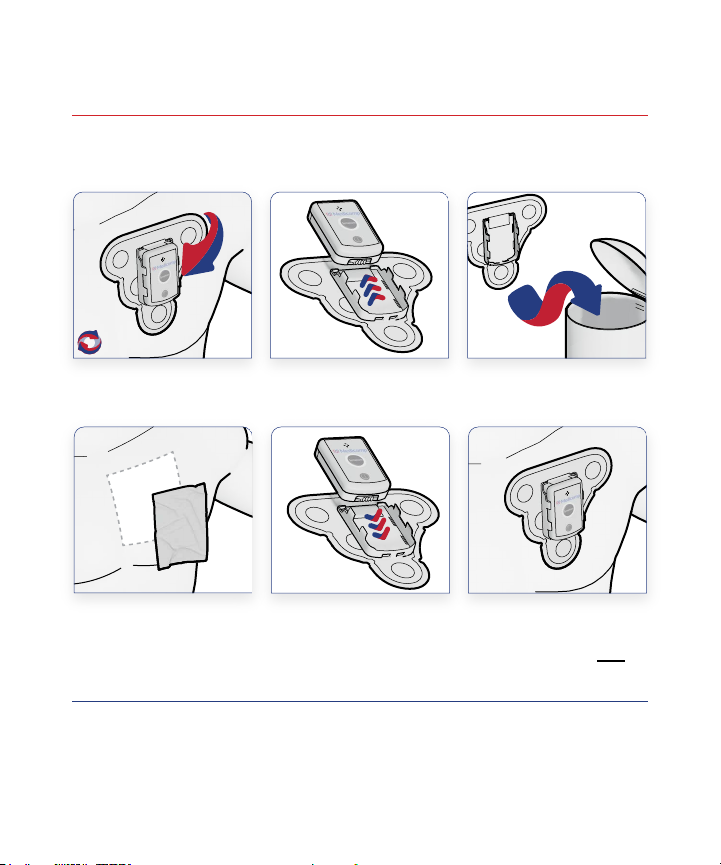
Replacing Electrode Patch
You should have enough supplies in your Kit to last through the end of
your Study. Please follow instructions carefully for proper application.
If you have questions, please contact Medicomp at 877-996-5553.
Remove Patch
Wipe location
with Protective
Skin Pad
Remove Pendant
Insert Pendant
Discard Patch
Only
Place on Chest
and Ensure
Pendant is ON
Replace every 7 daysReplace every 7 days
!
6
3
5
2
4
1
10

Charging
Charged
Battery Changing & Charging
Power Off
Insert and Ensure
Pendant is ON
Check Lights
Low Battery
Connect Cord
to Charger and
Electrical Outlet
Charged Battery and
Monitoring
Remove Battery
from Pendant
Add Battery
to Pendant
Add Battery
to Charger
1
2 3 4
5 6 7
Flashing Light
11
New!
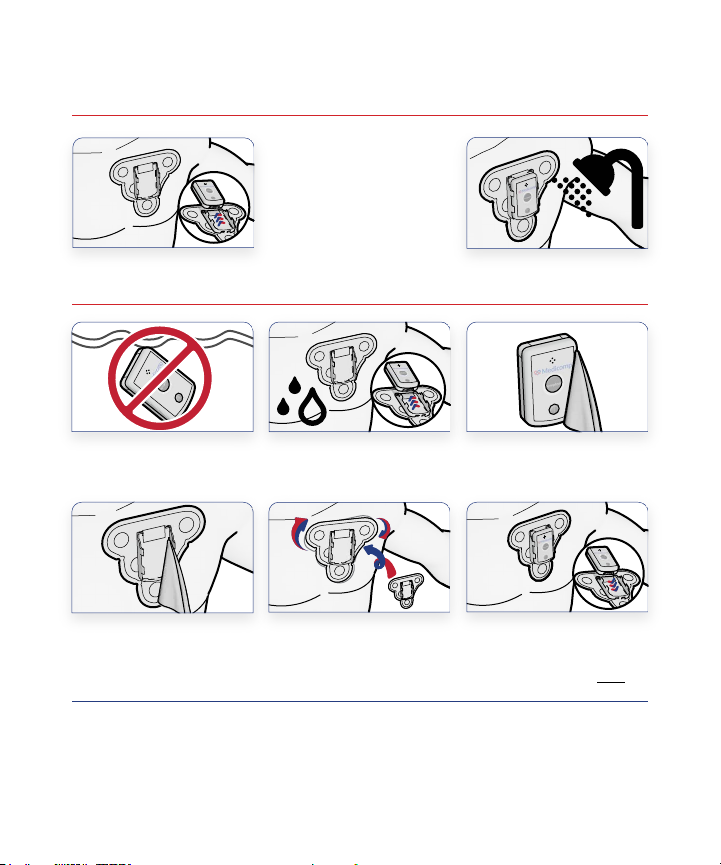
Showering and Drying
The Pendant is water-resistant, but the accessories are not. Please
take precautions to prevent the charger and cord from getting wet.
If Patch is loose, press down on inside of Cradle and all around edges.
Do Not Submerge
Remove Pendant Wear in shower
Dry Inside Cradle
If Patch is Loose,
Replace it
After Shower,
Remove Pendant
Insert Pendant
and Ensure
Pendant is ON
Dry the Pendant
Front and Back
OR
!
1 2
543
12
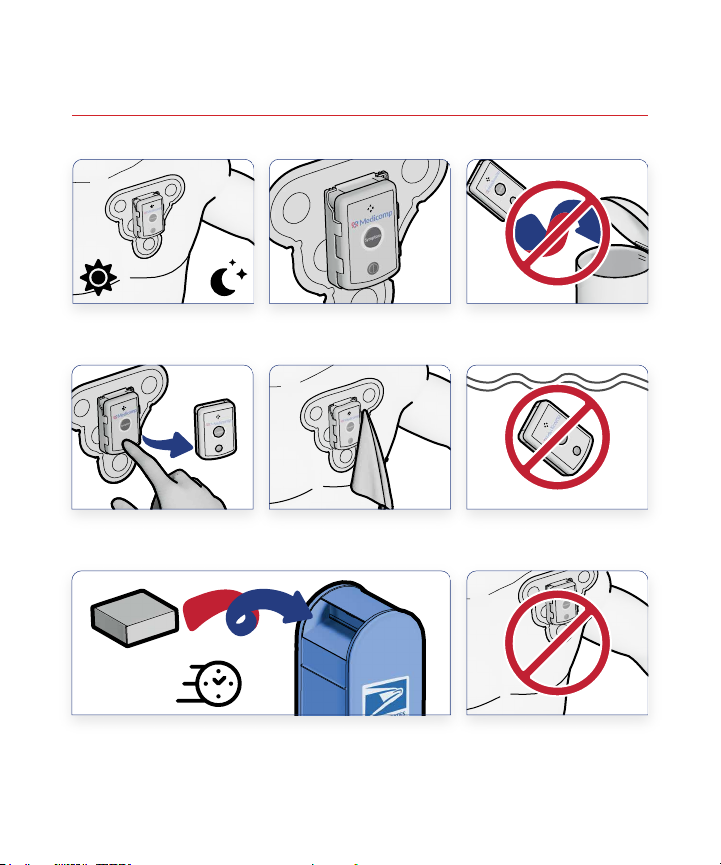
Do’s and Don’ts
Do Not Submerge
Return Promptly - Leave Kit for Mail Carrier to
Pick up in any USPS Mailbox
Do Not Move Patch
Over to Shoulder Area
Dry Pendant and Patch
Fully Insert in Cradle
Do Not Discard Pendant
Turn Off Before
Changing Battery
Wear Day and Night
13
Monitor SN: DOB:
Name:
Record the Date, Time, your Activity, and what you were Feeling
for all symptoms you may experience.
SAMPLE SAMPLE SAMPLE
12/2/21 10:12 am
Working
Chest Pain
12/5/21 8:48 pm
Watching TV
Heart Racing
Date:
1ঞb|Ĺ
;;Ѵbm]Ĺ
$bl;Ĺ
01
Date:
1ঞb|Ĺ
;;Ѵbm]Ĺ
$bl;Ĺ
02
Date:
1ঞb|Ĺ
;;Ѵbm]Ĺ
$bl;Ĺ
03
Date:
1ঞb|Ĺ
;;Ѵbm]Ĺ
$bl;Ĺ
04
Date:
1ঞb|Ĺ
;;Ѵbm]Ĺ
$bl;Ĺ
05
Date:
1ঞb|Ĺ
;;Ѵbm]Ĺ
$bl;Ĺ
06
Date:
1ঞb|Ĺ
;;Ѵbm]Ĺ
$bl;Ĺ
07
Date:
1ঞb|Ĺ
;;Ѵbm]Ĺ
$bl;Ĺ
08
Date:
1ঞb|Ĺ
;;Ѵbm]Ĺ
$bl;Ĺ
09
Date:
1ঞb|Ĺ
;;Ѵbm]Ĺ
$bl;Ĺ
10
Date:
1ঞb|Ĺ
;;Ѵbm]Ĺ
$bl;Ĺ
11
Date:
1ঞb|Ĺ
;;Ѵbm]Ĺ
$bl;Ĺ
12
Date:
1ঞb|Ĺ
;;Ѵbm]Ĺ
$bl;Ĺ
13
Date:
1ঞb|Ĺ
;;Ѵbm]Ĺ
$bl;Ĺ
14
Date:
1ঞb|Ĺ
;;Ѵbm]Ĺ
$bl;Ĺ
15
Date:
1ঞb|Ĺ
;;Ѵbm]Ĺ
$bl;Ĺ
16
Date:
1ঞb|Ĺ
;;Ѵbm]Ĺ
$bl;Ĺ
17
Date:
1ঞb|Ĺ
;;Ѵbm]Ĺ
$bl;Ĺ
18
Date:
1ঞb|Ĺ
;;Ѵbm]Ĺ
$bl;Ĺ
19
Date:
1ঞb|Ĺ
;;Ѵbm]Ĺ
$bl;Ĺ
20
Date:
1ঞb|Ĺ
;;Ѵbm]Ĺ
$bl;Ĺ
Date:
1ঞb|Ĺ
;;Ѵbm]Ĺ
$bl;Ĺ
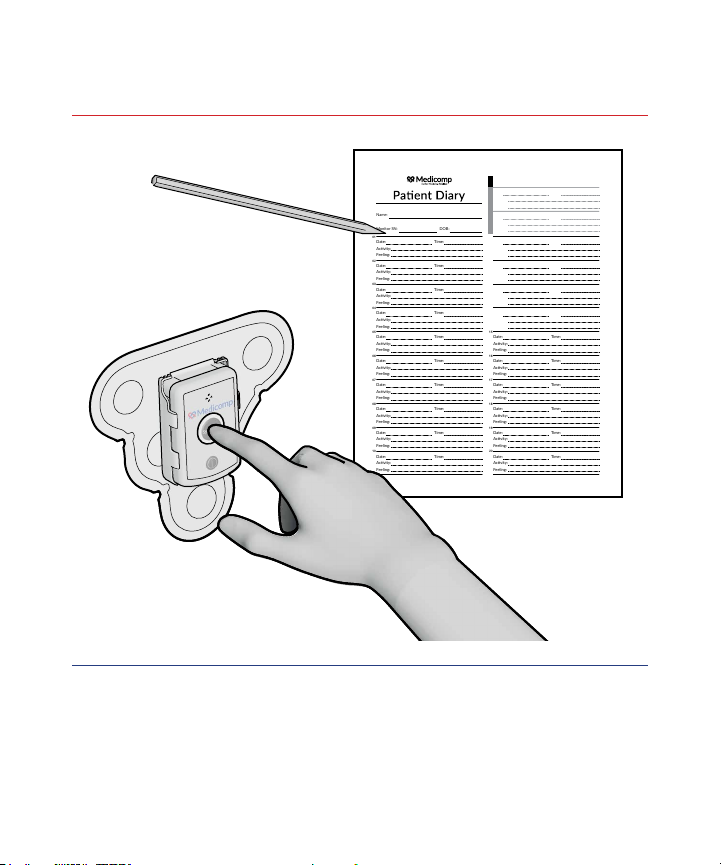
Making a Symptom Recording
Remember: Whenever you experience a symptom, press the
Symptom button. On a piece of paper or the Patient Diary with
your name, day of birth, date, time, what you were doing, and
what you felt for each symptom experienced and return in the Kit
promptly after study is completed.
!
14

Procedure Ending Instructions
Remove PendantRemove Patch with
Pendant from Chest
Insert all Contents / Used
Supplies Back into the Box
Close and Seal the Box
Discard Patch Only
Promptly Leave for Mail
Carrier in Any USPS Mailbox
1 2
3 4
5 6
15

800-23-HEART
www.medicompinc.com
Returning the Monitor Kit
Return your Kit promptly so your doctor can nalize your study.
Unreturned devices could slow delivery to your doctor, result in a bill
for the unreturned equipment, and delay helping the next patient.
Leave for mail carrier in any
USPS mailbox.
Please take a moment to ll out the survey on
medicompinc.com/survey/. Your input will help us provide
patients, like yourself, the best possible experience.
QSG0000723-01
Other manuals for TelePatch
3
Table of contents
Other Medicomp Medical Equipment manuals


Popular Medical Equipment manuals by other brands

OxySmart
OxySmart PC-60F user manual

Gentherm
Gentherm CSZ Blanketrol II 222S Operation and technical manual

SOMNOmedics
SOMNOmedics NIBP PLM instruction manual

Mindray
Mindray Resona 7 Operator's manual

Body Clock
Body Clock SensaTONE Instructions for use

CME America
CME America BodyGuard 323 Clinician Quick Reference


