MEDINAH POWER EDGE-ES-S-03 User manual
Contact us : For support & assistance, please feel free to contact us below.
SURFACE MOUNT LED EXIT SIGN
Installation Instructions
MEDINAH
POWER
NOTICE:
FCC Regulations state that any unauthorized
changes or modifications to this equipment not expressly
approved by the manufacturer could void the user’s
authorization to operate this equipment.
SAFETY INFORMATION
PRECAUTIONS
Please read and understand this entire manual before
aempting to assemble, install, or operate this light fixture.
This light fixture requires a 120-277 Volt AC
power source.
Some codes require installation by a qualified electrician.
This light fixture must be properly grounded.
Make sure connections are secure
using wire nuts, crimp-on lugs or other
approved connecting devices
Equipment should be mounted securely
in locations and at heights where it will
not be readily subjected to tampering
by unauthorized personnel.
WARNING: Turn the power off at the circuit breaker or
fuse. Place tape over the circuit breaker switch and verify
power is off at the light fixture.
CAUTION: Burn hazard. Allow the light fixture to
cool before touching.
IMPORTANT
THIS PRODUCT MUST BE INSTALLED IN ACCORDANCE
WITH THE APPLICABLE NATIONAL ELECTRICAL CODE AND
LOCAL BUILDING CODES BY A PERSON FAMILIAR WITH
THE CONSTRUCTION AND OPERATION OF THE PRODUCT
AND THE HAZARDS INVOLVED.
INFORMATION: The device is tested and found to
comply with Part 15 of the FCC Rules. Operation is subject
to two conditions: (1) This device may not cause harmful
interference and, (2) this device must accept any
interference received, including any interference that
may cause undesired operation. These limits are designed
to provide reasonable protections against harmful
interference when the equipment is operated in a
commercial environment.
NOTE:
This equipment has been tested and found to comply with the limits for a Class B digital device, pursuant to part 15 of the FCC rules.
These limits are designed to provide reasonable protection against harmful interference in a residential installation. This equipment generates uses
and can radiate radio frequency energy and, if not installed and used in accordance with the instructions may cause harmful interference to radio
communications. However, there is no guarantee that interference will not occur in a particular installation. If this equipment does cause harmful
interference to radio or television reception, which can be determined by turning the equipment off and on, the user is encouraged to try to correct
the interference by one or more of the following measures
- Reorient or relocate the receiving antenna
- Increase the separation between the equipment and receiver.
- Connect the equipment into an outlet on a circuit different from that to which the receiver is connected
- Consult the dealer or an experienced radio/TV technician for help
THIS INSTALL MANUAL IS APPLICABLE FOR
MODEL NO : EDGE-ES-S-03
☐
☐
☐
☐
☐
☐

Contact us : For support & assistance, please feel free to contact us below.
SURFACE MOUNT LED EXIT SIGN
Installation Instructions
MEDINAH
POWER
SURFACE MOUNT LED EXIT SIGN (EMERGENCY BATTERY BACKUP)
FAILURE TO FOLLOW THESE INSTRUCTIONS AND WARNINGS MAY RESULT IN DEATH,
SERIOUS INJURY OR SIGNIFICANT PROPERTY DAMAGE.
For your protection, read and follow these warnings and instructions carefully
before installing or maintaining this equipment. These instructions do not aempt
to cover all installation and maintenance situations. If you do not understand
these instructions or additional information is required, contact Medinah Power
or your Local Medinah Power distributor.
Warnings and Cautions
IMPORTANT SAFEGUARDS: READ AND FOLLOW ALL SAFETY INSTRUCTIONS.
SAVE THESE INSTRUCTIONS
ELECTRICAL CONNECTIONS
INSTALLATION & OPERATION INSTRUCTIONS (PACKAGE CONTENTS)
Part 1 Description Quantity
1 LED Edge-Lit Exit Sign 1
2 Canopy 1
3 Hardware Bag 1
1. Review the diagrams thoroughly before beginning. If you feel you do not have electrical wiring experience, refer to a do-it-yourself
wiring handbook or have your fixture installed by a qualified licensed electrician.
2. All electrical connections must be in accordance with local codes, ordinances, and the National Electric Code. If you are unfamiliar
with methods from installing electrical wiring, secure the services from a qualified licensed electrician.
3. Before starting the installation, disconnect the power by turning off the circuit breaker or by removing the appropriate fuse at the
fuse box. Using the light switch to turning the power off is not sufficient to prevent electrical shock.
4. Do not use outdoors.
5. Do not let power supply cords touch hot surfaces.
6. Do not mount near gas or electric heaters.
7. Use caution when servicing baeries. Baery acid can cause burns to skin and eyes. If acid is spilled on skin or eyes, flush acid with
fresh water and contact a physician immediately.
8. Equipment should be mounted in locations and at heights where it will not be subjected to tampering by unauthorized personnel.
9. The use of accessory equipment not recommended by the manufacturer may cause an unsafe condition.
10. Do not use this equipment for other than its intended use.
11. All servicings should be performed by a qualified personnel only.
12. Allow baery to charge for 24 hours before first use.
Make the proper supply wii
connections. For 120-277VAC,
connect the black to hot and
white to neutral wires to the
building utility. Connect the
green ground wire to the
ground.
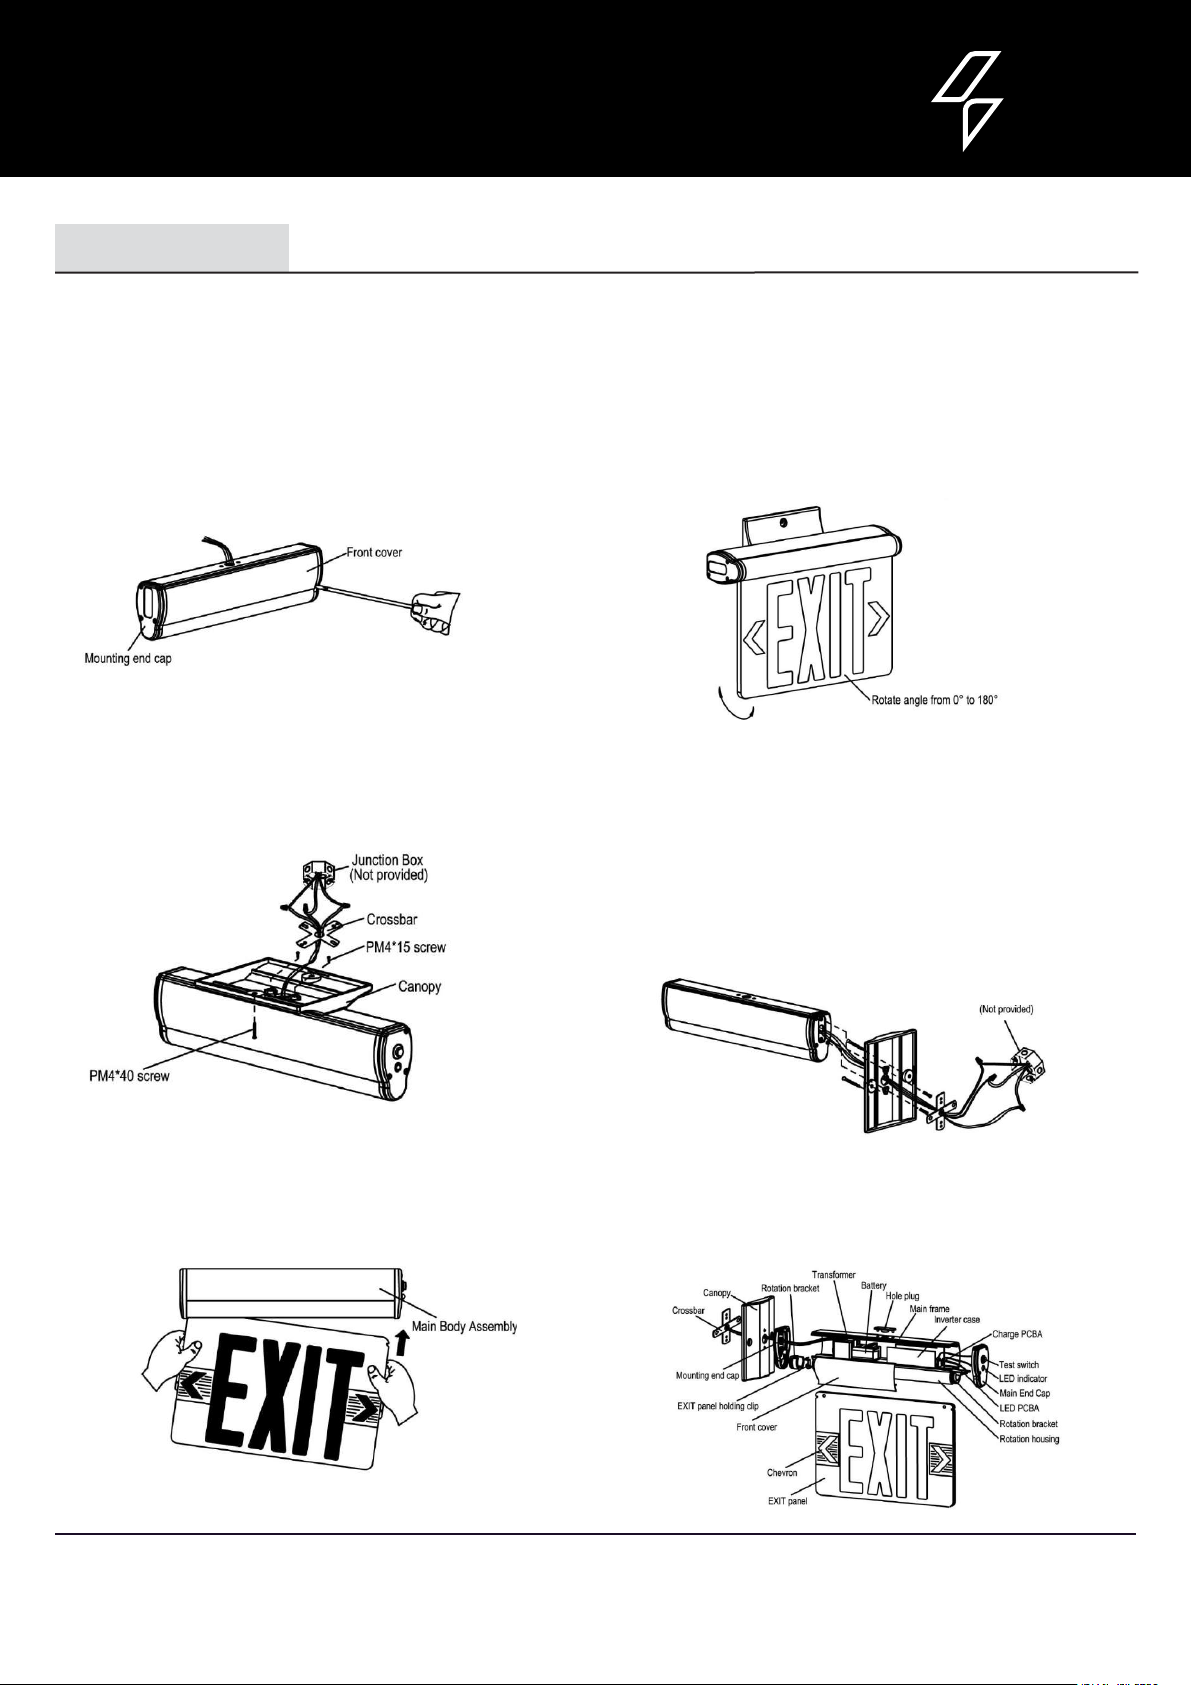
DETERMINE DIRECTION
If need indicator, remain indicator
and remove instruction film.
If no need indicator, remove
indicator and instruction film
together.
INSTALLATION I:
Contact us : For support & assistance, please feel free to contact us below.
SURFACE MOUNT LED EXIT SIGN
Installation Instructions
MEDINAH
POWER
MOUNTING INSTRUCTIONS
SURFACE END MOUNTING
ASSEMBLY DRAWING
NOTE: FIRST TURN OFF ELECTRICITY
NOTE: First turn off electricity
1. Aach crossbar to junction box, using screws
if needed. (screws are not provided)
2. Use screwdriver open front cover to connect
baery connector.
3. Feed AC supply wires through canopy center hole.
4. Assemble canopy onto main body assembly with (2)
PM4 15 screws (supplied) and make proper wire
connections. (See ELECTRICAL CONNECTIONS).
5. Use (2) PM4-40 screws (supplied) tighten canopy
to crossbar.
6. Insert EXIT panel into main body assembly gently.
If EXIT panel is for single face, make sure EXIT leer
direction is rig
NOTE: FIRST TURN OFF ELECTRICITY
8. The unit can be installed on any surface, you may rotate
the EXIT panel in any angle from 0° to 180°, Ceiling mounting
rotate 90° become Wall mounting.
1. Aach crossbar to junction box, using screws if needed.
(screws are not provided)
2. Use screwdriver open front cover to connect baery connector.
3. Remove the hole plug from mounting end cap.
4. Pull out all AC supply wires and feed wires thru the center holes
of mounting end cap and then canopy.
5. Reference 4-7 step in surface ceiling & wall mounting above for
surface end mounting.
6. The unit can be installed on any surface, you may rotate the
EXIT panel in any angle from 0° to 180°.
Table of contents
Other MEDINAH POWER Lighting Equipment manuals


