MediPlast Krabat Runner User manual
1
B-02 V.2.0 30.08.2018
B-02 –Krabat Runner –Bruksanvisning / User manual
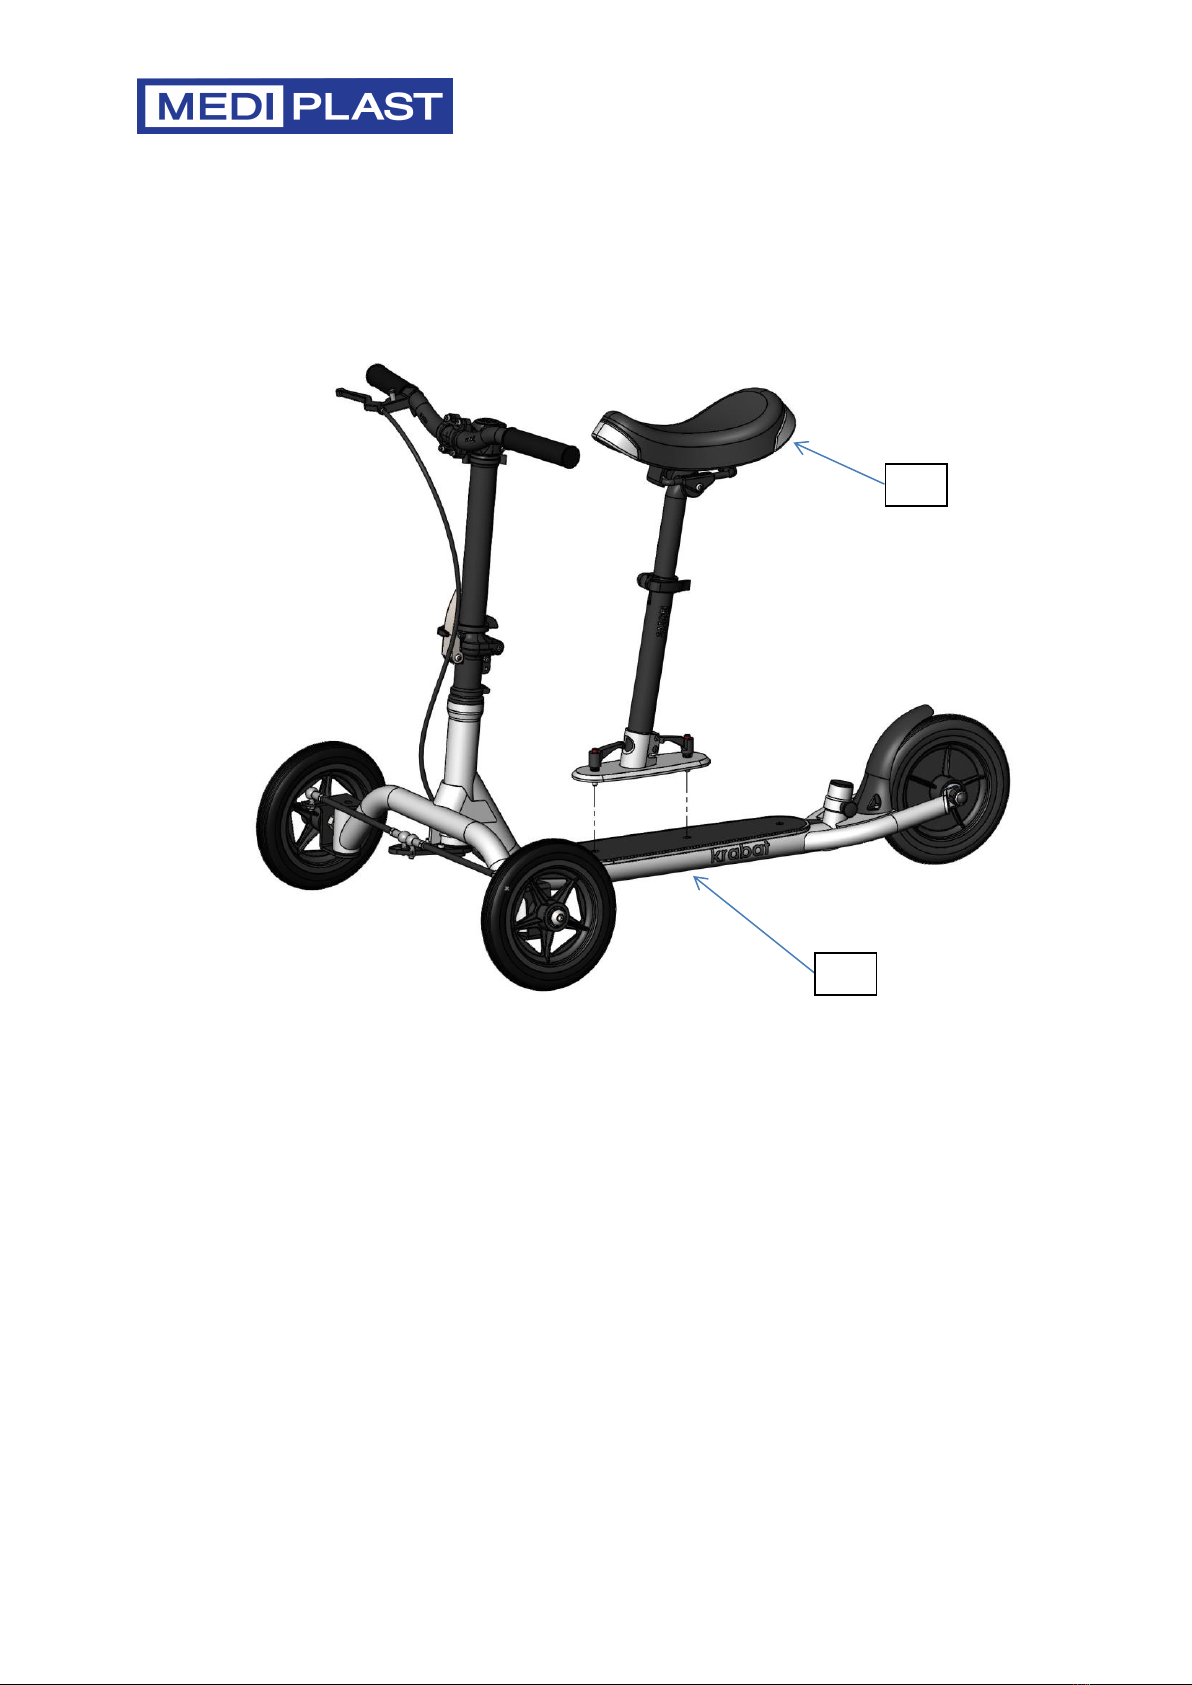
Hoveddeler/ Main Parts
01 Krabat Runner
02 Sete, komplett/ Seat, complete
Nødvendig verktøy / Necessary tools:
Dersom setedybde eller -vinkel ønskes justert, bruk en 4mm Unbrakonøkkel / If seat depth- or seat
angle adjustment is required, use a 4mm Allen key
Attention: Fest skruer og hendler godt / Tighten screws and handles properly
01
02

2
B-02 V.2.0 30.08.2018
Monteringsveiledning / Installation instructions:
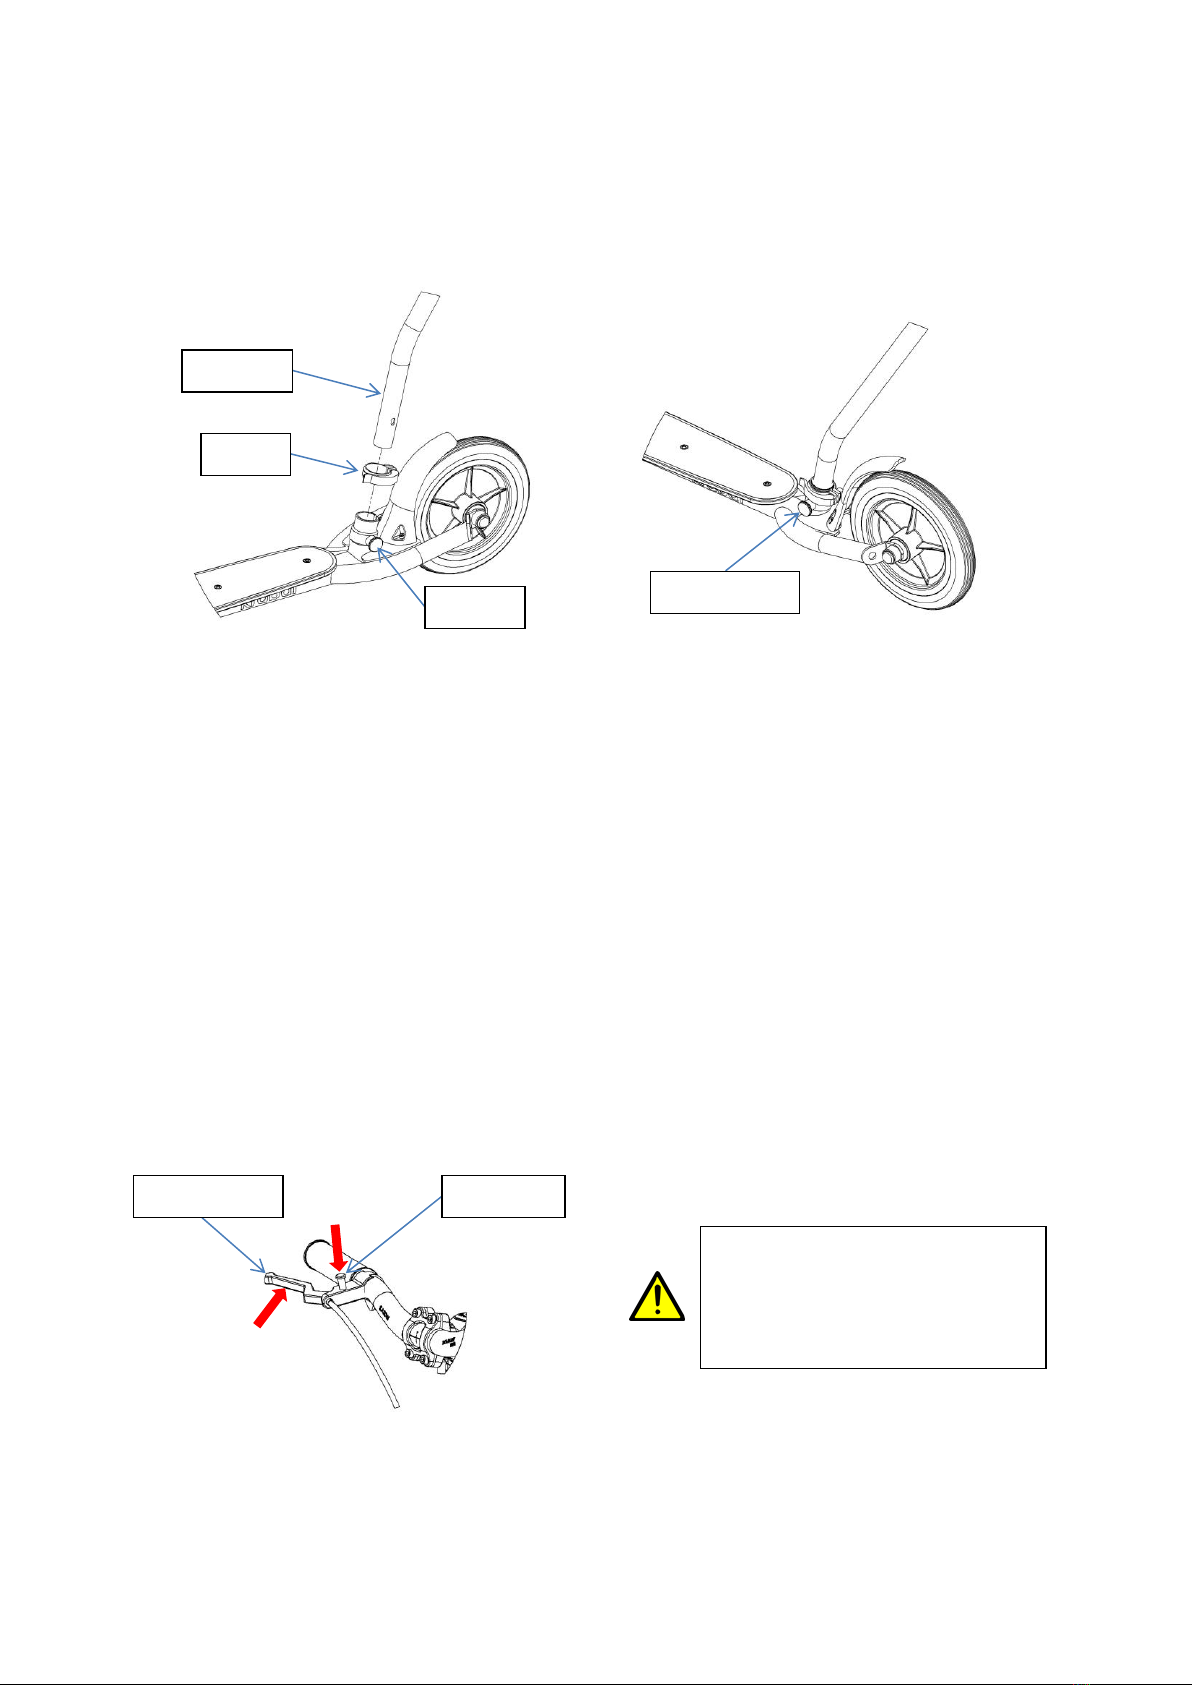
Styre/ Handlebar:
1. Løft styret opp til stående posisjon / Raise the handlebar to an upright position
2. Roter hendelen oppover for å låse styret i posisjon/ Move the handle upwards to lock the
handlebar
3. Roter sikringen for å låse hendelen, som vist under/ Rotate the safety catch to lock the
handle, as shown below
Note: Sikringen må være på så lenge Krabat Runner er i bruk / The safety catch must be engaged at
all times when Krabat Runner is in use!
4. Styret justeres i høyden ved å løsne klemmen, flytt styret til ønsket høyde og stram klemmen
/ The height of the handlebar can be adjusted by loosening the clamp, move handlebar to
the desired height and tighten the clamp
Handle
Safety catch
Clamp

3
B-02 V.2.0 30.08.2018
Sete/ Seat:
5. Plasser setet i ønsket posisjon. Plasser de to skruhendlene i korresponderende gjengede hull
og skru begge to godt til. For å hindre at hendlene blir ødelagt anbefaler vi å dra de to
hendlene opp og rotér dem som vist under/ Place seat in the desired position. Place the two
handles in corresponding threaded holes and tighten both handles firmly. To avoid damage
to the handles, we recommend that the two handles are pulled up and rotated to the
position as shown below
Justering/ Adjustment:
6. Høydejustering: Løsne klemmen, flytt setet til ønsket høyde og stram klemmen / Height
adjustment: Loosen the clamp, move the seat to desired height and tighten the clamp
7. Dybdejustering / vinkeljustering: Løsne de to skruene (en på hver side), flytt setet til ønsket
posisjon og stram godt til / Adjustment of seat depth and seat angle: Loosen the two screws
(one on each side), move seat to desired position and tighten both screws firmly
Front position
Rear position
Clamp
Screw
Note recommended
position of handles
4
B-02 V.2.0 30.08.2018
Bremser bør ha jevnlig vedlikehold
for å fungere optimalt /
Brakes should be maintained on a
regular basis for optimal function
Ledsagerbøyle/ Push bar (ekstrautstyr):
Krabat Runner kan leveres med en ledsagerbøyle. Denne kan ettermonteres ved behov / Krabat
Runner may be equipped with a Push bar. This item can be retrofitted if needed
8. Fjern proppen som er montert i røret for ledsagerbøylen / Remove the end plug from the
Push bar tube.
9. Tre klemmen over røret på Krabat Runner som vist over / Place the clamp on the protruding
tube as shown above
10. Dra ut låseknappen og skyv Ledsagerbøylen helt ned i røret. Sørg for at låseknappen klikker i
lås før klemmen strammes / Pull out the plunger and insert the Push bar in the tube as far as
it goes. Make sure that the plunger locks into position before tightening the clamp
Note: Ledsagerbøylen låses med en låseknapp for dobbelt sikring / The Push bar locks in place with
a plunger, for added safety
Brems - Parkeringsbrems/ Brake - Parking brake:
Krabat Runner er utstyrt med en kombinert kjørebrems/ parkeringsbrems / Krabat Runner is
equipped with a combined brake/ parking brake
11. For å aktivere parkeringsbremsen, press inn bremsehendelen og trykk deretter ned
låseknappen / To activate the parking brake, first apply force to the brake handle, then push
the Lock knob down
Push bar
Plunger
Brake handle
Lock knob
Clamp
Added safety

5
B-02 V.2.0 30.08.2018
Bremser bør justeres jevnlig for å
fungere optimalt /
Brakes should be adjusted on a
regular basis for optimal function
12. For å justere bremsewiren, løsne først låsemutteren og juster deretter bremsewirens
stramming med justeringsskruen. Stram låsemutteren / To adjust the brake wire, first loosen
the lock nut, then adjust the wire using the adjuster screw. Tighten the lock nut
Generelle advarsler/ General attention:
Extra:
Det er mulig å feste et tau og dra Krabat Runner, dette festes i egnet festepunkt framme på styringen
/ It is possible to attach a rope and pull the Krabat Runner, from a designated attachment point at
the front of the steering mechanism
Attachment
point
Lock nut
Adjuster screw
•Maksimum brukervekt: 35 kg!
•Krabat Runner er ikke et leketøy. All bruk skal skje under oppsyn av en voksen!
•Krabat Runner skal ikke benyttes i hastigheter over 5 km/h!
•Ulykker kan forekomme. Benytt derfor hjelm og annet nødvendig
sikkerhetsutstyr!
•Maximum user weight: 35 kgs!
•The Krabat Runner is not a toy. All use to be supervised by an adult!
•The Krabat Runner should not be operated in speeds that exceed 5 km/h!
•Accidents may occur. Use a helmet and necessary safety gear!

6
B-02 V.2.0 30.08.2018
SAFETY
All Krabat products are CE marked according to 93/42 / EØF, Class 1 of 14 June 1993 - Medical Device
Directive.
This certifies that it meets all relevant European safety requirements. This manual is approved
according to these standards.
The shelf life of the product corresponds to a lifespan of about 5 years under normal use. Then the
product should be renovated by Krabat AS or an approved partner to extend the life. All service must
be performed by Krabat or an authorized partner.
Products with electrical components must be submitted to Krabat for a technical review / overhaul
before it is sent out to use again.
WARRANTY
Krabat provide a guarantee of 2 years on all its products. This guarantee is aimed at defects in
workmanship or materials. The guarantee may be reduced or waive if service or daily maintenance
are not observed. It is the customer's responsibility to ensure that maintenance is carried out.
The warranty does not cover accidental damage, including damage caused by improper use or lack of
maintenance. The warranty does not cover normal wear or wear parts.
The warranty is void if non-original parts are used, or if the product is repaired or modified by
personnel not approved by Krabat.
The CE-label is to be removed if the product is modified, or non-original parts are used!
Krabat products are not toys! Improper use may cause damage to both user and/ or
the product.
Adjustments not described in Krabat user manuals shall only be carried out by Krabat,
or by personnel approved by Krabat.
Mediplast A/S
Marielundvej 46E, 2730 Herlev
Telefon 43 44 40 00
[email protected] | www.mediplast.dk
This manual suits for next models
1
Table of contents
Other MediPlast Mobility Aid manuals

Popular Mobility Aid manuals by other brands


RAMMTLC
RAMMTLC Turning Leg Caddy Pathfinder Operation and maintenance manual

Invacare
Invacare Izzo user manual

Freedom Innovations
Freedom Innovations Kinnex 2.0 Patient User Guide

Armon
Armon Edero user manual

aidapt
aidapt VM945 Usage and maintenance instructions

Invacare
Invacare DOLOMITE Legacy user manual

EasyCare
EasyCare Joerns Oxford Quickfit User instruction manual

Motion Concepts
Motion Concepts MaTRx-PB elite installation instructions

ABLE LIFE
ABLE LIFE SPACE SAVER WALKER manual

Gemino
Gemino 60 Walker user manual

Moretti
Moretti Mopedia MP167 instruction manual

AbilityOne
AbilityOne KINETEC 6080 user manual