Rightest Max Tel User manual

101-3GM777-020
EN(US)
Rev. Date: 2022-09
Max Tel
User’s Manual
BIONIME CORPORATION
No. 100, Sec. 2, Daqing St., South Dist.,
Taichung City 40242, Taiwan
Tel: +886 4 2369 2388
Fax: +886 4 2261 7586
Email: [email protected]
http://www.bionime.com
Made in Taiwan
Customer Support Center:
Ontario, CA 91761, USA
Tel: +1 888 481 8485
Fax: +1 909 781 6970
http: //www.bionimeusa.com
Service hour: Mon. to Fri. 8:00 AM to 5:00 PM PST.
For emergencies, call your healthcare provider.
Blood Glucose Monitoring System


2 3
RIGHTEST Blood Glucose Monitoring System Max Tel is intended to be used for the quantitative
measurement of glucose (sugar) in fresh capillary whole blood samples drawn from the ngertips,
forearm, or palm. It is intended to be used by a single person and should not be shared.
RIGHTEST Blood Glucose Monitoring System Max Tel is intended for self- testing outside the
body (in vitro diagnostic use) by people with diabetes at home/indoor as an aid to monitor the
effectiveness of diabetes control. It should not be used for the diagnosis of, or screening for
diabetes or for neonatal use. Alternative site testing should be done only during steady-state times
(when glucose is not changing rapidly).
The RIGHTEST Blood Glucose Monitoring System Max Tel is comprised of the RIGHTEST Meter
Max Tel and the RIGHTEST Blood Glucose Test Strip Max.
The RIGHTEST Blood Glucose Meter Max Tel is a LTE network device.
Thank you for choosing our product. This manual contains all the information you need to use
your product to get accurate blood glucose test results. Please read this entire manual before
you get started with any testing.
For people living with diabetes, it is important to regularly monitor blood glucose levels to reduce
complications from diabetes. The easy-to-use RIGHTEST Blood Glucose Monitoring System
Max Tel provides accurate, reliable test results to help you manage your diabetes better.
You may wish to consult your healthcare professional for further advice on how to use this
system.
Our customer service information is on the cover and our staff are also willing to provide you with
assistance. Please contact a healthcare professional in an emergency or when our service is
not available. Please forward your warranty card to customer support to activate your warranty
coverage.
The RIGHTEST Blood Glucose Monitoring System Max Tel is manufactured and supported by
Bionime Corporation. If you have any questions or concerns, please contact your local Bionime
Customer Service Representative or send an email to info@bionime.com for further assistance.
Intended Use Preface

4 5
Caution Caution
- Before using the RIGHTEST Blood Glucose Monitoring System Max Tel to test your blood
glucose, please read all of this information and conduct all of the tests including the Quality
Control test.
-
We recommend you perform the Quality Control test regularly to ensure test results are
accurate. The RIGHTEST Blood Glucose Monitoring System Max Tel should be used with
RIGHTEST Control Solution GC700.
-
The Blood Glucose Meter Max Tel can only be used with extra spacing Blood Glucose Test
Strips Max. Test strips from other brands should not be used under any circumstances. The
use of test strips from other brands may give inaccurate results.
- If the RIGHTEST Blood Glucose Meter Max Tel or Blood Glucose Test Strips Max are exposed
to extreme temperature changes, or environmental temperatures outside the meter operating
temperature - below 43°F (6°C) or above 111°F (44°C) - please wait at least 30 minutes before
testing again.
- Follow all environmental protection regulations when disposing of batteries, strips and lancets.
-
Avoid contact with spilled liquids.
- The minimum blood sample size to test using the Rightest Blood Glucose Monitoring System
Max Tel is 0.75 µL: ( )
Blood sample sizes greater than 3.0 µL may contaminate the test strip port and the meter.
Samples smaller than 0.75 µL will cause Er4. If this occurs, repeat the test with a new test strip.
Sample Size Example 0.75 µL 1.0 µL 1.5 µL 2.0 µL 3.0 µL
Important Safety Notes
- All parts of the kit are considered biohazardous and can potentially transmit infectious
diseases, even after following the cleaning and disinfecting procedures. Please refer to
the section "Maintaining the Products".
- Users should wash their hands with soap and water before and after touching the meter,
lancing device or test strips.
- E q u i p m e n t s p e c i e d f o r u s e o n l y i n s h i e l d e d l o c a t i o n h a s a p p r o p r i a t e m a r k i n g / w a r n i n g
labels
- This device should not be used adjacent to or stacked with other equipment.
- Please do not use any other cables or accessories not approved by the manufacturer in
this manual to avoid negative inuence on electromagnetic compatibility.

6 7
Limitations Limitations
- To avoid potential electromagnetic interference, keep the meter away from electromagnetic
radiation sources such as X-rays or MRI.
- LTE network is set on by default when the meter is on. Data transmission via LTE network is
not suggested during ights at any time. This is because the meter, when turning on, will emit
electronic signals, which should be restricted at all times aboard aircraft. Please turn on ight
mode to avoid the auto-enabling of LTE network.
- The RIGHTEST Blood Glucose Monitoring System Max Tel is not intended for serum or plasma
testing.
- Do not use at altitudes greater than 10,000 feet (3,048 meters).
- Severe dehydration and excessive water loss may cause inaccurately low results.
- The blood glucose test result may be affected by a high blood concentration of interference
ingredients. If you need more detailed information about interference ingredients, please see
the RIGHTEST Blood Glucose Test Strip Max Insert.
- Not for screening or diagnosis of diabetes mellitus.
- These test strips should not be used with meters to test critically ill patients.
- Use of this device on multiple patients may lead to transmission of Human Immunodeciency
Virus (HIV), Hepatitis C Virus (HCV), Hepatitis B Virus (HBV), or other bloodborne pathogens.
- RIGHTEST Blood Glucose Monitoring System Max Tel is for over-the-counter use and single-
patient use only.
- Alternative site testing (AST) should only be performed during steady-state times (when
glucose is not changing rapidly). Please refer to the Alternative Site Testing (AST) chapter
before you perform AST.
- DO NOT test on alternative sites (palm, forearm) if you are testing for insulin dose calculations,
for Continuous Glucose Monitor (CGM) calibration or hypoglycemia (low blood glucose).
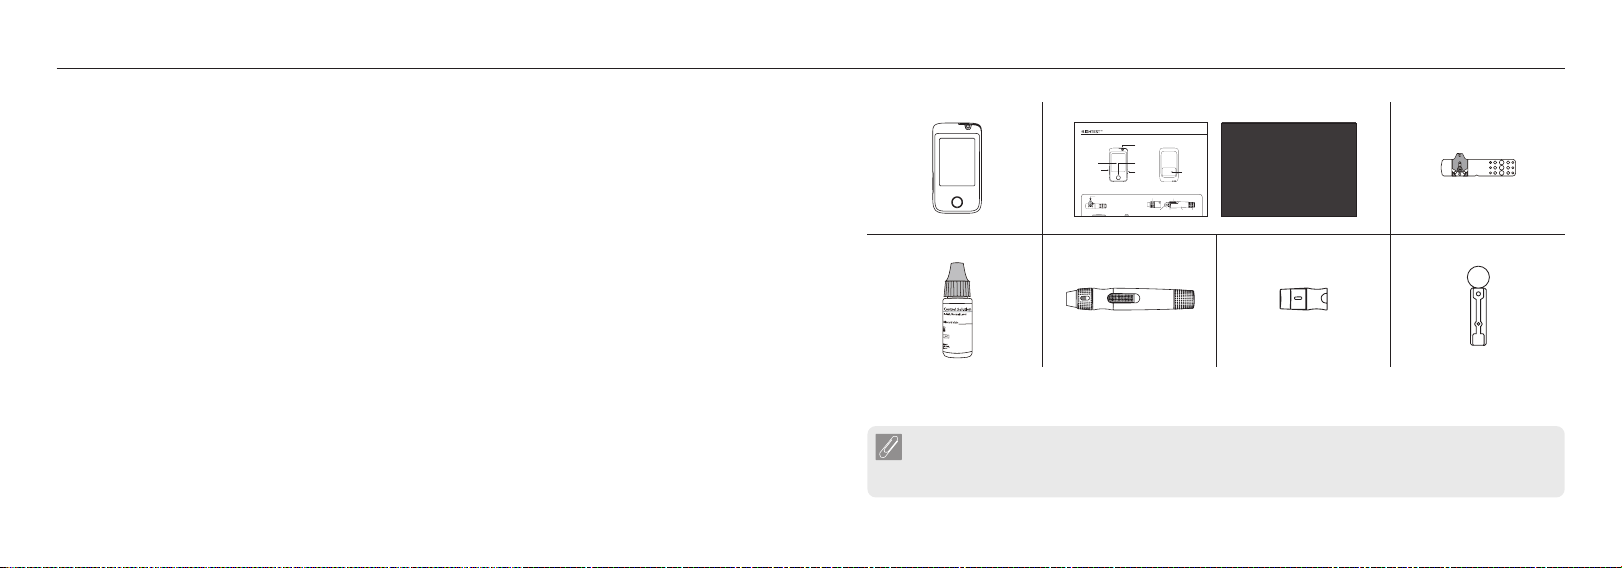
NOTE
To make the user's manual straightforward and easy to read, the product name will be
abbreviated as follow in subsequently sections.
- RIGHTEST Blood Glucose Monitoring System Max Tel as the system.
- RIGHTEST Blood Glucose Monitoring Meter Max Tel as the meter.
- RIGHTEST Blood Glucose Test Strips Max as the test strips.
- RIGHTEST Control Solution GC700 as the control solution.
- RIGHTEST Lancing Device as the lancing device.
All products mentioned in this manual are under the RIGHTEST brand unless otherwise
stated.

9
PRECAUTION
- Use as Directed: The AC power adapter, USB cable and USB charger provided with
RIGHTEST Max Tel comply safety regulations for medical devices. Use only these
components when charging your meter. Otherwise, it could damage the system or
cause re. Make sure the access to the power adapter is not blocked and it can be
easily unplugged due to the potential risk of electrical shock.
- Do NOT Use If It Could Fall into Water. Do not spill liquids on meter or submerge
it in water or other liquids. If the meter has fallen into water, do not touch it until you
unplug it from any electrical outlet. Touching the meter while it is wet could result in
electric shock or no glucose results.
- Traveling by Air. Always check and follow ight rules or regulations before departure.
- Trouble Shooting If any situation not mentioned in this user manual happens, please
contact your healthcare professional or Customer Service.
Safety Information
8
Safety Information
The following is a summary of safety information which must be observed before using the Max
Tel. WARNING indicates potential danger to user. PRECAUTION indicates potential injury to the
user or damage to the system. To minimize risks, read the following safety information before
using the system. Improper use and maintenance may damage the system resulting in failure or
user injury. It is important to understand that the safety information is not exhaustive. It is meant
to keep the user safe while using the system.
WARNING
- Modication of the System is Not Allowed: Do not modify or tamper with any
components or accessories of the Max Tel. All components of the Max Tel are not
allowed to be used with any product not in this system. Otherwise, you could damage
the integrity of the system and put yourself at risk especially when you have a severe
low or high glucose event.
- Choking Hazard: The Max Tel contains small components that may be dangerous if
swallowed.

10
Table of Contents
About RIGHTEST Blood Glucose Monitoring System Max Tel
RIGHTEST Blood Glucose Monitoring System Max Tel
RIGHTEST Blood Glucose Meter Max Tel
RIGHTEST Blood Glucose Test Strip Max
Before Testing
Before Getting Started
Turning On / Off the Meter
Meter Setting
Turn On/Off Flight Mode
Handling RIGHTEST Blood Glucose Test Strips Max
Testing Procedure
Performing a Blood Glucose Test
Setting Markers
Uploading Data
Alternative Site Testing
View Window Appearance
Understanding Test Results and Messages
12
14
18
20
22
23
25
26
28
33
34
35
37
38
11
Quality Control
About Quality Control Testing
Performing a Quality Control Test
Understanding Control Test Results
Other Information
Maintaining the Products
Recalling Test Results
Recalling Average Test Results
Error Messages and Troubleshooting
Specication
Certicate Statement
Warranty
Customer Service
Accuracy for Home Use by Lay-Users
Expected Glucose Values
Manufacturer’s declaration-electromagnetic emissions
Table of Contents
40
43
46
47
51
52
54
60
63
66
68
69
70
71

12
Your RIGHTEST Blood Glucose Monitoring System Max Tel consists of several items. Please
identify each item, learn its name and how it is used.
The items in RIGHTEST Blood Glucose Monitoring System Max Tel are:
1. RIGHTEST Blood Glucose Meter Max Tel (with Li-polymer battery, type C cable, 5V adapter)
2. User Documents (Getting Started Guide, User's Manual, Log Book, Warranty Card,
Emergency Card)
3. RIGHTEST Blood Glucose Test Strips Max: 10 or 25 pcs (with Package Insert) *
4. RIGHTEST Control Solution GC700 (with Package Insert) *
5. RIGHTEST Lancing Device (with Package Insert) *
6. Clear Cap *
7. Disposable Sterile Lancets (10 pcs) *
8. Carrying Case (not shown)
* Different packages have different bundled items. If you want to purchase the items not
included in your kit, please contact distributor for more details.
RIGHTEST Blood Glucose Monitoring System Max Tel
13
RIGHTEST Blood Glucose Monitoring System Max Tel
1
4*5*6*7*
23*
NOTE
- The RIGHTEST Blood Glucose Meter Max Tel is LTE network-compatible and can be
connected to cloud data server.
Front View of Meter B ack View of Meter
Read the manual before your operating. This Getting Started Guide is for reference only.
Test strip
Sample Entry
View Window
Lancing Device
PlungerHubLancet Carrier
Release Button
Safety Switch
Depth Adjustable Cap
Max Plus GETTING STARTED GUIDE
(For self-testing and professional
TestStrip Port
Main Button
SIM Card Port
Display Window
USBChargi ng Port Meter Label

14
RIGHTEST Blood Glucose Meter Max Tel
Test Strip Port
Main Button
SIM Card Port
Touch Panel
USB Charging Port
15
RIGHTEST Blood Glucose Meter Max Tel
SIM Card Port USB Charging Port
Meter Label

16
RIGHTEST Blood Glucose Meter Max Tel
Home Page
17
RIGHTEST Blood Glucose Meter Max Tel
Indicates that the current battery status. Larger black areas means
the battery is more charged, and vice versa. When the black areas
becomes smaller or empty, please charger your meter.
Indicates that the battery is actively charging. When the black areas
becomes full, your meter is fully charged.
Indicates the signal of LTE network is available and ready for data
uploading.
Indicates the sound of meter is turned on.
Indicates the sound of meter is turned off.
Indicates the meter vibration is turned on.
Indicates the ight mode is turned on (meter LTE network disabled).

18
The RIGHTEST Blood Glucose Meter Max Tel can only be used with RIGHTEST Blood Glucose
Test Strips Max and RIGHTEST Control Solution GC700. The use of other test strips or control
solutions may lead to incorrect results.
RIGHTEST Blood Glucose Test Strip Max
Sample Entry
Apply a drop of blood or control solution here.
The test requires only 0.75 µL of blood.
View Window
This window is yellow before applying a blood
sample. It turns red when lled with blood.
Indication Symbol
Insert strip with the symbol pointing
towards the test strip port of the meter.
Hand Bar
Grip here to insert
the test strip into
the test strip port
with auto code
key.
Noble Metal Electrodes
Electrochemical sensor.
19
RIGHTEST Blood Glucose Test Strip Max
Electrode Contacts
Sensing signal output terminals.
PRECAUTION
- Close the vial immediately after taking out a test strip.
- Do not reuse the test strip.
- Do not use expired test strip.
-
Write the opening date on the label of each new vial of test strips you open. Use test
strips within 4 months of opening or until the expiration date printed on the label,
whichever comes rst.
-
Store the test strip at 39 - 86°F (4 - 30°C) and 10 - 90% relative humidity. Do not expose
to direct sunlight or heat.
- If the meter or the test strips are exposed to extreme temperature changes, or
environmental temperatures outside the meter operating temperature – below 43°F (6°C)
or above 111°F (44°C) – please wait at least 30 minutes before testing again.
- For detailed strip information, please refer to RIGHTEST Blood Glucose Test Strip Max
Insert.

20
Charging Basics
Before using the system for the rst time, charge the meter for a complete charging cycle without
interruption.
A complete charging cycle of the meter takes about 3 hours when using the supplied USB
adapter plugged into a standard household electrical outlet (100 to 240V AC, 50/60 Hz). It is
recommended to use only the supplied USB cable and USB power adapter.
Charging the Meter
PRECAUTIONS :
- Cannot test during charging.
- Check the status of charging by the battery status icon (charging or discharging) is displayed in
the top-right corner of the screen. When the meter is charging, you will see lightning bolt in the
middle of the battery icon. When the meter is closed and is plugged in, you should see battery
status showed in the middle of the battery icon.
Before Getting Started
21
Battery Life Indicator On the Meter
From the meter display, battery level and the battery status icon
(charging or discharging) is displayed in the top-right corner of the screen. When the meter is
charging, you will see lightning bolt in the middle of the battery icon. When the meter is closed
and is plugged in, you should see battery status showed in the middle of the battery icon. The
meter utilizes an intelligent battery charging technology that prevents overcharging.
1. Connect the USB-C Plug of the charging cable to the USB-C input of
the receiver.
2. Connect the USB plug to the USB port of the AC
power adapter supplied with your system and connect the adapter to
the power source.
Before Getting Started

22
1. How to turn on the meter
Press and hold the main button for about 2 seconds or insert a test strip.
2. How to turn off the meter
Press and hold the main button for about 2 seconds and a box will pop up asking for
conrmation to power off the meter.
3. Sleep mode
To save power, if the meter is idle for more than 30 seconds in non-test mode; or more than 2
minutes in test mode, the meter will switch to sleep mode, and turn off the screen automatically.
The screen-off time in non-test mode can be set by the user, please refer to the "Meter Settings"
section.
You could also press the main button once, to manually turn the meter to sleep mode or wake it
up from sleep mode.
Turning On / Off the Meter
23
Initial setting
When the meter is turned on for the rst time, it will go into the setting process automatically.
Follow the on-screen instructions to complete and save your own setting. After that, the meter
will return to the home page. Now you can start using it.
Setting menu
You can go into the setting menu by tapping the "Setting" icon on the home page. In the setting
menu, features of the meter (e.g.: Notication, Display, Date/Time, Flight Mode, Language...)
could be set by user.
Tap the item you want to set, and follow the on screen instruction to nish the setting according
to your needs. You could also nd the CS mode (control solution testing mode) and the System
Info. (system information) in the setting menu.
For more detail about CS mode, please refer to the section "Performing a Quality Control Test".
In the "System Info.", you could nd the Device S/N, IMEI number, and rmware version.
Note: The test unit of the meter is mg/dL by default and cannot be changed.
Meter Setting

24 25
Meter Setting
LTE connection
Before turn on the meter, please make sure that you have installed the sim card. The LTE
connection will start automatically when the meter is turned on. If the LTE connection is
successful, the date and time will be auto-set according to the LTE signal, and can't be change
manually by user.
If the LTE connection is fail (or you did not install the sim card), you will need to set the date and
time manually. Please note, that the correct time and date are necessary for the meter's analytic
function.
If you install the sim after the meter was turned on, you could reboot the meter, or go into the
"Setting" , nd the "ight mode" in menu, turn on the mode then turn it off. Both ways could
trigger the LTE connection.
Turn on/off ight mode
Turn on/off "Flight Mode" in "Setting."
Turn On/Off Flight Mode
NOTE
- Please turn on ight mode in ight or electronic communications limited area.
User can still perform blood glucose testing while ight mode is on.
Please follow local electronic communications limited policy.
Setting 2/2
Back
CS mode
Flight mode
Language
System info.
Set Flight mode
Back Save
OFF ON

26 27
Handling RIGHTEST Blood Glucose Test Strips Max
1
2
3
Inserting a test strip:
1. Hold the test strip between your thumb and middle nger with the View
Window " " facing up.
2. Place your forenger on the side of the strip as shown.
3. Insert the strip into the test strip port until it clicks in securely.
Handling RIGHTEST Blood Glucose Test Strips Max
1
2
Rotate
3
Removing a test strip:
1. Hold the test strip as shown.
2. Rotate the test strip counterclockwise and pull up at the same time.
3. Take the strip out of the test strip port.
Please follow your local regulations to discard used strips properly.

28 29
Performing a Blood Glucose Test
Prepare the Lancing Device:
1. Wash and dry your hands.
2. Hold the Depth Adjustable Cap in one hand and the hub
in the other hand. Bend the cap downwards until a gap
appears. The device will gently pop open.
3. Pull apart both ends to separate cap from the hub.
4. Insert a new disposable lancet rmly into the lancet carrier.
5. Twist off and set aside the protective cap of the lancet
needle for later use.
6. Reconnect the Depth Adjustable Cap.
1
3 4
2
5 6
Depth Adjustable Cap Release Button
Lancet Carrier Safety Switch Hub
Plunger
Performing a Blood Glucose Test
7. Rotate the clear top part of the cap to adjust the depth.
Check the number of lines visible in the View Window.
More lines correspond to a greater depth. Try:
" " for soft or thin skin; " " for ordinary skin;
" " for thick or calloused skin.
8. Pull back the plunger until you hear a click. The device is
now primed. Let go of the plunger. It will return to its
original position.
Performing a Test:
9. Take one test strip from the vial then immediately close
the vial.
10. Insert the strip into the Test Strip Port of the meter with
the View Window face up.
78
910
NOTE
- The meter will automatically detect the Code Number of the test strip. You do not need
to check the Code Number on the meter display and strip vial.

30 31
11
Performing a Blood Glucose Test
11. Once the strip insert, the meter will switch to the
testing mode, the screen will display with "Checking"
and emit a beep.
12. "Apply Blood Sample" will display on the screen,
please apply the sample within 2 minutes after you
see it.
13. Place the lancing device against your ngertip and
press the release button.
14. Touch the blood drop to the edge of the sample port
until the View Window is lled with blood. If the View
Window is not lled, the test will not start. In this case,
discard the test strip and repeat the test procedure
with a new test strip.
12
13 14a
14c
Check Strip
Checking...
Apply Blood Sample
14b
Performing a Blood Glucose Test
15. The screen will display a countdown timer. Your test
result will be displayed after 5 seconds.
Lancet and Test Strip Disposal:
16. Separate the cap from the hub. Press the lancet
needle into the side of its original protective cap.
17. (1) Hold down the release button and (2) pull back the
plunger to eject the lancet.
18. Discard the lancet into a suitable biohazard container.
19. Replace the Depth Adjustable Cap after nishing the
test.
15
17
19
16
18
5

32 33
Performing a Blood Glucose Test
CAUTION
- Do not apply the blood sample before you see "Apply Blood Sample" appear. The meter
is performing an internal check. Apply the blood sample too early will result in "Sampling
Error". It will accompany by beeps if volume is turned on. If this happens, please repeat
the test with a new test strip.
- Write the opening date on the label of each new vial of test strips you
open. Use test strips within 4 months of opening or until the expiration
date printed on the label, whichever comes rst.
- Always keep the metal contacts of the test strip port clean. If there is any
dust or dirt, please clean it off with a small, soft brush.
- All parts of this kit are considered biohazards and can potentially transmit infectious
diseases, even after you have performed the cleaning and disinfecting procedure.
- Users should wash their hands with soap and water after handling the meter, lancing
device and test strips.
- Please refer to the section "Maintaining the Products" for surface cleaning.
- Do not reuse lancets. Discard used lancets properly.
Setting Markers
After 5 seconds countdown, the test result and test date and time
will be displayed, along with 4 status markers below the result.
By tapping the marker you want to set, different options will be
displayed, and you can use them to record the status and events
of this test result.
After marked, tap Save to complete the test process, and you
could nd the marked result in the "Record" (you could nd it on
the home page).
NOTE
You can only set the markers after each time the test result shows. Once the result saved,
the markers cannot be changed anymore.
If you leave the meter idle for more than 2 minutes after the test result shows, the meter
will automatically save the results without any marker.

34 35
Uploading Data
The LTE network is set to on by default.
After saving the new test results, the meter will try to connect to the cloud and automatically
upload the test results. After the upload is complete, the meter will automatically disconnect from
the cloud.
If the LTE is not connected when
the result is saved, the result will be
stored in the meter.
The next time you perform a test
with an LTE connection, stored
results that may not have been
uploaded will be uploaded together.
Save to trigger LTE
connect with cloud.
Data upload
completed.
Data uploading.
CAUTION
- Data transmission via LTE network is not suggested during ights at any time. This is
because the meter, when turning on, will emit electronic signals, which should be
restricted at all times aboard aircraft.
- Please turn on ight mode to avoid the auto-enabling of LTE network.
Data Uploaded
Data is automatically
uploaded.
OK
Data Uploading
20%
Alternative Site Testing
Alternative site testing: palm or forearm blood sampling
- Before performing alternative site testing, please replace
the Depth adjustable cap with the clear cap for your
lancing device. (For detailed information, refer to the
RIGHTEST Lancing Device insert.)
- To increase blood ow, massage the intended puncture
area of your palm or forearm for a few seconds.
- Immediately after massaging the area, press and hold the
lancing device against palm or forearm.
- Press the release button.
- Continue pressing the lancing device against your palm
or forearm and gradually increase the pressure for a few
seconds until the blood sample is of sufcient size.
Palm
Forearm
Pressing for
a few seconds Press the
release button

36 37
Alternative Site Testing
CAUTION
- Consult your healthcare professional before sampling from your palm or forearm.
- Alternate site testing should be done only during steady-state times (when glucose is
not changing rapidly). Fingertip sampling can show rapid changes in glucose faster
than palm or forearm samples.
- Only the ngertip should be used when glucose levels are rapidly uctuating: after
drinking, after a meal, after insulin injection or exercise, during illness, during periods of
stress, if you think your blood sugar is low, or if your results are inconsistent with how
you feel.
- DO NOT test on the palm or forearm if you are testing for insulin dose calculations or
hypoglycemia (low blood glucose).
- AST results should not be used to calibrate Continuous Glucose Monitors (CGM).
- Use the clear cap provided with the lancing device when testing sites other than
ngertips. The Depth adjustable cap may not produce a blood droplet of sufcient
size when testing on the palm or forearm.
To obtain an accurate test result, ensure
that your blood sample covers the entire
area of the View Window. An insufcient
blood sample will result in an error
message (Er4). If this happens, repeat
the test with a new test strip. Insufcient blood sample Sufcient blood sample
View Window Appearance
CAUTION
- Check the expiration date printed on the strip vial every time you use a test strip. Do not
use expired test strips.
- Use each test strip rapidly after taking it out from the vial.
- If the meter or test strips are exposed to extreme temperature changes, or environmental
temperatures outside the meter operating temperature - below 43°F (6°C) or above
111°F (44°C ) - please wait at least 30 minutes before testing again.
- Do not reuse the test strips.
- Only apply the blood sample to the test strip's sample port.
- Please don't drip or inject the blood sample directly into the sample entry
of the test strip with a syringe. Doing so may contaminate the meter or
cause damage.
Table of contents
Other Rightest Blood Glucose Meter manuals

Rightest
Rightest GT200 User manual

Rightest
Rightest GS100 User manual

Rightest
Rightest Wiz User manual

Rightest
Rightest HM312 User manual

Rightest
Rightest GT333 User manual

Rightest
Rightest Max User manual

Rightest
Rightest GS100 User manual

Rightest
Rightest GM250S User manual

Rightest
Rightest BIONIME GM300 User manual

Rightest
Rightest GM700SB User manual
Popular Blood Glucose Meter manuals by other brands

Bayer HealthCare
Bayer HealthCare Contour link user guide

iGlucose
iGlucose Cellular diabetes care system quick start guide

ACONLABS
ACONLABS On Call Vivid user manual

Homemed
Homemed glucoChek ConneKT instructions

Trividia
Trividia True Metrix Quick reference guide

Trividia Health
Trividia Health TRUEbalance user manual