MedLinket ESM201 User manual
REF: ESM201
20220520 B.0
Upper Arm Digital
Blood Pressure Monitor
P2-28
ENGLISH
P29-57
FRANÇAIS ESPAÑOL DEUTSCH NEDERLANDS ITALIANO
P58-86 P87-115 P116-144 P145-173
0123

English 2
Contents
Quick Start Guide………………………………………………………………
Important Safety Instructions ………………………………………………
Before Taking a Measurement ………………………………………………
Product Package Included ……………………………………………………
Part Identification ………………………………………………………………
Install or Replace Batteries …………………………………………………
System Setting …………………………………………………………………
Setting the year…………………………………………………………………
Setting the month………………………………………………………………
Setting the date…………………………………………………………………
Setting the hour…………………………………………………………………
Setting the minute………………………………………………………………
Switch the Unit Between mmHg and kPa…………………………………
Applying the Arm Cuff …………………………………………………………
Selecting the User ID …………………………………………………………
Correct Body Posture during Measurement ………………………………
Taking a Measurement …………………………………………………………
Recalling the Memory Data ……………………………………………………
Memory Recall……………………………………………………………………
Clear Memory……………………………………………………………………
Error Indication …………………………………………………………………
Troubleshooting ………………………………………………………………
Maintenance and Storage ……………………………………………………
Technical Specifications ………………………………………………………
Device Symbols …………………………………………………………………
Electromagnetic Environment ………………………………………………
About Blood Pressure …………………………………………………………
After-sales and Maintenance…………………………………………………
3
5
6
6
7
8
9
9
10
11
11
12
13
14
16
16
17
19
19
20
21
21
22
23
24
24
26
28
English 3
Quick Start Guide
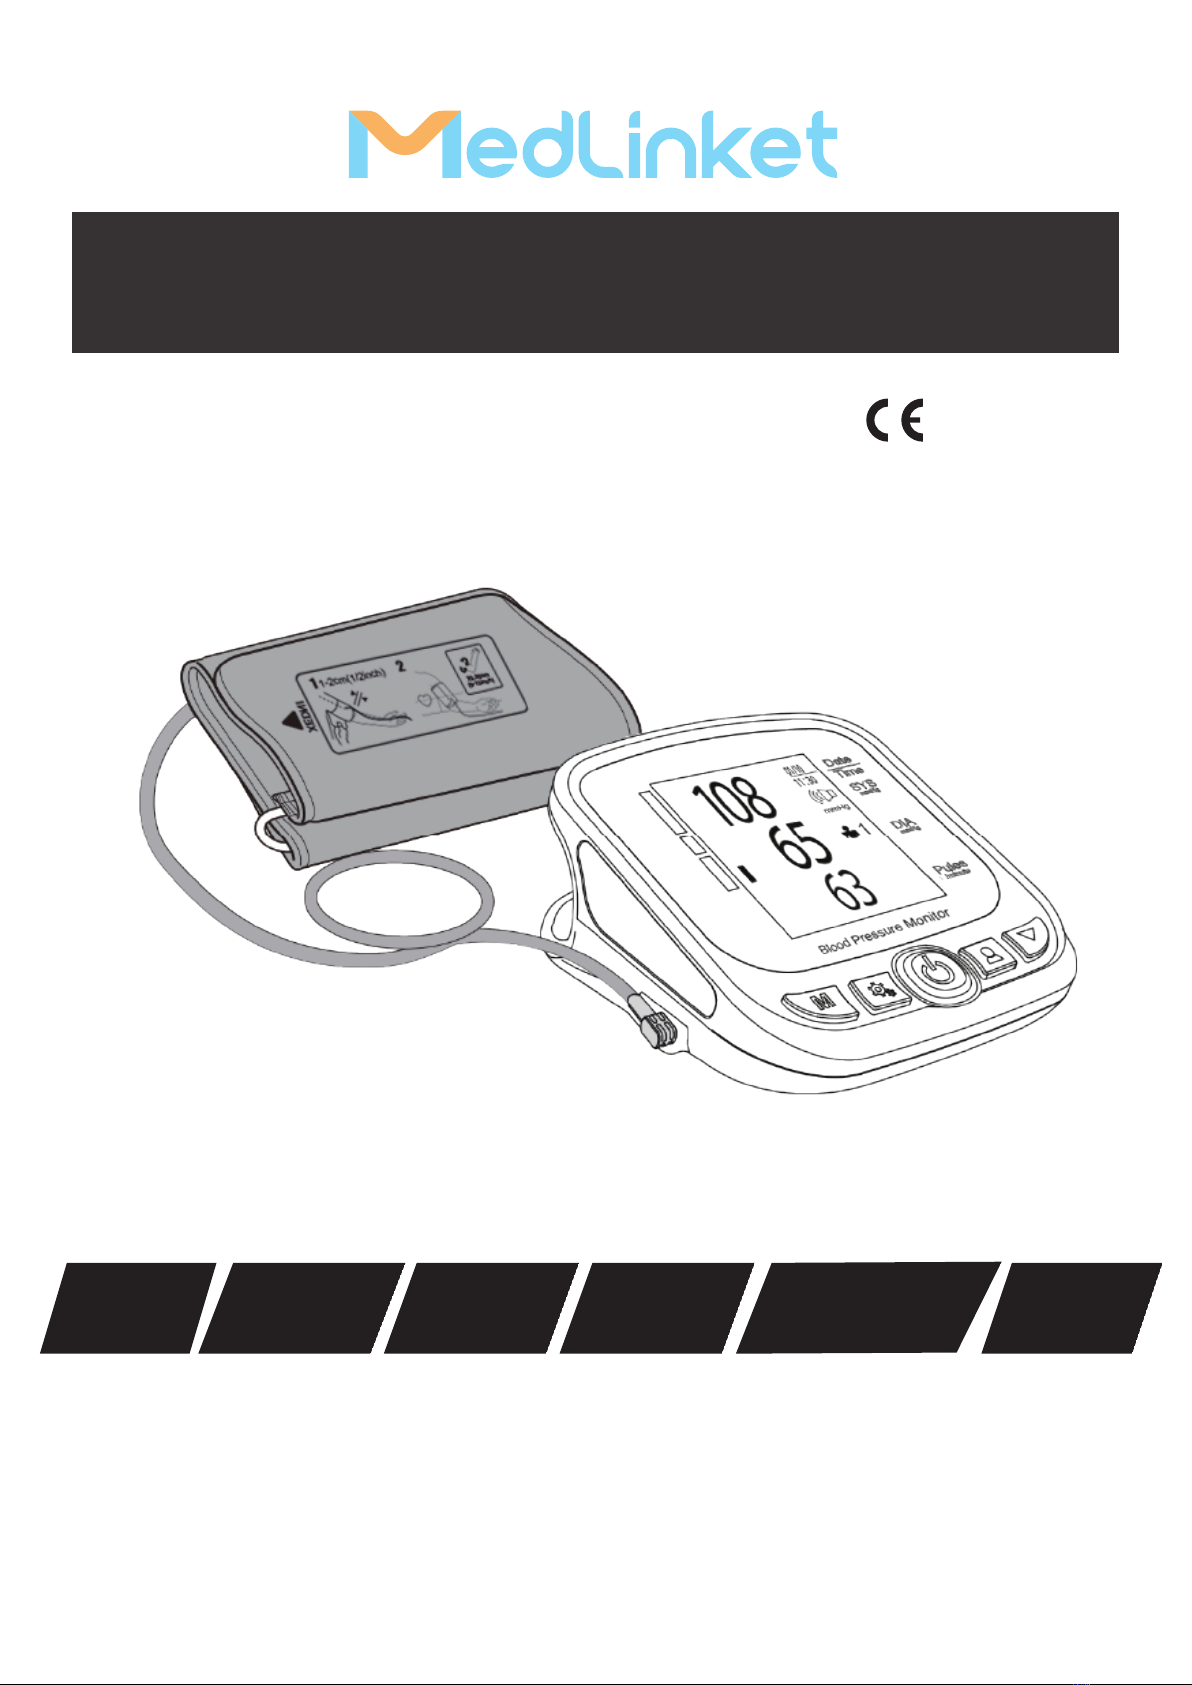
1. Insert the air connector plug into the air
socket firmly.
2. Remove tight-fitting clothing from your
upper left arm.
3. Wrap the cuff around your left upper arm,
about 1 to 2 cm above the inside of the elbow,
confirm that the index points within the proper
fit range.
1-2cm
XEDNI
12
1-2cm(1/2inch)
22-32cm
(9-13inch)
4. Sit on a chair with your feet flat on the floor,
make sure the cuff is at heart level.
XEDNI
12
1-2cm(1/2inch)
22-32cm
(9-13inch)
5. Press ON/OFF button the device will turn
on and LCD display will show all segments for
1 second. Then “00” will flash and the cuff
will start to inflate automatically.
00
01/10
20:30
mmHg
1
Data
Time
SYS
mmHg
DIA
mmHg
Pulse
minute
Blood Pressure Monitor
M
6. When the measurement is complete, the
systolic and diastolic pressure readings and
pulse rate are displayed. The cuff exhausts
the remaining air and deflates completely.
108
65
63
01/10
11:30
mmHg
1
Data
Time
SYS
mmHg
DIA
mmHg
Pulse
/minute
Blood Pressure Monitor
M
English 4
Scan the QR Code to download the user manual or watch
the instrucon video, thanks!
User manual in PDF Instrucon video
Scan the QR code to watch
the instrucon video on YouTube!
●The device is designed for use on adults, not newborns or infants.
●Environment for use. The device is for use to operate by yourself in the
home healthcare environment.
● We recommend that you read through this manual carefully before using
the device for the first time.
English, Français, Español,
Deutsch, Nederlands, Italiano
hps://www.med-linket.com/
uploads/user_manual_ESM201.pdf
Warning

English 5
1. Important Safety Instructions
● Never diagnose or treat by yourself only based on the blood pressure mea-
surement result since self-diagnose or self-treat may make the illness get
worse. Please follow the doctor’s directions.
● For the patient with blood circulation disorder or blood disease, please use
this device under doctor’s instructions.
● It may be a risk when the cuff bladder is inflated for too long time.
● This device is not applicable for neonatal, infant and the people who can’t
express his/her thought.
● This device is used to non-invasive measure human body’s blood pres-
sure. Do not use it for other purpose.
● Do not use this device close to strong electromagnetic fields such as
mobile telephones or radio installations.
● For the people has irregular heartbeat (such as APB, VPB or AF) the mea-
surement results may be inaccurate or the blood pressure can’t be measured
successfully.
● Diabetes, hyperlipemia, hypertension etc. diseases will accelerate athero-
sclerosis and also will cause peripheral blood circulation disorder.
● Please operate, transport and store this device in the environment noted in
this manual. Otherwise inaccurate measurement results will be obtained.
● Keep away from children because some parts are small enough to be
swallowed.
● The operator shall not touch battery connectors and the patient simultane-
ously.
● Do not use rechargeable batteries.
● The user must check that the device functions safely and see that it is in
proper working condition before being used.
Warning
● Do not open, alter or repair this device by yourself.
● Do not pull the upper arm cuff with excessive force. Do not twist it.
● Only pump up the cuff once fitted.
● Do not impact, drop, trample and shake the device.
● Only use the cuff provided by Med-link to ensure the measurement accuracy.
Precaution
English 6
2. Before Taking a Measurement
To ensure a reliable reading follow these recommendations:
1. Avoid eating, drinking alcohol, smoking, exercising, and bathing for 30
minutes prior to taking a measurement. Rest for at least 15 minutes prior to
taking the measurement.
2. Stress raises blood pressure. Avoid taking measurements during stressful
times.
3. Measurements should be taken in a quiet place.
4. Remove tight-fitting clothing from your arm.
5. Sit on a chair with your feet flat on the floor. Rest your arm on a table so
that the cuff is at the same level as your heart.
6. Remain still and do not talk during the measurement.
7. Keep a record of your blood pressure and pulse readings for your physi-
cian. A single measurement may not provide an accurate indication of your
true blood pressure. You need to take and record several readings over a
period of time. Try to measure your blood pressure at about the same time
each day for consistency.
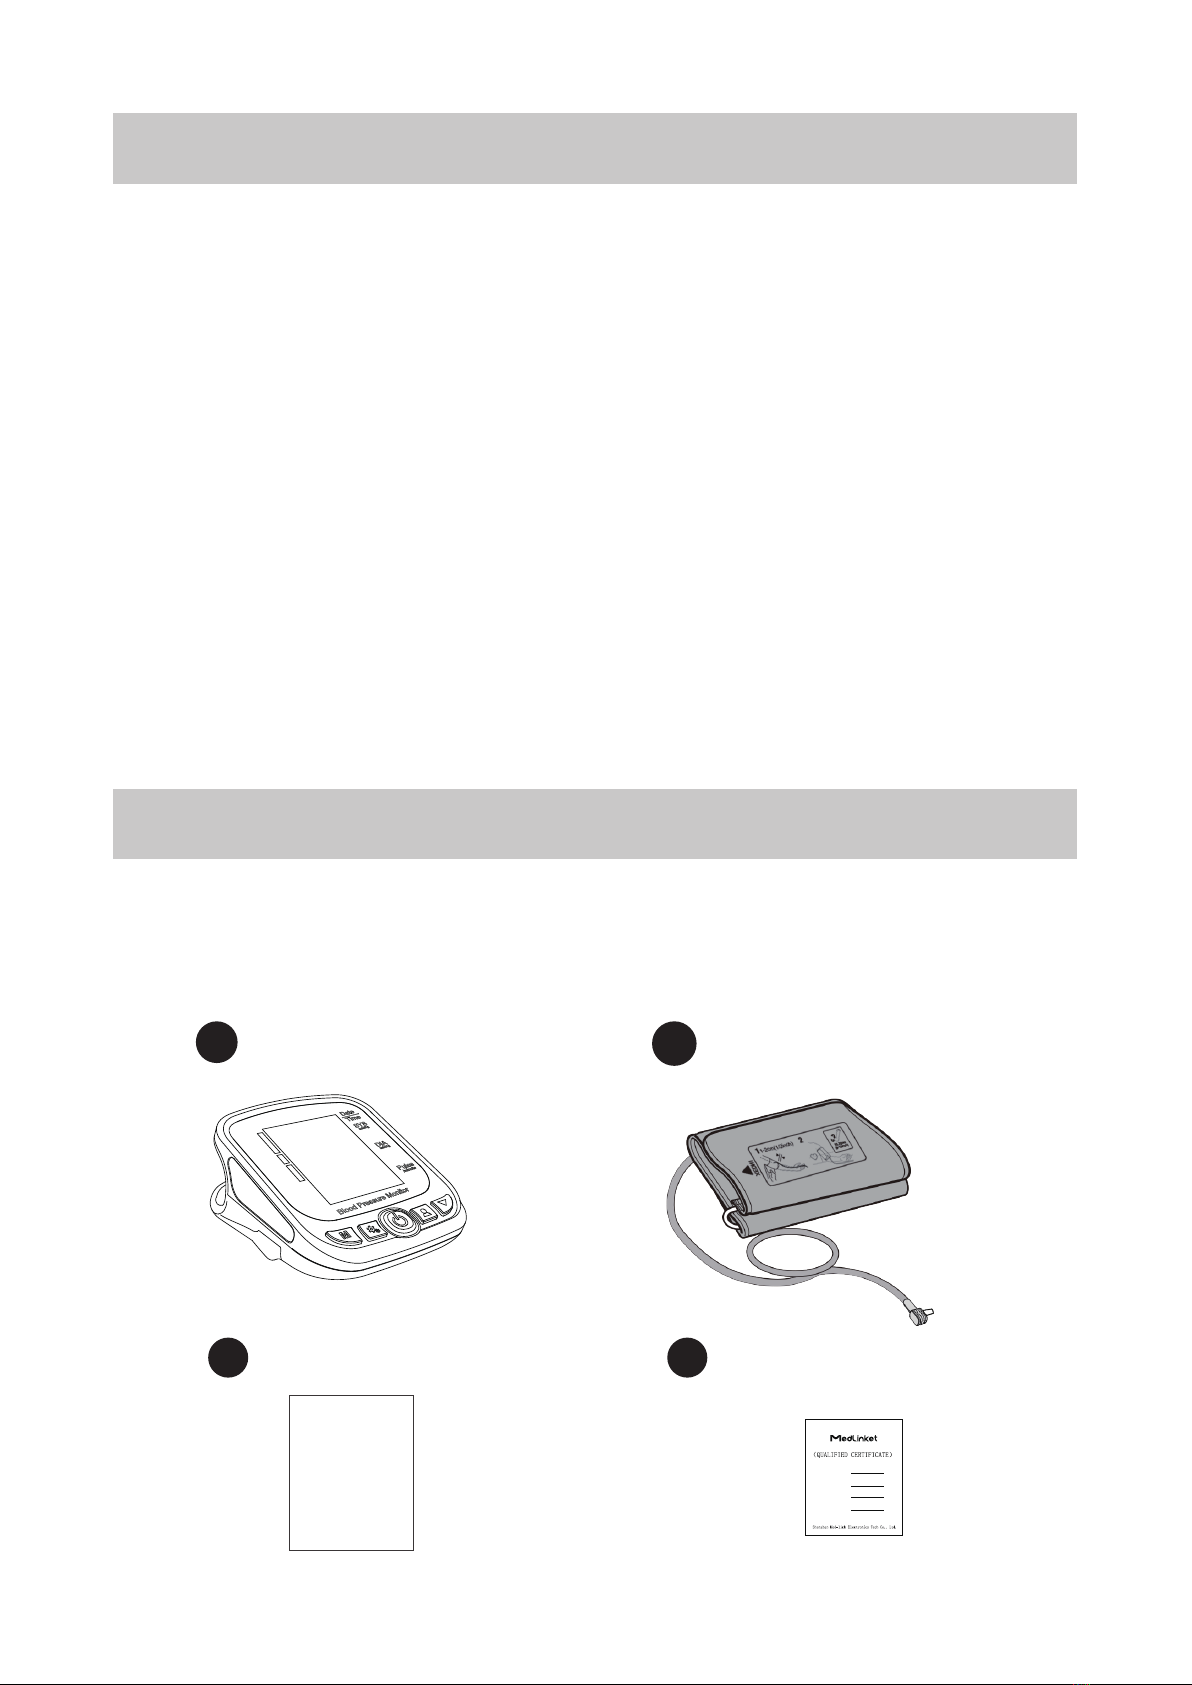
3. Product Package Included
The products are all packed in the packaging box. Please open the packag-
ing box to confirm whether the product is complete. If any item is found miss-
ing, please contact with the customer service for consultation.
1Blood pressure monitor 2Arm cuff
User manual3Qualified certificate
4
User's manual
PRODUCT NAME See product labels
PRODUCT MODEL Seeproduct labels
DATE 2020-11-15
INSPECTOR QC001

English 7
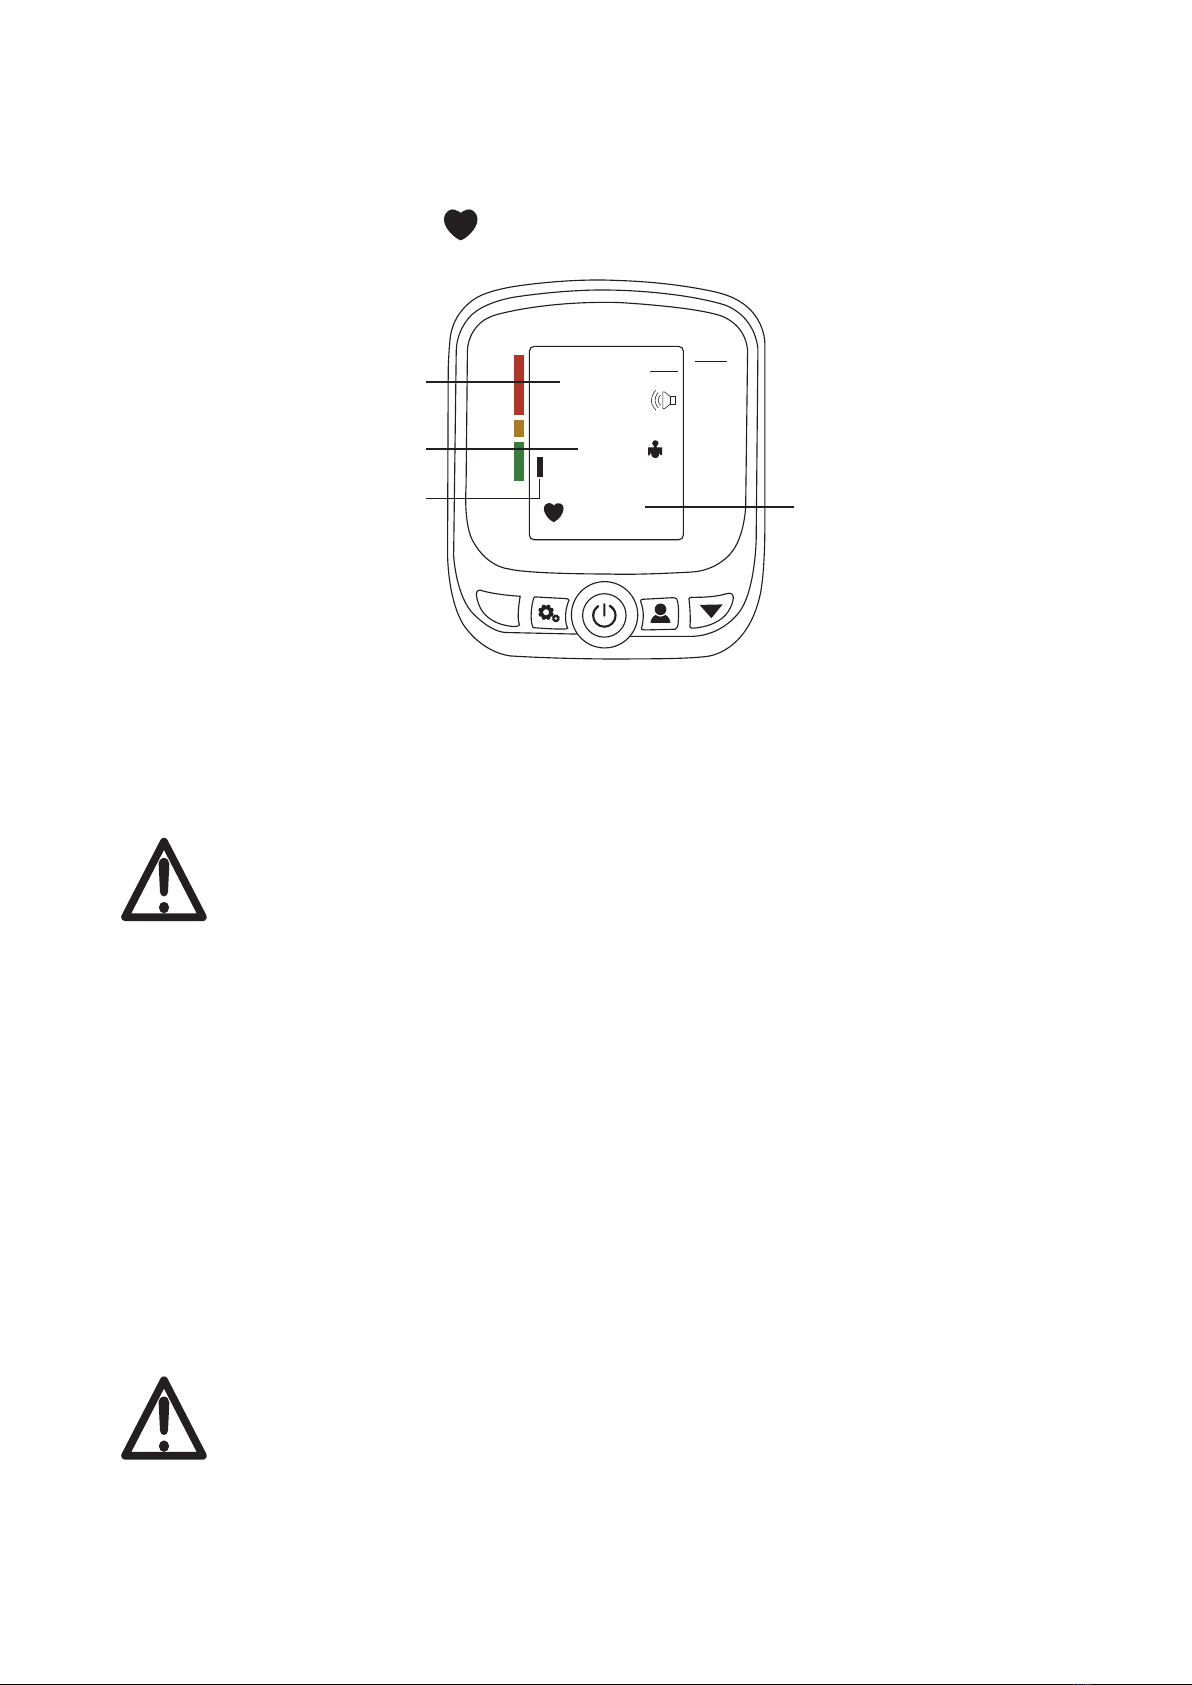
4. Part Identification
Product function: Measure and display systolic and diastolic blood pressure
and pulse rate. It can store 2x90 sets memory (2 users, 90 sets memory for
each user). Intended use: It is intended to measure adult's systolic and dia-
stolic blood pressure and pulse rate on upper arm.
Pressure Bar Indicator
Systolic Pressure
Date
Time
MEMORY
Blood Pressure Unit
USER ID Symbol (1 or 2)
Measurement Times
Diastolic Pressure
Heartbeat Symbol
Pulse Rate
Battery Indicator
Display screen
⑧
⑥
⑦
⑤
④
①
③
②
①ON/OFF button ②MEMORY button
③SET button ④USER button
⑤DOWN button ⑥DC interface
⑦LCD display ⑧Cuff storage slot
⑨Air socket ⑩Battery compartment cover
Air connector plug
Cuff
Artery position mark
Proper fit range
Index Air hose
Blood pressure monitor
Note: Applicable upper arm circumference: 22cm~32cm, please contact with the customer service to
purchase the large adult cuff 32cm~45cm if you need.
Arm cuff
⑨
⑩
NIW
XEDNI
12
1-2cm(1/2inch)
22-32cm
(9-13inch)
AR T.
English 8
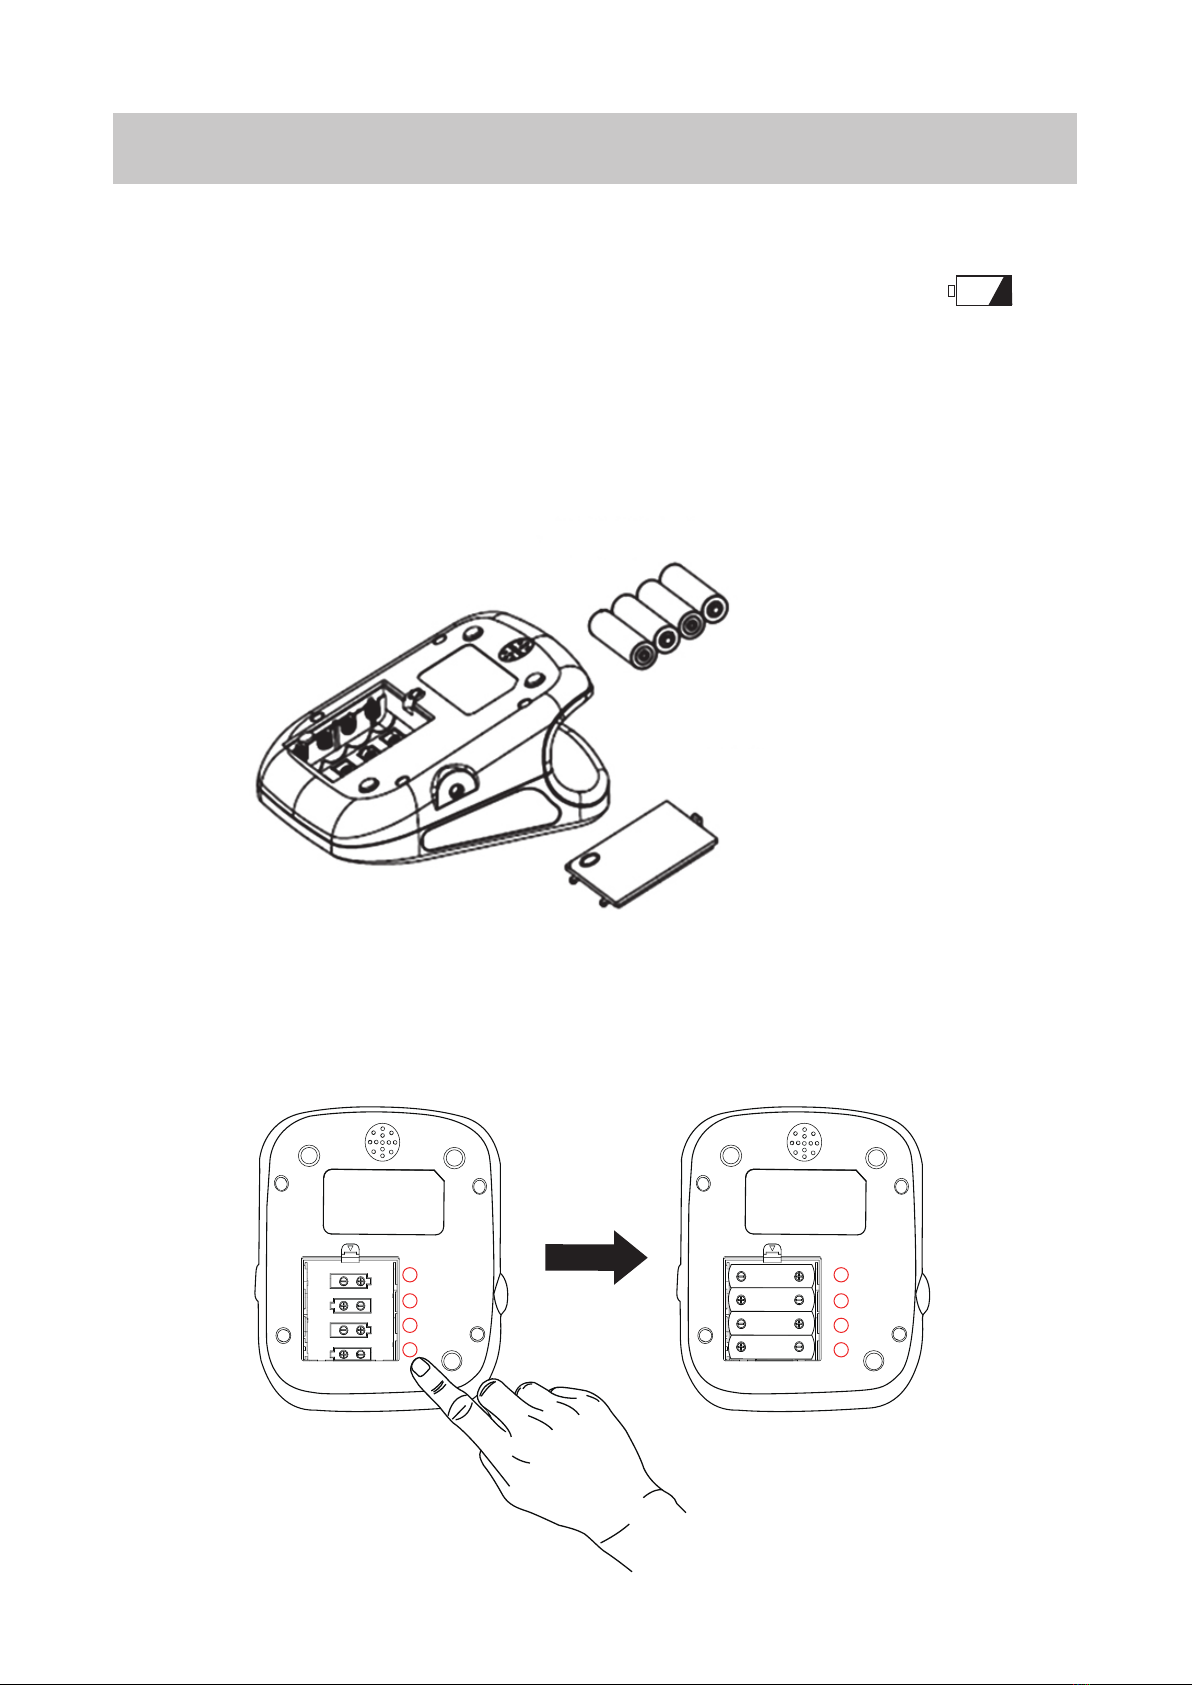
5. Install or Replace Batteries
Open battery compartment cover and insert batteries as indicated in
the battery compartment to ensure the polarity (<+> and <->) of the
batteries are correct and then close it. If the low battery icon dis-
played please replace the batteries immediately.
● Use 4pcs AA alkaline battery.
● Do not mix different types of batteries, or an old battery with a new one.
● Remove the batteries if the device is not going to be used for long time.
● Reset the time and date after replacing the batteries.
4XAA alkaline battery
battery cover
Reminder:
Please install the batteries as the follow picture guide.
1
2
3
4
1
2
3
4
English 9
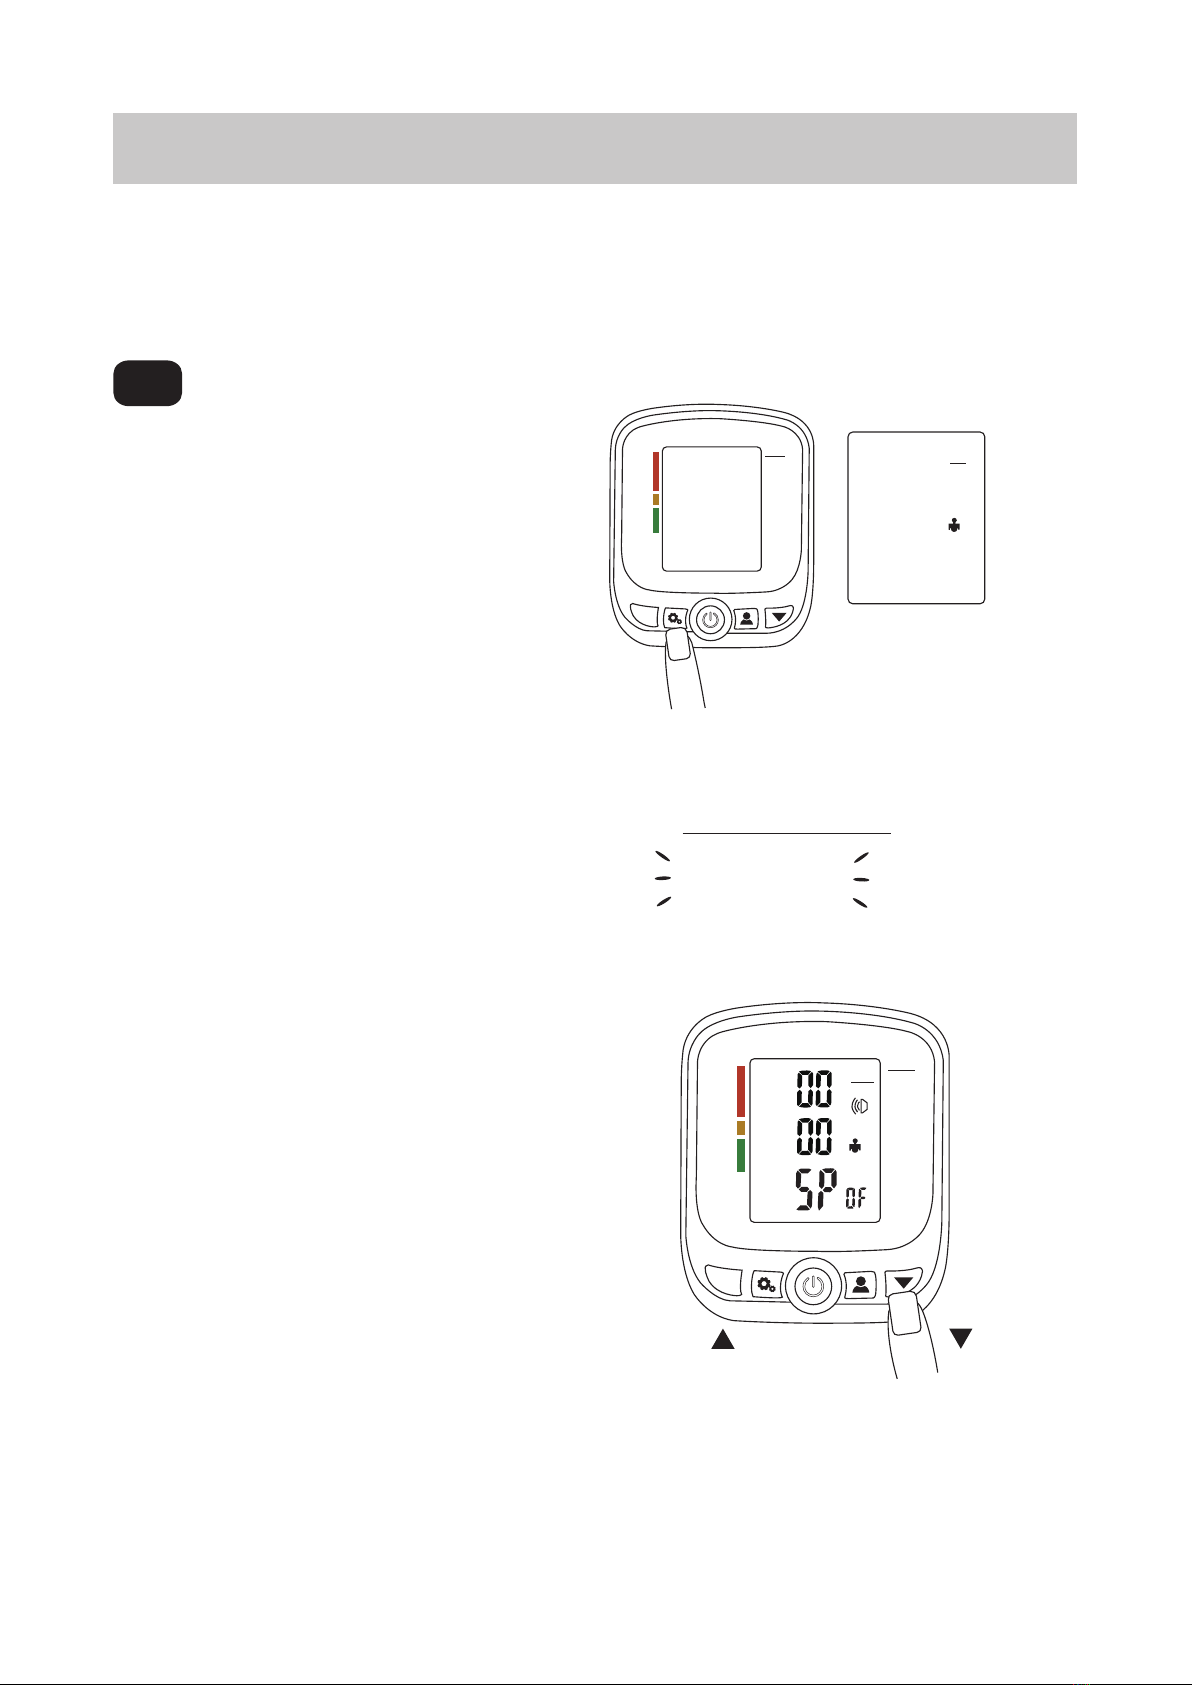
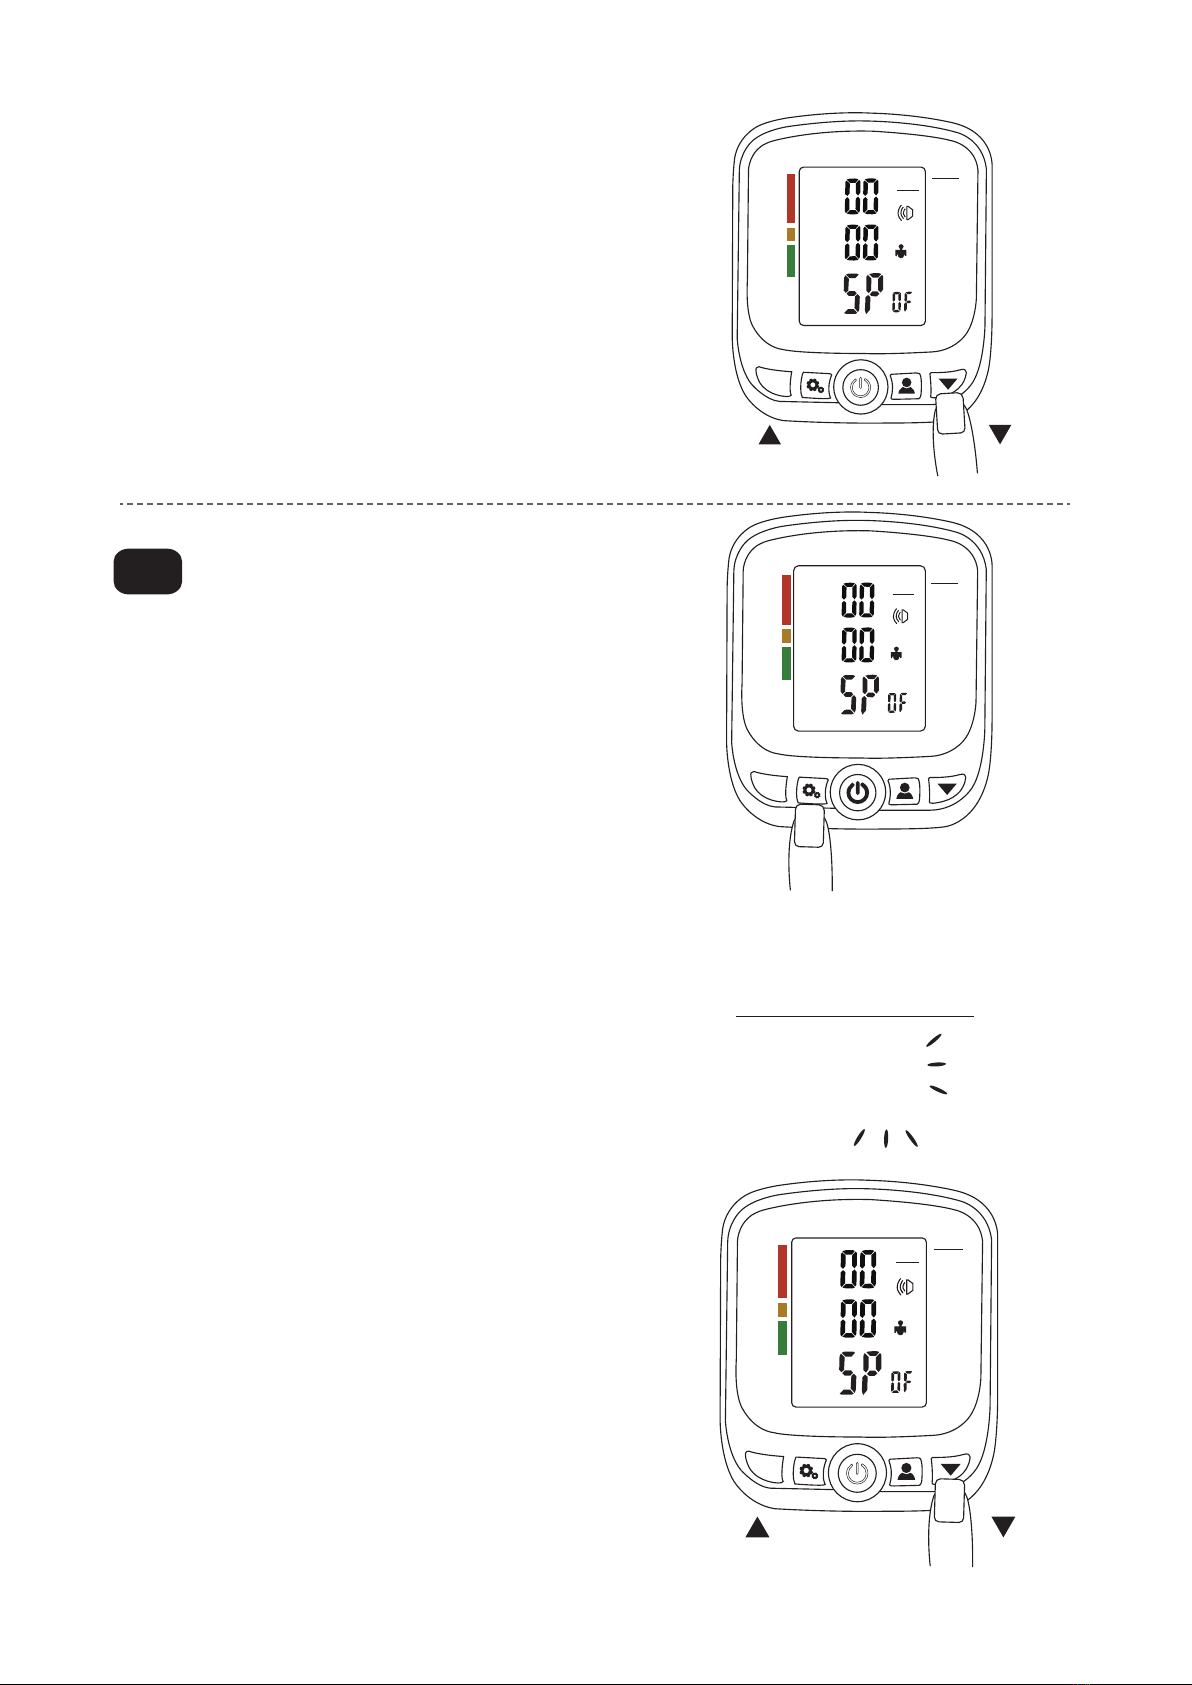
6. System Setting
Set the monitor to the current date and time before taking a measure-
ment for the first time. If the date and time are not set correctly, the
measurement values stored in the memory and the average values
may not be correct.
Setting the year
6.1
01/10
11:30
1
Blood Pressure Monitor
M
Data
Time
SYS
mmHg
DIA
mmHg
Pulse
/minute
Hold SET button for approx.
3 seconds when the device
is switched off.
The year number flashes
on the display.
2021
01/10
You can set the year values
by pressing MEMORY button
or DOWN button.
Note:
The year can be set between 2009 and 2099. When the display
reaches 2099, it will return to 2009.
Press and hold the MEMORY button or DOWN button to increase or
decrease the year values faster.
Blood Pressure Monitor
M
01/10
20 21
mmHg
1
Data
Time
SYS
mmHg
DIA
mmHg
Pulse
/minute
English 10
6.2
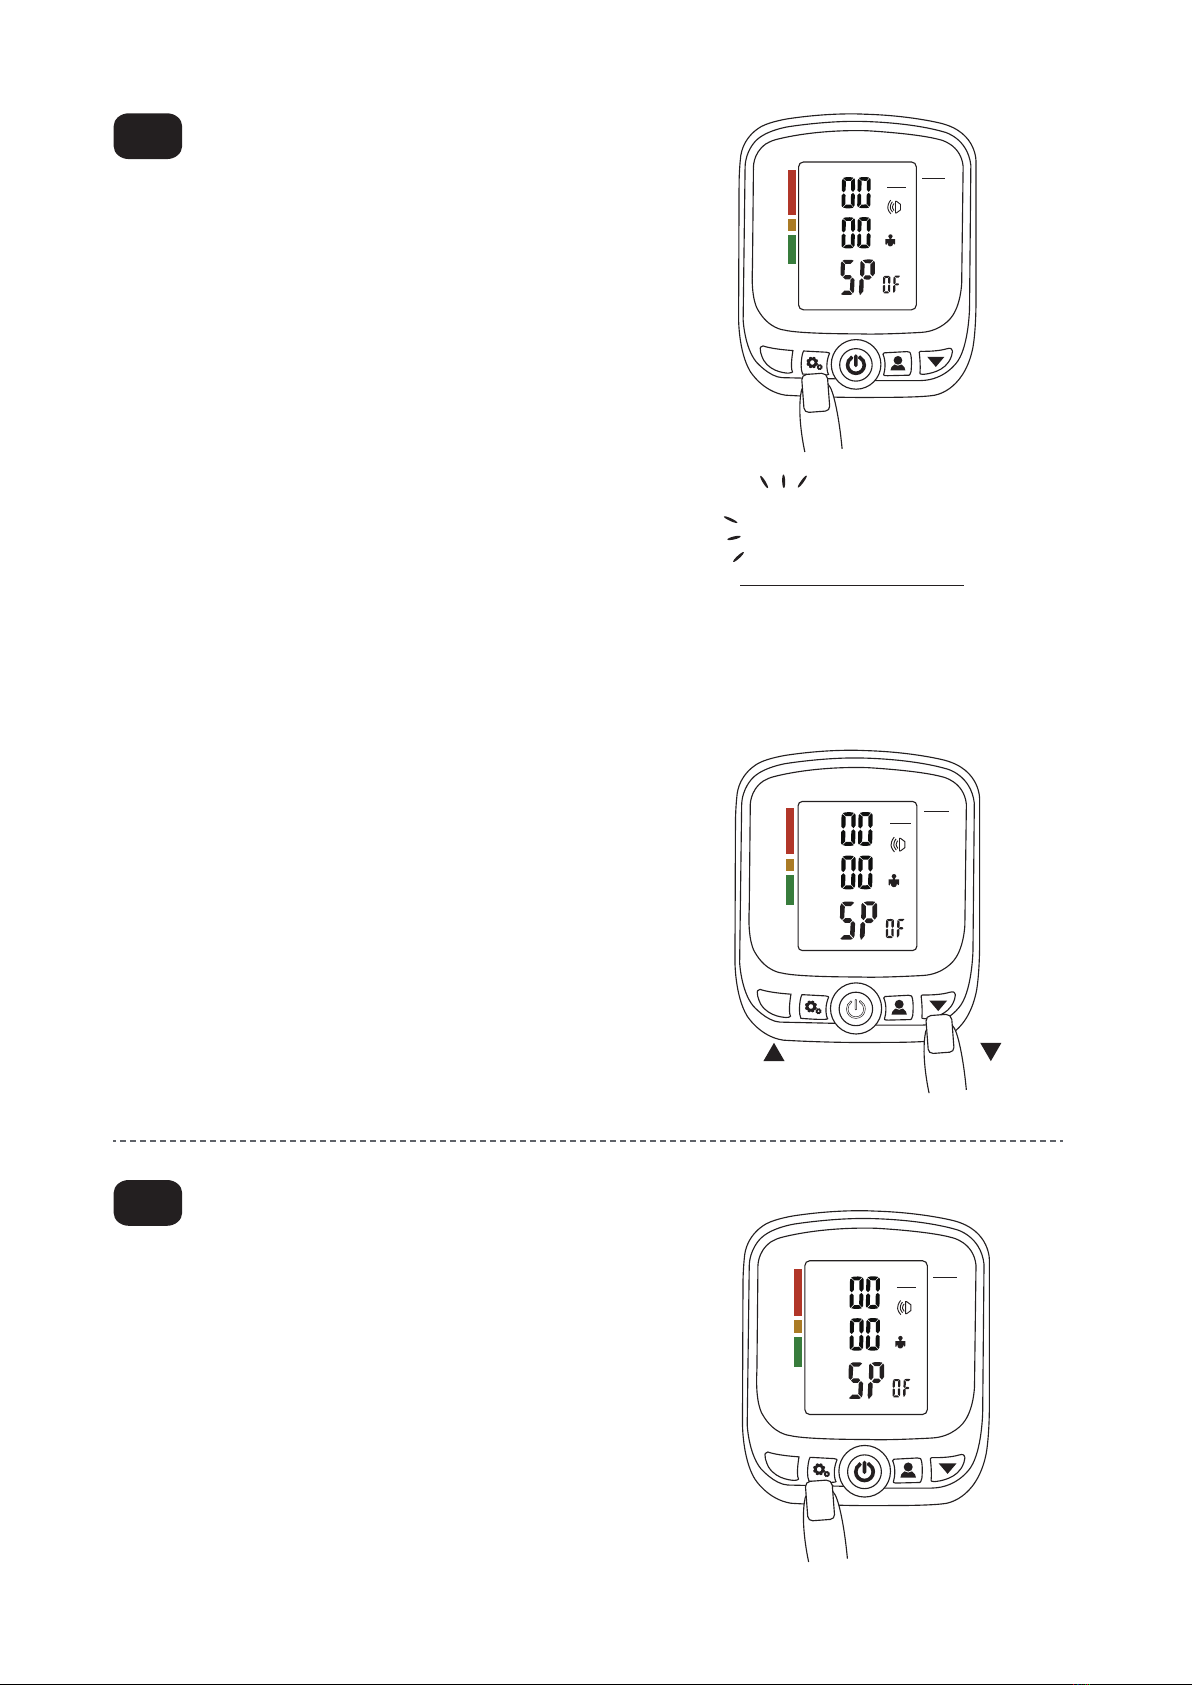
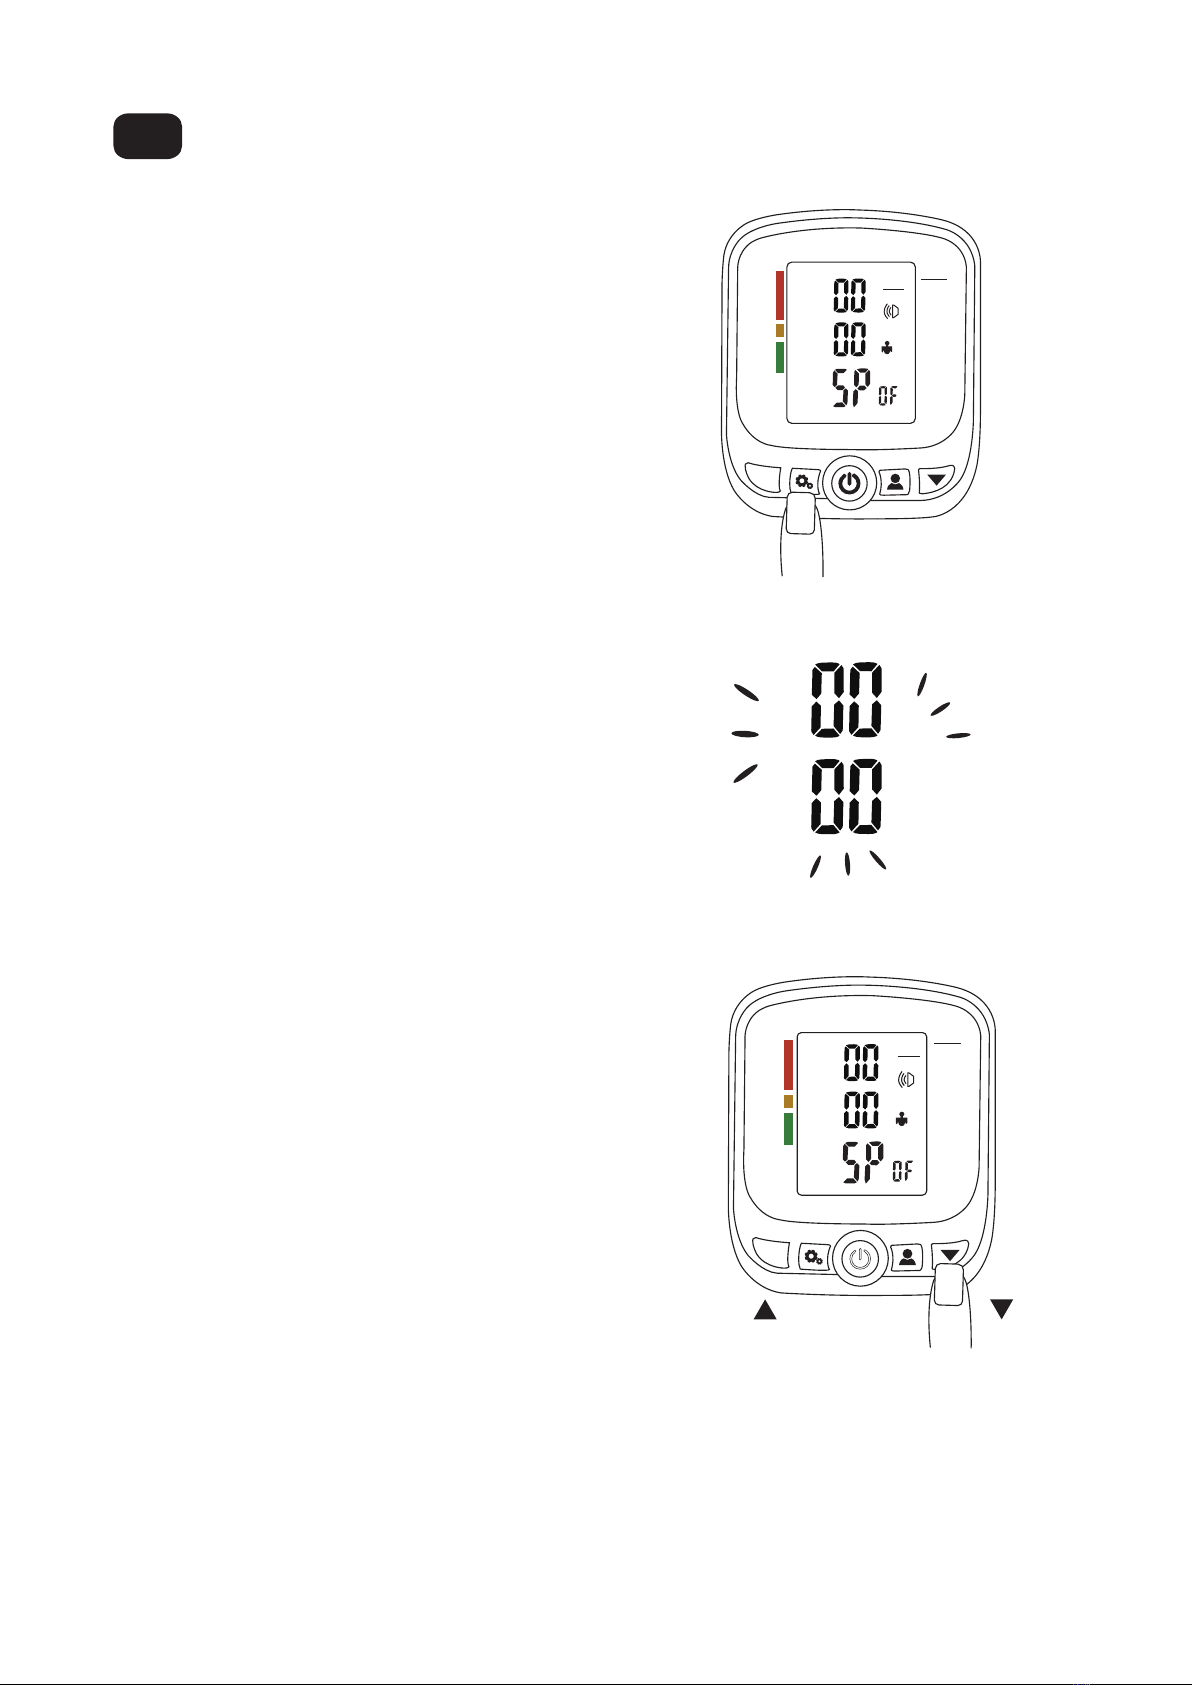
6.3
Setting the month
Blood Pressure Monitor
M
01/10
11:30
mmHg
1
Data
Time
SYS
mmHg
DIA
mmHg
Pulse
/minute
Press the SET button to move to
the month selection after you set
the year.
You can set the month values by
pressing MEMORY button or DOWN
button.
The month flashes on the display.
11:30
01/10
Blood Pressure Monitor
M
01/10
11:30
mmHg
1
Data
Time
SYS
mmHg
DIA
mmHg
Pulse
/minute
Setting the date
Blood Pressure Monitor
M
01/10
11:30
mmHg
1
Data
Time
SYS
mmHg
DIA
mmHg
Pulse
/minute
Press the SET button to set the date
selection after you set the month.
English 11
6.4
You can set the date values by
pressing MEMORY button or
DOWN button.
The date flashes on the display.
11:30
01/10
Blood Pressure Monitor
M
01/10
11:30
mmHg
1
Data
Time
SYS
mmHg
DIA
mmHg
Pulse
/minute
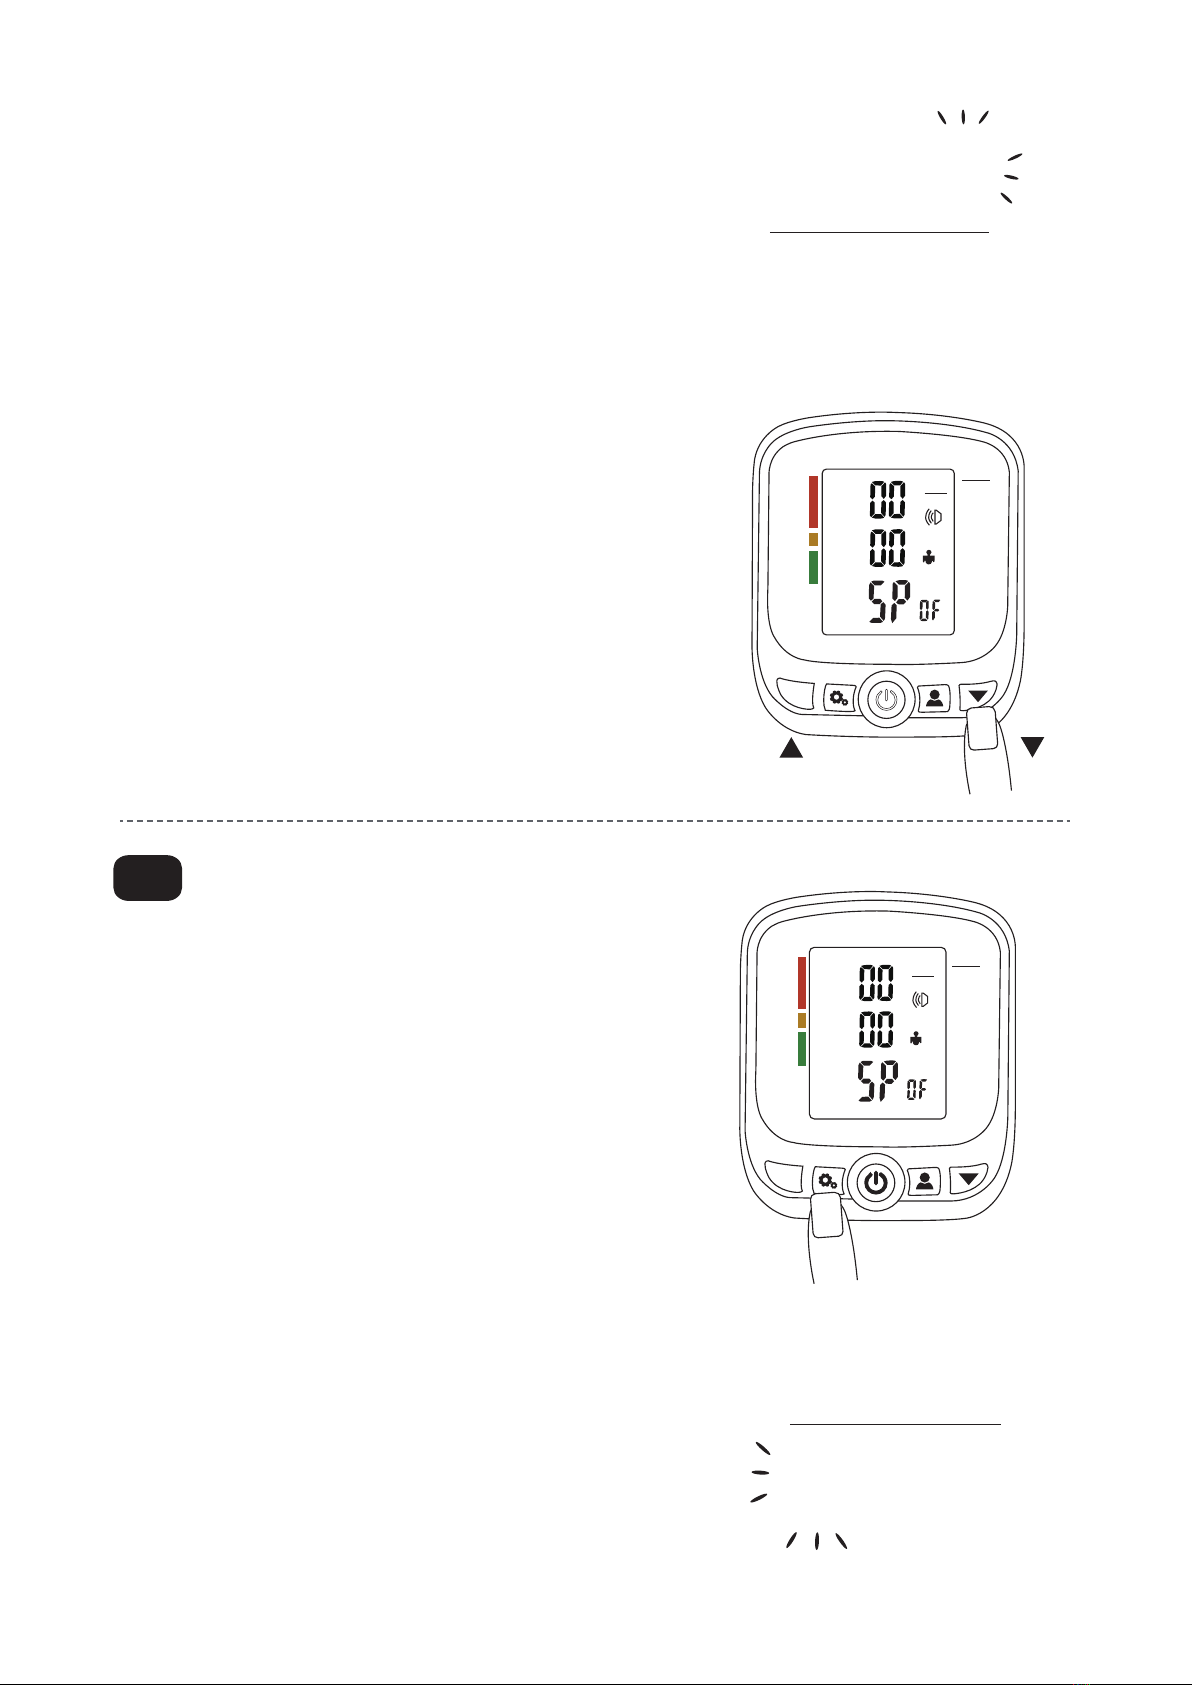
Setting the hour
Press the SET button to set the
hour selection after you set the
date.
The hour flashes on the display.
Blood Pressure Monitor
M
01/10
11:30
mmHg
1
Data
Time
SYS
mmHg
DIA
mmHg
Pulse
/minute
11:30
01/10
English 12
6.5
You can set the hour values by
pressing MEMORY button or
DOWN button.
Blood Pressure Monitor
M
01/10
11:30
mmHg
1
Data
Time
SYS
mmHg
DIA
mmHg
Pulse
/minute
Setting the minute
Press the SET button to set the
hour selection after you set the
hour.
You can set the minute values by
pressing MEMORY button or
DOWN button.
The minute flashes on the display.
11:30
01/10
Blood Pressure Monitor
M
01/10
11:30
mmHg
1
Data
Time
SYS
mmHg
DIA
mmHg
Pulse
/minute
Blood Pressure Monitor
M
01/10
11:30
mmHg
1
Data
Time
SYS
mmHg
DIA
mmHg
Pulse
/minute
English 13
6.6 Switch the unit between mmHg and kPa
Press the SET button to switch the
unit selection after you set the
minute.
You can switch the unit between mmHg
and kPa by pressing MEMORY button
or DOWN button.
The unit flashes on the display. mmHg
Blood Pressure Monitor
M
01/10
11:30
mmHg
1
Data
Time
SYS
mmHg
DIA
mmHg
Pulse
/minute
Blood Pressure Monitor
M
01/10
11:30
mmHg
1
Data
Time
SYS
mmHg
DIA
mmHg
Pulse
/minute

English 14
7.1
7. Applying the Arm Cuff
Selecting the Correct Cuff Size
1. Wrap the cuff around the upper arm, about 1 to 2 cm above the inside of
the elbow, as shown.
Cuff
1 to 2 cm
Artery position mark
Secure the fabric fastener
Air hose
Index and Proper fit range
Do notroll up shirtsleeve tightly
NIW
NIW
XEDNI
12
1-2cm(1/2inch)
22-32cm
(9-13inch)
A R T.
LATEX FREE
1. Place the cuff directly against the skin, as clothing may cause a faint pulse
and result in a measurement error.
2. Constriction of the upper arm, caused by rolling up a shirtsleeve, may pre-
vent accurate readings.
3. Confirm that the index points within the proper fit range.
Note: During measurement, it is normal for the cuff to feel very tight. (Do not
be alarmed).
4. If the index points outside of the range, contact the customer service to
purchase a replacement cuff.
Insert the air connector plug
into the air socket firmly.

English 15
7.2
7.3
7.4
7.5
Remove tight-fitting clothing from
your upper left arm.
Hold the thumb grip on the cuff
securely with your right hand.
Note: Remove your watch, bracelets
or other jewelry on your left arm.
A R T.
Sit on a chair with your feet flat on the floor, place your left
arm on a table so the cuff is level with your heart.
Wrap the cuff around your left
upper arm, about 1 to 2 cm
above the inside of the elbow.
NIW
XEDNI
12
1-2cm(1/2inch)
22-32cm
(9-13inch)

English 16
8. Selecting the User ID
1
1
2
Blood Pressure Monitor
M
Data
Time
SYS
mmHg
DIA
mmHg
Pulse
/minute
8.1. Press User button
then shift the user by
pressing this button
again.
8.2. After that you can save this user as
current user by pressing ON/OFF
button to switch off the device. Blood Pressure Monitor
M
Data
Time
SYS
mmHg
DIA
mmHg
Pulse
/minute
9. Correct Body Posture during Measurement
● Support your arm in a relaxed position and ensure that the cuff is at the
same height as your heart .
● Relax, do not move and do not tense your arm muscles. Breathe normally
and do not talk.

English 17
10. Taking a Measurement
Please follow the below steps to take a blood pressure measurement after
preparation is finished. (List blood pressure is mmHg for example).
10.1. Place the cuff on the arm at heart level (preferably the left arm).
Sit quietly during measurement.
Note: If you wish to stop inflation at any time, press the ON/OFF
button again.
Blood Pressure Monitor
M
ON/OFF button
Blood Pressure Monitor
M
Data
Time
SYS
mmHg
DIA
mmHg
Pulse
/minute
Data
Time
SYS
mmHg
DIA
mmHg
Pulse
/minute
1
mmHg
Blood Pressure Monitor
M
At heart level
MEM
mmHg
kPa
1
2
10.3. When the correct pressure is reached, the pumping stops and
the pressure falls gradually. The pulse icon will flash when the
pulse signal is detected.
01/10
20:30
mmHg
1
Note: If an appropriate pressure
is not obtained, the device starts
to inflate again automatically.
10.2. Press the ON/OFF button, the device will turn on and LCD dis-
play will show all segments for 1 second. The " " is displayed
blinking briefly and the cuff will start to inflate automatically. It is
normal for the cuff to feel very tight.
English 18
108
65
63
01/10
11:30
mmHg
1
Blood Pressure Monitor
M
Systolic Pressure
Diastolic Pressure
Pressure Bar Indicator Pulse Rate
Data
Time
SYS
mmHg
DIA
mmHg
Pulse
/minute
Note: The blood pressure monitor provided with an automatic power shut-off
function. you should press the ON/OFF button again to turn on the power to
have a measurement again, and allow at least 3 minutes between measure-
ments on the same person.
10.4. After measurement is finished the cuff will deflation automatical-
ly then the systolic/diastolic blood pressure, pulse rate and blood
pressure unit will be displayed and stored. If irregular heartbeat is
detected the pulse icon will flash.
● When the systolic pressure ≥140 mmHg (18.7 kPa) and/or diastolic
pressure ≥ 90 mmHg (12 kPa) the continuous beep that reminding
your blood pressure is abnormal.
● If you feel any uncomfortable such as the cuff is inflated for a long
time it may be a risk. You must stop the measurement by pressing
ON/OFF button .
● If the cuff pressure is over 300 mmHg (40 kPa) without deflation
automatically please remove the upper arm cuff.
● Repeat measurements will cause the upper congestion and then
affect the measurement result. Improvement method: remove the cuff
and relax for 2~3 minutes then take a measurement again.
Warning
Warning
● Always measure on the same position.
● The blood pressure is affected by many factors.

English 19
The values measured by yourself in home may be lower than those
measured in hospital because you feel more relax and comfortable in
home. The daily blood pressure measurement is very important to
manage your blood pressure. But even you take blood pressure mea-
surements in home the following situations may cause the blood pres-
sure values changing:
- In a hour after dining;
- After drinking wine, coffee or tea;
- After smoking, exercise or bathing;
- Nervous or emotional instability;
- Talking or movement during measurements;
- The ambient temperature is changed rapidly;
- Continuous measurement for long time
Please follow the doctor’s directions instead of diagnose by yourself
based on the measurement result.
11. Recalling the Memory Data
The device automatically stores up to 2x90 sets memory (2 users, 90
sets memory for each user) blood pressure and pulse measurements
in memory. Data stored in memory are assigned a data number in the
order of the newest to the oldest.
Memory Recall11.1
11.1.1. When the device is power off
or stand-by press MEMORY button it
will display the average value of the
last three measurement results and
there is a symbol " " on the
screen display.
11.1.2. You can recall the measure-
ment by pressing MEMORY button or
DOWN button.
Data
Time
SYS
mmHg
DIA
mmHg
Pulse
/minute
Blood Pressure Monitor
M
MEM
mmHg
1
Data
Time
SYS
mmHg
DIA
mmHg
Pulse
/minute
106
64
70
07/07
10:45
mmHg
1
Blood Pressure Monitor
M
English 20
11.2
113
54
73
07/07
10:45
mmHg
1
Blood Pressure Monitor
M
Data
Time
SYS
mmHg
DIA
mmHg
Pulse
/minute
11.1.3. If the measurement result is displayed
together with flashed pulse icon it means
irregular heartbeat is detected during that
measurement.You can exit from memory
recall by pressing ON/OFF button at any time.
Before clear the memory please confirm that the stored measurement results
are useless to you. We suggest you writing down your measurement results
as blood pressure diary to provide necessary information for your doctor.
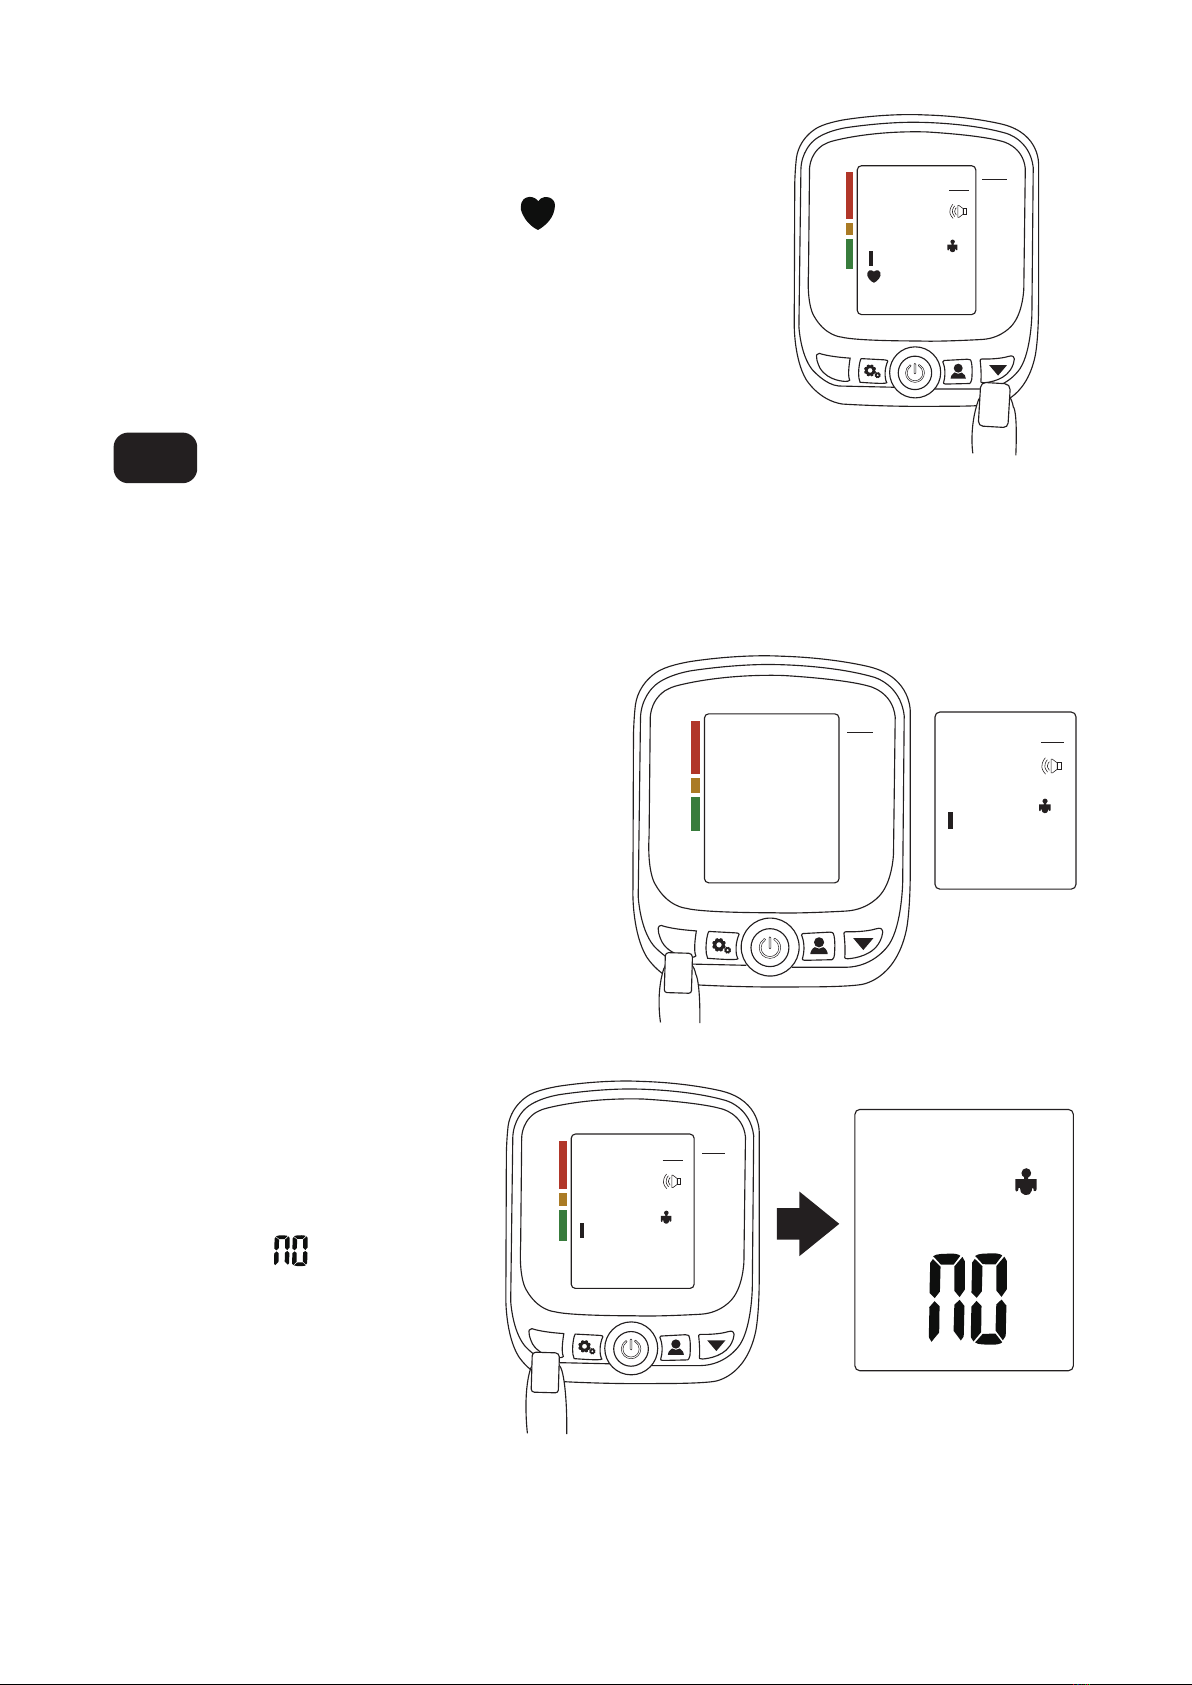
Clear Memory
Please note: you can’t delete individual stored measurement result.
108
65
63
01/10
11:30
mmHg
1
106
64
70
07/07
10:45
mmHg
1
Blood Pressure Monitor
M
Blood Pressure Monitor
M
Data
Time
SYS
mmHg
DIA
mmHg
Pulse
/minute
Data
Time
SYS
mmHg
DIA
mmHg
Pulse
/minute
11.2.1. Press the MEMORY
button to enter to memory status
when the device is power off or
stand-by.
11.2.2. Then hold the
MEMORY button for 3
seconds till “ ” displayed.
1
Table of contents
Languages:
Other MedLinket Medical Equipment manuals


Popular Medical Equipment manuals by other brands

DHG
DHG RoMedic LiftSeat Instructions for use

Bio Compression Systems
Bio Compression Systems SC-3004-DL-230 operating instructions

GCE
GCE S 400 Instructions for use

Otto Bock
Otto Bock 17B105 Instructions for use

Mobi Technologies
Mobi Technologies 700030 user manual

College Park
College Park celsus IVT Technical instructions

swissflex
swissflex uni 14_75RF bridge operating instructions

Joerns
Joerns Hoyer HPL450 manual

Promeba
Promeba STRETCHER Series user guide

Shenzhen Mindray Bio-Medical Electronics
Shenzhen Mindray Bio-Medical Electronics DC-80S Operator's manual

Orthofix
Orthofix Spinal-Stim instruction manual

Goodpl
Goodpl GP-304N manual


