MedLinket AM801 User manual
Temp-Pulse Oximeter BZ0300A REV: A.0 December. 05, 2022
Quick Start Guide
Model: AM801, AM801R, AM805, AM806, AM806B
Caution: Federal (U.S.A) law restricts this device to sale by or on the order of a physician.
How to begin?
Scan the QR Code to download the user manual or watch the instruction video, thanks!
User manual in PDF Instruction video
English, Spanish Scan the QR code to watch the instruction video on YouTube!
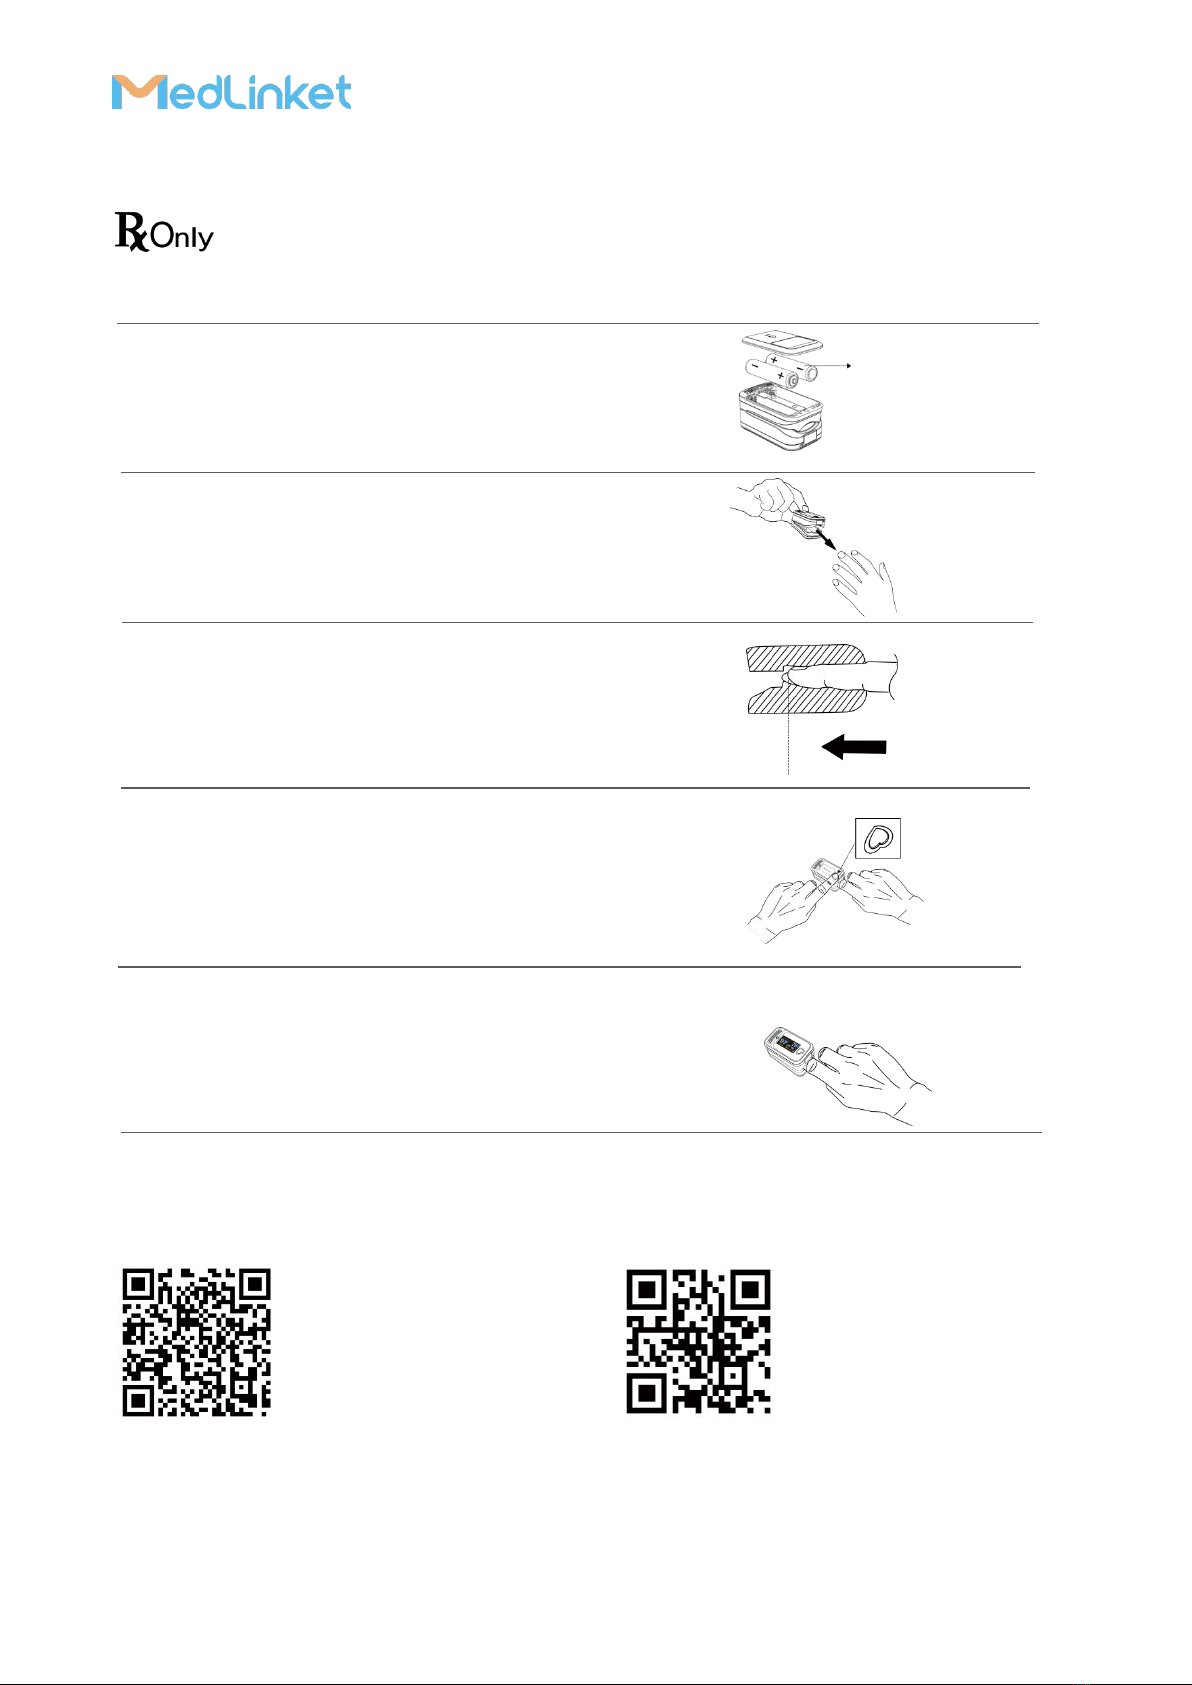
2*AAA
alkaline
battery
1. Open battery compartment cover and insert two new
AAA alkaline batteries as indicated below to ensure the
polarity (<+> and <->) of the batteries are correct and then
close it.
2. Open the clip of the pulse oximeter, insert a finger
(The preferred application is middle finger and index
finger), as shown below.
3. Make sure the sensor LED is above the fingernail as
shown in the below.
4. Turn on the pulse oximeter by pressing the Power
button.
5. Get the information of parameter directly from screen
display.

Temp-Pulse Oximeter BZ0300A REV: A.0 December. 05, 2022
Instruction for Use
Model: AM801, AM801R, AM805, AM806, AM806B
CONTENTS
Foreword................................................................................................................................................ 1
Warning..................................................................................................................................................1
Latex Content Statement.......................................................................................................................1
About This Manual................................................................................................................................ 2
Section 1 Overview.............................................................................................................................2
Intended Use........................................................................................................................................................... 2
Essential Performance............................................................................................................................................ 2
About the Pulse Oximeter.......................................................................................................................................2
Identification of Front Panel, Left Panel Buttons and Symbols..............................................................................2
Equipment Symbols................................................................................................................................................ 3
Technical Specifications.......................................................................................................................................... 3
Product parts and accessories................................................................................................................................ 5
Principle of Measurement...................................................................................................................................... 6
Clinical Restrictions................................................................................................................................................. 7
Attentions................................................................................................................................................................7
Unpacking and Inspection...................................................................................................................................... 7
Included in the package.......................................................................................................................................... 8
Section 2 Operation............................................................................................................................8
Installation and Verification.................................................................................................................................... 8
Procedure................................................................................................................................................................9
Low perfusion test.................................................................................................................................................. 9
General Operation.................................................................................................................................................. 9
Safety.....................................................................................................................................................................11
Function Setting Introduction...............................................................................................................................12
Menu Setting.........................................................................................................................................................12
Warning.................................................................................................................................................................14
Section 3 Troubleshooting................................................................................................................15
Section 4 Electromagnetic Environment..........................................................................................16
Electromagnetic Interference Caution................................................................................................................. 16
Electromagnetic Environment.............................................................................................................................. 16
Section 5 Measurement Validation..................................................................................................18
Subject Demographics.......................................................................................................................................... 18
ARMS Results.......................................................................................................................................................... 19

Temp-Pulse Oximeter BZ0300A REV: A.0 December. 05, 2022
Graphs................................................................................................................................................................... 21
Section 6 Service and Maintenance.................................................................................................23
Cleaning and Disinfecting......................................................................................................................................23
Calibrating............................................................................................................................................................. 23
Repairing and Maintenance..................................................................................................................................23
Warnings............................................................................................................................................................... 23
Disposal................................................................................................................................................................. 24
Warranty............................................................................................................................................................... 24
Qualified certificate.............................................................................................................................................. 24

Temp-Pulse Oximeter BZ0300A REV: A.0 December. 05, 2022
1
Foreword
The Pulse Oximeter manual is intended to provide information for proper operation and maintenance. General
knowledge of monitoring and understanding of the features and functions of the Pulse Oximeter are prerequisites
for proper use. Please read these instructions carefully before using this equipment.
The manual describing the operating procedures should be followed strictly. Failure to follow these instructions
can cause measuring abnormality, equipment damage and personal injury. The manufacturer is NOT responsible
for the safety, reliability and performance issues and any monitoring abnormality, personal injury and equipment
damage due to user’s negligence of the operation instructions.
The Pulse Oximeter is a medical device, and can be used repeatedly.
Contraindication
The device can not be used for patients with diseases or conditions including blood microcirculation disorder,
excessive staining in the blood, disorders of important hemoglobin indicators and severe arrhythmia.
Warning
Warnings are identified by the WARNING symbol shown above.
●Explosion hazard. Do not use the PULSE OXIMETER in the presence of flammable anesthetics mixed with air, or
with oxygen, or nitrous oxide.
●Do not spray, pour, or spill any liquid on the PULSE OXIMETER, its accessories, connectors, switches.
●Reusable sensors must be moved to a new site at least every 4 hours. Because individual skin condition affects
the ability of the skin to tolerate sensor placement, it may be necessary to change the sensor site more frequently
with some patients. If skin integrity changes, move the sensor to another site.
●At elevated ambient temperatures, patient skin could be severely burned after prolonged sensor application at
sites that are not well perfused. To prevent this condition, be sure to check patient application sites frequently. All
listed sensors operate without risk of exceeding 41℃on the skin if the initial skin temperature does not exceed
35℃.
●Be aware that following removal of the sensor from the patient, it is possible that environmental light may cause
the monitor device to continue to display a waveform or data values but these data should not be used as a basis
for a clinical diagnosis.
●Portable and mobile RF communications equipment can affect MEDICAL ELECTRICAL EQUIPMENT.
●The waste of PULSE OXIMETER must not be disposed as unsorted municipal waste and must be collected
separately. Please contact an authorized representative of the manufacturer for information concerning the
decommissioning of your equipment.
●Please refer to the correlative literature about the clinical restrictions and caution.
●This device is not intended for treatment.
●The LCD panel contains toxic chemicals. Do not ingest chemicals from a broken LCD panel.
●Do not modify this equipment without authorization of the manufacturer.
●Don't reuse disposable probe or it may cause cross-infection among patients.
Latex Content Statement
The PULSE OXIMETER is not made with natural rubber latex in any location that may result in patient contact.

Temp-Pulse Oximeter BZ0300A REV: A.0 December. 05, 2022
2
About This Manual
The PULSE OXIMETER is to be operated by qualified personnel only. Before servicing this product, read the
operator's manual carefully and a thorough understanding of operation.
Section 1 Overview
Intended Use
Med-link Pulse Oximeter is a reusable device intended for spot checking in measuring and displaying functional
arterial oxygen saturation (SpO2), pulse rate, temperature, respiration rate of patients under non-motion
conditions in hospitals, physician’s office, clinical settings and home care environment. Application sites include
fingers. For SpO2and pulse rate, it’s intended for adults and pediatrics who are well or poorly perfused. For
respiration rate, it’s intended for adults who are well perfused.
Essential Performance
The essential performance of this device is defined as SpO2accuracy, pulse rate accuracy, temperature accuracy
and respiration rate accuracy, or an indication of abnormal operation. Result of exposure to electromagnetic
disturbances that are outside of the environments listed in this Instruction for use. If such a kind of situation
appears, move the device away from the source of electromagnetic disturbances. When there's signal inadequacy,
the symbol of "?" will be displayed on the screen, indicating the displayed SpO2or pulse rate value is potentially
incorrect.
About the Pulse Oximeter
The device contains a dual light source (red LED and infrared red LED) and a photo detector. Bone, tissue,
pigmentation and venous vessels normally absorb a constant amount of light over time. The arteriolar bed
normally pulsates and absorbs variable amounts of light during the pulsations. The ratio of light absorbed is
translated in an oxygen saturation measurement (SpO2). Because a measurement of SpO2is dependent on light
from the device, excessive ambient light can interfere with this measurement.
Identification of Front Panel, Left Panel Buttons and Symbols
Refer to the PULSE OXIMETER Operator’s manual for a complete description of all buttons, symbols, controls,
displays and indicators.
Figure 1: PULSE OXIMETER Front Panel and Left Panel
1—Menu button/Power button
7—PPG (photoplethysmograph)
2—%SpO2Display
8—Respiration rate (rpm)
Temp-Pulse Oximeter BZ0300A REV: A.0 December. 05, 2022
3
Equipment Symbols
Technical Specifications
3—Pulse rate display (bpm)
9—Bar graph (the pulse amplitude indicator)
4—Perfusion index display (PI)
10—Signal inadequacy display
5—Low battery indicator
11—Screen turn switch
6—Temperature display
12—Accessories Port Connector
Type BF (body floating)
applied part
Atmospheric pressure limitation (storage,
transportation and operating)
Non-sterile
Caution
Refer to instruction
manual/booklet
Storage & transportation temperature limit
Humidity limitation
(storage, transportation
and operating)
Operation temperature limit
Protected against
vertically falling water
drops when enclosure
tilted up to 15°
Environment-friendly use period
No SpO2alarm
Batch code
Compliance with WEEE
standard
Date of manufacture
MR unsafe
Model number
Medical device
Unique device identifier
Do not re-use
Pulse Oximeter

Temp-Pulse Oximeter BZ0300A REV: A.0 December. 05, 2022
4
SpO2range
30% to 100%
SpO2resolution
1%
SpO2accuracy (under good & low perfusion)
90% to 100% range: ±2%;
70% to 89% range: ±3%
<70%: unspecified
Low perfusion index
≤0.3%
Reminder
Battery-low indicator
Method
Dual wavelength LED
Pulse rate range
30 to 300 bpm
Pulse rate resolution
1 bpm
Pulse accuracy (under good & low perfusion)
±3 bpm
Respiration rate range
4-70 RPM
Respiration rate resolution
1RPM
Respiration rate accuracy
±1 RPM (mean error); 2 RPM (ARMS)
LED Wavelengths
Red: approximately 660nm; Infrared: approximately
905nm
Optical output power
Less than 15mW
Temperature
Note: The function of temperature measure works by the accessory of temperature probe.
Shortest measurement time recommended
5min
Measuring site
skin surface
Reference body site
Oral cavity and axilla
Range, accuracy
77°to 113°F (25℃to 45℃):±0.1℃
Display resolution
±0.1℃
Power supply requirements
Note: The Oximeter does not include batteries.
Batteries
1.5V (AAA) alkaline batteryX2 (IEC Type LR03)
Adaptable range
2.6V~3.6V
Only SpO2 function works
Less than 55mA
Only Temp function works
Less than 40mA
SpO2 and Temp function work together
Less than 60mA
Display parameters
SpO2, pulse rate, temperature, Respiration Rate,pulse
waveform display, bar graph and low battery indicator
Data update period
8s
Reminder response time
<2s
SpO2plethysmogram, pulse sound
50Hz
Value of pulse and SpO2
1Hz
Environment
Operating environment
Temperature 41°~104°(5℃~40℃), humidity ≤80%
Transportation and storage environment
Temperature 14°~104°(-10℃~40℃), humidity ≤80%
Hyperbaric pressure
(storage, transportation and operating)
86kPa~106kPa
Classification

Temp-Pulse Oximeter BZ0300A REV: A.0 December. 05, 2022
5
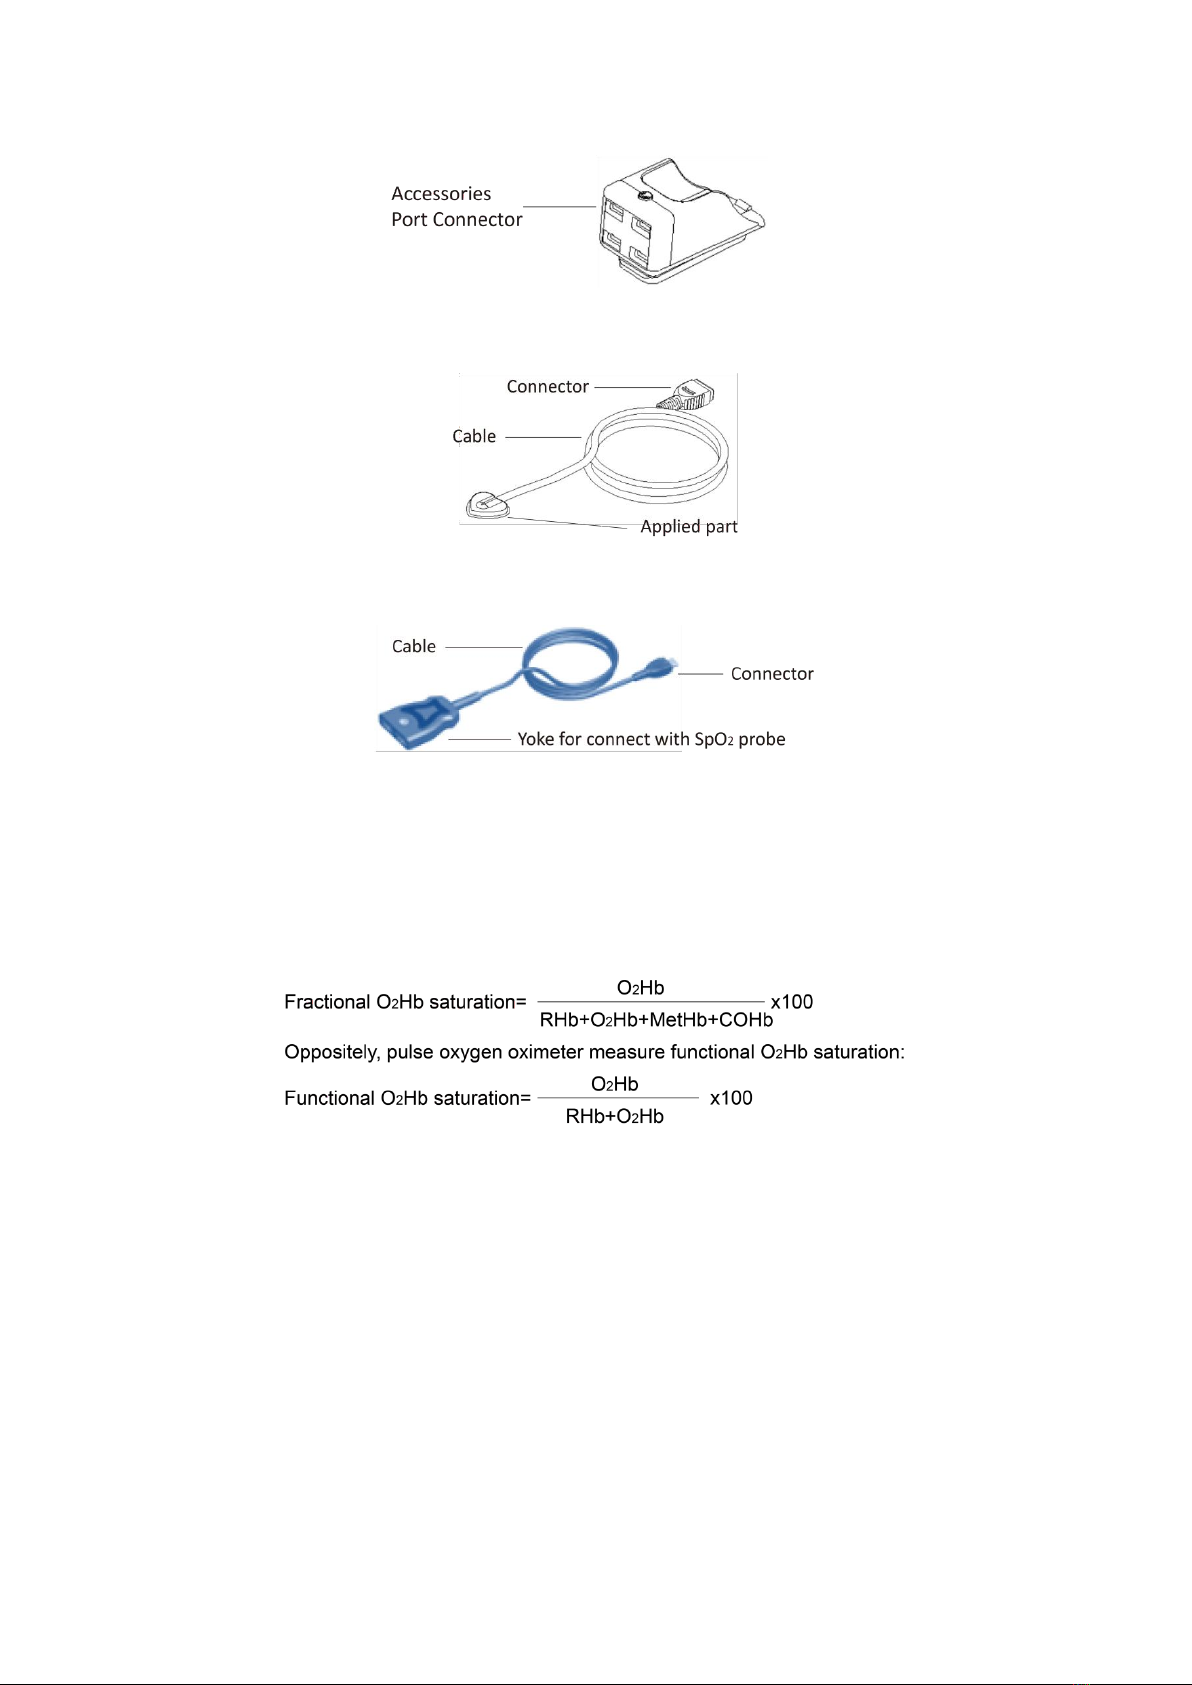
Product parts and accessories
The Pulse Oximeter is composed of instrument and accessories. As shown in the figure below, the Pulse Oximeter
is mainly composed of main unit, menu button, screen turn switch, display screen, applied part, battery cover and
lanyard. The accessories including adapter cable and Pulse Oximeter probe. Detail of the instrument and
accessories see figure 2 and figure 3.
1. Instrument
Figure 2: equipment
2. Accessories (Separate Purchase)
2.1 Wrist strap adapter
Medical device
ClassⅡa by EU Directive 93/42/EEC
Protection against liquids
IPX2
Dimension and weighting
Weight: 31.5g (Not including batteries)
Size: 61*34*30.5mm
Compliance
Item
Compliant with
Type of protection
Internally powered equipment (on battery power)
Degree of protection
Type BF Applied part
Mode of operation
Continuous
Compatibility
The surface material has no harm or toxicity for the
person in contact.
Bluetooth
RF
2.4G
Modulate types
GFSK
Frequency characteristic
FHSS
Radiant power
0dbm
Temp-Pulse Oximeter BZ0300A REV: A.0 December. 05, 2022
6
Figure 3-1: Wrist strap adapter
2.2 Probes
Figure 3-2: Temperature probe
2.3 Adapter Cable
Figure 3-3: Adapter Cable
Principle of Measurement
The measurement of PULSE OXIMETER uses a multi-functional oxyhemoglobinometer to transmit some narrow
spectrum light bands through blood samples, and to measure attenuation of spectrum with different wavelengths
according to the characteristic that RHb, O2Hb, Met Hb and COHb absorb the light of different wavelength,
thereby determining O2Hb saturation of different fractions. O2Hbsaturation is called “fractional”O2Hb saturation.
Present SpO2oximeter transmits light of two wavelengths only, red light and infrared, to differentiate HbO2from
HbR. One side of the sensor contains two LEDs, and the other side contains a photoelectric detector. SpO2
oximeter measures HbO2saturation in the blood by the light plethysmograph when the pulse beats. The result is
quite precise when HbO2saturatiion is between 70% to 100%. For respiration rate, it is provided through the same
mechanism of action as SpO2measurement. It is provided by first applying a SpO2sensor which is
embedded in the pulse oximeter to the application site (e.g. finger). The SpO2sensor then detects the
physiological variations which result in the variation in the absorption of the wavelength that are signals used to
display the pleth. The detected physiological signals are then processed to identify the cyclic variations associated
with the expression of the respiration rate upon the pleth. And those cyclic variations are further processed to
estimate the respiration rate which is then displayed.
Regarding temperature measurement, it's based on the principle that resistance ofthermistor based on the metal
conductor increases with temperature decrease, andchanges linearly with the temperature measurement

Temp-Pulse Oximeter BZ0300A REV: A.0 December. 05, 2022
7
characteristics.
Clinical Restrictions
1) As the measure is taken on the basis of arteriole pulse, substantial pulsating blood flow of the testee is required.
For a testee with weak pulse due to shock, low ambient, major bleeding, or use of vascular contracting drug, the
SpO2waveform will decrease. In this case, the measurement will be more sensitive to interference.
2) For those with a substantial amount of staining dilution drug such as monoxide hemoglobin (COHb), or
methionine (MetHb) or thiosalicylic hemoglobin, and some with icterus problem, the SpO2determination by this
device may be inaccurate.
3) The drugs like dopamine, procaine, prilocaine, lidocaine and butacaine may also be a major factor blamed for
serious error of SpO2measure.
4) The SpO2value serves only as a reference value for judgement of anemic anoxia and toxic anoxia, some patients
with serious anemia may also report good SpO2measurement.
Attentions
●Keep the oximeter away from dust, vibration, corrosive substances, explosive materials, high temperature and
moisture.
●If the oximeter gets wet, please stop using.
●When it is carried from cold environment to warm and humid environment, please do not use it immediately.
●DO NOT operate keys on front panel with sharp materials.
●High temperature or high pressure steam disinfection of the oximeter is not permitted. Refer to User’s
Manual for instructions of cleaning and disinfection.
●Do not have the oximeter immerged in liquid. When it needs cleaning, please wipe its surface with disinfect
solution by soft material. Do not spray any liquid on the device directly.
●When cleaning the device with water, the temperature should be less than 60℃.
●Measurements are recommended to be carried out in sitting, standing or supine position instead of prone or
lateral position that may affect measurement accuracy.
●Temperature probe that is compatible with pulse oximeter mentioned in this IFU include W0024E.
●The operator is responsible for checking the compatibility of the equipment connected,probe cable extender
and probe before use.
●Incompatible components can result in degraded performance.
Unpacking and Inspection
Remove the equipment of PULSE OXIMETER from the shipping carton and examine for signs of shipping damage.
Please check all materials against the packing list. Save the invoice, bill of lading and all packing materials. These
may be required if it is necessary to process a claim with the carrier.
If anything is missing or damaged, please contact the Technical Service Department.
You can contact by:
●Phone: +86 755 61120085
●Fax: +86 755 61120055
●Email: user07@med-linket.com
Temp-Pulse Oximeter BZ0300A REV: A.0 December. 05, 2022
8
Included in the package
Note: Please refer to the actual packing items
Description
Qty
Allocation
PULSE OXIMETER (equipment)
1 Piece
Standard configuration
PULSE OXIMETER Operator's Manual
1 Piece
Standard configuration
Lanyard
1 Piece
Standard configuration
CERTIFICATION
1 Piece
Standard configuration
Adapter
1 Piece
AM801 standard configuration
Data transfer cable
1 Piece
AM801 standard configuratio
SpO2probe
1 Piece
AM801 standard configuratio
Temperature probe
1 Piece
AM801, AM805 standard configuratio
Section 2 Operation
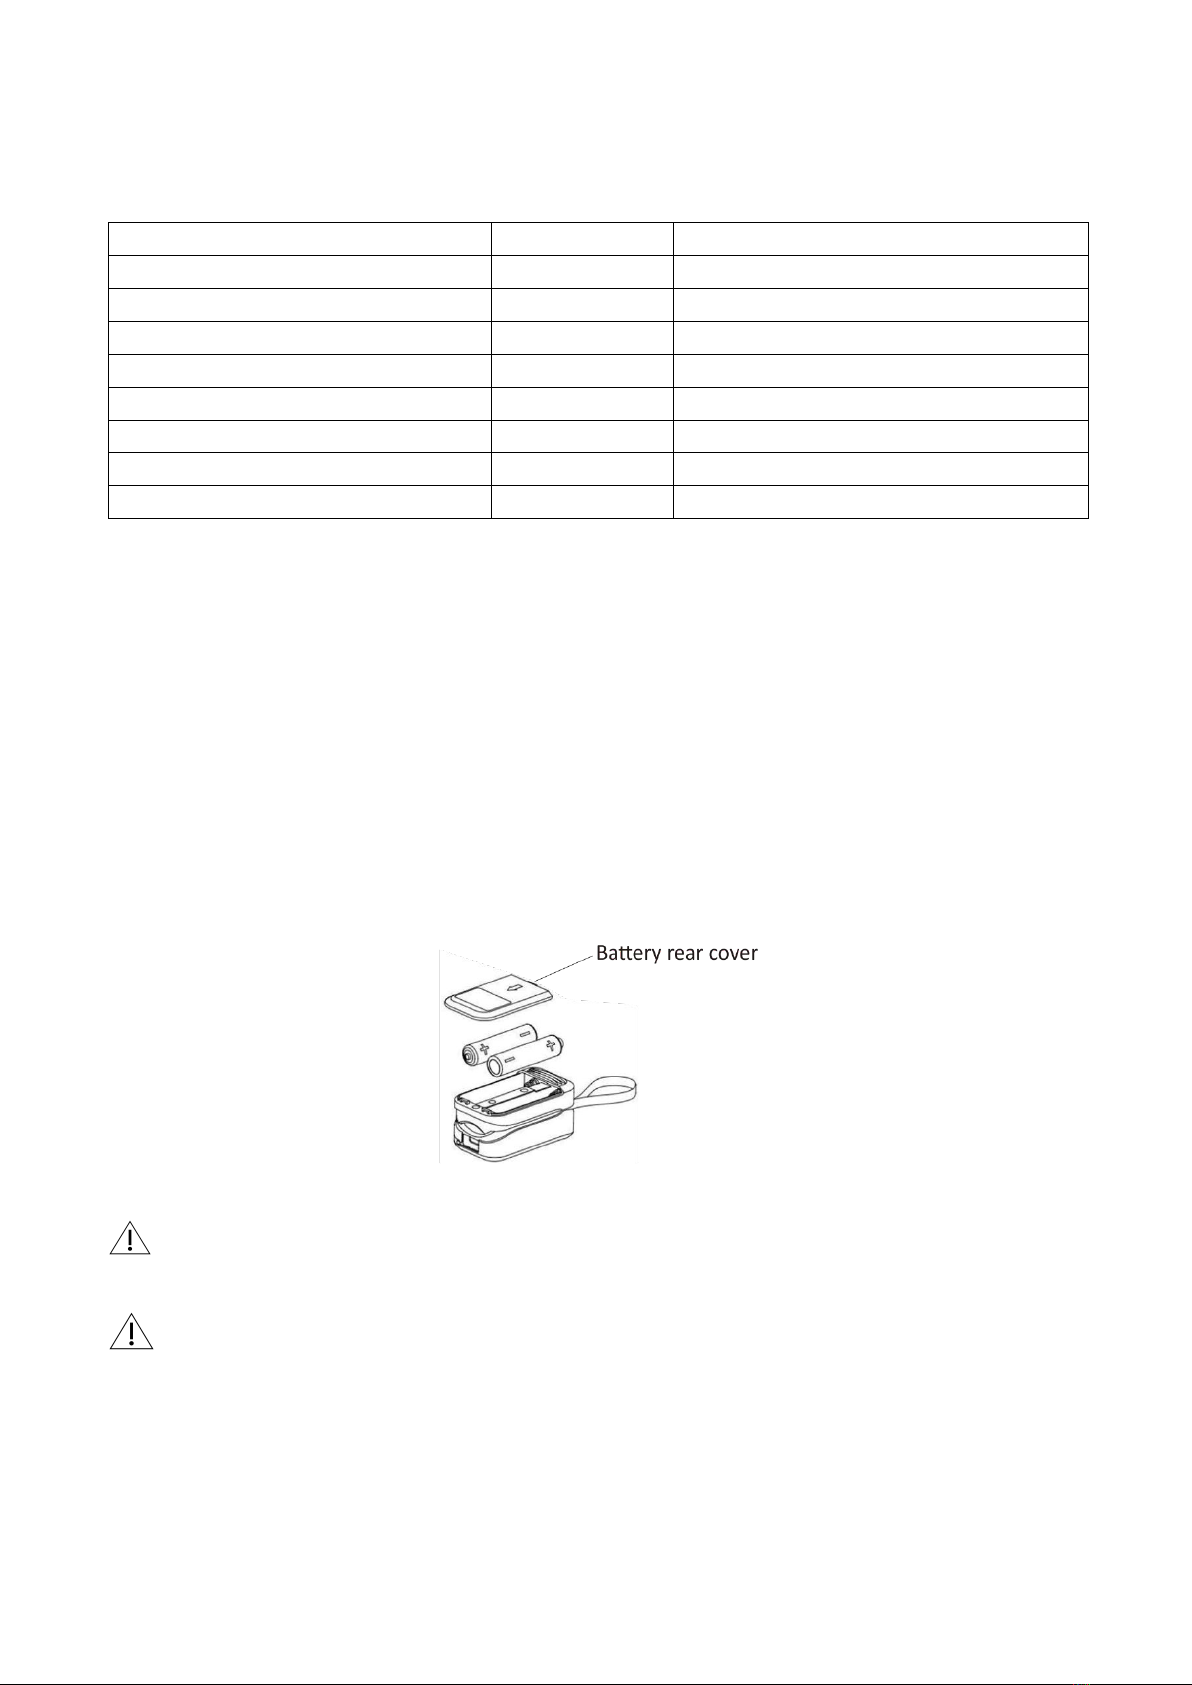
Installation and Verification
●Battery installation
Caution: The Pulse Oximeter does not operate with dead batteries and can not be powered by external power
source. Install new batteries.
1. Unplug all accessories from the Pulse Oximeter, and press the menu button to access the Setting Interface, turn
the PULSE OXIMETER off. See table 1.
2. Remove the battery cover out from the bottom of the PULSE OXIMETER. See Figure 3.
3. Insert two “AAA”size batteries, making sure the battery’
s positive and negative poles are correctly oriented
in the compartment as shown in Figure 3.
4. Closing the battery rear cover.
Figure 4: Installing Batteries
WARNING: Explosion hazard. Do not use the PULSE OXIMETER in the presence of flammable anesthetics
mixed with air, with oxygen, or nitrous oxide.
WARNING: To ensure accurate performance and prevent device failure, do not expose the PULSE
OXIMETER to extreme moisture such as rain.
●Performance Verification
1. Performance Tests
The power-up performance test verifies that the PULSE OXIMETER is ready for patient monitoring.
2. Power-On Self-Test

Temp-Pulse Oximeter BZ0300A REV: A.0 December. 05, 2022
9
Before using the PULSE OXIMETER, you must verify that the PULSE OXIMETER is working properly and is safe to
use. Proper working conditions are verified each time when the PULSE OXIMETER is turned on as described in the
following procedure. The verification procedure (POST) takes 2 to 3 seconds to complete.
Caution: If any indicator or display element does not light when the PULSE OXIMETER is turned on, do not use the
PULSE OXIMETER. Instead, contact qualified service personnel, your local MED-LINKET representative, or
MED-LINKET’s Technical Services Department.
Note: Physiological conditions, medical procedures, or external agents that may interfere with the PULSE
OXIMETER’s ability to detect and show measurements, including dysfunctional hemoglobin, arterial dyes, low
perfusion, dark pigment, and externally applied coloring agents such as nail polish, dye, or pigmented
cream.
Note: The Pulse Oximeter automatically starts the Power-On Self-Test (POST) to ensure that its internal circuits are
functioning properly.
Procedure
1) Turn on the PULSE OXIMETER by pressing the Menu button.
2) After the device completes the Power-On Self-Test (POST), it will directly switch to measure interface.
3) Long press the button to switch device interface of PULSE OXIMETER, adjustment parameters. See table-1.
Low perfusion test
SpO2simulator is used to simulate SpO2and pulse rate values to verify oximeter’s performance under low
perfusion condition. First, the oximeter is clamped onto the optical signal generator of the SpO2simulator, then
the simulator is turned on to set specific SpO2and pulse rate values. In addition, different perfusion levels like
0.1% can also be set on the simulator. The values of SpO2and pulse rate displayed on the oximeter are then
compared to those preset on the SpO2simulator to verify whether accuracy requirements can be met.
General Operation
The PULSE OXIMETER can be measure functional oxygen saturation in the blood, pulse rate and respiration rate by
itself. See table-1. Body temperature can be measured by applying a temperature probe of MED-LINK.
●Preparative for operating
1) Open up battery compartment cover carefully and then install two “AAA”
Alkaline batteries according to the
(+/-) polarity.
2) Press the “power switch”key for 1 second to activate the device.
●SpO2,pulse rate and respiration rate
1) Open the clip of PULSE OXIMETER, See figure 5.①.
2) Place a finger on the silicone pad. The recommended application sites include index finger, middle finger and
ring finger. Appropriate fingers for accurate measurements are within a size range of 8.5-24.3mm thick.

Temp-Pulse Oximeter BZ0300A REV: A.0 December. 05, 2022
10
Ensure the finger position is correct that the LED (irradiancy) window against finger prominence and the accepting
window against finger lunula), see figure 5.②, and then clip the finger, see figure 5.③.
3) Turn on the PULSE OXIMETER by pressing the Power button “ ”
4) Get the information of SpO2, pulse rate and respiration rate directly from screen display.
Figure 5: measurement
Note:
1. The detail of setting see table-1.
2. When put finger into the silicone cushions of the clip, make sure nail is Upturned.
●Temperature measurement
1) Plug the temperature probe connector side into the instrument’s USB female connector , and then place
another side of the temperature probe to patient’s surface or Esophageal/Rectal for collecting the temperature
signal.
2) Get the information of Temperature directly from screen display.
●Switch Screen turn switch
1) Press the Screen turn switch, See figure 6.
Figure 6

Temp-Pulse Oximeter BZ0300A REV: A.0 December. 05, 2022
11
2) There are eight display modes for your choice, See Figure 7. Figure 7.①-Figure 7.⑨display SpO2and pulse
rate.
Figure 7
Safety
1) Safety
Instructions for safe operations
●Check the main unit and all accessories periodically to make sure that there is no visible damage that may
affect patient’s safety and monitoring performance. It is recommended that the device should be inspected once
a week at least. Please stop using the device when there is obvious damage.
●Necessary maintenance must be performed by qualified service engineers ONLY. Users are not permitted to
maintain it by themselves.
●The oximeter cannot be used together with devices not specified in User’s Manual. Please use the device
recommended by Manufacturer.
●At elevated ambient temperatures, patient skin could be severely burned after prolonged sensor application at
sites that are not well perfused. To prevent this condition, be sure to check patient application sites frequently. All
listed sensors operate without risk of exceeding 41℃on the skin if the initial skin temperature does not exceed
35℃.
●Please remove the finger from the equipment to stop measure and pull the accessories from the equipment,
then the PULSE OXIMETER will power off automatically within 8 seconds if the equipment must be closed for the
urgent status.
2) Warnings
●Explosive hazard-DO NOT use the oximeter in environment with inflammable gas such as some ignitable
anesthetic agents.
●DO NOT use the oximeter while the testee is under measurement of MRI and CT.
●Be cautious of the hanging rope. Please do not break the hanging rope during usage to avoid device damage.
Please don’t use hanging rope if allergic to hanging rope.
●Please don’t use this product if you are allergic to silica gel and ABS plastic.
●Please dispose the device, accessory and packing (including plastic bag, foam and carton) according to local
law.

Temp-Pulse Oximeter BZ0300A REV: A.0 December. 05, 2022
12
●It's not an apnea monitor and should not be used for arrhythmia analysis.
●The device should not be used on patients with severe arrhythmia (defined as three or more events of
irregularity observed within 30 seconds) because the presence of these irregular cardiac rhythms may cause
inaccurate values or the loss of displayed information. Safety and effectiveness of SpO2, pulse rate and respiration
rate in patients with significantly irregular cardiac rhythms (such as but not limited to supraventricular
tachycardias, ventricular ectopy) have not been established. Use an alternate means of monitoring ventilatory
status for patients with significant cardiac dysrhythmia.
3) The attention of Operation
●The equipment should be fully tested to see if it can be used normally before using.
●The finger should be placed properly (see figure 4 of this manual), or else it may cause inaccurate
measurement.
●The SpO2sensor and photoelectric receiving tube should be arranged in a way with the testee’s arteriole in a
position in between.
●The device should not be used at a location or limb tied with arterial canal or blood pressure cuff of receiving
intravenous injection.
●Make sure the optical path is free from any optical obstacles like rubberized fabric; otherwise it may result in
venous pulsation and inaccurate measure of SpO2.
●Excessive ambient light may affect the measuring result. It includes fluorescent lamp, dual ruby light, infrared
heater, direct sunlight and etc.
●Strenuous action of the testee or extreme electrosurgical interference may also affect the accuracy.
●Testee cannot use enamel or other makeup.
●Please clean and disinfect the device after operating according to the user manual.
●The calculation of respiration rate may be affected by factors such as exercise, environmental interference and
low perfusion level, which may result in a large deviation of calculation results.
Function Setting Introduction
Press the Pulse Oximeter Menu button to power on and access to the testing interface, or press the Menu button
repeatedly during normal operation sequentially switch parameter-setting interfaces to set up the parameters and
then return to the POST display. Settable parameters include high and low SpO2limit, high and low bpm limits,
high and low temperature limits, high and pulse beep volume.
The device will power off automatically within 8 seconds when there is no any signals input, and users can also
use the menu button under parameter-setting interfaces to turn the PULSE OXIMETER off.
Menu Setting
Table 1:Instruction for Menu setting
Function
Instruction for operation
Figures
Power “on”
and “off”
Power on
Turn on the PULSE OXIMETER by pressing the Menu/Power
button “ ”.
Power off setting
Short press the button, move the cursor to select the item of
“power off”, and then long press the button to turn the
power off.
Temp-Pulse Oximeter BZ0300A REV: A.0 December. 05, 2022
13
Note:
The device will power off automatically within 8 seconds when
there is no any signal input.
Setting enter
and exit
Setting enter
Long press the button to enter the interface of settings.
The setting interface of PULSE OXIMETER includes “Setup 1”,
“Setup 2”and “Sounds Setup”.
Exit PULSE OXIMETER setting interface
Short press the button, move the cursor to select the item of
“Exit”, long press the button return to the POST display.
“Prompt”on
or off setting
“Prompt”on or off setting
●Short press the menu button to enter the interface of
settings of “Setup 1”. Move the cursor to select the item of
“prompt”, and then long press the button to turn the
functions on or off.
●Short press the button, move the cursor to select the item
of “Exit”, and then long press the button to return to the
POST display.
“Pulse Beep”
on or off
setting
“Pulse Beep”on or off setting
Short press the button, move the cursor to select the ite
m of “Pulse Beep”, and then long press the button to
turn the functions on or off.
Default setting
Default setting
Short press the button, move the cursor to select the ite
m of “Restore”, then long press the button to returns
the PULSE OXIMETER to factory default setting.
After completing the setting, the interface will indicate
“OK”.
Move the cursor to select the item of “Exit”by short
press the button, and then long press the button to retu
rn to the POST display.
SpO2High
limit setting
SpO2high limit setting
Long press the button to enter the interface of settings of
“Setup 2”. Short press the button, move the cursor to
select the item of“SpO2High”, long press the button to adjust
the parameter of SpO2in the ≤100 and ≥SpO2Low+2
Temp-Pulse Oximeter BZ0300A REV: A.0 December. 05, 2022
14
SpO2Low
limit setting
SpO2low limit setting
Short press the button in the interface of“Setup 2”, move the
cursor to select the item of“SpO2Low”, long press the button
to adjust the parameter of SpO2in the ≤SpO2High-2 and ≥
50.
Pulse rate (PR)
High limit
setting
Short press the button in the interface of“Setup 2”
, move the
cursor to select the item of “PR High”, long press the button
to adjust the parameter of BMP in the ≤245 and ≥PR
Low+2.
Pulse rate (PR)
low limit
setting
Short press the button in the interface of“Setup 2”
, move the
cursor to select the item of “PR Low”, long press the button
to adjust the parameter of BMP in the ≥30 and ≤PR
High-2.
Temp High
limit setting
Short press the button in the interface of
“Setup 3”
, move the
cursor to select the item of “Temp High”, long press the
button to adjust the parameter of temperature in the ≤45
and ≥Temp Low+1.
Temp Low
limit setting
Short press the button in the interface of“Setup 3”, move the
cursor to select the item of“Temp Low”, long press the button
to adjust the parameter of temperature in the≥25 and ≤
Temp High-1.
Return to the
POST display
After completed above setting, press the button switch to any
interface of setting, move the cursor to select the item of
“Exit”to return to the POST display.
Warning
Uncomfortable or painful feeling may appear if use the device ceaselessly, especially for the microcirculation
barrier patients. It is recommended that the sensor should not be applied to the same finger for over 4 hours.
For the special patients, there should be a more prudent inspecting in the placing process. The device cannot
be clipped on the edema and tender tissue.
The light (the infrared is invisible) emitted from the device is harmful to the eyes, so the user and the
maintenance man should not stare at the light.
Testee cannot use enamel or other makeup.
Testee’s fingernail cannot be too long.
Please refer to the correlative literature about the clinical restrictions and caution.
This device is not intended for treatment.
The user is not allowed to repair the equipment. Changes or modification not expressly approved by

Temp-Pulse Oximeter BZ0300A REV: A.0 December. 05, 2022
15
Shenzhen Med-link may void the warranty.
Removing the batteries to avoid battery leakage and device damage if long time no use.
Note: The device has No Alarm System, just only warning signal is provided.
The symbol of "?" will be displayed on the screen when there's signal inadequacy, indicating the displayed
SpO2or pulse rate value is potentially incorrect.
Section 3 Troubleshooting
This section explains how to troubleshoot the PULSE OXIMETER. Tables list possible PULSE OXIMETER difficulties,
along with probable causes, and recommended actions to correct the difficulties. Detailed see table 2 as below.
Table 2:Instruction for Menu setting
Phenomena
Possible Causes
Solutions
Abnormal booth of
Pulse-Oximeter
(display screen and
transmitting tube
of LCD presenting
lights off)
The power button is not pressed in
place
Re-press the power button in place, and keep 1-2
seconds
Not Install battery
Install battery
Battery use-out
Replace battery
Install battery improperly Partial
damage of Metal dome (which is
directly connected to the battery).
Check and re-install battery, contact authorized
distributors
Damage in Connection between
mainboard and battery holder (i.e.
Damage in flexible printed circuit
board (FPCB) or break in soldering
spot).
Contact authorized distributors
No display on
screen, but the
transmitting tube
of LED lights on.
With damage in display screen or
break in the connection spot of
display screen
Contact authorized distributors
No reading display
on Pulse-Oximeter
Poor perfusion problem (generally,
oscillator intensity has no display
on screen, while the transmitting
tube of LCD presenting lights on, and
the finger insert in place)
If the oscillator intensity has no display on screen,
Please, adjust the finger position; Use your middle
or index finger in preference; Warm your fingers
The transmitting tube of LED lights
off
Contact authorized distributors
Fail auto-off
Damage in collection tube or other
device parts.
Contact authorized distributors
Inaccurate Temp
Measurement
The surface Temp-probe did not
firmly stick on the skin surface.
Stick the Temp-probe on the proper measuring
position by medical proof fabric
Wrong position of Temp-probe
Place the Temp-probe in proper position according
to the specification
No enough measuring time
Keep the correct measuring method by 10 mins
and then get the result

Temp-Pulse Oximeter BZ0300A REV: A.0 December. 05, 2022
16
Section 4 Electromagnetic Environment
Electromagnetic Interference Caution
This device has been tested and found to comply with the limits for medical devices to the IEC 60601-1-2 and
MDD 93/42/EEC. These limits are designed to provide reasonable protection against harmful interference in a
typical medical installation. However, because of the proliferation of radio-frequency transmitting equipment and
other sources of electrical noise in healthcare environments (for example, electrosurgical units, cellular phones,
mobile two-way radios, electrical appliances, and high-definition television), it is possible that high levels of such
interference due to close proximity or strength of a source may result in disruption of performance of this device.
This Fingertip pulse oximeter is not designed for use in environments in which the pulse can be obscured by
electromagnetic interference. During such interference, measurements may seem inappropriate or the device may
not seem to operate correctly.
Electromagnetic Environment
The PULSE OXIMETER is intended for use in an electromagnetic environment in which radiated RF disturbances are
controlled. The customer or user of the PULSE OXIMETER can help prevent electromagnetic interference by
maintaining a minimum distance between portable and mobile RF communications equipment (transmitters) and
the PULSE OXIMETER as recommended below, according to the maximum output of the communications
equipment.
Warning:
PULSE OXIMETER should not be used adjacent to or stacked with other equipment and that if adjacent or stacked
use is necessary, PULSE OXIMETER should be observed to verify normal operation in the configuration in which it
will be used.
Table 3—Declaration electromagnetic emissions
Guidance & Declaration - Electromagnetic ImmunityTable 4—Guidance & Declaration — electromagnetic immunity
Table 4—Guidance & Declaration—electromagnetic immunity
The PULSE OXIMETER is intended for use in the electromagnetic environment specified below. The customer or
the user of the PULSE OXIMETER should assure that It is used in such an environment.
Immunity test
IEC 60601 test level
Compliance level
Electromagnetic environment-guidance
Electrostatic
±8 kV contact
±8kV contact
Floors should be wood, concrete or
PULSE OXIMETER is intended for use in the electromagnetic environment specified below. The customer or the
user of the Oximeter probe should assure that it is used in such an environment.
Emissions test
Compliance
Electromagnetic environment-guidance
RF emissions CISPR 11
Group 1
The PULSE OXIMETER uses RF energy for its internal
function. Therefore, its RF emissions are very low and
are not likely to cause any interference in nearby
electronic equipment.
RF emissions CISPR 11
Classe B
The PULSE OXIMETER is suitable for use in domestic
establishment and in establishment directly
connected to a low voltage power supply network
which supplies buildings used for domestic purposes.

Temp-Pulse Oximeter BZ0300A REV: A.0 December. 05, 2022
17
discharge (ESD)
lEC 61000-4-2
±2 kV, ±4kV,
±8 kV,
±15 kV air
±2 kV, ±4kV,
±8 kV,
±15 kV air
ceramic tile. If floors are covered with
synthetic material, the relative humidity
should be at least 30 %.
Radiated RF
Electromagnetic
Fields IEC61000-4-3
10 V/m
80MHz to 2.7GHz
80% AM at 1kHz
10 V/m
Power frequency
magnetic field
IEC 61000-4-8
30 A/m
50 Hz or 60 Hz
30 A/m
50 Hz or 60 Hz
Power frequency magnetic fields should
be at levels characteristic of a typical
location in a typical commercial or
hospital environment.
FCC Warning:
Any Changes or modifications not expressly approved by the party responsible for compliance could void the
user's authority to operate the equipment.
This device complies with part 15 of the FCC Rules. Operation is subject to the following two conditions:
(1) This device may not cause harmful interference, and
(2) this device must accept any interference received, including interference that may cause undesired operation.
Note: This equipment has been tested and found to comply with the limits for a Class B digital device, pursuant to
part 15 of the FCC Rules. These limits are designed to provide reasonable protection against harmful interference
in a residential installation. This equipment generates uses and can radiate radio frequency energy and, if not
installed and used in accordance with the instructions, may cause harmful interference to radio communications.
However, there is no guarantee that interference will not occur in a particular installation. If this equipment does
cause harmful interference to radio or television reception, which can be determined by turning the equipment
off and on, the user is encouraged to try to correct the interference by one or more of the following measures:
-Reorient or relocate the receiving antenna.
-Increase the separation between the equipment and receiver.
-Connect the equipment into an outlet on a circuit different from that to which the receiver is connected.
-Consult the dealer or an experienced radio/TV technician for help.
This transmitter must not be co-located or operating in conjunction with any other antenna or transmitter. The
device has been evaluated to meet general RF exposure requirement. The device can be used in portable exposure
condition without restriction.
This manual suits for next models
4
Table of contents
Other MedLinket Medical Equipment manuals


Popular Medical Equipment manuals by other brands


Getinge
Getinge Arjohuntleigh Nimbus 3 Professional Instructions for use

Mettler Electronics
Mettler Electronics Sonicator 730 Maintenance manual

Pressalit Care
Pressalit Care R1100 Mounting instruction

Denas MS
Denas MS DENAS-T operating manual

bort medical
bort medical ActiveColor quick guide

AccuVein
AccuVein AV400 user manual


