MedLinket AM-806 User manual

REF: AM-806
20211230 A.1
Temp-pulse oximeter
P2-24
P1-23
Instruction Manual
Original
(Suitable for A4 paper printing)
Manual de Instrucciones
Traducción
(Adecuado para impresión en papel A4)

English 1
Contents
Quick Start Guide…………………………………………………………………………………………
Foreword ……………………………………………………………………………………………………
Warning ………………………………………………………………………………………………………
Latex Content Statement ……………………………………………………………………………
Secon1-Overview ………………………………………………………………………………………
Intended Use …………………………………………………………………………………………………
Essenal Performance ……………………………………………………………………………………
About the Pulse Oximeter ………………………………………………………………………………
Idenficaon of Front Panel, Le Panel Buons and Symbols …………………………
Equipment Symbols …………………………………………………………………………………………
Technical Specificaons ……………………………………………………………………………………
Product parts and accessories …………………………………………………………………………
Principle of Measurement ………………………………………………………………………………
Contraindicaon ………………………………………………………………………………………………
Aenons ………………………………………………………………………………………………………
Unpacking and Inspecon ………………………………………………………………………………
Included in the package …………………………………………………………………………………
Secon 2- Operaon ……………………………………………………………………………………
Installaon and Verificaon ……………………………………………………………………………
General Operaon……………………………………………………………………………………………
Safety………………………………………………………………………………………………………………
Funcon Seng Introducon…………………………………………………………………………
Menu Seng…………………………………………………………………………………………………
Secon 3- Troubleshoong……………………………………………………………………………
Secon 4- Electromagnec Environment………………………………………………………
Electromagnec Interference Cauon………………………………………………………………
Electromagnec Environment…………………………………………………………………………
Secon 5- Measurement Validaon………………………………………………………………
Subject Demographics……………………………………………………………………………………
ARMS Results…………………………………………………………………………………………………
Graphs……………………………………………………………………………………………………………
Secon 6- Service and Maintenance……………………………………………………………
Cleaning and Disinfecng…………………………………………………………………………………
Calibrang………………………………………………………………………………………………………
Repairing and Maintenance……………………………………………………………………………
Warnings…………………………………………………………………………………………………………
Disposal……………………………………………………………………………………………………………
Warranty…………………………………………………………………………………………………………
Qualified cerficate…………………………………………………………………………………………
2
3
3
4
4
4
4
4
5
5
6
7
8
9
9
9
9
10
10
11
13
14
14
17
18
18
18
20
20
20
21
22
22
22
22
22
22
23
23
English 2
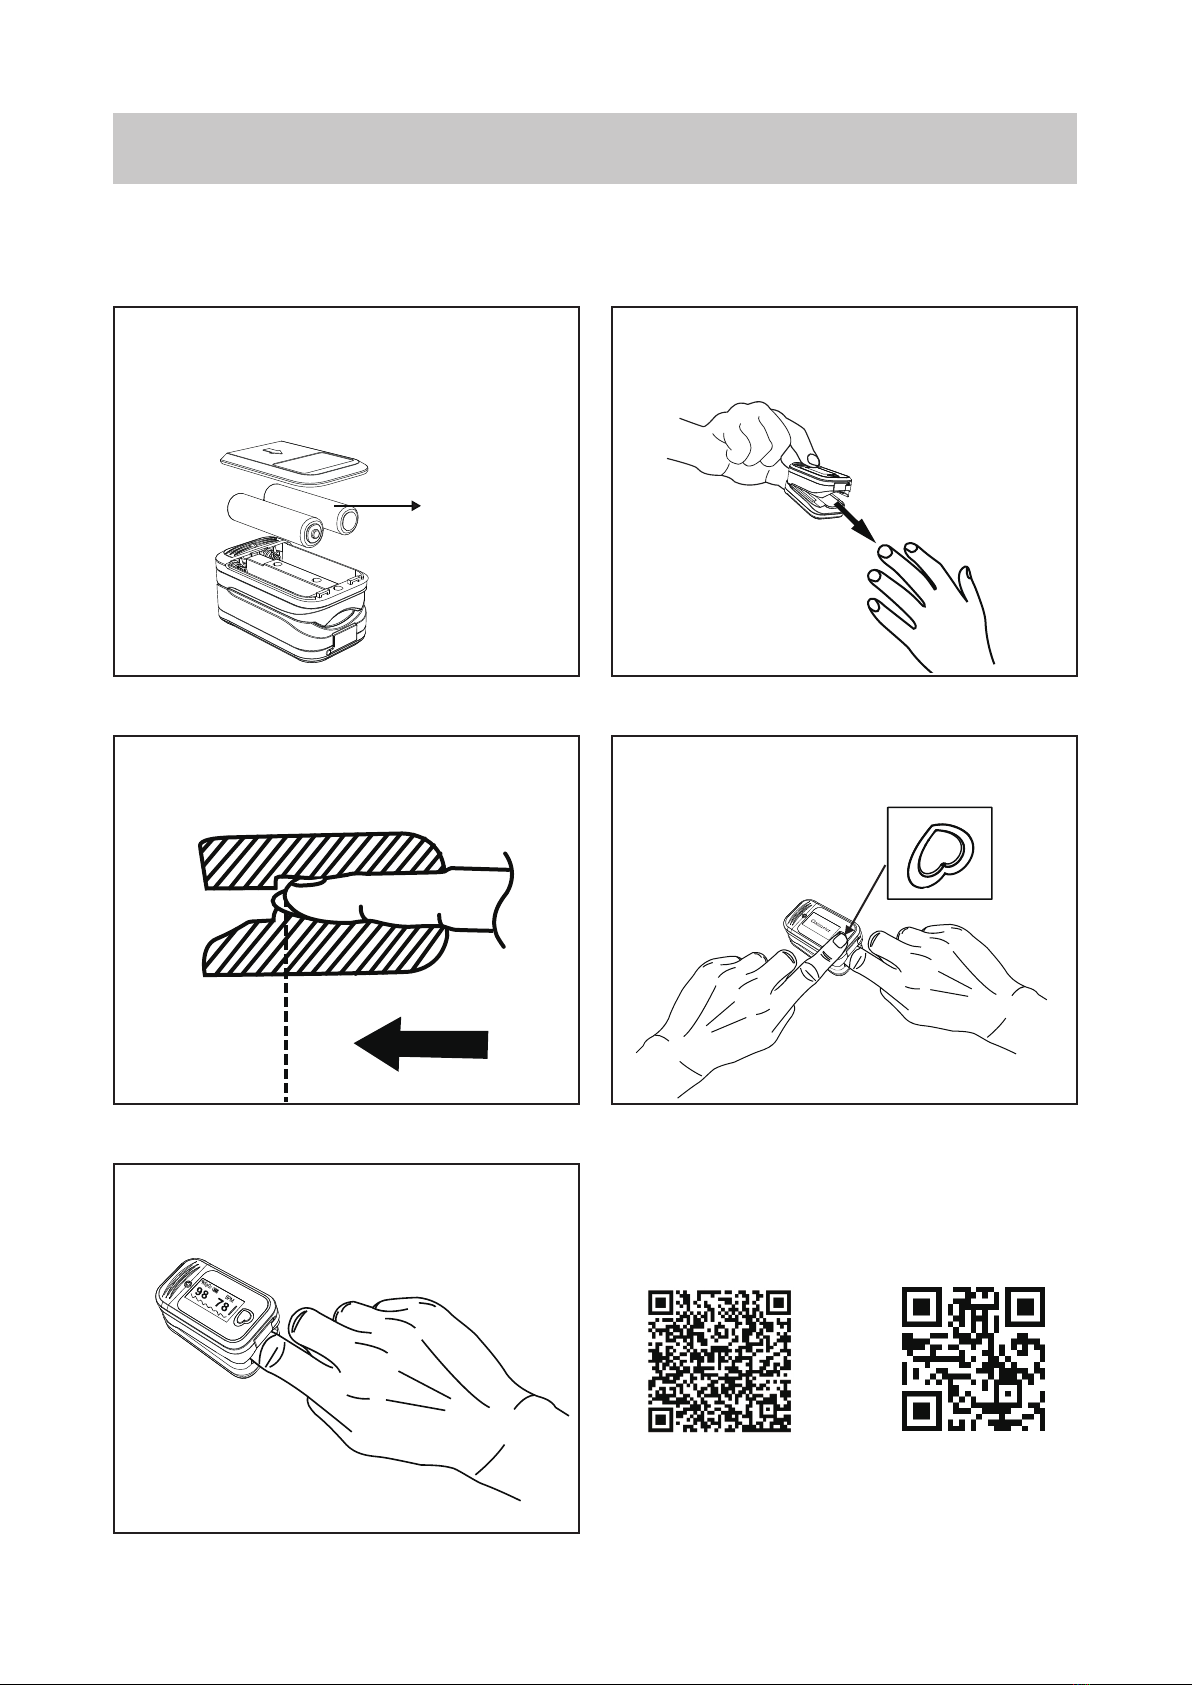
Quick Start Guide
How to begin?
3. Make sure the sensor LED is above the fingernail
as shown below.
2. Open the clip of the pulse oximeter, insert a
finger (The preferred applicaon is middle finger
and index finger), as shown below.
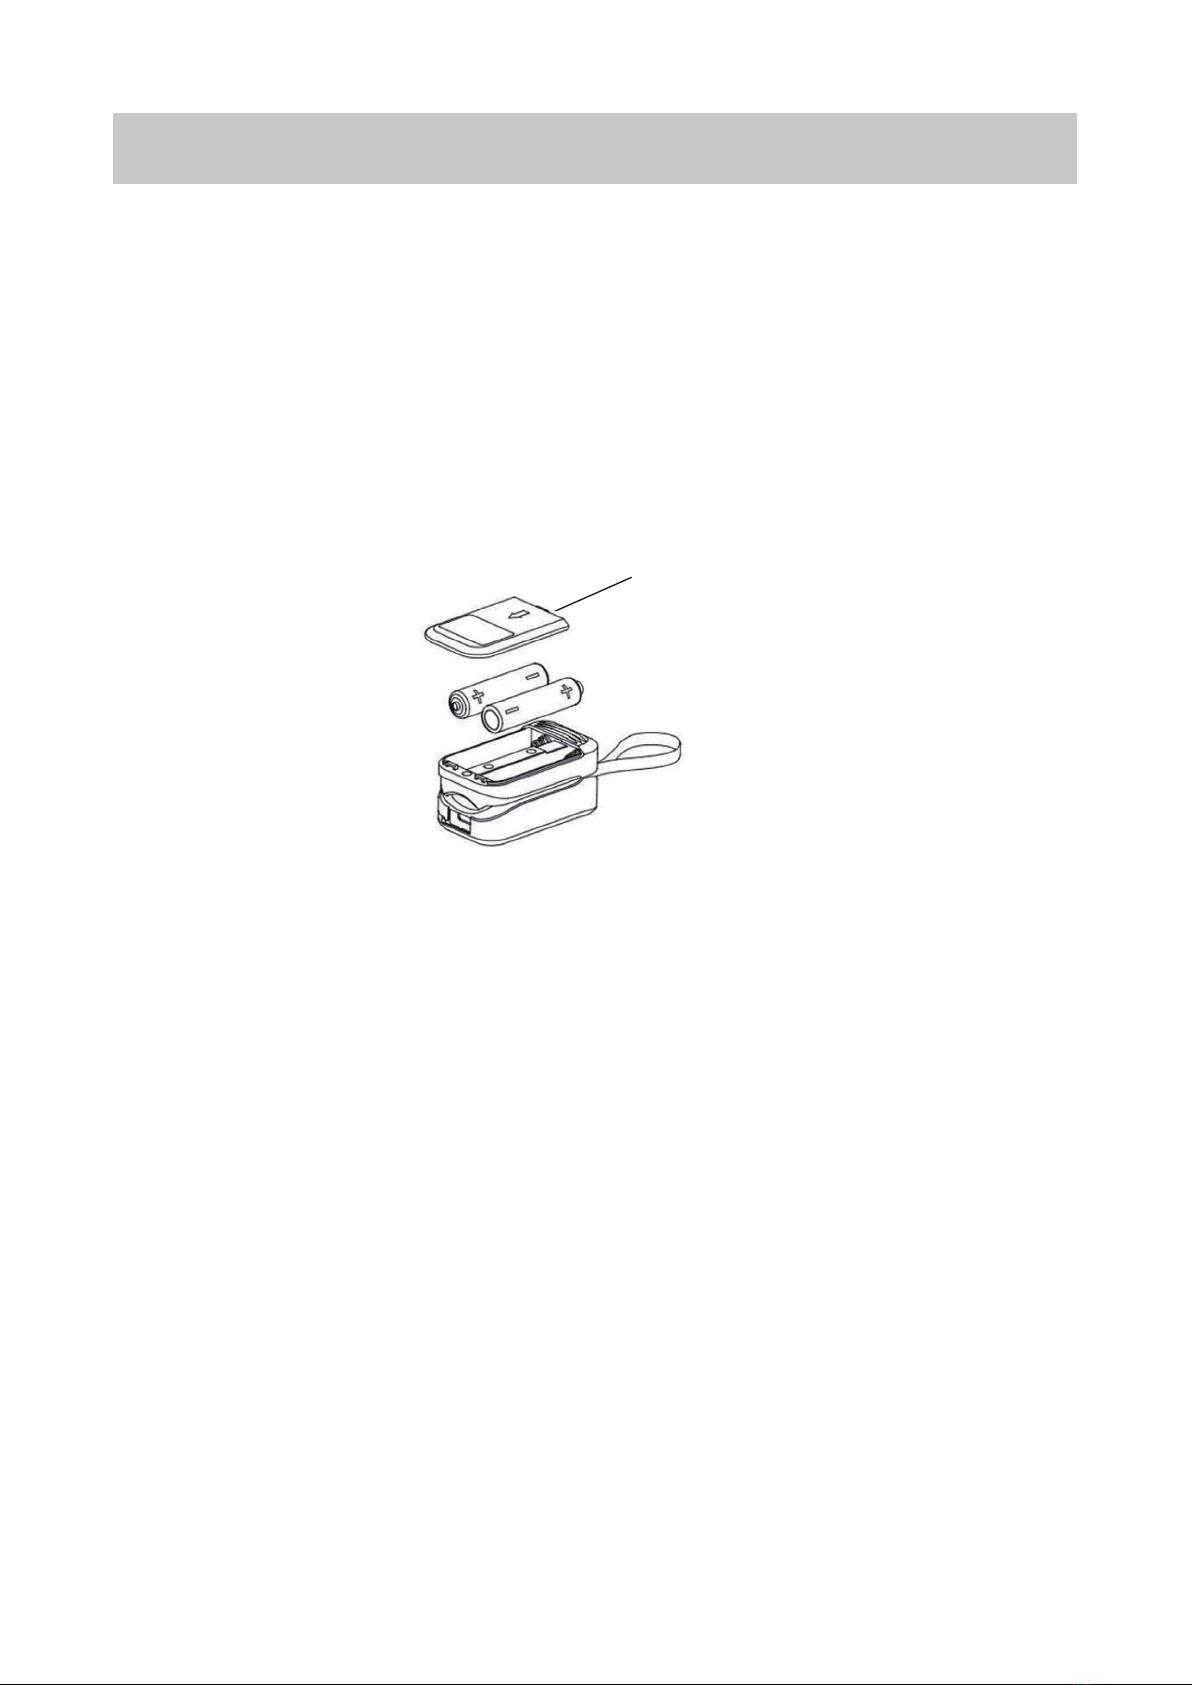
1. Open baery compartment cover and insert two
new AAA alkaline baeries as indicated below to
ensure the polarity (<+> and <->) of the baeries
are correct and then close it.
+
+
-
-
2*AAA
alkaline
baery
5. Get the informaon of SpO2 directly from screen
display.
4. Turn on the pulse oximeter by pressing the
Power buon.
Scan the QR Code to download the user manual
or watch the instrucon video, thanks!
User manual in PDF Instrucon video
English,Spanish Scan the QR code to watch
the instrucon video on YouTube!
hps://www.med-linket.com/
uploads/US_manual_AM-806.pdf

English 3
Foreword
The Pulse Oximeter manual is intended to provide informaon for proper operaon
and maintenance. General knowledge of monitoring and understanding of the
features and funcons of the Pulse Oximeter are prerequisites for proper use. Please
read these instrucons carefully before using this equipment.
The manual describing the operang procedures should be followed strictly. Failure to
follow these instrucons can cause measuring abnormality, equipment damage and
personal injury. The manufacturer is NOT responsible for the safety, reliability and
performance issues and any monitoring abnormality, personal injury and equipment
damage due to user’s negligence of the operaon instrucons.
Warnings are idenfied by the WARNING symbol shown above.
Explosion hazard. Do not use the PULSE OXIMETER in the presence of flammable
anesthecs mixed with air, or with oxygen, or nitrous oxide.
Do not spray, pour, or spill any liquid on the PULSE OXIMETER and its accessories.
Reusable sensors must be moved to a new site at least every 4 hours. Because
individual skin condion affects the ability of the skin to tolerate sensor
placement, it may be necessary to change the sensor site more frequently with
some users. If skin integrity changes, move the sensor to another site.
At elevated ambient temperatures, users skin could be severely burned aer
prolonged sensor applicaon at sites that are not well perfused. To prevent
this,be sure to check users applicaon sites frequently. The temperature of the
sensor contacng with skin won't exceed 105.8℉ if the inial skin temperature
doesn't exceed 95℉.
Be aware that following removal of the sensor from the users, it is possible that
environmental light may cause the oximeter device to connue to display a
waveform or data values but these data should not be used as a basis for a
clinical diagnosis.
Portable and mobile RF communicaons equipment can affect MEDICAL
ELECTRICAL EQUIPMENT.
The waste of PULSE OXIMETER must not be disposed as unsorted municipal
waste and must be collected separately. Please contact an authorized
representave of the manufacturer for informaon concerning the disposal of
your equipment.
This device is not intended for treatment.
The LCD panel contains toxic chemicals. Do not ingest chemicals from a broken
LCD panel.
Do not modify this equipment without authorizaon of the manufacturer.
●
●
●
●
●
●
●
●
●
Warning

English 4
The PULSE OXIMETER is not made with natural rubber latex in any locaon that may
result in users contact.
Latex Content Statement
Intended Use
This pulse oximeter is not a medical device and is not intended to diagnose and/or
treat any medical condion or disease. It is intended for non-medical use by healthy
people to monitor their pulse rate and blood oxygen levels. It is for sports and/or
aviaon use.
Target populaon: Adult, adolescent and child.
Essenal Performance
The essenal performance of this device is defined as SpO2 accuracy and pulse rate
accuracy, or an indicaon of abnormal operaon. Accuracies may be affected as a
result of exposure to electromagnec disturbances that are outside of the
environments listed in this Instrucon For Use. If such a kind of situaon appears,
move the device away from the source of electromagnec disturbances. When
there's signal inadequacy, the symbol of "?" will be displayed on the screen, indicang
the displayed SpO2 or pulse rate value is potenally incorrect.
About the Pulse Oximeter
The device contains a dual light source (red LED and infrared red LED) and a photo
detector. Bone, ssue, pigmentaon and venous vessels normally absorb a constant
amount of light over me. The arteriolar bed normally pulsates and absorbs variable
amounts of light during the pulsaons. The rao of light absorbed is translated in an
oxygen saturaon measurement (SpO2). Because a measurement of SpO2 is
dependent on light from the device, excessive ambient light can interfere with this
measurement.
Section 1- Overview
English 5
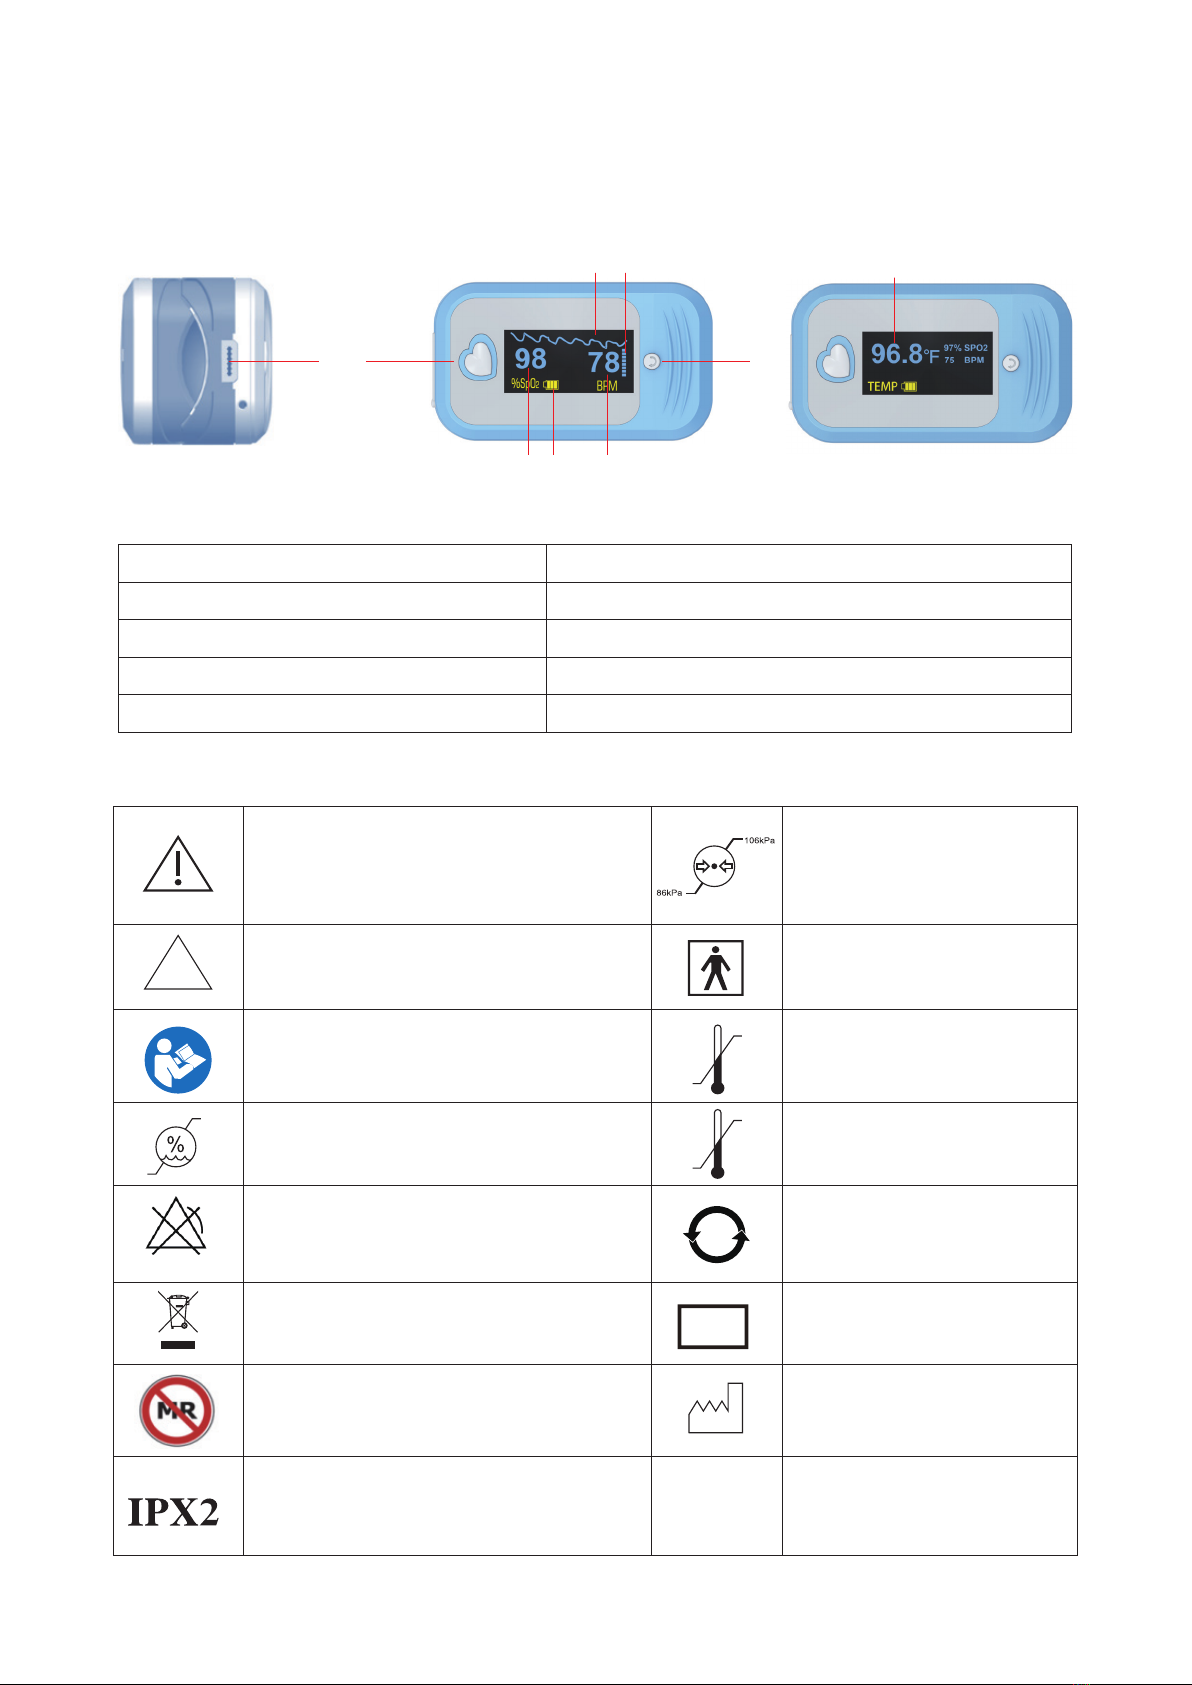
Idenficaon of Front Panel, Le Panel Buons and Symbols
Refer to the PULSE OXIMETER Operator’s manual for a complete descripon of all
buons, symbols, controls, displays and indicators.
98
1
23 5
4
6 7
Figure 1: PULSE OXIMETER Front Panel and Le Panel
1—Menu buon/Power buon
2—%SpO2 Display
3—Low Baery indicator
4—Temperature Display
5—Pulse Rate Display (bpm)
6—PPG (photoplethysmograph)
7—Bar graph (The Pulse Amplitude Indicator)
8—Display mode switch
9—Accessories Port Connector
Equipment Symbols
Cauon
Non sterile Packaging
Refer to Instrucon
manual/booklet
Humidity limitaon(Storage,
Transportaon and Operang)
No SpO2 Alarm
Batch Code
Compliance with WEEE Standard
MR unsafe
Protected against vercally
falling water drops when
enclosure lted up to 15°
NON
STERILE
80%
0%
-10℃
40℃
5℃
40℃
LOT
Atmospheric Pressure
limitaon(Storage,
Transportaon and
Operang)
Type BF (Body Floang)
Applied Part
Storage & transportaon
temperature limit
Operaon temperature
limit
10 Environment-friendly
use period
Date of manufacture

English 6
Technical Specifications
Reminder Baery-low indicator
Method Dual wavelength LED
Pulse Rate Range 30 to 245 bpm
Pulse Oximeter
SpO2 Range 70% to 100%
SpO2 Resoluon 1%
SpO2 Accuracy
(under good &
low perfusion)
90% to 100% range: ±2%
70% to 89% range: ±3%
<70%: unspecified
Pulse Rate Resoluon
Pulse Accuracy
(under good
& low perfusion)
±3 bpm
LED Wavelengths Red: approximately 660nm; Infrared: approximately 905nm
Less than 15mW
Range, Accuracy
Display Resoluon
1 bpm
Opcal output power
Temperature
Note: The funcon of temperature measure works by the accessory of temperature probe.
Power Supply Requirements
Note: The Oximeter does not include baeries.
Baeries 1.5V (AAA) alkaline baeryX2 (IEC Type LR03)
Adaptable Range 2.6V~3.6V
Only SpO
2
funcon works
Less than 55mA
Only Temp funcon works
Less than 40mA
SpO2 and Temp funcon
work together Less than 60mA
Apply the accessory of
SpO2 probe Less than 55mA
Display Parameters SpO2, Pulse Rate, Pulse Waveform Display, Bar Graph and
Low Baery Indicator
Data Update Period 8s
Reminder Response Time
<2s
SpO2 plethysmogram,
pulse sound 50Hz
Value of Pulse and SpO21Hz
77°to 113°F (25℃ to 45℃): ±0.2°F(±0.1℃)
±0.2°F (±0.1℃)
English 7
Environment
Operang environment Temperature 41℉~104℉(5℃~40℃), humidity ≤80%
Transportaon and
Storage environment Temperature 14℉~104℉(-10℃~40℃), humidity ≤80%
Hyperbaric Pressure
(Storage, Transportaon
and Operang) 86kPa~106kPa
Classificaon
Protecon Against Liquids
IPX2
Dimension and Weighng Weight: 31.5g (Not including baeries), Size: 61*34*30.5mm
Compliance
Item Compliant with
Equipment classificaon Safety Standards: IEC 60601-1:2012,
EMC: IEC 60601-1-2:2014
Type of protecon Internally powered equipment (on baery power)
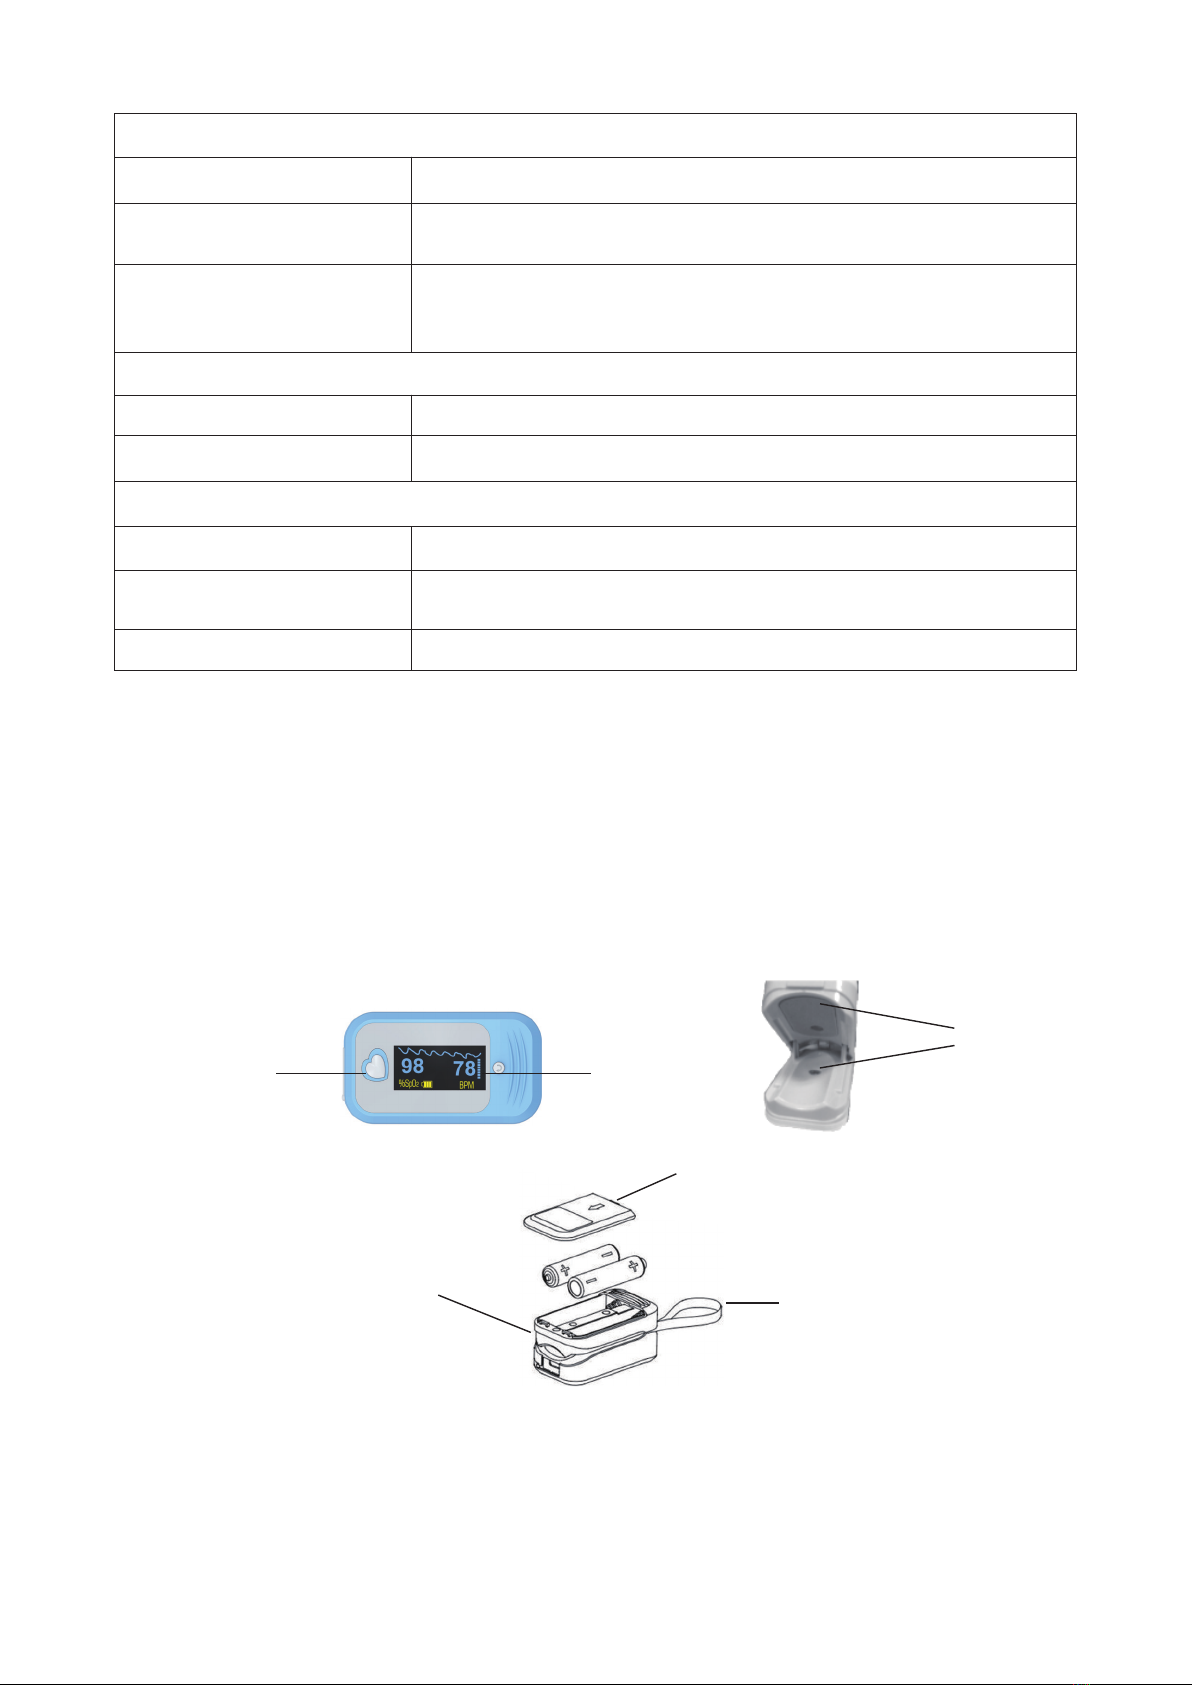
Product parts and accessories
The Pulse Oximeter is composed of instrument and accessories, detail of the
instrument and accessories see figure 2 - figure 4.
1. Instrument
Control buon Display
Screen
Applied
part
Baery cover
Accessories
Port Connector lanyard
Figure 2: instrument
English 8
Principle of Measurement
The measurement of PULSE OXIMETER uses a mul-funconal
oxyhemoglobinometer to transmit some narrow spectrum light bands through
blood samples, and to measure aenuaon of spectrum with different wavelengths
according to the characterisc that RHb, O2Hb, Met Hb and COHb absorb the light
of different wavelength, thereby determining O2Hb saturaon of different fracons.
O2Hb saturaon is called “fraconal” O2Hb saturaon.
Fractional O2Hb saturation=
Oppositely, pulse oxygen oximeter measure functional O2Hb saturation:
RHb+O2Hb+MetHb+COHb
O2Hb x100
Functional O2Hb saturation= RHb+O2Hb
O2Hb x100
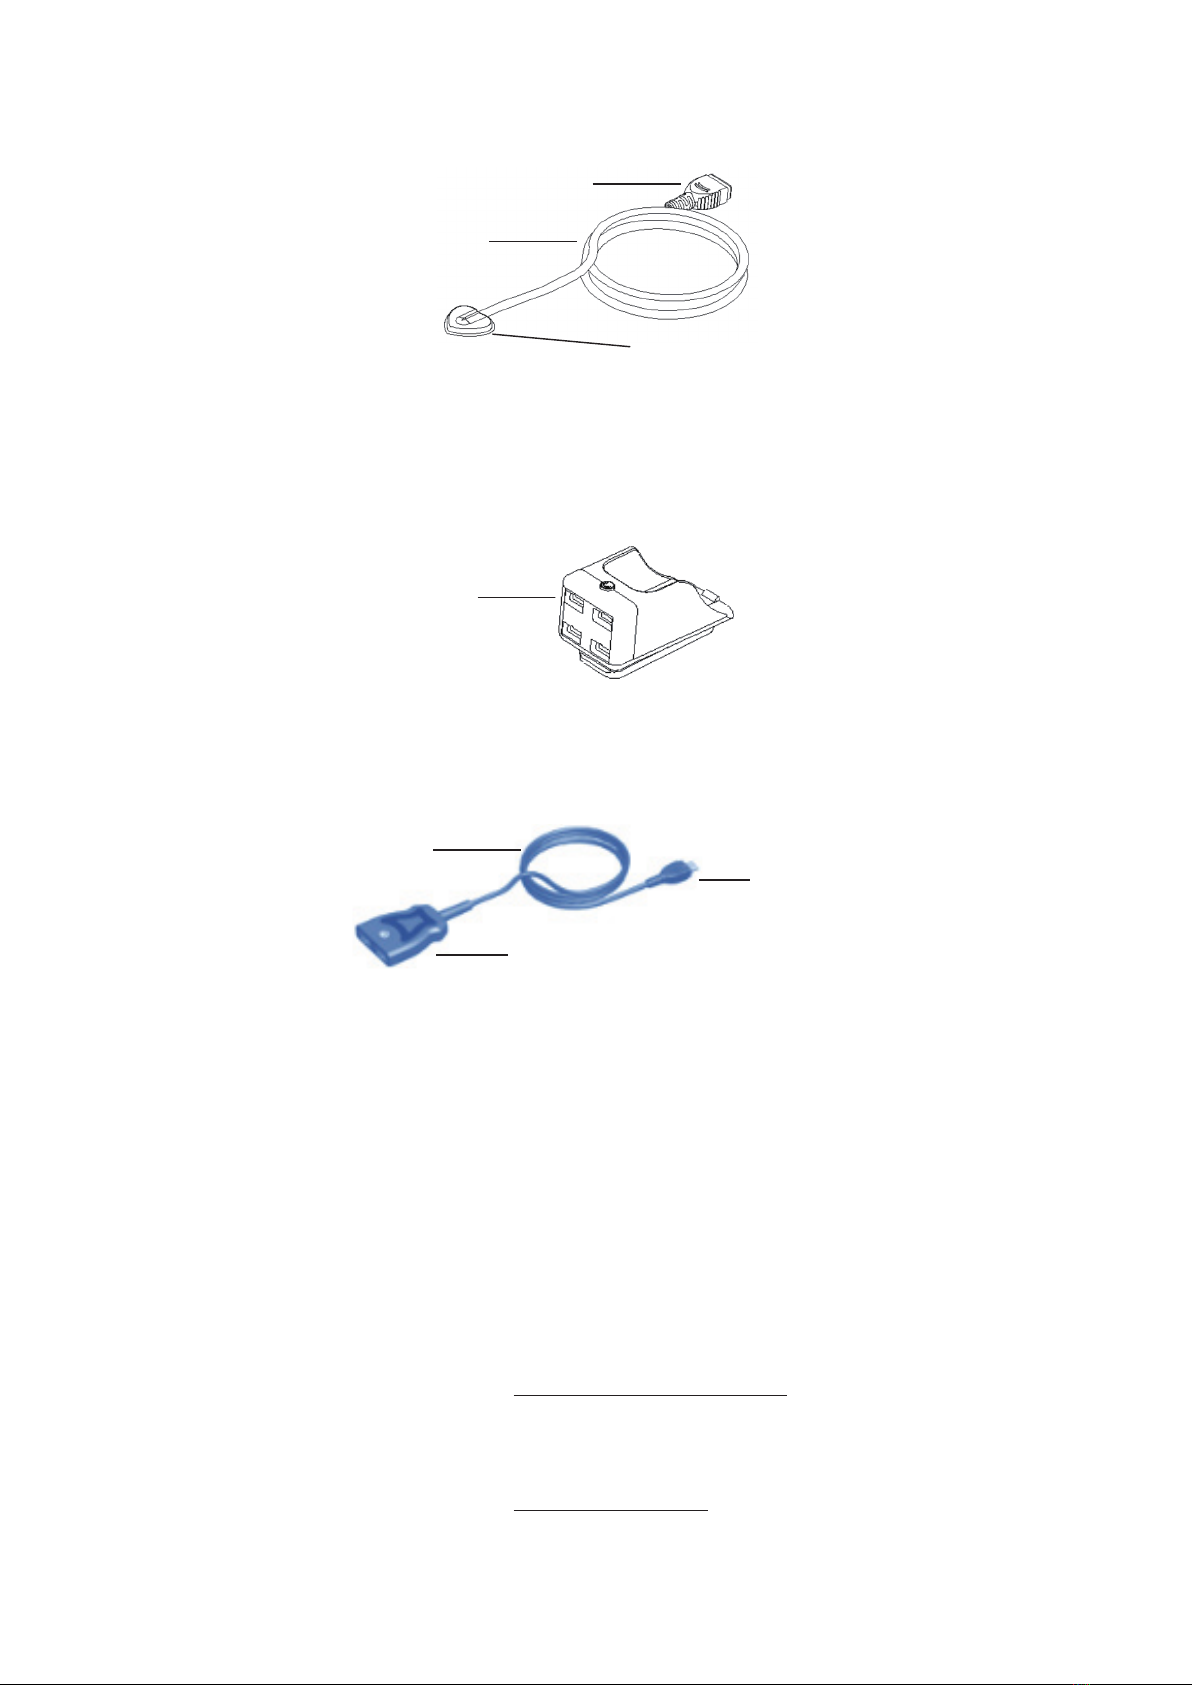
Connector
Cable
3. Accessories (Separate Purchase)
3.1 Wrist strap adapter
Accessories
Port Connector
Figure 4-1: Wrist strap adapter
2. Temperature probe
Applied part
Figure 3: Temperature probe
3.2 Adapter Cable
Cable
Connector
Yoke for connect with SpO2 probe
Figure 4-2: Adapter Cable

English 9
● Keep the oximeter away from dust, vibraon, corrosive substances, explosive
materials, high temperature and moisture.
● If the oximeter gets wet, please stop using.
● When it is carried from cold environment to warm and humid environment,
please do not use it immediately.
● DO NOT operate keys on front panel with sharp materials.
● High temperature or high pressure steam disinfecon of the oximeter is not
permied. Refer to User’s Manual for instrucons of cleaning and disinfecon.
● Do not have the oximeter immerged in liquid. When it needs cleaning, please
wipe its surface with disinfect soluon by so material. Do not spray any liquid on
the device directly.
● When cleaning the device with water, the temperature should be less than 140℉.
Aenons
Unpacking and Inspecon
Remove the equipment of PULSE OXIMETER from the shipping carton and examine
for signs of shipping damage. Please check all materials against the packing list. Save
the invoice, bill of lading and all packing materials. These may be required if it is
necessary to process a claim with the carrier.
If anything is missing or damaged, please contact the Technical Service Department.
You can contact by:
● Phone: +86 755 61120085
● Fax: +86 755 61120055
● Email: user07@med-linket.com
Included in the package
Present SpO2 oximeter transmits light of two wavelengths only, red light and
infrared, to differenate HbO2 from HbR. One side of the sensor contains two LEDs,
and the other side contains a photoelectric detector. SpO2 oximeter measures HbO2
saturaon in the blood by the light plethysmograph when the pulse beats. The result
is quite precise when HbO2 saturaon is between 70% to 100%.
The device can not be used for users with diseases or condions including blood
microcirculaon disorder, excessive staining in the blood, disorders of important
hemoglobin indicators and severe arrhythmia.
Contraindicaon
Descripon
PULSE OXIMETER (instrument)
PULSE OXIMETER Operator's Manual
Lanyard
Temperature probe: Disposable Skin-surface
Temperature Probe, 0.9m.
Qty
1 Piece
1 Piece
1 Piece
1 Piece
English 10
Section 2- Operation
Installaon and Verificaon
● Baery installaon
Cauon: The Pulse Oximeter does not operate with dead baeries and
can not be powered by external power source. Install new baeries.
1. Unplug all accessories from the Pulse Oximeter, and press the menu buon to
access the Seng Interface, turn the PULSE OXIMETER off. See table 1.
2. Remove the baery rear cover towards the direcon indicated on the cover.
3. Insert two “AAA” size baeries, making sure the baery’s posive and negave
poles are correctly oriented in the baery compartment as shown in Figure 5.
4. Close the baery rear cover.
● Performance Verificaon
1. Performance Tests
Power up the device to get the oximeter ready for measurement.
2. Power-On Self-Test
Before using the PULSE OXIMETER, you must verify that the PULSE OXIMETER is
working properly and is safe to use. Proper working condions are verified each me
when the PULSE OXIMETER is turned on as described in the following procedure. The
verificaon procedure (POST) takes 2 to 3 seconds to complete.
Cauon: If any indicator or display element does not light when the PULSE OXIMETER
is turned on, do not use the PULSE OXIMETER. Instead, contact qualified service
personnel, your local MED-LINKET representave, or MED-LINKET’s Technical Services
Department.
Note: The Pulse Oximeter automacally starts the Power-On Self-Test (POST) to
ensure that its internal circuits are funconing properly.
Baery rear cover
Figure 5: Installing Baeries

English 11
Procedure
1) Turn on the PULSE OXIMETER by pressing the Menu buon.
2) Aer the device completes the Power-On Self-Test (POST), it will directly switch to
measurement interface.
%SpO2 BPM
① ② ③
Figure 6: measurement
3) Long press the buon to switch device interface of PULSE OXIMETER, and adjust
parameters. See table-1.
3. Low perfusion test
SpO2 simulator is used to simulate SpO2 and pulse rate values to verify oximeter’s
performance under low perfusion condion. First, the oximeter is clamped onto the
opcal signal generator of the SpO2 simulator, then the simulator is turned on to set
specific SpO2 and pulse rate values. In addion, different perfusion levels like 3% and
0.1% can also be set on the simulator. The values of SpO2 and pulse rate displayed on
the oximeter are then compared to those preset on the SpO2 simulator to verify
whether accuracy requirements can be met.
General Operaon
The PULSE OXIMETER can measure funconal oxygen saturaon in the blood by itself
, which can also be obtained through plugging an accessory of MED-LINKET SpO2
probe into the instrument. Body temperature can be measured by applying a
temperature probe of MED-LINK. See table-1.
● Preparave for operang
1) Insert baeries according to the installaon procedure above.
2) Press the “power ” key for 1 second to acvate the device.
● SpO2 measurement
1) Open the clip of PULSE OXIMETER, See figure 6.①.
2) Place a finger ( The preferred applicaon is middle finger and index finger) on the
silicone and ensure the finger posion is correct , see figure 6.②, and then clamp the
finger, see figure 6.③.
3) Turn on the PULSE OXIMETER by pressing the Power button “ ”
4) Get the information of SpO2 directly from screen display.
English 12
Note:
1. The detail of seng see table - 1.
2. When placing finger onto the silicone pad, make sure nail is upturned.
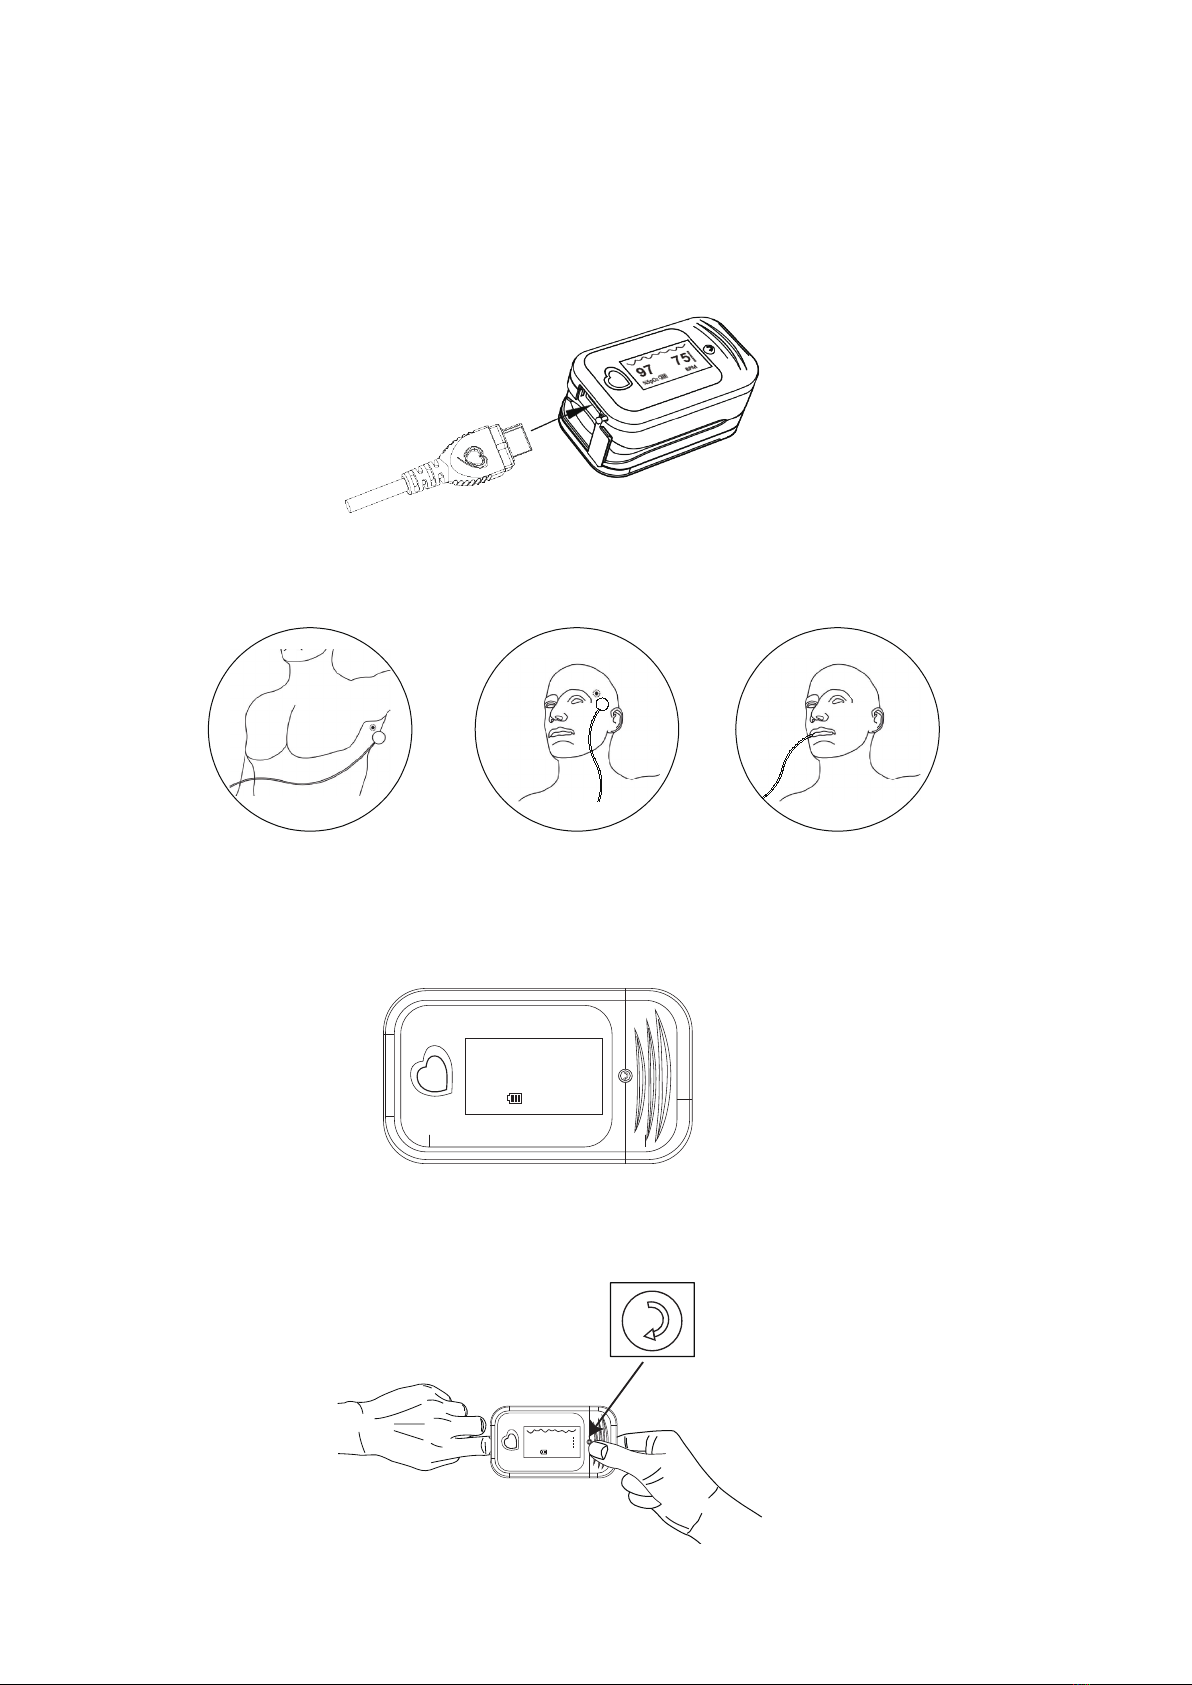
● Temperature measurement
1) Plug the temperature probe connector side into the instrument’s USB female
connector .
● Switch Screen turn switch
1) Press the Screen turn switch, See figure 7.
Figure 7
%SpO
2
97
75
BPM
TEMP
96.8
℉97%SpO2
75 BPm
3) Get the informaon of temperature directly from screen display.
2) Place another side of the temperature probe to user’s surface or esophageal/rec-
tal for collecng the temperature signal.
Recommended measure
5-8 minutes
Recommended measure
8-10 minutes
Recommended measure
3-5 minutes
English 13
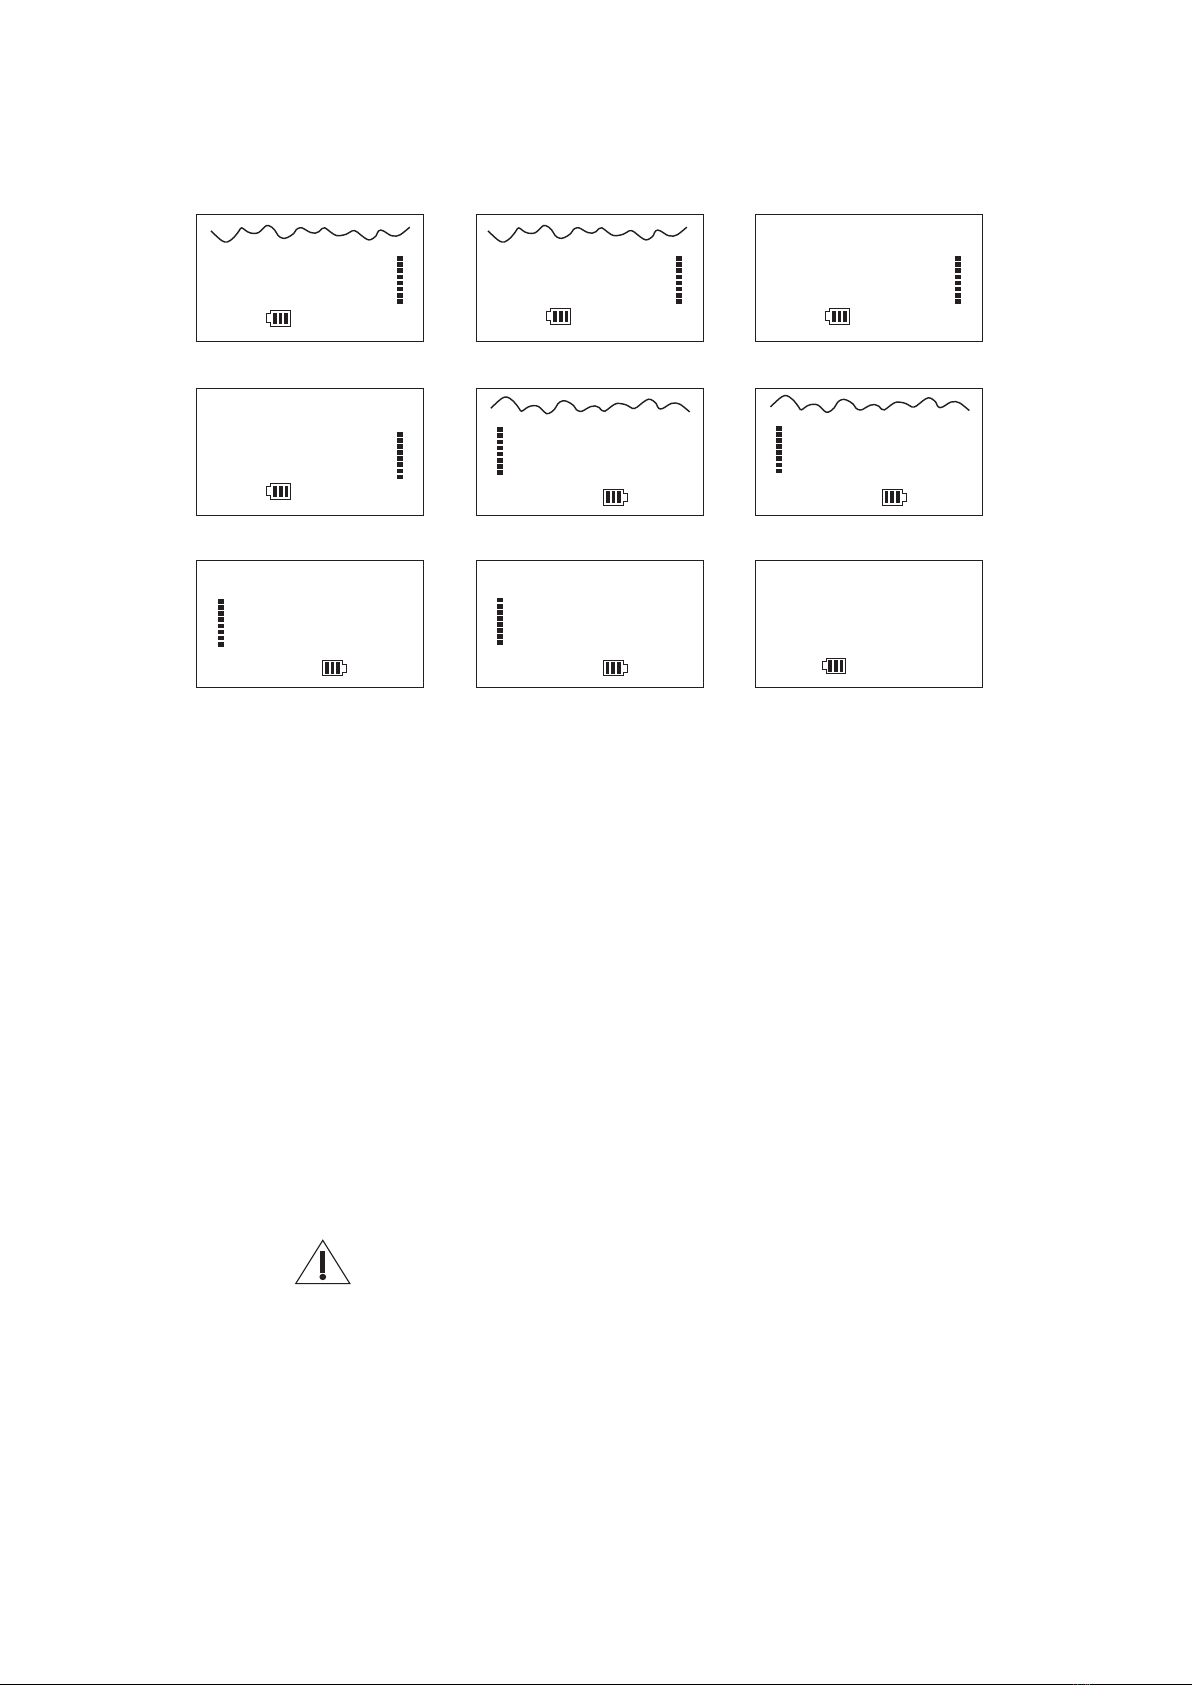
2) There are nine display modes for your choice, See Figure 8. Figure 8.①-Figure
8.⑧ display SpO2 and pulse rate, Figure 8. ⑨ display SpO2, pulse rate and tem-
perature.
Figure 8
①②③
75
%SpO
2
97
BPM
%SpO
2
97
75
BPM
%SpO
2
97
75
BPM
⑦⑧⑨
TEMP
96.8
℉97%SpO2
75 BPm
%SpO
2
97
75
BPM
%SpO
2
97
75
BPM
④⑤⑥
%SpO
2
BPM
97
75
%SpO
2
97
75
BPM
%SpO
2
97
75
BPM
Safety
1) Safety
Instrucons for safe operaons
● Check the main unit and all accessories periodically to make sure that there is
no visible damage that may affect user’s safety and monitoring performance. It is
recommended that the device should be inspected once a week at least. Please
stop using the device when there is obvious damage.
● Necessary maintenance must be performed by qualified service engineers
ONLY. Users are not permied to maintain it by themselves.
● The oximeter cannot be used together with devices not specified in User’s
Manual. Please use the device recommended by Manufacturer.
● Please remove the finger from the equipment to stop measure and pull the
accessories from the equipment, then the PULSE OXIMETER will power off auto-
macally within 8 seconds if the equipment must be closed for the urgent status.
2) Warnings
● Explosive hazard—DO NOT use the oximeter in environment with inflammable
gas such as some ignitable anesthec agents.
● DO NOT use the oximeter while the testee is under measurement of MRI and
C T.
● Be cauous of the cable. Please do not break the cable during usage to avoid
device damage. Please don’t use cable if allergic to cable.
● Please don’t use this product if you are allergic to silicone pad and ABS plasc.
● Please dispose the device, accessory and packing (including plasc bag, foam
and carton) according to local law.
English 14
3) The aenon of Operaon
● The equipment should be fully tested to see if it can be used normally before
using.
● The finger should be placed properly (see figure 4 of this manual), or else it may
cause inaccurate measurement.
● The SpO2 sensor and photoelectric receiving tube should be arranged in a way
with the testee’s arteriole in a posion in between.
● The device should not be used at a locaon or limb ed with arterial catheter or
blood pressure cuff of receiving intravenous injecon.
● Make sure the opcal path is free from any opcal obstacles like rubberized
fabric; otherwise it may result in venous pulsaon and inaccurate measure of SpO2.
● Excessive ambient light may affect the measuring result. It includes fluorescent
lamp, dual ruby light, infrared heater, direct sunlight and etc.
● Strenuous acon of the testee or extreme electrosurgical interference may also
affect the accuracy.
● Testee cannot use enamel or other makeup.
● Please clean and disinfect the device aer operang according to the user
manual.
Funcon Seng Introducon
Press the Pulse Oximeter Menu buon to power on and access to the tesng inter-
face, or press the Menu buon repeatedly during normal operaon to switch to
parameter-seng interfaces to set up the parameters and then return to the POST
display. Seable parameters include high and low SpO2 limit, high and low bpm
limits, high and pulse beep volume.
The device will power off automacally within 8 seconds when there is no any
signals input, which can also be turned off by using the menu buon under parame-
ter-seng interfaces.
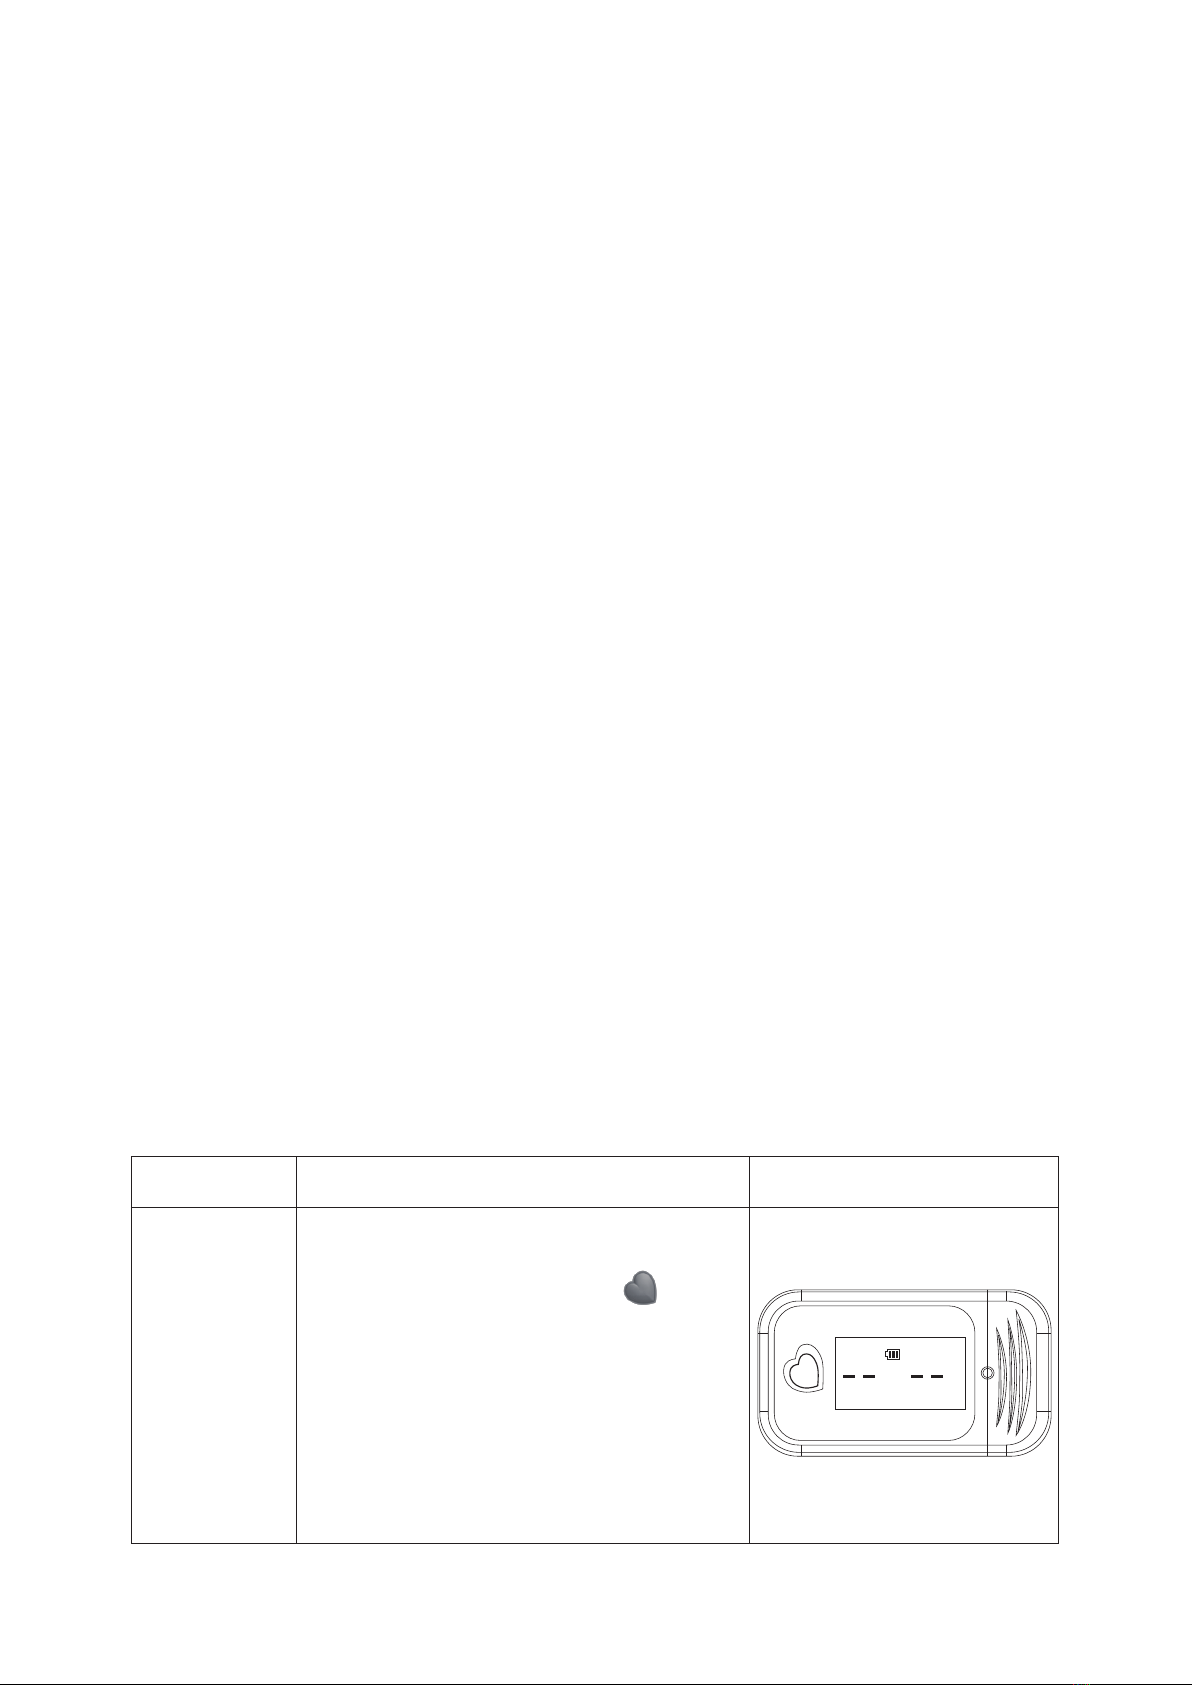
● Power on
Turn on the PULSE OXIMETER by press-
ing the Menu/Power buon “ ”.
● Power off seng
Short press the buon, move the cursor
to select the item of “power off”, and
then long press the buon to turn the
power off.
Note:
The device will power off automacally
within 8 seconds when there is no any
signal input.
Menu Seng
Table 1:Instrucon for Menu seng
Funcon Instrucon for operaon Figures
Power “on”
and “off”
%SpO2 BPM

English 15
Exit PULSE OXIMETER seng interface
● Short press the buon, move the
cursor to select the item of “Exit”, long
press the buon to return to the POST
display.
“Beep” on or off seng
Short press the buon, move the cursor
to select the item of “Beep”, and then
long press the buon to turn the func-
ons on or off.
Default seng
Short press the buon, move the cursor
to select the item of “Restore”, then long
press the buon to return the PULSE
OXIMETER to factory default seng.
Aer compleng the seng, the inter-
face will indicate “OK”.
Move the cursor to select the item of
“Exit” by short press the buon, and
then long press the buon to return to
the POST display.
“Alm” on or off seng
● Short press the menu buon to enter
the interface of sengs of “Alm Setup
1”. Move the cursor to select the item
of “Alm”, and then long press the buon
to turn the funcons on or off.
● Short press the buon, move the
cursor to select the item of “Exit”, and
then long press the buon to return to
the POST display.
Seng enter
Long press the buon to enter the
interface of sengs.
The seng interface of PULSE OXIME-
TER includes “Alm Setup 1”, “Alm Setup
2” and “Sounds Setup”.
Seng enter
and exit
“Alm” on or
off seng
“Beep” on or
off seng
Default
seng
SpO2 High Limit seng
Long press the buon to enter the
interface of sengs of “Alm Setup 2”.
Short press the buon, move the cursor
to select the item of “SpO2 Alm Hi”,
long press the buon to adjust the
parameter of SpO2 in the scope of 52%
to 100%.
The default upper limit is 100%.
SpO2 High
Limit seng
English 16
%SpO
2
97
75
BPM
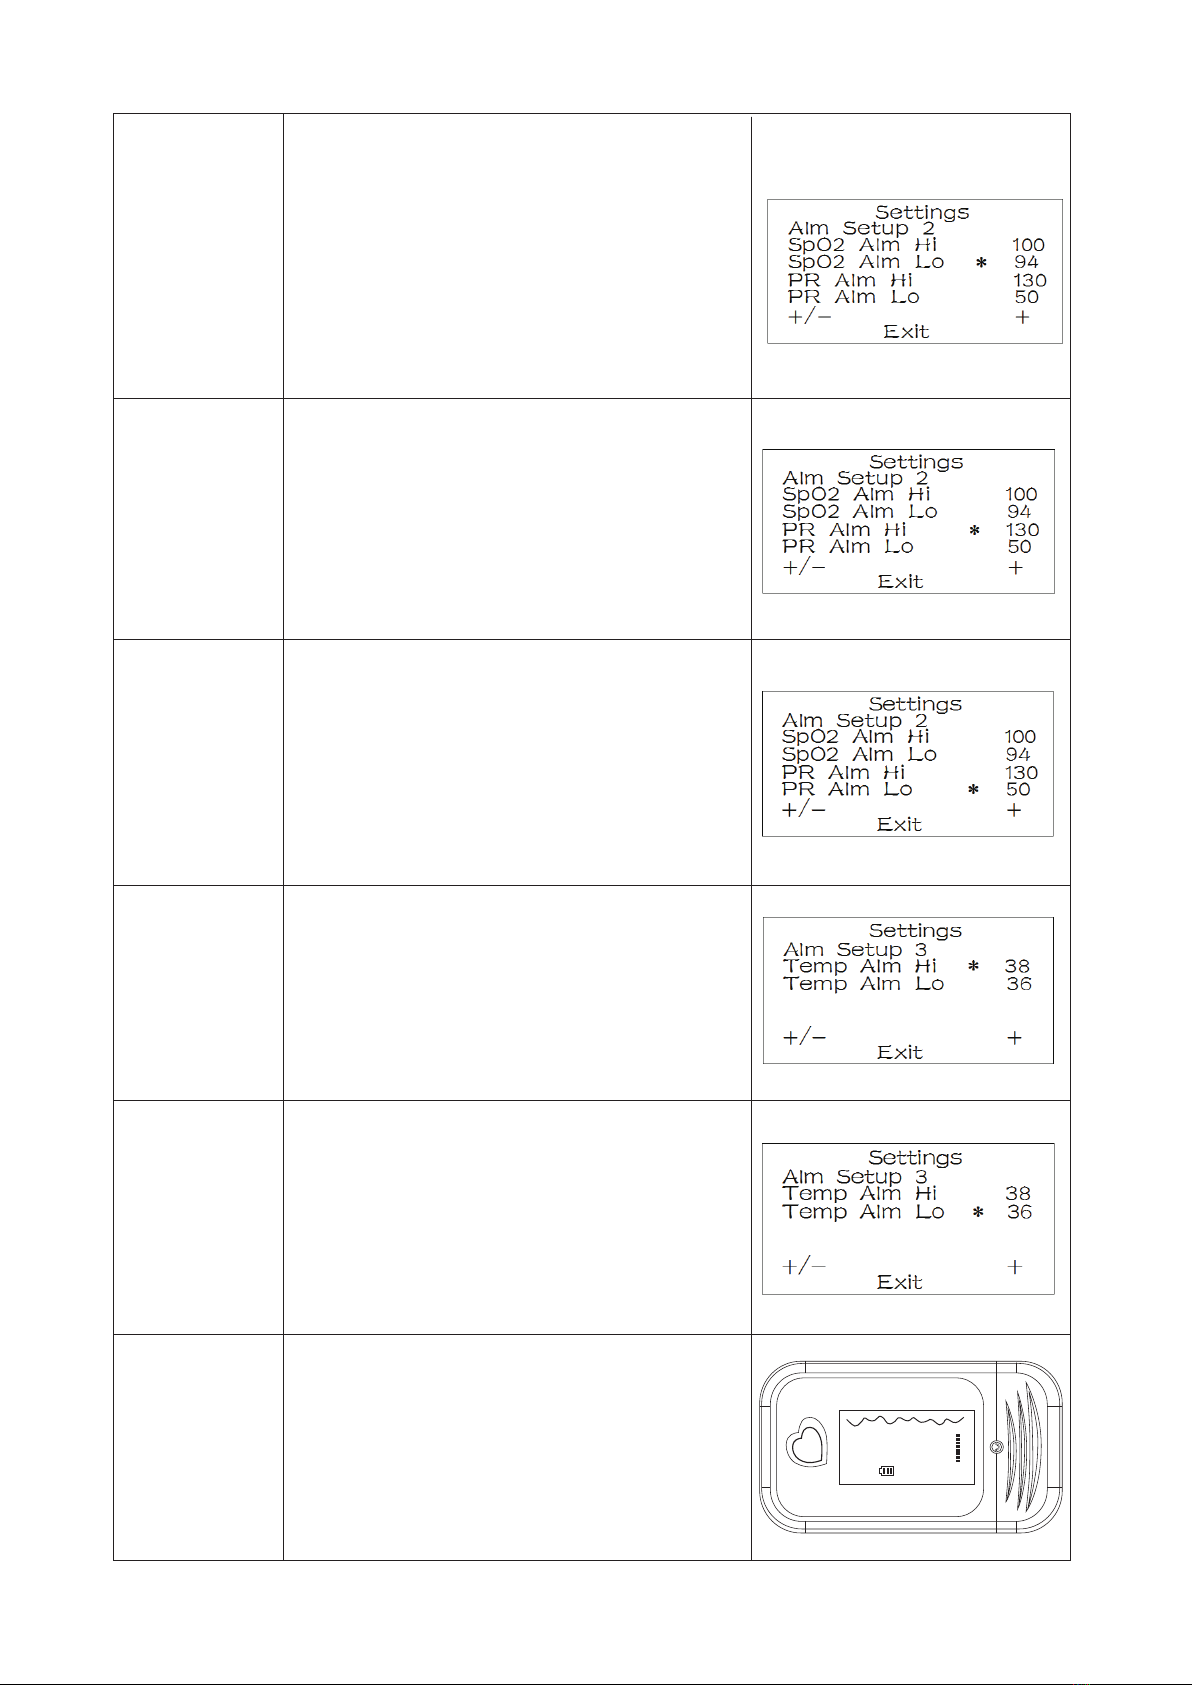
Short press the buon in the interface
of “Alm Setup 2”, move the cursor to
select the item of “PR Alm Lo”, long
press the buon to adjust the
parameter of BPM in the scope of
30-243bpm. The default lower limit is
50bpm.
Short press the buon in the interface of
“Sounds Setup”, move the cursor to select
the item of “Temp Alm Hi”, long press the
buon to adjust the parameter of tem-
perature in the scope of 78-113℉.
Short press the buon in the interface of
“Sounds Setup”, move the cursor to select
the item of “Temp Alm Lo”, long press the
buon to adjust the parameter of tem-
perature in the scope of 77-112℉.
Aer completed above seng, press the
buon switch to any interface of seng,
move the cursor to select the item of
“Exit” to return to the POST display.
Short press the buon in the interface
of “Alm Setup 2”, move the cursor to
select the item of “PR Alm Hi”, long
press the buon to adjust the parame-
ter of BPM in the scope of 32-245bpm.
The default upper limit is 130 bpm.
SpO2 Low Limit seng
Short press the buon in the interface
of “Alm Setup 2”, move the cursor to
select the item of “SpO2 Alm Lo”, long
press the buon to adjust the
parameter of SpO2 in the scope of 50%
to 98%.
The default lower limit is 94%.
SpO2Low
Limit seng
Pulse Rate (PR)
High Limit
seng
Pulse Rate (PR)
Low Limit
seng
Temp High
Limit seng
Temp low
Limit seng
Return to the
POST display

English 17
Warning
● Uncomfortable or painful feeling may appear if use the device ceaselessly, espe-
cially for the microcirculaon barrier users. It is recommended that the sensor
should not be applied to the same finger for over 4 hours.
● For the special users, there should be a more prudent inspecng in the placing
process. The device cannot be clamped on the edema and tender ssue.
● The light (the infrared is invisible) emied from the device is harmful to the eyes,
so the user and the maintenance man should not stare at the light.
● Testee cannot use enamel or other makeup.
● Testee’s fingernail cannot be too long.
● This device is not intended for treatment.
● The user is not allowed to repair the equipment. Changes or modificaon not
expressly approved by Shenzhen Med-link may void the warranty.
● Removing the baeries to avoid baery leakage and device damage if long me
no use.
●The symbol of "?" will be displayed on the screen when there's signal inadequacy,
indicang the displayed SpO2 or pulse rate value is potenally incorrect.
Note: The device has No Alarm System, just only warning signal is provided.
Section 3- Troubleshooting
This secon explains how to troubleshoot the PULSE OXIMETER. Tables list possible
PULSE OXIMETER difficules, along with probable causes, and recommended acons
to correct the difficules. Detailed see table 2 as below.
Table 2:Instrucon for Menu seng
Phenomena Possible Causes Soluons
Abnormal starng-up
of Pulse-Oximeter
(display screen and
transming tube of
LCD presenng lights
off)
The power buon was not
pressed in place
Re-press the power buon
in place, and keep 1-2
seconds
Not Install baery Install baery
Replace baery
Check and re-install baery
Contact authorized
distributors
Contact authorized
distributors
Baery use-out
Install baery improperly Paral
damage of Metal dome (which is
directly connected to the baery).
Damage in Connecon between
mainboard and baery holder
(i.e. Damage in flexible printed
circuit board (FPCB) or break in
welding spot).

English 18
Contact authorized
distributors
With damage in display screen or
break in the connecon spot of
display screen
No display on
screen, but the
transming tube of
LED lights on.
Contact authorized
distributors
No reading display
on Pulse-Oximeter
Poor perfusion problem (general-
ly, there's no display on pulse
amplitude indicator but the light
of LED transming tube is on
and the finger is inserted in
place)
The transming tube of LED
lights off
If there's no pulse amplitude
displayed on the screen,
Please adjust the finger
posion;Use your middle or
index finger in preference;
Warm your fingers;
Fail auto-off
Inaccurate Temp
Measurement
External Temp-probe is
sll working Pull out the external
temp-probe
Damage in collecon tube or
other device parts. Contact authorized
distributors
Sck the Temp-Probe on the
proper measuring posion
by medical proof fabric
Place the Temp-Probe in
proper posion according
to the specificaon
Keep the correct measuring
method by 10 mins, and then
get the result.
The surface Temp-Probe did not
firmly sck on the skin surface.
Wrong posion of Temp-Probe
No enough measuring me
Electromagnec Interference Cauon
This Fingerp pulse oximeter is not designed for use in environments in which the
pulse can be obscured by electromagnec interference. During such interference,
measurements may seem inappropriate or the device may not seem to operate
correctly.
Electromagnec Environment
The PULSE OXIMETER is intended for use in an electromagnec environment in
which radiated RF disturbances are controlled. The customer or user of the PULSE
OXIMETER can help prevent electromagnec interference by maintaining a mini-
mum distance between portable and mobile RF communicaons equipment (trans-
miers) and the PULSE OXIMETER as recommended below, according to the maxi-
mum output of the communicaons equipment.
Warning:
PULSE OXIMETER should not be used adjacent to or stacked with other equipment
and that if adjacent or stacked use is necessary, PULSE OXIMETER should be
observed to verify normal operaon in the configuraon in which it will be used.
Section 4- Electromagnetic Environment

5
English 19
Table 3—Declaraon electromagnec emissions
PULSE OXIMETER is intended for use in the electromagnec environment specified
below. The customer or the user of the Oximeter probe should assure that it is used in
such an environment.
Emissions test Compliance Electromagnec environment-guidance
RF emissions
CISPR 11
RF emissions
CISPR 11
Group 1
Class B
The PULSE OXIMETER uses RF energy for its
internal funcon. Therefore, its RF emissions
are very low and are not likely to cause any
interference in nearby electronic equipment.
The PULSE OXIMETER is suitable for use in
domesc establishment and in establishment
directly connected to a low voltage power
supply network which supplies buildings used
for domesc purposes.
● Guidance & Declaraon - Electromagnec Immunity
Table 4—Guidance & Declaraon — electromagnec immunity
The PULSE OXIMETER is intended for use in the electromagnec environment specified
below. The customer or the user of the PULSE OXIMETER should assure that It is used in
such an environment.
±8 kVcontact
±2 kV,±4kV,
±8 kV,
±15 kV air
±8kVcontact
±2 kV,±4kV±8 kV
±15 kV air
10 V/m
80MHz to2.7GHz
80% AM at 1kHz 10 V/m
30 A/m
50 Hz or 60 Hz
30 A/m
50 Hz or 60 Hz
Immunity test IEC 60601
test level
Compliance
level
Electromagnec
environment-guidance
Electrostac
discharge (ESD)
lEC 61000-4-2
Radiated RF
Electromagnec
Fields IEC61000-4-3
Power frequency
magnec field
IEC 61000-4-8
Floors should be wood,
concrete or ceramic le. If
floors are covered with
synthec material, the
relave humidity should
be at least 30 %.
Power frequency mag-
nec fields should be at
levels characterisc of a
typical locaon in a
typical commercial or
hospital environment.
Other manuals for AM-806
1
Table of contents
Other MedLinket Medical Equipment manuals


Popular Medical Equipment manuals by other brands


sensiplast
sensiplast SF-1509 Instructions for use

Fehling Instruments
Fehling Instruments CERAMO CONCEPT X PUNCHES Assembly instructions

NJORD
NJORD Atle 180 Instructions for use

Progetti
Progetti Rescue Life 9 Instructions for use

Aspect
Aspect BIS VISTA Service information manual

Linak
Linak MEDLINE & CARELINE CBJ-Home user manual


