MedX Rehab Console System User manual


Table of Contents
Foreword ..............................................................................................1
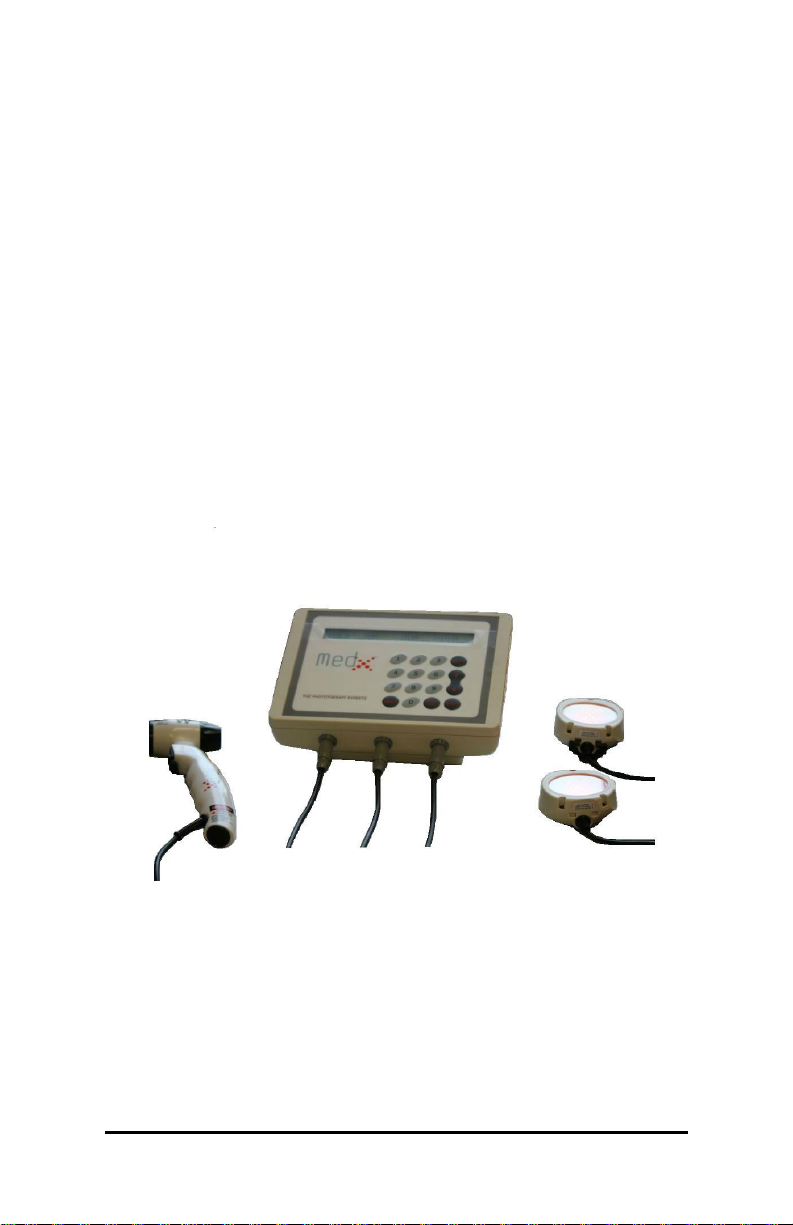
Product Description ..............................................................................2
Package Contents ................................................................................3
i) Standard Components ...........................................................3
ii) Optional Components ............................................................3
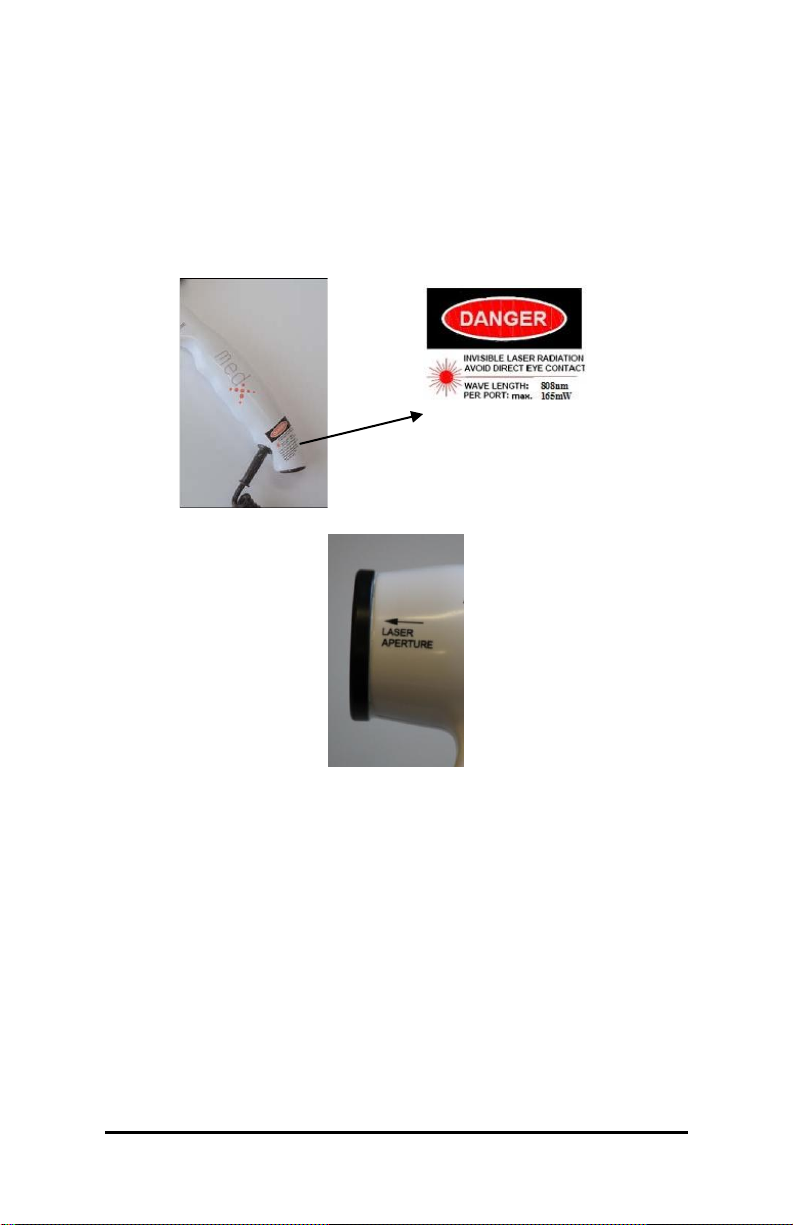
Precautions and Warnings ...................................................................3
i) Caution...................................................................................3
ii) Labels ....................................................................................4
iii) Warning..................................................................................5
Indications and Contraindications.........................................................6
i) Indications..............................................................................6
ii) Contraindications ...................................................................6
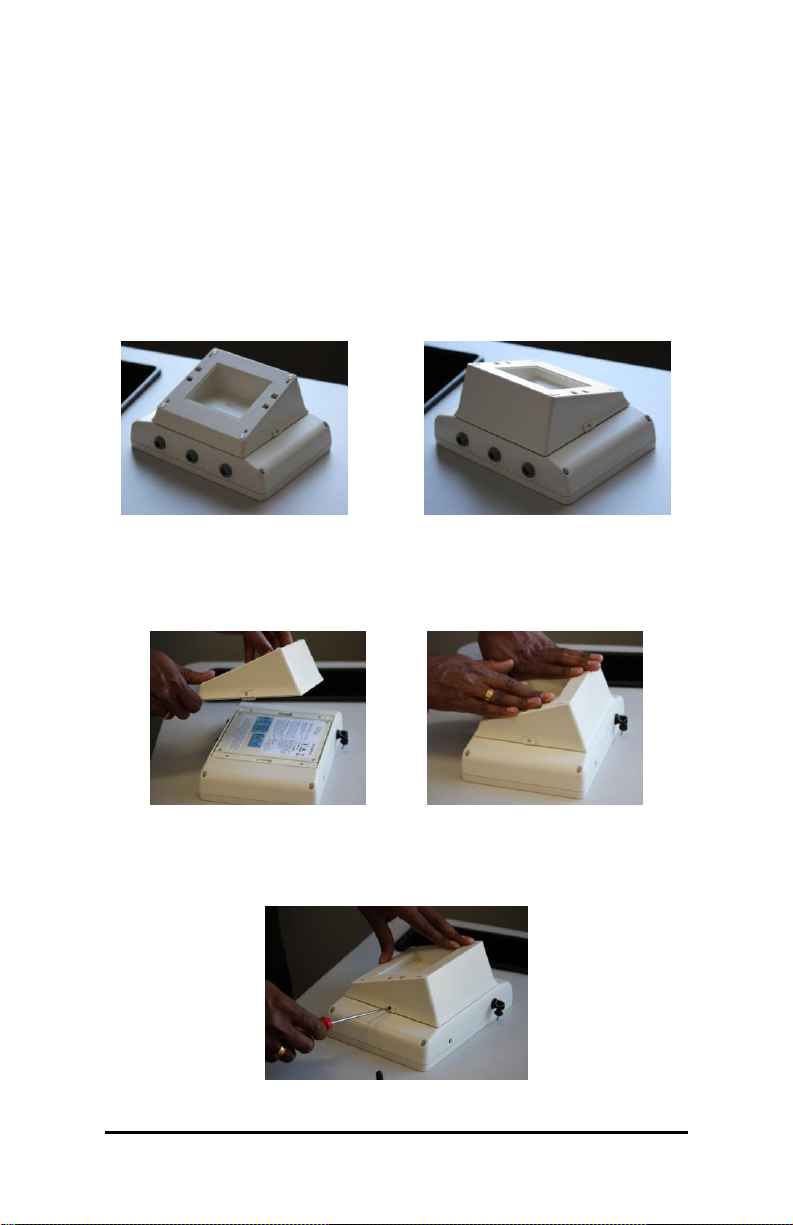
Initial Setup Instructions .......................................................................7
i) Installing the Base for the Laser Console (Optional) ..............7
ii) Caution...................................................................................8
iii) Setup......................................................................................8
System Orientation...............................................................................9
i) MedX Laser Console..............................................................9
ii) MedX Rehab Tethered Laser accessory..............................11
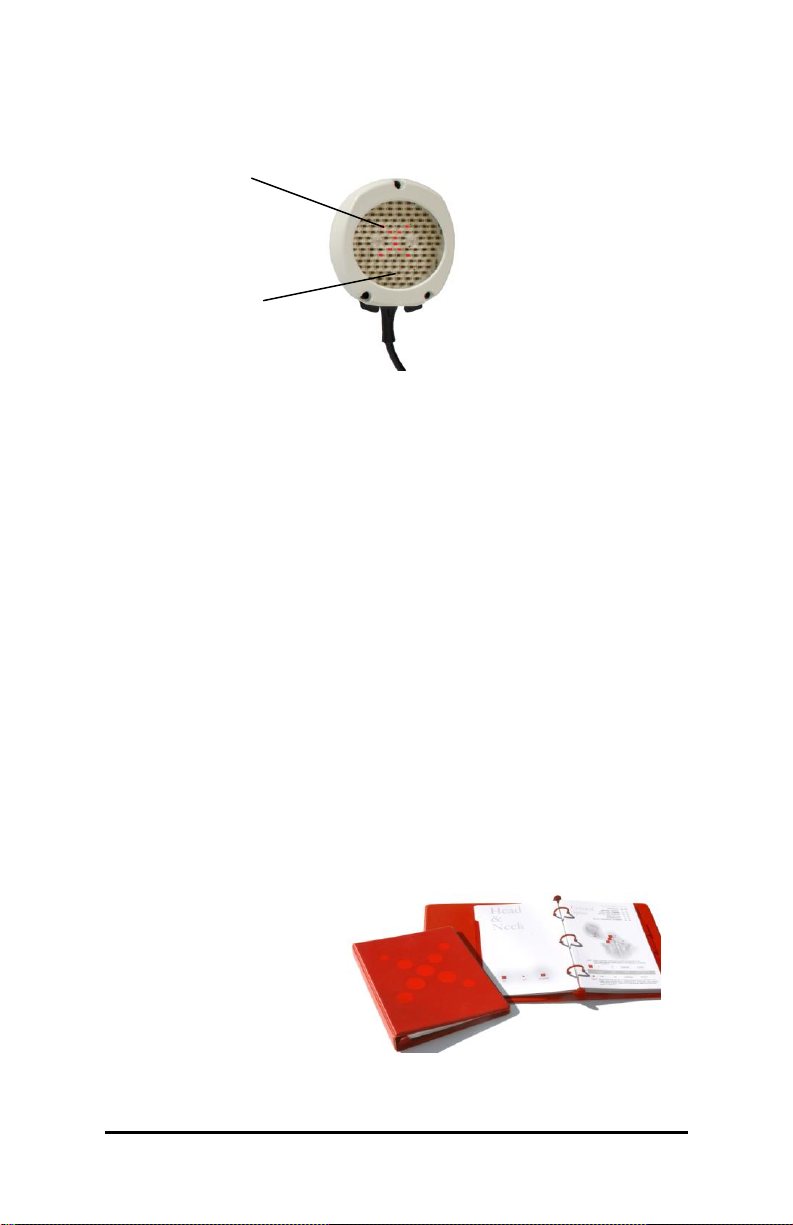
iii) MedX SLD Light Cluster accessory...................................... 12
Support Materials ...............................................................................12
Operating Instructions ........................................................................13
User Maintenance ..............................................................................16
i) Ongoing Maintenance..........................................................16
ii) Equipment Operating Conditions .........................................16
iii) Technical Maintenance ........................................................16
Technical Specifications.....................................................................17
i) MedX Laser Console (MBM1100N) .....................................17
ii) MedX Rehab Tethered Laser (LCT450) ............................... 18
iii) MedX SLD Light Cluster (MCT1001)....................................19
Warranty.............................................................................................20
Service Contact Information ...............................................................21
Revisions............................................................................................22


Rehab Console System Operating Guide (760-0188-0001) 1
Foreword
Congratulations on your purchase of a MedX Rehab Console System.
MedX takes pride in its product lines and the service it provides to its
customers.
This Guide is written for the owners and operators of the MedX Rehab
Console System. It contains general instructions for operation,
warnings, precautionary practices and maintenance procedures. In
order to maximize the use, efficiency and life of your product, please
read this Guide thoroughly prior to using the MedX Rehab Console
System.
The MedX MBM1100N Console controls and powers both SLD Clusters
for larger area treatment and a variety of handheld Tethered Laser
devices for various clinical applications, such as; Rehab, Dental or
Acupuncture.
MedX has received international approval for a variety of sports
rehabilitation and dental applications.
MedX Rehab Console system has been cleared for sale by Canadian
and US regulatory agencies. In the U.S.A., MedX has multiple FDA
clearances, covering its entire product line
Laser and Light Therapy (phototherapy) is a safe and effective therapy
which uses light energy to decrease or eliminate pain and accelerate
tissue healing.

2Rehab Console System Operating Guide (760-0188-0001)
Product Description
The MedX Rehab Console System (see page 3 for package contents)
has been developed to offer product flexibility and choice. The
components have been designed for ease of use by licensed healthcare
professionals and/or their designated assistants.
The MedX MBM1100N Console powers the convenient, high-quality
handheld laser therapy device and two SLD Cluster accessories.
The MedX Rehab Tethered Laser accessory is a Low Level Laser
Therapy (LLLT) device for deeper tissue conditions. This accessory
features three near-infrared laser diodes for therapeutic applications and
a visible LED guide light.
The MedX SLD Light Cluster accessory offers SLD light therapy for
broader applications. This accessory can be strapped to the body for
“hands-free”, unattended treatment.
Figure 1 –MedX MBM1100N Console, Rehab Laser
and two SLD Clusters

Rehab Console System Operating Guide (760-0188-0001) 3
Package Contents
i) Standard Components
1 MedX Console (model: MBM1100N) with Removable Key
1 MedX Rehab Tethered Laser (model: LCT450)
2 MedX SLD Light Cluster (model: MCT1001) with Flexstrap
1 Base for MedX Console
1 Power Supply
1 Power Cord
1 Treatment Guide
1 Operating Guide (this book)
2 Standard Protective Goggles (MPG01) –
(one each for patient and
Clinician)
ii) Optional Components
MPG02 Premium Protective Goggles
RIA1 Remote Interlock Adaptor
Precautions and Warnings
Before using the MedX Rehab Console System, the operator should
become acquainted with the operating procedures, as well as the
indications, contraindications, warnings and precautions. On the
internet you can find many resource documents for additional
information regarding the benefits, limitations and applications of LLLT
and SLD therapy. (See references in the MedX Treatment Guide.)
i) Caution
The MedX Rehab Tethered Laser (LCT450) is a Class IIIb laser device.
Therefore, the following recommendations should be adhered to:
DO NOT point the laser beam directly into human or animal eyes.
The lens of the eye does not detect the invisible, coherent near-
infrared wavelength beam potentially resulting in retinal damage.
Both the patient and operator must always wear Protective Goggles
(laser safety glasses) to block any near-infrared energy from the
eyes during treatment.
A visible guide LED is active when the laser is operating to provide
a direct indication at the radiant (treatment) surface.

4Rehab Console System Operating Guide (760-0188-0001)
ii) Labels
The following danger labels are required by the FDA for Class IIIb laser
products and affixed to all MedX Lasers. The label warns users of the
near-infrared laser radiation emitted by the device. The label is located
at the lower end of the handle –see Figures 2 and 3 bellow.
Figure 2 –Danger label on Rehab Laser LCT450
Figure 3 –Radiant
surface label
Additionally, the following statement is printed on the product “This
product complies with performance standards for laser products, under
21 CFR 1040.10 and 1040.11”
CLASS IIIb LASER PRODUCT
MedX Health Corp.
1495 Bonhill Road, Unit 1
Mississauga, ON
Canada, L5T 1M2
This product complies with
performance standards for
laser products under
21 CFR Part 1040.10 and 1040.11

Rehab Console System Operating Guide (760-0188-0001) 5
iii) Warning
MedX accessories should be operated by a healthcare professional
or trained healthcare delegate.
When the MedX Laser Console is not in use, remove the key to
prevent unauthorized operation.
Use of controls or adjustments or performance or procedures other
than those specified herein may result in hazardous radiation
exposure.
Patients and operator must wear the specified safety goggles, when
the Handheld Laser accessory is being used.
Use only as directed.
To remove the accessory cable from the console correctly you may
only pull on the actual connector plug in order to unlock it and
remove it. Excessive pulling on any cable may cause damage and
may void your warranty on the device.

6Rehab Console System Operating Guide (760-0188-0001)
Indications and Contraindications
The MedX Rehab Console System is used for the treatment of various
medical conditions. The non-invasive, low energy devices emit photons,
which are absorbed to produce cellular effects and biological changes.
The photons temporarily increase microcirculation, resulting in
temporary relief of pain and stiffness, relaxation of muscles, decrease of
muscle spasms and decreased pain and stiffness associated with
arthritis. The dosage and frequency of treatment needs to be adjusted
to produce the desired effects.
i) Indications
MedX products are produced in an ISO 13485: 2003 certified
manufacturing and testing facility.
The MedX Rehab Console System is cleared for the following indication
of use:
“to increase local microcirculation resulting in temporary relief
of minor muscle and joint aches, pains and stiffness, and the
relaxation of muscles; for muscle spasms, and minor pain and
stiffness associated with arthritis.”
ii) Contraindications
Avoid using MedX Rehab devices:
Over areas injected with cortisone in the past 15 days,
If the patient has been diagnosed and is currently being treated
for cancer,
Over a pregnant uterus,
Over the thyroid region of the neck,
Over areas with open wounds, unless covered with a clear
protective barrier,
Where it might deliver direct irradiation to the eye, and
During the prescription of any photo-sensitive medication such
as steroids within 15 days from the last oral intake.

Rehab Console System Operating Guide (760-0188-0001) 7
Initial Setup Instructions
After unpacking, make sure all items are present and undamaged.
i) Installing the Base for the Rehab Console (Optional)
The Rehab Console may be used with or without having the Base
attached. The Base may be attached in order to configure the Console
for desktop or wall mount.
Note: Hardware for mounting the Console to the wall is not provided.
Desktop configuration Wall mount configuration
Figure 4a and 4b –Base orientation
Once you have decided on the configuration
(see Figures 4a and 4b)
,
place the Base over the Console and press firmly to snap the latches in
place
(see Figure 5a and 5b)
.
Figure 5a and 5b –Installing the Base
Once you hear the click sound, using a standard slot-type screwdriver,
turn the two screws from the vertical (open) position to the horizontal
(secured) position in order to lock the latches in place
(see Figure 6)
.
Figure 6 –Securing the latches

8Rehab Console System Operating Guide (760-0188-0001)
To remove the Base, turn the screws back to the vertical (open) position,
press on both latches and lift off the Base.
ii) Caution
(1) Place unit in a location where the power cord cannot be tripped
over or pulled out during treatment.
(2) Use the system only if it is properly grounded.
(3) Prior to use, the following items should be checked to ensure
proper operation:
(a) Power cord, plug and AC power supply
Check to ensure the cord is free of kinks, and not frayed,
torn or cut, exposing insulation.
(b) Therapy accessories
Check to ensure the cables are flexible, free of kinks, not
frayed and that the insulation is intact. Check the radiant
surfaces to ensure they are free of foreign materials, grease
or cream.
iii) Setup
Connect the power cord to the AC adaptor, and then plug the power
cord into an AC outlet. Ensure the adaptor is connected to the power
port in the rear of the console.
Remove protective coverings from the radiant surface of each
accessory. Plug accessories into ports at the front of the Console,
starting with Port 1
. (left port on front)
The MedX Rehab Laser accessory must be plugged into Port 1 ONLY in
order to operate.

Rehab Console System Operating Guide (760-0188-0001) 9
System Orientation
i) MedX Rehab Console (MBM1100N)
The MedX Console is turned ON and OFF by using the removable key
in the keyhole on the back panel. Also on the back panel is the POWER
port.
(See Figure 7)
Figure 7 –Rehab Console –Back Panel View
Removable Key Power Port
The faceplate of the Console consists of a liquid crystal display (LCD)
and a keypad for programming.
(See Figure 8)
Figure 8 –Rehab Console –Front Panel View

10 Rehab Console System Operating Guide (760-0188-0001)
System Orientation
Continued
START
This key will START treatment, following a 3
second delay. An audible beep indicates the
unit has been activated.
MENU
This key will prompt the next selection option.
ENTER
ENTER key confirms the setting selection
during Manual Setup.
PAUSE/CLEAR
During parameter selection, this key returns
the screen to previous display. After treatment
starts, this key will PAUSE the treatment and
treatment timer. A second push of the key will
CLEAR the setting and return it to the previous
screen.
Arrow Keys
Use these keys to scroll up and down options
on the screen.
Numerical Keys
Numeric Keys are used to select dosage,
treatment mode, and conditions.
Accessory Ports
The MedX Rehab Console includes three
ports for accessories. The Console firmware
allows the three ports to be programmed and
used simultaneously. This system verifies that
the accessories are operational. A warning
message indicates if the accessory is
unplugged or fails. Always plug the Handheld
Laser accessory into Port 1.
LCD
Liquid Crystal Display

Rehab Console System Operating Guide (760-0188-0001) 11
ii) MedX Rehab Tethered Laser accessory
START/PAUSE
A click of this switch will activate the
accessory (after the START key has first been
pushed on the MedX Rehab Console).
Treatment will start immediately, in
conjunction with the illumination of the Active
LED.
A second click of this switch while the
accessory is active will PAUSE treatment. To
resume treatment from PAUSE, reactivate the
accessory by clicking this switch.
SERVICE LED
Continuous illumination of this red LED
indicates that service is required. Contact
your MedX distributor for further instructions.
ACTIVE LED
Continuous illumination of this green LED
indicates that the accessory is active.
Guide LED
Visible LED to indicate treatment area center.
Laser Diodes
Three near infrared laser diodes.
Beam
Attenuator
Laser cap to be utilized to cover the radiant
surface when the device is not in use.
Figure 9 –Rehab Laser

12 Rehab Console System Operating Guide (760-0188-0001)
iii) MedX SLD Light Cluster accessory
Figure 10 –SLD Cluster
Visible Diodes
The red visible diodes form the visible red “X”.
Infrared Diodes
The infrared diodes are not visible to the
human eye. If the red “X” is ON, then the
infrared diodes are also actively illuminating.
Using a digital camera it is possible to take a
picture and see the active diodes. (Shown
above)
Support Materials
MedX Treatment Guide
An outline of highly effective protocols for the delivery of low level laser
and SLD treatments for many muscloskeletal conditions can be found in
the MedX Treatment Guide which is available with the MedX Rehab
Console System.
The MedX Treatment Guide provides detailed treatment parameters
including dosage and placement recommendations for the laser and
SLD clusters. The
introduction provides
background information to
be considered prior to
initiating treatment.
Figure 11–MedX Treatment Guide

Rehab Console System Operating Guide (760-0188-0001) 13
Operating Instructions
The MedX Rehab Console System has been designed for ease-of-use.
Set up the equipment. Plug the accessories into the ports located on
the front of the Console. The Laser accessory must be plugged into
Port 1. If a Laser accessory is not being used, the other accessories
must be plugged into the ports in sequence (i.e. Port 1, Port 2, Port 3),
otherwise, the following warning message will be displayed on the LCD.
WARNING: Move Laser Handheld Accessory
To Port 1
1. Connect the power cord to the AC adaptor, plug the power cord into
an AC outlet, and connect the AC adaptor to the Console.
2. Remove protective covering (beam attenuator for MedX Laser),
from the radiant surface of accessory. Wipe radiant surface with damp
cloth, followed by germicide to ensure surface is clean.
3. Turn on the Console by inserting the key and turning it on. The
following statement will appear on the liquid crystal display screen.
(version number may vary). After a 5 second delay the screen will
display the first prompt.
Welcome to the MedX1100 Console
Version 1.25
4. Place the radiant surface of the accessories directly on skin in
appropriate positions for treatment. If necessary, use the flexstraps to
hold accessories in place for the duration of treatment. (If there are
open areas on the skin, cover accessory or open area with clear plastic
barrier prior to use.)
5. The Console will automatically detect which accessories are
plugged in. If using a MedX Laser accessory, plug ONLY into Port 1.
The MedX SLD accessory can be plugged into any port.
Select Accessory Ports to be Use
1:Port 1 2:Ports 1,2 3:Ports 1,2,3
6. After 1, 2 or 3 is entered, the next prompt screen will be displayed:
Push Category Number or Scroll or
Push “enter” for Default (Manual Setup)

14 Rehab Console System Operating Guide (760-0188-0001)
Operating Instructions
(Continued)
If the category number is known, enter the Console setting code found in
the MedX Treatment Guide. Then press the start key.
If using the preprogrammed codes in the Console and category number
is not known, use the arrow keys to scroll through the category list.
0 —Manual Setup
1 —Muscle/Joint Category [12J* continuous]
2 —Muscle/Joint Deep Category [16J* continuous]
3 —Nerve Category [16J* Pulsed Low]
4 —Wound Superficial Category [4J* continuous]
5 —Wound Deep Category [6J* continuous]
Only the category on display can be selected. Once category is
displayed, press the corresponding number. This will bring up selected
settings - push “Start” to begin the treatment.
7. If “0” is selected for manual setup, the display will change to:
Select Dosage (max 20J) and push “enter”
0-- manual J* [*Laser: J SLD : J/cm²]
8. After entering desired dosage the display will change to:
Push 0-Continuous or 1, 2, 3 Pulsing
06- manual 6J*
The third digit indicates continuous or pulsed laser and light therapy
treatment. There are 4 options:
0 = Continuous
1 = Low (8 pulses/second)
2 = Medium (146 pulses/second)
3 = High (1000 pulses/second)
Pulsing outputs have an 80% ON duty cycle. Treatment times are 25%
longer than continuous mode.
9. Once treatment mode is selected, the display will change to:
Push “start” to Begin, “clear” to Cancel
Manual 6J* Pulsed Low

Rehab Console System Operating Guide (760-0188-0001) 15
Operating Instructions
(Continued)
If changes are required, press the PAUSE/CLEAR key to return to the
previous prompt display. Each time the PAUSE/CLEAR key is pressed,
the screen will return to the previous display until reaching the beginning
of the program.
10. Push the START key. There is a 3 second timer countdown, and
then a single beep indicates that treatment has been initiated.
Treatment timer will start counting down. However, when using the
Laser accessory, the momentary switch (marked START/PAUSE) on
Laser accessory must also be pressed to initiate treatment.
When using the Laser accessory, a LED marked ACTIVE will signal that
treatment has started. When using the SLD Cluster accessory, the
console will signal that treatment has started and the visible red LEDs
will light to form an “X” on the treatment face of the accessory.
During treatment, maintain pressure on the accessory by firmly holding it
in a stable position, or strapping the accessory (SLD only) in position.
No medium or gel is required.
During the last 10 seconds of treatment, the Console will beep every 2
seconds and then emit 3 quick beeps to indicate treatment is complete.
11. Once treatment is complete the following message will be
displayed:
Treatment Complete.
Press “menu” to Exit or Retrigger Port 1
Remove accessories from patient and turn the MedX Console OFF by
turning the key on the back of the unit. Remove the key if the MedX
Console is not in use or unattended.
12. A Remote Interlock Adaptor is available as an optional accessory.
If in use, when the terminals of the interlock are open-circuited, the laser
radiation will be terminated, and the following warning message will be
displayed on the LCD:
WARNING: Output Remote Shutoff
Push Any Key To Continue
The remote interlock adaptor would be placed in Port 3.

16 Rehab Console System Operating Guide (760-0188-0001)
User Maintenance
To clean the MedX Rehab Console, first turn off system, unplug power
cord and wipe Console with a damp cloth. Do not use abrasive
cleaners. A small amount of mild household detergent may be used, if
desired.
Between uses, wipe radiant surface of accessories with a clean, damp
cloth with a hospital grade germicide. Follow germicide manufacturer
directions. Do not use highly concentrated germicide mixtures. Dilute
according to directions of the germicide manufacturer, or damage may
result. DO NOT spray cleaner directly onto radiant surface.
DO NOT use any alcohol base or abrasive germicide cleaner directly on
the cables. Use small amount of mild household detergent if the cables
require to be cleaned.
i) Ongoing Maintenance
The MedX Rehab Console System devices should be checked
regularly to determine that all controls function normally.
Inspect radiant surfaces before each use to ensure cleanliness.
Inspect associated connectors before each use.
ii) Equipment Operating Conditions:
This device should be operating in the following conditions:
Ambient Temperature 32°F and 104°F (0°C to 40°C)
Relative Humidity 20% to 95% non-condensing
Store or Transport -4°F to 149°F (-20°C to 65°C).
iii) Technical Maintenance
No attempt should be made to disassemble the unit. Only authorized
personnel should complete maintenance and repairs. The manufacturer
will not be held responsible for the results of maintenance or repairs by
unauthorized persons.
The MedX Rehab Console System should be tested and re-calibrated
annually to verify functional condition. It is recommended that all MedX
LLLT products be serviced by the manufacturer or send to an authorized
servicing dealer for repairs or recalibration. Recalibration is also
recommended after the replacement or repair of any major component.
Table of contents