mectron Piezosurgery touch User manual

Û Cleaning and sterilization manual
Û Manuale di pulizia e sterilizzazione
Û Reinigungs- und Sterilisationsanleitung
Û Manuel de nettoyage et de stérilisation
Û Manual de limpieza y esterilización
Û Rengörings-och steriliseringsanvisning
0476
EN
SV
ES
FR
DE
IT

EN
Û Cleaning and sterilization manual

EN
ÛTABLE OF CONTENTS
01 Û
INTRODUCTION ................................................. 3
02 Û CLEAN FUNCTION ............................................... 4
03 Û DISASSEMBLY OF PARTS FOR CLEANING AND
STERILIZATION....................................................6
04 Û CHART OF REFERENCE FOR MATERIALS WASHABLE WITH
ULTRASOUNDS AND/OR MATERIALS THAT CAN BE
STERILIZED ........................................................9
05 Û CLEANING AND STERILIZATION ............................... 10
05.1 Cleaningofthedevicebody.................................... 10
05.2 Cleaningofthefootpedal ..................................... 11
05.3 Cleaningandsterilizationofthehandpiece ..................... 12
05.4 Cleaningandsterilizationoftheinserts......................... 15
05.5 Cleaningandsterilizationofthetorquewrench ................. 19
05.6 Cleaningandsterilizationoftheperistalticpumptubes ......... 22
05.7 Cleaning and sterilization of the tube-to-tube connector
(optional).....................................................24
05.8 Cleaning and sterilization of the irrigation bag support rod
andofthehandpiecefixedsupport.............................26
05.9 Cleaningandsterilizationofthehandpiecemobilesupport......28
2

EN
3
01 ÛINTRODUCTION
01 ÛINTRODUCTION
Carefully read this manual before proceeding
with the cleaning and sterilization operations,
and always keep it within reach.
IMPORTANT: to prevent harm to persons
or damages to objects, read all the “Safety
precautions”present in the manual with
special care. Depending on their degree
of seriousness, the safety precautions are
classified with the following indications:
WARNING
(always refers to personal injury)
CAUTION
(refers to possible damage to property)
The purpose of this manual is to make
the operator knowledgeable of the safety
precautions, the installation procedures,
and the instructions for a correct use and
maintenance of the device and its accessories.
Use of this manual for purposes other than
those strictly tied to cleaning and sterilization
of the device is forbidden.
The information and illustrations in this
manual are updated as of the date of issue
reported on the last page.
Mectron is committed to continuously
update its products with possible
modifications to device components.
In case you uncover discrepancies between
what described in this manual and the device
in your possession, contact your Retailer or the
After-Sales Service of Mectron for clarification
and support.
Limitations on the number of cleaning and
sterilization cycles: Cleaning and sterilization
cycles repeated over time have minimum
effects on the instruments examined in this
Manual.The life expectancy of the products is
usually determined by their consumption and
by damages caused from their use.
WARNING: The operators who perform
the cleaning and sterilization operations
must be adequately protected and trained
WARNING: Infections control.
First use: All new and repaired accessories
are supplied in NON STERILE conditions.
Before use, and after each treatment, they
must be cleaned and sterilised in strict
compliance with the instructions given in
the Cleaning and Sterilization Manual.
Subsequent uses: After every treatment,
clean and sterilize all the reusable parts
and accessories, following the instructions
provided in the Cleaning and Sterilization
Manual.
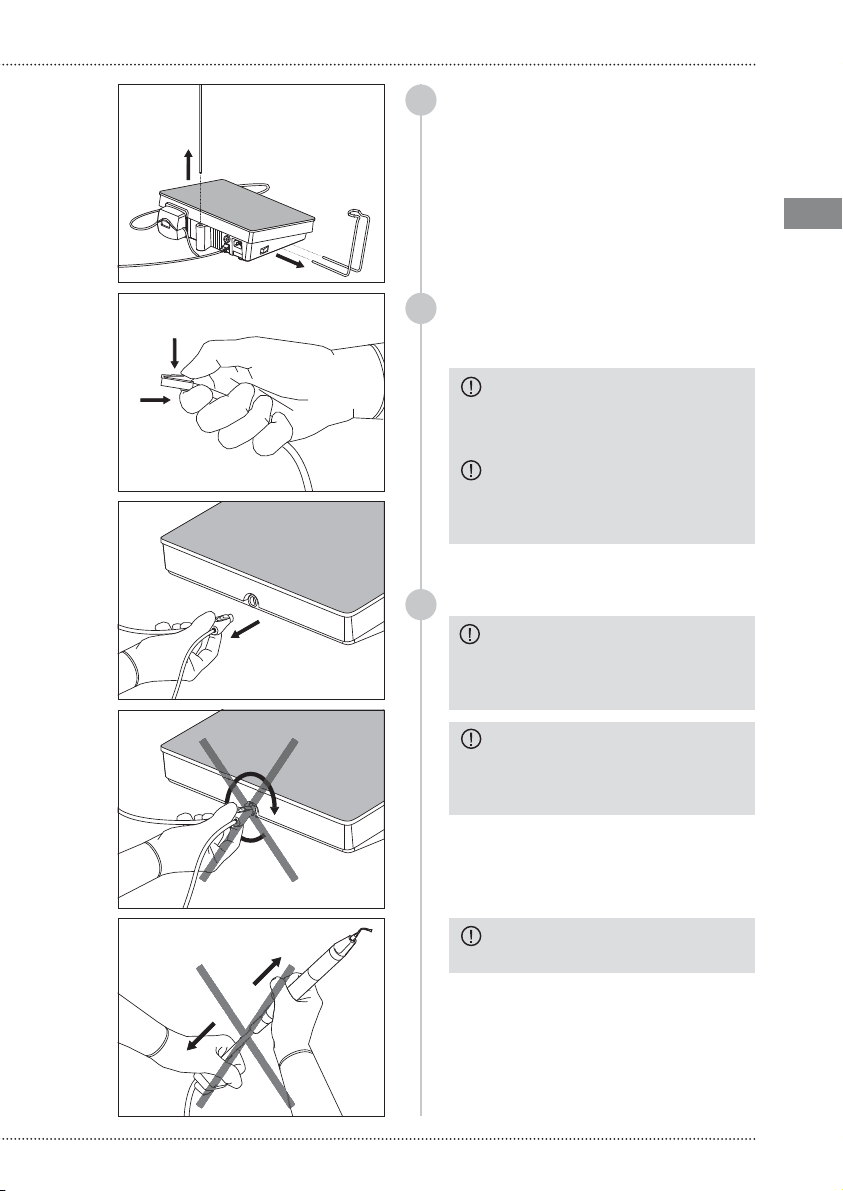
WARNING: The cleaning processes
must be commenced immediately after
each use. Do not allow that contaminated
instruments dry up before starting
the cleaning and sterilization process.
To eliminate organic remains such as
blood, bone, and other, use an enzymatic
detergent with neutral pH (pH7),
immediately after use.
CAUTION: Do not use metallic brushes
or abrasive sponges during the cleaning
processes,because they damage the
surfaces of the treated parts and the
finishes of the inserts. Only use brushes
with soft nylon bristles.
CAUTION: The detergent solution must
be completely removed from the treated
parts to prevent accumulation of chemical
residues.
CAUTION: During cleaning procedures
only use detergents with pH 6-9.
CAUTION: If you intend to disinfect,
we recommend that you use water-based
disinfectant solutions with a neutral pH
(pH 7). Alcohol-based disinfectant solutions
and hydrogen peroxide are contra-
indicated, because they can fade the color
and/or damage the plastic materials.This
also holds true for chemical products such
as acetone and alcohol. Always rinse with
sterile water to preserve the disinfection.
WARNING: Do not use tap water, unless
where explicitly indicated.
WARNING: Reusable accessories that
must be forwarded to an Authorized
Mectron Service Center. All the parts must
be cleaned and sterilized in accordance to
the procedures described in this Manual,
before they are sent to an Authorized
Mectron Service Center.
Incorrectly treated and bio-contaminated
parts will not be accepted by the
Authorized Mectron Service Centers.

EN
4
Prepare an enzymatic detergent solution
with pH 6-9, as per the instructions of the
manufacturer;
Immerge the end part of the peristaltic
pump tube or the tube of the bone grafting
kit, if used, in a container containing the
enzymatic detergent solution prepared;
1
2
3
4
Disconnect the flow adjuster from the
irrigation bag and from the peristaltic pump
tube or from the tube of the bone grafting
kit, if used.
Dispose of the flow adjuster correctly,
following the norms in force locally on the
disposal of hospital wastes;
Close the flow of the adjuster;
The CLEAN function allows to run a cleaning cycle on the irrigation circuit of the handpiece(s)
used during the treatment, by following the steps described in this chapter.
02 ÛCLEAN FUNCTION
CAUTION: Clean function. The CLEAN
function must be used after every
treatment, before starting the cleaning and
sterilization procedures.
CAUTION: If the tubes are not cleaned,
the crystallization of the salts may seriously
damage the device.
CAUTION: The handpiece and the cord
cannot be separated.

EN
5
Position the handpiece, with or without
insert, above a container to contain the
liquid that will outflow during the cleaning
cycle;
To enter the cleaning mode, select PUMP/
CLEAN on the keyboard:all the other
selection options present on the display
are disabled, and the PUMP/CLEAN writing
flashes;
PLEASE NOTE You can exit the cleaning
mode by pressing on PUMP/CLEAN again
or, alternatively, by waiting for at least 15
seconds.The CLEAN function is disabled and
the keyboard is enabled again, and displays
the last setting used;
02 ÛCLEAN FUNCTION
As soon as the peristaltic pump starts, the
entire scale of values of the “irrigation”
section lights up and during the liquid
passage, the value of the irrigation shifts
from 6a 0.The cycle lasts 20 seconds. Once
it has ended, the keyboard is enabled again,
and displays the last setting used;
To make the CLEAN function start while the
PUMP/CLEAN writing is flashing, press the
foot pedal once and release it: PUMP/CLEAN
stops flashing and the cleaning cycle starts;
PLEASE NOTE The Clean function can be
interrupted at any time by pressing the
PUMP/CLEAN writing again or, alternatively,
by pressing on foot pedal.The keyboard is
enabled again, and displays the last setting
used;
6
5
7
8

EN
6
WARNING: Switch the device off.
Always turn the device off via the switch,
and disconnect the power supply cable
from the power outlet and from the
device body, before performing the
cleaning and sterilization interventions.
WARNING: Supplementary
grounding cable. If present, disconnect
the supplementary grounding cable
before you perform the cleaning and
sterilization interventions.
Before moving on to the cleaning procedures described in Chapter 05 - CLEANING AND
STERILIZATION, disconnect all the accessories and components of the PIEZOSURGERY® touch.
9
10
Once you have finished cleaning the irrigation circuit, move on to the cleaning and sterilization
of the individual parts (see Chapter 05 - CLEANING AND STERILIZATION).
To perform a cleaning cycle of every
handpiece, tube, or connector used during
the same treatment, repeat the operations
described above, from point 6onward;
IMPORTANT After the cleaning cycle with
the enzymatic detergent solution, perform
a new cleaning cycle with distilled water to
remove detergent residues.
03
Û
DISASSEMBLY OF PARTS FOR CLEANING
AND STERILIZATION
1
off

EN
7
03 ÛDISASSEMBLY
Remove the handpiece fixed holder and the
irrigation bag support rod from the device
body;
Disconnect the foot pedal from the device:
Grab the connector of the foot pedal, press
the release flap, and pull the connector
back;
CAUTION: Do not attempt to unscrew
or turn the connector during the
disconnection: the connector could get
damaged.
CAUTION: When disconnecting the
foot pedal, always and only hold the
connector of the cord. Never actually pull
on the cord itself.
2
3
4
CAUTION: The handpiece and cord
cannot be separated.
CAUTION: To avoid damaging the
handpiece, disconnect it by always
holding onto the connector only. Never
pull the cord.
Disconnect the handpiece from the device;
CAUTION: Do not attempt to
unscrew or turn the connector when
disconnecting the handpiece.
The connector could get damaged.

EN
8
Completely open the peristaltic pump and
remove the peristaltic pump tube or the
tube of the bone grafting kit (if present).
Close the pump again;
Disconnect the peristaltic pump tube from
the connector of the handpiece;
5
6
7
8
If the bone grafting kit has been used,
disconnect the tube-to-tube connector from
the peristaltic pump tube and from the tube
of the bone grafting kit;
If present, unscrew the insert from the
handpiece by using the torque wrench;
9
Unscrew the front cone of the handpiece;
NOTE: on the cone with LED light the metal
ring cannot be separated from the cone in
plastic;

EN
9
04 Û
MATERIALS WASHABLE WITH ULTRASOUNDS AND/OR STERILIZABLE
10 Remove the protective foil from the
keyboard.
Reference
Paragraph 05.1
Paragraph 05.2
Paragraph 05.3
Paragraph 05.4
Paragraph 05.5
Paragraph 05.6
Paragraph 05.7
Paragraph 05.8
Paragraph 05.9
Part Sterilization
with steam
Wash
with ultrasound
Device body
Foot pedal
Handpiece
Inserts
Torque wrench
Peristaltic pump
tube
Tube-to-tube
connector
Irrigation bag support
rod and handpiece
fixed support
Handpiece mobile
support
NO
NO
NO
YES
YES
NO
YES
NO
NO
NO
NO
YES
YES
YES
YES
YES
YES
YES
This chart serves merely as a quick reference. For the complete cleaning and sterilization
procedures of the individual parts, refer to the paragraphs indicated in the chart.
04
Û
REFERENCE CHART FOR MATERIALS
WASHABLE WITH ULTRASOUNDS AND/OR
MATERIALS THAT CAN BE STERILIZED

EN
10
PREPARATION
- Make sure that all the following accessories
have been removed/disconnected from the
device body (see Chapter 03):
• electrical power supply cable
• foot pedal
• peristaltic pump tube
• handpiece
• handpiece fixed support
• irrigation bag support rod
• protective foil
• supplementary grounding connector
(if present)
WARNING: Do not sterilize the device
body: it could stop working and cause
harm to person and/or damages to things.
WARNING: Always turn the device off
via the switch and disconnect it from the
electrical network before performing the
cleaning and disinfection interventions.
WARNING: The device is not protected
against penetration of liquids. Do not spray
liquids directly onto the surface of the
device.
MATERIALS NECESSARY
- Clean, soft cloths with low
fiber-release
- Detergent solution (pH 6-9) and, if need be,
non-aggressive disinfectant solution with
neutral pH (pH7)
CAUTION: We recommend that you use
water-based disinfectant solutions with
neutral pH (pH7). Alcohol-based disinfectant
solutions and hydrogen peroxide are contra-
indicated, because they can fade the color
and/or damage the plastic materials.This
also holds true for chemical products such
as acetone and alcohol.
CLEANING AND DISINFECTION METHOD - Device body
Clean the surface of the device with a clean,
soft cloth with low fiber-release, dampened
with a detergent solution (pH 6-9) and, if
need be, disinfect with a non-aggressive
disinfectant solution with neutral pH (pH7),
following the instructions provided by the
manufacturer of the solution;
Dry the device body with a clean, non-
abrasive cloth with low fiber-release.
05.1 ÛCLEANING OF THE DEVICE BODY
05 ÛCLEANING AND STERILIZATION
1
2
pH 6-9

EN
11
05 ÛCLEANING AND STERILIZATION
PREPARATION
- Disconnect the foot pedal from the device
body (see Chapter 03)CAUTION: Do not sterilize the foot
pedal in autoclave,it would stop working.
CAUTION: Do not clean the foot pedal
under running tap water.
CAUTION: Do not immerge the foot
pedal in liquids and/or solutions of various
nature.
MATERIALS NECESSARY
- Clean, soft cloths with low fiber-release
- Detergent solution (pH 6-9) and, if need be,
non-aggressive disinfectant solution with
neutral pH (pH7)
CAUTION: We recommend that you
use water-based disinfectant solutions
with neutral pH (pH7). Alcohol-based
disinfectant solutions and hydrogen
peroxide are contra-indicated, because
they can fade the color and/or damage the
plastic materials.This also holds true for
chemical products such as acetone and
alcohol.
CLEANING AND DISINFECTION METHOD - Foot pedal
Clean the surface of the foot pedal with
a clean, soft cloth with low fiber-release,
dampened with a detergent solution
(pH 6-9) and, if need be, disinfect with a
non-aggressive disinfectant solution with
neutral pH (pH7), following the instructions
provided by the manufacturer of the
solution;
Dry the foot pedal with a clean,
non-abrasive cloth with low fiber-release.
05.2 ÛCLEANING OF THE FOOT PEDAL
1
2
pH 6-9

EN
12
PREPARATION
- Perform the CLEAN function
(see Chapter 02)
- Disconnect the handpiece from the device
body (see Chapter 03)
- Disconnect the peristaltic pump
tube from the connector of the handpiece
(see Chapter 03)
- If present, disconnect the insert from the
handpiece with the torque wrench (see
Chapter 03)
- Unscrew the front terminal
CAUTION: The handpiece and the cord
cannot be separated.
CAUTION: Disconnect the handpiece
from the device exclusively acting on the
connector.
CAUTION: Do not immerge the
handpiece in disinfectant solutions
or other liquids, because it could get
damaged.
CAUTION: Do not immerge the
handpiece in an ultrasonic tank.
CLEANING AND DISINFECTION METHOD - Handpiece with cord
Prepare an enzymatic* detergent solution
with pH 6-9, as per the instructions of the
manufacturer;
* Process validated by an independent institute with
enzymatic detergent Cidezime® (Enzol®).
05.3 ÛCLEANING AND STERILIZATION OF THE HANDPIECE
1
MATERIALS NECESSARY
- Detergent solution (pH 6-9) and, if need be,
non-aggressive disinfectant solution with
neutral pH (pH7)
- Enzymatic detergent with pH 6-9
- Water
- Container for solution with enzymatic
liquid
- Clean, soft cloths with low fiber-release
- Brush with soft nylon bristles
- Distilled water
- Compressed air
- Single-use sterilization packets
- Steam sterilization
CAUTION: If you intend to disinfect,
we recommend that you use water-based
disinfectant solutions with a neutral pH
(pH7). Alcohol-based disinfectant solutions
and hydrogen peroxide are contra-
indicated, because they can fade the color
and/or damage the plastic materials.This
also holds true for chemical products such
as acetone and alcohol. Always rinse with
sterile water to preserve the disinfection.
CAUTION: Once used, correctly dispose
of the enzymatic detergent solution, do
not recycle.

EN
13
05 ÛCLEANING AND STERILIZATION
Delicately clean the surface of the
handpiece using the enzymatic detergent
solution with the aid of a brush with soft
nylon bristles,placing special care to the
following areas:
- threading of the handpiece
- titanium stem
- front terminal in its external and internal
parts
2
3
4
5
Accurately rinse with tap water to eliminate
any detergent residues and perform the last
rinse with distilled water;
Thoroughly dry all the parts, especially
the electrical contacts, blowing on them
with compressed air;
Clean the surface of the handpiece and of
its cord with a clean, soft cloth with low
fiber-release, dampened with a detergent
solution (pH 6-9) and, if need be, disinfect
with a non-aggressive disinfectant solution
with neutral pH (pH7), following the
instructions provided by the manufacturer
of the solution;

EN
14
Once you’ve finished the cleaning
operations, check all the objects under an
adequate source of light, paying attention
to the details that could conceal dirt
residues (threading, cavities, grooves) and,
if need be, repeat the cleaning cycle. Finally,
check the integrity of those parts and
elements that may have worn out during
their use;
Individually seal the handpiece (without
inserts) and the front terminal in single-use
packets for separate sterilization cycles.
Proceed with the sterilization.
7
STERILIZATION METHOD - Handpiece with cord
CAUTION:The electrical contacts of the
handpiece cord connector must be dry.
At the end of the sterilization cycle and
before connecting the cord to the device,
make sure that the electrical contacts and
the connector are perfectly dry; if need be,
dry them by blowing compressed air.
6
The handpiece with cord is built with
materials that resist to a maximum
temperature of 135°C for a maximum time of
20 minutes.
The sterilization process in steam autoclave
must be performed setting the parameters
indicated below, which are validated by
Mectron and reach the sterilization safety
levels (SAL 10-6):
- 3times Pre-vacuum
(minimum pressure 60 mBar).
- Sterilization temperature 132°C
(interval 0°C ÷ +3°C).
- Sterilization time 4minutes.
- Minimum drying time 20 minutes.
All the sterilization phases must be performed
by the operator in compliance to the norms
UNI EN ISO 17665-1:2007,UNI EN ISO
556-1:2002 e ANSI/AAMI ST 46:2002.
CAUTION: Do not sterilize the
handpiece with the insert screwed onto it.
WARNING: Checking infections - Parts
that can be sterilized - Diligently remove
all residues of organic dirt before the
sterilization.
CAUTION: Perform the sterilization
using a water steam autoclave only. Do not
use any other sterilization procedure (dry
heat, irradiation, ethylene oxide, gas, low
temperature plasma, etc.).
CAUTION: Do not exceed the allowed
load of the steam sterilizer.
CAUTION: At the end of the steriliza-
tion cycle, let the handpiece cool down
completely prior to using it.

EN
15
05 ÛCLEANING AND STERILIZATION
05.4 ÛCLEANING AND STERILIZATION OF THE INSERTS
PREPARATION
- Disconnect the insert from the handpiece
with the torque wrench (see Chapter 03)CAUTION: Always disconnect the insert
from the handpiece before proceeding to
its cleaning and sterilization.
MATERIALS NECESSARY
- Enzymatic detergent with pH 6-9
- Water
- Container for immersion in enzymatic
solution
- Brush with soft nylon bristles
- Compressed air
- Ultrasound tank
- Distilled water
- Single-use sterilization packets
- Steam sterilization
- Syringe
CAUTION: Do not use hydrogen
peroxide. If you intend to disinfect the
inserts, do not use hydrogen peroxide, but
only disinfectants with neutral pH (pH7);
always rinse with sterile water to preserve
the disinfection.
CAUTION: Once used, correctly dispose
of the enzymatic detergent solution, do
not recycle.
1
2
Prepare an enzymatic* detergent solution
with pH 6-9, as per the instructions of the
manufacturer;
Place the insert horizontally in a clean
container, and add a quantity of enzymatic
detergent solution sufficient to completely
cover the insert;
* Process validated by independent institute with
enzymatic detergent Cidezime® (Enzol®).
CLEANING AND DISINFECTION METHOD - Inserts

EN
16
Leave to soak for 10 minutes at 40°C.This
procedure reduces the quantity of blood,
protein, and mucous present in the insert;
During immersion into the enzymatic
solution, delicately brush the surface of
the insert with a brush with soft nylon
bristles to eliminate all traces of visible dirt.
Accurately clean the difficult areas such as
sharp edges and especially the interstices
between the cutting cusps;
3
4
5
6
7
Delicately brush the surface of the insert
under tap water with the brush with soft
nylon bristles;
With a syringe, inject the enzymatic
detergent solution three times from inside
the cavity of the insert to effectively remove
the residues from the internal surface;
Rinse the cavity of the insert with distilled
water injected under pressure (3,8bar) for
at least 10 seconds to eliminate all residues
of detergent;
x3
10 sec
3,8 bar

EN
17
05 ÛCLEANING AND STERILIZATION
Place the insert in the ultrasound tank
submerged by the enzymatic detergent
solution at 40°C, for at least 10 minutes;
Delicately brush the surface of the insert
again with the brush with soft nylon
bristles;
Remove the insert from the ultrasonic tank
and rinse with distilled water;
8
10
9
11
12
Rinse the internal canal of the insert
with distilled water injected under pressure
(3,8bar) for at least 10 seconds to eliminate
all residues;
Once you’ve finished the cleaning
operations, check all the inserts under an
adequate source of light, paying attention
to the details that could conceal dirt
residues (threading, cavities, grooves) and, if
need be, repeat the cleaning cycle;
10 sec
3,8 bar

EN
18
13
14
CAUTION: Before starting the
sterilization cycle, make sure that the
insert is thoroughly dry, both externally
and internally. For this purpose, blow
compressed air both externally and
through the internal thru hole; this will
prevent the onset of stains and haloes
on the surface or rust inside the insert.
Individually seal the inserts in single-use
sterilization packets.
Sterilize the inserts in a steam autoclave.
STERILIZATION METHOD - Inserts
The sterilization process in steam autoclave
must be performed setting the parameters
indicated below, which are validated by
Mectron and reach the sterilization safety
levels (SAL 10-6):
- 3times Pre-vacuum
(minimum pressure 60 mBar).
- Sterilization temperature 132°C
(interval 0°C ÷ +3°C).
- Sterilization time 4minutes.
- Minimum drying time 20 minutes.
All the sterilization phases must be performed
by the operator in compliance to the norms
UNI EN ISO 17665-1:2007,UNI EN ISO
556-1:2002 e ANSI/AAMI ST 46:2002.
CAUTION: Do not sterilize the insert
screwed onto the handpiece.
WARNING: Checking infections - Parts
that can be sterilized - Diligently remove
all residues of organic dirt before the
sterilization.
CAUTION: Perform the sterilization
using a water steam autoclave only. Do not
use any other sterilization procedure (dry
heat, irradiation, ethylene oxide, gas, low
temperature plasma, etc.).
CAUTION: Do not exceed the allowed
load of the steam sterilizer.

EN
19
05 ÛCLEANING AND STERILIZATION
05.5 ÛCLEANING AND STERILIZATION OF THE TORQUE WRENCH
PREPARATION
Take the wrench
MATERIALS NECESSARY
- Enzymatic detergent with pH 6-9
- Water
- Container for the immersion in the
enzymatic solution
- Brush with soft nylon bristles
- Distilled water
- Ultrasound tank
- Clean and soft cloth with low fiber-release
- Medical degree lubricant
- Single-use sterilization packets
- Steam sterilization
CAUTION: Do not use hydrogen
peroxide. If you intend to disinfect the
wrench, do not use hydrogen peroxide, but
only disinfectants with neutral pH (pH7);
always rinse with sterile water to preserve
the disinfection.
CAUTION: Once used, correctly dispose
of the enzymatic detergent solution, do
not recycle.
1
2
Prepare an enzymatic* detergent solution
with pH 6-9, as per the instructions of the
manufacturer;
Put the wrench to soak in the enzymatic
detergent solution for 10 minutes at 40°C;
CLEANING AND DISINFECTION METHOD - Torque wrench
* Process validated by independent institute with
enzymatic detergent Cidezime® (Enzol®).
Table of contents
Languages:
Other mectron Medical Equipment manuals
Popular Medical Equipment manuals by other brands

Otto Bock
Otto Bock 14Y1 Patient Information

Sirona
Sirona teneo Installation requirements

Stryker
Stryker SDC Ultra user guide

Nanosonics
Nanosonics trophon 2 user manual

Whitehall
Whitehall Thermalator T-12-M Instructions for operation and care

ABTECH SAFETY
ABTECH SAFETY SLIX 100 Instruction & maintenance manual