Mee-go Otto ISOFIX User manual
Otto ISOFIX Base
Instruction Manual
Approval according to ECER44-04 with certicate no.: 0442447.
For your child’s safety please read these instructions before use.
Child’s weight 0 - 13kgs.
Important Safety Information
IMPORTANT - KEEP THESE INSTRUCTIONS FOR FUTURE USE.
Please read this instruction manual carefully before use.
If you have any questions concerning the use of this child seat, please do not
hesitate to contact us.
WARNING: DO NOT PLACE A REAR-FACING CHILD SEAT IN THE FRONT SEAT
WHICH IS FITTED WITH AN AIRBAG. DEATH OR SERIOUS INJURY CAN OCCUR.
NOTICE
• This is a “Semi-universal” ISOFIX CHILD RESTRAINT SYSTEM. It is approved to
Regulation No.44,04 series of amendments for general use in vehicles tted
with ISOFIX anchorages systems.
• It will t vehicles with positions approved as ISOFIX positions (as detailed in
the vehicle handbook).
• The mass group and the ISOFIX size class for which this car seat is intended is :
Group 0+ (0-13kg).
EXTREME HAZARD
Do not use in passenger seats equipped with airbags (SRS).
GENERAL
• This child seat can be used for children less than 13kg in weight (Group 0+),
installed rearward-facing using ISOFIX anchorage.
• Use the ISOFIX child restraint system exactly as shown in this instruction
manual.
• Periodically inspect the harness for wear and tear, pay attention to the
attachment points, stitching and adjusting mechanisms.
• In an emergency your child can be released quickly by pressing the red button
on the harness buckle.
• In the event of an emergency it is important that the child can be released
quickly. NEVER LET YOUR CHILD PLAY WITH THE BUCKLE.
• Do not modify this child restraint in any way.
• Always ensure the harness is securely fastened.
CLEANING AND MAINTENANCE.
• Regularly inspect ISOFIX Base and Car Seat for wear, paying particular attention
to attachment points, stitching and adjusting devices.
• Your child’s car seat must be replaced if it is involved in a collision.
• Please keep this child seat in dry and ventilated place to avoid from damp.
Should you nd a defect with this product:
Please keep your original receipt of purchase safe as it will be required should you
unfortunately nd a defect. The receipt must show the date of purchase clearly.
Should you nd a defect with this product you must rst contact the original place
of purchase. Repairs to any part of this product do not extend the warranty period.
Do not return your product direct to the manufacturer.
Warranty information:
For full warranty details please visit http://www.mee-go.co.uk/warranty/
To register your warranty:
Please visit http://www.mee-go.co.uk/register/
!
SAFETY WARNINGS!
Failure to follow the instructions contained in this manual could result in serious
injury to your child.
WARNING! DO NOT LEAVE CHILDREN UNATTENDED IN THE CAR AT
ANY TIME.
WARNING! FOR ISOFIX INSTALLATION: MAKE SURE YOU READ THE CAR
MANUFACTURER’S HANDBOOK.
WARNING! RETAIN THIS INSTRUCTION MANUAL IN THE PLACE PROVIDED ON
THIS CHILD SEAT FOR ITS LIFE PERIOD.
WARNING! DO NOT LEAVE YOUR CHILD UNATTENDED IN THE SEAT AT
ANY TIME.
WARNING! DO NOT PLACE A REAR-FACING CAR SEAT ON THE FRONT SEAT
WITH AN AIRBAG. DEATH OR SERIOUS INJURY CAN OCCUR.
WARNING! THE CHILD SEAT SHOULD BE REPLACED WHEN IT HAS BEEN
SUBJECT TO VIOLENT STRESSES IN AN ACCIDENT.
WARNING! FOR THE REASON OF SAFETY, THE CHILD SEAT MUST BE FIXED
INSIDE THE VEHICLE USING ISOFIX ANCHORAGE EVEN IF YOU DO NOT PUT YOUR
CHILD IN THE CHILD SEAT.
WARNING! ALWAYS MAKE SURE THAT ANY STRAPS HOLDING THE SEAT
RESTRAINT TO THE VEHICLE ARE TIGHT.
WARNING! ALWAYS ENSURE THE HARNESS IS SECURE WHEN FASTENING YOUR
CHILD IN THIS SEAT. ENSURE THE HARNESS IS NOT TWISTED.
WARNING! DO NOT USE ANY LOAD BEARING CONTACT POINTS OTHER THAN
THOSE DESCRIBED IN THE INSTRUCTIONS AND MARKED IN THE CHILD
RESTRAINT.
WARNING! ENSURE ANY LUGGAGE OR OTHER OBJECTS LIABLE TO CAUSE
INJURIES IN THE EVENT OF A COLLISION ARE SECURED.
WARNING! DO NOT ALTER OR MODIFY THIS PRODUCT IN ANY WAY.
ANY REPAIRS REQUIRED MUST BE MADE BY THE CHILD RESTRAINT
MANUFACTURER.
WARNING! CHECK FOR HOT SEAT AND BUCKLES BEFORE PLACING CHILD IN
THIS CHILD RESTRAINT.
WARNING! NEVER USE A SECOND HAND CHILD RESTRAINT.
WARNING! NEVER REMOVE ANY WARNING LABELS FROM THE CAR SEAT.
!
!
!
!
!
!
!
!
!
!
!
!
!
!
!
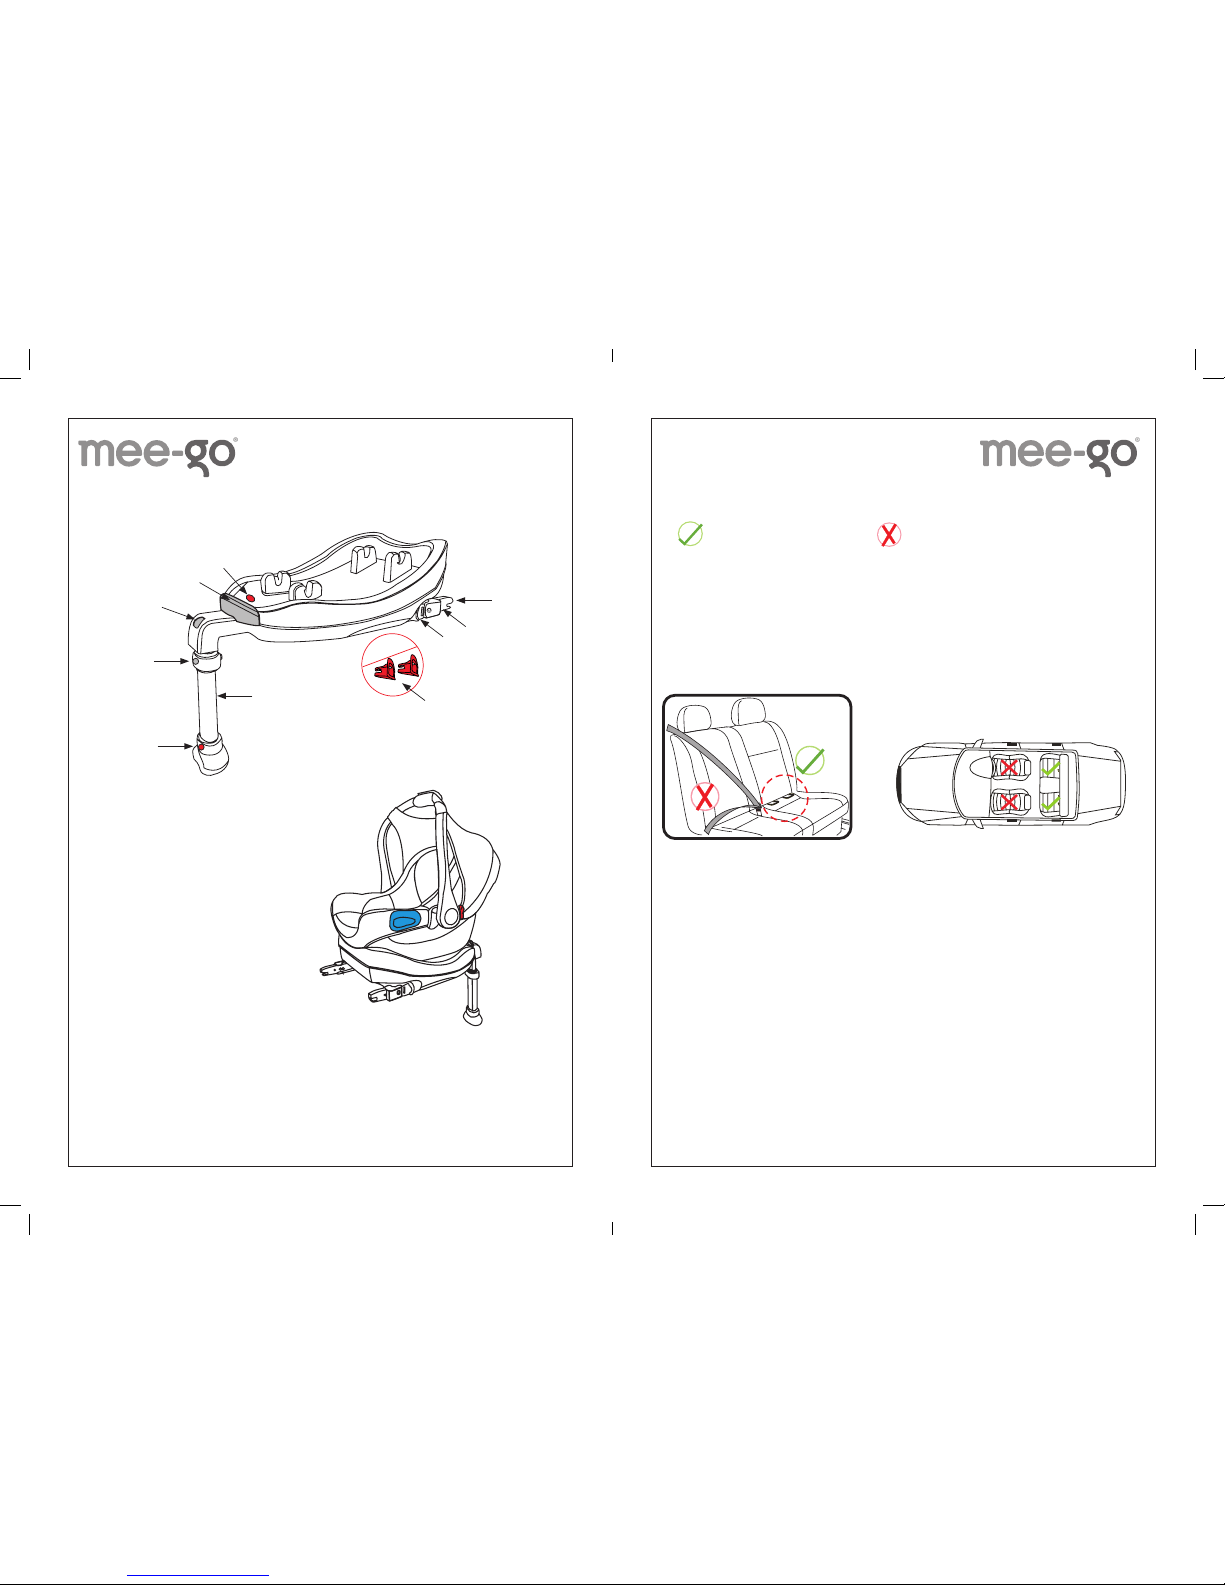
Parts
1. ISOFIX attachments.
2. ISOFIX release buttons.
3. ISOFIX connecting bars.
4. ISOFIX point protection plugs.
5. Support leg.
6. Support leg adjustor button.
7. ISOFIX bars extender button.
8. Car seat release lever.
9. Child seat latching indicator.
10. Support leg foot button.
1. Install position of the child seat in vehicle using ISOFIX.
Correct tting/suitable. Incorrect tting/not suitable.
This child seat is suitable for xing into the seat positions of the cars equipped
ISOFIX anchorage that are tted in accordance with European standard (ECE44 or
equivalent standard).
IMPORTANT:
The child seat must only be installed using ISOFIX anchorage. Refer to your vehicle
handbook.
WARNING! Only use on this seat if ISOFIX
anchorage is equipped.
1
5
6
10
7
8
9
23
4

2. Attaching the ISOFIX Base.
1. Locate the ISOFIX points on the vehicle’s seat and insert the ISOFIX point
protection plugs.
2. Press the ISOFIX bars extender button to extend the ISOFIX bars at the rear of the
base.
3. Locate the bars to the ISOFIX points on the vehicle’s seat and push to connect
until it clicks.
4. Once locked in correctly the indicator will appear green.
CAUTION! Ensure the latching indicator is green before use.
3. Attaching the car seat to the ISOFIX Base.
1. Align the car seat to the anchor points on the base, rearward facing.
2. Press down rmly ensuring the ISOFIX anchorage bars click into place on the
base. Correct tting will be indicated when the child seat latching indicator turns
green.
3. Ensure the car seat is snug against the backrest of the vehicle’s seat by adjusting
the ISOFIX bars extender button.
4. Press the support leg adjustor button and adjust the leg until it is rmly on the
footwell of the vehicle. Ensure the support leg foot button is green for a correct
tting.
5. Adjust the handle of the car seat to the foot end of the car seat.
CAUTION! Ensure all indicators are green before use.
1.
2.
3.
4.
Unlock
Click
Red
Lock
Green
1.
3. 4.
5.
2.
Click
Green

6. Adjusting the harness.
1. To slacken the harness press the button on the front of the seat and pull the
harness shoulder straps forwards.
2. Tighten the harness by pulling the harness adjuster strap at the front of the seat.
The harness needs to be a snug t without causing discomfort to your child.
CAUTION! Adjust the harness for a snug t every time you place your child in
the seat.
4. Checking the correct use of the shoulder straps.
Always check that the shoulder straps are at the correct height for your child. The
shoulder straps should always be through the slots which are closest to the top of
your child’s shoulders.
5. Operating the harness buckle.
1. Put the two metal sections of the buckle connectors together.
2. Slot the two buckle connectors into the slot in the buckle until they ‘click’
into place.
3. Check the harness is correctly locked by pulling the shoulder straps upwards.
To release the harness; press the red button on the buckle, the two metal sections
will release.
CAUTION! Never let your child play with the buckle.
Too low Too high Correct
1. 2. 3.
Click
1. 2.
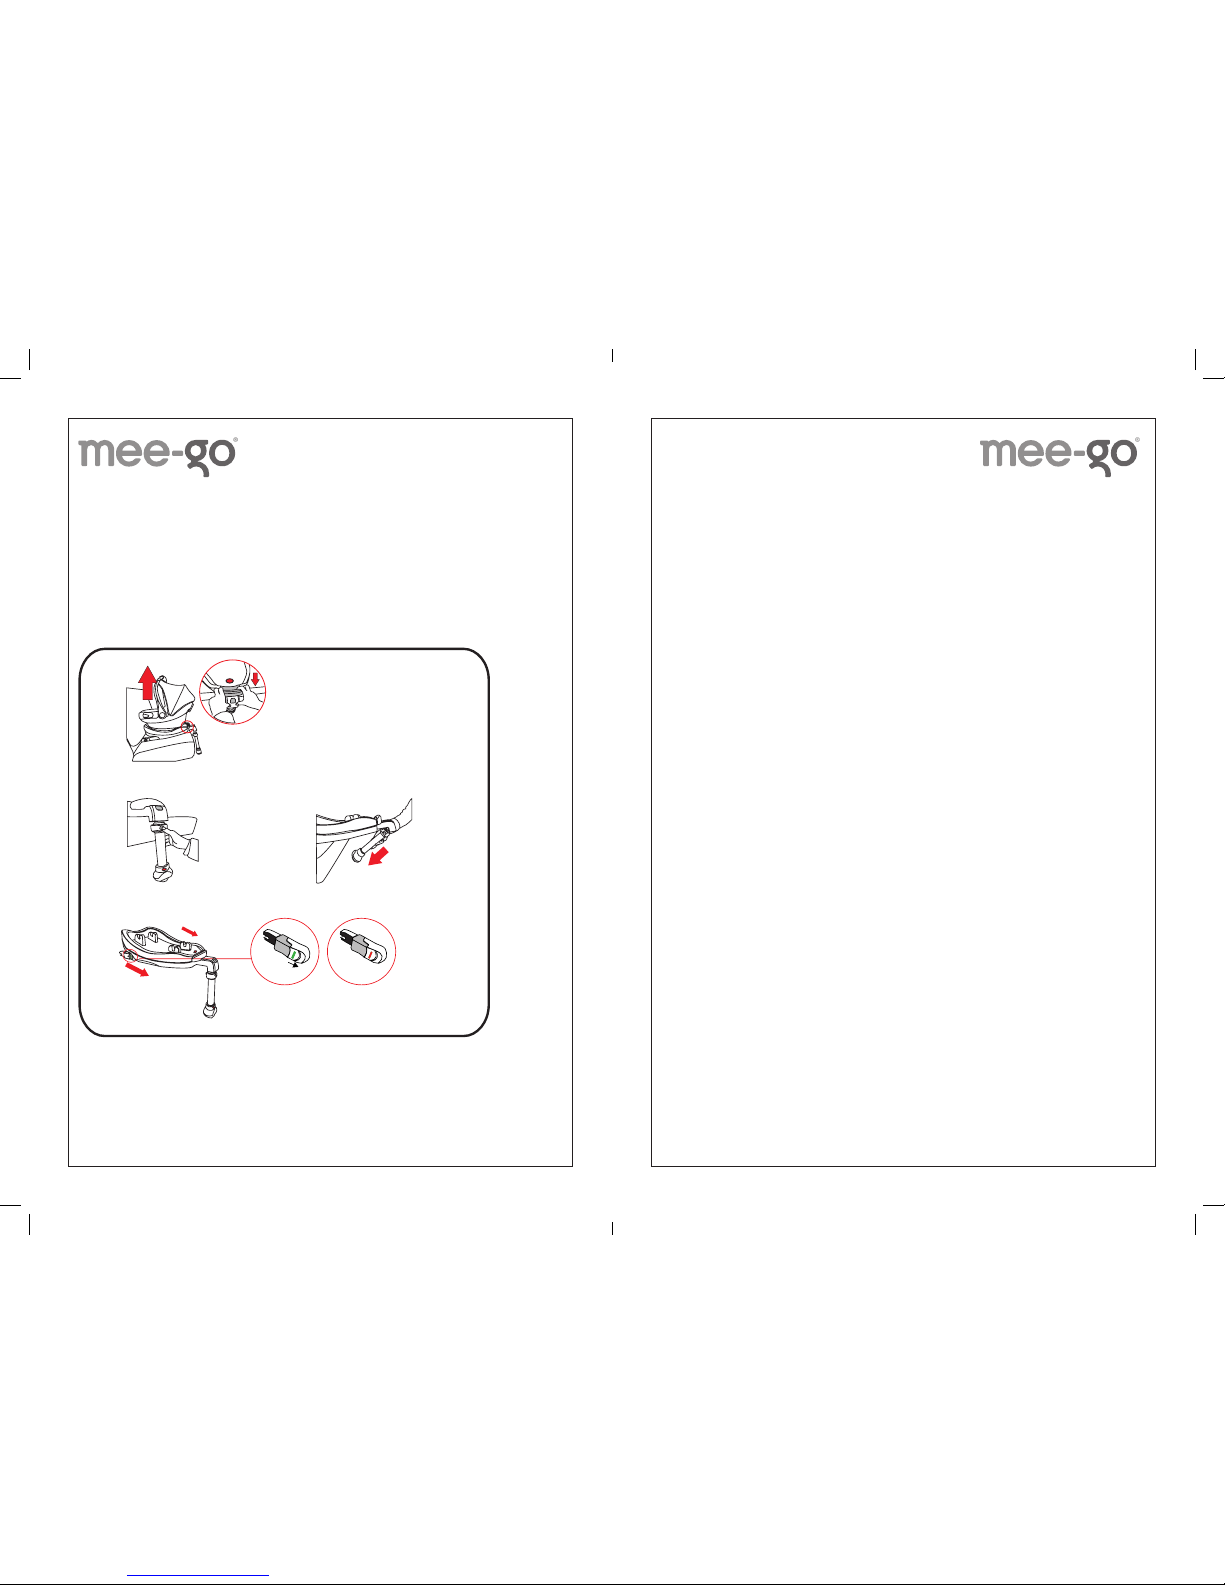
7. Removing the Car Seat and the ISOFIX Base.
1. To release the car seat from the ISOFIX base pull the car seat release lever and lift
the car seat from the base.
2. Press the support leg adjustor button to release the pressure from the support leg
3. Press the ISOFIX bars extender button on the front of the base, pull back the
ISOFIX release buttons until the indicators show red and slide the base from the
vehicles ISOFIX points.
1.
2.
Green
Lock
Red
Unlock
3.

Mee-go Ltd
Unit 5, Wharf Street,
Dewsbury WF12 9AU
T: 01924 485552
E: [email protected]o.uk
W: www.mee-go.co.uk
Copyright Mee-go Limited
November 2016.
Table of contents
Other Mee-go Car Seat manuals


