Mega Machine GX35 User manual
2
SAFETY MESSAGES
Your safety and the safety of others is very important. We have provided important safety messages in this manual and on the engine. Please
read these messages carefully.
A safety message alerts you to potenal hazards that could hurt you or others. Each safety message is preceded by a safety alert symbol and
one of three words, DANGER, WARNING, or CAUTION.
These signal words mean:
You WILL be KILLED or SERIOUSLY HURT if you do not follow instrucons.
You CAN be KILLED or SERIOUSLY HURT if you do not follow instrucons.
You CAN be HURT if you do not follow instrucons.
Each message tells you what the hazard is, what can happen, and what you can do to avoid or reduce injury.
DAMAGE PREVENTION MESSAGES
You will see other important messages that are preceded by the word NOTICE.
This word means:
Your engine or other property can be damaged if you don’t follow instrucons.
The purpose of these messages is to help prevent damage to your engine, other property, or the environment.
INTRODUCTION
Thank you for purchasing a Honda engine. We want to help you to
get the best results from your new engine and to operate it safely.
This manual contains informaon on how to do that; please read it
carefully before operang the engine. If a problem should arise, or
if you have any quesons about your engine, consult an authorized
Honda servicing dealer.
All informaon in this publicaon is based on the latest product
informaon available at the me of prinng. Honda Motor Co., Ltd.
reserves the right to make changes at any me without noce and
without incurring any obligaon. No part of this publicaon may be
reproduced without wrien permission.
This manual should be considered a permanent part of the engine
and should remain with the engine if resold.
This manual should be considered a permanent part of the engine
and should remain with the engine if resold.
Review the instrucons provided with the equipment powered by
this engine for any addional informaon regarding engine startup,
shutdown, operaon, adjustments or any special maintenance
instrucons.
United States, Puerto Rico, and U.S. Virgin Islands:
We suggest you read the warranty policy to fully understand its
coverage and your responsibilies of ownership. The warranty policy
is a separate document that should have been given to you
by your dealer.
THE ENGINE EXHAUST FROM THIS PRODUCT CONTAINS CHEMICALS KNOWN TO THE STATE OF CALIFORNIA TO CAUSE CANCER, BIRTH DEFECTS
OR OTHER REPRODUCTIVE HARM.

3
HONDA BRUSHCUTTER
CONTENTS OF BOOKLET
IntroducƟon Page 2
Safety Messages Page 2
Safety InformaƟon Page 5
Safety IndicaƟon LocaƟon Page 5
Component, Assembly and Control LocaƟon Page 6-8
Features Page 8
Before OperaƟon Checks Page 9
OperaƟon Page 9
Safety OperaƟng PrecauƟons Page 9
StarƟng The Engine Page 10-11
Seƫng Engine Speed Page 12
Stopping The Engine Page 12-13
Servicing Your Engine Page 13
The Importance of Maintenance Page 13
Maintenance Safety Page 14
Safety PrecauƟons Page 14
Maintenance Schedule Page 14
Refueling Page 15
Engine Oil Page 16
Recommended Oil Page 16
Oil Level Check Page 17
Oil Change Page 17-18
Air Cleaner Page 19
M
aintenance Schedule Pa
g
e 14
E
n
g
ine Oil Pa
g
e 16
Oil Level Check Pa
g
e 17
A
ir Cleaner Pa
g
e 1
9

4
HONDA BRUSHCUTTER
CONTENTS OF BOOKLET CONTINUED
InspecƟon Page 19
Cleaning Page 19
Spark Plug Page 20-21
Cooling Fins Page 21
Fuel Filter Amd Fuel Tank Page 22
Spark Arrester Page 23-25
Helpful Tips And SuggesƟons Page 26
Storing Your Engine Page 26-27
Fuel Mixture 28
Taking Care Of Unexpected Problems Page 29

5
SAFETY INFORMATION
• Understand the operaon of all controls and learn how to stop the engine quickly in case of emergency. Make sure the operator receives
adequate instrucon before operang the equipment.
• Do not allow children to operate the engine. Keep children and pets away from the area of operaon.
• Your engine’s exhaust contains poisonous carbon monoxide. Do not run the engine without adequate venlaon, and never run the
engine indoors.
• The engine and exhaust become very hot during operaon. Keep the engine at least 1 meter (3 feet) away from buildings and other
equipment during operaon. Keep flammable materials away, and do not place anything on the engine while it is running.
SAFETY INDICATION LOCATION
Standard/Pump type:
READ OWNER’S MANUAL BEFORE OPERATION
Tiller type:
READ OWNER’S MANUAL BEFORE OPERATION
The illustraons in this manual are based on: GX25
• The illustraons may vary according to the type.

6
ASSEMBLY
Please aach the four providedHex Screws through
the connecter cone of the shaand onto the main
engine body.

7
COMPONENT &
CONTROL LOCATION

8
FEATURES
Centrifugal Clutch (Standard/Tiller type)
The centrifugal clutch automacally engages and transmits power when engine speed is increased above approximately 4,200 rpm. At idle
speed, the clutch is disengaged.
Tiller type:
DO NOT RUN THE ENGINE WITHOUT MOUNTING IT ON EQUIPMENT THAT INCLUDES THE CENTRIFUGAL CLUTCH DRUM AND HOUSING,
OR CENTRIFUGAL FORCE WILL CAUSE THE CLUTCH SHOES TO CONTACT AND DAMAGE THE ENGINE CASE.
NOTICE
9
IS YOUR ENGINE READY TO GO?
For your safety, and to maximize the service life of your equipment, it is very important to take a few moments before you operate the engine
to check its condion. Be sure to take care of any problem you find, or have your servicing dealer correct it before you operate the engine.
Before beginning your preoperaon checks, be sure the engine is level and the engine switch is in the OFF posion.
Always check the following items before you start the engine:
CHECK THE GENERAL CONDITION OF THE ENGINE
1 . Look around and underneath the engine for signs of oil or gasoline leaks.
2. Remove any excessive dirt or debris, especially around the muffler and recoil starter.
3. Look for signs of damage.
4. Check that all shields and covers are in place, and all nuts, bolts, and screws are ghtened.
CHECK THE ENGINE
1. Check the fuel level. Starng with a full tank will help to eliminate or reduce operang interrupons for refueling.
2. Check the engine oil level. Running the engine with a low oil level can cause engine damage.
3. Check the air filter element. A dirty air filter element will restrict air flow to the carburetor, reducing engine performance.
4. Check the equipment powered by this engine.
Review the instrucons provided with the equipment powered by this engine for any precauons and procedures that should be followed
before engine startup.
OPERATION
SAFETY OPERATING PRECAUTIONS
Before operang the engine for the first me, please review the SAFETY INFORMATION secon and the BEFORE OPERATION CHECKS.
Review the instrucons provided with the equipment powered by this engine for any safety precauons that should be observed with engine
startup, shutdown or operaon.
BEFORE OPERATION CHECKS
IMPROPERLY MAINTAINING THIS ENGINE OR FAILURE TO CORRECT A PROBLEM BEFORE OPERATION CAN CAUSE A MALFUNCTION IN
WHICH YOU CAN BE SERIOSULY HURT OR KILLED.
ALWAYS PERFORM A PREOPERATION INSPECTION BEOFRE EACH OPERATION AND CORRECT ANY PROBLEM.
CARBON MONOXIDE GAS IS TOXIC. BREATHING IT CAN CAUSE UNCONSCIOUSNESS AND EVEN KILL YOU.
AVOID ANY AREAS OR ACTIONS THAT EXPOSE YOU TO CARBON MONOXIDE.
10
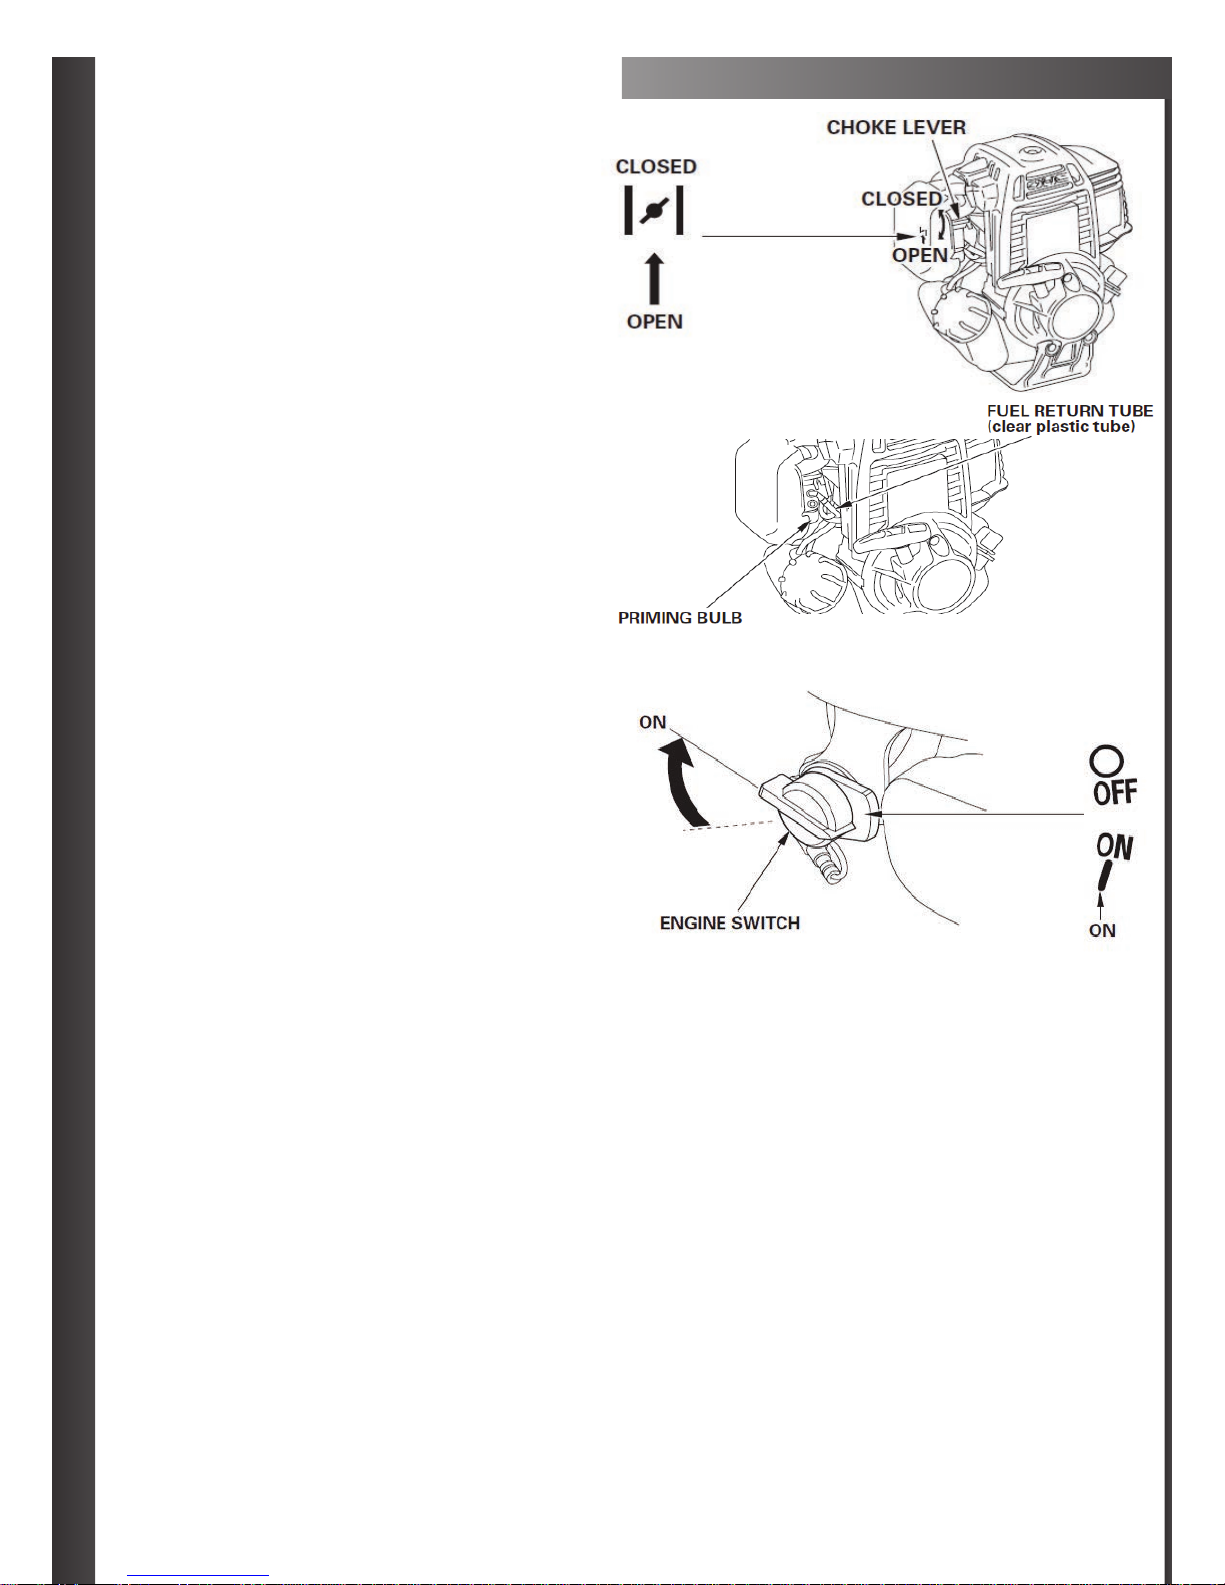
STARTING THE ENGINE
1. To start a cold engine, move the choke lever to the
CLOSED posion.
To restart a warm engine, leave the choke lever in te
OPEN posion.
2. Press the priming bulb repeatedly unl fuel can be seen in the
clear-plasc fuel-return tube.
3. • Standard/Tiller type: Turn te engine switch on the equipment to
the ON posion.
• Pump type: Turn the engine switch to the ON posion.

11
4. Pull the starter to grip lightly unl you feel resistance, then pull
briskly. Return the starter grip gently.
5. If the choke lever was moved to the CLOSED posion to start the
engine, gradually move it to te OPEN posion as the engine warms up.
Hot Restart
If the engine is operated at higher ambient temperatures, then turn it
offand allow it to sit for a short me. It may not restart on first pull.
If necessary, use the following procedure:
IMPORTANT SAFETY PRECAUTION
Turn the engine switch to the OFF posion before performing the
following procedure. This will prevent the engine from starng and
running at maximum speed when the throle is in the MAX. speed
posion. If the engine starts with the throle in the MAX. speed
posion, the equipment can move forward rapidly or the trimmer
aachment can spin at maximum speed. This may result in personal
injury.
• Tiller type
1. Turn the engine switch on the equipment to the OFF posion.
2. Move the choke lever to the OPEN posion.
3. Hold the throle lever on the equipment in the MAX. speed posion.
4. Pull the starter grip 3 to 5 mes.
Follow the STARTING THE ENGINE procedure on page 4 and start the
engine with the choke lever in the OPEN posion.
• Pump type
1. Turn the engine switch to the OFF posion.
2. Move the choke lever to the OPEN posion.
3. Hold the throle lever in the MAX. speed posion.
4. Pull the starter grip 3 to 5 mes.
Follow the STARTING THE ENGINE procedure on page 4 and start the
engine with the choke lever in the OPEN posion.
12
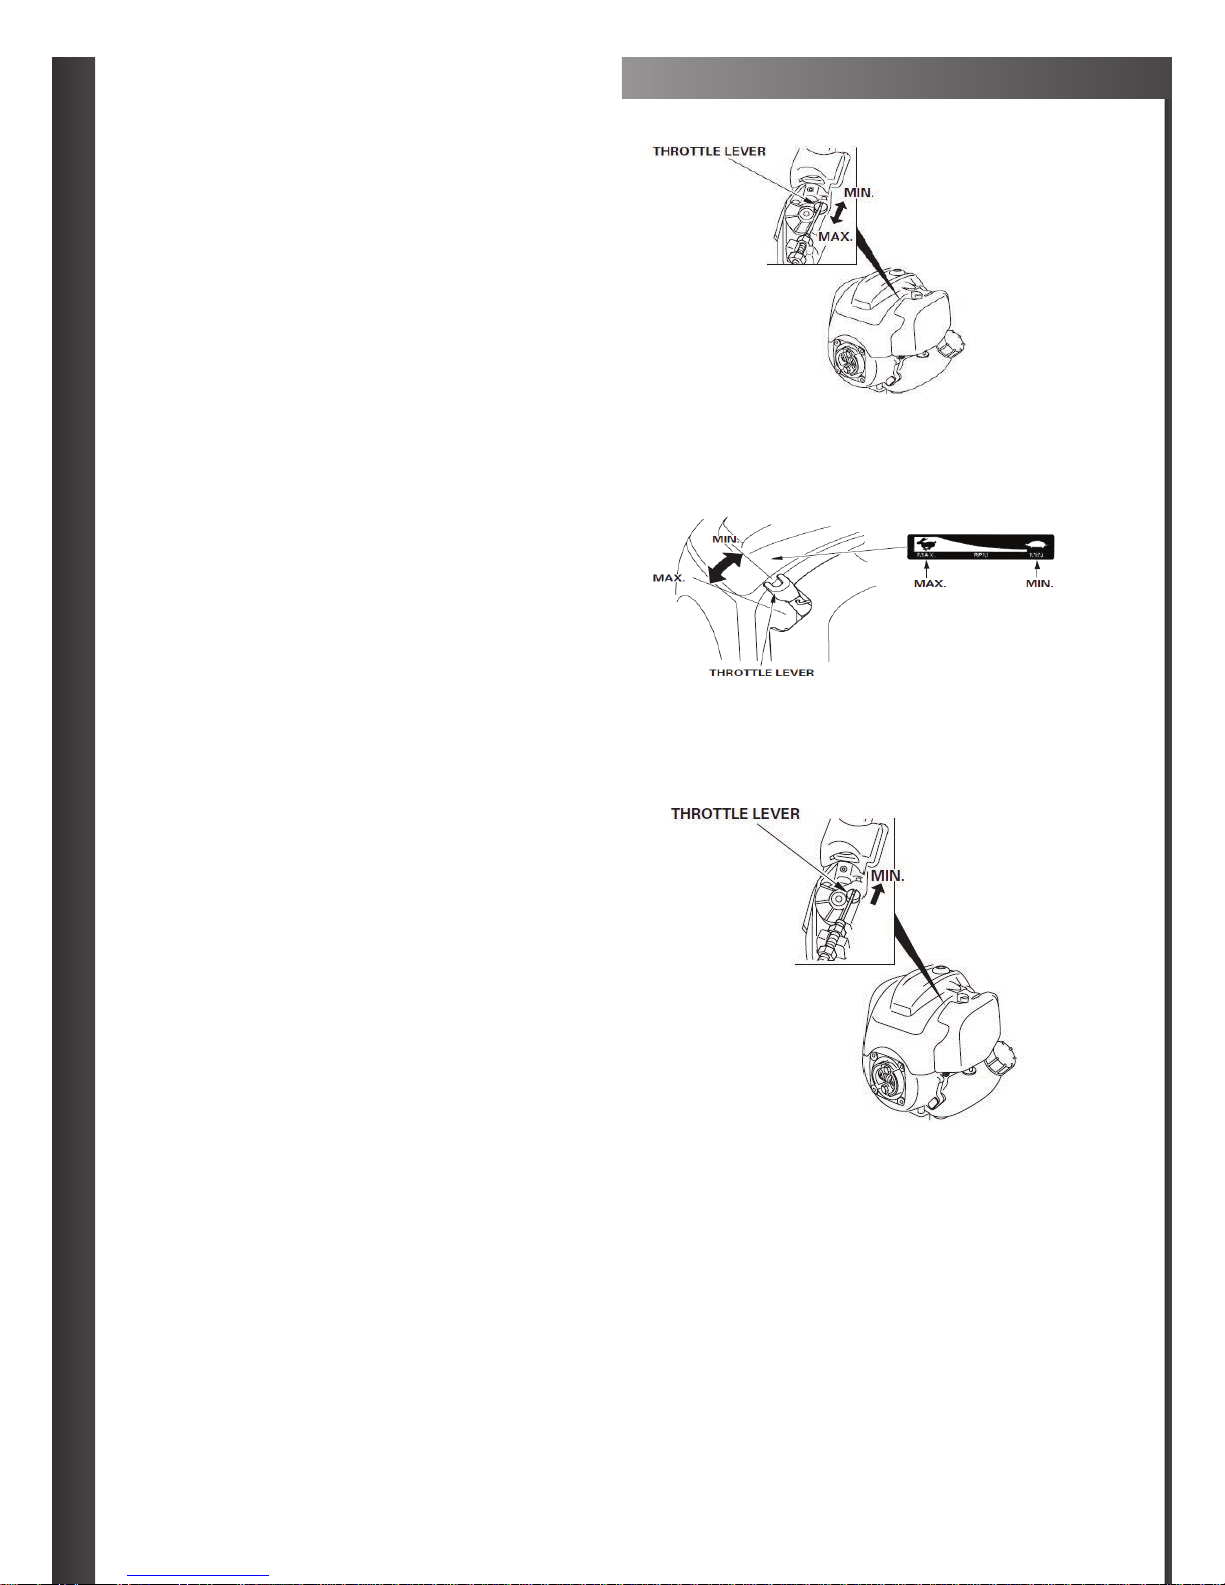
SETTING ENGINE SPEED
Standard/Tiller type:
Posion the throle lever for the desired engine speed.
The throle lever shown here will be connected to a remote control
on the equipment powered by this engine. Refer to the instrucons
provided with the equipment for remote control informaon and for
engine speed recommendaons.
Pump type:
Posion the throle lever for the desired engine speed.
For engine speed recommendaons, refer to the instrucons provided
with the equipment powered by this engine.
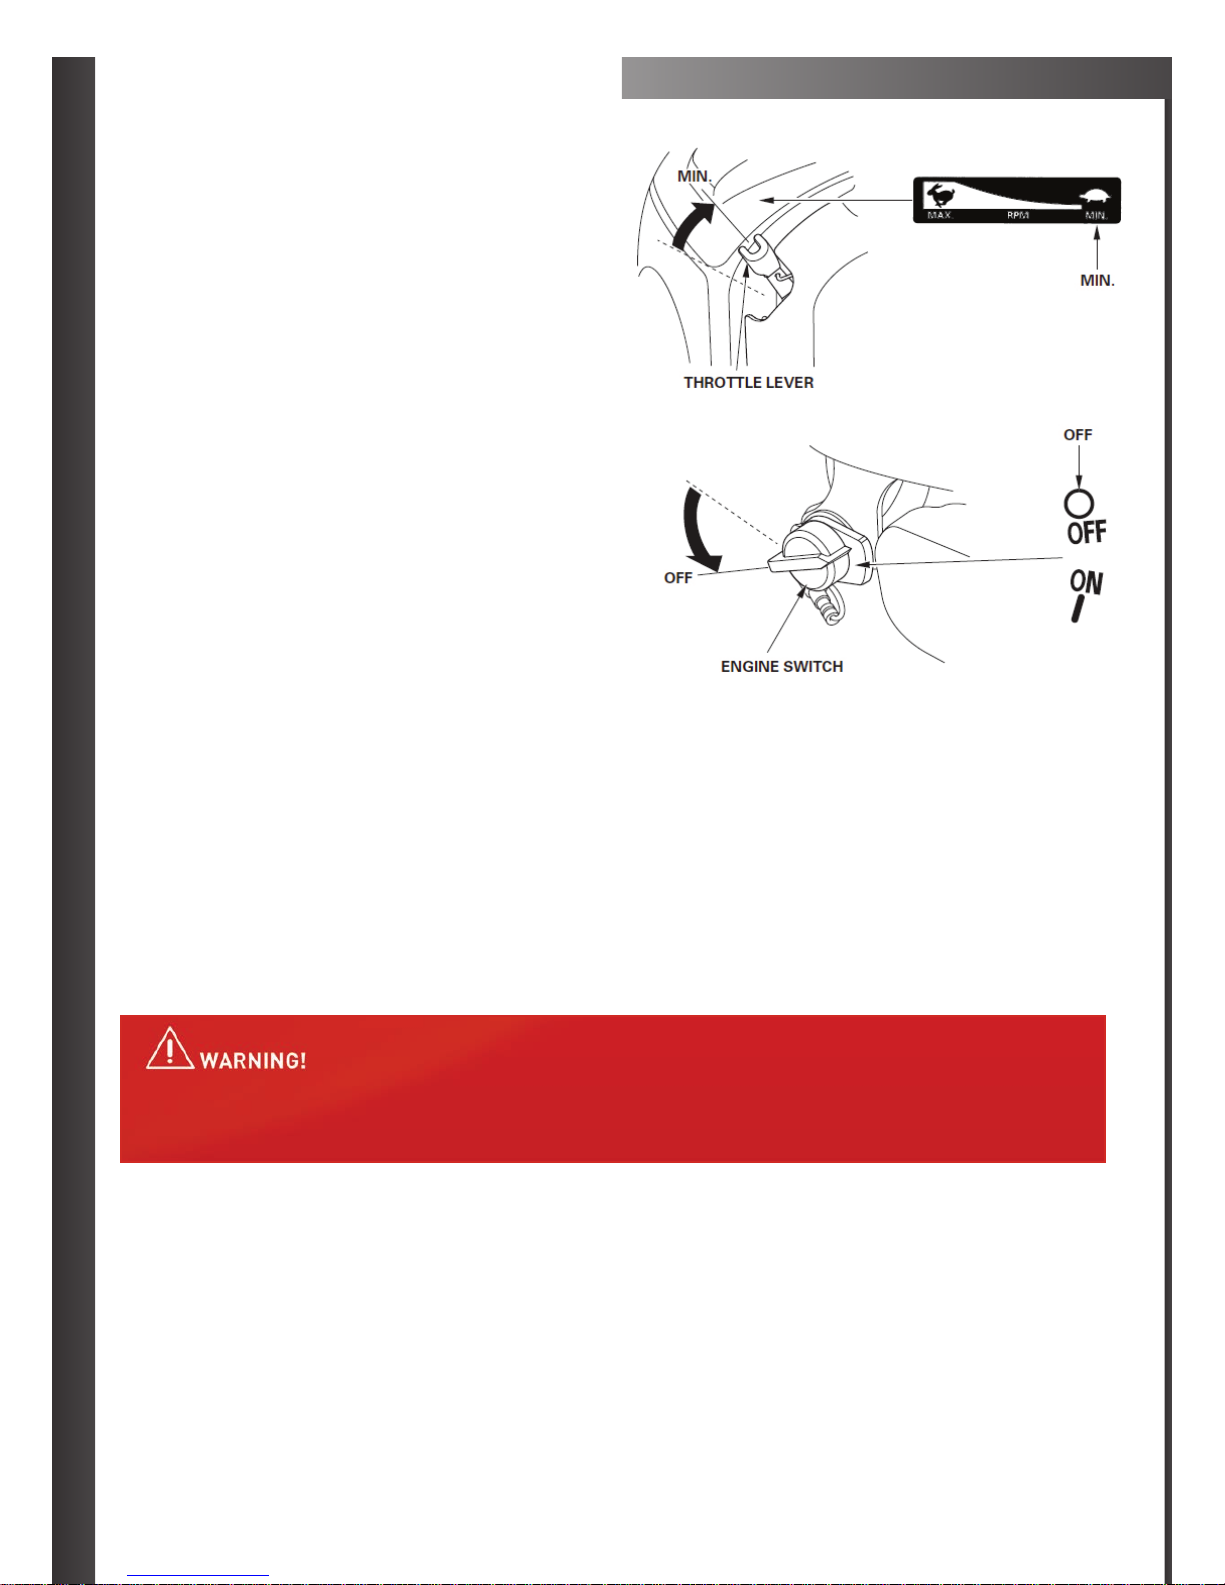
STOPPING THE ENGINE
Standard/Tiller type:
To stop the engine in an emergency, simply turn the engine switch on
the equipment to the OFF posion. Under normal condions, use the
following procedure.
1. Move the throle lever to the MIN. posion.
The throle lever shown here will be connected to a remote control
on the equipment powered by this engine. Refer to the instrucons
provided with the equipment for remote control informaon and for
engine speed recommendaons.
2. Turn the engine switch on the equipment to the OFF posion.
13
Pump type:
To stop the engine in an emergency, simply turn the engine switch
to the OFF posion. Under normal condions, use the following
procedure.
For engine speed recommendaons, refer to the instrucons provided
with the equipment powered by this engine.
1. Move the throle lever to the MIN. posion.
2. Turn the engine switch to the OFF posion.
SERVICING YOUR ENGINE
THE IMPORTANCE OF MAINTENANCE
Good maintenance is essenal for safe, economical and troublefree
operaon. It will also help reduce polluon.
To help you properly care for your engine, the following pages include
a maintenance schedule, roune inspecon procedures, and simple
maintenance procedures using basic hand tools. Other service tasks
that are more difficult, or require special tools, are best handled by
professionals and are normally performed by a Honda technician or
other qualified mechanic.
The maintenance schedule applies to normal operang condions. If
you operate your engine under severe condions, such as sustained
high-load or high-temperature operaon, or use in unusually wet or
dusty condions, consult your servicing dealer for recommendaons
applicable to your individual needs and use.
Maintenance, replacement, or repair of the emission control devices
and systems may be performed by any engine repair establishment
or individual, using parts that are “cerƟfied” to EPA standards.
IMPROPER MAINTENANCE, OR FAILURE TO CORRECT A PROBLEM BEFORE OPERATION, CAN CAUSE A MALFUNCTION IN WHICH YOU CAN
BE SERIOUSLY HURT OR KILLED.
ALWAYS FOLLOW THE INSPECTION AND MAINTENANCE RECOMMENDATIONS AND SCHEDULES IN THIS OWNER’S MANUAL.

14
MAINTENANCE SAFETY
Some of the most important safety precauons follow. However, we cannot warn you of every conceivable hazard that can arise in performing
maintenance. Only you can decide whether or not you should perform a given task.
SAFETY PRECAUTIONS
• Make sure the engine is offbefore you begin any maintenance or repairs. This will eliminate several potenal hazards:
- Carbon monoxide poisoning from engine exhaust.
Be sure there is adequate venlaon whenever you operate the engine.
- Burns from hot parts.
Let the engine and exhaust system cool before touching.
- Injury from moving parts.
Do not run the engine unless instructed to do so.
• Read the instrucons before you begin, and make sure you have the tools and skills required.
• To reduce the possibility of fire or explosion, be careful when working around gasoline. Use only a nonflammable solvent, not gasoline, to
clean parts. Keep cigarees, sparks, and flames away from all fuel related parts.
Remember that an authorized Honda servicing dealer knows your engine best and is fully equipped to maintain and repair it.
To ensure the best quality and reliability, use only new genuine Honda parts or their equivalents for repair and replacement.
FAILURE TO PROPERLY FOLLOW MAINTENANCE INSTRUCTIONS AND PRECAUTIONS CAN CAUSE YOU TO BE SERIOUSLY HURT OR KILLED.
ALWAYS FOLLOW THE PROCEDURES AND PRECAUTIONS IN THIS OWNER’S MANUAL.
(1) Service more frequently when used in dusty areas.
(2) These items should be serviced by your servicing dealer, unless
you have the proper tools and are mechanically proficient. Refer to
Honda shop manual for service procedures.
(3) For commercial use, log hours of operaon to determine proper
maintenance intervals.
Failure to follow this maintenance schedule could result in non-
warrantable failures.
15
REFUELING
Recommended Fuel
This engine is cerfied to operate on unleaded gasoline. Unleaded gasoline produces fewer engine and spark plug deposits and extends exhaust
system life.
1. Check the fuel level by looking through the translucent fuel tank.
2. If the fuel level is low, refuel in a well-venlated area with the engine stopped. If the engine has been running, allow it to cool.
FUEL CAN DAMAGE PAINT AND SOME TYPES OF PLASTIC. BE CAREFUL NOT TO SPILL FUEL WHEN FILLING YOUR FUEL TANK. DAMAGE
CAUSED BY SPILLED FUEL IS NOT COVERED UNDER THE DISTRIBUTOR’S LIMITED WARRANTY.
NEVER USE STALE OR CONTAMINATED GASOLINE OR OIL/GASOLINE MIXTURE. AVOID GETTING DIRT OR WATER IN THE FUEL TANK.
OCCASIONALLY YOU MAY HEAR A LIGHT “SPARK KNOCK” OR “PINGING” ΈMETALLIC RAPPING NOISEΉWHILE OPERATING UNDER HEAVY
LOADS. THIS IS NO CAUSE FOR CONCERN.
IF SPARK KNOCK OR PINGING OCCURS AT A STEADY ENGINE SPEED, UNDER NORMAL LOAD, CHANGE BRANDS OF GASOLINE. IF SPARK
KNOCK OR PINGING PERSISTS, SEE AN AUTHORIZED HONDA SERVICING DEALER.
NOTICE
RUNNING THE ENGINE WITH PERSISTENT SPARK KNOCK OR PINGING CAN CAUSE ENGINE DAMAGE.
RUNNING THE ENGINE WITH PERSISTENT SPARK KNOCK OR PINGING IS CONSIDERED MISUSE, AND THE DISTRIBUTOR’S LIMITED
WARRANTY DOES NOT COVER PARTS DAMAGED BY MISUSE.
NOTICE
GASOLINE IS HIGHLY FLAMMABLE AND EXPLOSIVE, AND YOU CAN BE BURNED OR SERIOUSLY INJURED WHEN REFUELING.
• STOP ENGINE AND KEEP HEAT, SPARKS, AND FLAME AWAY.
• REFUEL ONLY OUTDOORS.
• WIPE UP SPILLS IMMEDIATELY.

16
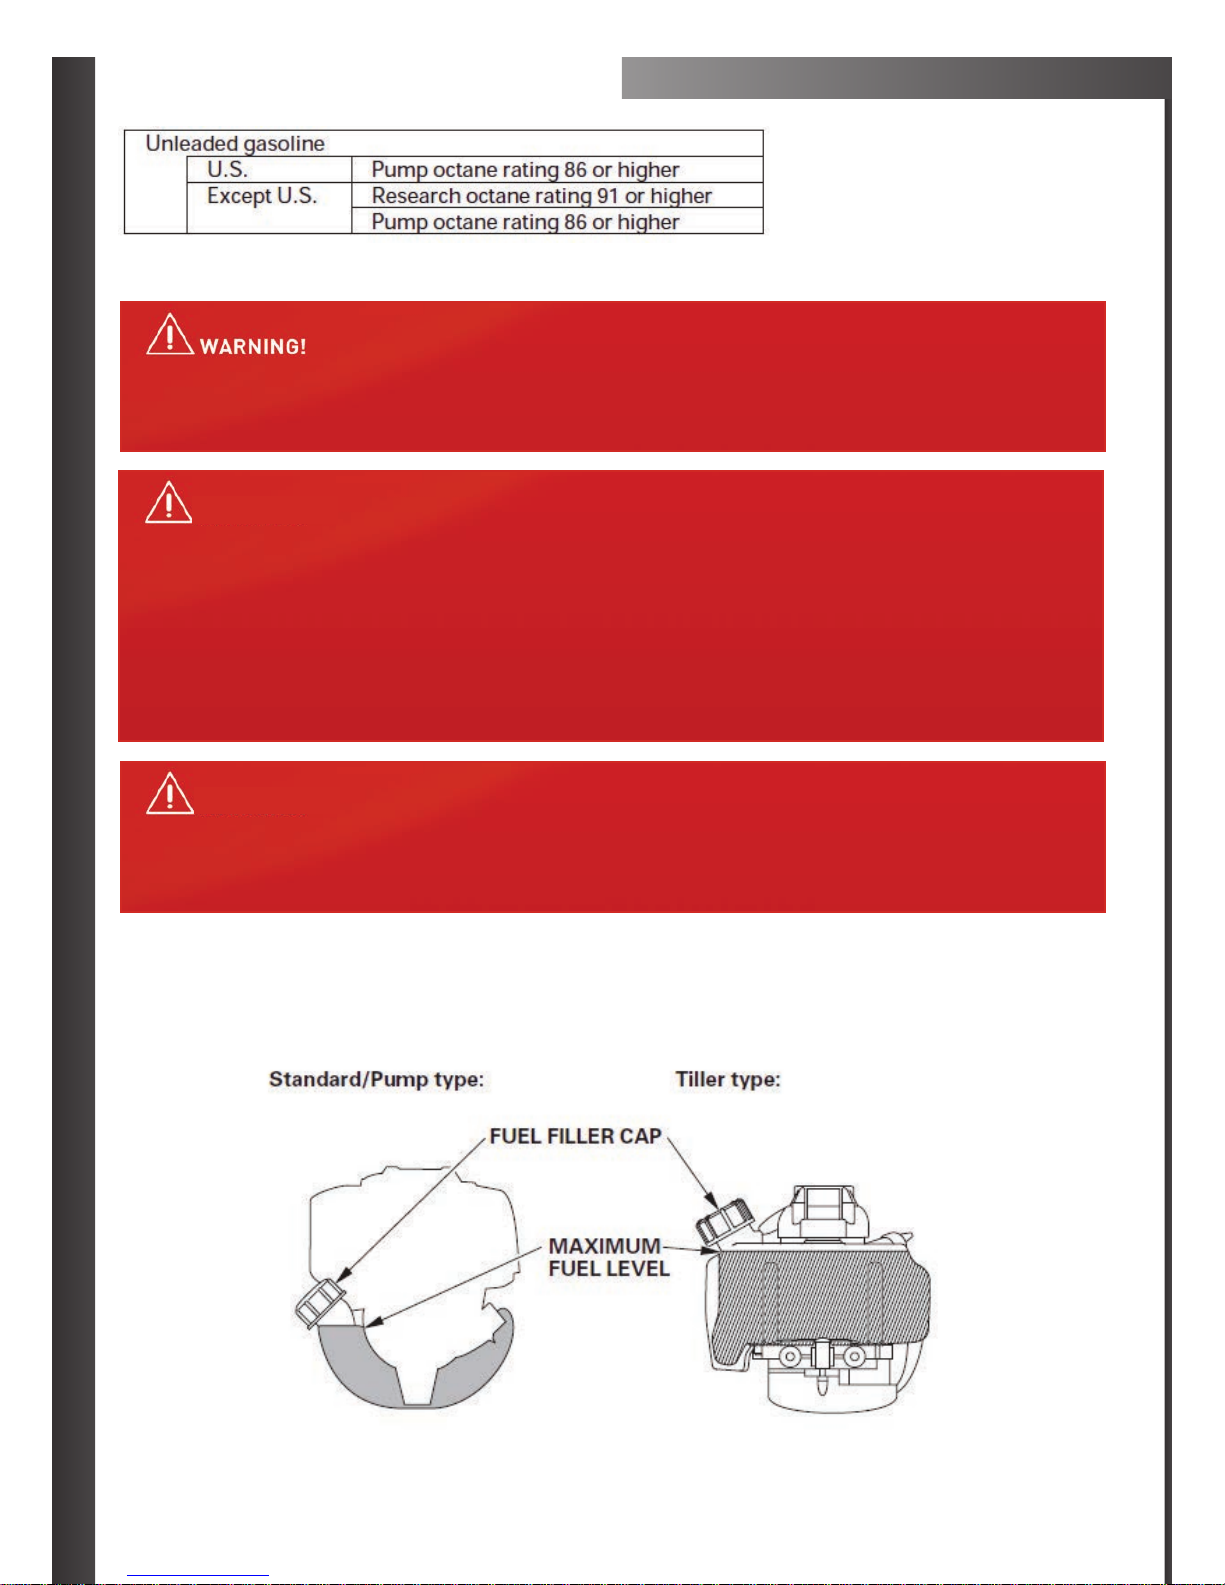
To refuel, rest the engine on the ground with the fuel filler cap
facing up, as shown. Remove the fuel filler cap, and fill the tank with
gasoline to the boom of the filler neck. Refuel carefully to avoid
spilling fuel. Do not overfill. There should be no fuel in the filler neck.
Aer refueling, ghten the fuel filler cap securely.
Never refuel the engine inside a building where gasoline fumes may
reach flames or sparks. Keep gasoline away from appliance pilot
lights, barbecues, electric appliances, power tools, etc.
Spilled fuel is not only a fire hazard, it causes environmental damage.
Wipe up spills immediately.
ENGINE OIL
Oil is a major factor affecng performance and service life. Use
4-stroke automove detergent oil.
RECOMMENDED OIL
Use 4-stroke motor oil that meets or exceeds the requirements for
API service classificaon SJ, SL, or equivalent. Always check the API
service label on the oil container to be sure it includes the leers SJ,
SL, or equivalent.
SAE 10W-30 is recommended for general use. Other viscosies shown
in the chart may be used when the average temperature in your area
is within the indicated range.
STANDARD/TILLER TYPE:
The recommended operang range of this engine is -5°C to 40°C (23°F
to 104°F).
PUMP TYPE:
The recommended operang range of this engine is 5°C to 40°C (41°F
to 104°F).

17
OIL LEVEL CHECK
Check the engine oil level before each use, or every 10 hours if
operated connuously.
Check the engine oil level with the engine stopped and in a level
posion.
1. Remove the oil filler cap/dipsck and wipe it clean.
2. Insert & remove the oil filler cap/dipsck without screwing it into
the oil filler neck, then remove it to check oil level shown on the
dipsck.
3. If the oil level is near or below the lower limit mark on the dipsck,
fill to the boom edge of the oil fill hole with the
recommended oil.
To avoid overfilling or underfillig, be sure the engine is in a level
posion, as shown, while adding oil.
4. Reinstall the oil filler cap/dipsck and ghten securely.
OIL CHANGE
Drain the used oil when the engine is warm. Warm oil drains quickly
and completely.
1. Check that the fuel filler cap is ghtened securely.
2. Place a suitable container below the engine to catch the used oil.
3. Remove the oil filler cap/dipsck and drain the oil into the
container by pping the engine toward the oil filler neck.
Please dispose of used motor oil in a manner that is compable with
the environment. We suggest you take used oil in a sealed container
to your local recycling center or service staon for reclamaon. Do
not throw it in the trash, pour it on the ground, or down a drain.
RUNNING THE ENGINE WITH PERSISTENT SPARK KNOCK OR PINGING CAN CAUSE ENGINE DAMAGE.

18
OIL LEVEL CHECK
4. With the engine in a level posion, fill to the boom edge of the
fill hole with the recommended oil.
Some oil will remain in the engine aer draining. When refilling with
fresh oil, start with less than 80 cm ³ (2.7 US oz, 2.8 lmp oz). Slowly add
enough oil to fill to the boom edge of the oil fill hole as sown below.
5. Reinstall the oil filler cap/dipsck securely. If any oil is spilled,
make sure to wipe it up.
RUNNING THE ENGINE WITH A LOW OR EXCESSIVE OIL LEVEL CAN CAUSE ENGINE DAMAGE.

19
AIR CLEANER
A dirty air cleaner will restrict air flow to the carburetor, reducing
engine performance. If you operate the engine in very dusty areas,
clean the air filter element more oen than the specified in the
MAINTENANCE SCHEDULE.
InspecƟon
Press the latch tab on the top of the air cleaner cover, and remove the
cover. Inspect the filter element. Clean or replace dirty filter elements.
Always replace damaged filter elements.
Refer to this page for instrucons that apply to the air cleaner and
filter service.
Reinstall the filter element and air cleaner cover.
Cleaning
1. Clean the filter element in warm soapy water, rinse, and allow to
dry thoroughly. Or clean in nonflammable solbent and allow to dry.
2. Dip the filter element in clean engine oil, then squeeze out all
excess oil. The engine will smoke whenb started if too much
oil is lein the foam.
3. Wipe dirt from the air cleaner body and cover, using a moist rag.
Be careful to prevent dirt from entering the carburetor.
4. Reinstall the filter element and air cleaner cover securely.
OPERATING THE ENGINE WITHOUT AN AIR FILTER ELEMENT, OR WITH A DAMAGED AIR FILTER ELEMENT, WILL ALLOW DIRT TO ENTER THE
ENGINE, CAUSING RAPID ENGINE WEAR. THIS TYPE OF DAMAGE IS NOT COVERED BY THE DISTRIBUTOR’S LIMITED WARRANTY.
NOTICE
20
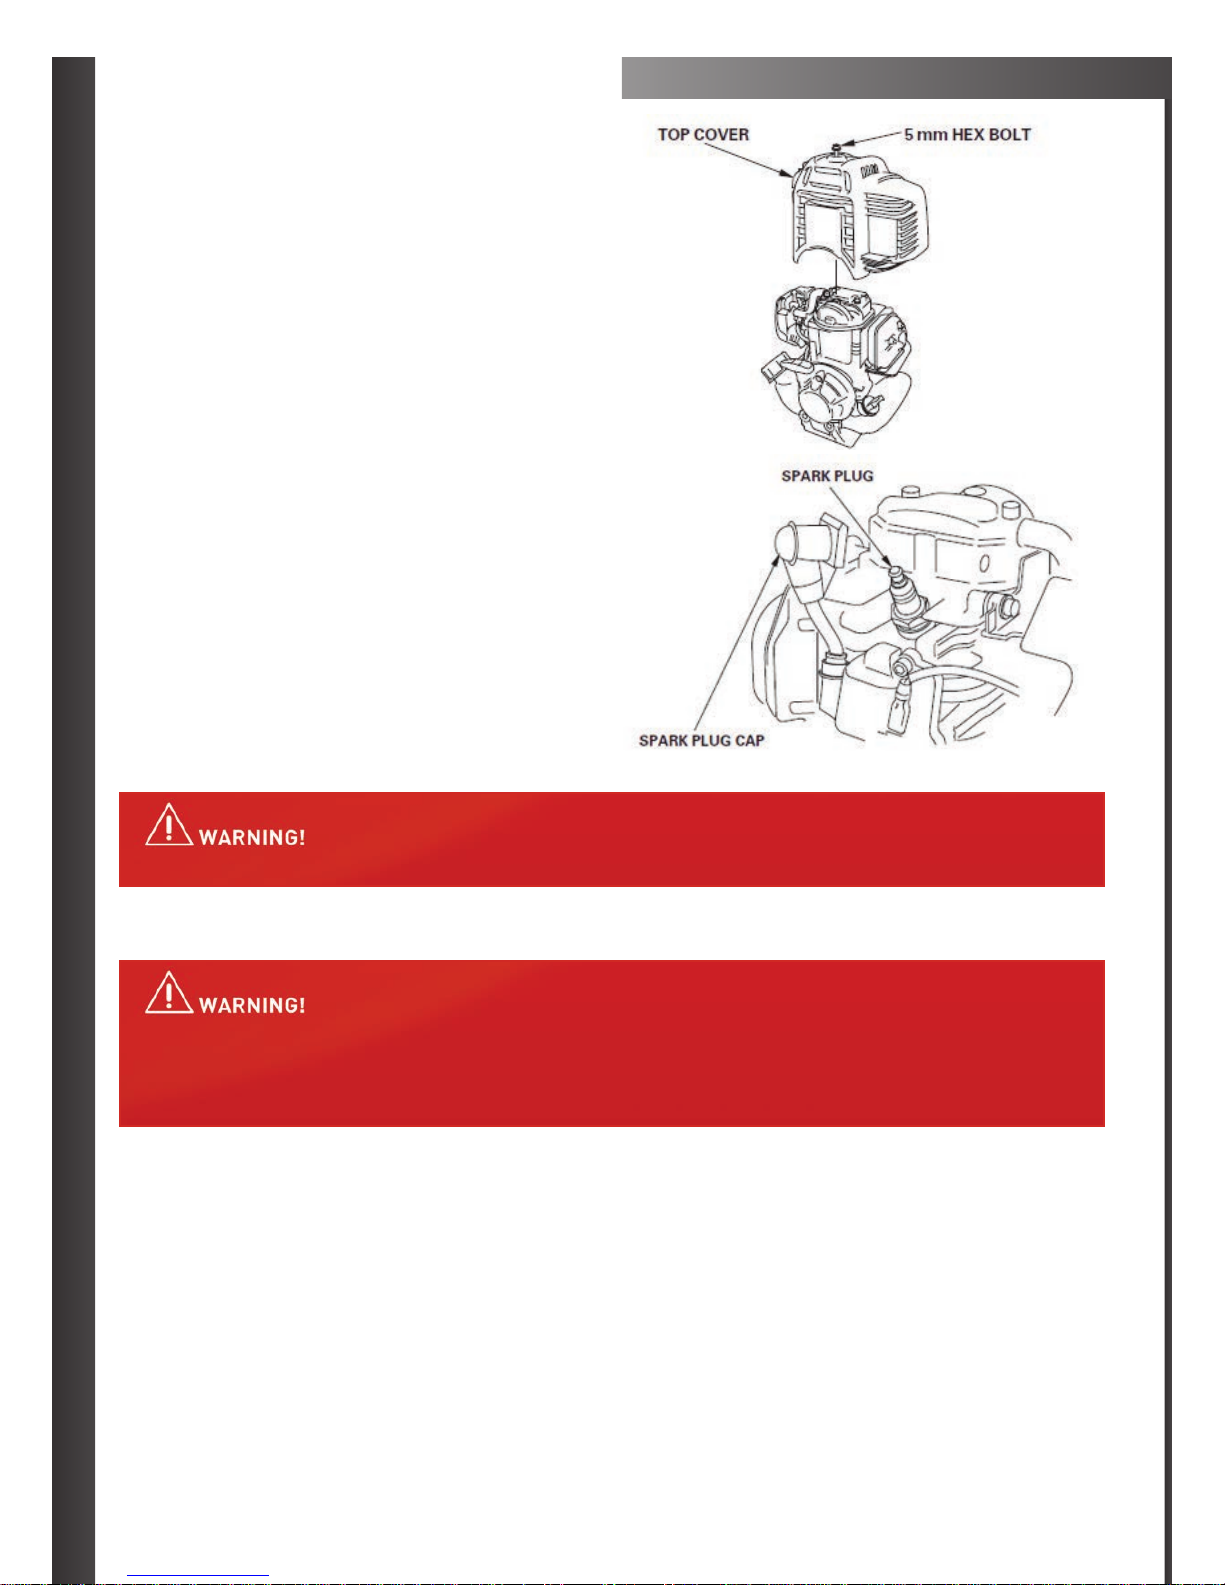
SPARK PLUG
Recommended Spark Plug: CM5H (NGK), CMR5H (NGK)
The recommended spark plug is the correct heat range for normal
engine operaon temperatures.
For good performance, the spark plug must be properly gapped and
free of deposits.
1. Remove the top cover.
Loosen the 5 mm hex bolt with a hexagon wrench, then remove
the top cover.
2. Disconnect the spark plug cap and remove any dirt from around
the spark plug area.
3. Remove the spark plug with a 5/8-inch spark plug wrench.
4. Inspect the spark plug. Replace it if damaged or badly fouled, if the
sealing washer is in poor condion, or if the electrode is worn.
DO NOT OPERATE ENGINE WHEN THE TOP COVER IS REMOVED.
DO NOT PULL THE RECOIL STARTER HANDLE WHEN THE TOP COVER IS REMOVED.
YOU MAY BE INJURED FROM THE ROTATING PARTS OR BURNED BY THE MUFFLER.
AN INCORRECT SPARK PLUG CAN CAUSE ENGINE DAMAGE.
Table of contents


