Meicheng PDR-1 User manual

Meicheng
PDR-1
Portable Digital Audio Recorder
USER’S MANUAL
®
www.meicheng.com.tw

1
INDEX
I. Introduction ……………………………… ………………………………………………… …………….2
II. Notice……………………………………… ……………………………………………… ……………..2
III. Parts description (Switches, Connectors, and Buttons)…………………………………… …………….3
IV. Power on………………… ………………………………………………………… ………… …………5
V. Operate MENU setup……………………………………………………………………………… ……..6
VI. Recording……………………………………………………… ……………………………… ………..6
VII. Playback………………… …………………… ……………… ……………… ……………… ……… …9
VIII. Delete tracks…………………… ……………… ……………… ……………… …………… ……..…10
IX. Transfer to and fromyour computer…………………………………………………………………….11
X. Specification……………………………………………………..………………………………………12

2
Meicheng
I. Introduction:
Thank you for purchasing the Meicheng PDR-1 Portable Digital Audio Recorder. This machine is equipped with
leading edge digital recording technology, excellent sound quality and easy operation, is suitable for acoustic
instruments, electric guitars, microphones, keyboards, MP3players, interviews, education, band rehearsal,
ecological records…and more.
Features of PDR-1
9 Groups and 99 Recording Tracks
The PDR-1 provides 1-9 groups, numbered 1-9, and 99 recording tracks for each group, for either the internal flash
memory or SD card. You may select any blank track number you prefer to record on before you record, or the
PDR-1 will select a blank track for you automatically. Whenever a track is recorded, the track number will be
fixed and you will not able to change it even if the previous track is deleted or added. There is no limit in
recording time for each individual recording track.
Two Storage Folders
The PDR-1 provides two folders for storage files: in FOLDER 1, you can record music either from the built-in
microphone, from an external microphone, from an electric guitar and from Line-in sources and play it back. In
FOLDER 2, you can download MP3 music from your PC or MAC and play it. The two flexible operation folders
allow flexibility to organize your music for both your recording and leisure time.
Leading and Unique Sound Mixer Technology
The Meicheng PDR-1 is equipped with built-in microphones, and two audio inputs. When you connect audio
inputs to record, the sound will automatically be mixed with the built-in microphone with a balance level. Our
leading and unique sound mixing technology is perfect for occasions with multiple instruments playing,
combinations with background music or for the creation of any creative music made by you!
Multiple Audio Inputs Selection
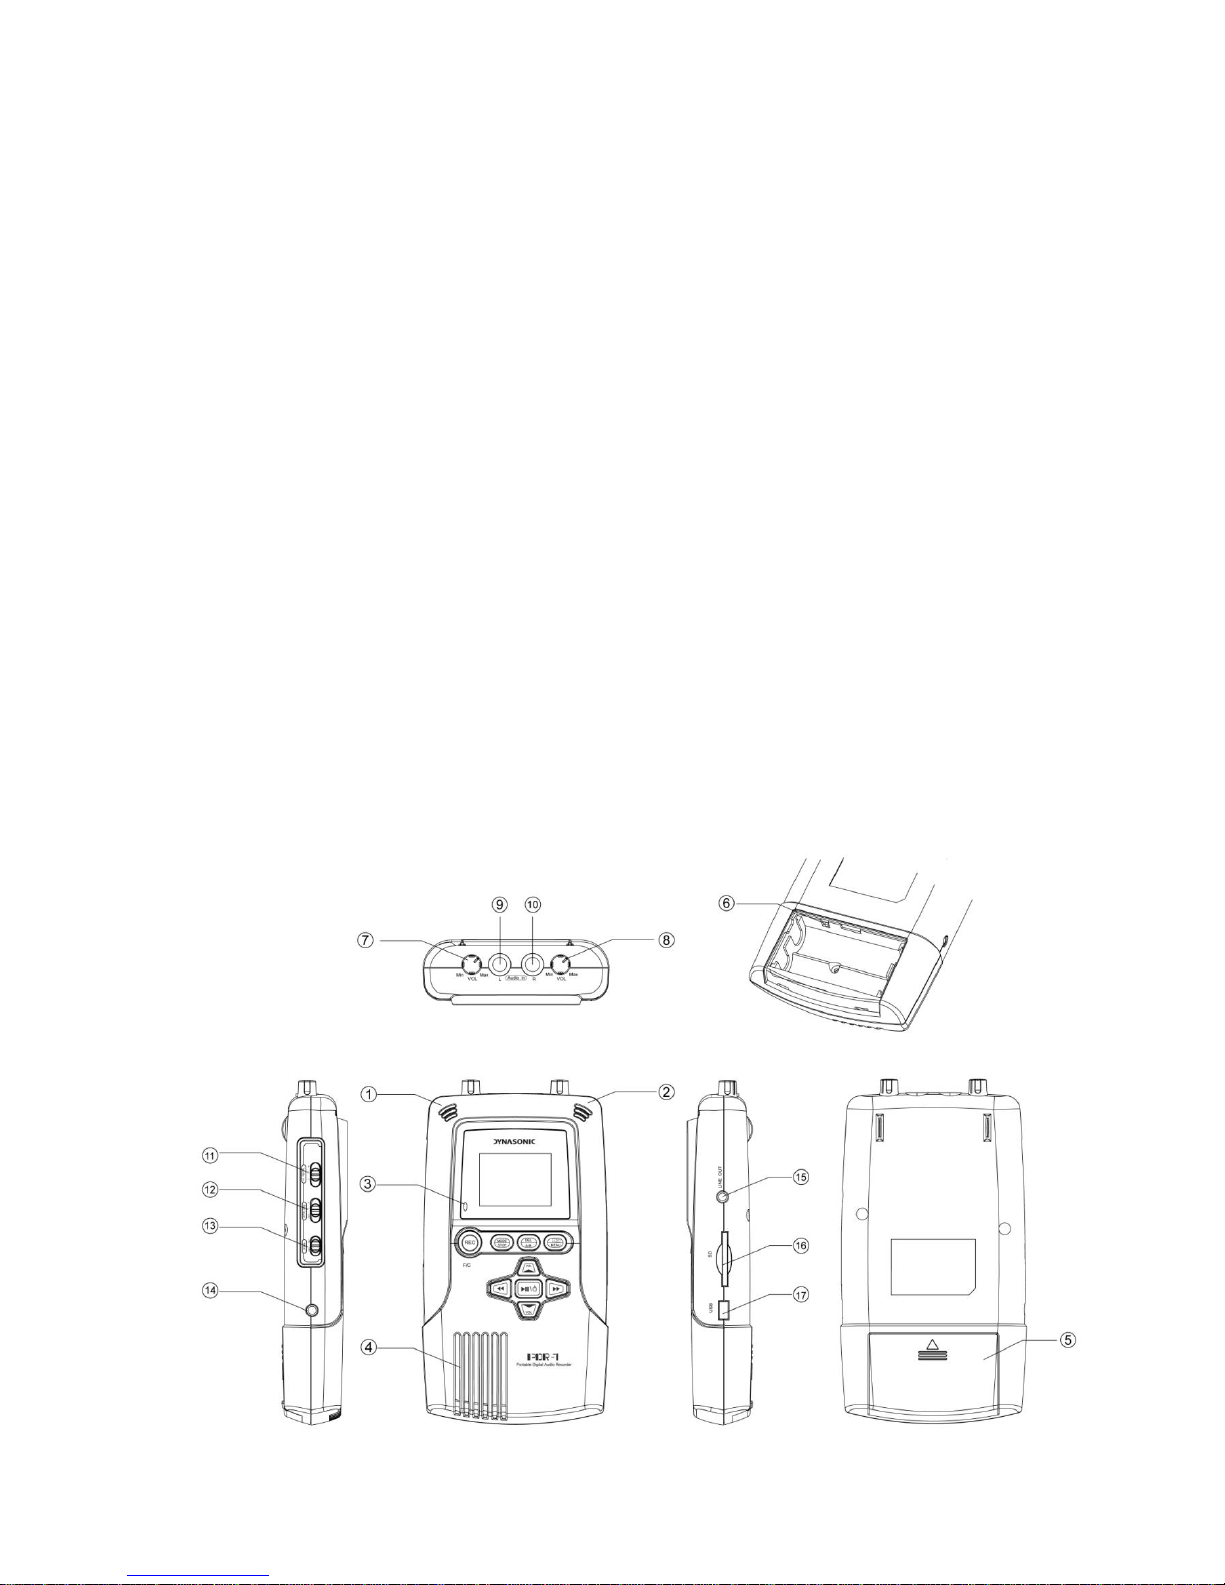
The PDR-1 is equipped with two Audio-in jacks for Left & Right channel recording. You can select to plug in
external microphone, electric guitar, or Line-in as recording sources, by changing the switch position of the Audio-in
selector. The multiple audio input selection adds more convenience to your recording experience!
II. NOTICE
Please read the following notice before you use the PDR-1.
1. Please read this guide carefully before you use the device.
2. Please notice the position to put batteries inside the PDR-1.
3. Please use the DCpower adaptor of USB type in correct 5V DC specification.
4. Please do not take apart or repair the PDR-1 by yourself. Please bring the PDR-1 back to your retailer or to a
local service vendor for repair and assistance.

3
5. In order to keep stable data transmission, please do not twist the USBcable when you plug it into the computer.
6. The built-in LCD display is a fragile electronic part, please do not press on it heavily and do not touch it with
sharp objects. We suggest you use only special cloth to clean the LCD display. Please make sure that the
LCD display does not get exposed to water.
7. The SD card is a very precise electronic device; please use it according to the following notice: Prevent taking
the SD card out of the machine during data transmission. Do not bend, strike, drop or take apart the SD card.
Prevent to place the SD card in a place with high temperature, high humidity or dust. Do not expose the SD
card to static electricity. In addition:
-Please make sure the SD card you are using has been formatted (the format type of the PDR-1 is FAT32).
-Please release the write protection switch of SD card before you record.
-The PDR-1 processes large amount of data during recording and playback, as result, we strongly suggest
you to use high speed SD cards as extension memory only, to prevent noise, data lost or any transmission
problem.
We do not guarantee the function, operation or life of any SD card that is used in the device. We do not also
take any responsibility of indemnity for the damage of SD cards. Like any digitally stored data, data shall be
backed up regularly. In no event, we will be liable to any indirect incidental, special or consequential
damages to any person caused by, or for any lost profits, lost savings, loss of use, loss revenues or lost data
arising fromor relating to this device.
III. Parts Description (Switches, Connectors, and Buttons)
Switches and connectors on the PDR-1

4
○
1Built-in microphone “L “channel: an omni condenser microphone is installed into the device as “L”
channel.
○
2Built-in microphone “R”channel: an omni condenser microphone is installed into the device as “R”
channel.
○
3Recording indicator LED: the LED will light up during recording.
○
4Built-in speaker: a monitor speaker is installed, it will stop working when earphone is plug in.
○
5Battery cover: open the cover and installtwoAA batteries to work.
○
6Battery select switch: when using primary batteries (or Alkaline batteries), switch to “1.5V”; or switch to
“1.2V” when using Ni-MH rechargeable batteries.
○
7Volume controller of Audio-in “L”channel
○
8Volume controller of Audio-in “R”channel
○
9Audio-in “L”channel: it allows audio input of M(ext. microphone), G(E. guitar) or L(Line-in). It provides
1.5Vpower supply.
○
10Audio-in “R”channel: it allows audio inputs of M(ext. microphone), G(E. guitar) or L(Line-in). It
provides 1.5V power supply.
○
11 Audio-in selector: to select three kinds of audio input types, M(ext. microphone) / G(E. guitar) / L(line-in)
○
12Built-in microphone sensitivity selector: H(high) / L(low) / OFF: to select the sensitivity level of built-in
microphones, H(high) or L(low). Or switch off the built-in microphone (OFF).
○
13Key hold switch ON / OFF: switch “ON”to hold (stop running) the key control, or switch “OFF”to release
key control.
○
14Earphone jack (stereo): when an earphone is connected to this jack, the built-in speaker will be switched
off.
○
15Line out port: connect to amplifier.
○
16SD card socket: allow to use installSD memory cards.
○
17USB socket / DC Power in: Use a USB cable to connecting with a computer. You may use USB type DC
adaptor (DC 5V) to work fromthis port (DCpower adaptor is not include).
Button control
Record button: press the button to start recording
Stop button: press the button to stop or cancel operations (recording, playback, delete …)
A-B loop button: press the button during playback to define a loop start point (A point), then press
the button again to indicate the loop end point (B point). The music will then play from A to B
again and again loop untilyou press the button again to stop.
MENU button: press the key to enter MENU, press the button again to leave MENU.
Power/Play button: press still for 2 seconds to switch ON or OFF the machine; Press the button to
PLAYBACK; press it during playbackwill pause playback, push it again to continue playback.

5
Track down/Rewind button: Press the button once to select previous track, hold down the button to
change the track number quickly; Hold down the key during playing to rewind playback, release the
button to go back to normal playback.
Track up/Forward key: Press the button once to select next track, hold down the button to change the
tracknumber quickly; Hold down the key during playing to fast forward playback, release the button
to go backto normal playback.
Vol. up/ Manual selector button: Press the button during playback to increase the volume level of
earphone or speaker; Press this button for itemselection when in MENU mode.
Vol. down/ Manual selector key: Press the key while playing to decrease the volume level of
earphone or speaker; Press the key for itemselection in MENU mode.
MODE button control
The MODE button is used to provide additional functions. To operate a MODE function, press the MODE button
first (the LCD will show MODE) and then press the desired function button immediately to operate the MODE
function. Here is a description of the mode functions:
+
Memory selection: use this function to select the internal flash memory (F) or the SD card
(C) memory as record target and playbacksource.
+
Delete tracks function
+
Folder 1 or Folder 2 select mode function
+
Group number: decrease the selection function
+
Group number: increase the selection function
IV. Power on
1. Open the battery cover and install two newAA batteries into the PDR-1.
2. The PDR-1 works on both primary batteries (and Alkaline batteries) and Ni-MH rechargeable batteries. To use
primary batteries, select to “1.5V”position; to use Ni-MH rechargeable batteries, select to “1.2V”position of the
battery select switch.
3. Hold the button still for two seconds, the device will switch on and enter the operating mode.
4. Press the buttonstill for two seconds to switch off the device.
5. The device will switch off automatically if there is not any other button controlafter 5 minutes.
6. The LCD will show “ ” when the batteries are at low power level, please change new batteries at this point.

6
V. Operate MENU setup
When press key, the LCD will show up all main items of MENU setup, press or keys to
move to previous or next main items, press or keys to interchange to secondary items. Press
key again to leave MENU mode.
○1Recording format: There are two formats available for recording, WAV and MP3.
○2Sample rate: WAV(16bit), sample rate: 8/16/22/24/32/44.1/48/96KHz
WAV(24bit), sample rate: 8/16/22/24/32/44.1/48KHz
MP3 (16bit), sample rate : 16/22/32/44.1/48 KHz
○
3REP (repeat): there are two repeat functions, REP (the track will be repeated always) or REP All (the device will
repeat all the tracks). The LCD willshownothing if user does not select REP function.
○
4BL (back light time): There are four back light time for selection
ON (back light always on)
10s (turn the back light off if there is not any other button controlafter 10sec)
20s (turn the back light off if there is not any other button control after 20seconds)
OFF (no back light)
VI. Recording
How to record

7
1. The device allows you to record ONLY in FOLDER 1. To change to FOLDER 1, press + , when
the LCD display shows FOLDER 1, you are in FOLDER 1 mode. (○1)
2. The device allows you to record into the internal flash memory or into an installed SD card memory (○
2). The
PDR-1will change to the SD card memory automatically when SD card is installed. Or you can press
+ to interchange between the memory of the internal flash memory (F) and the SD card (C).
3. Press + or + to select the group number in the range from range 1 to 9. (○
3)
4. Press or to select the recording track in the range from 01 to 99 to record (○
4). You may
select any of a blank track number you want to record to, then press button to record; Orjust press
button directly, the device will select a blank track follows the last recorded tracknumber to record (for
example, if the last recorded track number is 05, the automatically selected track number willbe 06).
5. Press button to start recording, the Recording indicator LED will light up still, the LCD display will
show “●”, and the time clock will start running (○5), which means that the recording is in progress. Press
to pause record during recording, the Recording indicator LED will start flash, press the same button
again to continue recording. Press button to finish recording.
6. The volume indicator willshow on the LCD during recording (○
6), you can adjust input volume by the Volume
controller of Audio-in (○
8or ○
9). Please do not set to the highest volume level on recording, otherwise, the
recording sound quality will be distorted.
7. When you finish recording, the recording format and sample rate of this track will show up on the LCD. (○
7)
8. For long time recording, you can switch Key hold switch (○
14)to ON position to hold (stop running) the key
control. And switch to OFF position to release key control.
Record from microphones
1. The PDR-1 is equipped with two built-in microphones (omni directional condenser type). You may adjust
high/low sensitivity level of built-in microphones for recording from the Built-in microphone sensitivity selector
(○
13). The high sensitivity level of built-in microphone is at -45dB(at 1KHz), while the low sensitivity level is at
-35dB(at 1KHz). You may also adjust the Volume controller of Audio-in to make slight volume adjustment.
(○
8or ○
9)
2. There are two extension Audio-in jacks of PDR-1 (○
10 & ○
11 ). They allow you to plug two extension
microphones into the jacks for recording, please select to “M”position of the Audio-in selector (○
12). The
two Audio-in jacks both provide DC 1.5V power; you may use either condenser microphones or dynamic

8
microphones as recording sources. The extension microphone record level is adjustable via the knob of volume
controller of Audio-in jack (○
8or ○
9) for proper recording sound level.
3. The recording source of the built-in microphones and the extension microphones will be mixed into two
separate tracks (Left and Right channels) with balance level.
4. You may turn off the built-in microphones while recording from other sources. Switch to OFF position from
the Built-in microphone sensitivity selector. (○
13)
Record fromelectric guitar or line-in
1. The PDR-1 allows you to plug in an electric guitar as recording source. Please select to “G”of the Audio-in
selector (○
12). The electric guitar record level is adjustable via the knob of volume controller of Audio-in jack
(○
8or ○
9) for proper recording sound level.
2. The PDR-1 allows you to plug line-in as recording source, such as CD players, tape decks, radios, etc. Please
select to “L”of the Audio-in selector (○
12). The line-in record level is adjustable via the knob of volume
controller of Audio-in jack (○
8or ○
9) for proper recording sound level.
3. The recording source of the built-in microphones and the electric guitar or line-in recording source will be
mixed into two separate tracks (Left and Right channels) with balance level.
4. You may turn off the built-in microphones while recording from other sources. Switch to OFF position from
the Built-in microphone sensitivity selector. (○
13)
Suitable position to record
1. Polar pattern of the built-in microphones
The built-in microphone of PDR-1 is of omni-directional condenser microphone type. The sound collecting area
is wide as below diagram.

9
2. To produce best recording result, we suggest that you put the PDR-1 at a distance of around 60cm from the
sound source, at table height.
3. Please adjust the input volume level to a proper condition. Do not set to the highest volume level on recording,
otherwise, the recording sound quality willbe distorted.
4. In situations where multiple instruments are played simultaneously, the PDR-1 should be positioned near to
instruments with smaller sound levels –or you need to use extension microphones for the different instruments.
5. If you want to record speech (e.g. from a teacher) together with the playing of instruments, it is best if the
speaker uses the extensional lapel microphone to improve the results.
6. For better recording quality, the extensional lapel microphone could also be clipped on score stands or the body
of a player, depending on the situation.
VII. Playback

10
1. FOLDER 1 or FOLDER 2: You need to enter the FOLDER 1 to play the files/tracks previously recorded with
the PDR-1. Enter the FOLDER 2 instead to play files downloaded/transferred from a computer. To change
between the two folders, you need to press + to interchange FOLDER 1 and FOLDER 2.(○1)
2. Playback from flash memory or SD card memory: Select the files you want to playback form internal flash
memory or SD card memory (further explained in the previous chapter Recording) (○
2)
3. Select the Group and track you want to playback: By pressing + or to select group
number in the range from range 1 to 9.(○
3)And select the track to playback by press or button
in the range from 1-99 (○
4). The recording format and sample rate of the track you select will show up on the
LCD display.(○
5)
4. Press to start to playback, the LCD display will show “”. Press the button during playing to pause,
the LCD display will show “”.(○
7) Press thesame button again to continue playing.
5. Forward and rewind during playback: Hold on during playback to rewind the playing. Hold down
to forward the playing. The time display will move quickly according to the position. Release the
button to go back to normal playback.
6. Repeat and Repeat All: Enter the MENU mode, and set up repeat mode. When select REP, the track will be
repeated always. If you select REP All, the device will repeat all the tracks. Please note that the REP All
function only works in FOLDER 2 mode. The LCD will show REP mode on the LCD display. (○
6)
7. A-B loop : press button during playback to define a loop start point (A point), then press the button
again to indicate the loop end point (B point). The music will then play from A to B again and again loop until
you press the button again to stop.(○
8)
8. The device allows you to adjust the volume level of earphone or built-in speaker by press or
during playback. The adjusting level range is from 00 to 20.
VIII. Delete tracks
You can delete the recording files via computer or by the device itself. The following progress is the way to delete
the files with the device: Select the track you want to delete, press + , the LCD will show “dEL”,
then you need to press again, the machine will start to delete the track. When the LCD finish showing
“dELETE”and the clock return to 00:00:00, means the track is empty and are available for a new recording.

11
IX. Transferto and fromyour computer
The device can be connected with computer, to copy and store your recording files on your computer (to backup
your data), or download music to play at this unit.
When you connect USB port with your computer, the computer will detect the PDR-1 as two removable disks (the
first disk represents the build-in flash memory; the second disk represents the SD card memory), and you will find
folders of Group 1 –9 in each removable disks. The music you have downloaded from the computer to the device
will be accessible in FOLDER 2, and the track number depends on the sequence in which the files are transferred.
This means that the track number in FOLDER 2 is not fixed and can be changed at any time if a track is deleted or
added.
If you want the files get a fixed track number, you can store the music in FOLDER 1. To do this, you simply need
to change the filenames according to the following sequence:
a) If you want to download files to FOLDER 1 to be with fixed track number, and store to the built-in
flash memory, change the file name to M_INT_xx (where xx is the track number you want it to be.)
b) If you want to download files to FOLDER 1 to be with fixed track number, and store to the SD
memory card, change the file name to M_EXT_xx(where xx is the tracknumber you want it to be.)
PS1. The device can work with USB adaptor, when connecting with computer, LCD will show “USB”so you
can press once, the machine will enter the operating mode, then you can operate the device with
the power of computer. You will leave the operating mode when you press over 2 seconds.
PS2. The device can work with USB DC 5V adaptor, while LCD showed“USB”so you can press once,
the machine will enter the operating mode, then you can operate the device with the power of DC 5V.
You will leave the operating mode when you press over 2 seconds.

12
X. Specifications
Recording media: Internalflash memory 128MB, SD memory card (16MB - 2GB),
SDHC memory card (support up to 32G)
SD card format type: FAT 32
Recording format: WAV(16bit), sample rate: 8/16/22/24/32/44.1/48/96KHz
WAV(24bit), sample rate: 8/16/22/24/32/44.1/48KHz
MP3 (16bit), sample rate : 16/22/32/44.1/48 KHz
Playback format: WAV: PCM WAV with sampling rate of 8KHz, 16KHz, 32KHzand 44.1KHz,
MP3:MPEG1, MPEG2, MPEG2.5 Layer3, from 32K~320Kbps
S/N ratio at 1KHz: 55dB
Frequency response: 20 –20KHz
Built-in microphone: omni-directional condenser microphone type
Input: two 1/4”mono for selection of extension microphone,
Line-in, and E. Guitar (plug-in power 1.5V)
Built-in stereo microphones (L& R).
Output: 1/8”stereo headphone
1/8”stereo Line out
Built-in speaker: 0.1Watt, 32 Ohm
USB interface: Mini-B type (USB 2.0 Full-Speed compatible)
Power requirements: AA battery x 2, or USB DC adaptor 5V (not included).
Battery life
(Alkaline batteries): 5 hours for recording, or 6 hours for playback (by earphone)
Dimensions: 15.5(L) x 8.5(W) x 3(D) cm
Weight: 200g (not include batteries)
Accessories: Two lapel microphones, USB cable, two AA batteries, and a headphone.
Table of contents
Other Meicheng Recording Equipment manuals
Popular Recording Equipment manuals by other brands

Korg
Korg MPS-10 owner's manual

Nakanishi
Nakanishi E3200 Series Operation manual

Lectrosonics
Lectrosonics SPNCWB Installation and startup guide

ATEN
ATEN StreamLIVE PRO UC9040 user manual

twisted electrons
twisted electrons CRAZY8 BEATS user manual

Broadcast Tools
Broadcast Tools ProMix-1 Installation and operation manual