meitav-tec RT40 User manual
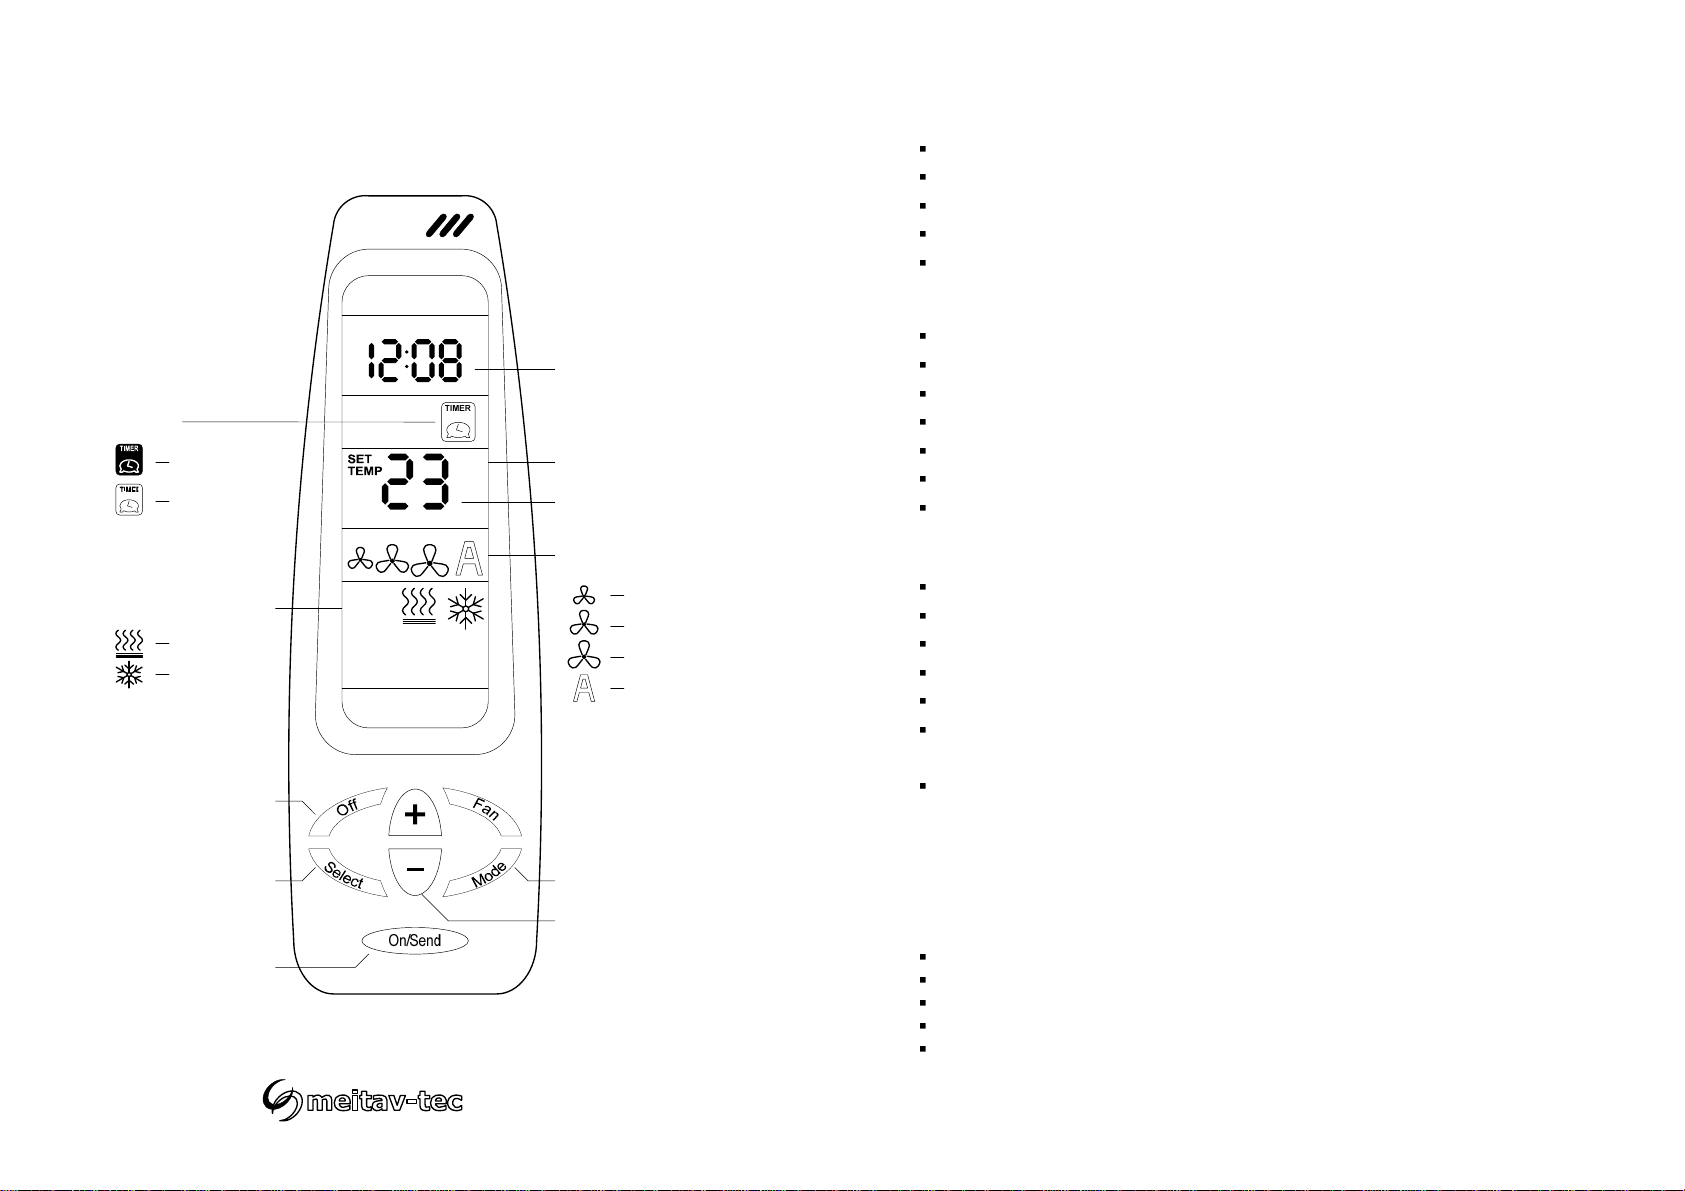
Set-point adjustment
Turn system ON
/ Send changes
Mode selection
Set-point display
Temperature scale
Clock
Fan speeds display
Modes display
Clock adjustment
Turn system OFF
Heat
Cool
Low
Medium
High
Auto
Timer and Real Time Clock and Day
Timer Start Time
Press the [Select] button – “PROGRAM & START” will flash on display.
Press the [+] button - the hours will flash.
Adjust the hours using the [+] or [-] buttons.
Press the [Select] button - the minutes will flash.
Adjust the minutes using the [+] or [-] buttons.
Timer Stop Time
Press the [Select] button again – “PROGRAM & STOP” will flash on display.
Press the [+] button - the hours will flash.
Adjust the hours using the [+] or [-] buttons.
Press the [Select] button - the minutes will flash.
Adjust the minutes using the [+] or [-] buttons.
Press the [Select] button - the TIMER will blink
Select TIMER ON (black icon) or OFF (white icon) using the [+] or [-] buttons.
Clock
Press the [Select] button again – “CLOCK SET” will flash.
Press the [+] or [-] buttons - the hours will flash.
Adjust the hours using the [+] or [-] buttons.
Press the [Select] again - minutes will flash.
Adjust the minutes using the [+] or [-] buttons.
Press the [Select] again to return to normal display.
Press the “On/Send” button to send information to the thermostat.
Batteries Replacement
When the batteries are low, the display of the remote control will dim.
If the batteries will not be replaced the display will turn off completely.
Batteries replacement:
Pull the batteries cover down to reveal the batteries.
Remove the old batteries.
Wait for 10 minutes before installing the new batteries.
Install two new AAA batteries – Pay attention to the polarity.
Return the batteries cover to place.
Important: The remote control will not operate unless at least 10 minutes pass
between removing the old batteries and installing the new ones.
RT40
Infra Red Remote Control
Timer
Active
Not active
Tel: +972-3-9626462
Fax: +972-3-9626620
support@meitavtec.com
°C

0 T M- M+ 8 7
External temperature
sensor (option)
M-
M+ PS201P
Power Supply
ETN40P1
Back Plate
8 7
12VDC
12VDC
Damper
DA6/401
DA8/401
DA10/401
~ 0
Supply
230VAC
JMP1
ES IS
JMP8
31
JMP7
1
3
JMP3
MZ
IR
40
40
MZ
JMP5 JMP6 JMP4
ETN40P1
Back of Front Plate
Use JMP1 to select between:
- Internal temperature
sensor (default)
JMP1
ES IS
- External temperature
sensor (option)
JMP1
ES IS
Note: All other jumpers mustremain
on factory default position as shown
in the illustration above.
Owner’s Manual
Turning the ETN40P1 ON or OFF
- Press the [On/Off] button to turn the ETN40P1ON or OFF.
Note: This operation will not affect the ON or OFF status of the A/C unit.
Adjusting the set point temperature
- Press the [+] button – the set point temperature will appear on display.
- Use the [+] and [-] buttons toadjust the set point temperature.
Selecting system mode
- Press the [Mode] button to switch between Heating and Cooling modes.
Note: The actual mode is set by the A/C unit.
The mode set by ETN40P1 should be the same as the mode set by the A/C unit, in order to operate the
damper properly.
Adjusting the On/Off timer
- Press the [Timer] button.
- Use the [+] and [-] buttons to select the number of hours until the thermostat turns ON or OFF (opposite
to current position).
Note: The timer can also be set using the RT40 remote control unit (option).
When the timer is activated, “Aux” will appear on display.
In order to cancel the timer, change the hours to “0”.
ON
OFF
Cool
Heat Aux
C
o
TimerModeOn/Off
Tel: +972-3-9626462
Fax: +972-3-9626620
support@meitavtec.com
Other meitav-tec Remote Control manuals


