MELICONI HP300 Professional User manual

2
A
B
C
E
DF
G
CHG
OFF ON
1.2.3
CHANNEL
AUDIO IN
DC IN 6V
1
2
H
L
J
M

13
EN
To avoid damage to hearing, do not use the headphones at loud volumes for long periods of time.
This unit must be used only with the rechargeable batteries included.
This unit only accepts analogue electrical (stereo) audio signals, e.g. those from standard headphone outputs, as its
input.
As such, if you wish to connect it to a device with a different kind of audio output (digital - HDMI) or (optical digital - TOS-
LINK), an appropriate converter / adapter will be required.
Do not use the device outdoors or in a humid environment, nor expose it to water drops or sprays. Do not install the
device in an enclosed space, and ensure adequate ventilation. In order to enable the device to be disconnected from
the power supply, the AC power supply adapter must be easily accessible. Before connecting the cables, unplug the
devices from the mains.
Do not attempt to open, repair or modify the device – danger of electric shock! Any repairs must be performed only by
qualied technicians. If anything unusual is noticed on the AC power supply adapter, disconnect it immediately from
the socket.
Do not expose the batteries or device to excessive heat, for example under direct sunlight, near a re or similar heat
source.
HP300 professional
Thank you for buying a Meliconi product!
The Meliconi HP300 RF stereo wireless headphones system uses an advanced wireless audio transmission technology,
providing high quality stereo sound from the most popular audio player devices, and offering an outdoor range of up
to 100 m for maximum freedom of movement. The signal can pass through walls and ceilings. The transmitter can be
connected to a TV or any other audio source, from DVD and Blu-ray players to CD players, HiFi systems or radios, or
PCs and notebooks.
WARNING: When inserting the batteries, check that their polarity is correct. Do not disassemble or
dispose of the batteries in a re. Do not mix new and used batteries, nor batteries of different brands
or types. Do not dispose of them in the environment. Improper use can damage the environment and
human health. The bin symbol, also shown on the battery, indicates that the battery must be disposed
of according to applicable regulations (EC 2006/66): familiarise yourself with the disposal methods for
used batteries applicable for your country.
Warnings
The symbol of bin with a cross over it on the appliance or the packaging indicates that the product
should be disposed of separately from other refuse at the end of its life cycle. The user must therefore
hand over the appliance at the end of its life cycle to an approved recycling centre for electrical and elec-
tronic refuse, or return it to the seller each time a new or replacement appliance is purchased. Correct
disposal in separated refuse collection for subsequent recycling, treatment and environmentally friendly
disposal contributes to reducing any negative impacts on the environment and human health, and en-
courages recycling of the materials used to manufacture the appliance. Illegal disposal of the product by
the user shall result in the application of sanctions provided for in applicable legislation (in Italy, article
50 and subsequent of Legislative Decree 22/1997).

14
1. HEADPHONES (receiver) Fig. 1
2. BASE (transmitter) Fig. 2
3. AC Power supply adapter, 6V 300 mA
4. Audio cable, 3.5mm to 3.5mm
5. Two rechargeable batteries
6. Instructions
Package contents
Installation
HEADPHONES (FIG. 1)
- Ensure that the headphones are off by checking that the ON/OFF switch “A” is in the OFF position.
- Remove the battery cover “F” located on the back of the left headphone earpad.
- Insert the two rechargeable batteries supplied. Ensure you insert them with the correct polarity.
- Close the battery cover again.
BASE (FIG. 2)
- Connect the power cord from the AC power supply adapter to the input connector “M” (DC IN) located on the back of
the base.
- Connect the AC power adapter to a mains power socket.
- Turn on the base using switch “H” on its rear (selecting one of the three available channels).
- Position the headphones on the transparent housings on the base, ensuring that they light up BLUE to indicate correct
contact between the headphones and recharging clips “J”.
- Leave the headphones charging for 24 hours (mandatory before rst use).
Headphone parts:
A. On / Off switch
B. On / Off LED (RED)
C. Volume adjustment wheel
D. Auto Scan button
E. Signal reception LED (GREEN)
F. Battery cover
G. Battery cover opening
CONNECTING AN AUDIO SOURCE (after recharging the HEADPHONES)
Make sure that the devices are switched off before making the connections.
- Remove the headphones from the charging base.
- Identify the headphone output on the TV or other audio device you wish to connect (3.5 mm stereo headphone
connector) This is usually indicated with the symbol.
BE SURE not to mix up the headphone output with the microphone input or PC audio input present on some devices.
If the device does not have a headphone output, try using other available audio outputs (SCART / RCA) as an
alternative. See the chapter “ALTERNATIVE AUDIO CONNECTIONS”.
- Use the supplied audio cable to connect the audio source to the “AUDIO IN” input on the back of the base.
- Turn on the base and connected audio device.
- The connected device (e.g. TV) will generally turn off its internal speaker when its headphone output is connected.
- Check that the RED LED “L” on the base turns on to indicate that an audio signal is being received by the transmitter.
If it does not, try increasing the volume on the playback device (e.g. TV).
NOTE that some TVs have separate volume controls for the internal SPEAKERS and HEADPHONE output; if this is
the case, make the necessary adjustments.
- Remaining near the base, turn on the headphones using switch “A” and wait for a few moments.
- Check that the RED LED “B” and GREEN LED “E” on the back of the headphone pads both light up.
- Put on the headphones and adjust the volume using the volume wheel “C” until you obtain the desired audio.
If no sound comes from the headphones, or the audio is distorted, see the chapter “TROUBLESHOOTING”

15
Use
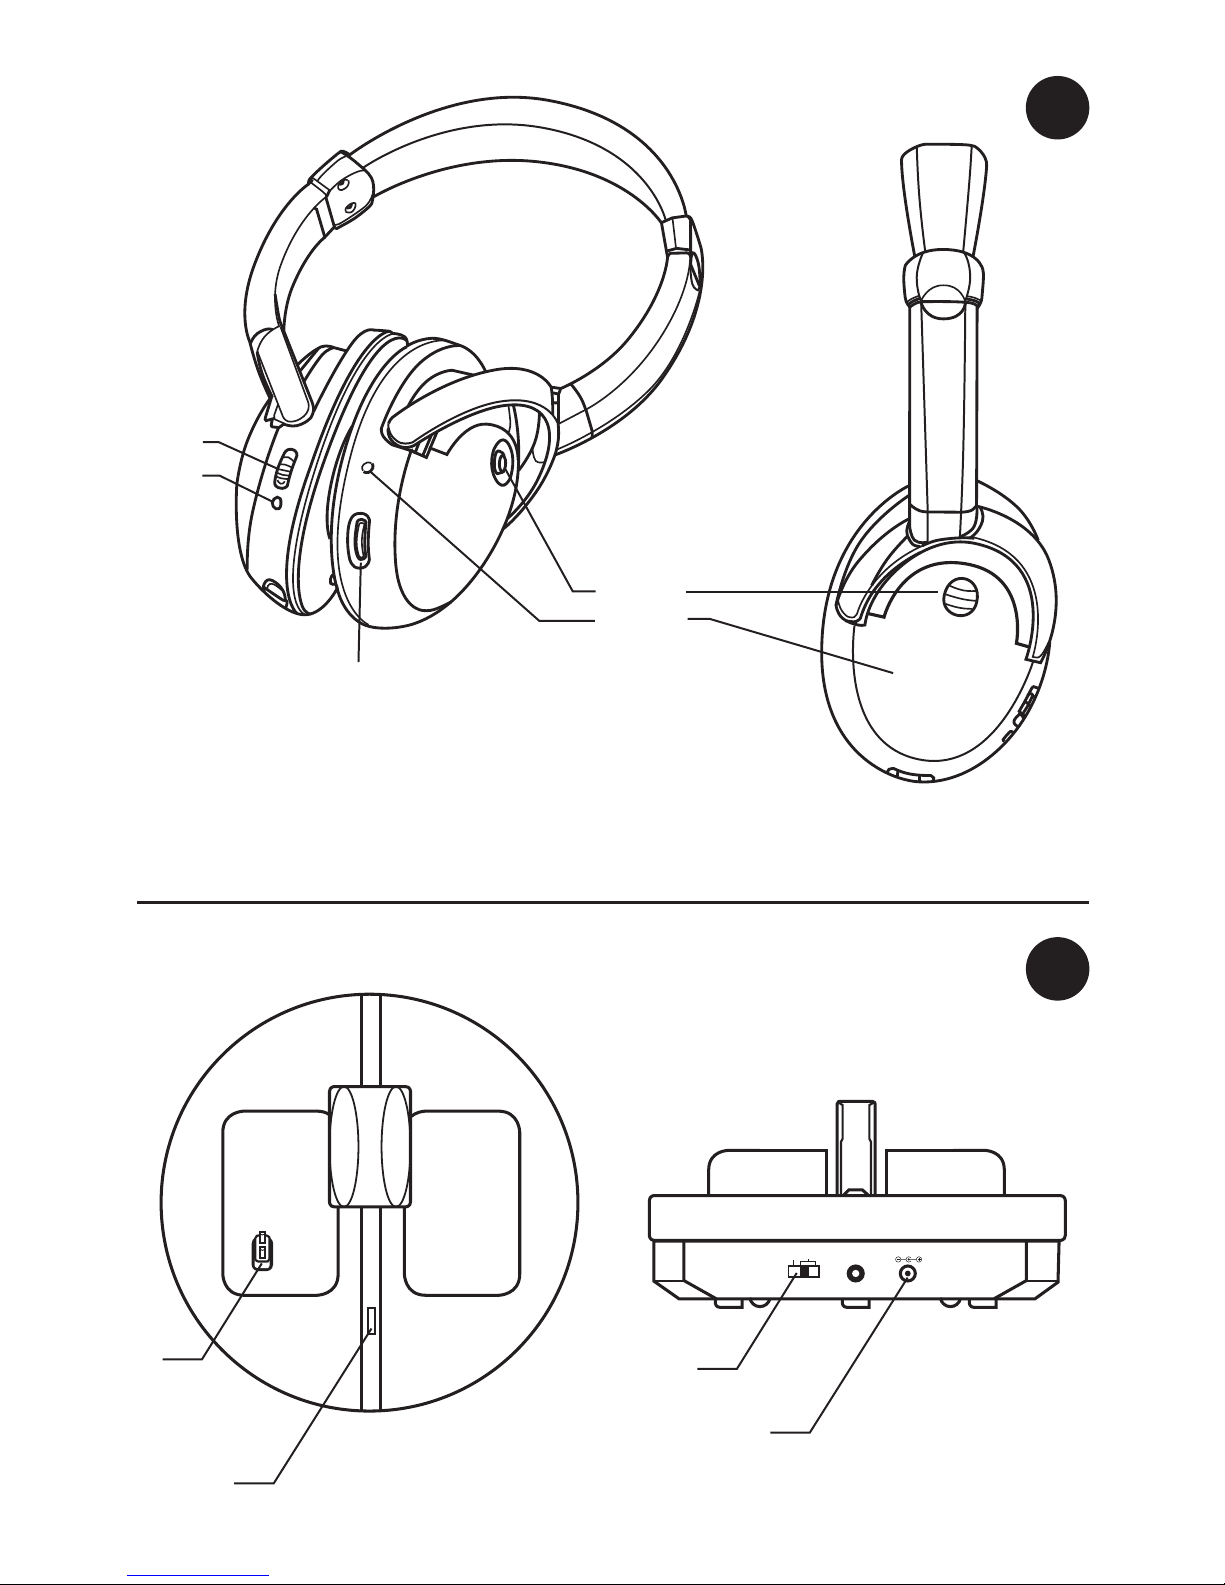
For normal use, it is sufcient to turn the headphones on and off using only switch “A” located on the headphones
themselves.
The base station transmitter will turn off automatically after 4 minutes in the absence of an audio input signal (the RED
LED “L” on the base and GREEN LED “E” on the headphones will turn off).
When the headphones are not being used, replace them on the base, ensuring correct contact with the recharging
clips “J” (the transparent housings on the base will light up BLUE). This procedure will ensure you nd the headphones
charged the next time you wish to use them.
If the headphones are not used for long periods, you should remove the batteries and disconnect the AC power supply
unit from the mains.
CAUTION
- The RED LED “L” on the base should always be on during normal use. If it is off, this means that the audio input signal
to the transmitter is missing or insufcient – turn up the volume on your TV or other device until the light comes on.
To adjust the listening volume you should use the volume wheel “C” on the headphones and NOT the volume on the
TV or other device.
- If the GREEN light “E” does not come on when turning on the headphones or the audio reproduction is distorted, go to
the base station and press the “D” (auto scan) button to link the headset with the base.
Battery recharging
With its batteries charged, the device will operate for at least 6 hours continuously.
To recharge the batteries, turn off the headphones and replace them on the base, ensuring correct contact with the
recharging clips “J” (the transparent housings on the base will light up BLUE).
Leaving the headphones charging on the base, even for days at a time, will not cause any problems.
WARNINGS:
- For safety reasons, the batteries supplied are of a special type. Never use other batteries to replace the supplied
batteries. If necessary, contact MELICONI technical support.
- When headphones are not being used, turn them off to avoid draining the batteries completely and potentially
damaging them.
- The batteries must be fully charged before you rst use the device. An initial 24 hour recharge is required to ensure
maximum life for the rechargeable batteries. Always ensure that the ON/OFF switch “A” on the headphones is in the
OFF position while recharging the batteries.
- Do not expose the batteries to excessive heat sources such as direct sunlight, re or similar.
CAUTION:
Always follow applicable legislation in disposing of the product, and the batteries in particular. Dispose of the batteries in
a battery recycling container in order to ensure they are safely disposed of without damaging the environment.
Alternative audio connections
If the audio device you wish to use does not have a headphone output, or you wish the TV to continue to use its own
speaker while using the headphones (if this does not offer separate controls), try connecting the base to other available
audio outputs via an appropriate adapter (not included).
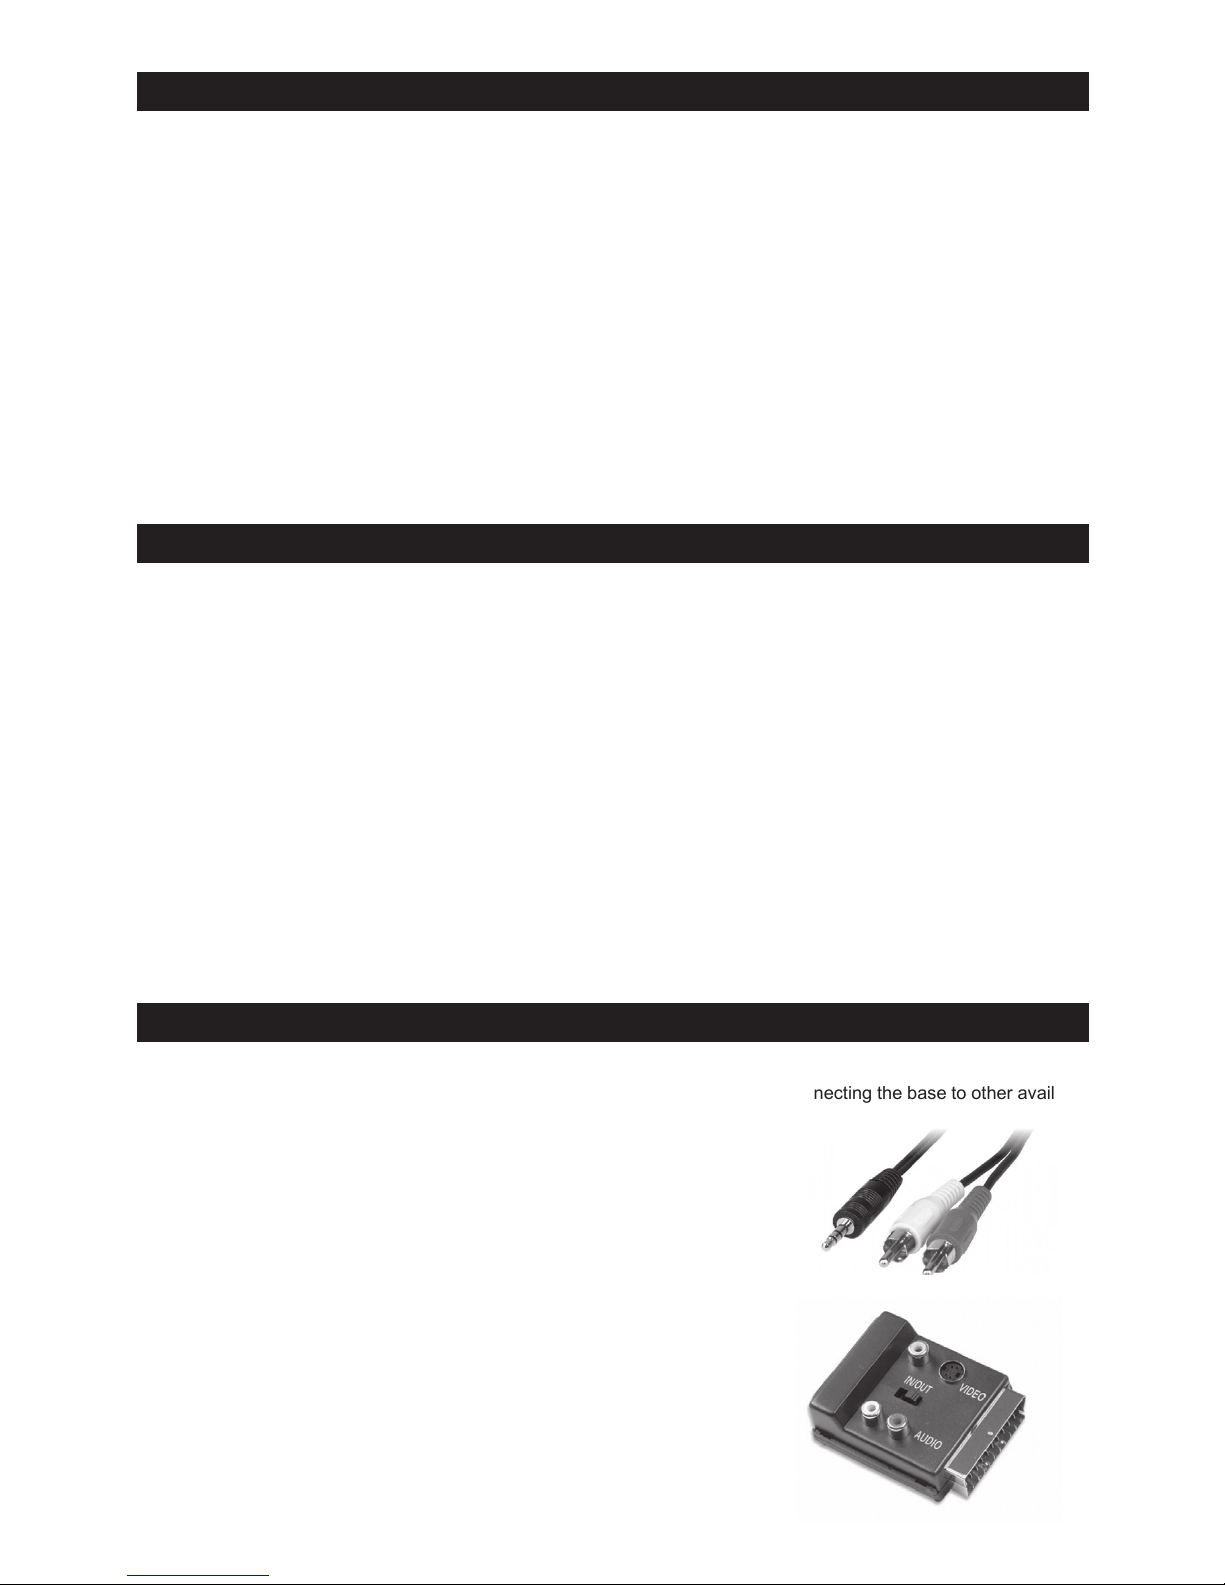
RCA connectors
Use an appropriate cable (RCA male / 3.5 mm stereo headphone male),
as shown in the gure, to connect the device’s RCA audio output (RED
and WHITE sockets) to the audio IN input on the base.
BE SURE you have correctly identied the red and white RCA sockets
labelled “OUTPUT” and not “INPUT”.
SCART
Obtain the adapter shown in the gure as well as the cable (RCA male -
3.5 mm headphone male) illustrated above.
Connect the adapter to the TV’s SCART socket and then connect this
to the audio IN input on the base using the cable (RCA male - 3.5 mm
headphone male).
If no audio signal is obtained, try adjusting the (IN / OUT) switch on the
adapter or using another SCART socket on the TV.

16
Helpline
If you have any queries about the HP300 Professional:
• Read this instruction manual carefully, which will help you nd a solution to most of your problems.
• Consult our website: www.meliconi.com
In case of need, you can write to cuf[email protected].
If the headphones do not produce any sound, or if the audio is distorted or seems to be coming from other sources,
perform the following steps:
1) Ensure that the AC power supply adapter is fully plugged into the mains power socket and the cable is properly
connected to the connector “M” on the base (DC IN).
2) Ensure that the ON/OFF switch on the base is not in the OFF position.
3) Make sure the batteries are fully charged. Recharge them if necessary.
4) Ensure that the TV or audio playback device is on and outputting an audio signal.
5) Ensure that the RED LED “L” on the base is constantly on when an audio input signal is present. Increase the audio
source volume if necessary.
6) Turn off the headphones using the switch on the back of the headphone earpad and go over to the base.
7) Turn on the headphones and ensure that the RED and GREEN LEDs on them turn on.
8) Press the AUTO SCAN button on the headphones.
9) Use the volume control wheel on the headphones to adjust the volume.
10) If the problem persists, use the selector “H” on the base to change the channel (1-2-3), then repeat the procedure
from step 6.
Troubleshooting
Technical specications
Transmission mode : UHF stereo
Carrier frequency : 863 MHz
Operating voltage : transmitter – 6 V 300 mA
Receiver – 2.4 V
(2 x rechargeable batteries supplied)
Frequency response : 20 Hz – 20 kHz
Distortion : 1.5 %
Signal/Noise Ratio : 60 dB
Channel separation : 30 dB
Maximum transmission distance : 100 m (outdoors)
Other manuals for HP300 Professional
2
Table of contents
Other MELICONI Headphones manuals

MELICONI
MELICONI MySound PEAK RIGHT BT User manual

MELICONI
MELICONI HP 200 User manual

MELICONI
MELICONI HP400 User manual

MELICONI
MELICONI HP300 Professional User manual

MELICONI
MELICONI MySound SAFE PODS V5.1 User manual

MELICONI
MELICONI HP FLASH EVO User manual

MELICONI
MELICONI My Sound User manual

MELICONI
MELICONI MY SOUND SPEAK DAY BT/NIGHT BT User manual

MELICONI
MELICONI MySound User manual

MELICONI
MELICONI HP500 User manual