manuals.online logo
Brands
  1. Home
  2. •
  3. Brands
  4. •
  5. Memorex
  6. •
  7. Clock Radio
  8. •
  9. Memorex MSBQ270DW User manual

Memorex MSBQ270DW User manual

MSBQ270DW v2609-01
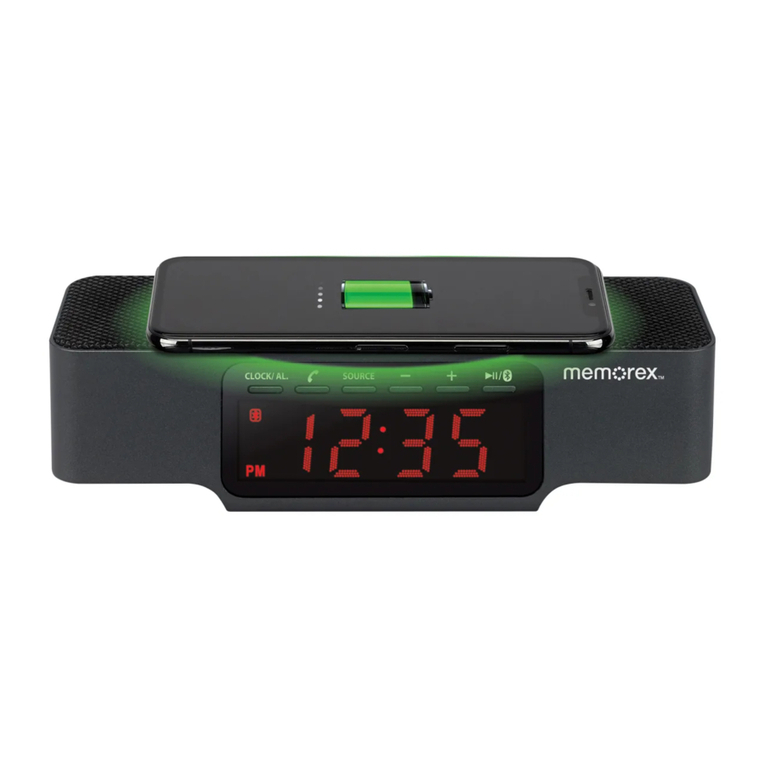
Desktop Clock Radio with Wireless Charging
Warning: To reduce the risk of electric shock, do not
remove cover (or back). No user-serviceable parts
inside. Refer servicing to qualied service personnel.
ATTENTION
RISQUE D' ÉLECTROCUTION
NE PAS OUVRIR
CAUTION
RISK OF ELECTRIC SHOCK
DO NOT OPEN
The exclamation point within an equilateral triangle is
intended to alert the user to the presence of important
operating and maintenance (servicing) instructions in
the literature accompanying the appliance.
This symbol indicates that this product incorporates
double insulation between hazardous mains voltage
and user accessible parts.
The lightning ash with arrowhead symbol, within an
equilateral triangle, is intended to alert the user to the
presence of uninsulated “dangerous voltage” within the
product’s enclosure that may be of sufcient magnitude
to constitute a risk of electric shock to persons.
This product utilizes a Class 1 laser to read Compact
Discs. This laser Compact Disc Player is equipped with
safety switches to avoid exposure when the CD door
is open and the safety interlocks are defeated. Invisible
laser radiation is present when the CD Player’s lid is
open and the system’s interlock has failed or been
defeated. It is very important that you avoid direct
exposure to the laser beam at all times. Please do not
attempt to defeat or bypass the safety switches.
Important Safety Instructions
• Read these Instructions.
• Keep these Instructions.
• Heed all Warnings.
• Follow all instructions.
• Do not use this apparatus near water.
• Clean only with a dry cloth.
• Do not block any ventilation openings. Install in accordance with the
manufacturer’s instructions.
• Do not install near any heat sources such as radiators, heat
registers, stoves, or other apparatus (including ampliers) that
produce heat.
• Do not defeat the safety purpose of the polarized or grounding -
type plug. A polarized plug has two blades with one wider than the
other. A grounding type plug has two blades and a third grounding
prong. The wide blade or the third prong are provided for your
safety. When the provided plug does not t into your outlet, consult
an electrician for replacement of the obsolete outlet.
• Protect the power cord from being walked on or pinched particularly
at plugs, convenience receptacles, and the point where they exit
from the apparatus.
• Only use attachments/accessories specied by the manufacturer.
• Unplug this apparatus during lightning storms or when unused for
long periods of time.
• Refer all servicing to qualied service personnel. Servicing is
required when the apparatus has been damaged in any way, such
as power-supply cord or plug is damaged, liquid has been spilled
or objects have fallen into the apparatus, the apparatus has been
exposed to rain or moisture, does not operate normally, or has been
dropped.
FCC Statement
Warning: Changes or modications to this unit not expressly approved
by the party responsible for compliance could void the user’s authority to
operate the equipment.
NOTE: This equipment has been tested and found to comply with the
limits for a Class B digital device, pursuant to Part 15 of the FCC Rules.
These limits are designed to provide reasonable protection against harmful
interference in a residential installation. This equipment generates, uses,
and can radiate radio frequency energy and, if not installed and used in
accordance with the instructions, may cause harmful interference to radio
communications. However, there is no guarantee that interference will
not occur in a particular installation. If this equipment does cause harmful
interference to radio or television reception, which can be determined by
turning the equipment off and on, the user is encouraged to try to correct
the interference by one or more of the following measures:
• Reorient or relocate the receiving antenna.
• Increase the separation between the equipment and receiver.
• Connect the equipment into an outlet on a circuit different from
that to which the receiver is connected.
• Consult the dealer or an experienced radio/TV technician for help.
• Additional Warnings and Precautions
• CAUTION: TO PREVENT ELECTRIC SHOCK, MATCH WIDE BLADE
OF PLUG TO WIDE SLOT, FULLY INSERT.
• Mains plug is used as disconnect device and it should remain readily
operable during intended use. In order to disconnect the apparatus
from the mains completely, the mains plug should be disconnected
form the mains socket outlet completely.
• WARNING: To reduce the risk of re or electric shock, do not expose
this apparatus to rain, moisture, dripping, or splashing.
• CAUTION: Use of controls or adjustments or performance of
procedures other than those specied may result in hazardous
radiation exposure.
• WARNING: Changes or modications to this unit not expressly
approved by the party responsible for compliance could void the
user’s authority to operate the equipment.
• WARNING: Do not place this unit directly onto furniture surfaces
with any type of soft, porous, or sensitive nish. As with any rubber
compound made with oils, the feet could cause marks or staining
where the feet reside. We recommend using a protective barrier
such as a cloth or a piece of glass between the unit and the surface
to reduce the risk of damage and/or staining.
• WARNING: Shock hazard - Do Not Open.
• Caution and marking information is located at the rear or bottom of
the apparatus.
• Objects lled with liquids, such as vases, shall not be placed on
the apparatus.
• Keep new and used batteries away from children. If the battery
compartment does not close securely, stop using the product and
keep it away from children.
• If you think batteries might have been swallowed or placed inside
any part of the body, seek immediate medical attention.
• CAUTION: Danger of explosion if battery is incorrectly replaced.
Replace only with the same or equivalent type.
• WARNING: There is a danger of explosion if you attempt to charge
standard Alkaline batteries in the unit. Only use rechargeable NiMH
batteries.
• Battery shall not be exposed to excessive heat such as sunshine,
re, or the like.
• Do not mix old and new batteries.
• Completely replace all old batteries with new ones.
• Do not mix alkaline, standard (carbon-zinc), or rechargeable (ni-cad,
ni-mh, etc) batteries.
• Batteries should be recycled or disposed of as per state and local
guidelines.
Warning: Do not ingest battery, chemical burn
hazard.
WARNING : This product can expose you to
chemicals including lead, which is known to the State
of California to cause cancer and birth defects or
other reproductive harm. For more information go to
www.P65Warnings.ca.gov. This product meets and
complies with required Federal product guidelines.
Includes
• DC power adapter
• User’s manual
• 3.5mm audio cable
Features
• Bluetooth wireless - range 59 ft.
• Voice prompts announce
speaker functions
• FM scan radio
• Rotary volume control
• 3.5mm aux in
• SD port - supports MP3 le
format
• Built-in rechargeable battery
• Battery life: approx. 10 hours
at 50%
Power Pad
Place phone onto power pad
to charge wirelessly.
Power/Play
Press and hold to power ON/OFF.
Press to enter Standby Mode.
Next/Previous
Press to skip to next track or replay
previous track. In FM Mode press to
cycle through radio stations.
Play/Pause/Mode
Press to play/pause a track. Press and
hold to switch to change audio mode
between Bluetooth, aux in, SD and
FM radio. Press to scan all available
stations when in FM radio mode. In
Standby Mode tap continuously to set
sleep timer (10-90 minutes). Press and
hold to set the clock time.
Volume Wheel
Control Panel
Alarm & Sleep Timer
Charging the Battery
Bluetooth Wireless
Aux In
SD Card
FM Radio
Clock
To power the unit or charge the internal battery, connect the DC Power Input
on the back of the clock to a standard power outlet using the included AC/DC
power adapter.
Note: Must use the included DC adapter if you want to use the wireless
charging feature.
Pairing & Playing Audio
1. When rst powered on, the speaker defaults to Bluetooth Mode and is ready to
pair automatically. When pairing, remain within 3 feet of the unit.
2. Using the controls on your Bluetooth device, select MSBQ270 in the Bluetooth
settings to pair. If need be, refer to the user’s manual for your specic device for
more information.
3. When successfully paired, a voice will announce the connection.
4. Use the controls on the connected Bluetooth device to select and play audio.
Use the speaker controls or the connected Bluetooth device to play, pause, and
adjust the volume level.
5. After initial pairing, the speaker will automatically connect to the last Bluetooth
device used whenever it is in Bluetooth Mode. Note: If your device should
become unpaired or you nd it is unable to connect, quickly press the Play/
Pause/Mode twice button to enter to Pairing Mode. A voice will announce,
“Bluetooth is connecting,” and you can connect to the speaker manually.
Setting the Clock
1. Make sure to change the clock to Standby Mode by pressing the Power
button.
2. Press the Power button to change to Standby Mode.
3. Press and hold the Play/Pause/Mode button until the display starts to blink, the
clock is now in alarm set mode. You will need to Press and hold Play/Pause/
Mode button again until the hour indicator blinks signifying you are in clock set
mode. Use the Volume Wheel to select the desired hour. (Note: When in PM the
PM indicator will light up. When in AM the PM indicator will turn off).
4. Once you have selected the correct hour, press the Play/Pause/Mode button to
conrm. You may now adjust the minutes. Use the Volume Wheel to adjust the
minutes to the desired time.
5. Once you have selected the desired minute, press the Play/Pause/Mode button
to nish setting the time.
Setting the Alarm
Make sure to change the clock to Standby Mode by pressing the Power button.
1. Press the Power button to change to Standby Mode.
2. Press and hold the Play/Pause/Mode button until the hour and the alarm clock
indicator begin to blink.
3. Use the Volume Wheel to select the desired hour. (Note: When in PM the PM
indicator will light up. When in AM the PM indicator will turn off).
4. Once you have selected the correct hour, press the Play/Pause/Mode button
again to adjust the minute. Use the Volume Wheel to adjust the minutes to the
desired time.
5. Once you have selected the correct minute, press the Play/Pause/Mode button
again. Use the Volume Wheel to select “ON” to enable the alarm. Select “OFF”
to disable the alarm.
6. The alarm will then give you the choice to choose the frequency of the alarm.
“One” means the alarm will only go off one time “All” means the alarm will go off
everyday at the time you set. Press Play/Pause/Mode when you have selected
the option you want.
7. The unit will then let you choose your alarm tone. “Bu” means the alarm will be a
standard alarm buzz. “SD” means the alarm will play the last song playing from
your SD memory card ( SD card must be inserted). “Fn” means the alarm will turn
on the radio. Press Play/Pause/Mode when you have selected the option you
want.
8. The alarm is now set.
Sleep Timer
1. The sleep timer will automatically put the radio into Standby Mode after the
amount of time you selected expires. Ex: If you select “10” the clock will play for
10 minutes and then it will switch to Standby Mode.
2. Press the power button to change to Standby Mode.
3. Press the Play/Pause/Mode button repeatedly until you select the desired sleep
time, (0 mins - 90 mins).
4. Once the selected sleep time has expired the clock radio will automatically go
into Standby Mode.
5. To turn off the sleep timer feature set the sleep timer to “00.”
Requires a 3.5mm audio cable (included).
1. Make sure the unit is not in Standby Mode by pressing the Power button.
2. Connect a 3.5mm audio cable to the Aux In on the unit and the
audio output/headphone jack on an audio device.
3. Press and hold the Play/Pause/Mode button repeatedly until the unit switches
to Aux in mode.
4. Use the controls on the connected device to select and play audio.
Note: Newer phone models may require an adapter (lighting to-3.5mm headphone
adapter for iPhone,) or (USB-C to 3.5mm audio adapter,) for android.
1. Load an SD memory card into the SD media port on the back of the clock.
2. The unit will automatically switch to SD mode.
3. Use the controls on the speaker to select and play and pause audio from the
connected SD card.
1. To use the auto search function press the Play/Pause/Mode button while in FM
radio mode.
2. The radio will auto search stations and save them.
3. To cycle through the saved stations press the Next/Previous buttons.
Auto Search and Saving Stations
Improving Radio Reception
An FM receiver is built into the speaker but functions best when a 3.5mm audio cable
(included) is connected to the speaker. Adjust the position of the cable and the speaker to
improve FM radio reception
1. To use the FM radio, make sure the unit is in Play Mode by pressing the Power
button.
2. Press and hold the Play/Pause/Mode button to switch to FM radio mode and
use the Next/Previous buttons to manually search stations.
Power Pad
To wirelessly charge your phone place your device onto the Power Pad located
on top of the clock radio as shown below. Note: the unit must be connected to
the DC power adapter and a standard wall outlet for wireless charging to work.

Other Memorex Clock Radio manuals

Memorex MC7100 - CD Clock Radio User manual

Memorex

Memorex MC7100 - CD Clock Radio User manual

Memorex MC3800 User manual

Memorex

Memorex MC3800 User manual

Memorex MA4203BK User manual

Memorex

Memorex MA4203BK User manual

Memorex MC2842 - MC CD Clock Radio User manual

Memorex

Memorex MC2842 - MC CD Clock Radio User manual

Memorex MC2863AOM User manual

Memorex

Memorex MC2863AOM User manual

Memorex MMG-CR3810 User manual

Memorex

Memorex MMG-CR3810 User manual

Memorex Mi4290P Operation manual

Memorex

Memorex Mi4290P Operation manual

Memorex MC1886 User manual

Memorex

Memorex MC1886 User manual

Memorex MCB428 User manual

Memorex

Memorex MCB428 User manual

Memorex MC2863 User manual

Memorex

Memorex MC2863 User manual

Memorex Mi4390 User manual

Memorex

Memorex Mi4390 User manual

Memorex MC2864 User manual

Memorex

Memorex MC2864 User manual

Memorex MC2885 User manual

Memorex

Memorex MC2885 User manual

Memorex iWake Mi4004 User manual

Memorex

Memorex iWake Mi4004 User manual

Memorex MC7101 - CD Clock Radio User manual

Memorex

Memorex MC7101 - CD Clock Radio User manual

Memorex MMG-CR1210 User manual

Memorex

Memorex MMG-CR1210 User manual

Memorex MSP-CR1100 User manual

Memorex

Memorex MSP-CR1100 User manual

Memorex MC7223 User manual

Memorex

Memorex MC7223 User manual

Memorex iWakeUp Mi4014 User manual

Memorex

Memorex iWakeUp Mi4014 User manual

Memorex MCBQ618 User manual

Memorex

Memorex MCBQ618 User manual

Memorex Mi4004-BLK User manual

Memorex

Memorex Mi4004-BLK User manual

Memorex EMI47103PWHT User manual

Memorex

Memorex EMI47103PWHT User manual

Memorex MC3800 User manual

Memorex

Memorex MC3800 User manual

Memorex MC5550 User manual

Memorex

Memorex MC5550 User manual

Popular Clock Radio manuals by other brands

AudioSonic CL-1463 user manual

AudioSonic

AudioSonic CL-1463 user manual

Vitek VT-3508 Manual instruction

Vitek

Vitek VT-3508 Manual instruction

Insignia NS-PRCL01 Quick setup guide

Insignia

Insignia NS-PRCL01 Quick setup guide

MAJORITY CB24-DAB-RSE Instruction guide

MAJORITY

MAJORITY CB24-DAB-RSE Instruction guide

Philips AJL308 user manual

Philips

Philips AJL308 user manual

Eurochron EFP 3900 operating instructions

Eurochron

Eurochron EFP 3900 operating instructions

Philips AJH5100 user manual

Philips

Philips AJH5100 user manual

Philips AJ3120 user manual

Philips

Philips AJ3120 user manual

Majestic RS 136 user manual

Majestic

Majestic RS 136 user manual

Philips AJT3300 Short user manual

Philips

Philips AJT3300 Short user manual

Curtis CR1320 Specification sheet

Curtis

Curtis CR1320 Specification sheet

Daewoo electricals AVS1376 user manual

Daewoo electricals

Daewoo electricals AVS1376 user manual

Philips AJL308/78 user manual

Philips

Philips AJL308/78 user manual

Timex T236BQX manual

Timex

Timex T236BQX manual

Sony DREAM MACHINE ICF-C1iP operating instructions

Sony

Sony DREAM MACHINE ICF-C1iP operating instructions

Gear4 AlarmDock Halo user manual

Gear4

Gear4 AlarmDock Halo user manual

Zenith Z250 Owner's manual and warranty

Zenith

Zenith Z250 Owner's manual and warranty

Steren CLK-350 instruction manual

Steren

Steren CLK-350 instruction manual

manuals.online logo
manuals.online logoBrands
  • About & Mission
  • Contact us
  • Privacy Policy
  • Terms and Conditions

Copyright 2025 Manuals.Online. All Rights Reserved.