Saving Radio Presets
1. TunetothedesiredFMfrequency(seeabovesteps).
2. PressandholdtheProgbutton.Thedisplaywillbeginashingapreset.Ex: "P01".
3. Pressthe buttonstoselectthepresettobesaved.(P01 to P23).
4. PresstheProgbuttontosavethatpreset.
5. WiththeradioON,pressthePlay buttontocyclethroughradiopresets.
Clock
Setting the Clock
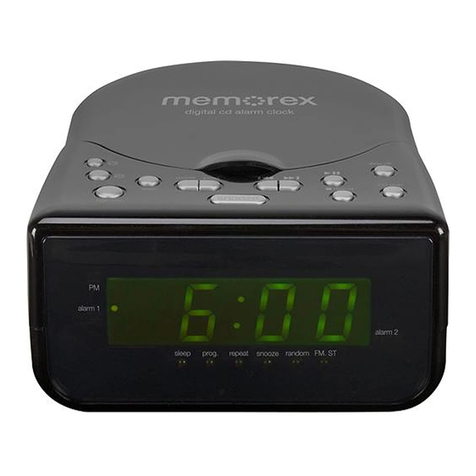
1. WiththeunitOFF,pressandholdtheStop/Clock buttonuntilthedisplayashes.
2. Pressthe buttonstoadjustthehour.Note the PM indicator on the display.
3. PresstheStop/Clock buttontoset.
4. Pressthe buttonstoadjusttheminute.
5. PresstheStop/Clockbuttontonishsettingthetime.
Alarm and Sleep Timer
Setting the Alarm
1. WiththeunitOFF,pressandholdtheAL1orAL2buttonuntilthedisplayashes.
2. Pressthe buttonstoselectCD,buzzer(bb),ortheradio.
3. PresstheAL1orAL2 button.
4. Ifusingtheradio,pressthe buttonstoadjusttheradiofrequency.
IfusingtheCDplayer,pressthe buttonstoselecttheCDtrack.Be sure a CD is
loaded in the unit.
5. PresstheAL1orAL2 button.
6. Pressthe buttonstoadjustthehour.Note the PM indicator on the display.
7. PresstheStop/Clock buttontoset.
8. Pressthe buttonstoadjusttheminute.
9. PresstheStop/Clockbuttontonishsettingthealarmtime.
10. UsetheVolume dialtosetthevolumeofthealarm,exceptwhensettoBuzzer.
11. Oncethesetalarmtimeisreached,thealarmwillsound.Tosettheotheralarm,follow
theabovestepsandchoosethealarmnotcurrentlyset.
Snooze and Alarm Reset
Afterthealarmsounds:
PresstheSnoozebuttontodelaythealarmforseveralminutes.
OR
PressthePowerbuttontoturnthealarmountilthesetalarm
timeisreachedagain.
Disabling the Alarm
PresstheAL1orAL2buttonstoturnthealarmONorOFF.
FM Radio
Radio Reception
AnFMantennaisbuiltintotheclockradio.Toimproveradioreception,adjustthepositionof
theclockradio.
Tuning the FM Radio
1. PressthePowerbuttontoturntheuniton.
2. PresstheSource buttontoswitchtoRadio mode,thenpressthe buttonsto
selectthedesiredfrequency,orpressandholdtoscanforthenextavailablefrequency.
CD Player
Note:ThisunitisnotcompatiblewithMP3CDs.
Loading and Playing a CD
1. OpentheCD Door.
2. PlaceaCDintotheunit,labelsidefacingup.
3. ClosetheCD Door.
4. PresstheSource buttontoswitchtoCDmode.
5. PressthePlay/PausebuttontobeginplayingtheloadedCD.Pressthe
buttonstoskiptracksorpressandholdtosearchthroughatrack.
Programming a CD
1. PresstheStopbuttontostoptheCDduringplay.
2. PresstheProgbutton,“P01”willbegintoshowonthedisplay.
3. Pressthe buttonstoselectatrack.
4. Pressthe Progbuttontosavetheselectedtracktotheprogram.Repeatthisstepto
programupto20tracks.
5. Whenyouarenishedprogramming,pressthePlaybuttontobeginyourprogram.The
Prog Indicatorwilllightonthedisplay.
6. PressStoptostopplaying.PressStopagaintocanceltheprogram,theProg indicator
onthedisplaywillturnOFF.
Aux In
Using the Audio Input
Requiresa3.5mmaudiocable(notincluded).
1. WiththeunitpoweredON,connecta3.5mmaudiocabletotheAux Inontherearof
theunitandtheaudio outputonanaudiodevice.Theunitwillautomaticallydetect
theconnectionandswitchtoAUXmode.
2. Usethecontrolsontheconnecteddevicetoplayyouraudiothroughtheunit.Usethe
Volume dialtoadjustthevolume.
Setting the Sleep Timer
1. PresstheSleepbuttontosetthesleeptimer(90,60,30,15minorOFF).
2. Oncethesetsleeptimehasexpiredtheclockradiowillautomaticallypowero.
Important Safety Instructions
• ReadtheseInstructions.
• KeeptheseInstructions.
• HeedallWarnings.
• Followallinstructions.
• Donotusethisapparatusnearwater.
• Cleanonlywithadrycloth.
• Donotblockanyventilationopenings.Installinaccordancewiththemanufacturer’sinstructions.
• Donotinstallnearanyheatsourcessuchasradiators,heatregisters,stoves,orotherapparatus(includingampliers)that
produceheat.
• Donotdefeatthesafetypurposeofthepolarizedorgrounding-typeplug.Apolarizedplughastwobladeswithone
widerthantheother.Agroundingtypeplughastwobladesandathirdgroundingprong.Thewidebladeorthethirdprong
areprovidedforyoursafety.Whentheprovidedplugdoesnottintoyouroutlet,consultanelectricianforreplacement
oftheobsoleteoutlet.
• Protectthepowercordfrombeingwalkedonorpinchedparticularlyatplugs,conveniencereceptacles,andthepoint
wheretheyexitfromtheapparatus.
• Onlyuseattachments/accessoriesspeciedbythemanufacturer.
• Unplugthisapparatusduringlightningstormsorwhenunusedforlongperiodsoftime.
• Referallservicingtoqualiedservicepersonnel.Servicingisrequiredwhentheapparatushasbeendamagedinany
way,suchaspower-supplycordorplugisdamaged,liquidhasbeenspilledorobjectshavefallenintotheapparatus,the
apparatushasbeenexposedtorainormoisture,doesnotoperatenormally,orhasbeendropped.
FCC WARNINGS
Warning:Changesormodicationstothisunitnotexpresslyapprovedbythepartyresponsiblefor
compliancecouldvoidtheuser’sauthoritytooperatetheequipment.
NOTE:ThisequipmenthasbeentestedandfoundtocomplywiththelimitsforaClassBdigitaldevice,
pursuanttoPart15oftheFCCRules.Theselimitsaredesignedtoprovidereasonableprotectionagainst
harmfulinterferenceinaresidentialinstallation.Thisequipmentgenerates,uses,andcanradiateradio
frequencyenergyand,ifnotinstalledandusedinaccordancewiththeinstructions,maycauseharmful
interferencetoradiocommunications.However,thereisnoguaranteethatinterferencewillnotoccurina
particularinstallation.Ifthisequipmentdoescauseharmfulinterferencetoradioortelevisionreception,
whichcanbedeterminedbyturningtheequipmentoffandon,theuserisencouragedtotrytocorrectthe
interferencebyoneormoreofthefollowingmeasures:
• Reorientorrelocatethereceivingantenna.
• Increasetheseparationbetweentheequipmentandreceiver.
• Connecttheequipmentintoanoutletonacircuitdifferentfromthattowhichthereceiverisconnected.
• Consultthedealeroranexperiencedradio/TVtechnicianforhelp.
ADDITIONAL WARNINGS AND PRECAUTIONS
• CAUTION:TOPREVENTELECTRICSHOCK,MATCHWIDEBLADEOFPLUGTOWIDE
SLOT,FULLYINSERT.
• Mainsplugisusedasdisconnectdeviceanditshouldremainreadilyoperableduringintendeduse.In
ordertodisconnecttheapparatusfromthemainscompletely,themainsplugshouldbedisconnected
formthemainssocketoutletcompletely.
• Cautionmarkingislocatedattherearorbottomoftheapparatus.
• WARNING: Toreducetheriskofreorelectricshock,donotexposethisapparatustorain,moisture,
dripping,orsplashing.
• CAUTION:Useofcontrolsoradjustmentsorperformanceofproceduresotherthanthosespecied
mayresultinhazardousradiationexposure.
• WARNING:Changesormodicationstothisunitnotexpresslyapprovedbythepartyresponsiblefor
compliancecouldvoidtheuser’sauthoritytooperatetheequipment.
• WARNING:Donotplacethisunitdirectlyontofurnituresurfaceswithanytypeofsoft,porous,or
sensitivenish.Aswithanyrubbercompoundmadewithoils,thefeetcouldcausemarksorstaining
wherethefeetreside.Werecommendusingaprotectivebarriersuchasaclothorapieceofglass
betweentheunitandthesurfacetoreducetheriskofdamageand/orstaining.
• CAUTION: Dangerofexplosionifbatteryisincorrectlyreplaced.Replaceonlywiththesameor
equivalenttype.
• WARNING:Shockhazard-DoNotOpen.
• Batteryshallnotbeexposedtoexcessiveheatsuchassunshine,reorthelike.
• Keepnewandusedbatteriesawayfromchildren.Ifthebatterycompartmentdoesnotclosesecurely,
stopusingtheproductandkeepitawayfromchildren.
• WARNING:DONOTINGESTBATTERY,CHEMICALBURNHAZARD.Ifyouthinkbatteries
mighthavebeenswallowedorplacedinsideanypartofthebody,seekimmediatemedicalattention.
• Ifthecoin/buttoncellbatterysuppliedwiththisproductisswallowed,itcancausesevereinternal
burnsinjust2hoursandcanleadtodeath.
• Completelyreplacealloldbatterieswithnewones.
• Batteriesshouldberecycledordisposedofasperstateandlocalguidelines.
WARNING : Thisproductcanexposeyoutochemicalsincludinglead,whichisknown
totheStateofCaliforniatocausecancerandbirthdefectsorotherreproductiveharm.For
moreinformationgotowww.P65Warnings.ca.gov.This product meets and complies
with all Federal regulations.
Support
Customer Service: 1-888-999-4215
For Warranty Information and the most up-to-date version of this User’s
Guide, go to www.gpx.com
Copyright © 2018 Digital Products International (DPI, Inc.) All other
trademarks appearing herein are the property of their respective owners.
Specications are subject to change without notice.
