MEMUP V-SLIM User manual

Feel Design
User Guide
PLEASE READ CAREFULLY THIS MANUAL BEFORE USING V-SLIM.
THE INFORMATION ON THIS GUIDE COULD BE UPDATED.
FOR ANY REQUEST OR MORE INFORMATION, PLEASE VISIT OUR WEBSITE: WWW.MEMUP.COM

1
CONTENTS
1. Safety and Warnings 1
2. Introducing the Player 2
ChargingtheBattery 2
3.PlayerControls 2
Screen display 3
4. Using the player 4
5. Transferring Media Files to the Player by Windows Media Player 4
6. Adding Tracks to your Media Library 4
7. Removing the Media Player from Your Computer 4
8. Listening to WMA/MP3 music files with the Media Player 5
Lyric Display Function 5
9.BasicOperation 5
10.UsingaSDCard 5
11.HoldFunction 6
12. Browsing the Main Menu 6
SearchingMusic 7
13.Videomode 7
14. Using the Media Conversion Tool 7
15.VoiceRecorder 8
16.MyEbook 9
17.FMRadio 10
18.Pictures 11
19.Calendar 11
20. Advanced Settings 12
21.FileNavi 12
22.DataExchange 12
Format the player using the Windows Format Tool 12
23. Troubleshooting 13
24. Player Specifications 13
1. Safety and Warnings
Turn the volume down before putting on the headphones. While listening to music, slowly increase the volume until you
find a comfortable listening level.
Static Electricity
To minimize static electricity, avoid operating the player in an extremely dry environment. In an environment with
electrostatic discharge the product may get malfunction and require the user to reset the product.
USB Storage Device Data Protection
¾Always insert the USB device in the correct direction. Failure to do so may result in damage to the USB device and
this product.
¾Do not remove the USB device whilst it is being accessed.
¾Electrical interference and electrostatic discharges may cause the USB device to malfunction and suffer damage and
data loss.
Statement
¾It is strongly recommended that any important data is backed up on a PC to protect against corruption, data loss or
device malfunction. Please note that our company and the manufacture shall be not liable for any data loss or corruption.
¾The operation of the player described in the manual may differ slightly from actual product. For better performance, it
is subject to change without notice.

2
2. Introducing the Player
Player Features
•2.4’ Color TFT Display
•WMA/MP3 Player
•E- book Reader
•Video Player
•Photo Viewer
•External Micro SD Card (Up to 4GB)
•Synchronous Lyric Display with WMA/MP3 Music
•Voice Recorder
•High Speed USB 2.0
•USB Mass Storage Device
•Integrated USB Connector
•Backlight Display
System Support
•Supports Windows 2000/XP/Vista.
•Supports Mac OS X (version 10.2.6 or later)
Charging the Battery
Battery: Built-in high capacity rechargeable Li polymer battery
Charging: Connect the V-Slim to your computer. A battery icon blinks on the screen, indicating the battery is being
charged. When the battery icon stays full, it means the charging process has finished. The process should take about 4
hours.
Note
•When the tips “Warning! Low Battery Voltage, Shutting Down…” appears, charge your player as soon as
possible.
•Please fully charge the battery every two or three months when the player is not used for a long time.
Otherwise, the battery voltage may be too low to turn on the player.
3. Player Controls
1. Earphone Jack
2. Hold switch
3. Microphone
4. USB port
5. Power On/Off/Play/Pause
6. Reset Hole
7.Skip Previous/Fast Rewind/Up
8.Skip Next/Fast Forward/Down
9.Menu / Back
10.Volume Up +
11.Volume Down –
12.Micro SD Card Slot

3
Screen Display
4. Using the player
Transferring data to and from the player
1. Disconnect the earphone.
2. Connect the player to your computer through the provided USB cable.
MSC Mode
MSC stands for Mass Storage Class. The player works as a removable disk when connecting to a PC in MSC mode.
Windows Me/ 2000 and Mac
OS
Windows XP
without WMP10 &11
Windows XP
with WMP10 or 11
Windows
Vista
MSC √√√√
Transferring Files in MSC mode (For all Windows and MAC users)
{The Media Player can be used as an external disk for you to transfer files.
{You may use drag-and-drop or copy-and-paste method to copy your media files to the respective folder of the unit
memory. It is strongly recommended that transfer photos to PICTURES folder and video files to VIDEO folder, txt files to
TXT folder.
{After removing the Media Player from your computer, you can listen to all the music files and all data in the unit can
be transferred to another computer.
Note: Do not disconnect the player from computer during accessing.
5. Transferring Media Files to V-Slim by Windows Media Player
You can use Windows Media Player 10 or 11 to manage your music files, copy tracks from your audio CDs,
transfer tracks to the player, and more. The following is an overview of the options on the Windows.
Windows Media Player 10:
1. Now Playing - Watch/listen to currently
playing media.
2. Library - Create playlists and manage your
media files.
3. Rip - Copy CD Audio tracks to WMA or MP3
format.
4. Burn - Copy MP3/WMA tracks to a recordable
CD.
5. Sync - Copy MP3 or WMA tracks to your V-Slim.
Guide - Search for media (music, movies, etc.)
online.
A. Album art
B. Rating Stars / Track number / Total track number
C. Skip previous
D. Process bar
E. Battery Indicator
F. Equalizer Setting Play/Pause
G. Play/Pause
H. Skip next
I. Elapsed time
J. Locked icon
K. Play mode
L. Volume level
M. ID3 Tag (track name) Display

4
6. Adding Tracks to your Media Library
Windows Media Player will automatically gather all MP3 and/or WMA files on your PC into a media library, where they can
be played, edited, burned to CD, or copied to your V-Slim.
1. Click Tools > Search for Media Files
(or press F3).
2. In the Look in dialog box, browse to
the drive and folder where your music
files are stored.
3. Click Search.
4. Windows Media Player will
automatically add all tracks in the
selected folders to your library.
5. When searching is complete, click
Close.
Ripping Tracks from your CDs
You can also use Windows Media Player to build your music library by encoding your Audio CD's to music
files.
1. Insert an Audio CD.
2. Click Rip. The contents of the CD will be displayed. By default, all tracks are checked.
3. Uncheck any track you do not want to encode into a music file.
4. Click the Rip Music button to begin encoding the selected tracks.
NOTE: You can change your track encoding options by selecting Tools > Options > Rip Music.
5. When finished, Windows Media Player will automatically add the new tracks to your library.
To copy files from your PC to your V-Slim:
1. Connect the Player to your PC.
2. Click Sync.
3. Click Edit Playlist to add tracks to
transfer to your player. Click OK once all
desired tracks have been added.
4. You should now see the tracks you wish
to transfer to your player listed and checked
on the left side of the Windows Media Player
screen under Sync List. If you wish to not
transfer any of the listed tracks, uncheck
them.
5. Click Start Sync.
6. The selected track(s) are copied to the
player.
7. When you're finished copying files,
unplug the player.
7. Removing the Media Player from Your Computer
¾Remove the player directly from computer.
¾With MSC mode, remove the player from your computer using the following steps:
1. Click on the Safely Remove Hardware icon in the taskbar (next to the clock).
2. Click on Safely Remove USB Mass Storage Device.
3. Wait until a Safe to Remove Hardware message is displayed.
4. Remove the Media Player.

5
8. Listening to WMA/MP3 music files with the Media Player
1. Follow the instructions for the transfer of data to and from the Media Player to copy
WMA/MP3 music files to the player.
2. Connect the supplied earphone to the earphone socket.
3. Press and hold the Power button for 3 about seconds to turn on the player if it is off.
4. Select My Music and press the Play button.
5. Select All Music and press the Play button.
6. Select the song you want to listen to and press the Play button.
7. Use the player controls to adjust playback and volume level to listen to your WMA/MP3 music.
Lyric Display Function
The player supports lyric files in LRC format.
1. Prepare a MP3 or WMA music file, for example, happymusic.mp3;
2. Download a lyric file from internet. The lyric file needs to be with an extension file name LRC. For example,
happymusic-2004.lrc.
3. Rename the lyric file. For example, happymusic.lrc. This ensures that the player connects the lyric filename with
the corresponding music filename.
4. Copy the lyric file & music file to the player.
5. Disconnect the player.
6. Use Skip buttons to select the music file, for example, abc.mp3. Touch Play button to play.
7. The lyrics would display synchronously on screen while the music is being played back.
Note: The player supports LRC format only.
•If the lyrics do not synchronize perfectly with the music, this is not a defect of the player. Check the lyric file or
download a better lyric file from internet and try again.
•Make sure the MP3 music file and LRC file are located in same directory and the filenames are the same. If not,
the player can not recognize the lyric file.
9. Basic Operation
¾Press and hold the Power button for about 3 seconds to turn on the player.
¾In playing mode press the Play button to pause, press again it to continue.
¾Press +/- buttons to increase/decrease volume.
¾Press the skip buttons(∧∨)to skip to the next or previous song; press and hold the skip buttons to fast forward or
rewind the current song.
¾To turn off the player, press and hold the Power button until the screen turns completely dark.
10. Using a SD Card
Installing a micro SD Card
The player memory can be expanded with a micro SD memory card (up to 4GB – not supplied).
1. Make sure the player is powered off.
2. Find the Micro SD card slot on the bottom of the player.
3. Insert the card into the slot. Push on the end of the card slightly until the card is locked in the slot.
Note: Using a card will shorten the battery life of the player.
Removing a micro SD card
1. Make sure the player is powered off.
2. Push on the end of the card slightly until the card unlocked, remove the card from the player.
Playing Media stored on the card
If a micro SD card has been inserted into the card slot, all media files stored on it are auto detected by the player. If you
want to play the media files stored on the card:
1. Select File Navi in main menu.
2. Select Card Memory.
3. All files and folders on the card are displayed. Select a file and press the player buttons, a window will pop up.
4. Select Play to play the media file, select Remove to delete it from the card.

6
Note: When using a micro SD card with the player, the power consumption is higher. This may cause the player to power
off automatically when turning on the player with a card installed. If this happens, please charge the battery. The battery
playtime will be shorter than the playtime without card. To get longer playtimes, remove the card if it is not in use.
11. Hold Function
Use the Hold function to deactivate the player controls (to avoid accidental activation).
1. To activate the hold function, slide the Hold Switch on the top of the player in the direction of the locked icon.
2. Slide the Hold switch away from the locked icon to turn off the Hold function.
Note: If the hold function is activated, you can not turn on the player.
12. Browsing the Main Menu
In the main menu, press the Up and Down buttons to select Menu options, press the Play button to enter the menu.
Menu Structure
Now Playing
All Music
Artists
Albums
Genres
My Recordings
My Music
My Storage Local Memory/Card Memory
All videos
Local Memory
My Video
Card Memory
All Pictures
Local Memory
My Picture
Card Memory
Listen In
Station List
FM Band USA Band/Japan Band
FM
Stop Playing
Now Recording
WAV Rec 32kbps/64kbps/192kbps/384kbps
Recorder Recording Type
MP3 Rec 64kbps/128kbps/256kbps
Now Reading
Dir List Local Memory/Card Memory
Tag List
My Ebook
Auto Play Gap: 5sec
Calendar
EQ Normal/Rock/Pop/Classic/Soft/Jazz/DBB
Repeat On/Off
My Music
Shuffle On/Off
Viewing Mode Manual Play/Slide Play
My Pictures Slideshow Timer 5 Sec. / 10 Sec. / 15 Sec.
Display Backlight/Brightness
Language Select
Player Configure Sleep Time
Online Device MTP Device / USB Disk
Information
Setting
Reset
Local Memory
File Navi
Card Memory
Local Memory
Data Exchange
Card Memory
Lock

7
Searching Music
There are several ways to manage music in this player, with which you can find and play your favorite songs easily. In the
menu, press the Up button and Down button to select options, press the Play button to enter or confirm your selection.
Press and hold the Menu button to go back to previous menu.
Now Playing Songs in the play queue.
All Music Play all songs on the internal flash.
Artists Play song by artist.
Album Play songs by album.
Genre Play songs by genre.
My Recordings Play the FM records and voice records
My Storage Play songs on the card or internal flash.
13. Video Mode
This player can play AVI and WMV video files. Please use the conversion software preloaded on the flash memory to
convert your files into correct format supported by the player.
1. Select My Video in the Main Menu, press Play button to enter.
2. Select Local Memory or Card Memory.
3. All video files in the memory display. Select a file to play.
14. Using the Video Conversion Tool
You have to use the conversion software included in the CD to convert MPG, MPG4, ASF, AVI, WMV
files to AVI or WMV files supported by the player.
1. Connect V-Slim to your computer using provided USB cable.
2. On Explorer window, V-Slim appears as “Memup” icon.
3. Double-clic on it then you will see different files.
4. Double-click on “START.htm”. A window will pop up and you will be able to download the video
conversion software “Video_conversion_tool.zip” or user guide.
Battery
Indicato
r
Volume -
V
olume +
Skip previous
/
Fast Rewind
Skip Next
Fast Fo
r
ward
Play/Pause

8
1. Download and launch the conversion tool but be sure that you got the last video codecs available on the net on
your PC.
2. Click on “ Input File” to add files to be converted. In the window that appeared “add file”, select the source
file you want to convert and click “Open” button. The file is now added to the conversion window.
3. Set up the destination of the converted files. In “Output Folder” Window , select the direction and place
where the converted files are saved.
4. Set up the advanced conversion settings on “Settings”. Make sure the Screen width and height is 320x240.
5. Then click on “Start Conversion” button to begin the conversion.
6. Wait until the “Progress bar” turn to 100% to indicate that the file has been converted.
7. Go finding the converted file on the chosen place and transfer it on your V-Slim.
15. Voice Recorder
Now Recording
WAV Rec 32kbps/64kbps/192kbps/384kbps
Recorder Rec Type
MP3 Rec 64kbps/128kbps/256kbps
Now you can convert other files in the same way!
Click on “Help” for more details.
Note:
Only the video files that can be played on your PC
can be converted correctly. If you encounter failures for
converting your video files, please check if your PC has
the necessary codec installed. These codec are usually
bundled on some media player software, such as
Windows Media Player. You can get them by installing
corresponding media player software on your PC to
support converting these files.

9
Record Setting
1. Select Recorder in the Main Menu, press the Play button to enter.
2. Select Rec Type and press the Play button to enter.
3. Select a recording format from WAV and MP3 and press the Play button to enter.
4. Select a bit rate and press the Play button to confirm.
Note: A higher recording bit rate brings better recording quantity, but takes more memory space.
Start Record
1. Select Now Recording and press the Play button to begin recording.
2. Press the Play button to pause recording.
3. Press and hold the Menu button to stop recording and save the recording.
¾The recording recorded by the microphone will be saved in the RECORD folder(e.g. /Voice/REC001.WAV);
Recording Pause recording
Playback a Recording file
1. Select My Music in the main menu and press the Play button.
2. Select My Recordings and press the Play button to enter the voice recorded file list.
3. Select a recording from the recording list for playback.
16. My Ebook
The player is not only a music player but also a txt book reader. The player supports e-book in TXT format.
Now Reading
Dir List Local Memory / Card Memory
Tag List
My Ebook
Auto Play Gap
Reading e-books
1. Select My Ebook in the main menu and press the Play button.
2. Select Dir List and press the Play button to enter e-book list.
3. Select a file and press the Play button to read the book.
4. Press the Play button to switch the reading mode between auto mode and manual mode.
Skipping
When reading the e-book, Press the Menu button. Select Skip to, and then press the Volume + and Volume –button to
adjust the point you want to skip to.
Adding Tag for e-book
When reading the e-book, press the Menu button. Select Add Tag to tag the current page. Press the Play button to
confirm.
Reading e-book from the tag
1. Select My Ebook in the main menu and press the Play button.
2. Select Tag List and press the Play button to enter tag list.
3. Select a tag and press the Play button to read the book from the position you tagged.

10
Removing Tags
1. Select Tag List and press the Play button to enter tag list.
2. Select a tag and press the Menu button.
3. Select Remove to delete the tags.
4. Press the Play button to confirm.
Setting the Auto Play Gap
1. Select My Ebook in the main menu and press the Play button.
2. Select Auto Play Gap.
3. Press the Volume + and Volume –button to adjust the page interval.
17. FM Radio
The Media Player allows you to listen to FM radio with the built-in digital FM tuner.
Note: The earphones must be connected to the Media Player otherwise the FM tuner will not be able to scan properly for
FM stations.
Start the FM Tuner
Listen In Listen to FM radio
Station List Preset stations
FM Band USA Band (87 - 108 MHz)/Japan Band (76 - 90 MHz)
FM
Stop Playing Stop receiving FM radio
To switch to FM radio mode,
1. Select FM from the Menu list and press the Play button.
2. Select FM Band and press the Play button.
3. Select one frequency band from USA and Japan.
4. Press the play button to confirm and go back to previous menu.”
5. Select Listen In to start listen to FM radio.
Using the FM Settings menu
To navigate the FM Settings menu, in FM Radio mode, press the Menu button to enter the FM Settings menu.
Auto Search Search all available FM radio stations
Save Channel/Remove Save the current channel to channel list/Remove it from the channel list
Record quality Set the FM recording quality
FM Record Record FM radios
Tune to one FM radio station manually
To tune manually, press Up and Down buttons, each time the buttons are pressed, the player changes the frequency by
0.1MHz.
1. Searching Process Ba
r
2. Battery Indicator
3. Scan Mode
4. Locked
5. Play/pause status
6. Volume Level
7. Stereo/mono
8. Current frequency
11
18. Pictures
1. Select My Picture in the main menu.
2. Press the Play button.
3. Select All Pictures and press the Play button.
4. All pictures in the local memory and card memory list. Press the Up and Down buttons to select a
picture.
5. Press the Play button to view the pictures.
Setting the view mode
1. Select Setting in the main menu.
2. Press the Play button.
3. Select My Pictures and press the Play button.
4. Select Viewing Mode and press the Play button.
5. Select one mode you want to set from Manual Play and Slide Play.
6. Press the Play button to confirm.
Setting the slideshow timer
1. Select Setting in the main menu.
2. Press the Play button.
3. Select My Pictures and press the Play button.
4. Select Slideshow timer and press the Play button.
5. Select one interval and press the Play button to confirm.
6. The pictures will be show automatically at the interval you selected when you view the pictures in Slide
Play.
Note: The media player supports pictures in JPG and BMP formats.
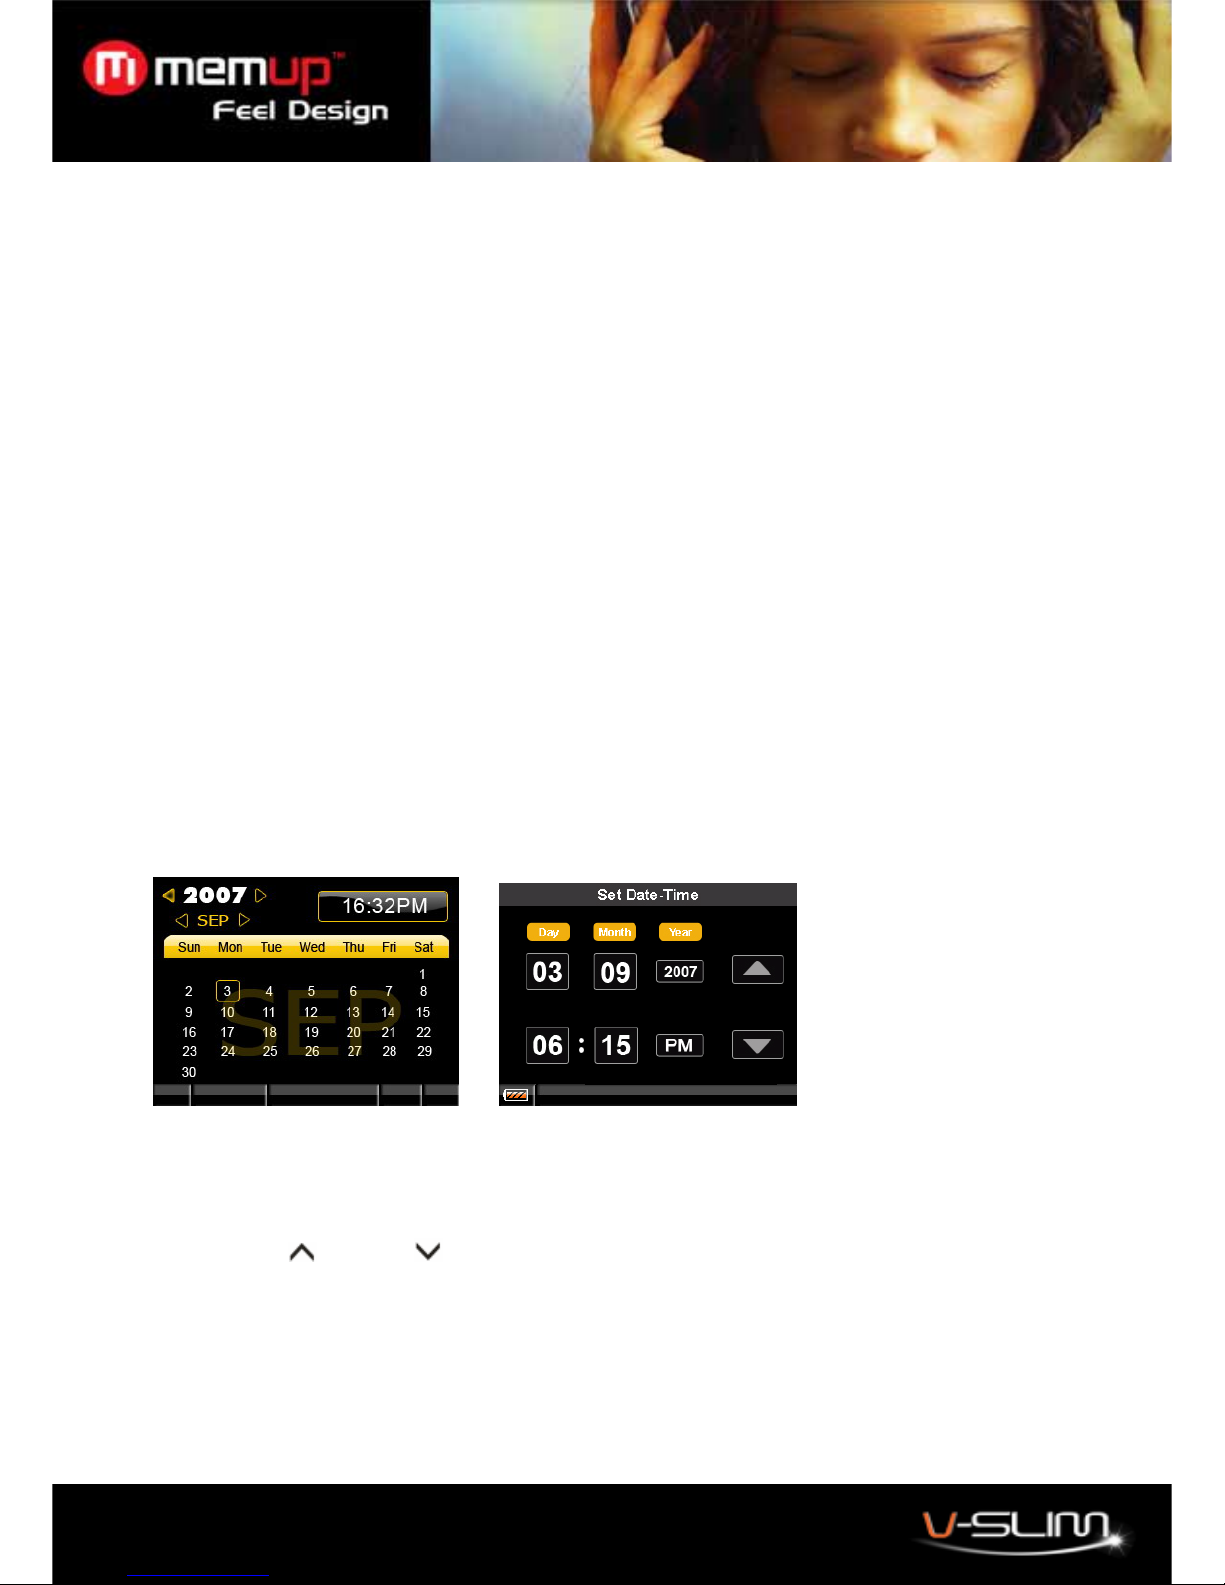
19. Calendar
To set the time,
1. In the main menu, select Calendar and press the Play button.
2. The time shows.
3. If the time is not correct, press the Play button to enter the time settings.
4. Use the Up and Down buttons to adjust the number, and use the Left –and Right + buttons to
switch between options.
5. Press the Play button to confirm.

12
20. Advanced Settings
To navigate the Settings menu,
1. Select Setting in the main menu and press the Play button.
2. Press the Up and Down button to choose a setting and press the Play button to enter the submenu. Press the +
and –button to adjust the value.
3. After setting is finished, press and hold the Menu button to go back to the previous menu.
Menu Submenu Description
Level 1 Level 2 Level 3
EQ Normal/Rock/Pop/
Classic/Soft/Jazz/DBB
Set the Equalizer of music.
Repeat On/Off The music will be played repeatedly if
Repeat is set to On.
My Music
Shuffle On/Off The music will be played randomly if
Shuffle is set to On.
Viewing Mode Manual Play/Slide Play
My Pictures Slideshow Timer 5 Sec. / 10 Sec. / 15
Sec.
Set the interval in slideshow mode.
Display Backlight/Brightness Set the backlight and brightness.
Language
Select
English/Simplified Chinese/Traditional Chinese Set the Language the menu shows.
Player
Configure
Sleep Time The player will power off
automatically after the predetermined
time.
Online Device MTP Device / USB Disk Set the connected mode when
connect to computer.
Information Information about the player.
Setting
Reset Reset the player to factory default
settings.
21. File Navi
All files within your player are classified in accordance with the folders' name. This function can navigate and delete files
within your player.
1. In the main menu, select File Navi.
2. Choose a folder, all files within your player are classified in accordance with the folders' name.
3. Press the Play button, a submenu pops up, choose Remove to delete the media file.
4. Press the Play button to play the media file.
22. Data Exchange
Data exchange is to copy data from internal memory to card or from card to internal memory.
Format the player using the Windows Format Tool
1. Connect the player to the computer.
2. Right click on the disk representing the Media player.
3. Select format and start the formatting process.
Note: Do not select NTFS from the Format File System menu. Otherwise, the player will not function, and you will
need to format it again
13
23. Troubleshooting
Symptoms Solutions
The volume level is too low to hear. Increase the volume level by touching
volume + button.
No sound
The earphones may not be properly plugged into the earphone jack.
Re-plug the earphones into the earphone jack carefully.
Intermission when playing music The battery is low. Please charge the battery.
Sound distortion The battery is very low. Please charge the battery.
Some music can’t be played back. The music files may be in an incompatible format. Make sure the music files
are in MP3 or WMA format.
No response to touching buttons
-The Hold switch is in the hold position. Slide the Hold switch away from the
lock symbol. The player may be malfunctioning due to improper operation.
Use a straightened paperclip to press the reset button carefully to reset the
player.
Can not turn on the player after
formatting the player with windows
format tool.
The player may have been formatted with the NTFS file system. Reformat
the player into FAT or FAT32 file system with the same windows format tool.
Can not turn on the player.
-The battery is dead. Charge the battery. There is not enough space
reserved for system files. Release some memory by erasing some files.The
player may have malfunctioned due to improper operation. Use a
straightened paperclip to press the reset button carefully to reset the player.
24. Player Specifications
•Interface : USB 2.0: High Speed
•Power : Rechargeable Li-polymer Battery
•Equalizer : Normal, Classic, Rock, Jazz, Soft, Pop and DBB
•Display : 320 x 240 dots Dot-matrix TFT color display, ID3 Tag display
•Controls :
•Power On/Off/Play/Pause
•Volume + /Right
•Volume –/Left
•Skip Next /Down
•Skip Previous/Up
•Hold
•Reset
•Audio Playback : Windows Media Audio (WMA), MPEG Audio Layer 3 (MP3)
•Audio Playback : MP3 & WMA
•Video Playback : Movie (AVI, WMV)
•Signal to Noise Ratio : > 90 dB
•Frequency Response : 20 Hz ~ 20 kHz
•Output : < 4.4 mW (each output)
•Total Harmonic Distortion Output : 0.01% ~ 0.5%
•Ports : USB Port, Phone Out
•Firmware : Flash based. User upgradeable.
LIMITATION OF LIABILITY AND DAMAGES.
IN NO EVENT WILL MANUFACTURER AND MANUFACTURER’S RESELLERS (COLLECTIVELY REFERRED
TO AS “THE SELLERS”) BE LIABLE FOR DAMAGES OR LOSS, INCLUDING BUT NOT LIMITED TO DIRECT,
INDIRECT, SPECIAL WILLFUL, PUNITIVE, INCIDENTAL, EXEMPLARY, OR CONSEQUENTIAL, DAMAGES,
DAMAGES FOR LOSS OF BUSINESS PROFITS, OR DAMAGES FOR LOSS OF BUSINESS OF ANY
CUSTOMER OR ANY THIRD PARTY ARISING OUT OF THE USE OR THE INABILITY TO USE THE PRODUCT
OR THE SOFTWARES, INCLUDING BUT NOT LIMITED TO THOSE RESULTING FROM DEFECTS IN THE
PRODUCT OR SOFTWARE OR DOCUMENTATION, OR LOSS OR INACCURACY OF DATA OF ANY KIND,
WHETHER BASED ON CONTRACT, TORT OR ANY OTHER LEGAL THEORY, EVEN IF THE PARTIES HAVE
BEEN ADVISED OF THE POSSIBILITY OF SUCH DAMAGES. BECAUSE SOME STATES DO NOT ALLOW
THE EXCLUSION OR LIMITATION OF LIABLITY FOR DAMAGES, THE ABOVE LIMITATION MAY NOT APPLY
TO THE PARTIES. IN NO EVENT WILL THE SELLERS’ TOTAL CUMULATIVE LIABLIITY OF EACH AND
EVERY KIND IN RELATION TO THE PRODUCT OR ITS SOFTWRE EXCEED THE AMOUNT PAID BY
CUSTOMER FOR THE PRODUCT.
Table of contents
Other MEMUP Media Player manuals

MEMUP
MEMUP MEDIADISK User manual

MEMUP
MEMUP MEDIADISK User manual

MEMUP
MEMUP M430TR Troubleshooting guide

MEMUP
MEMUP K-SLIM LS User manual

MEMUP
MEMUP M26THD User manual

MEMUP
MEMUP MEDIA DISK User manual

MEMUP
MEMUP MEDIADISK User manual

MEMUP
MEMUP Mediadisk TWX Series User manual

MEMUP
MEMUP M40 Troubleshooting guide

MEMUP
MEMUP K-PEARL User manual


