Mercusys ME50G User manual

User Guide
AC1900 WiFi Range Extender
ME50G
REV1.0.0
1910080083

COPYRIGHT & TRADEMARK
Specications are subject to change without notice. is a registered
trademark of MERCUSYS TECHNOLOGIES CO., LTD. Other brands and product names are
trademarks or registered trademarks of their respective holders.
No part of the specications may be reproduced in any form or by any means or used to make
any derivative such as translation, transformation, or adaptation without permission from
MERCUSYS TECHNOLOGIES CO., LIMITED. Copyright © 2022 MERCUSYS TECHNOLOGIES
CO., LIMITED. All rights reserved.
http://www.mercusys.com

CE Mark Warning
This is a class B product. In a domestic environment, this product may cause radio interference,
in which case the user may be required to take adequate measures.
OPERATING FREQUENCY (the maximum transmitted power)
2400 MHz -2483.5 MHz (20dBm)
5150 MHz -5250 MHz (23dBm)
5250 MHz -5350 MHz (23dBm)
5470 MHz -5725 MHz (30dBm)
EU Declaration of Conformity
MERCUSYS hereby declares that the device is in compliance with the essential requirements
and other relevant provisions of directives 2014/53/EU, 2009/125/EC, 2011/65/EU and
(EU)2015/863.
The original EU Declaration of Conformity may be found at
https://www.mercusys.com/en/ce
RF Exposure Information
This device meets the EU requirements (2014/53/EU Article 3.1a) on the limitation of exposure
of the general public to electromagnetic elds by way of health protection.
The device complies with RF specications when the device used at 20 cm from your body.
National Restrictions
Attention: This device may only be used indoors in all EU member states, EFTA countries and
Northern Ireland.
AT BE BG CH CY CZ DE DK
EE EL ES FI FR HR HU IE
IS IT LI LT LU LV MT NL
NO PL PT RO SE SI SK UK(NI)
UKCA Mark
UK Declaration of Conformity
Mercusys hereby declares that the device is in compliance with the essential requirements
and other relevant provisions of the Radio Equipment Regulations 2017.

The original UK Declaration of Conformity may be found at
https://www.mercusys.com/support/ukca/
National Restrictions
Attention: This device may only be used indoors in Great Britain.
UK
Korea Warning Statements
당해 무선설비는 운용중 전파혼신 가능성이 있음 .
NCC Notice
注意!
取得審驗證明之低功率射頻器材,非經核准,公司、商號或使用者均不得擅自變
更頻率、加大功率或變更原設計之特性及功能。
低功率射頻器材之使用不得影響飛航安全及干擾合法通信;經發現有干擾現象時,
應立即停用,並改善至無干擾時方得繼續使用。
前述合法通信,指依電信管理法規定作業之無線電通信。
低功率射頻器材須忍受合法通信或工業、科學及醫療用電波輻射性電機設備之干
擾。
應避免影響附近雷達系統之操作。
BSMI Notice
安全諮詢及注意事項
•請按照本產品注明的電源類型使用本產品。
•清潔本產品之前請先切斷電源。請勿使用液體、噴霧清潔劑或濕布進行清潔。
•注意防潮,請勿將水或其他液體潑灑到本產品上。
•插槽與開口供通風使用,以確保本產品的操作可靠並防止過熱,請勿堵塞或覆蓋開口。
•請勿將本產品置放於靠近熱源的地方。除非有正常的通風,否則不可放在密閉位置中。
•請不要私自拆開機殼或自行維修,如產品有故障請與原廠或代理商聯繫。

限用物質含有情況標示聲明書
設備名稱:AC1900WiFiRangeExtender型號(型式):ME50G
EquipmentnameTypedesignation(Type)
單元
Unit
限用物質及其化學符號
Restrictedsubstancesanditschemicalsymbols
鉛
Lead
(Pb)
汞
Mercury
(Hg)
鎘
Cadmium
(Cd)
六價鉻
Hexavalent
chromium
(Cr+6)
多溴聯苯
Polybrominated
biphenyls
(PBB)
多溴二苯醚
Polybrominated
diphenylethers
(PBDE)
PCB ○ ○ ○ ○ ○ ○
外殼 ○ ○ ○ ○ ○ ○
電源供應板 −○ ○ ○ ○ ○
天線 ○ ○ ○ ○ ○ ○
備考 1.〝超出 0.1wt%〞及〝超出 0.01wt%〞係指限用物質之百分比含量超出百分比含量基準值
Note1:“Exceeding0.1wt%”and“exceeding0.01wt%”indicatethatthepercentage
contentoftherestrictedsubstanceexceedsthereferencepercentagevalueofpresencecondition.
備考 2.〝○〞係指該項限用物質之百分比含量未超出百分比含量基準值。
Note2:“○”indicatesthatthepercentagecontentoftherestrictedsubstancedoesnotexceed
thepercentageofreferencevalueofpresence.
備考 3.〝−〞係指該項限用物質為排除項目。
Note3:The“−”indicatesthattherestrictedsubstancecorrespondstotheexemption.
Продукт сертифіковано згідно с правилами системи УкрСЕПРО на відповідність
вимогам нормативних документів та вимогам, що передбачені чинними законодавчими
актами України.
Safety Information
Ǵ Keep the device away from water, re, humidity or hot environments.
Ǵ Do not attempt to disassemble, repair, or modify the device. If you need service, please
contact us.
Ǵ Do not use the device where wireless devices are not allowed.
Ǵ The socket-outlet shall be installed near the equipment and shall be easily accessible.
Ǵ Make sure the power socket has a good contact with the ground.
Ǵ Operating Temperature: 0℃ ~ 40℃ (32℉ ~ 104℉)

Ǵ This product uses radios and other components that emit electromagnetic elds.
Electromagnetic elds and magnets may interfere with pacemakers and other implanted
medical devices. Always keep the product and its power adapter more than 15 cm (6
inches) away from any pacemakers or other implanted medical devices. If you suspect
your product is interfering with your pacemaker or any other implanted medical device,
turn o your product and consult your physician for information specic to your medical
device.
Please read and follow the above safety information when operating the device. We cannot
guarantee that no accidents or damage will occur due to improper use of the device. Please
use this product with care and operate at your own risk.
Explanation of the symbols on the product label
Symbol Explanation
Class II equipment
Class II equipment with functional earthing
Alternating current
Indoor use only
Caution, risk of electric shock
Fuse is used in neutral N
Caution
Operator’s manual
RECYCLING
This product bears the selective sorting symbol for Waste electrical and
electronic equipment (WEEE). This means that this product must be handled
pursuant to European directive 2012/19/EU in order to be recycled or
dismantled to minimize its impact on the environment.
User has the choice to give his product to a competent recycling organization
or to the retailer when he buys a new electrical or electronic equipment.

CONTENTS
Conventions ...............................................................................................................01
Chapter 1 Introduction ..........................................................................................02
1.1 Product Overview..............................................................................................................02
1.2 Product Appearance........................................................................................................02
Chapter 2 Connect the Extender to the Internet...........................................04
2.1 Method 1: Via a Web Browser.......................................................................................04
2.2 Method 2: Via WPS ...........................................................................................................08
2.3 Method 3: Via MERCUSYS App....................................................................................09
Chapter 3 Customize Your Network ..................................................................11
3.1 Check Internet Status ....................................................................................................11
3.2 Congure Wireless Network.........................................................................................12
3.3 Change LAN Settings ......................................................................................................14
3.4 Specify DHCP Server Settings ....................................................................................15
3.5 Set High Speed Mode .....................................................................................................15
3.6 Set Access Control...........................................................................................................16
3.7 Adjust Wi-Fi Coverage.....................................................................................................18
Chapter 4 Use Your Extender as an Access Point..........................................20
4.1 Set Up the Extender as an Access Point..................................................................20
4.2 Connect Wireless Devices to the Extender ............................................................21
4.3 LED Explanation for the Access Point Mode ..........................................................23
Chapter 5 Manage the Extender.........................................................................24
5.1 Set System Time ..............................................................................................................24
5.2 Control the LED..................................................................................................................25
5.3 Set Power Schedule.........................................................................................................26
5.4 Upgrade the Firmware.....................................................................................................27
5.5 Back up and Restore Conguration Settings .........................................................27
5.6 Reboot the Extender........................................................................................................29
5.7 Change Login Password.................................................................................................29
5.8 Check System Log ...........................................................................................................30
FAQ (Frequently Asked Questions) .....................................................................31

01
Conventions
This guide is a complement to Quick Installation Guide. The Quick Installation Guide provides
instructions for quick internet setup, while this guide contains details of each function and
demonstrates how to congure them in typical scenarios.
Note: Features available in this range extender may vary by model and software version.
Range extender availability may also vary by region or ISP. All images, steps, and descriptions
in this guide are only examples and may not reect your actual product experience.
More Info
Specications and the latest software can be found at the product page at the ocial website
http://www.mercusys.com.
The Quick Installation Guide can be found where you nd this guide or inside the package of
the router.
Speed/Coverage Disclaimer
*Maximum wireless signal rates are the physical rates derived from IEEE Standard 802.11
specications. Actual wireless data throughput and wireless coverage per ft2 are not
guaranteed and will vary as a result of 1) environmental factors, including building materials,
physical objects, and obstacles, 2) network conditions, including local interference, volume
and density of trac, product location, network complexity, and network overhead, and
3) client limitations, including rated performance, location, connection quality, and client
condition.

02
Chapter 1 Introduction
Chapter 1 Introduction
1.1 Product Overview
The range extender connects to your router wirelessly, strengthening its signal and
expanding its coverage into areas that could not otherwise be reached.
Multicolor LED helps you nd the right location for your range extender for the best
Wi-Fi extension.
1.2 Product Appearance
1.2.1 LED Explanation
LED Status Indication
Signal
O Power is o.
Blinking
green
The extender is starting, upgrading, or connecting to
the router.
Solid red The extender is not connected to the router.
Solid green The extender is connected to the router, and is in a
good location.
Solid
orange
The extender is connected to the router, but is too
far away from the router.
03
Chapter 1 Introduction
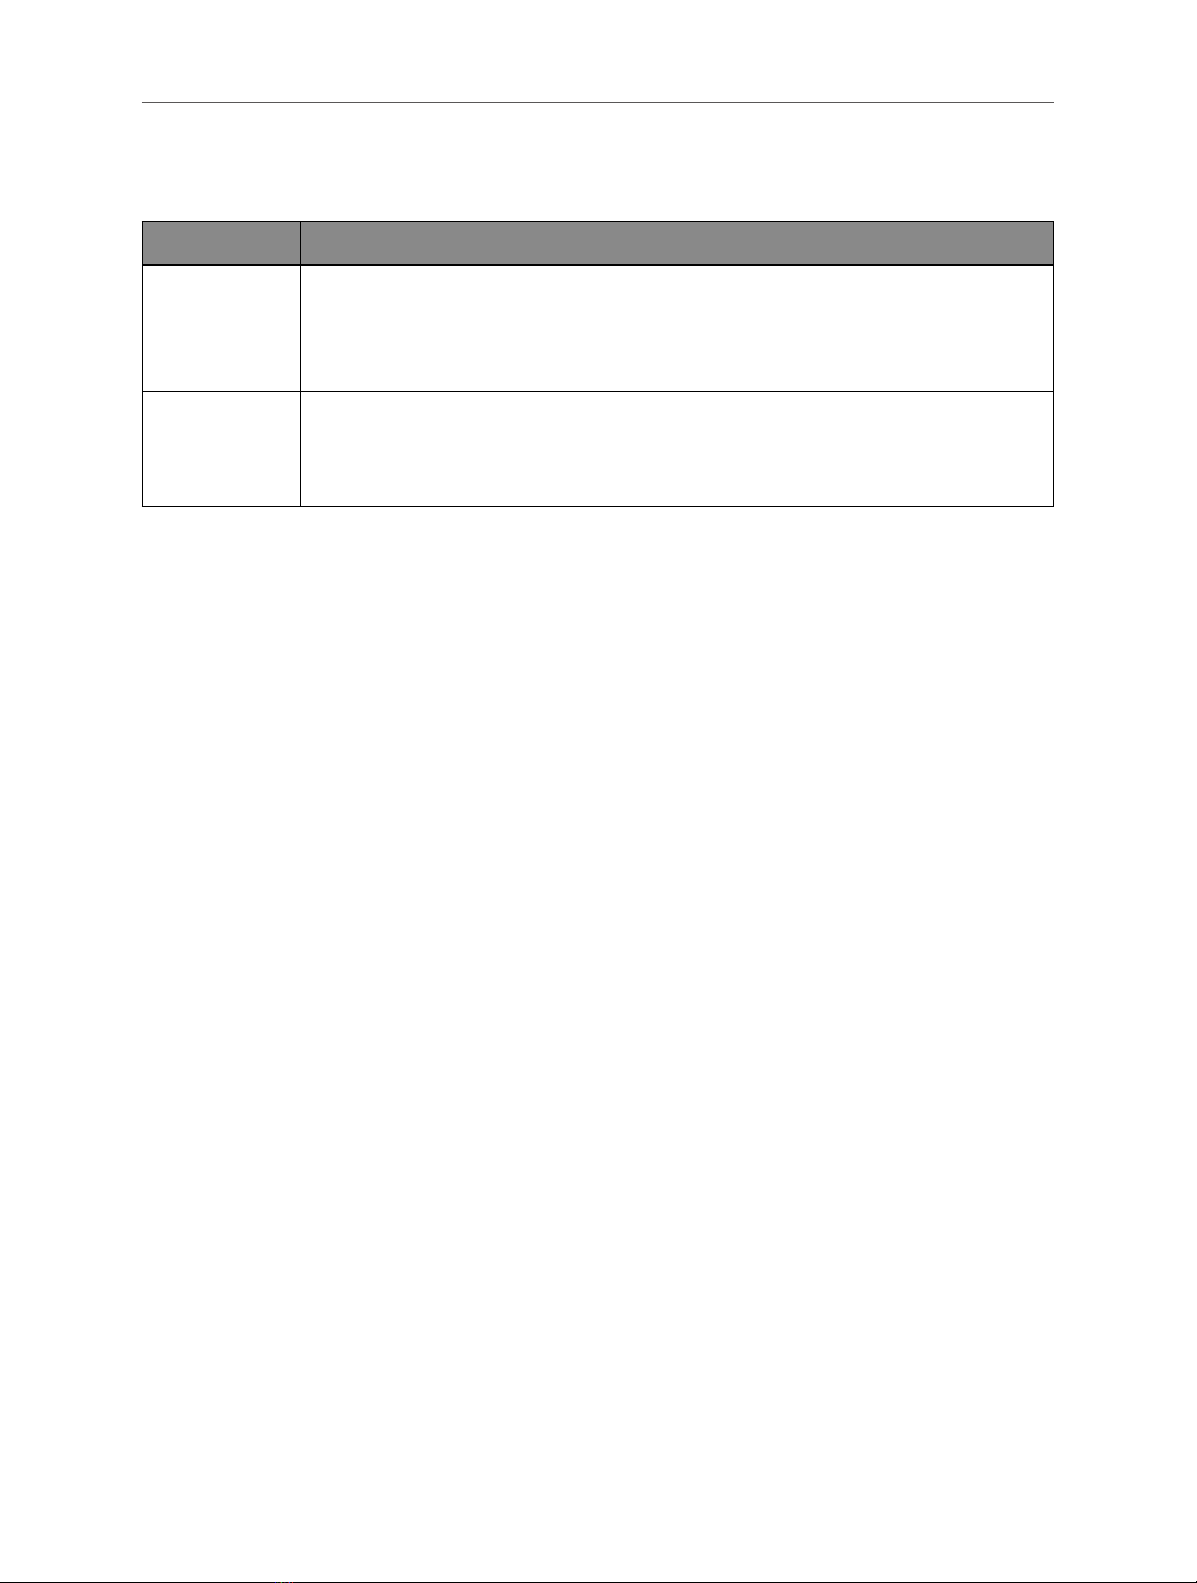
1.2.2 Item Explanation
Item Description
RESET/WPS
Button
Press and hold this button for more than 5 seconds until the Signal
LED turns o to reset the extender.
Press for 1 second to use the WPS function.
Ethernet
Port
Connect your Ethernet-only device (such as a Blu-ray player, game
console, DVR, or smart TV) to the Ethernet port of the extender to
join the network.

04
Chapter 2 Connect the Extender to the Internet
Chapter 2 Connect the Extender to the Internet
This chapter introduces how to boost your host wireless coverage. Please follow the
step-by-step instructions to set up the internet connection.
Power On
Plug the extender into a power outlet near your router, and the Signal LED turns
solid red.
Note: For safety and best performance, we suggest that you position the extender vertically as shown below.
2.1 Method 1: Via a Web Browser
1. Connect your wireless device to the extender's network MERCUSYS_RE_XXXX.
Note:
1. The default SSID (network name) is printed on the product label at the back of the extender.
2. If you are using a computer, unplug the Ethernet cable from your computer rst (if any).
2. Follow the instructions of the Quick Setup Wizard to connect the extender to your
router.
1) Launch a web browser and enter http://mwlogin.net in the address eld.
2) A login window will appear. Create a password to log in. For subsequent logins,
use the password you have set.

05
Chapter 2 Connect the Extender to the Internet
3) The extender will scan and display all available 2.4 GHz networks. Select your
router's 2.4 GHz host network and enter the password to connect.

06
Chapter 2 Connect the Extender to the Internet
Note:
If the network you want to extend is on but not listed, please try the following steps.
• Move the extender closer to your router, and click Rescan.
• Click Other... to manually enter the SSID (network name) and password of the network you want to extend.
4) Select your router's 5 GHz host network and enter the password to connect.
5) Conrm the network passwords.
6) Customize the extended network names or keep the default ones.

07
Chapter 2 Connect the Extender to the Internet
7) Follow web instructions to relocate the extender.
3. Done! Connect to the extended network and enjoy the internet.

08
Chapter 2 Connect the Extender to the Internet
Smart TV
Game Console
Desktop
Laptop
Smartphone
Tablet
2.2 Method 2: Via WPS
1. Press the WPS button on your router.
2. Within two minutes, press the RESET/WPS button on your extender for 1 second.
The Signal LED should change from ashing to solid green or orange, indicating a
successful WPS connection.
3. Relocate the extender.
1) Plug the extender into an electrical outlet between your host router and the
Wi-Fi “dead“ zone. The location you choose must be within the range of your
existing host network.
2) Wait until the Signal LED is lit and solid green. If it’s not, relocate it closer to the
host router to achieve better signal quality.
Router
Host Network
Green: Good location
Orange: Too far from router
Extended Network
Clients
4. Enjoy! Connect to the extended network and enjoy the internet.
Extended Network Names:
Router’s network name with EXT at the end
Passwords:
Same as your router
Smart TV
Game Console
Desktop
Laptop
Smartphone
Tablet

09
Chapter 2 Connect the Extender to the Internet
2.3 Method 3: Via MERCUSYS App
1. Scan the QR code to download the MERCUSYS app from the Apple App Store or
Google Play.
2. Launch the app and log in with your MERCUSYS ID.
Note: If you don’t have an account, create one rst.
3. Follow app instructions to complete the setup.

10
Chapter 2 Connect the Extender to the Internet
4. Enjoy! Connect to the extended network and enjoy the internet.
Smart TV
Game Console
Desktop
Laptop
Smartphone
Tablet

11
Chapter 3 Customize Your Network
Chapter 3 Customize Your Network
This chapter guides you on how to congure network settings that are available for
this extender.
3.1 Check Internet Status
You can view the internet status of your extender to check whether you have
successfully set up the extended network(s).
1. Visit http://mwlogin.net, and log in with the password you set for the extender.
2. Go to Network Map to view the internet status of your extender.
• The extender runs normally.
• The extender fails to connect to the host networks. Please go to Wireless
> Connect to Host Network to check whether the host network passwords
are correct. If the problem still exists, relocate the extender closer to the
router to achieve better signal quality.
• The extender is connected to the host networks, but is not transmitting data.
Please check the internet connection of your router.
• The extender is connected to the router abnormally. Please go to Settings >
Network and try setting your extender to obtain an IP address automatically.

12
Chapter 3 Customize Your Network
Click the icon of the Internet/Router/Range Extender/Clients to view corresponding
information.
3.2 Congure Wireless Network
If you want to extend another host network after Quick Setup, you can refer to
this section. Moreover, you can change the wireless settings for your extended
networks.
Visit http://mwlogin.net, and log in with the password you set for the extender.
• To extend another host network:
1. Go to Wireless > Connect to Host Network.
2. Enable Connect to 2.4GHz Network and click WIRELESS SCANNER to find all
available networks.
3. Select the 2.4GHz host network you want to extend.
Note:
If the network you want to extend is on but not listed, please try the following steps.
· Move the extender closer to your router, and click Refresh in the top-right corner of the list.

13
Chapter 3 Customize Your Network
· You can manually enter the SSID (network name) and password of the network you want to extend, and click
SAVE.
4. Once a host network is selected, the SSID and security type will be automatically
lled in. If the selected network is encrypted, enter the password in the Password
eld.
5. Click SAVE.
• To enable or disable the extended network:
1. Go to Wireless > Extended Network.
2. Extended networks are enabled by default. If you want to disable the wireless
function of a certain band, just clear the Enable checkbox. In this case, all the
wireless settings of this band will be invalid.
3. Click SAVE.
• To change the wireless network name (SSID):
1. Go to Wireless > Extended Network.
2. Create a new SSID in Extended 2.4GHz SSID or click COPY HOST SSID. The value
is case-sensitive.
3. Click SAVE.
Note:
If you have changed the wireless settings via a wireless device, you will be disconnected after the settings are
applied. Please write down the new SSID for future use.
Table of contents
Other Mercusys Extender manuals

Mercusys
Mercusys ME70X User manual

Mercusys
Mercusys ME60X User manual

Mercusys
Mercusys MP510 KIT User manual

Mercusys
Mercusys MW300RE User manual

Mercusys
Mercusys MP510 KIT User manual

Mercusys
Mercusys MP510 User manual

Mercusys
Mercusys Range Extender User manual

Mercusys
Mercusys ME20 User manual

Mercusys
Mercusys MW300RE User manual

Mercusys
Mercusys MW300RE User manual


