Merging Anubis Technical document

ANUBIS COMMENTARY UNIT
MISSION APPENDIX
21.04.2022

2
Contents
COMMENTARY UNIT MISSION APPENDIX..................................................................................................3
SWITCHING ON MERGING+ANUBIS.............................................................................................................4
Add products and features with MLM.......................................................................................................5
COMMENTARY UNIT MISSION LAUNCH.....................................................................................................7
THE COMMENTARY UNIT MISSION .............................................................................................................9
OVERVIEW......................................................................................................................................................9
MISSION SCHEMATIC............................................................................................................................... 10
COMMENTATORS ..................................................................................................................................... 11
MONITORING.............................................................................................................................................. 12
ON-AIR.......................................................................................................................................................... 13
TALKBACK................................................................................................................................................... 14
MUTE............................................................................................................................................................ 15
PREAMPS .................................................................................................................................................... 16
EFFECTS PROCESSING............................................................................................................................ 17
PHYSICAL BUTTONS ................................................................................................................................ 18
WEB INTERFACE............................................................................................................................................ 19
Tablets Remote Access - Using the Anubis IP Address ..................................................................... 23
I/O CONNECTIONS ........................................................................................................................................ 24
I/O Connectivity to a Computer............................................................................................................... 26
SETTINGS........................................................................................................................................................ 27
REST API.......................................................................................................................................................... 30
Identify Me –Device Location ..................................................................................................................... 31
TROUBLESHOOTING..................................................................................................................................... 32
FOR MORE INFORMATION........................................................................................................................... 33

3
COMMENTARY UNIT MISSION APPENDIX
This appendix comes as a supplement to the Anubis User Manual and is intended to take you
through the ANUBIS+COMMENTARY UNIT mission in detail. We encourage you to first familiarize
yourself with MERGING+ANUBIS User Manual prior to reading this appendix.
To ensure the safe operation of your Anubis, please read the instructions, important safety
information and warnings carefully before installation and use.

4
SWITCHING ON MERGING+ANUBIS
1. Press the switch on the unit’s rear panel next to the DC input, as shown on the Back-Panel
figure.
Pressed = ON
Released = OFF
2. The Anubis Soft buttons will light up orange when the unit initiates the boot-up sequence,
the TFT display will follow soon after. During this time the unit will perform a series of
self-test and initialization routines.
3. Once the Anubis TFT display shows the Home page, the unit is ready for use.
Note: To turn OFF Anubis, press the POWER button to the released state.

5
Add products and features with MLM
Some specific Products (Missions or Features) will require a valid License Activation key prior to
operations. Contact your Merging Local Sales Partners to purchased or get trial activation key.
Once you have received your key code enter this one into your Anubis from the Merging License
Manager.
Available Anubis Product and Features page TBC https://confluence.merging.com/XXXX
Steps to add a Product License with MLM
Requirements:
▪A MERGING+ANUBIS connected in RAVENNA/AES67 to your system (mac or PC)
▪A valid product licenses key code
▪One of Merging latest application (MAD, VAD, ANEMAN, MTDiscovery)
▪The latest Anubis Firmware version
Procedure:
1. Connect your Anubis to your system
2. Open one of Merging’s applications: MAD, VAD, ANEMAN or MTDiscovery.
3. Right click on the discovered Anubis icon and select “Launch License Manager”

6
4. This will open the Merging License Manager from which you can enter the activation key of the
Product feature you wish to activate.
In the example here we will activate the Commentary Unit.
5. Enter the received key code you have received for the Product Feature. It should look as such
AXXXX-XXXXX-XXXXX-XXXXX-XXXXX-X
Enter this code in the activation field and press the Activate entry line
6. This will activate the Product (Commentary Unit in this example) and make this one available
on that specific Anubis.
Note: A given activation key code can only be activated on one Anubis at the time.
You can Release a License to activate it on another Anubis device at any time

7
COMMENTARY UNIT MISSION LAUNCH
The Anubis Home page provides access to the Settings and Preamps pages and the Logs
(messages).
The Anubis Home page can, at all times, be accessed by a long press on the Anubis Home button.
When in the Commentary Unit Mission, a long press on the Anubis Home button first displays a
menu allowing access to the Home section or the Settings directly.
Then enter the Missions page by pressing the Missions icon

8
Load the Mission you plan to use. The Commentary Unit Mission, Music and Monitoring Mission
are currently available. This Guide focuses on the Commentary Unit Mission.
If you do not see the Commentary Unit Mission icon, make sure you are on the latest Anubis
Firmware (1.3.0b and above required) and you entered the Commentary Unit Mission license,
please see the MLM section above.
Once the Commentary Unit Mission is selected and launched the Main Page will be displayed and
is ready for operation.

9
THE COMMENTARY UNIT MISSION
The main function of this unit is to provide access to a combined microphone-headset for the
broadcast of commentary or communication with a studio or facility. The unit provides several
operational possibilities and customization, which will vary in relation to the technical and
operating criteria forecast for each event.
OVERVIEW
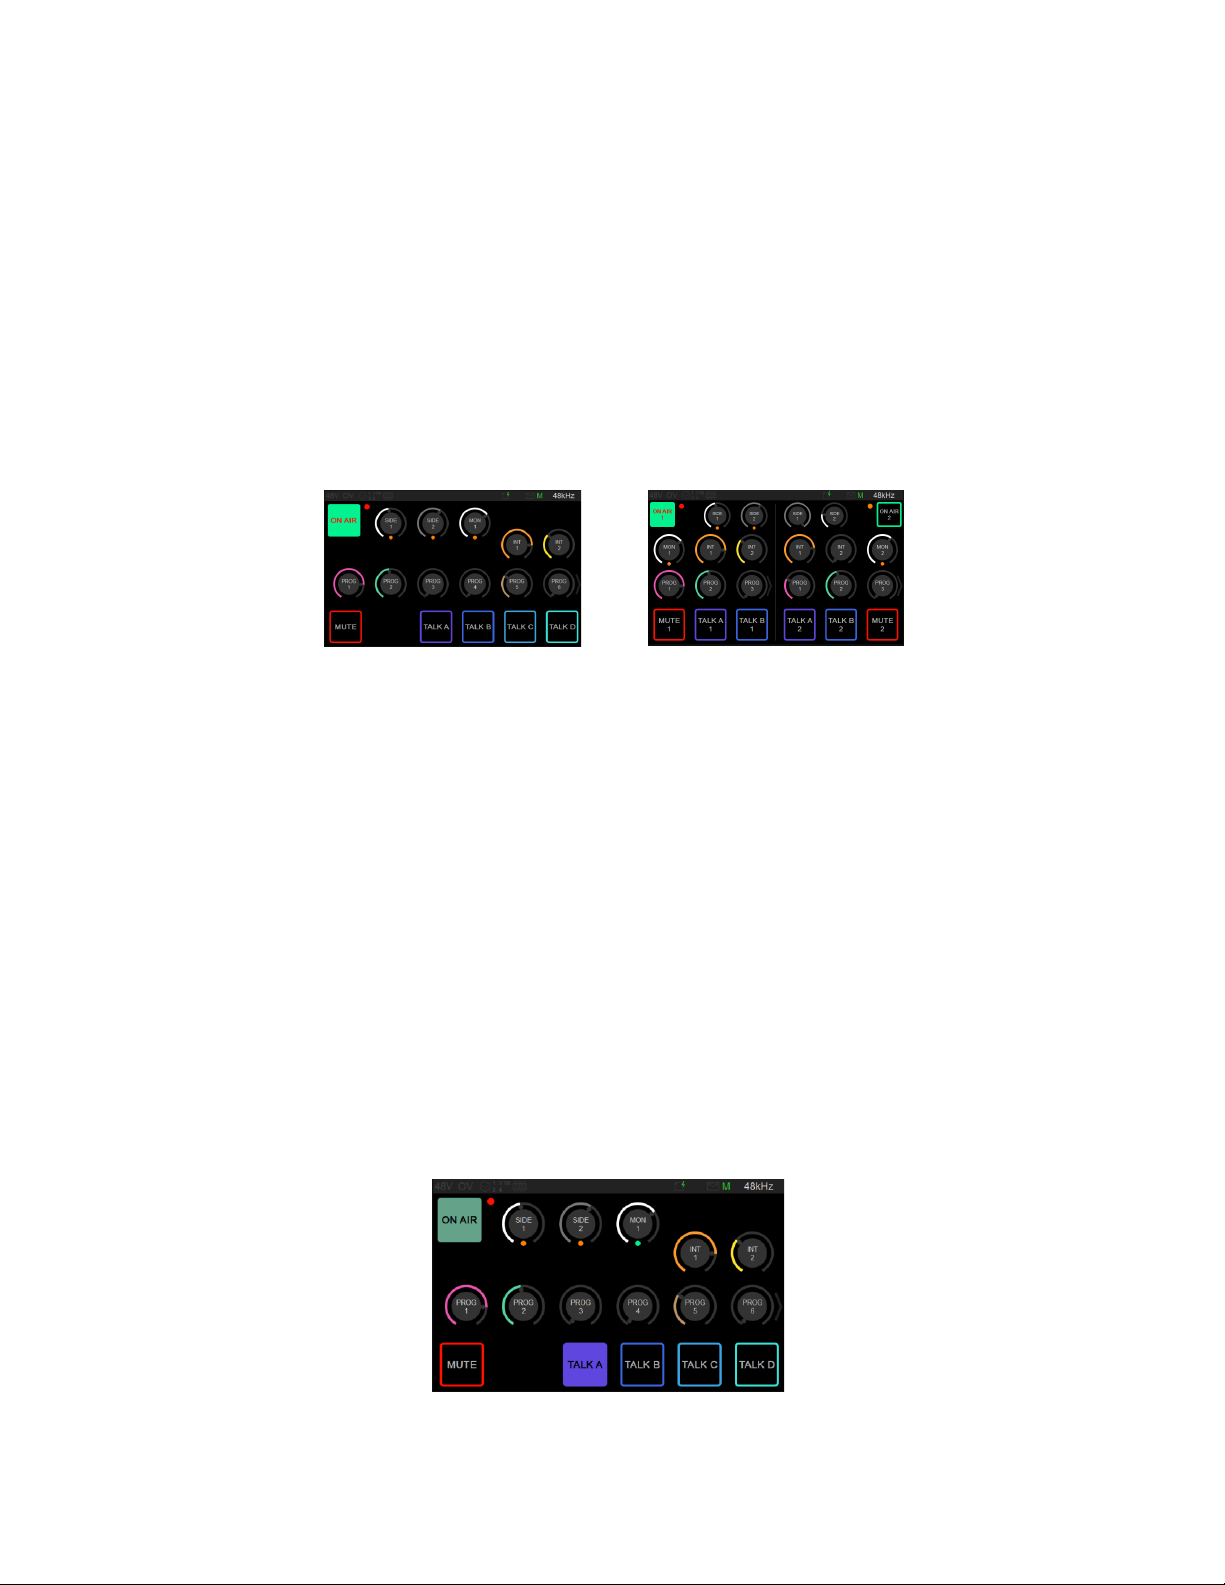
The Commentary Unit Mission allows for one single or two Commentators to comment on events
On-Air, separately or mixed together, with optional EQ and Dynamics processing, while monitoring
up to two mono Intercoms, eight stereo programs and each-others sidetones, with the possibility
of muting their own voice temporarily and optionally talking to up to four separate talkback
channels.
One single or both commentators can be displayed and operated on the local ANUBIS unit Touch
Interface, while at the same time be displayed and operated on one or more remote Web
Interfaces.
The user interface can be entirely customized to show or hide, rename, lock and configure any of
the Intercoms, Programs, Sidetones controls, and Mute, Talkback and On-Air buttons.
The mission can also be controlled either by the local Touch Display of the ANUBIS unit, a remote
Web Interface, GPI/O commands and a Web Sockets based REST API.

10
MISSION SCHEMATIC
Below an overview of the Mission signal flow in the schematic for your reference when reading
this manual.
Please find below under I/O Connection how to patch the related I/O found in this schematic
either internally or externally.
MONITORING 1
MONITORING 2
ON AIR 2
ON AIR MIX
TALKBACK A
TALKBACK B
MIC 1 MIC 2
INTERCOM 1
INTERCOM 2
PROG 1
PROG 2
PROG 3
PROG 4
PROG 5
PROG 6
PROG 7
PROG 8
ON AIR 1
TALKBACK C
TALKBACK D
EQ
DYN
SIDE EQ
SIDE DYN
EQ
DYN
SIDE EQ
SIDE DYN

11
COMMENTATORS
The Commentary Unit mission supports Single or Dual commentator mode
▪Commentator 1:
oIs always Enabled and Visible on the ANUBIS touch screen.
oCan use Mic 1 (default) or Built-in Mic as input for On-Air, Talkback and Sidetone.
oSelection of Mic 1 or Built-In Mic input is performed in the Commentary >
Commentator 1 section in the settings.
▪Commentator 2:
oCan be Enabled and Visible on the touch screen, in this case both Commentators are
accessible on the touch screen.
oCan be Enabled and not Visible on the touch screen, in this case the touch screen only
displays Commentator 1 and Commentator 2 is accessible through the Web Interface
(see Web Interface section below) or remote control (see REST API section below).
oCan be Disabled (and therefore not Visible, default). These options can be set in the
Commentary > Commentator 2 section in the settings.
oAlways uses Mic 2 as input for On-Air, Talkback and Sidetone.

12
MONITORING
Each Commentator has access for its own Monitoring to:
o2 Intercoms (Mono)
o8 Programs (Stereo)
oIts own Sidetone
oThe Sidetone of the other Commentator (if enabled)
oA Monitoring Level
▪Gain Level of each of the above parameters is accessible by a short touch on its rotary control
and turning the main ANUBIS wheel or operating the displayed popup window. By default, the
maximum level of these controls is 0dB, the option of setting the maximum level to 6dB or
12dB is available in the Monitoring section in the settings.
▪Pan or Balance of each of the above parameters is accessible by a long touch on its rotary
control and turning the main ANUBIS wheel or operating the displayed popup window. A small
arrow will display on the top left or top right side of the rotary control if the pan is not
centered.
▪If none of the on-screen rotary controls are selected, then the ANUBIS wheel controls
Commentator 1 Monitoring level.
▪Only 6 Programs in single commentator mode or 3 Programs in dual commentator mode are
visible on screen, additional Programs can be accessed by touching and scrolling the
Programs rotaries row.
▪Any of the Sidetones, Intercoms and Programs rotaries for each commentator can be
displayed or hidden, depending on relevance for the each of the commentators, in the
Commentary > Commentator 1/2 > VISIBILITY section in the settings.
▪Any of the Intercoms and Programs rotaries can be renamed in the Commentary > NAMES
section in the settings. The names will be the same for both commentators.
▪All rotaries display a single LED meter at its bottom, to simply show activity and overload,
from black (no signal), green (below -18dB), orange (below -6dB) and red (above -6dB).

13
ON-AIR
Each Commentator can be set to On-Air mode by pressing its own dedicated On-Air button.
▪When enabled its Mic input is then sent to both its dedicated On-Air output and to the On Air
Mix output where both commentators are mixed together. (See Mission Schematic above).
▪The On-Air button can be locked, separately for the each of the commentators, depending on
relevance, in the Commentary > Commentator 1/2 > LOCK section in the settings. In this case
the Commentator is always On-Air.
▪If the Mute or any of the Talkbacks for a given Commentator is enabled, then:
oIts Mic is removed from both On-Air and On-Air Mix outputs
oThe On-Air button turns to grey
oThe physical button mapped to On-Air blinks
▪A long press on the On-Air button enlarges it to cover the full screen
oIn this case the On-Air button affects both Commentators On-Air (if enabled)
oAnother long press when the button is maximized restores it to its default size
14
TALKBACK
The Commentary Unit offers 4 channels of Talkback named A, B, C, D.
▪Each Commentator can talk to any of the 4 channels by pressing the dedicated Talk buttons.
When any of the Talk buttons are enabled, the commentator is removed from the On-Air and
On Air Mix outputs.
▪The 4 Talk buttons are available in single commentator mode, while only 2 Talk buttons are
visible in dual commentator mode.
▪Any of the Talk buttons for each commentator can be set to Latch (default for Talk) or
Press/Release in the Commentary > Commentator 1/2 > LATCH section in the settings.
▪Any of the Talk buttons for each commentator can be displayed or hidden depending on
relevance to each of the commentators in the Commentary > Commentator 1/2 > VISIBILITY
section in the settings.
▪Any of the Talk buttons can be renamed in the Commentary > NAMES section in the settings.
The name will be the same for both commentators.
▪If any of the Talkbacks for a given Commentator are enabled, then:
oIts Mic is removed from both On-Air and On-Air Mix outputs
oThe On-Air button turns to grey
oThe physical button mapped to On-Air blinks

15
MUTE
Each Commentator has a Mute button that removes him from the On-Air and On-Air Mix outputs
when pressed.
▪The Mute button can be set to Latch or Press/Release (default for Mute) in the Commentary >
Commentator 1/2 > LATCH section in the settings.
▪The Mute button can be locked depending on the relevance to each of the commentators in
the Commentary > Commentator 1/2 > LOCK section in the settings.
▪The Mute button can be renamed in the Commentary > NAMES section in the settings. The
name will be the same for both commentators.
▪If the Mute for a given Commentator is enabled then:
oIts Mic is removed from both On-Air and On-Air Mix outputs
oThe On-Air button turns to grey
oThe physical button mapped to On-Air blinks

16
PREAMPS
The preamps for the Mic 1, Mic 2 and Built-In Mic inputs can be adjusted in the preamp settings.
▪The preamp settings are accessible in the Home button menu
▪Preamp settings
Please find additional information about Preamps in the Music Mission Appendix.

17
EFFECTS PROCESSING
Each Commentator can both have:
oa 4 bands parametric EQ and a full Dynamics section
oon both their Mic and Sidetone path separately
▪Each effect setting is accessible from the Home button menu
▪4 band parametric EQ
▪Gate, Compressor, Limiter sections Dynamics
Please find additional information about EQ and Dynamics in the Music Mission Appendix.

18
PHYSICAL BUTTONS
The ANUBIS unit physical buttons can be mapped to any of the On-Air, Mute or Talkback
functions for the commentator.
▪The mapping can be changed in the Buttons section in the settings.
The default mapping is:
oHome (long push): Menu (can’t be remapped)
oSpeaker A: Commentator 1 Talkback A
oSpeaker B: Commentator 1 Talkback B
oHeadphone 1: Commentator 1 Talkback C
oHeadphone 2: Commentator 1 Talkback D
oMute: Commentator 1 Mute
oMic: Commentator 1 On-Air
▪The main ANUBIS rotary wheel behavior can also be adjusted:
oOFF: The wheel is totally disabled
oSELECTION: The wheel only affects the selected rotary control, if any
oSEL+MON1: The wheel affects the selected rotary control, if any, or Commentator
Monitor output if no rotary control is selected (default behavior)

19
WEB INTERFACE
The Commentary Unit Web Interface can be accessed on any Web Browser by:
▪Typing the IP Address of the ANUBIS unit in the URL bar (please find additional information
about access with an IP address on the next section Tablet Remote Access below)
▪Right clicking and selecting the proper menu on the discovered ANUBIS unit on either:
oANEMAN on Mac and PC
oMT Discovery on Mac and PC
oMAD on Windows
oVAD on PC
The Commentary Unit Web Interface will display and exactly mimic the ANUBIS unit touch screen
display, while offering extended functionalities. Please refer to the touch interface described
above for most operations; information about the specific features of the Web Interface follows
below.

20
Commentator selection:
The Commentary Unit Web Interface only displays one commentator at a time. To access both
commentators, please open them in two different browsers tabs or windows. If Commentator 2 is
enabled then the displayed commentator can be selected in the Web Interface menu:
Advanced remote control:
While the Commentary Unit Web Interface exactly mimics the ANUBIS unit touch screen, it can
bypass the hiding of rotaries and buttons and display all controls for easy configuration of the
unit remotely by a system administrator. This is option can be selected in the Web Interface
menu:
Preset loading and saving:
The current entire state of the Commentary Unit can be downloaded or uploaded as a preset file
from the Web Interface menu:
Other manuals for Anubis
2
Table of contents
Other Merging Media Converter manuals


